Insert usage examples
This section presents some practical examples and mechanisms of inserts.
In inserts, you use:
- Jinjava elements (values), inserted in the following way:
{{ ... }}
Such a value will be printed in the place where it’s used. - tags, which are statements that allow you to use functions and build logic. They are inserted in the following ways:
{% ... %},{%- ... -%}(see “Tag delimiters”)
Objects and arrays
Object properties
You can access object properties in the following ways:
object.get('property')- accepts special characters in property names.object.property- doesn’t accept special characters in property names.object['property']- accepts special characters in property names.
If a property doesn’t exist, there is no output. This doesn’t cause an error, so if you need to verify if a property is defined, you can use tests such as is defined.
Examples:
{% set exampleProduct = {'size':12,'prop:title':'Item'} %}

{{ exampleProduct.get('size') }}       // renders successfully
{{ exampleProduct['size'] }}           // renders successfully
{{ exampleProduct.size }}              // renders successfully

{{ exampleProduct.get('prop:title') }} // renders successfully
{{ exampleProduct['prop:title'] }}     // renders successfully
{{ exampleProduct.prop:title }}        // error in rendering the template (special character in name)

{{ exampleProduct.get('color') }}      // property doesn't exist, doesn't cause an error
{{ exampleProduct['color'] }}          // property doesn't exist, doesn't cause an error
{{ exampleProduct.color }}             // property doesn't exist, doesn't cause an error
Arrays
You can access values from an array by referring to the index:
{% set exampleArray = [1,2,3] %}

{{ exampleArray[0] }} // output: 1
{{ exampleArray[2] }} // output: 3
{{ exampleArray[4] }} // no output
Nested arrays and objects
An object can contain objects and arrays:
{% set exampleObject = {'nestedObject':{'size':12}} %}

{{ exampleObject.nestedObject }}     // output: {size=12}
{{ exampleObject.nestedObject.size}} // output: 12
An array can contain objects and arrays:
{% set exampleArray = [{'size':12,'prop:title':'Item'},{'size':14,'prop:title':'Item2'}] %}

{{ exampleArray[0] }}      // output: {size=12, prop:title=Item}
{{ exampleArray[1].size }} // output: 14
Expressions
To find out what expressions are and how to create them, read this article.
{% expression %} expression-hash {% endexpression %}Example:
An expression that holds the value of an abandoned cart.
<h1>
  Total amount: {% expression %} 4085025a-313e-4a63-a6b4-d19820853912 {% endexpression %}$
</h1>
Output:
<h1>
  Total amount: 345$
</h1>
You can also use the expression result as a variable:
{% expressionvar expression-hash %}
    {{ expression_result }} {# the result of the expression is stored in this variable #}
{% endexpressionvar %}Example:
The result of an expression that is a number can be rounded:
{% expressionvar 0abc195a-548e-460d-a904-1e285b8adb96 %}
    You have {{ expression_result|round }} loyalty points.
{% endexpressionvar %}
Aggregates
To find out what aggregates are and how to create them, read this article.
Syntax:
{% aggregate aggregate-hash %}
  {{ aggregate_result[0] }}
{% endaggregate %}If an aggregate has dynamic elements (such as values from another aggregate or expression), then instead of using the aggregate tag:
- Create an expression that includes the aggregate with dynamic values.
- Insert this expression by using the
expressiontag.
Example:
An aggregate that holds a list of categories that have recently been added to the cart.
{% aggregate 0b352529-497e-3cbd-bf3d-fcb6072cef9e %}
<ul>
  {%- for item in aggregate_result -%}
  <li>{{ item }}</li>
  {%- endfor -%}
</ul>
{% endaggregate %}
Output:
<ul>
  <li>Home</li>
  <li>Sports</li>
  <li>Toys</li>
  <li>Electronics</li>
</ul>
Recommendations
Recommendations as Jinjava variable
This insert can be used to retrieve recommendations in HTML. If you need an insert that can be used in JSON requests (for example, generating a document), see Recommendations as JSON.
{% recommendations3 campaignId=campaignId %}
    {{recommended_products3}}
{% endrecommendations3 %}
You can find more information, examples, and advanced scenarios in Inserting recommendations.
Recommendations as JSON
If you need to retrieve the recommendation as a JSON object (for example, in documents), you can use the following insert:
{% recommendations_json3 campaignId=COhsCCOdu8Cg %} {% endrecommendations_json3 %}Example
A document has the following content.
"{% recommendations_json3 campaignId=FcP8UtRgrype %} {% endrecommendations_json3 %}"The recommendation type of the requested campaign is “Top items”. It’s configured to return one item in a slot.
The output of the generated document is the following:
{
  "campaignId": "FcP8UtRgrype",
  "campaignHash": "0cfa5c65-a62a-47d6-93f5-fa98eb346d6b",
  "recommended": {
    "data": [
      {
        "category": "Synerise Hub > Use cases",
        "itemId": "21baa503-9c26-42a4-aebe-1e04adb0bf2e",
        "link": "https://synerise.com/use-cases/?snrai_campaign=FcP8UtRgrype&snrai_id=0cfa5c65-a62a-47d6-93f5-fa98eb346d6b",
        "title": "Use cases"
      }
    ],
    "extras": {
      "contextItems": null,
      "correlationId": "0cfa5c65-a62a-47d6-93f5-fa98eb346d6b",
      "slots": [
        {
          "id": 0,
          "itemIds": [
            "21baa503-9c26-42a4-aebe-1e04adb0bf2e"
          ],
          "name": "Unnamed slot"
        }
      ]
    }
  }
}
Catalogs
To find out what catalogs are and how to create them, read this article.
Extracting values from catalogs
The following method lets you obtain a single value from a catalog.
Syntax:
{% catalog.catalogName(itemKey).columnName %}Or as a variable that you can modify:
{% catalogvar.catalogName(itemKey).columnName %}
  {{ catalog_result }}
{% endcatalogvar %}
where:
catalogNameis the name of the catalogitemKeyis the value of the unique identifier of the item in the catalog.
This is the value from the column which you selected as itemKey (for data imports by API) or Primary key (when importing data into the catalog in the Synerise Portal or with Automation).columnNameis the name of the column (attribute) in the item whose value you want to retrieve.
itemKey must always be entered as a variable.
CORRECT:
{% set myitemKey = "1234" %}
{% catalog.catalogName(myitemKey).columnName %}{% catalog.catalogName("1234").columnName %}Example:
|
|
- An aggregate (line 2) returns a list of 10 SKUs of recently viewed products.
The SKUs will be used as identifiers to retrieve more data about those products from a catalog and display them on a website. - On line 3, a loop starts that runs for each SKU in that list.
sku_valueis an example name of the iterator variable. You can change it. The value of the iterator is the SKU from the aggregate result.aggregate_resultis the name of the iterable. Theaggregateinsert from line 2 creates this iterable, always under this name.
- On lines 4-6, attributes from the
myCatalogcatalog are accessed:- SKU was set to be the unique item identifier in the catalog when data was imported into
myCatalog. sku_valueis replaced with the current iterator value in each iteration of the loop, so the item identified by the SKU is accessed.- The values of the following columns are retrieved:
product:retailer_part_noog:urlog:titleog:image
- SKU was set to be the unique item identifier in the catalog when data was imported into
Output:
<ul>
    <li id="000097">
        <a href="https://example.com/accessories-for-shaver/cleaner-contribution-to-shavers,id-2369"
            title="Cleaning insert for shavers">
            <img src="https://example.com/temp/thumbs-new/2/other/cd1c73e35b1db186e79e8a0039b27293_250x200w50.jpg">
        </a>
    </li>
    <li>...</li>
    <li>...</li>
    <li>...</li>
    <li>...</li>
    <li>...</li>
    <li>...</li>
    <li>...</li>
    <li>...</li>
    <li>...</li>
</ul>
Extracting items from catalogs as objects
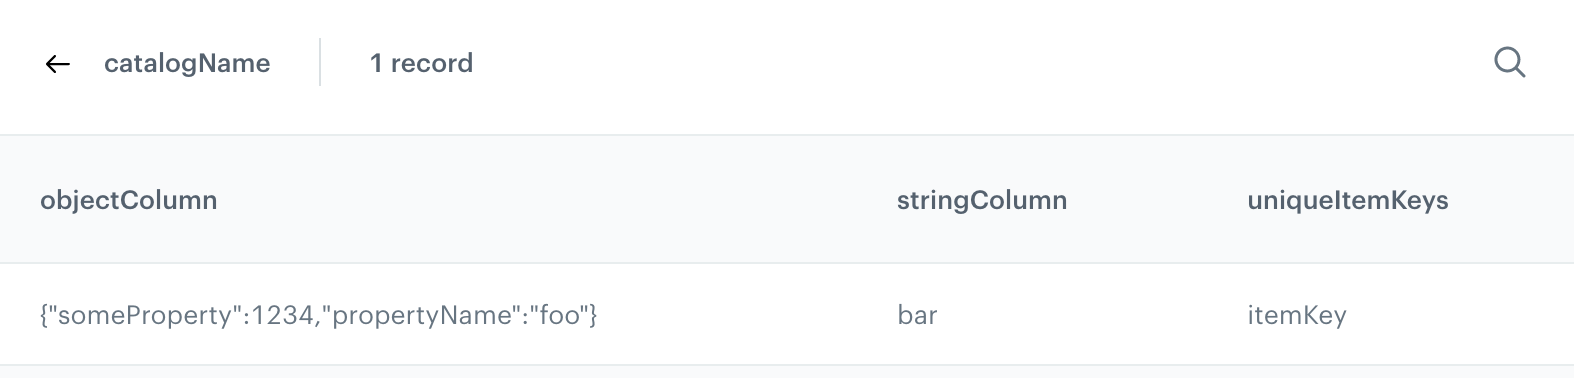
You can retrieve an entire item as an object and extract values of multiple columns at once using the following syntax:
{% set key = 'itemKey' %}
{% catalogitemv2.catalogName(key) allowEmpty=False %}
    {% set object = catalog_result %}
    {{ object.get("objectColumn").propertyName }}
    {{ object.get("stringColumn") }}
{% endcatalogitemv2 %}
where:
itemKeyis the unique key of the item in the catalogcatalogNameis the catalog nameobjectColumnis the name of the column that stores an objectpropertyNameis the name of a property in the objectstringColumnis the name of the column that stores a stringallowEmptyis an optional parameter that manages the handling of non-existing items.
The above code, without any changes, will return foo and bar for the following catalog:
To extract more values, add more object.get() statements.
Handling non-existing items in catalogs
By default, when a requested item does not exist in the catalog, the catalogitemv2 insert is not executed at all (communication is not sent).
You can change this behavior by setting the optional allowEmpty parameter to True. With this setting, the insert returns empty strings as the values of the item’s parameters. You need to add a logic to handle those empty strings.
The following code returns the string No item if the requested itemKey does not exist in the catalog and the requested name parameter is empty:
{% set key = 'itemKey' %}
{% catalogitemv2.catalogName(key) allowEmpty=True%}
  {% set object = catalog_result %}
  {%- if object.get("name") is defined -%}
    {{ object.get("name") }}
    {%- else -%}
    No item
  {%- endif -%}
{% endcatalogitemv2 %}
Metrics
To find out what metrics are and how to create them, read this article.
Syntax:
{% metrics %} metrics-hash {% endmetrics %}Or as a variable that you can modify:
{% metricsvar metric_id:metrics-hash %}
    {{ metric_result }}
{% endmetricsvar %}
Example:
A metric that holds the value of products sold in the last 30 days.
{% metricsvar metric_id:07e93207-4dd4-4239-ab1a-9267118276b0 %}

  {% set result = metric_result|int %}

  {%- if result > 4500 -%}
  Bravo! we achieved the set goal
  {%- else -%}
  {{ 4500 - result }} USD more to get a goal
  {%- endif -%}

{% endmetricsvar %}
Output (metric result is 2356):
2144 USD more to get a goalCustomer attributes
You can access customer attributes, such as the name, surname, email, phone number, and more and use them as variables.
By means of those variables, you can personalize the content, for example you can use the name of the customer in the greeting at the beginning of an email.
Syntax:
{% customer attr-name %}Example:
A welcome message.
<div class="snrs-wrapper">
  <div id="snrsCornerMessage" class="snrs-corner-message-wrap">
    <div class="snrs-corner-message">
      <div class="snrs-corner-main">
        <div class="snrs-corner-message-text">
            Hello {% customer firstname %}!
        </div>
      </div>
    </div>
  </div>
</div>
Output (the result of the variable is “John”):
<div class="snrs-wrapper">
  <div id="snrsCornerMessage" class="snrs-corner-message-wrap">
    <div class="snrs-corner-message">
      <div class="snrs-corner-main">
        <div class="snrs-corner-message-text">
            Hello John!
        </div>
      </div>
    </div>
  </div>
</div>
Inserting attributes conditionally
If you’re not sure if an attribute is present in the profiles of all target customers, you can use conditional logic.
For example:
Hello {%- if customer.get('firstname') -%}{{ customer.firstname }}{%- else -%}user{%- endif -%}!Output:
- If the
firstnameattribute isJohn:Hello John! - If the
firstnameattribute does not exist:Hello user!
Advanced use
You can check if a customer has an attribute set and act accordingly.
For example, this can be used to set up a single campaign for customers who have an attribute and those who don’t. Without the check, you would need to create two separate campaigns.
Example 1: Check if a customer belongs to a loyalty club and what kind of membership they have:
{%- if "club_member" in customer.keySet() -%} // checks if the club_member attribute exists
  {%- if customer["club_member"] == "highPriority" -%}
    <!-- insert HTML code -->
  {%- elif customer["club_member"] == "mediumPriority" -%}
    <!-- insert HTML code -->
  {%- elif customer["club_member"] == "lowPriority" -%}
    <!-- insert HTML code -->
  {%- endif -%}
{%- endif -%}
Example 2: Check if the customer profile includes an entry about the city of residence:
{%- if "city" in customer.keySet() -%}
  Check the best prices in {{ customer["city"] }}!
{%- else -%}
  Check the best prices in your city!
{%- endif -%}
Code pools
To find out what code pools are and how to create them, read this article.
Normally, each code can only be retrieved once. You can override this behavior by binding the code to a profile. This code is stored separately, so you can bind a code and still assign other codes (only one code can be bound to a profile). For example, you can bind a code and use it to identify a profile, and still retrieve codes from other pools to use in marketing campaigns.
When a code is assigned or bound to a profile, a voucherCode.assigned event is generated.
Assigning a code to a profile
Syntax:
{% voucher %} pool-uuid {% endvoucher %}Example:
A promotion code from a selected code pool:
<div class="snrs-wrapper">
  <div id="snrsCornerMessage" class="snrs-corner-message-wrap">
    <div class="snrs-corner-message">
      <div class="snrs-corner-main">
        <div class="snrs-corner-message-text">
            Take your promotional code and use it durning the transaction to get a 50% discount!
            <strong>{% voucher %} 274a18d5-e8bd-4fec-82d1-cea0af19af01 {% endvoucher %}</strong>
        </div>
      </div>
    </div>
  </div>
</div>
Output (voucher result is “5510018091219”):
<div class="snrs-wrapper">
  <div id="snrsCornerMessage" class="snrs-corner-message-wrap">
    <div class="snrs-corner-message">
      <div class="snrs-corner-main">
        <div class="snrs-corner-message-text">
            Take your promotional code and use it during the transaction to get a 50% discount!
            <strong>5510018091219</strong>
        </div>
      </div>
    </div>
  </div>
</div>
Using the code as a variable
By using the vouchervar tag, you can create a block of code in which the code can be accessed as the voucher_result variable.
Syntax:
{% vouchervar id=pool-uuid %}
  {{ voucher_result }}
{% endvouchervar %}
Example:
In this example, the voucher’s value is accessible as a variable and can be converted to capital letters.
{% vouchervar id=5fae8aba-b48e-4144-8d28-db24b1570ab0 %}
<ul>
  <li>The voucher value is {{ voucher_result }}.</li>
  <li>When capitalized, it becomes {{ voucher_result|capitalize }}.</li>
</ul>
{% endvouchervar %}
The output (the voucher’s value is “CapitalizeMe”) is:
<ul>
  <li>The voucher value is CapitalizeMe.</li>
  <li>When capitalized, it becomes CAPITALIZEME.</li>
</ul>
Retrieving the same code every time
Setting the assign variable to false binds a code from a pool to a profile (unless one is already bound) and retrieves that same code for this profile every time. This can be used, for example, to create unique codes that can be used to identify a profile.
Binding codes doesn’t have any influence on assigning codes (described earlier).
{% voucher assign=false %} pool-uuid {% endvoucher %}Barcodes
To add a barcode of a voucher to an email template, paste the following code:
{% vouchervar id=pool-uuid  %}
{% barcode code= {{voucher_result}}, gray=true, type=EAN_13, hrp=BOTTOM %}
{% endvouchervar %}
The result of that insert will be the HTML code for the image of the barcode.
If you want to get only the URL of the barcode, use the following code:
{% vouchervar id=pool-uuid  %}
{% barcodeurl code= {{voucher_result}}, gray=true, type=EAN_13, hrp=BOTTOM %}
{% endvouchervar %}
Explanation of parameters:
pool-uuidis the UUID of a voucher pool available on the platform (Data Management > Voucher pools).graydefines the color of the barcode. Parameter values:TRUE- The code is generated in grayscale.FALSE- The code consists of black and white pixels.
typedefines the type of barcode. Parameter values:EAN_13EAN_8EAN_128CODE_39CODE_128ITF_14POSTNETUPC-AUPC-E
hrp(human readable part) defines the position of the readable part of the code for customers (usually it takes the form of a string of numbers). Parameter values:NONE- There is no readable part of the code.BOTTOM- The readable string is at the bottom of the barcode.
resolutiondefines the resolution of a bar code in dpi and indirectly affects the width of the narrowest bar.
Stopping communication from rendering
You can use the {% kill %} insert to completely stop the message from rendering, which means an email is not sent at all, a dynamic content is not displayed, and so on.
This can be useful when you want to terminate a communication when a certain condition is met.
For example, the following communication:
- is terminated for customers whose result of an expression is less than 100.
- informs a customer about the result of the expression if it’s 100 or more.
{% expressionvar expression-hash %}
  {%- if expression_result < 100 -%}
    {% kill %}
  {%- else -%}
    You have {{ expression_result }} loyalty points.
  {%- endif -%}
{% endexpressionvar %}
{% killit %} insert works identically.