Voucher pools
Voucher pool is a place where you can import discount codes and coupons, which you can later use through many communication channels (email, SMS, mobile push, web push, and dynamic content).
The discount codes and coupons get two forms:
- a text string
- a barcode
In a workspace, it is crucial for codes to be unique across voucher pools. A code that has been used in one pool cannot be utilized in another. It is important to note that the system does not provide automatic warnings in the following scenarios:
- when the voucher pool used in a message is inactive,
- when all codes within an active voucher pool have already been assigned
- when a voucher pool is inactive but there are still unassigned codes remaining.
Therefore, it is your responsibility to control and manage these aspects independently.
The voucher feature does not provide the logic of voucher usage. You will need to implement and integrate this logic in your applications and systems, ensuring that information about voucher usage is passed to Synerise.
Supported barcodes
Accepted types of barcodes in Synerise:
| EAN_13 | EAN_8 |
| EAN_128 | CODE_39 |
| ITF_14 | CODE_128 |
| POSTNET | QR-CODE |
| UPC-A | UPC-E |
You may want to read
- Developer Guide: Barcodes
- Use case: Birthday email with coupon
- Use case: Coupon for membership anniversary
- Use case: Discount coupon for installing the application
Creating a code pool
First, create a pool to which you will later import the codes.
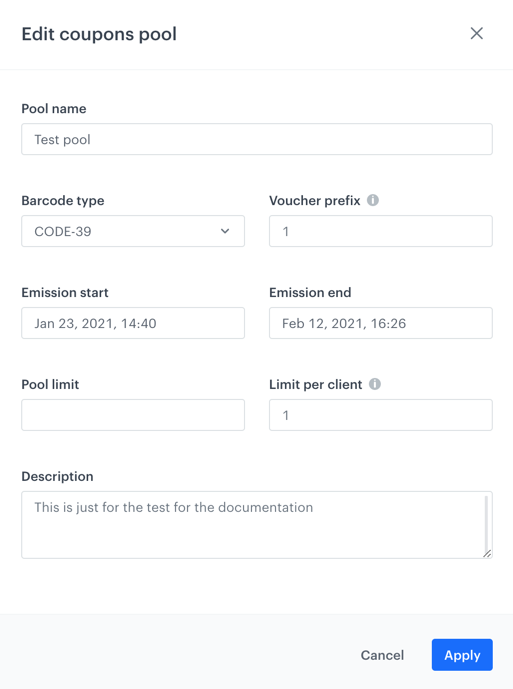
- Go to
 Data Management > Voucher Pools > Add pool.
 - On the pop-up, fill in the following fields:
- In the Pool name field, enter the name of the pool (the name is only visible on the list of the voucher pools).
- Optionally, from the Barcode type dropdown list, select the type of codes which will be imported in the CSV file to Synerise.
Important: The selection in the dropdown has no influence on the further process. It serves only informational purposes for the users. - Optionally, in the Voucher prefix field, enter a number that will be added to the beginning of each code.
- In the Emission start and Emission end fields, select the dates when the distribution of the codes starts and finishes, respectively.
- Optionally, to limit the size of the pool, fill in the Pool limit field.
- Optionally, in the Limit per profile, define how many times a customer can get this voucher from the pool.
- Optionally, in the Description field, enter the internal description of the pool that is visible only on the list of voucher pools.
- Confirm by clicking Apply.
Result: Your code pool appears on the top of the list.
Importing codes to the pool
After you created a pool, add or import codes to the pool. You must also import the codes to your backend.
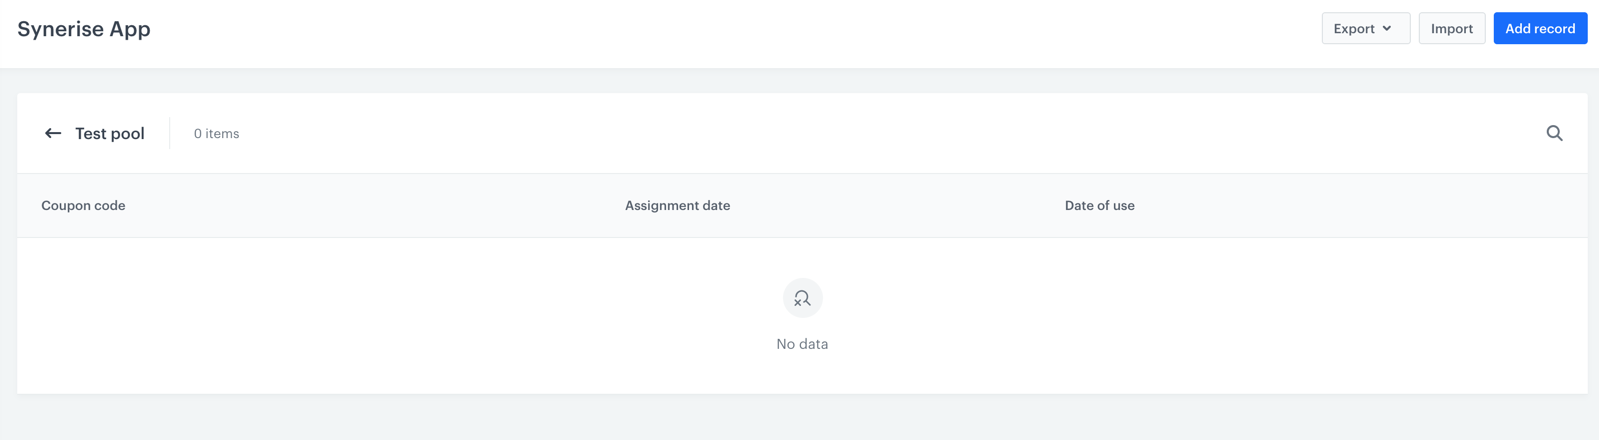
- Create a CSV file according to these requirements
- Go to Data Management > Voucher Pools.
- Double-click the code pool to which you want to import the file with codes.
- Click Import.
- Proceed according to this instruction from step 3 (selecting the import method).
Result: A list of codes is uploaded.
Assigning a code to a customer
To limit code usage by redeeming, which is recommended when distributing unique codes to customers, you must first assign a code to the customer using the methods described in the table below. If you don’t assign a code, it cannot be used. However, if you distribute a code in a message, it will be assigned automatically.
This part of the process can be omitted in a scenario in which you display one, non-redeemable discount code which expires at a specific date.
| Method | API consumer | Description | Events generated |
|---|---|---|---|
Assign a voucher from a pool to Profile /v4/vouchers/item/assign |
Profile (formerly client), Anonymous profile (formerly client) | This method lets you assign a code from a specific pool to a customer. | n/a |
Assign a voucher to a Profile /v4/vouchers/item/assign-for-client |
Workspace (formerly Business Profile), Synerise User | This method lets you assign a code from a specific pool to a customer. | n/a |
Distributing codes in communication channels
Apart from displaying discount codes, you can distribute discount them in the following messages:
Read more about voucher pools inserts and barcodes inserts.
-
Go to
 Communication > Email > Create new.
 -
In the Content section, click Create message.
-
Select Code editor.
Tip: Adding a discount code pool is also possible in Drag&drop builder. -
Enter one of the following code snippets in the HTML section:
Insert formula Explanation {% voucher %} pool-uuid {% endvoucher %}This insert assigns a code from a pool to a customer. If the code is already assigned to the customer, it retrieves different code for this customer. {% voucher assign=false %} pool-uuid {% endvoucher %}This insert assigns a code from a pool to a customer (unless one is already assigned) and retrieves that same code for this customer every time -
Replace
pool-uuidwith the ID of your voucher pool. To get the uuid of the voucher pool:- Go to Data Management > Voucher Pools.
- From the list, open the pool.
- From the URL, copy the UUID of the pool.

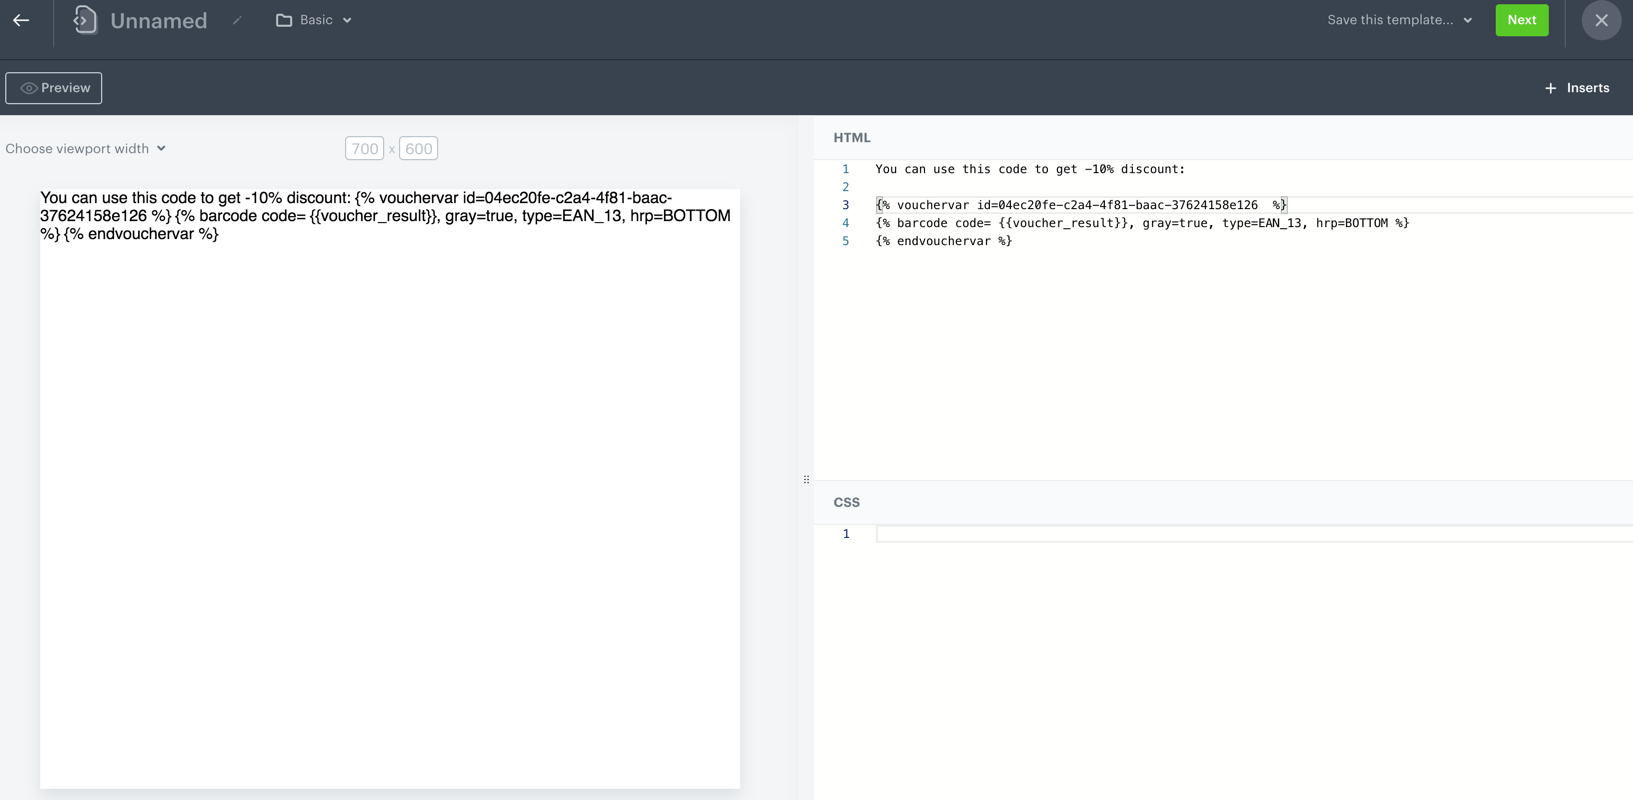
-
Go to
Communication > Email > Create new. -
In the Content section, click Create message.
-
Select Code editor.
-
In the HTML section, enter the following code:
{% vouchervar id=uuid_of_voucher_pool %} {% barcode code= {{voucher_result}}, gray=true, type=barcode_type, hrp=BOTTOM %} {% endvouchervar %} -
Replace
uuid_of_voucher_poolwith the actual ID of your voucher pool. To get the ID of the voucher pool:- Go to Data Management > Voucher Pools.
- From the list, open the pool.
- From the URL copy the UUID of the pool.
-
Edit the values for
typeandhrpparameters according to this instruction.WARNING: The barcode type must match the type of codes stored in the voucher pool.
Results: The preview mode for a specific customer is unused for this configuration.
Displaying codes
You can distribute a discount code by displaying it on a website, mobile application, or digital signage. You can do it in the following ways:
-
Using the following method:
Method API consumer Description Events generated Get assigned vouchers
/v4/vouchers/item/get-assignedProfile (formerly client), Anonymous profile (formerly client) This method lets you retrieve all codes assigned to a customer so you can display it. n/a -
You can use dynamic content for this purpose. While creating a dynamic content campaign, in its contents use an insert that retrieves a code from a pool.
-
Create a document that contains a code pool insert and barcode inserts in its body and display the document in a mobile application using the following methods:
When a voucher is retrieved for a profile, a voucherCode.assigned event is generated.
Example voucher insert:
 {% vouchervar id=pool-uuid %}
  {{ voucher_result }}
{% endvouchervar %}
Output:
{% vouchervar id=5fae8aba-b48e-4144-8d28-db24b1570ab0 %}
<ul>
  <li>The voucher value is {{ voucher_result }}.</li>
</ul>
{% endvouchervar %}
Redeeming codes
When a customer uses a discount code in a transaction, your backend must send a redemption request right after the discount is used. If you don’t redeem a code, it will still be available to the customers and they may use it again. It is highly recommended to implement control over redeeming codes on your backend.
When a code is redeemed, a voucherCode.redeemed event is generated.
| Method | API consumer | Description | Events generated |
|---|---|---|---|
Redeem a voucher /v4/vouchers/item/redeem |
Workspace (formerly Business Profile), Synerise User | This method lets you redeem a code. | n/a |