Generate Event node
This action allows users to generate an event with defined parameters on a profile card.
Node configuration
-
Click the pencil icon on the node.
-
In the Event name field, enter the name of the event. Keep the name pattern used for the default event names in Synerise (such as page.visit, transaction.charge, and so on). This name functions as a key name of the event.
-
In the Label field, enter the description of the event. It will be displayed in the header of the event on a profile card (see picture below).

Example of the Label use -
Optionally, in the Category field, type in the category of the action (the option isn’t reflected anywhere on the interface nor on the backend).
-
In the Body field, enter the parameters of the event in JSON format.
-
To
impose a limit on the action, switch the Action limit toggle. Enter a number and from the dropdown list, select the time unit. You can define how many times this action can be executed for the whole automation process (workflow), or you can define how many times per second/minute/hour/day/week/month can be executed.
-
If
If you want to monitor the entries into this step, switch the Track datapoints toggle on. As a result, events related to the movement between nodes (
automation.clientPathStep) will be available in the Analytics module to use. These events (automation.clientPathStep,automation.clientEndStep,automation.startPath) are displayed on the activity list on the profile card regardless of the configuration of this option. -
Confirm by clicking Apply.
Example of use
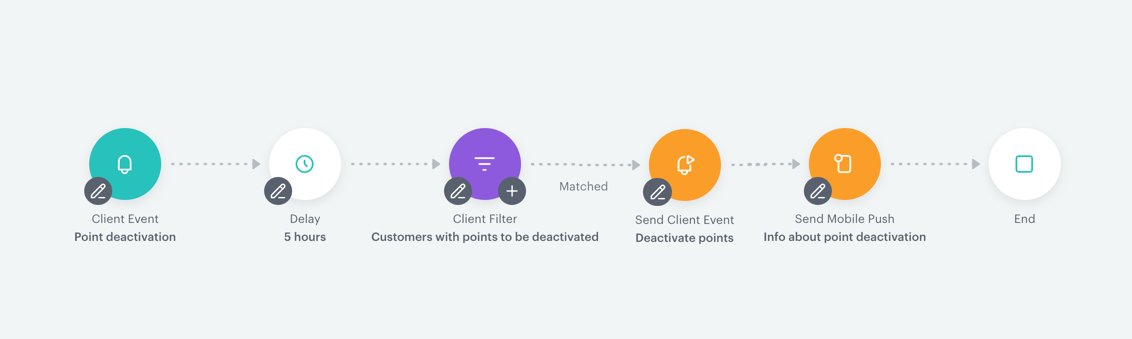
- Start with the Profile Event Trigger node. In the settings of the node, set loyalty point deactivation event (this event doesn’t belong to the default Synerise events).
- Add the Delay node to postpone the passage from the trigger to the next step. This way you give some time to your customers to perform necessary actions in the context of this workflow.
- Add the Profile filter. In the settings of the node define the conditions that must be met by the customers in order to continue the workflow.
- Those customers who meet conditions in the Profile filter will be subject to the Generate Event action.
- Add Generate Event.
- In the settings of the action define the event. This is a custom event that deducts the points. This event is available on the activity list on a profile card, when a customer is subject of the action.
- In the body of the event (in JSON format), use the ID of the expression that contains a formula which deducts the loyalty points. For example:
{ "key1": "value1", "balance": "{% expression %} 824wtefq-1235tfs-12wdvny5s634-2578284 {% endexpression %}" } - Set the action execution limit at
1to avoid unwanted repetitions of the action.
- When the points are deducted, the customer receives a mobile push notification about the number of deactivated points.
- The workflow is completed with the End node.