Send Webpush node
This node allows sending Web Push notifications to customers in an automated way.
Requirements
- You must implement a tracking code into your website.
- You must configure web push notifications.
- You must have Web Push subscribers.
Configuration
- Click the pencil icon on the node.
Result: A pop-up opens. - In the Content section, from a dropdown list, select the web push notification template.
- In the Schedule section, define the life span of the notification.
It means that if a customer proceeds to this action in the scenario and the delivery of the web push notification is not possible, Google Firebase receives a message about it. The notification is displayed as soon as a user opens a browser in the time range that exceeds the notification lifespan. If you want to make sure that this message is sent to a customer, even it exceeds the global limit of this type of messages for a single customer per day (more information is available here), enable the Ignore limits toggle. You may apply it to system messages such as a transaction confirmation, notifications about order delays, and so on.
- If you want to add the custom event parameters with constant values to the automatically generated events in the web push channel, in the Additional parameters section, click Define. The full instruction on this section is available at Creating web push.
- To
impose a limit on the action, switch the Action limit toggle. Enter a number and from the dropdown list, select the time unit. You can define how many times this action can be executed for the whole automation process (workflow), or you can define how many times per second/minute/hour/day/week/month can be executed.
- If
If you want to monitor the entries into this step, switch the Track datapoints toggle on. As a result, events related to the movement between nodes (
automation.clientPathStep) will be available in the Analytics module to use. These events (automation.clientPathStep,automation.clientEndStep,automation.startPath) are displayed on the activity list on the profile card regardless of the configuration of this option. - Confirm by clicking Apply.
Example of use
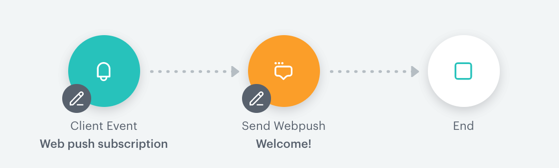
This scenario sends a welcome web push notification to customers who subscribed to web push notifications.
- It starts with a Profile Event trigger node. In the settings of the trigger, select a web push subscription event.
- Add Send webpush action. In the settings of the action select the template of the notification (which you need to prepare before) and set the notification lifespan (TTL).
- When the notification is sent to a customer, the process ends.