"Send offline conversion" node
In Synerise, you can collect information about offline conversion after clicking an ad and send such data to Google Ads. This way, you can get the full picture of customer journey and find out who sees ads online but ultimately completes an offline transaction with your business by buying after visiting your brick and mortar shop or speaking with a salesperson by phone.
Through the Send offline conversion node, you will send the following data to Google Ads:
- the ID of your Google Ads account,
- the value of the
gclidparameter - In order to send the value of thegclidparameter for each profile who will go through a workflow, you can extract it from thepage.visitevent by an expression and then an aggregate which extracts thegclidvalue from thepage.visit. - the conversion action ID,
- the date when the conversion occurred,
- the value of the conversion for the advertiser (optional),
- currency (optional).
Prerequisites
- Implement SDK to a website to which a profile is referred after clicking the ad.
- Implement sending events about completing offline conversion.
- Create a Google Ads account.
- Launch an ad campaign through Google Ads.
Create an expression
In this part of the process, you can create an event expression for the page.visit event (an event generated after a visit of a profile to the website) to extract the gclid parameter from the URL of visited website. After saving the expression, it becomes a parameter of the page.visit event, which can be used while creating other analyses. This expression will be used in the next part of the process in which the value of the gclid parameter will be retrieved from the specific page.visit event.
- Go to
 Analytics > Expressions > New expression.
 - Enter the name of the expression.
- Set the Expression for option to Event.
- From the Choose event dropdown list, select an event generated after a visit to the page.
- In the Formula definition dashboard, click Select.
- From the dropdown list, select Functions > Regexp.
- Click the left Select node.
- From the dropdown list, select Event attribute.
- Click the Unnamed node.
- From the Choose parameter dropdown list, select the parameter that signifies URL address.
- Click the right Select node.
- From the dropdown list, select Constant.
- Click the 0 node.
- In the text field, enter the following formula:
(?<=gclid=)(.+?)(?=$)
The configuration of the expression that retrieves the value of gclid parameter from the URL - Click Publish.
Create an aggregate
In this part of the process, you can create an aggregate that retrieves the value of the gclid parameter from the latest page visit to your website. This way, you can inject the result of the aggregate in the form of a Jinjava tag in step 2 in the Define the integration settings in which you must provide the value of the gclid parameter.
-
Go to
Analytics > Aggregates > New aggregate. -
Enter the name of the aggregate.
-
Set the Aggregate option to Last.
Note: The choice of an aggregator depends on your business needs. The aggregator you choose in this step will define which clicked ad you will attribute the conversion to. For example, by selecting the Last aggregator, the conversion will be attributed to the last ad clicked before the conversion. You can additionally modify the conditions of the aggregate by specifying a specific time period or date of a specific event. -
From the Choose event dropdown list, select an event generated after a visit to the page.
-
From the Choose parameter dropdown list, click
 > Expressions and select the expression you created in the previous part of the process.
 -
Click + where.
-
From the Choose parameter dropdown list, select the parameter that signifies URL address.
-
As the logical operator, select Contain (String).
-
In the text field, enter
gclid=. -
In the right bottom corner, click the calendar icon and set the date range to Lifetime.
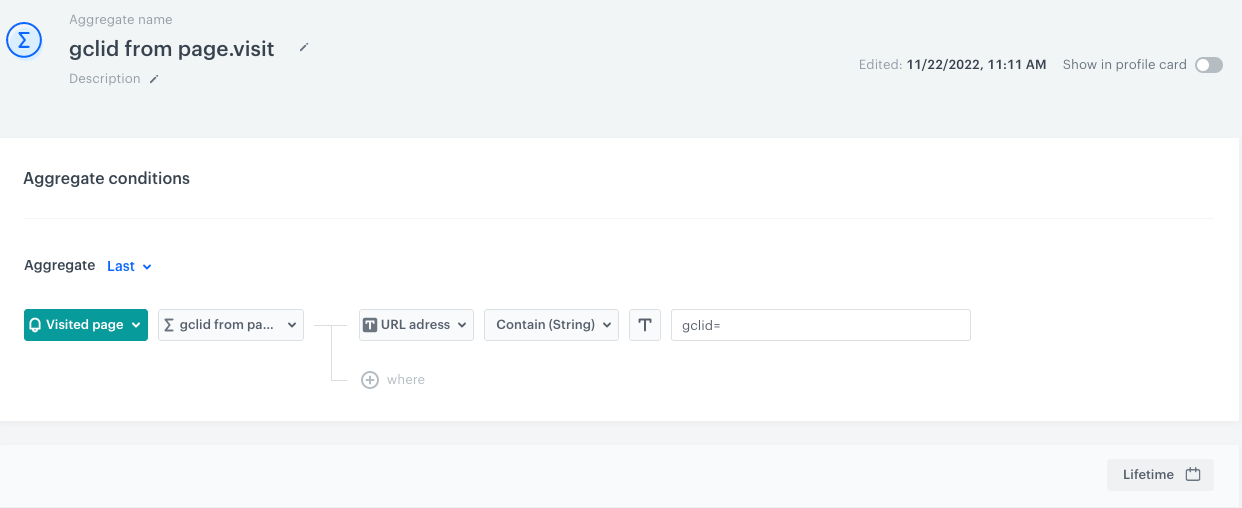
The configuration of the aggregate that retrieves the value of gclid parameter from the latest visit to the page -
Click Save.
Node configuration
- Click Google Ads > Send offline conversion.
- Click Select connection.
- From the dropdown list, select the connection.
- If no connections are available or you want to create a new one, see Create a connection.
- If you selected an existing connection, proceed to defining the integration settings.
Create a connection
To allow the data exchange, establish a connection between Synerise and Google Ads.
- At the bottom of the Select connection dropdown list, click Add connection.
- On the pop-up, click Sign in with Google.
- Select a Google account which has access to the Google Ads account that you want to use.
- Follow the instructions on the interface.
- After successful authentication, click Next.
- In the Connection name field, enter the name of the connection.
It’s used to find the connection on the list. - Click Apply.
Result: A connection is created and selected.
Define the integration settings
-
In the Google Ads customer ID field, enter the number of the Google Ads account. It can’t contain dashes. Learn how to find this number.
-
In the The Google click ID (GCLID) associated with this conversion field, enter the part of the URL that starts with
?gclid=.
For that purpose, you can enter a Jinjava tag that inserts the value of the aggregate you created in the previous part of the process:{% aggregate AGGREGATE_ID %}{{ aggregate_result[0] }}{% endaggregate %}. Replace theAGGREGATE_IDwith an actual ID of the aggregate, you can find it in the URL while previewing the aggregate. -
In the Conversion action ID field, enter the ID of the conversion. You can find it in the Google Ads panel. When you go to conversion action details, the URL contains the “ctld” parameter (for example, “ctId=123456789") whose value is the conversion action ID. Learn more about conversion action in Google Ads.
-
In the Conversion time field, enter the time of the conversion in the following format:
yyyy-mm-dd hh:mm:ss+|-hh:mm.
For that purpose, you can use a Jinjava code that inserts date of conversion dynamically. For example,{{ event.params.time|timestamp_to_time|datetimeformat('%y-%m-%d %H:%M:%S+2:00') }}. -
Optionally, in the Conversion value for the advertiser field, enter the value. For that purpose, you can use a Jinjava code that inserts the value dynamically.
-
Optionally, in the Currency associated with the conversion value field, enter the currency. For that purpose, you can use a Jinjava code that inserts the value dynamically.
-
Confirm the settings by clicking Apply.