"Create directory" node
The Create directory node allows you to send a request to your SFTP server to create a new folder. This node can be used in workflows that export data to Synerise, so the export can be preceded by defining a new folder in your resources.
Node configuration
Set up a connection
In this part of the process, you must define how you will get access to your source. By selecting the authentication method and providing required information, you establish a connection.
- Click the Create directory node.
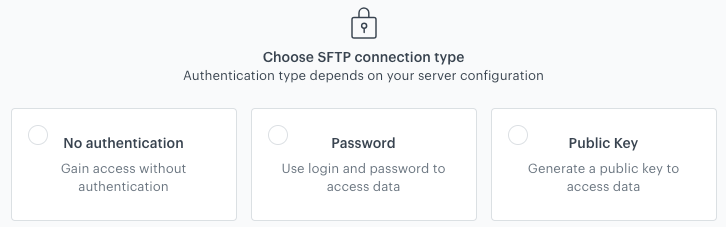
Selecting the authentication method - On the pop-up, select the authentication method:
- No authentication - No authentication is required.
- Password - Authentication is based on a log-in and a password to your resource.
Click here to see the instructions- Click Select connection.
- If the connection you want to use is in the list, select it and proceed to Filling out the configuration form.
- If the connection list is empty or you don’t see a connection you need to use:
- At the bottom of the dropdown list, click Add connection.
- In the Connection name field, enter the name of your connection (it’s visible only on the Select connection dropdown list).
- In the Login field, enter a log-in.
- In the Password field, enter the password.
- Click Save.
The connection you created can be used later in other nodes and workflows.
- If the connection list is empty or you don’t see a connection you need to use:
- Public key - Authentication is based on a public SSH key which is issued for a selected integration. This option lets you generate a public key and download it. Then, you must add it to your server configuration. After you download the key, you must secure it, because you won’t be able to download it later for security reasons.
Click here to see the instructions
- Click Select connection.
- If the connection you want to use is in the list, select it and proceed to Filling out the configuration form.
- If the connection list is empty or you don’t see a connection you need to use:
- At the bottom of the dropdown list, click Add connection.
- In the Connection name field, enter the name of your connection (it’s visible only on the Select connection dropdown list).
- In the Login field, enter your login to your resource.
- In the Password field, enter your password to your resource.
- Click Generate key. Download it and secure it.
- Click Save.
The connection you created can be used later in other nodes and workflows.
- If the connection list is empty or you don’t see a connection you need to use:
Fill out the configuration form
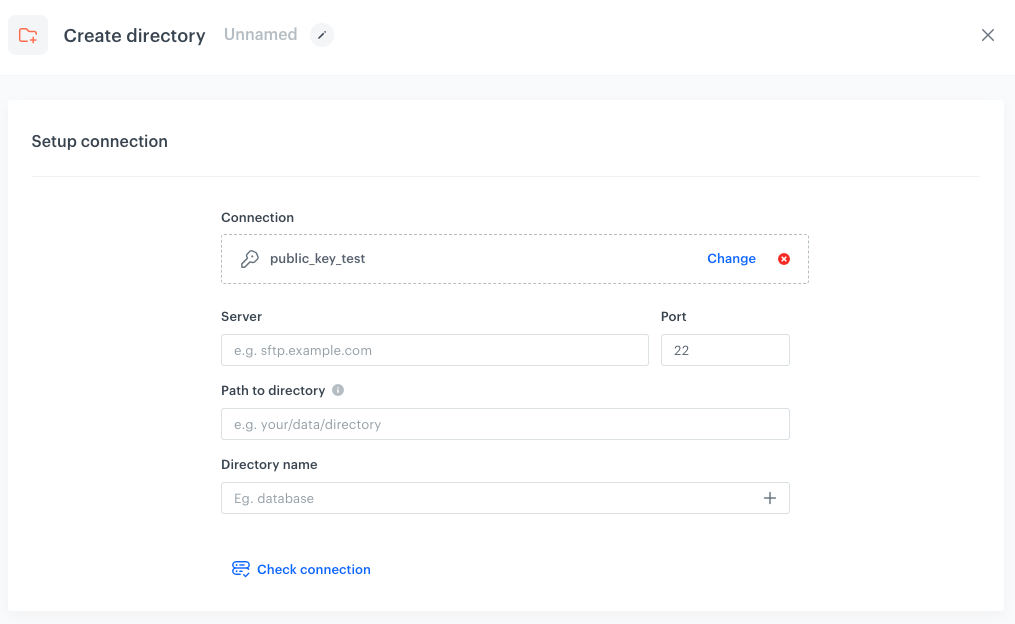
- In the Server field, enter the URL of the server.
- In the Port field, set the port. The default value is the most commonly used SFTP port.
- In the Path to directory field, provide a path where your new directory will be created (for example:
/home/file-directory/). - In the Directory name field, enter the name of the directory you want to create.
Don’t use spaces and special characters. - Optionally, by clicking Check connection, you can verify if your connection you created in Set up a connection procedure is ready.
- Confirm the settings by clicking Apply.
Example of use
You can use the Create directory node in a workflow that exports customer data from a selected segmentation to SFTP. The customer data will be extracted with the Get Profiles node. This workflow will be triggered only once and before it sends a file with extracted customer data, it will send a request to your SFTP to create a directory whose name will be a date of the export.
- Start the workflow with the Scheduled Run node. In the configuration of the node, set the Run trigger to one time. Select the Immediately tab.
- To retrieve customers’ data for the workflow, as the next node, select Synerise > Get Profiles. In the configuration of the node:
- Select a segmentation from which you want to extract customers’ data. In this example, it’s a segmentation of loyalty program prospects.
- Select the customer attributes to be exported. In this example, the email address and email marketing agreement status.
- The next step is creating a new directory in your SFTP. For this purpose, select SFTP > Create directory. In the configuration of the node, in the Directory name, you can use the following Jinjava code to use a date of launching the node as the directory name.
The Jinjava code returns the date in the following format:{{ timestamp|timestamp_to_time|datetimeformat('%d-%m-%Y', tz="UTC" ) }}08-03-2023. - The next step is sending the customer data retrieved from the Get Profiles node. For this purpose, select SFTP > Send File. In the configuration of the node, fill out the configuration form.
- Add the End node.
Result:
The configuration of the workflow that creates a directory in SFTP