"Audience" node
An audience trigger launches a workflow for the profile group chosen by you. It’s a good method to let a group of customers into an automated scenario based on the history of their activity. You can control the time intervals when the scenario is active for a specific group of customers thanks to the scheduler.
You can use this node to:
- launch a single-use workflow with static segmentation conditions.
- launch a repeatable workflow with static segmentation conditions to reach the same.
- launch a repeatable workflow with segmentation conditions that change periodically thanks to Jinjava. This means that with every workflow repetition, the workflow is triggered for a different audience. This way, instead of creating many workflows for each audience within one marketing campaign, you can manage one workflow.
- Dynamic conditions work only for segmentations created within the Audience node.
- When preparing a dynamic query for segmentation conditions, become familiar with the exceptions.
- Because such workflow relies on dynamic data (for example, data from Synerise catalogs, results of Synerise analyses), we highly recommend monitoring these workflows.
- Example of use: A campaign involves sending a daily email promoting the product of the day. The message is directed to the customers who added that product to their cart within the last month (a dynamic segmentation). As each day a different product is promoted, a schedule file must be imported to Synerise. This file must contain two columns: the date and the product ID. You can use that data to create a dynamic query which checks the current date and retrieves the product ID assigned to the current date from the catalog. Consequently, the audience for the emails changes every day, because the product ID extracted from the catalog changes.
Workflow status
The status of the workflow changes to Stopped when (applies only to workflows triggered by Audience):
- it’s been 62 days from the latest execution of the trigger,
- it is a one-off workflow and it is completed,
- the limit of repetitions in the trigger settings runs out
In the audit log, this change of the workflow status will be marked as a change done by internal user.
Requirements
- You must have customers in your database.
- You must implement a tracking code into your website.
- Optionally, you can create a segmentation beforehand.
Tips before you go
- Remember that it may take several minutes to start processing the Audience node after launching a workflow.
- If you plan your actions, bear in mind that it’s highly recommended to spread your scheduled workflows in time. Many workflows scheduled at the same time may have an impact on the performance.
- Some of your workflows may be responsible for data synchronization or integration with external sources. Consider scheduling such workflows for when they do not interfere with the workflows responsible for communicating with your customers.
Node configuration
-
Click the pencil icon.
Result: A pop-up shows up. -
In the Run trigger section, define the frequency of launching a trigger:
- One time - This trigger is activated only once. The workflow can be activated:
- immediately after launching (Immediately). After selecting this option, proceed to step 3.
- at the date and time specified (At specified date).
For One time, At specified date option- From the Timezone dropdown list, select the timezone for executing a one-off workflow activation.
- In the Date field, using the calendar, select date and time when the workflow will be activated.
- Repeatable - The trigger is activated repeatedly, according to a set of detailed time conditions.
For Repeatable option
-
For Repeatable option:
- In the Interval field, define the frequency of launching the node.
- In the Begin at field, select the date when the first activation is scheduled.
Example: If a user selects the 2nd of February, 5.00 PM means that this is the date when the trigger is activated for the first time. - From the Timezone dropdown list, select the timezone for executing the Audience node repetitions.
- To define the number of times a trigger launch is repeated, switch the Limit repetition toggle on.
EXAMPLE: If the scheduled time is February 2; 5.00 PM, the interval is 1 day; and the repetition limit is 3, it means the trigger is activated for the first time at the February 2 at 5.00 PM, repeated on the February 3 at 5.00 PM and repeated the day after.
Important: Because the number of customers in a segmentation can change, the trigger may not be repeated exactly with the frequency defined in the schedule for all customers. It can take longer to repeat the trigger launch as customers rejoin segmentations. If a customer rejoins a segmentation after the trigger reaches the repetition limit for the customer, the trigger will not launch for this customer.
-
- One time - This trigger is activated only once. The workflow can be activated:
-
In the Define audience section, select the segment:
- Segments - You can choose from the list of existing segmentations. There is no limit on the number of selected segmentations.
Important: If you select several segments they are connected with the
ORlogic operator. - New audience - You can select a new group of customers.
- Segments - You can choose from the list of existing segmentations. There is no limit on the number of selected segmentations.
-
Confirm the settings by clicking the Apply button.
Example of use
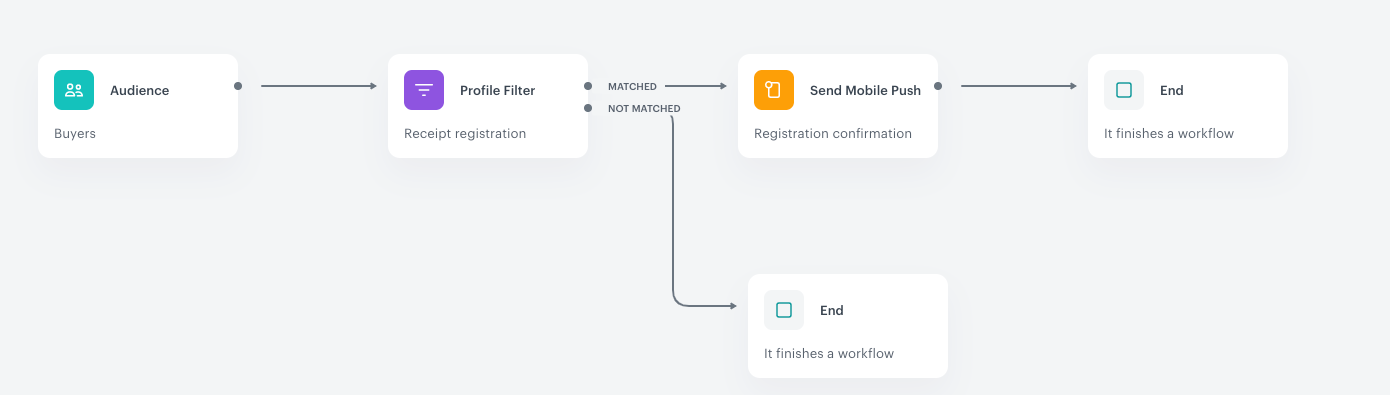
The assumption of the scenario is to allow the customers to register a receipt in a lottery directly after a purchase, but also to give this possibility to customers who made a transaction the week before.
- Add an Audience trigger. In the settings of the trigger, add a segment (or several segments) of customers.
- Add a Profile Filter condition which waits until customers register their receipts.
- When the receipt registration is completed, a push notification is sent with information about joining the lottery.
- When the push is sent, the workflow is completed.