Configuring item catalog for recommendations
Before you can use AI recommendations, you must prepare an item catalog which will be the source of items.
The process consists of the following steps:
- Adding product feed
- Selecting a product feed
- Selecting attributes for preview
- Selecting a recommendation type
- Selecting response attributes
- Selecting filterable attributes
- Defining the item link
- Selecting training attributes
- Selecting attributes increasing the item variety
After the configuration and the model training, you can monitor the status. When the model is active, you can create a recommendation.
Adding item feed
The first step is selecting the feed from which recommendations will source the items. You can either select a catalog that contains a feed or use Google Merchant Feed.
- Go to Settings > AI engine configuration.
- Click Add feed.
Result: A pop-up appears. - Select the product feed you want to use.
Product feed uploaded to a catalog
- On the pop-up, select the type of catalog:
- Data catalog
- Metadata catalog
- From the dropdown list, select a catalog.
- Confirm by clicking Apply.
Result: The selected catalog appears on the list in Settings > AI Engine configuration.
Google MerchantTip: Include the Last-Modified header to enable detection of whether the product feed import is necessary, this will help you reduce data transmission costs.- Provide the following information:
- the link to the Google Merchant feed,
- the name of the field,
- the type of the feed,
- the frequency of pulling updates from the feed to Synerise,
- authorization type,
- user name,
- and password.
- Confirm by clicking Apply.
Result: The feed appears on the list in Settings > AI Engine configuration.
- On the pop-up, select the type of catalog:
Selecting item feed
-
In Settings > AI Engine Configuration, on the list of feeds, click the feed you added according to the Select product feed procedure.
The configuration form opens. In the Item catalog section, the feed you are configuring is selected automatically and you can proceed to the next part of the configuration.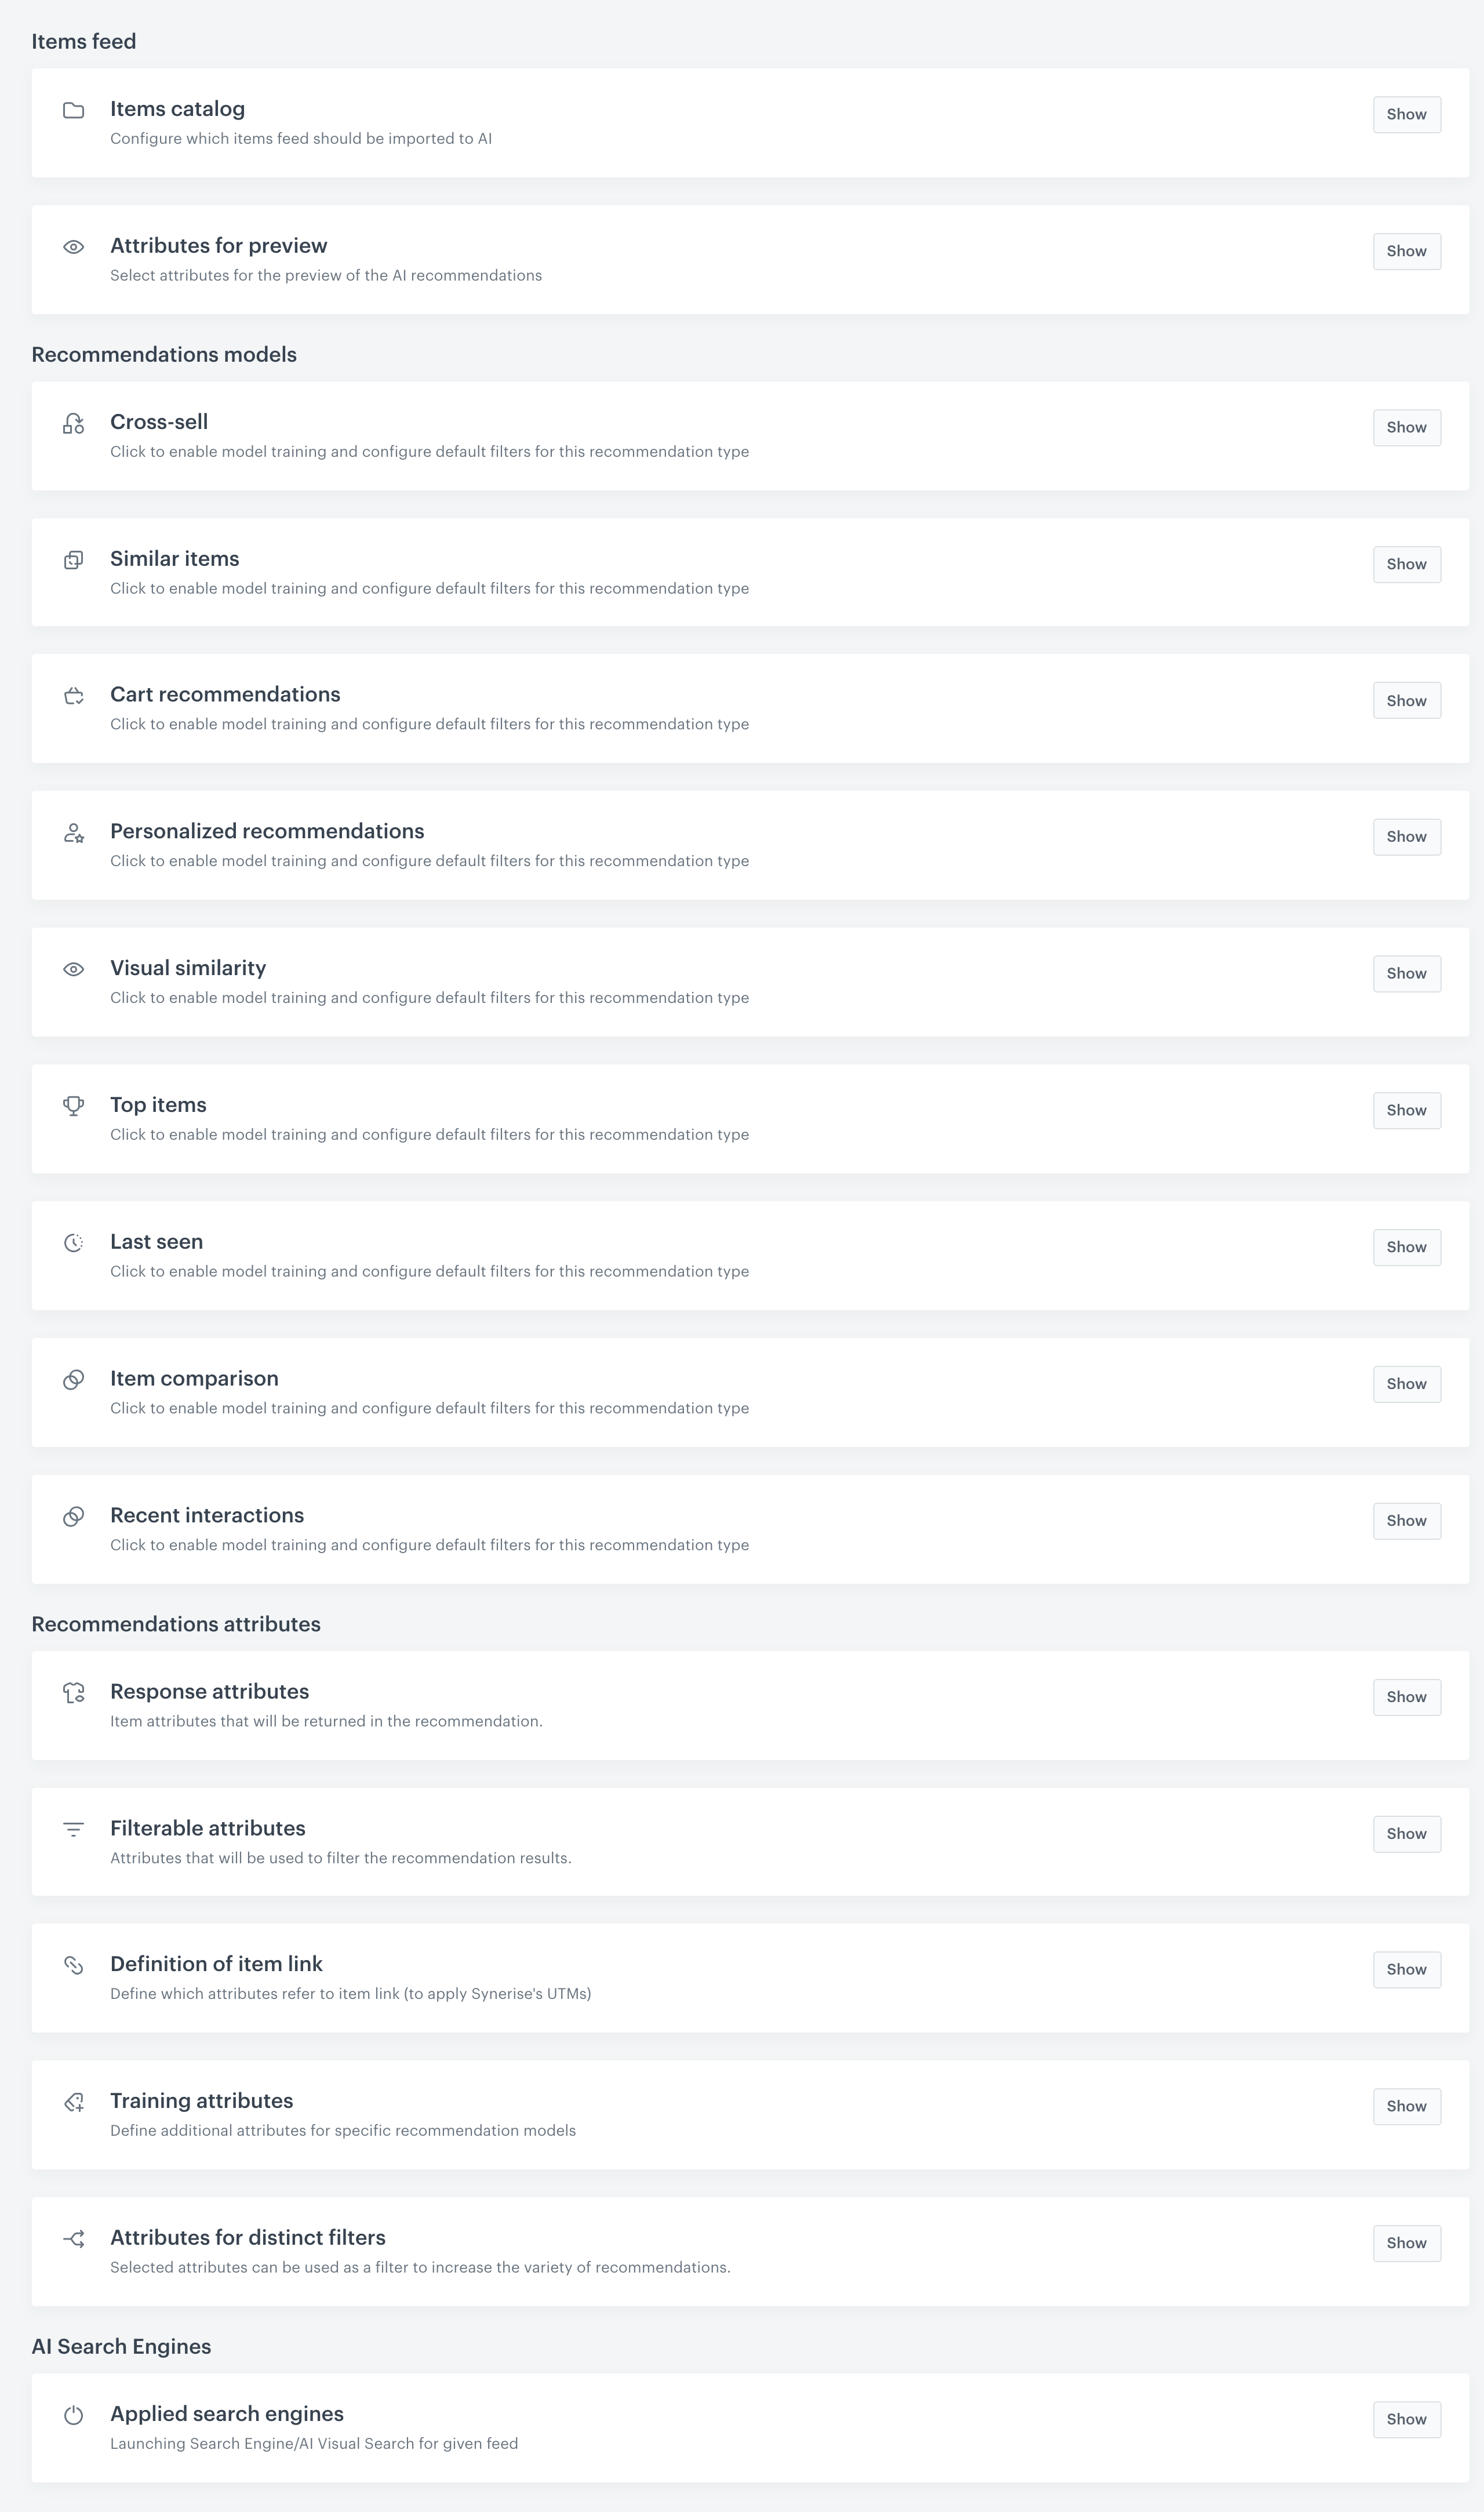
Blank model configuration form
Selecting attributes for preview
You can define attributes whose values will appear in the Synerise platform preview when you test the recommendation or the search settings.
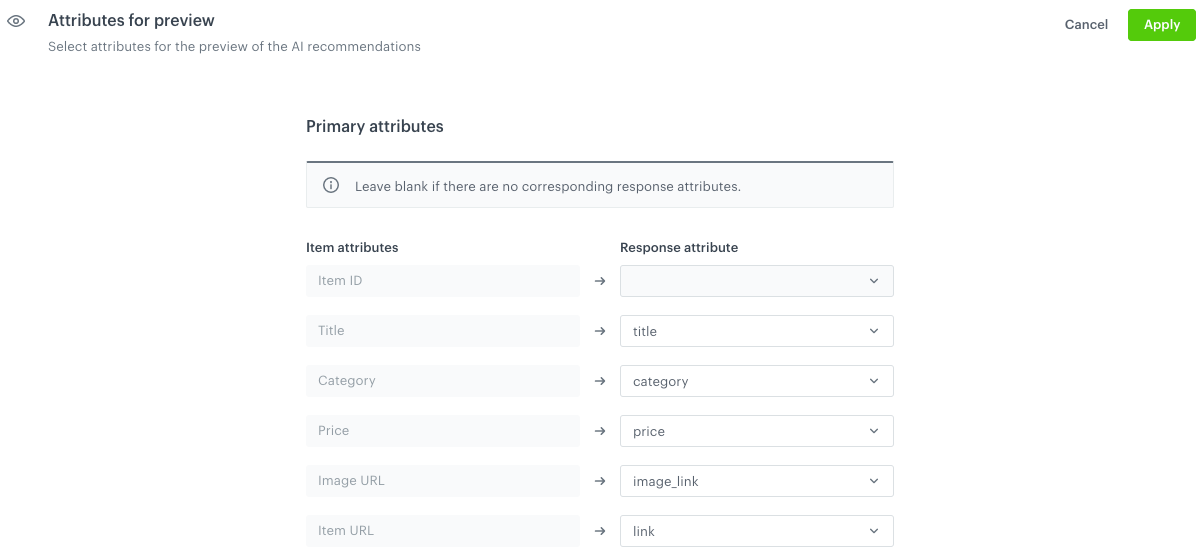
- On the Attributes for preview tab, click Show.
- In the Response attribute column, from the lists select the attributes that contain the data in the Item attributes column.
Example: If the data source stores the item title in the itemTitle attribute, choose itemTitle: on the right, select the itemTitle attribute as the pair for Title from the left column.
Result: Values for the attributes that are chosen in the Response attribute column will be shown for products when previewing them in the Synerise platform.
Selecting recommendation types and default filters
Select the recommendation models you want to enable for the selected product feed. Optionally, you can define the default filters for each model. These filters define universal conditions an item must meet to be included in the recommendation of a given type.
In the Recommendation models section:
- On the recommendation model you want to enable, click Show.
- Switch the Model enabled toggle on.
- Optionally, define default filters for the recommendation model. These are filters which are automatically applied to the recommendation. When creating a recommendation campaign, you can override the default filters.
- Repeat steps 1 to 4 for other recommendation models you want to select.
- Confirm by clicking Apply.
Result: The AI model is trained. When it’s done, the default filters are added to all recommendations of this type, unless disabled in the campaign’s settings (the Additional settings section).
Selecting response attributes
A response attribute is an attribute of the item that is returned in the response to a recommendation request.
- In the Response attributes tab, click Show.
- Click Select attributes.
- Select the checkboxes next to the attributes which you want to include in the response to a recommendation request.
Note:
There are two types of attributes:
- Textual attributes: String-type attributes, for example, a color, an item name, a brand name, fabric, pattern, and so on.
- Range attributes: Attributes that can have numerical values within a selected range, such as size, price, width, length, and so on.
- Confirm by clicking Apply.
Selecting filters
You can define the attributes which you can use later to filter recommendations results as well as allow you to filter items in the settings of the Propensity predictions. The attributes also become available in the Analytics module.
- On the Filterable attributes tab, click Show.
- Click Select attributes.
- Tick the checkboxes next to the attributes which you want to use for filtering the recommendation results.
Recommended: Don’t usetitleordescriptionas filterable attributes. Using these attributes as filterable has a negative impact on performance. - Confirm by clicking Apply.
Every day, attributes added to Filterable attributes are automatically deleted if they fulfill all of the following conditions:
- They were added to filterable attributes more than 10 days ago.
- They are not used in a search or suggestion index configuration.
- They are not set as filters or boosting rules in a recommendation campaign.
- They are not set as a default filter in a recommendation configuration.
- They are not used as additional filters in a recommendation API/SDK request.
Defining the item link
An item link is an attribute of an item to which Synerise’s UTM parameters are added.
- On the Definition of item link tab, click Show.
- From the Attribute dropdown list, select an attribute that is the item link. You can select more than one attribute.
Tip: When you use one workspace for multiple language versions, you can select several attributes as an item link. This lets you analyze the statistics such as item clicks or visits across various website language versions. - Confirm by clicking Apply.
Result: Thesnrai,snr_content, andsnr_idparameters are added to the URL of the item. For example:https://www.exemplary-shop.com./winter-shoes-camelbrown.html?snrai_campaign=QWERTY[…]e=&snrai_content=&snrai_id=123456789010305
Selecting training attributes
Select the attributes which will be used for training for the Similar items and Visual similarity models, so they can produce relevant results.
- For the Similar items and Item comparison models, the title attribute is set at default.
- For the Visual similarity model, the default attributes are: image link, additional image links, and availability. These attributes are necessary as the location of the data and images are required.
We recommend selecting short attributes such as title, color, brand.
- On the Training attributes tab, click Show.
- Click Select attributes.
- Tick the checkboxes next to the attributes which you want to display to the customers.
Note:
There are two types of attributes:
- Textual attributes: String-type attributes, for example, a color, an item name, a brand name, fabric, pattern, and so on.
- Range attributes: These are all attributes that can have numerical values within a selected range, such as size, price, width, length, and so on.
- Confirm by clicking Apply.
Selecting attributes to increase item variety
By using distinct filters, you can define the number of items with the same value of an attribute (for example, a brand) that can be displayed in the recommendation frame.
- On the Attributes for distinct filters tab, click Show.
- Click Select attributes.
- On the pop up, from the list, choose up to 5 attributes.
- Click Apply.
- Confirm the settings of the tab by clicking Apply.
Result: These attributes are available in the Distinct filter while creating a campaign and in the Item attributes dropdown in the the slot configuration for the Section recommendations and the Attribute recommendations.
After the configuration and the model training, you can monitor the status. When the model is active, you can create a recommendation.