Cloning analyses to other workspaces
You can clone the following analyses between workspaces:
- funnels,
- segmentations,
- metrics,
- histograms,
- reports,
- trends,
- Sankey diagrams,
- aggregates,
- expressions,
- dashboards
To learn the basics of cloning, read the Introduction to cloning article.
Prerequisites
To clone objects between workspaces you must be assigned a user role that has the following permissions in the source and target workspaces:
- The Cloning module set to Read and Create
- In the Analytics module, set the permission for each component which you plan to clone to other workspaces to Read, Create, and Update.
Cloning objects
- To clone an object, click
 and select the analysis type.
 - On the list of analyses, find the analysis you want to clone.
- To the right side of the analysis author information, click
 .
. - From the context menu, select Clone to workspace.
Result: The Choose destination pop-up appears. - On the pop-up, select the workspace or workspaces to which you want to clone your analysis.
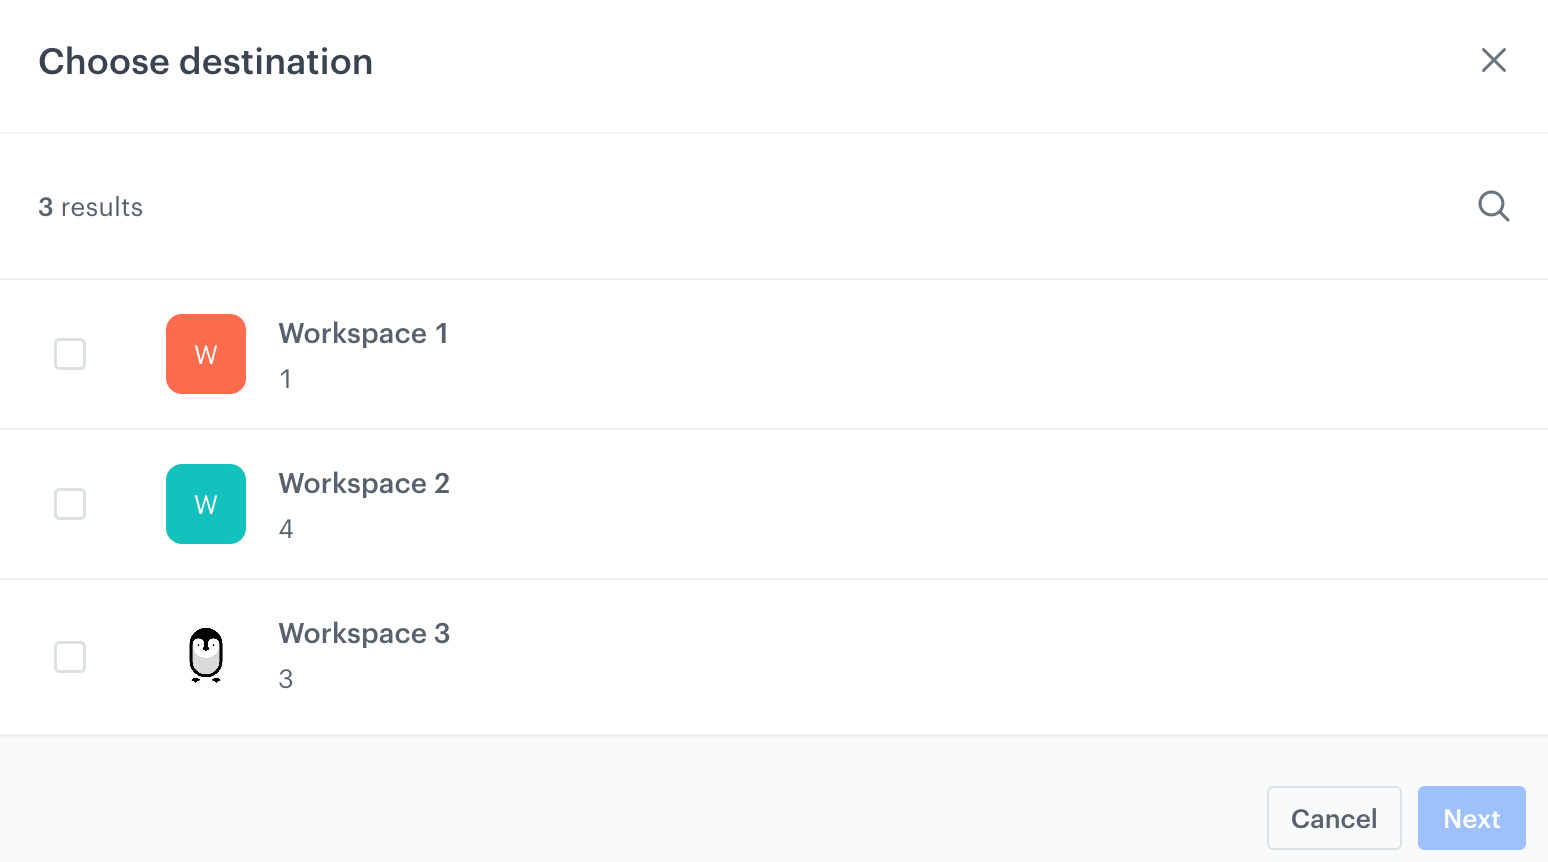
A pop-up with selection of workspaces Important: You can select up to 5 target workspaces at the same time. - Confirm your choice by clicking Next.
Result: You are directed to the mapping wizard.
Cloning an object that doesn’t exist in the target workspace
The procedure of cloning an object that doesn’t exist in the target workspaces involves only mapping the events and/or parameters included in the cloned analysis with the events and/or parameters existing in the target workspace.
If events or parameters from the cloned objects exist in the target workspaces, in the Mapping events section, the text on the button says Change solutions. Optionally, you can change the mapping settings by following the instruction below:
- In the mapping section, click Change solutions.
- Next to the target workspace name, click the downward arrow icon.
- Verify that the system mapped the events correctly. The system automatically mapped the events because in both workspaces there is an event with the same action name.
- Optionally, from the dropdown list under the name of the target workspace, select a different event to map in the target workspace than the one selected by the system.
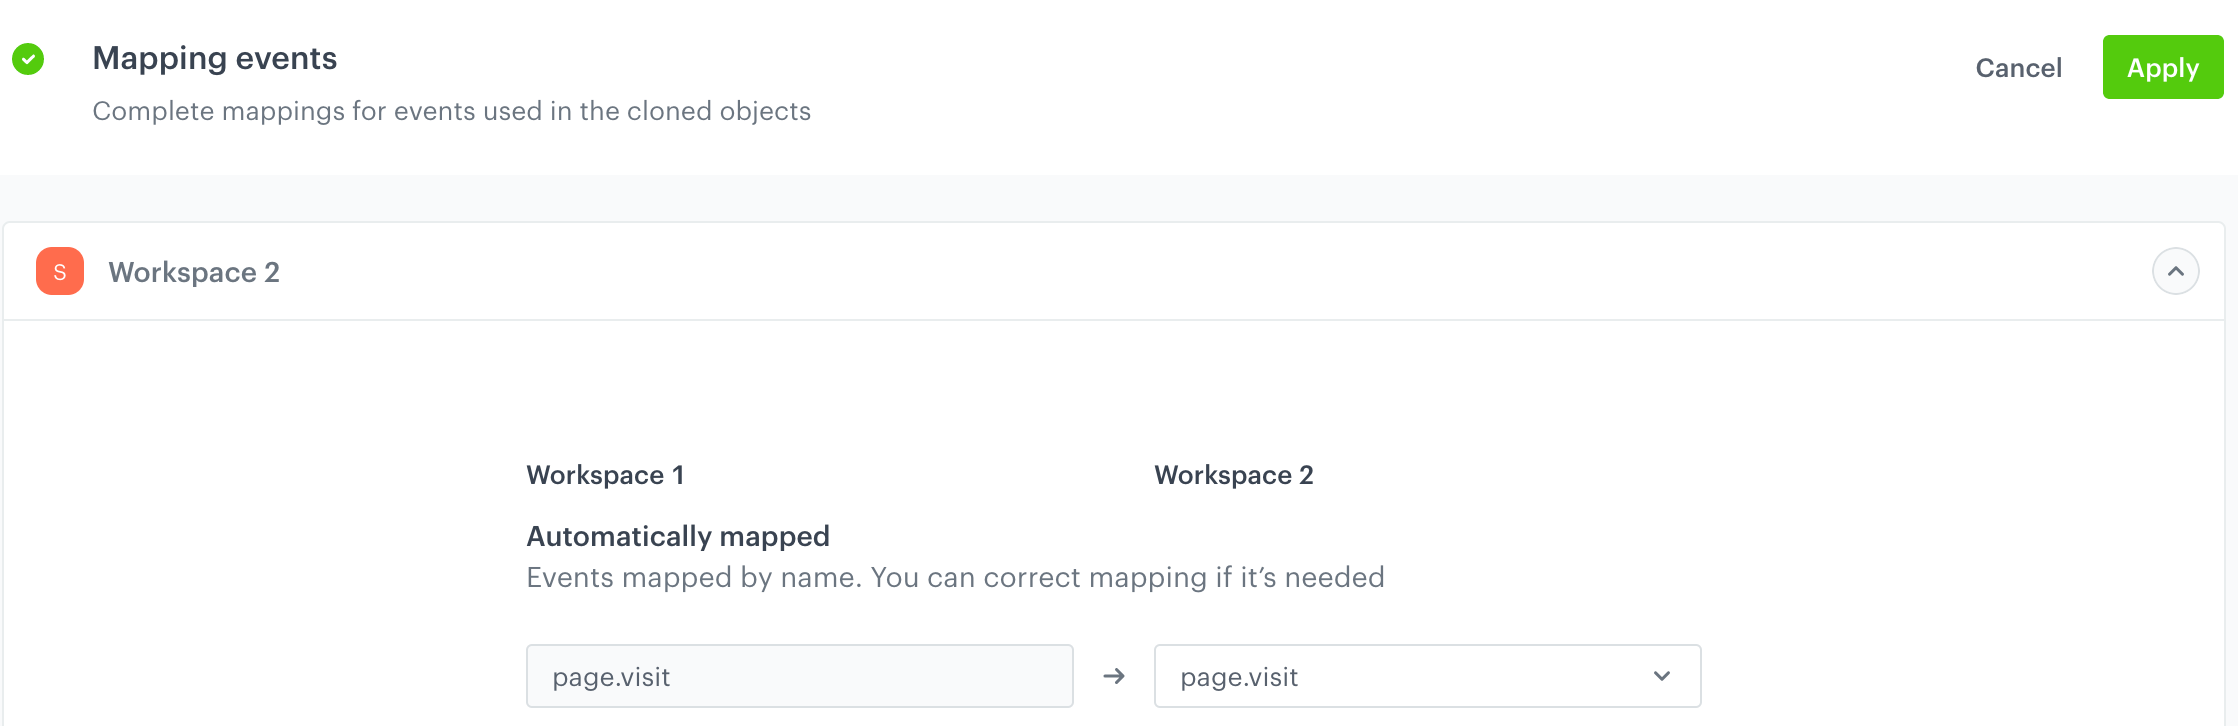
Mapping events compatible in the source and target workspaces - If applicable, repeat steps 2-4 for other workspaces.
- When all events and their parameters (if there are any) are mapped, confirm the mapping settings by clicking Apply.
- In the upper right corner, click Clone.
If events or parameters from the cloned objects don’t exist in the target workspaces, in the Mapping events section, the text on the button says Solve issues. Map the parameters by following the instruction below:
- In the mapping section, click Solve issues.
- Next to the target workspace name, click the downward arrow icon.
- On the dropdown list, perform one of the following actions:
- Create the missing parameter in the target workspace by clicking Create
[parameter name]. - Select an existing parameter in the target workspace under which the values of the parameter from the source workspace will be saved in the cloned object.
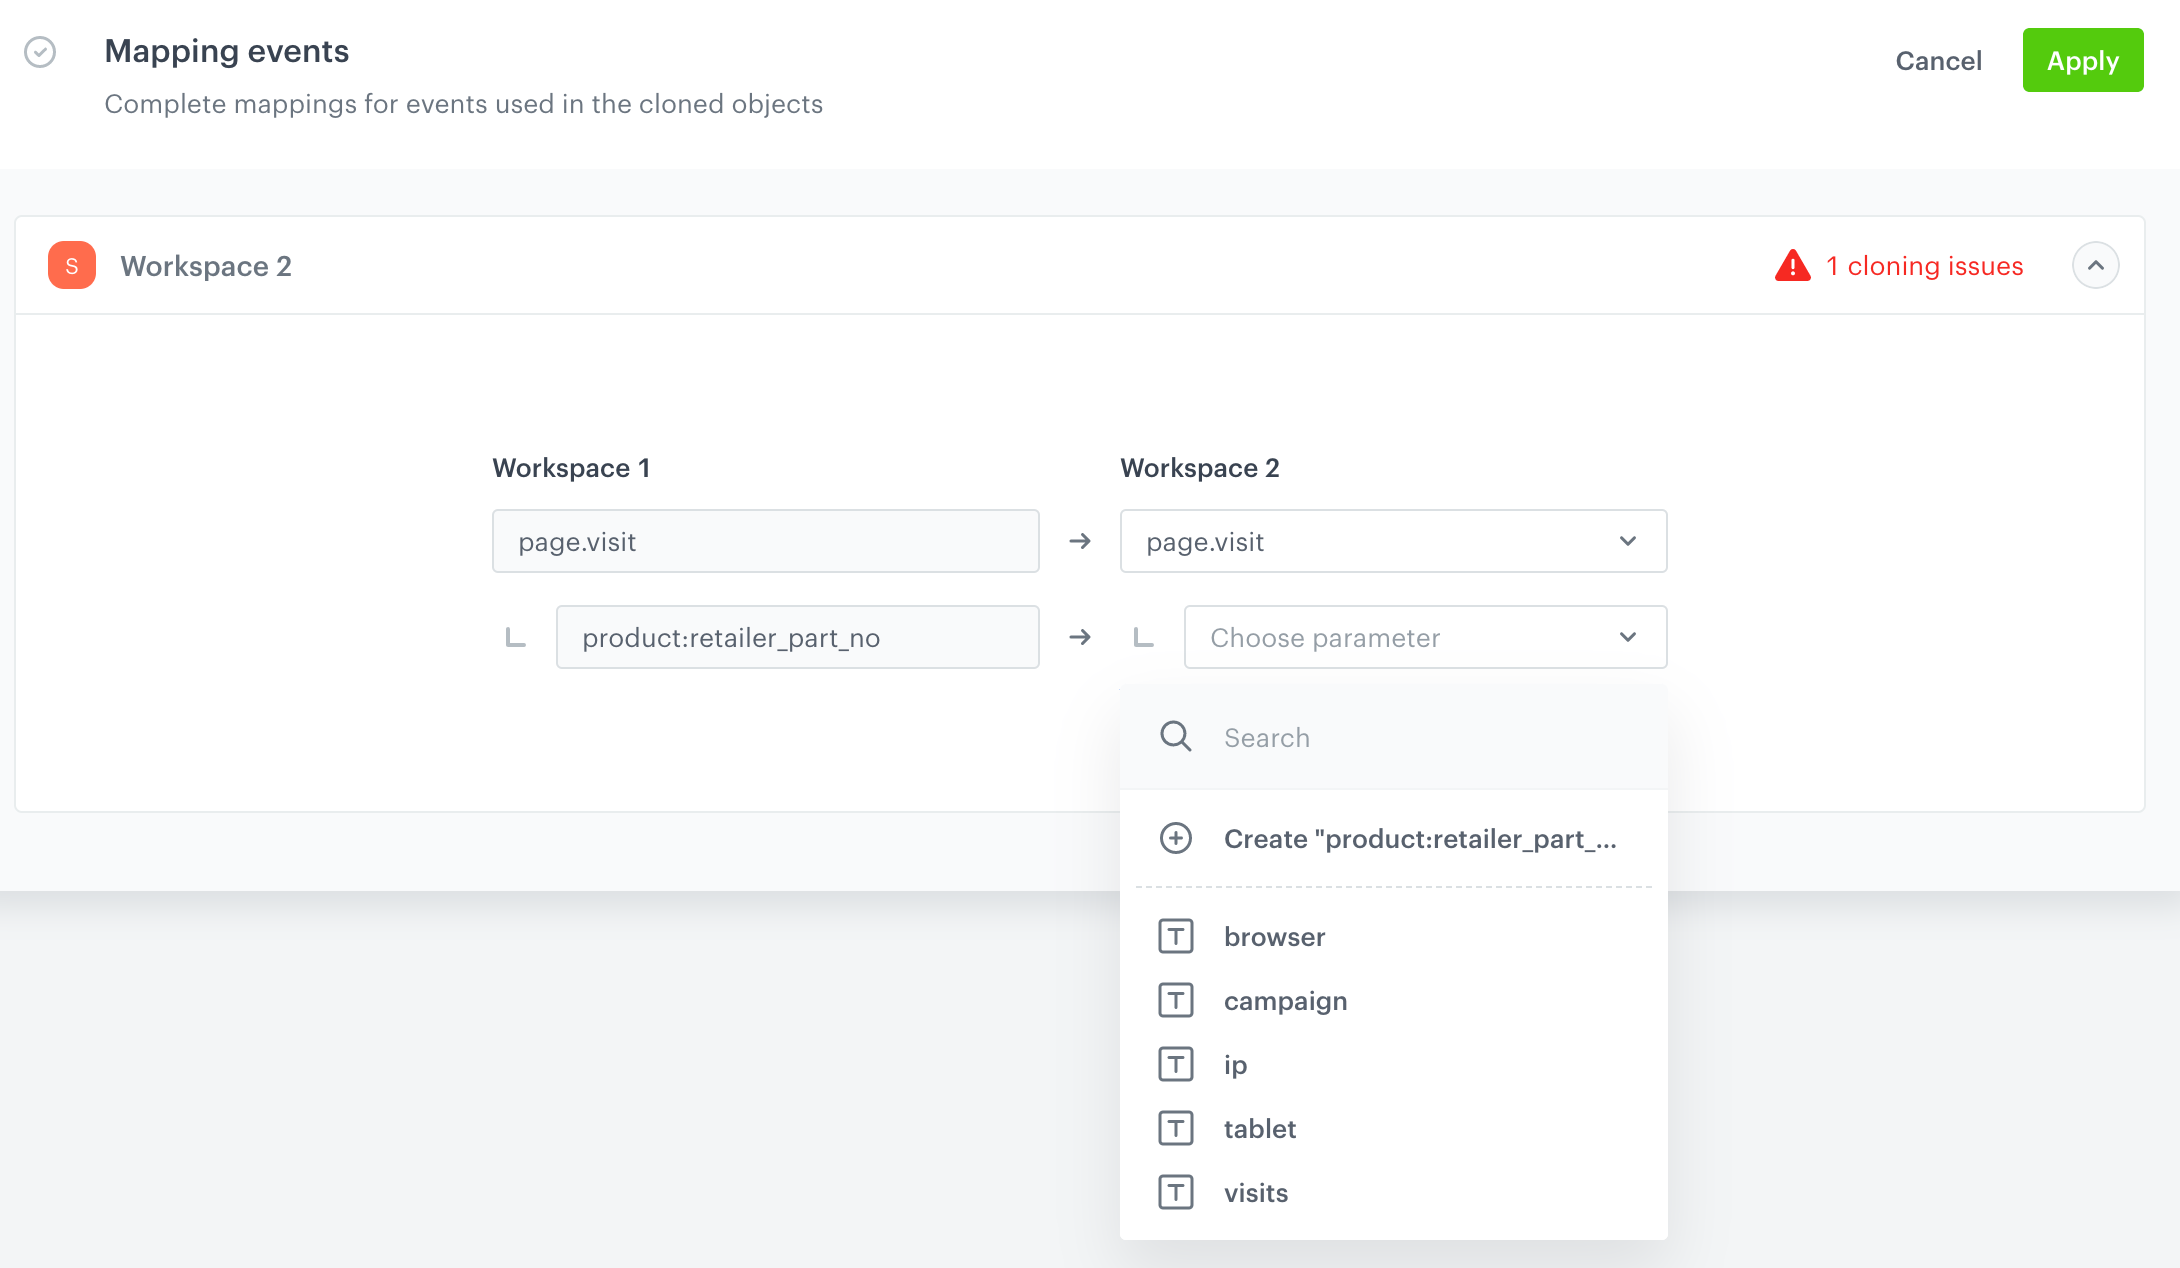
Mapping event parameters that don't exist in the target workspace - Create the missing parameter in the target workspace by clicking Create
- If applicable, repeat steps 2 and 3 for other workspaces.
- When all events and parameters are mapped, confirm the mapping settings by clicking Apply.
- In the upper right corner, click Clone.
Cloning an object that exists in the target workspace
When you clone an object and an object with the same name exists, you need to resolve the conflict. Remember that objects may be named identically by coincidence. Before you decide to use the “overwrite” option, make sure that you’re not overwriting something that should not be overwritten.
-
In the Objects to clone section, click Solve issues.
-
Next to the target workspace name, click the downward arrow icon.
Result: The list displays the analysis to be cloned which also exists in the target workspace. If the analysis contains other analyses which are also present in the target workspace, the list includes them. -
You can perform one of the following actions for each conflicting object:
- To overwrite the object in the target workspace with the object from the source workspace, click Update.
- To skip cloning the object to the target workspace, click Don’t update.
- To create a copy of the object from the source workspace in the target workspace, click Create a copy. The word
copywill be added to the name of the cloned object in the target workspace.
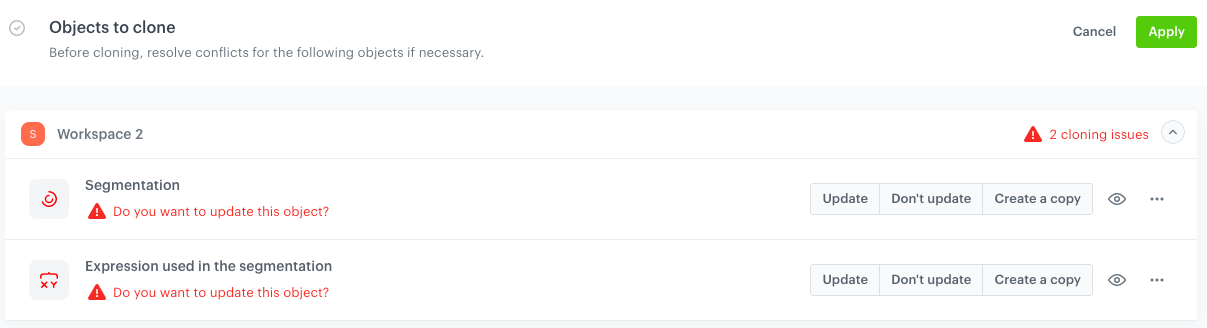
Resolving conflicts -
If applicable, repeat steps 2 and 3 for other workspaces.
-
Confirm the settings by clicking Apply.
-
In the Mapping events section, click Change solutions (or Solve issues, the text on the button depends on whether the events and/or attributes in cloned objects are compatible).
-
If the events and attributes are not compatible, under the name of the target workspace, on the dropdown list:
- Create the missing parameter in the target workspace by clicking Create
[parameter name]. - Select an existing parameter in the target workspace under which the values of the parameter from the source workspace will be saved in the cloned object.
- Create the missing parameter in the target workspace by clicking Create
-
If the system automatically mapped the events and attributes, you can either confirm the mapping or you can select the events and parameters.
-
When all events and their parameters (if there are any) are mapped, confirm the mapping settings by clicking Apply.
-
In the upper right corner, click Clone.
Events and attributes created while cloning
Events
Events and their parameters created while cloning will be available in the target workspace in Data Management > Events.
name and display name defined. The remaining metadata are empty and the JWT authorization settings for the event are disabled.Profile attributes
Profile attributes created while cloning will be available in the target workspace in Data Management > Params Manager. The attributes will only have the following metadata:
source parameterproperty name- the type (string)
Important: The attribute created while cloning is always a string, even if it was a different data type in the original workspace.
Cloning logs
To check whether the objects were successfully cloned, go to Settings > Cloning logs.