


Abandoned search scenario
Recover customers who have abandoned their search. When customers conduct a search on your website without adding any items to their cart, this is known as search abandonment. When a customer doesn’t complete a purchase, send an email with products related to the phrase they searched.
This use case describes how to prepare an automated workflow that is triggered by customer searching a specific phrase and sends them an email with an offer based on the abandoned search after 48 hours. One of the challenges addressed in this use case is the use of outgoing integration.
Prerequisites
- Implement AI search in any of your channels (mobile app, website, and so on).
- Match customers using search in any of your channels with their emails. To do so, we suggest to implement customer identification on the website and in your mobile app.
- Create an email account.
- Create an email template.
Prepare a workflow
Create a workflow which sends your customers an email offer with the products from their abandoned AI search. Optionally, you can add additional nodes, depending on your business needs.
- Go to
 Automation > Workflows > New workflow.
 - Enter the name of the workflow.
Define the Profile Event trigger node
At this stage, we will configure conditions that launch the workflow. As a trigger, we will use the item.search event.
-
As the first node of the workflow, add Profile Event. In the configuration of the node:
- From Choose event dropdown menu, choose
item.searchevent.
Note:item.searchis an event that our system generates automatically, when our AI search is implemented somewhere in any of your channels, when customer searches for a phrase. It containsqueryparameter which stores the phrase entered by customer. - From Choose event dropdown menu, choose
-
Confirm by clicking Apply.
Configure the Event Filter node
This node will set the workflow to wait for 48 hours for customer conversion (product.buy). If the purchase is made, then the workflow ends. If it doesn’t happen, the workflow moves on because the customer meets the abandoned search scenario. This setting is just an example and can be configured according to your business needs.
- As the next node, add Event Filter. In the configuration of the node:
- In the Check field, from the dropdown menu choose for period of time.
- Set the time range. In our case, it is 48 hours.
- In the Define conditions field, from the Choose event dropdown menu, choose
product.buyevent.
- Confirm by clicking Apply.
- For the Matched path, add the End node .
Configure the Outgoing Integration node
In this step, we will use the phrase that the customer has searched for (it is stored as a query event parameter in the trigger) to send a request to AI search for products related to this phrase. In further steps, we will use these products in the email which will be added to it through a dynamic insert. You can find the method to retrieve products related to the phrase at this link.
In order to create a request, we configure a custom webhook by defining the Endpoint URL, body request, and so on. This action allows you to send requests from Synerise to external systems.
-
To the Not matched path, add Outgoing integration. In the configuration of the node:
-
Choose Custom webhook.
-
Name the webhook. In our case
get search result. -
In the URL section, next to POST, type the endpoint of request:
https://api.synerise.com/search/v2/indices/{indexId}/autocomplete, where{indexId}is the ID of your AI search index. -
In the Headers section, click add header. In the first field type
x-api-key, and in the second an authorization key according to the documentation. -
In the Body section add the following JSON frame with Jinjava code:
        {
        "query": "{{event.params.query}}",
        "limit":6
        }
Where:
Phrase Explanation querythis is the phrase the customer used in their search, taken from the event triggering the workflow -
item.search. To insert this phrase dynamically we used an insert.limitthis phrase limits how many products the customer will receive. -
Leave None as the the method of authorization.
-
-
Confirm by clicking Apply.
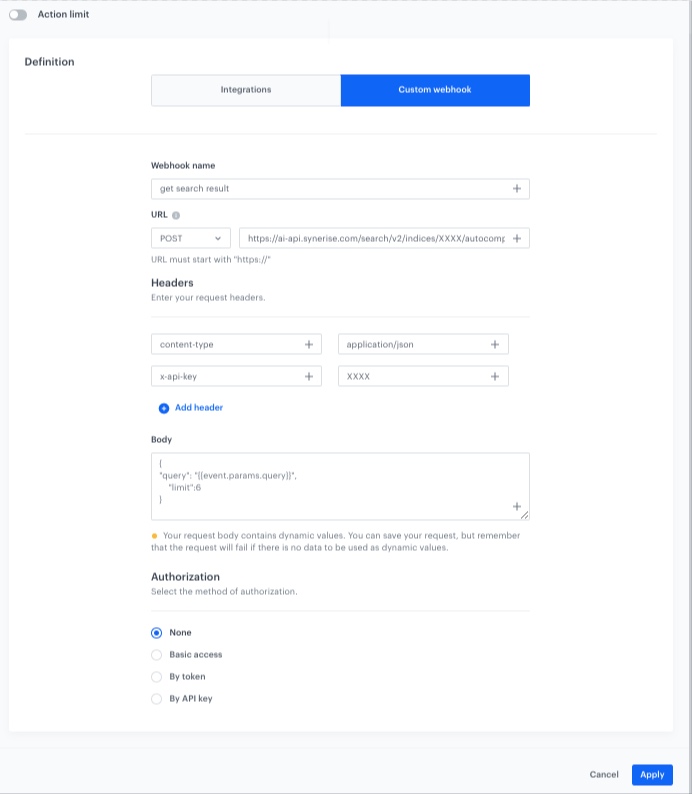
Outgoing integration configuration
Configure the Event Filter node
This node will allow you to use the products returned by the AI search in the previous step, to send an email with those products. The data of the returned products will be included in the parameters of the webhook.response event.
- As the next node, add Event Filter. In the configuration of the node:
- In the Define conditions field, from the Choose event dropdown menu, choose the
webhook.responseevent.
- In the Define conditions field, from the Choose event dropdown menu, choose the
- Confirm by clicking Apply.
Configure settings for email
- As the next node, add Send Email. Configure it according to your business needs.
- Configure the sender details section.
- Configure the Content section.
- In the Subject field, enter your message subject.
- In the Template section, choose the template email template prepared earlier.
- You can define UTM & URL parameters.
- Confirm by clicking Apply.
webhook.response event.Add the finishing node
- Add the End node.
- In the upper right corner, click Save & Run.
Result: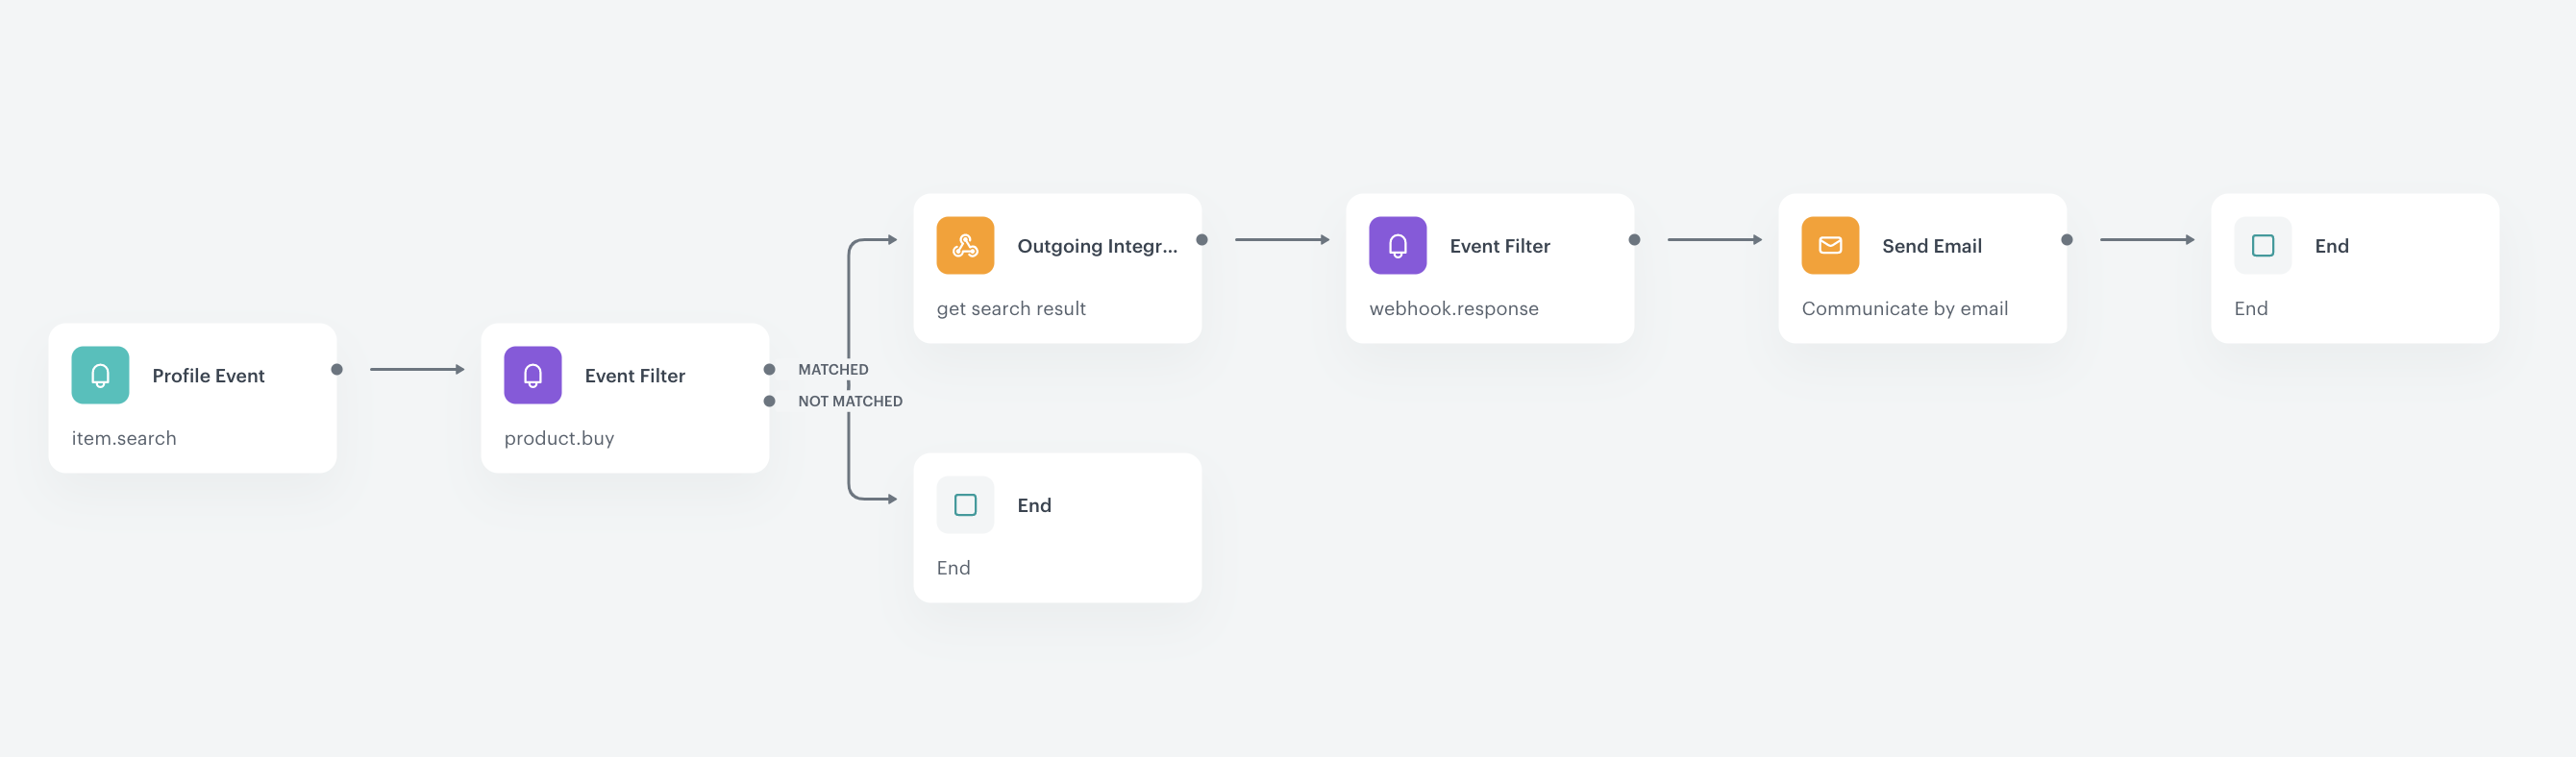
The workflow configuration
Check the use case set up on the Synerise Demo workspace
You can also check the workflow configuration directly in Synerise Demo workspace.
If you don’t have access to the Synerise Demo workspace, please leave your contact details in this form, and our representative will contact you shortly.