

Collect and update weather information in a catalog
The targeting of advertisements or messages can be based on external data, such as weather information. This type of communication with recipients is especially relevant to companies from the medical, fashion, beverage, or agricultural industries. By collecting data on cloud cover, air temperature, and pressure, we are able to better advertise products, arouse customer interest, and even strengthen the positive perception of a brand.
This use case describes how to retrieve data from the WeatherAPI portal and save it in the Synerise catalog. As the next steps (not covered as part of this use case), you may send marketing communication to the customers encouraging them to buy sunglasses for the upcoming sunny days.
Prerequisites
- Assign the following permission to your workspace API key allowing you to authorize requests and update contents in the catalog:
CATALOGS_ITEM_BATCH_CATALOG_CREATE - Create an account at the WeatherAPI portal that provides weather information.
- Prepare a
CSVfile with the list of your points of sales (POS). The file must include the columns with the following names:attributes.store_name- The name of the storeattributes.storeId- The ID of the storeemail- Email address of the POS.Important:- If your points of sales don’t have email addresses, instead of the
emailcolumn, addcustomIdcolumn and assign to it the same value as toattributes.storeId. - If you implemented non-unique email setting, use
customIdinstead ofemail.
- If your points of sales don’t have email addresses, instead of the
attributes.store_city- City where the POS is locatedattributes.latitude- Latitude of the POSattributes.longitude- Longitude of the POS
Process
In this use case, you will go through the following steps:
- Import a list of offline stores.
- Create a segmentation that gathers the points of sales you imported.
- Create a catalog which will contain regularly updated weather information.
- Create a workflow which retrieves weather information from the WeatherAPI portal and saves it in the catalog.
Import a list of offline stores
To collect weather information for each store, first you must import them with their location into Synerise. In this part of the process, you will import the list of POSes to Synerise as profiles (each POS will have a profile in the Profile module). This way, in the further part of the process, you will be able to create a segmentation of POSes and use it in a workflow that updates weather information for each POS.
For this purpose, you will create a workflow that will import the list of POSes to Synerise.
-
Go to
 Automation > Workflows > New workflow.
 -
Enter the name of the workflow.
-
Click Add trigger.
-
From the dropdown list, select Scheduled Run.
-
Click the node.
-
Set the Run trigger option to one time.
-
Select the Immediately tab.
-
Confirm by clicking Apply.
-
Click THEN.
-
From the dropdown list, select Local File.
-
Click the node.
-
Click Upload a new file or drag one here.
-
Select the file you created as a part of prerequisites.
-
If needed, modify Delimiter, Quotation mark, and Escape character.
-
Confirm by clicking Apply.
-
Click THEN.
-
From the dropdown list, select Import profiles. This node doesn’t require any configuration.
-
Click THEN.
-
From the dropdown list, select End.

Configuration of the workflow -
Click Save & Run.
Result: Each POS have a profile.
Create a segmentation
In this part of the process, create a segmentation that gathers all points of sales you imported to Synerise.
-
Go to
 Analytics > Segmentation > New segmentation.
 -
Enter a name for the segmentation.
-
Choose the
storeIdattribute. -
As an operator, choose Is true.
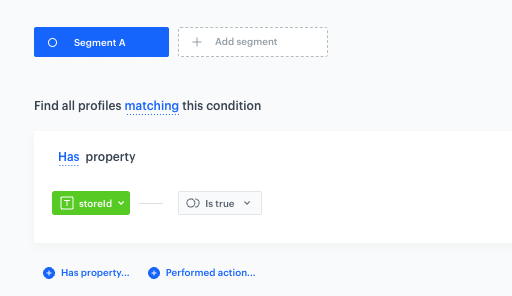
Configuration of the segmentation -
Save your segmentation.
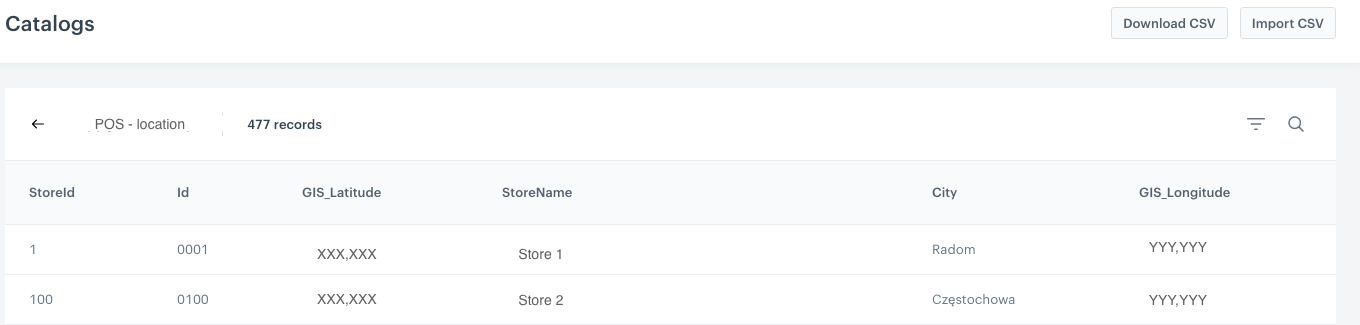
Create a catalog
In this part of the process, create a catalog that will store the current weather information for each point of sales. This catalog will be later updated by the workflow that requests the weather information.
- Go to Data Management > Catalogs > New Catalog.
- Enter the name of the catalog.
- Confirm by clicking Apply.
- Find the catalog on the list and click it.
Result: Its URL looks as follows:
https://app.synerise.com/spa/modules/catalogs/catalogs/1234. The number at the end is the catalog ID, save it in a notepad as you will need it later.
Create a workflow
In this part of the process, you will create a workflow for all points of sales you created (for this purpose, you will use the segmentation you created earlier). This workflow will be launched repetitively (at a frequency required by your business) to retrieve data from the Weather API portal and save it in the catalog you created eariler.
Add the Audience node
Start with the Audience node. In its configuration, you will use the segmentation you created in previous steps and define the frequency of launching the workflow.
-
Click Add trigger.
-
From the dropdown list, select the Audience node.
-
Leave the Run trigger option at default (repeatable).
-
Define the values for the Interval (frequency), Begin at, and Timezone fields according to your business requirements.
-
In the Define audience section, click Select segment.
-
Confirm by clicking Apply.
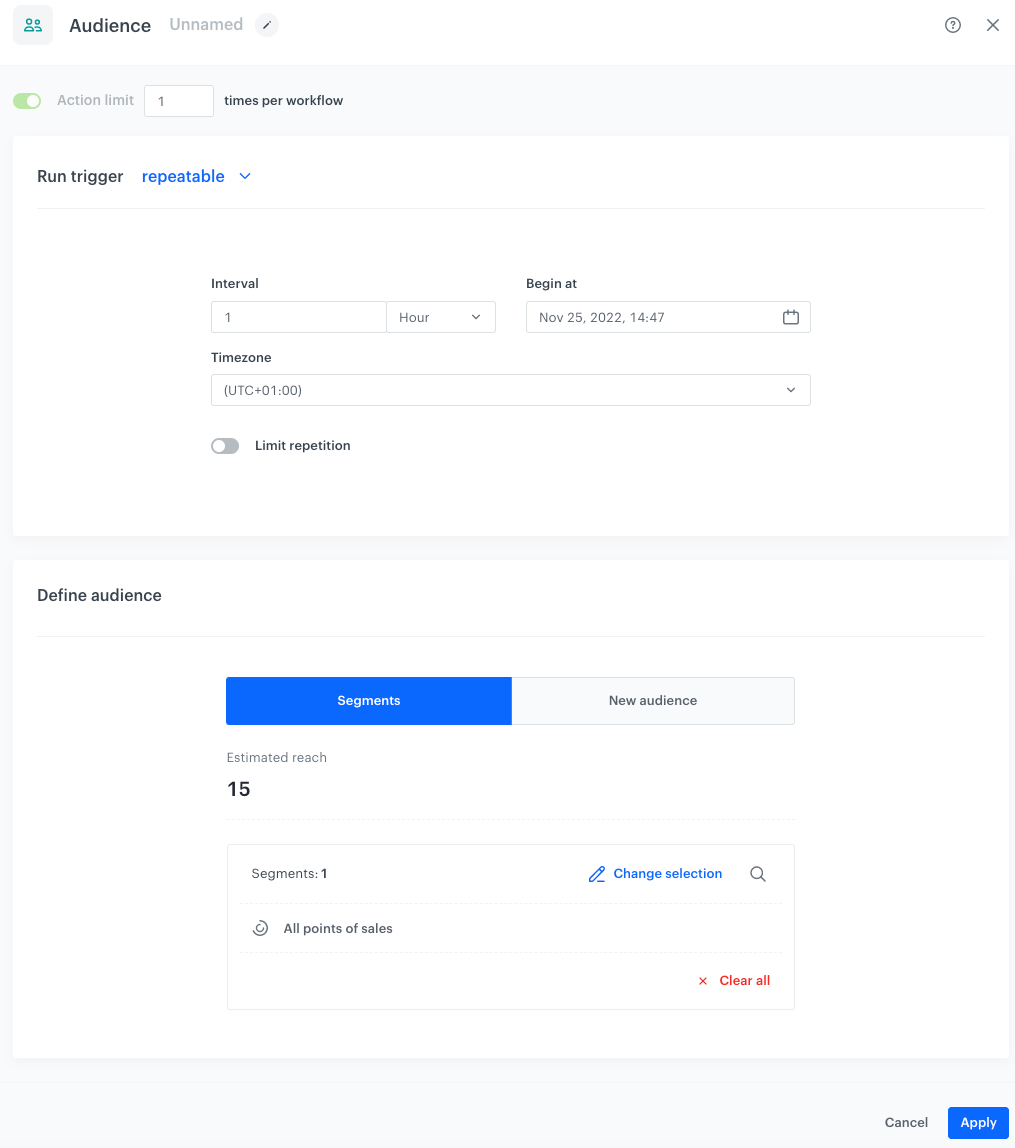
Configuration of the Audience node -
Confirm the settings in the node by clicking Apply.
Add the Get weather information node
Add the Get weather information node which retrieves weather information.
- Click THEN.
- From the dropdown list, select Get weather information.
- Click the node.
- Click Select connection.
- From the dropdown list, select the connection.
If you haven’t established a connection yet, see Create a connection. - Leave the selection in the Weather data period field at default (current weather).
- In the Location field, enter
{{ customer.latitude }},{{ customer.longitude }} - Fill the rest of the configuration form according to instructions here.
- Confirm the settings by clicking Apply.
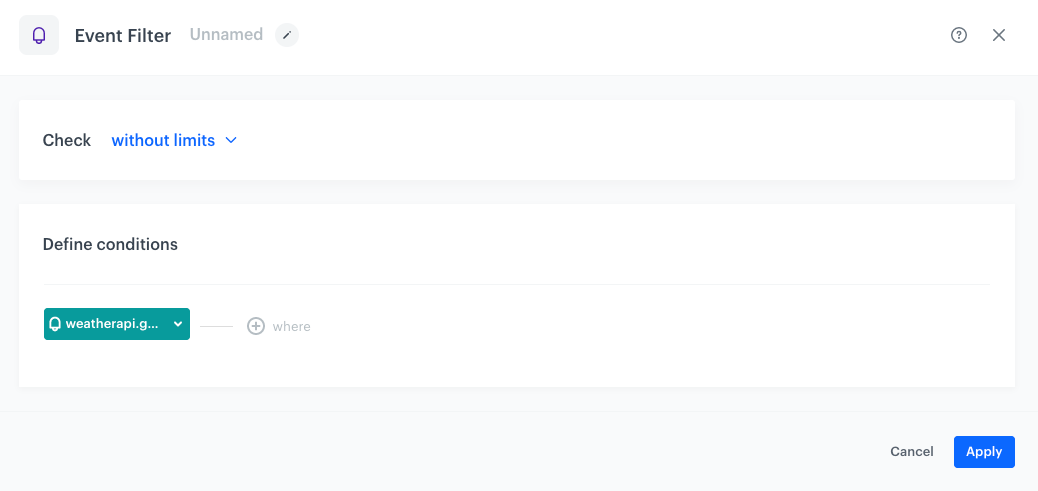
Add the Event Filter node
By adding the Event Filter node, the workflow waits until the weatherapi.getWeatherInfo event is generated on the profile card of the points of sales. This way, you can be sure that there is weather information. The event contains parameters with weather information configured in the previous node for each POS.
- Click THEN.
- From the dropdown list, select Event Filter.
- Leave the Check option at default.
Tip: If there are other workflows which depend on the occurrence of this event, adjust the time of checking according to your business needs. - Select the weatherapi.getWeatherInfo event.
- Confirm by clicking Apply.
Add the Outgoing Integration node
This webhook will be used to save the retrieved information to the catalog you created in previous part of the process.
-
Click THEN.
-
From the dropdown list, select Outgoing integration.
-
Select the Custom webhook tab.
-
In the Action name field, enter
save.weather(you can use different name, it’s just an example). -
Select POST method.
-
In the Endpoint field, enter
https://api.synerise.com/items-collector/bags/{YOUR_CATALOG_ID}
where{YOUR_CATALOG_ID}is the catalog ID you noted down earlier. -
Leave content-type at default:
application / json. -
In the body of the request, paste the request body with the weather parameters returned by WeatherAPI you would like to save in the catalog. Below you can find example code:
Check the example code{ "value": { "StoreId": "{{ customer['storeId'] }}", "condition_text": "{{ event.params['body.current.condition.text'] }}", "condition_code": "{{ event.params['body.current.condition.code'] }}", "location_name": "{{ event.params['body.location.name'] }}", "last_updated": "{{ event.params['body.current.last_updated'] }}", "temp_c": "{{ event.params['body.current.temp_c'] }}" }, "itemKey": "{{ customer['storeId'] }}" }This example uses inserts with event context to access WeatherAPI response data from the Event Filter node. The parameters from the response are injected into a request to the catalogs API and saved in a catalog.
Column name in the catalog Information saved in the column StoreIdThe ID of the point of sales condition_textWeather condition (as a string, for example Mist)condition_codeWeather condition (as WeatherAPI code ) location_nameCity name last_updatedLocal time when the real time data was updated. temp_cTemperature given in degrees Celsius itemKeyUnique identifier in the catalog (in this case, same as POS ID), necessary to save the weather data to the corresponding POS entry. 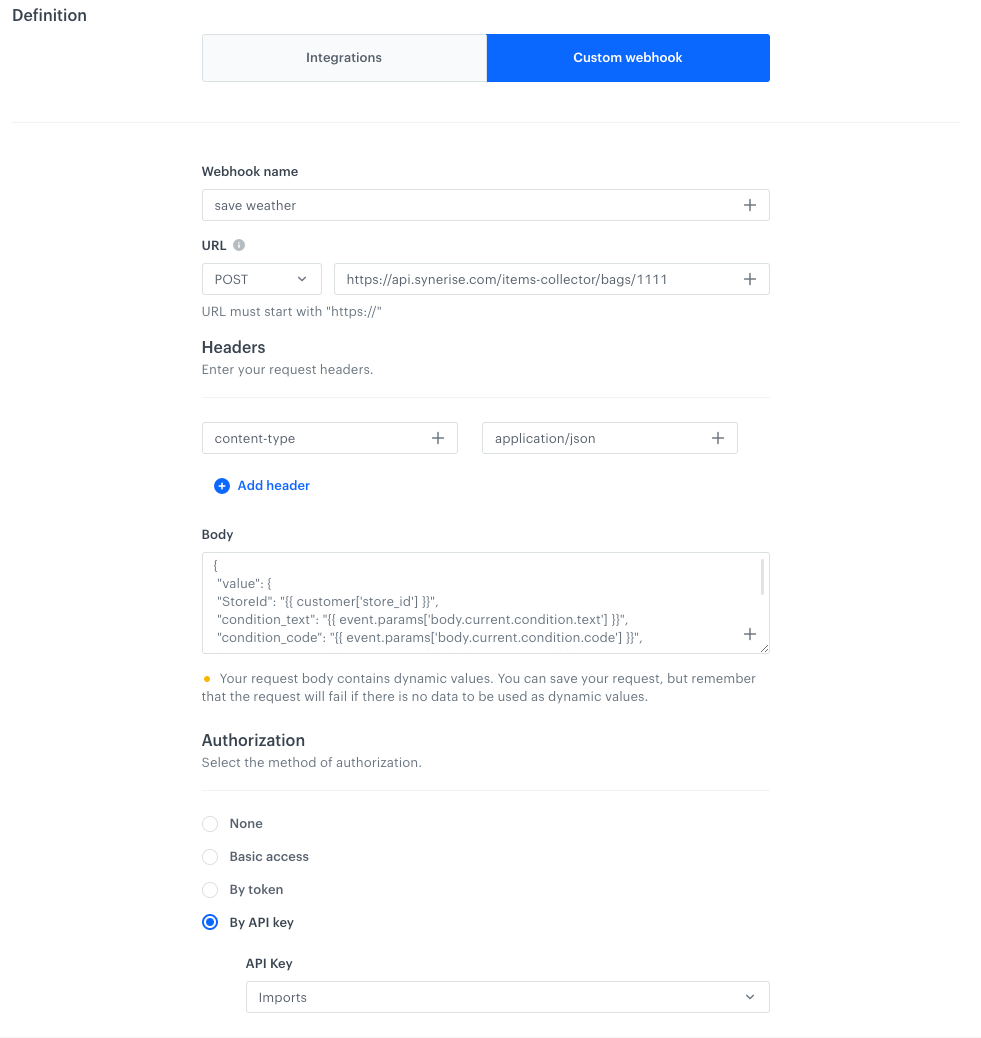
The configuration of the Outgoing Integration node -
In the Authorization section, select By API key.
-
From the dropdown list, select the API key who has enabled the
CATALOGS_ITEM_BATCH_CATALOG_CREATEpermission. -
Confirm the settings by clicking Apply.
Set up final settings of the workflow
-
After the Outgoing integration node, add the End node.
-
Optionally, add titles to each node so the workflow will be more understandable to your colleagues.
-
Enter the name of the workflow.

The complete configuration of the workflow -
Finish your work:
- To save the workflow as a draft, click Save.
- To activate the workflow, click Save & Run.
As a result, you will receive a catalog with regularly updated weather data for each point of sales included in the Audience node.
What’s next
The outcome of this use case is a regularly updated catalog with weather data for the region of your points of sales. You can use this information in your communication with customers by adding references to this catalog in the templates. This way, based on the weather conditions, you can prepare a message for your customers.
Adding new POS
To add new points of sales, you can import them as shown in this part of the process or you can add them manually in the Profiles module.
Updating existing POS
To update existing POS, you can do it on their profiles in the Profile module or you can import a file with points of sales with their updated data.
Removing POS
To remove a point of sales, go to Profiles, find the POS you want to remove and use the context menu on the right hand side to remove it.
Check the use case set up on the Synerise Demo workspace
You can check the configuration of use case in Synerise Demo workspace:
If you don’t have access to the Synerise Demo workspace, please leave your contact details in this form, and our representative will contact you shortly.