Gravity Form integration
If you use the Gravity Form plugin for building custom forms in WordPress, you can use webhooks to send data from forms to Synerise. In this use case, the answers from the form are saved as the event parameters on a customer’s profile.
Prerequisites
- Create a form in Gravity Form plugin. The example form used in this use case contains three pieces of information:
- Email address of a user who submits the form
- The name of the form
- A question about a vehicle condition
- Install and activate the webhooks add-on in your WordPress account.
Process
In this use case, you will go through the following steps:
- Create an incoming webhook.
- Create a webhook in Gravity Form.
- Finish incoming integration.
- Create a workflow.
- Testing.
Create an incoming webhook
In this part of the process, create an incoming webhook to which you will send the data submitted through Gravity forms.
- In Synerise, go to Automation > Incoming > New integration.
- Enter the name of the webhook.
- In the Endpoint section, click Define.
Important: The URL field is already is filled in with the endpoint to which the data submitted through the form will be sent.- Optionally, you can add an icon to this integration.
- Confirm by clicking Apply.
- Click Finish later.
Result: The incoming webhook is saved as a draft.
Create a webhook in Gravity Form
In this part of the process, you need to configure the webhook which will send data from the form to Synerise.
- In the WordPress account, go to Form Settings > Webhooks tab, and then click the Add New button.
- Fill in the form:
- In the Name field, enter a name for your form.
- In the Request URL, enter the Synerise endpoint URL from step 3 in Creating an incoming webhook procedure.
- From the Request method dropdown list, select POST method.
- From the Requested Format dropdown list, select JSON format.
- In the Request body input, choose Select fields (recommended set-up).
Note:- The Select Fields option displays the field values setting which let you define what you send to Synerise.
- The All Fields option sends the entire unformatted entry.
- In the Field Values inputs, define how each entry from the survey should be sent in the webhook response.
- In the Key column, enter the name of variables visible in the webhook response. WARNING: Use letters only without diacritical characters.
- In the Value column, enter the question in the form that is assigned to the key.
- In the Key column, enter the name of variables visible in the webhook response.
- Confirm the settings by clicking Update settings.
Result: From now, everytime somebody submits the survey, the request will be sent to the Synerise endpoint.
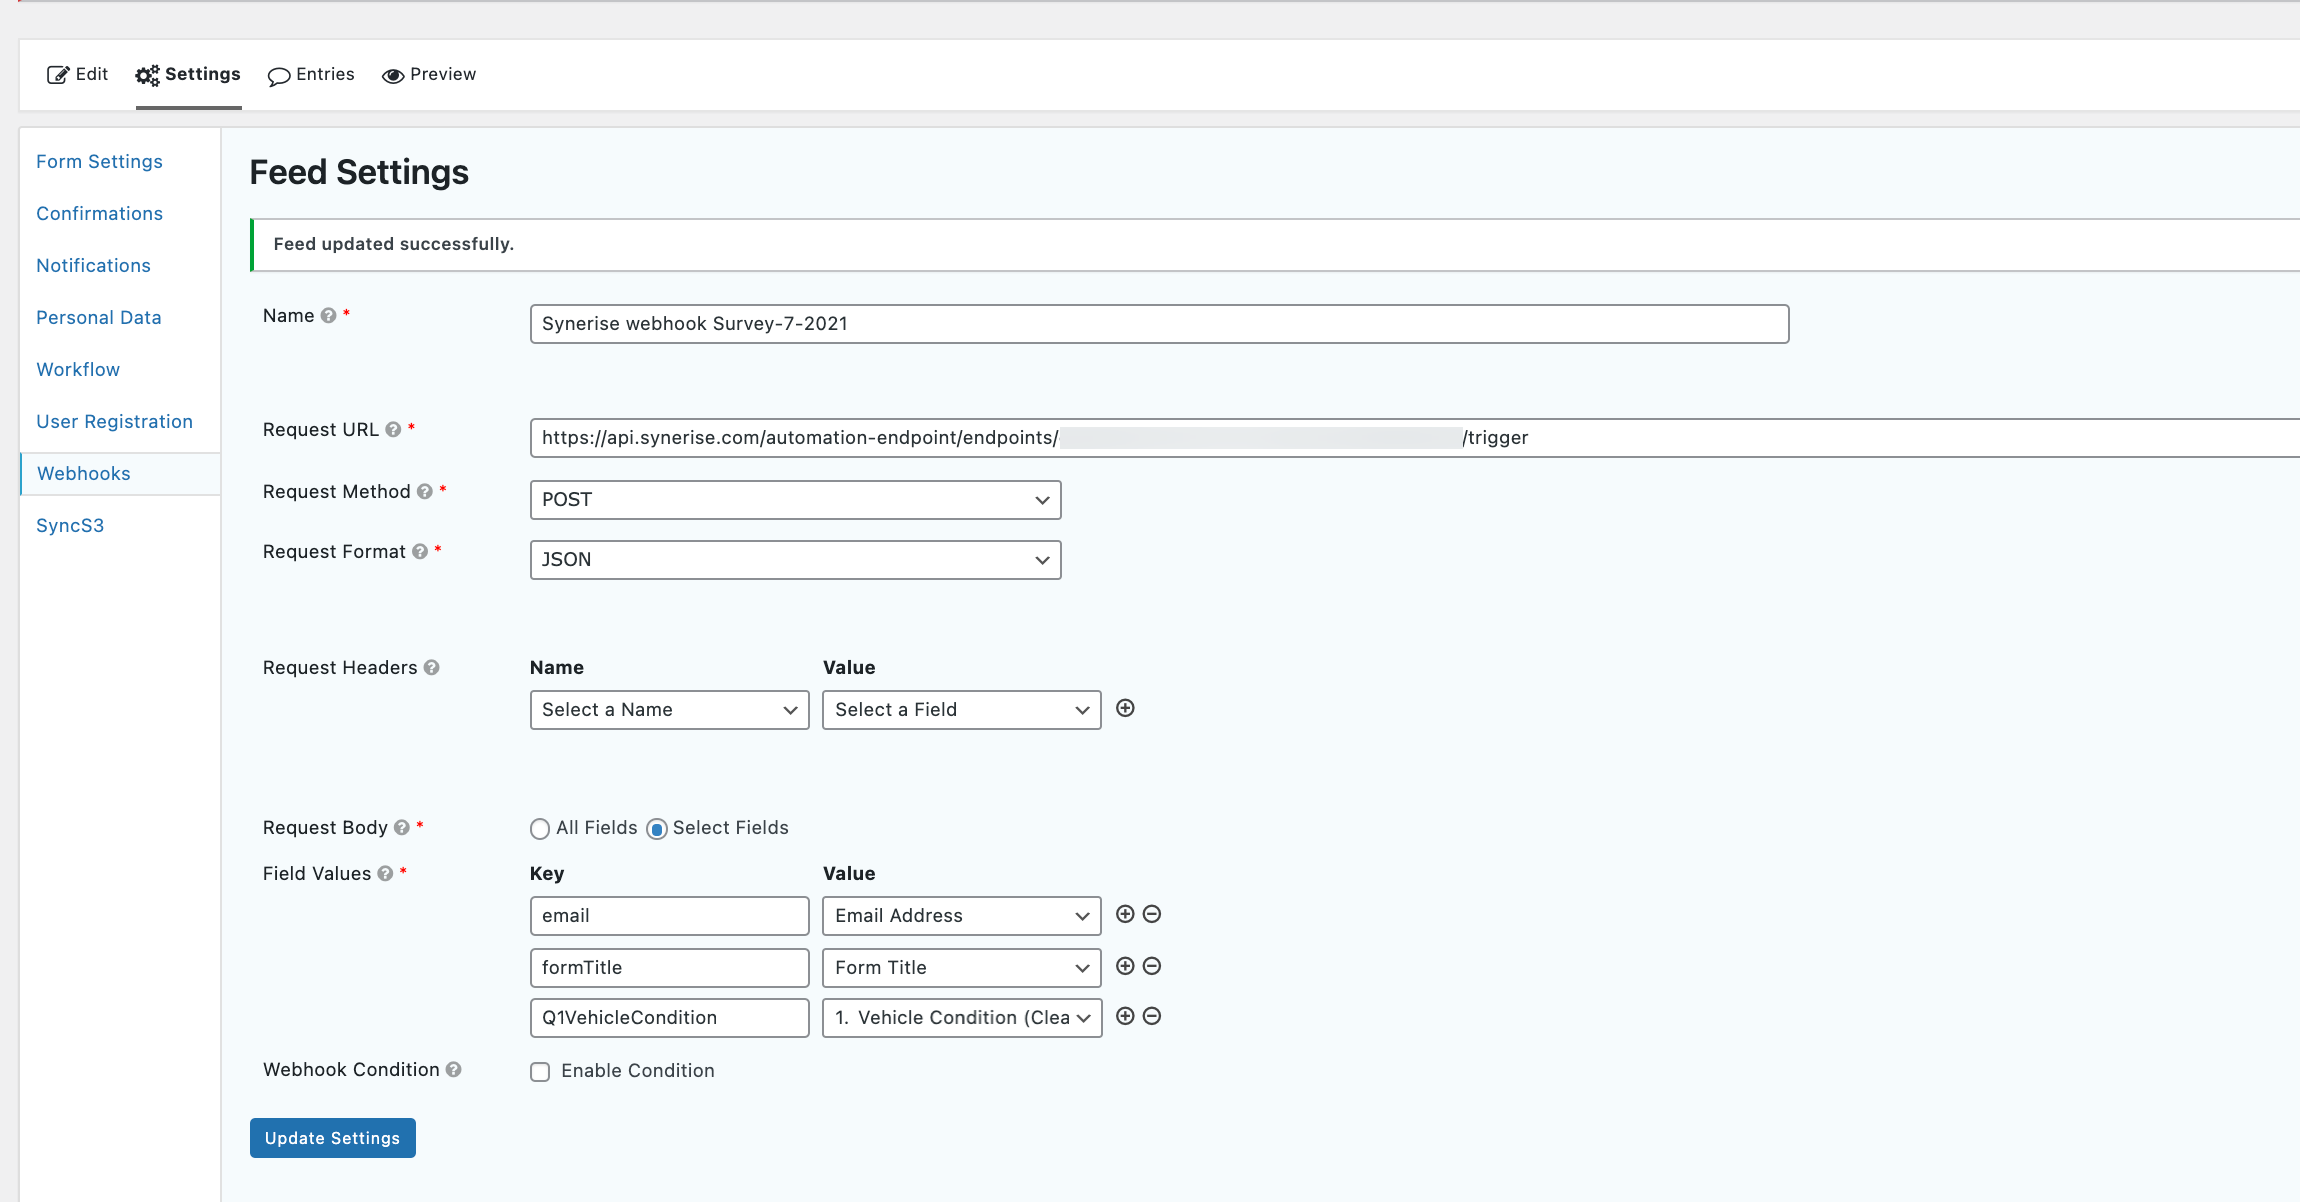
Configuration of the Gravity form webhooks
Finish incoming integration
Go back to creating the incoming webhook in Synerise.
-
In Synerise, go to Automation > Incoming.
-
On the list, find the draft incoming integration you created in step Create an incoming webhook.
-
In the Incoming data section, click Define.
-
Fill in the form you created in Gravity Forms and submit it. Alternatively, you can send a request in Postman to this endpoint.
Example request:
Important: Replace the body of the request with a sample of the data you will send from the formcurl --location --request POST 'ENDPOINT_URL_FROM_STEP_3' \ --header 'Content-Type: application/json' \ --data-raw '{ "email": "john.doe@example.com", "formType": "formTitle", "VehicleCondition": "neutral", }' -
In the Incoming data section in Synerise, click Retrieve data. The system waits for the incoming request for 1 minute and 30 seconds.
Create a workflow
In this part of the process, you create a workflow in Synerise. The workflow starts with the business event trigger that is launched every time a customer submits the form. In response to that, on the profile of the customer who submitted the form, an event is saved with the answers in the survey in the form of parameters.
- Go to Automation > Workflows > New workflow.
- Enter the name of the workflow.
- As the first node, select Business Event. In the configuration of the node:
- Select the incoming webhook you created as the first part of this use case.
- Confirm by clicking Apply.
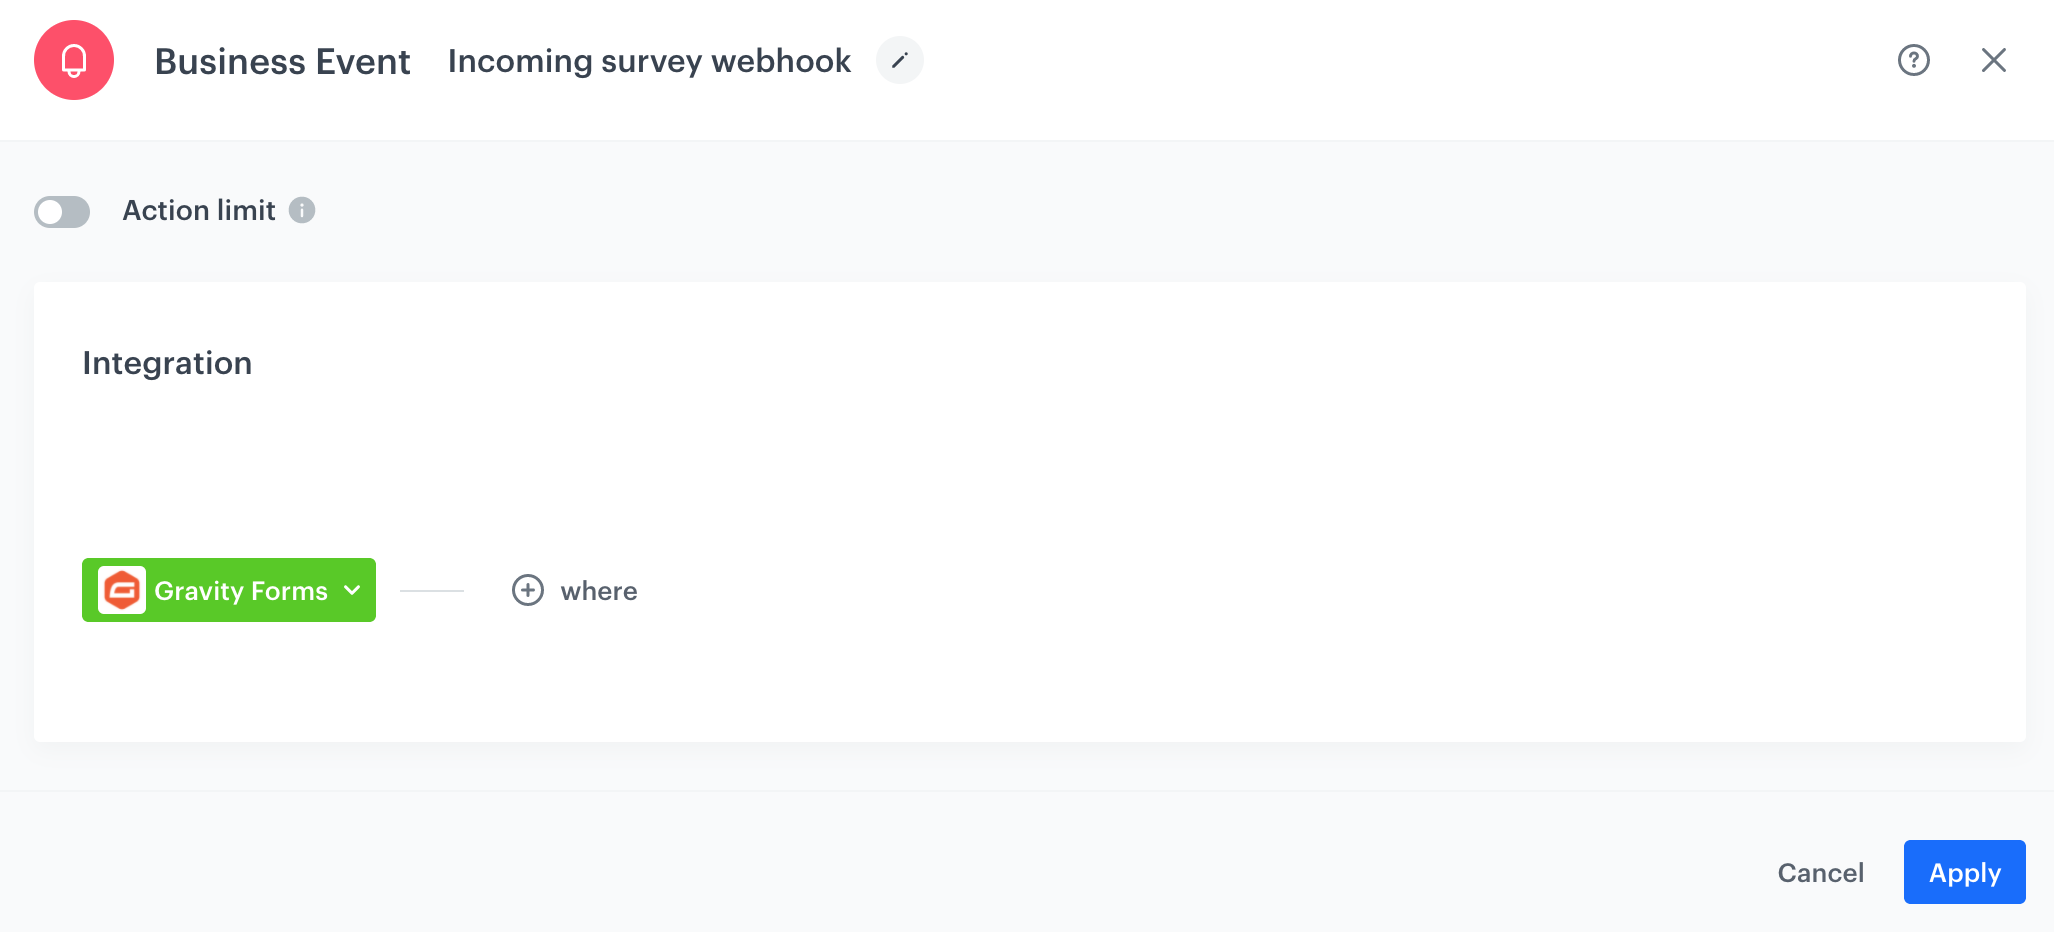
Configuring the Business Event node
- Add the Ougtoing integration to the workflow. In the configuration of the node:
-
Enter the name of the webhook. This name will be used as the value of the
nameparameter of thewebhook.responseevent. -
Select the POST method.
-
Enter the endpoint URL:
- For workspaces hosted in Microsoft Azure:
https://api.synerise.com/v4/events/custom - For workspaces hosted in Google Cloud Platform:
https://api.geb.synerise.com/v4/events/custom
- For workspaces hosted in Microsoft Azure:
-
Enter the following headers:
- set the
content-typeheader toapplication/json(default), - set the
acceptheader toapplication/json, - set the
api-versionheader to4.4
- set the
-
Enter the request body. For the form used in this case, the body is as follows:
{
    "action": "form.submit",
    "label": "Customer submitted a survey",
    "client": {
        "email": "{{request.body.email}}"
    },
    "params": {
        "formTitle": "{{request.body.formTitle}}",
        "VehicleCondition": "{{request.body.VehicleCondition}}"
    }
}
Note: Learn more about reusing data from incoming integrations in the Outgoing integration node here -
In the Authorization section, select By API key.
-
From the dropdown list, select a workspace’s API key that has permissions to send custom events.
-
- Confirm by cliking Apply.
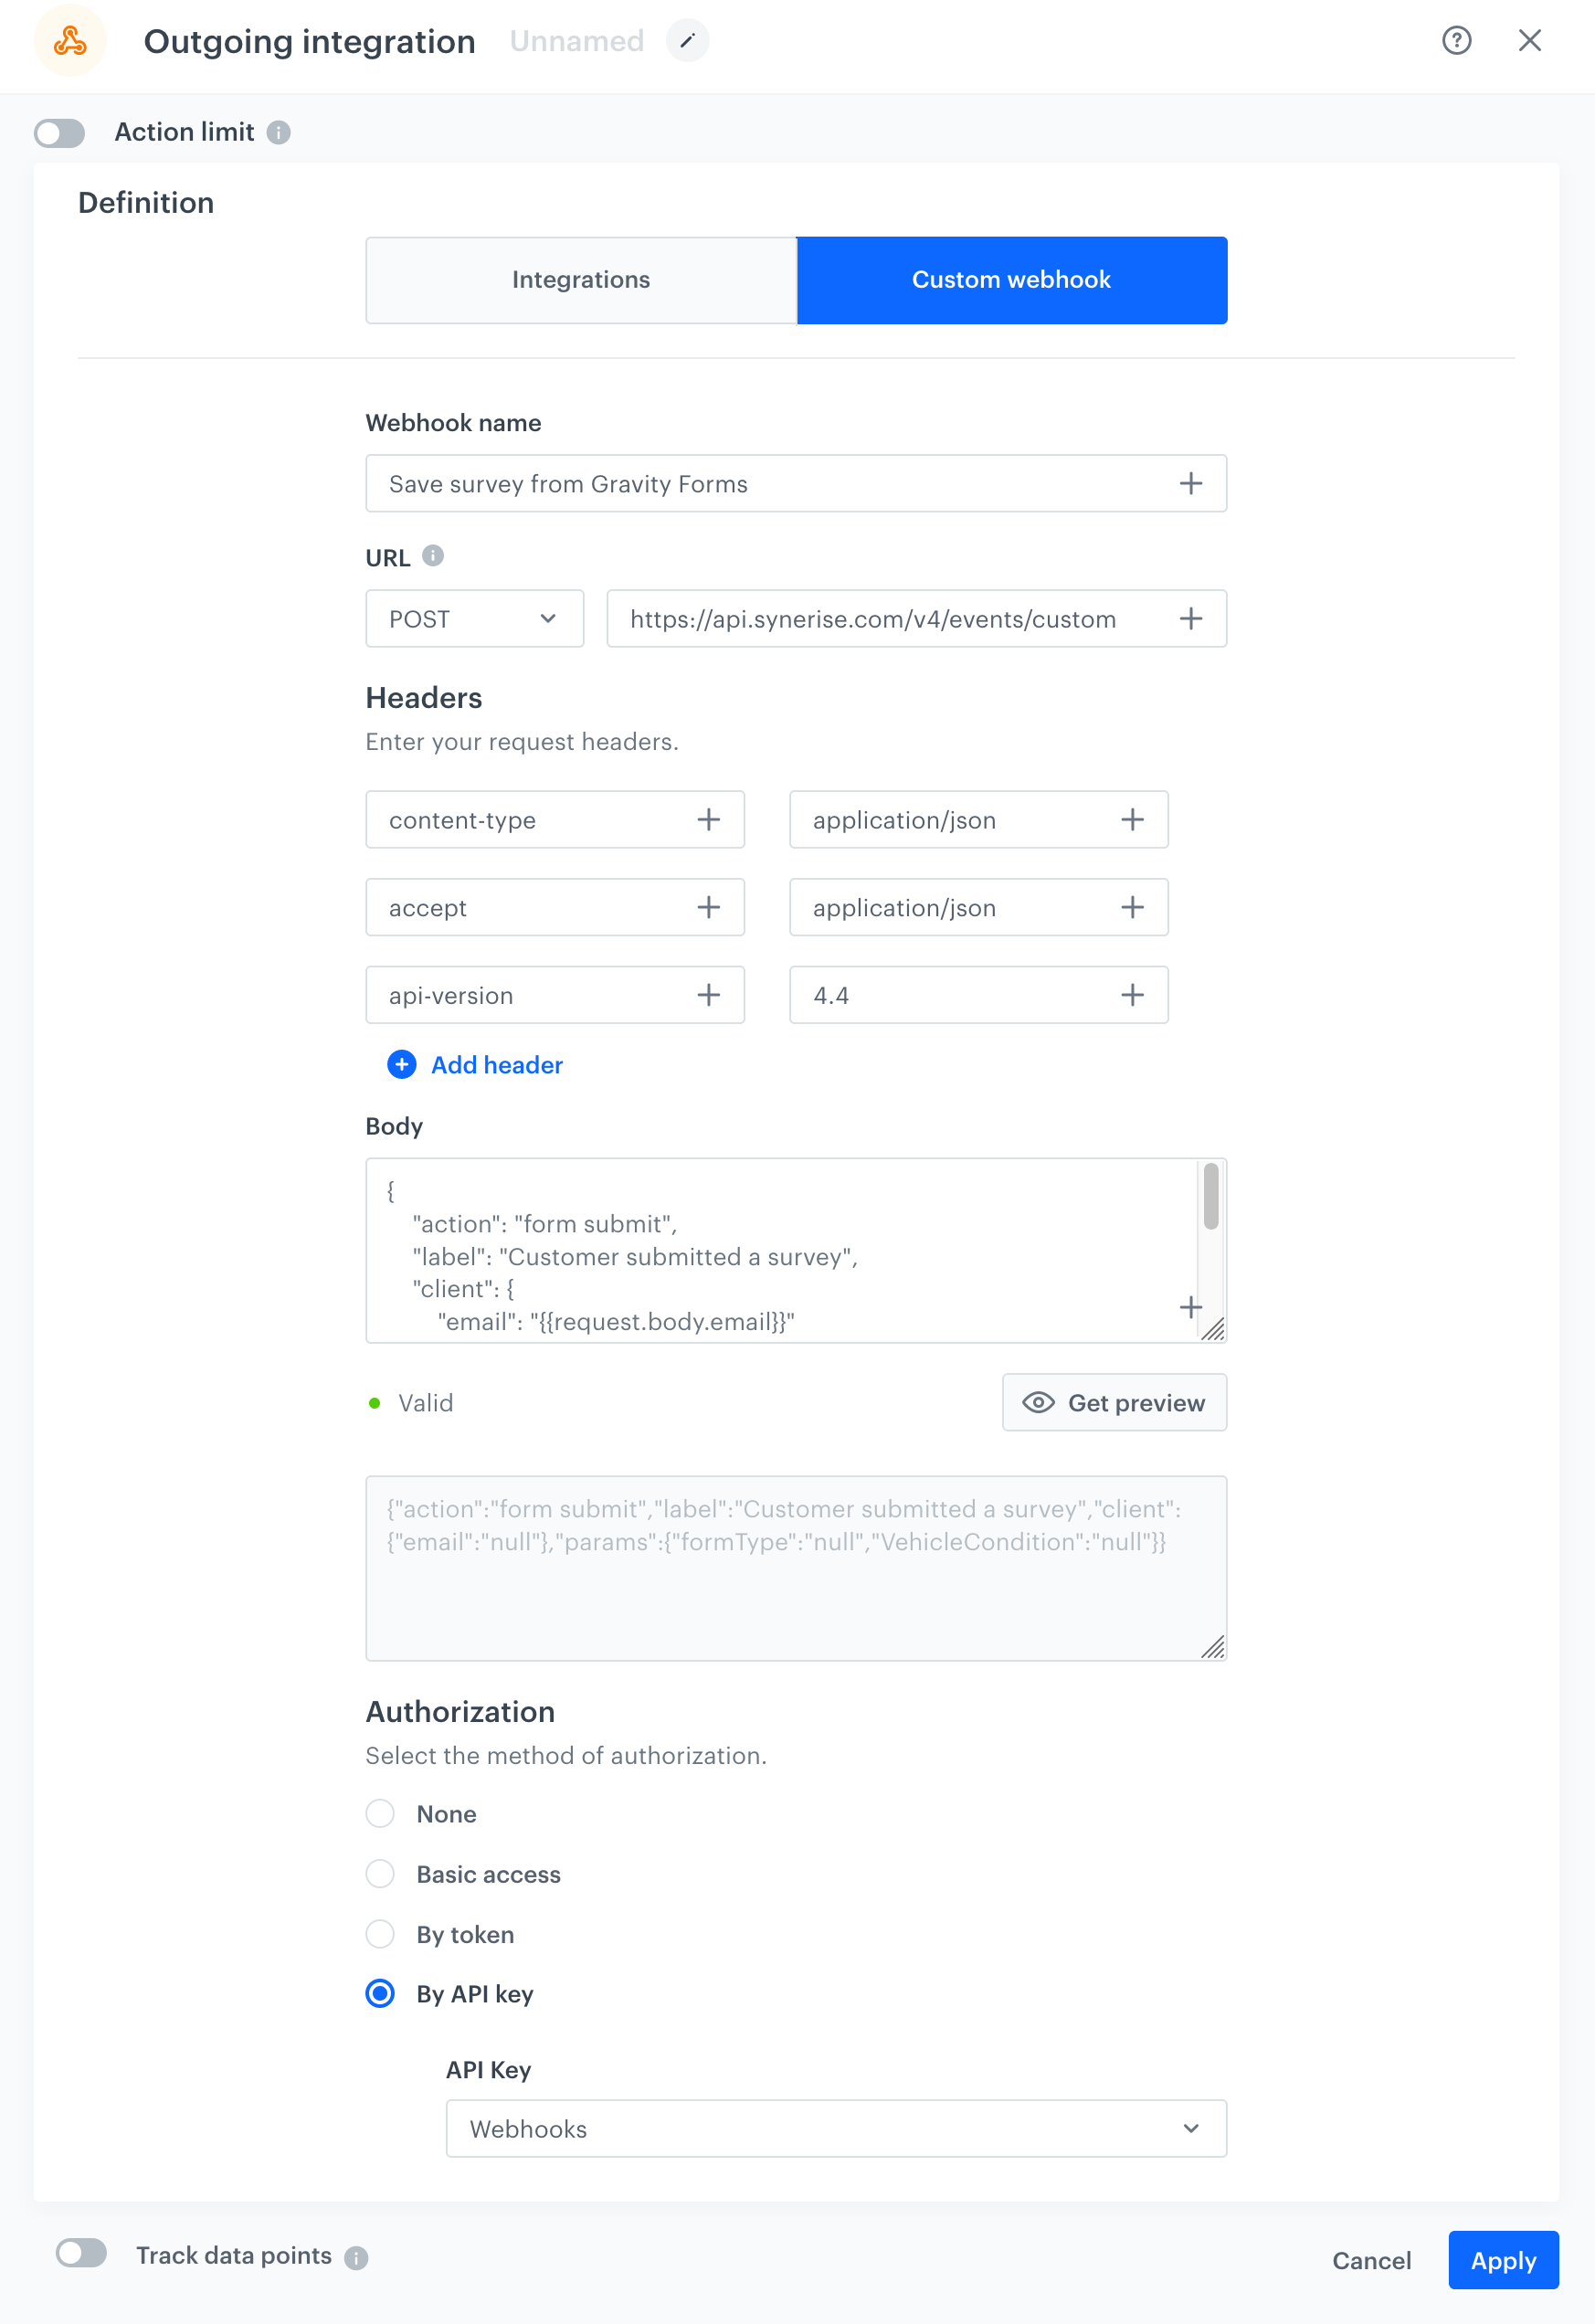
Configuring the Outgoing integration node - Add the End node.
- Activate your workflow by clicking Save & Run.
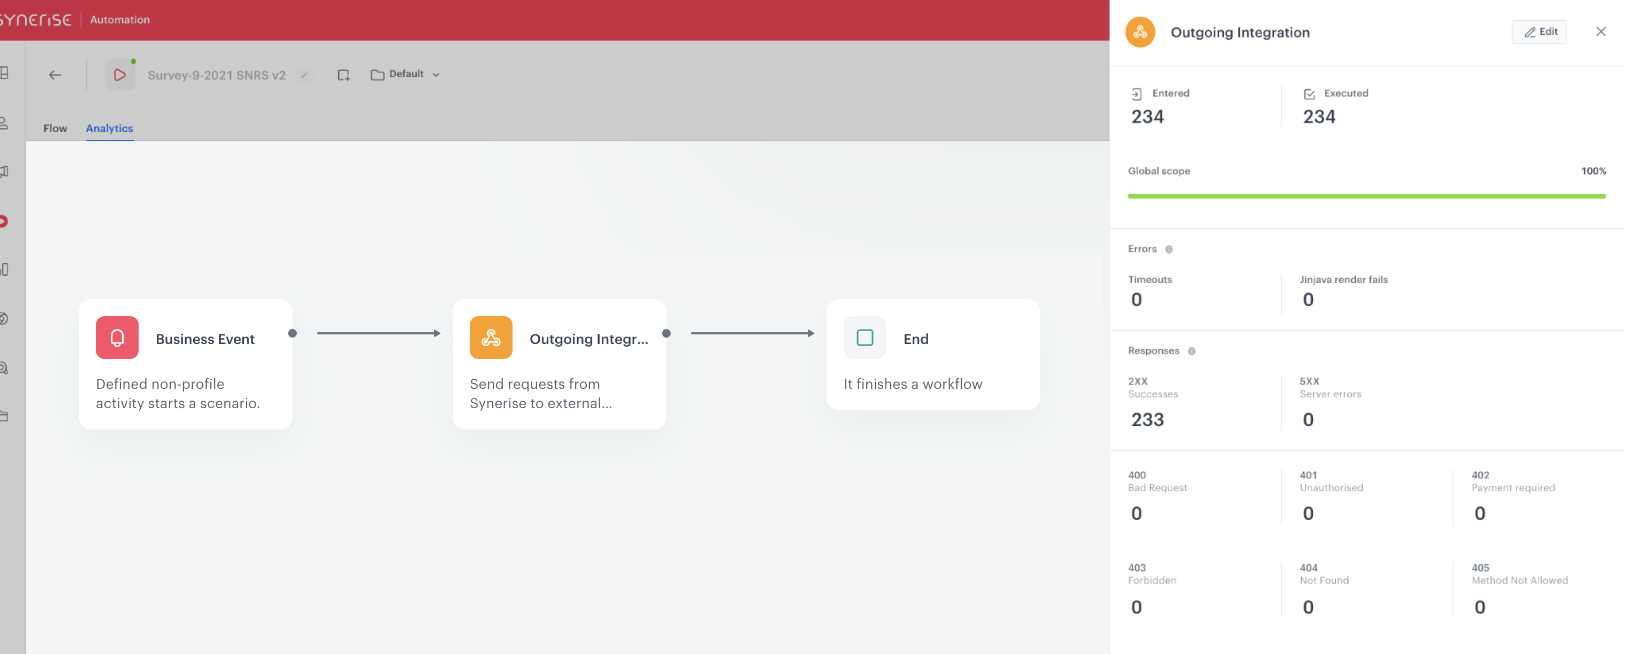
Final workflow configuration
Testing
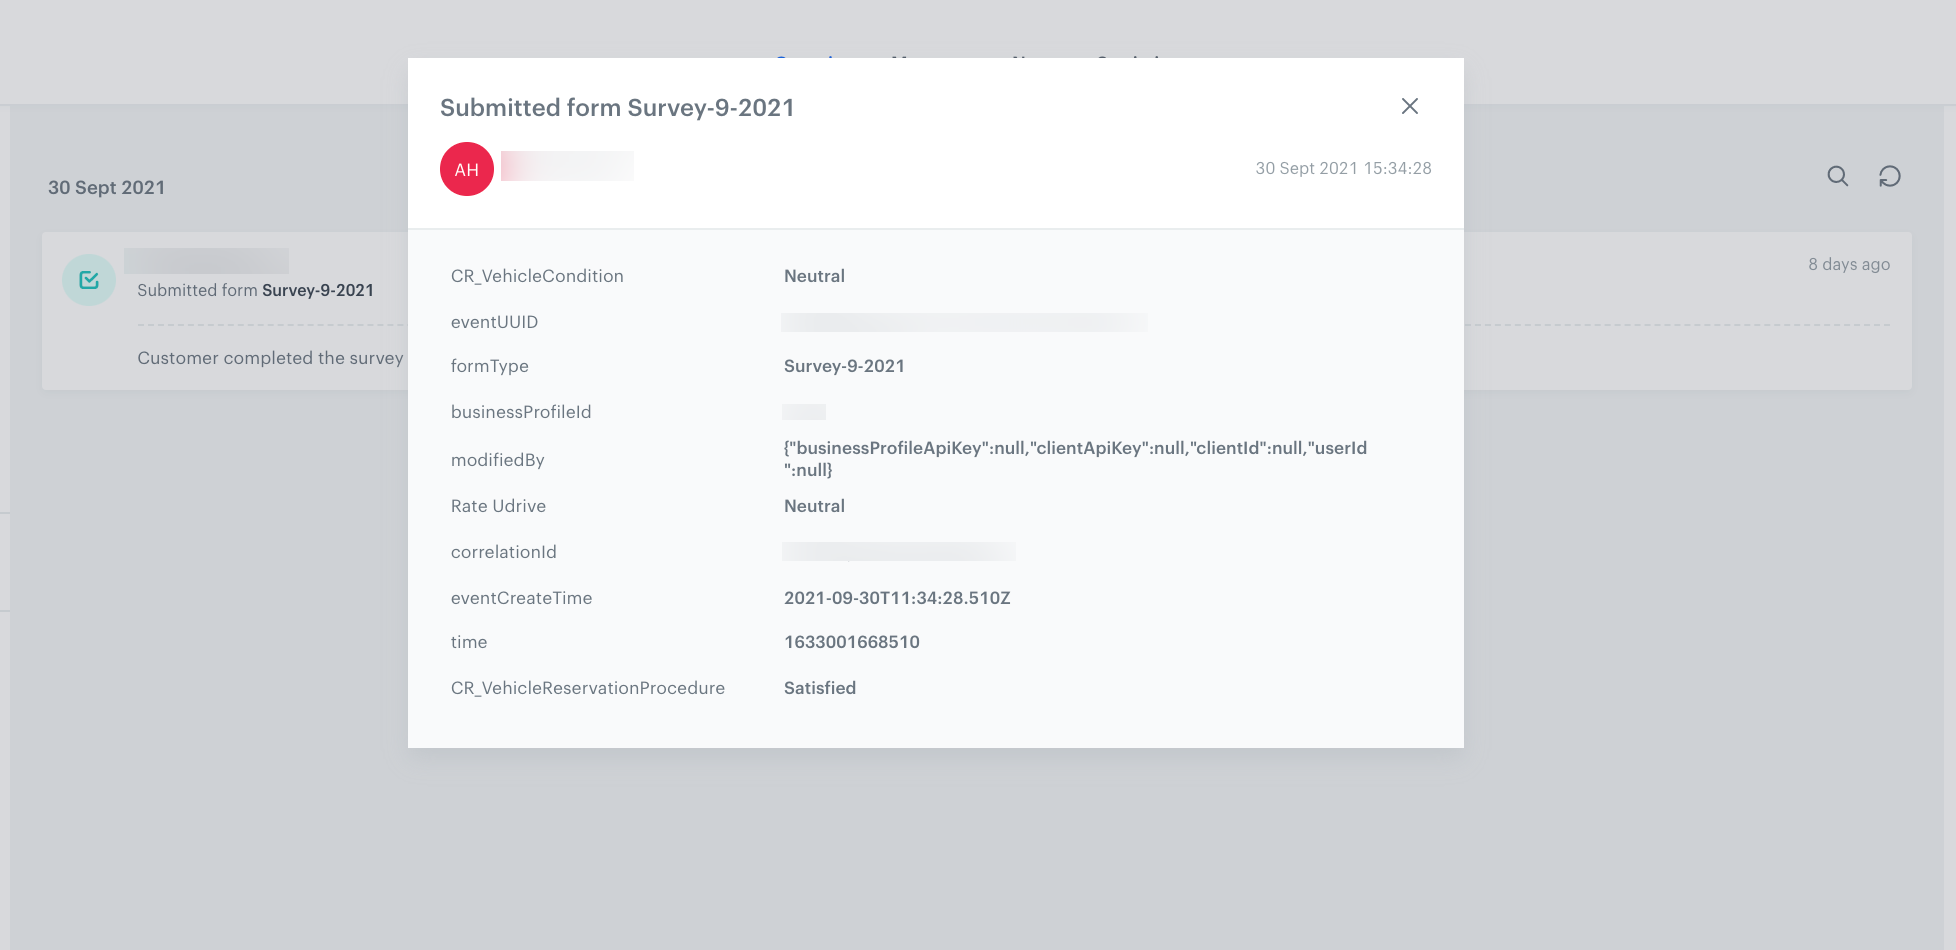
Fill in your survey and check if data is collected in Synerise properly. Open the workflow statistics and the survey. Fill in the survey, send it, and observe the statistics. If the Entered and Executed counters increment, your survey triggered the workflow and completed it.
The profile whose identifier was entered in the survey is updated.