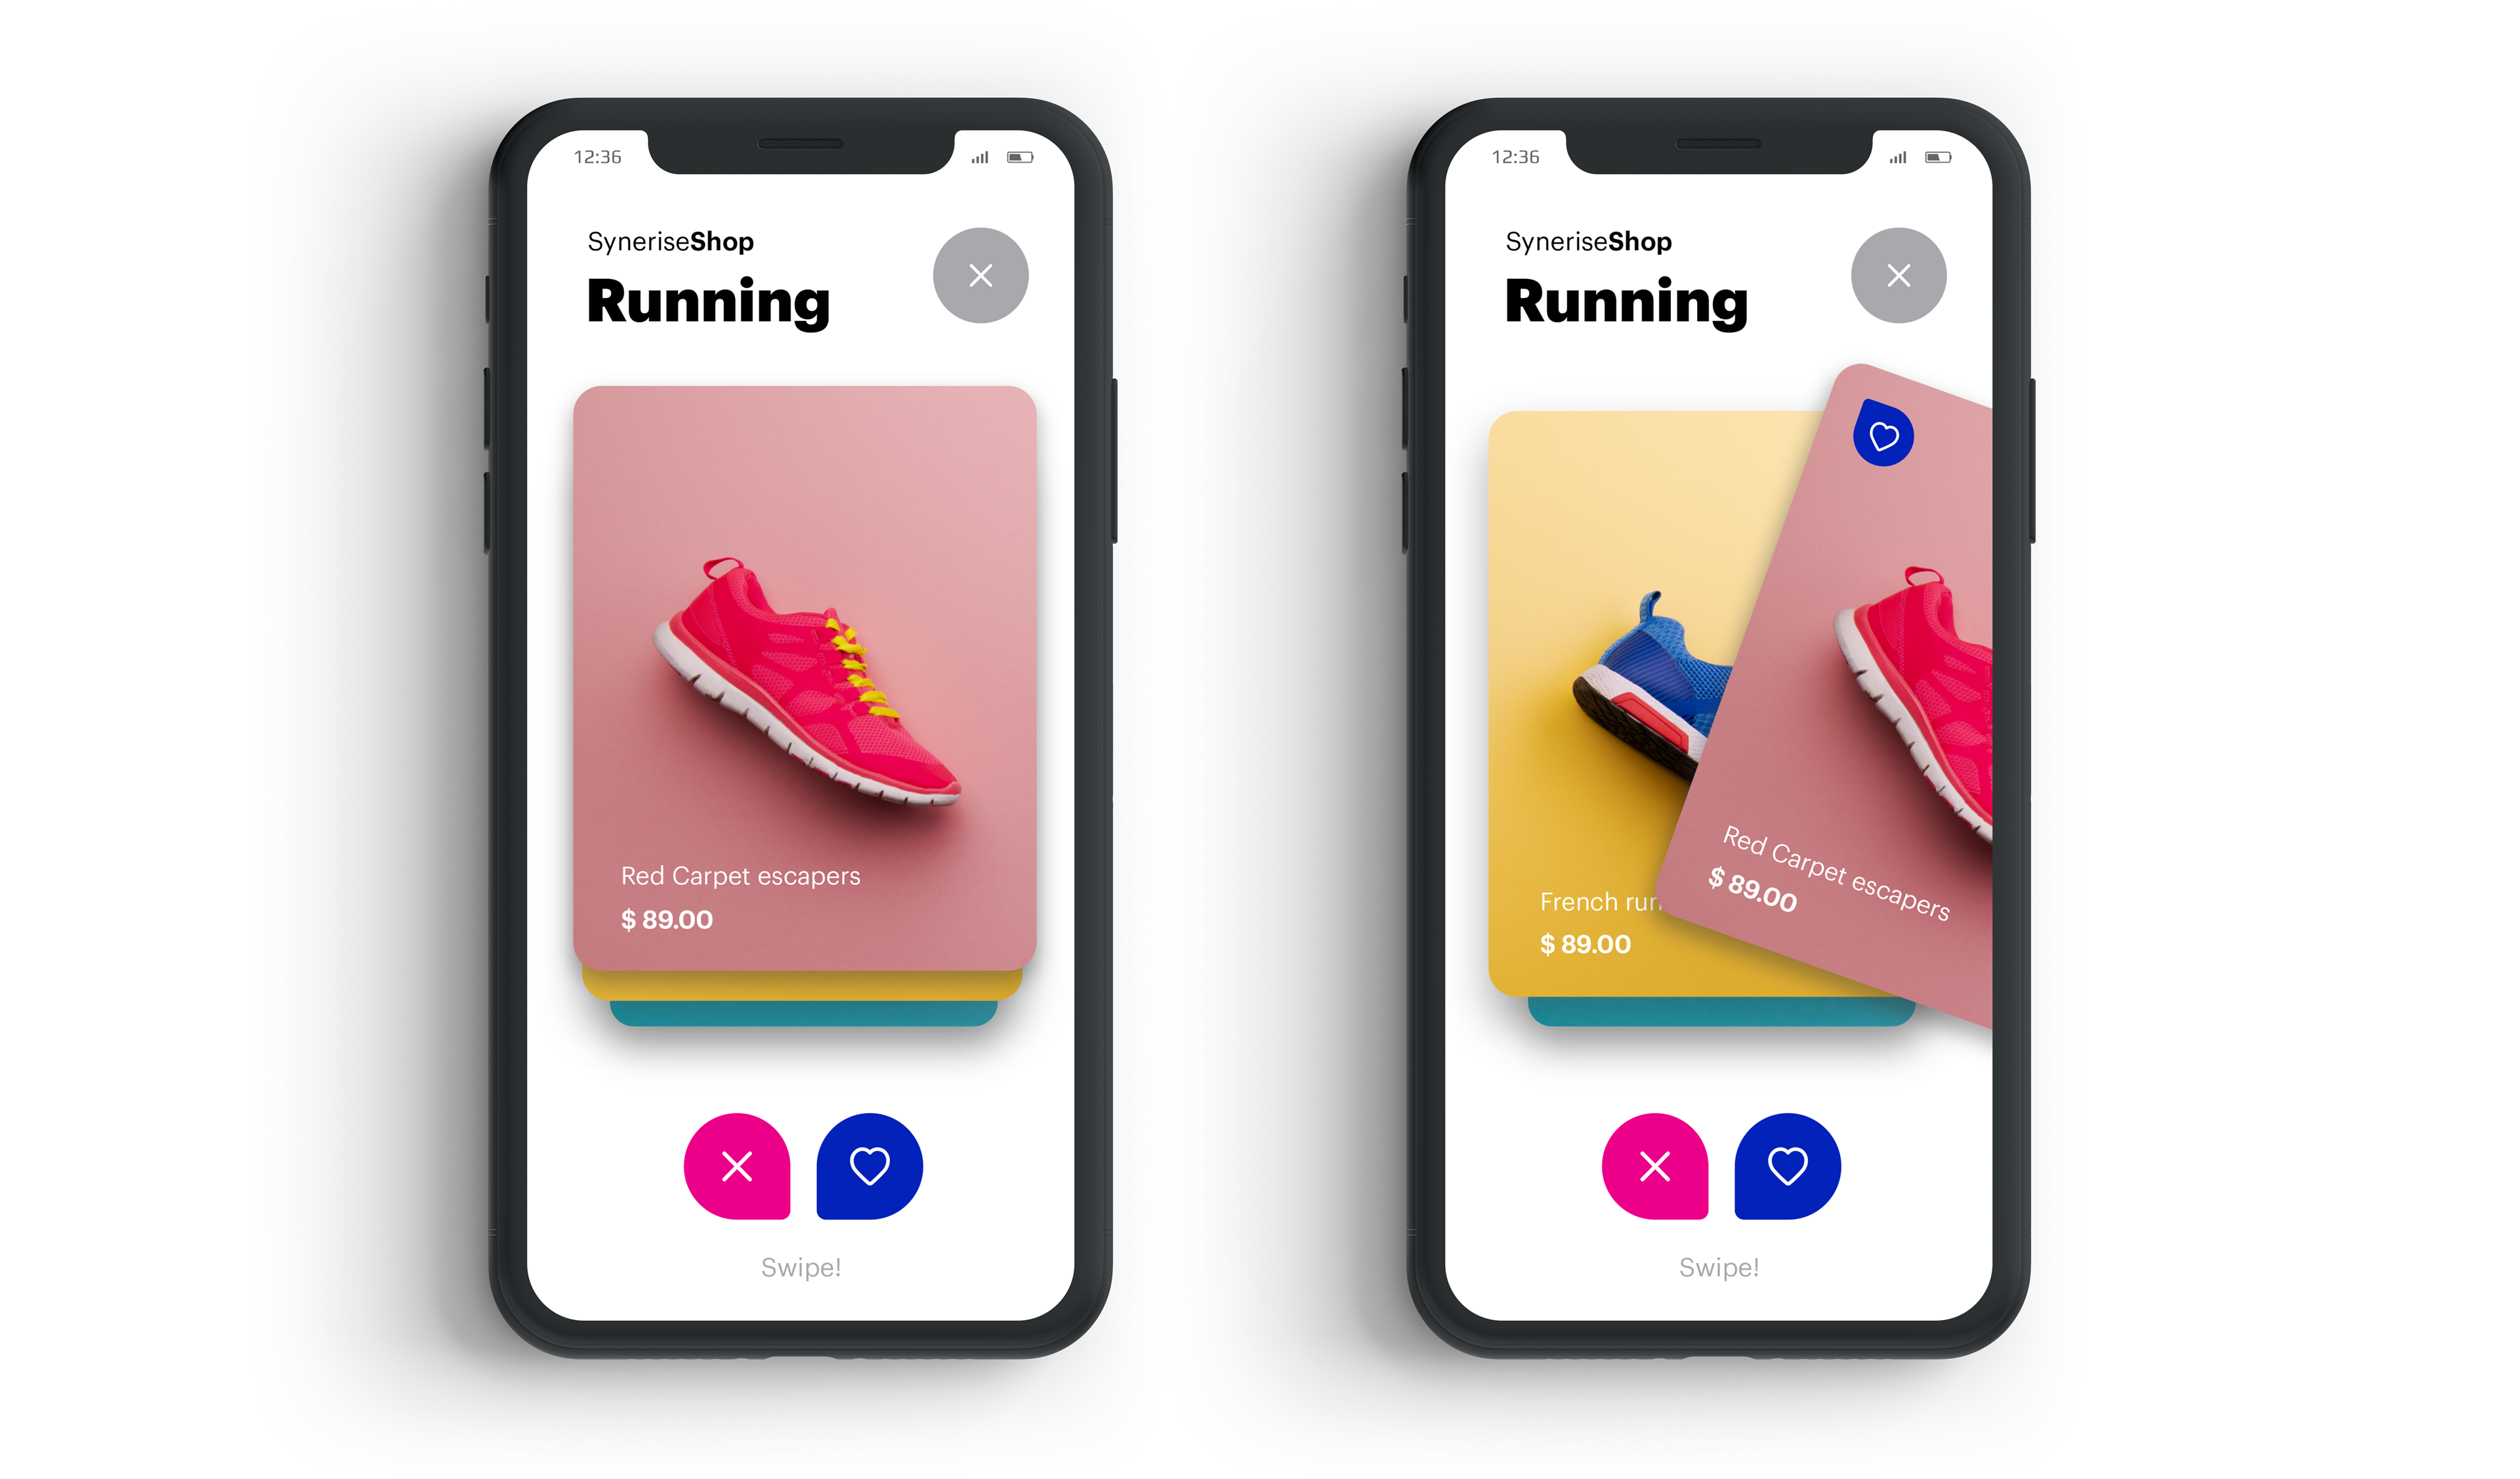
In-app campaign with like/dislike swipe functionality
In-app campaigns are designed to enhance the customer experience in the mobile application. Thanks to them, on the one hand, we are able to present personalized products based on the analysis of customers behavior and activities. As a result, you always reach your target group with relevant, personalized messages tailored to each customer’s specific actions. We can also go a step further and give the customer the opportunity to decide for themselves what products they really like and what are their preferences.
One of such actions may be adding a product to your favorites. This activity can be used as a trigger for the campaign which displays the current bestsellers. Based on the swipe mechanism, customer can either like specific product or reject and see another product. In this way, we get to know the customer’s taste and preferences better. The products you show to your customers depend on your business needs. These could be bestsellers, but you can also specify a static group of products or use other type of AI recommendations.
Moreover, products marked as liked or disliked by the customer can be used in further communication with them. You can boost recommendation campaigns results with the liked products or filter the campaigns and exclude products that were disliked. The results of AI campaigns can be used in personalized mailings and in any other touchpoint, ensuring that you show customers only products they really like.
In this use case, we will describe the process of creating an in-app mechanism presenting bestsellers with the swiping system. The campaign will be displayed after the customer adds any product to the favorites. The customer has the option of swiping the products to the right or left and based on the customer decision an event with information that someone like/dislike the specific product is send to Synerise. The mechanism consists of two in-app campaigns: one to display the bar at the bottom of the screen encouraging to display bestsellers, and second one, appearing after clicking the bar, with the proper swiping system.
Prerequisites
- Implement Synerise SDK in your mobile app.
- Configure AI engine. Enable Top items recommendations.
- Implement the
product.addToFavoriteevent in your mobile application. The event must be sent to Synerise after adding any product to favorites by the customer. - In Data Management > Events, configure the event actions that your in-app campaign will use to trigger displaying of the swipe mechanism and to send data about liking/disliking a product. In the JS SDK event settings section, you should set the way of authorizing these events to Make this event available to anonymous profiles without JWT. In this use case, the event actions are
preferences.actionandpreferences.trigger.
Process
In this use case, you will go through the following steps:
- Create AI recommendations with bestsellers.
- Create an in-app campaign to propose the swiping mechanism presenting the bar encouraging to display bestsellers after adding any product to favorites.
- Create an in-app campaign to display the swiping mechanism presenting bestselling products with a swipe mechanism after clicking the bar.
Create AI recommendations
In this stage, you will create an AI recommendation campaign which will be used to display products in your in-app message. The customer will have the ability (implemented in the next stage by using an in-app campaign) to express liking or disliking the presented products.
-
Go to
 Communication > Recommendations > Add recommendation.
 -
Enter the name of the recommendation (it is only visible on the list of recommendations).
-
In the Type & source section, click Define.
-
From the Catalog dropdown list, select a product feed.
-
Select the Top products recommendation type.
-
Confirm the recommendation type by clicking Apply.
-
In the Items section, click Define.
-
Click Add slot.
-
Click the Unnamed slot that was created.
-
Define the minimum and maximum number of products displayed in the frame according to your needs.
-
In Static filters, select the availability parameter and set it to is defined, so the recommendations will show only available items.
-
Optionally, you can use filters to include specific items in the recommendation frame.
-
Confirm the configuration by clicking Apply.
-
In the Additional settings, click Define.
-
From the Sort metric dropdown list, select Sold items count in the last 7 days.
-
Confirm the configuration of Additional settings by clicking Apply.
-
Click Save.
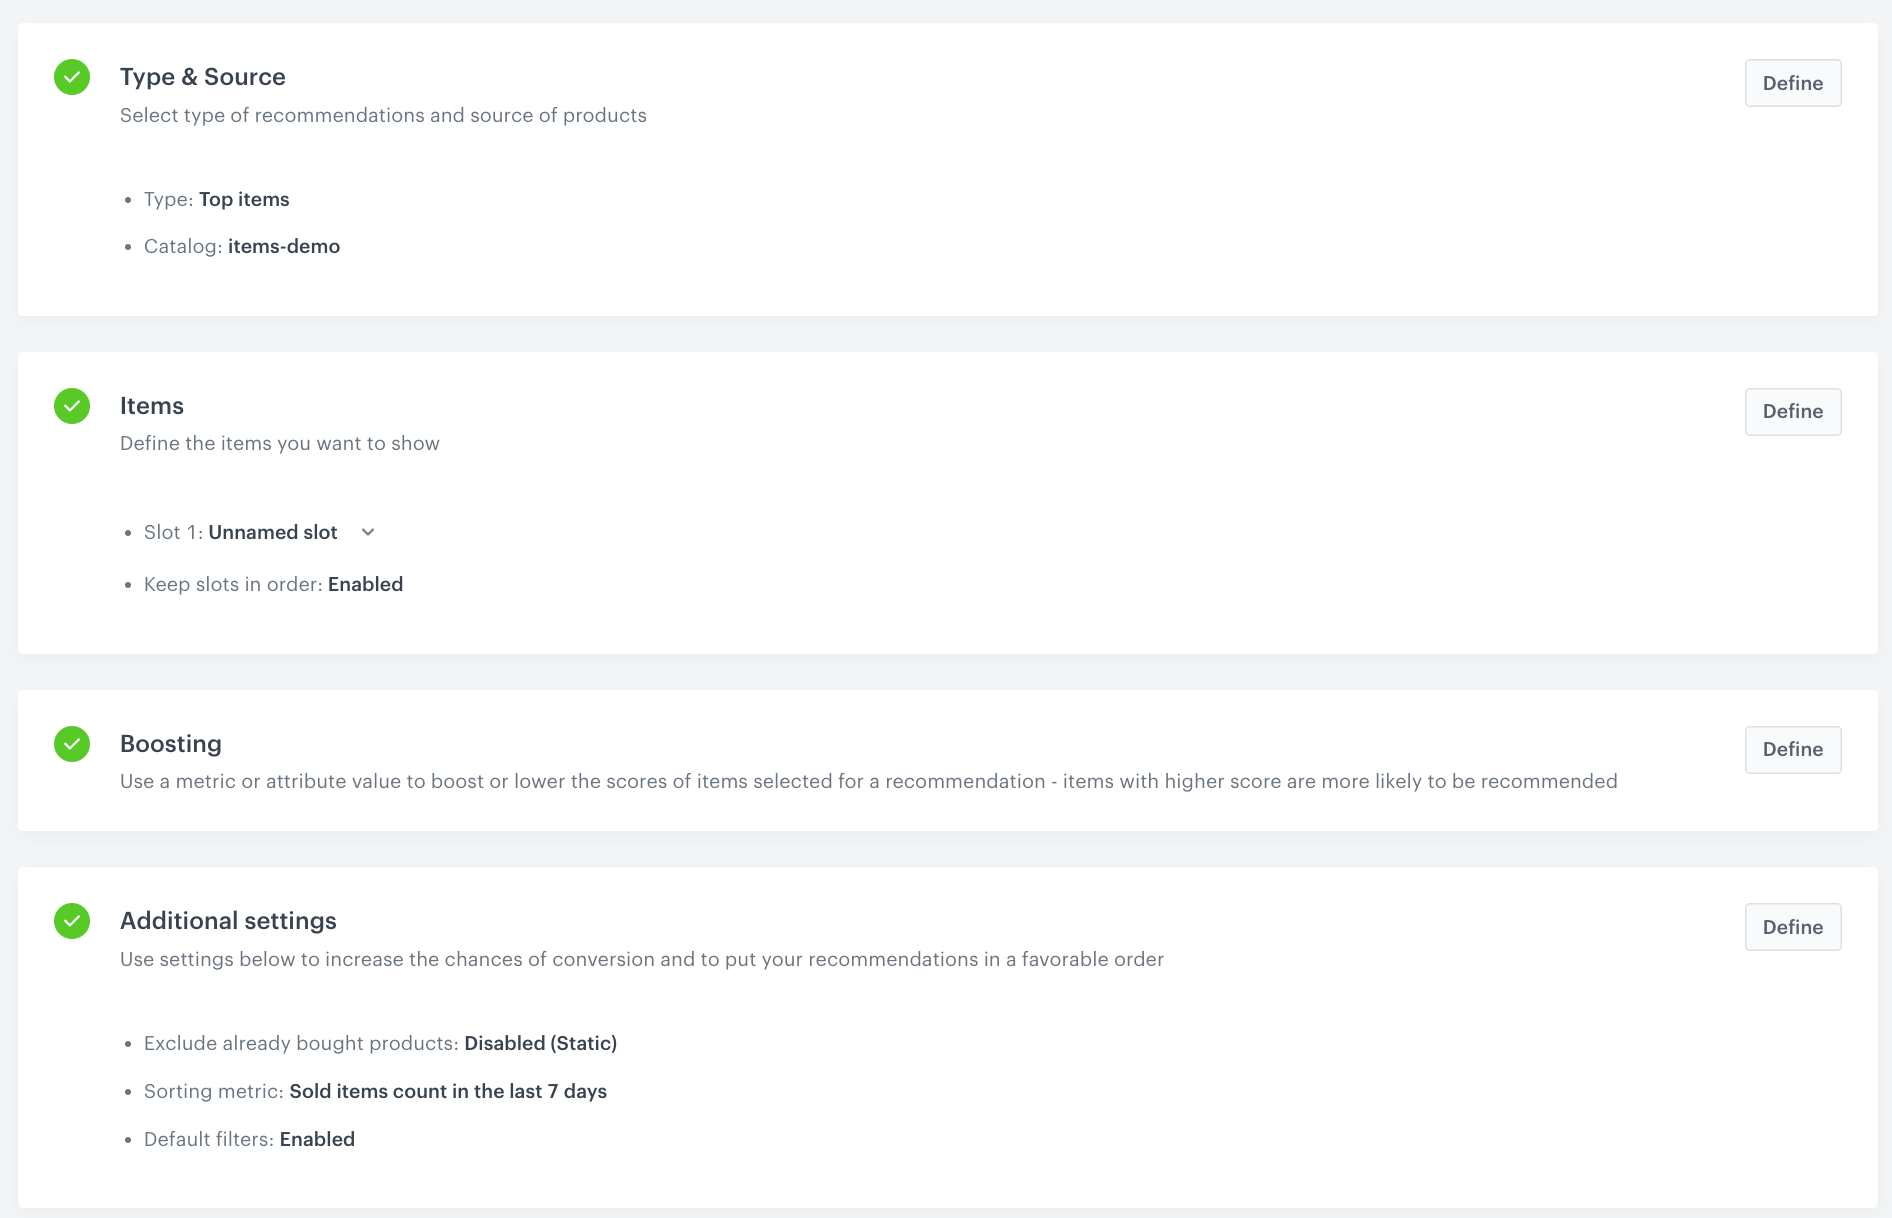
AI recommendation campaign configuration
Create an in-app campaign to propose the swiping mechanism
In this part of the process, you create an in-app campaign triggered by the product.addToFavorite event.
After that, the bar encouraging to display bestsellers is displayed. The campaign lets the customer decide if they want to launch the swiping mechanism with the proposed products. The ready-to-use code presented below generates a custom event (preferences.trigger) after the customer clicks the bar. This event triggers the second in-app campaign, described further in this article.
-
Go to
Communication > In-app messages > Create in-app -
Enter a meaningful name for the in-app campaign.
-
In the Audience section:
- Click Define.
- Select the Everyone tab.
- Click Apply.
-
In the Content section:
- Click Define.
- Click Create message and select Code Editor
- Create the content of your in-app campaign. You can reuse the code snippets presented below in your in-app template.
Check the HTML code<div class="in-app-wrapper bottom_bar"> <div class="in-app-close"> <svg viewBox="0 0 24 24" class="close-m"> <path fill="none" d="M0 0h24v24H0z"></path> <path d="M13.06 12l4.72-4.72a.75.75 0 00-1.06-1.06L12 10.94 7.28 6.22a.75.75 0 00-1.06 1.06L10.94 12l-4.72 4.72a.75.75 0 101.06 1.06L12 13.06l4.72 4.72a.75.75 0 001.06-1.06z"> </path> </svg> </div> <div class="in-app-content"> <p class="in-app-title">Do you like our products?</p> <p class="in-app-subtitle">Let us know your taste 🔥</p> </div> </div>Check the CSS code@import url("https://fonts.googleapis.com/css2?family=Nunito:wght@400;600;700;900&display=swap"); .in-app-wrapper.bottom_bar { margin: 15px; background-color: whitesmoke; height: 95px; border-radius: 30px; box-shadow: 0 0px 10px 0 rgba(35, 41, 54, 0.2); display: flex; flex-direction: column; flex-wrap: nowrap; align-content: center; justify-content: center; align-items: center; } .in-app-close { cursor: pointer; position: absolute; padding: 10px; top: 15px; right: 15px; } .in-app-close svg { width: 32px; height: 32px; } .in-app-content { text-align: center; } .in-app-title { margin: 0; font-weight: 600; font-size: 20px; margin-bottom: 2px; font-family: "Nunito", sans-serif; } .in-app-subtitle { margin: 0; font-size: 14px; font-family: "Nunito", sans-serif; }Check the JS code(function () { var inApp = document.querySelector('.in-app-wrapper.bottom_bar'); var close = inApp.querySelector('.in-app-close'); close.addEventListener('click', function () { SRInApp.close(); }) var content = inApp.querySelector('.in-app-content'); content.addEventListener('click', function () { SRInApp.close(); setTimeout(function() { SRInApp.trackCustomEvent('preferences.trigger', {}, 'Preferences trigger event'); }, 0) }) })(); -
In the Trigger events section:
- Click Define.
- Select Add event and from the dropdown list, choose the
product.addToFavoriteevent. - Click the + where button and as the parameter, choose
source. - As the logical operator, select Contain and as the value add MOBILE to analyze events only from the mobile application.
- Click Apply.
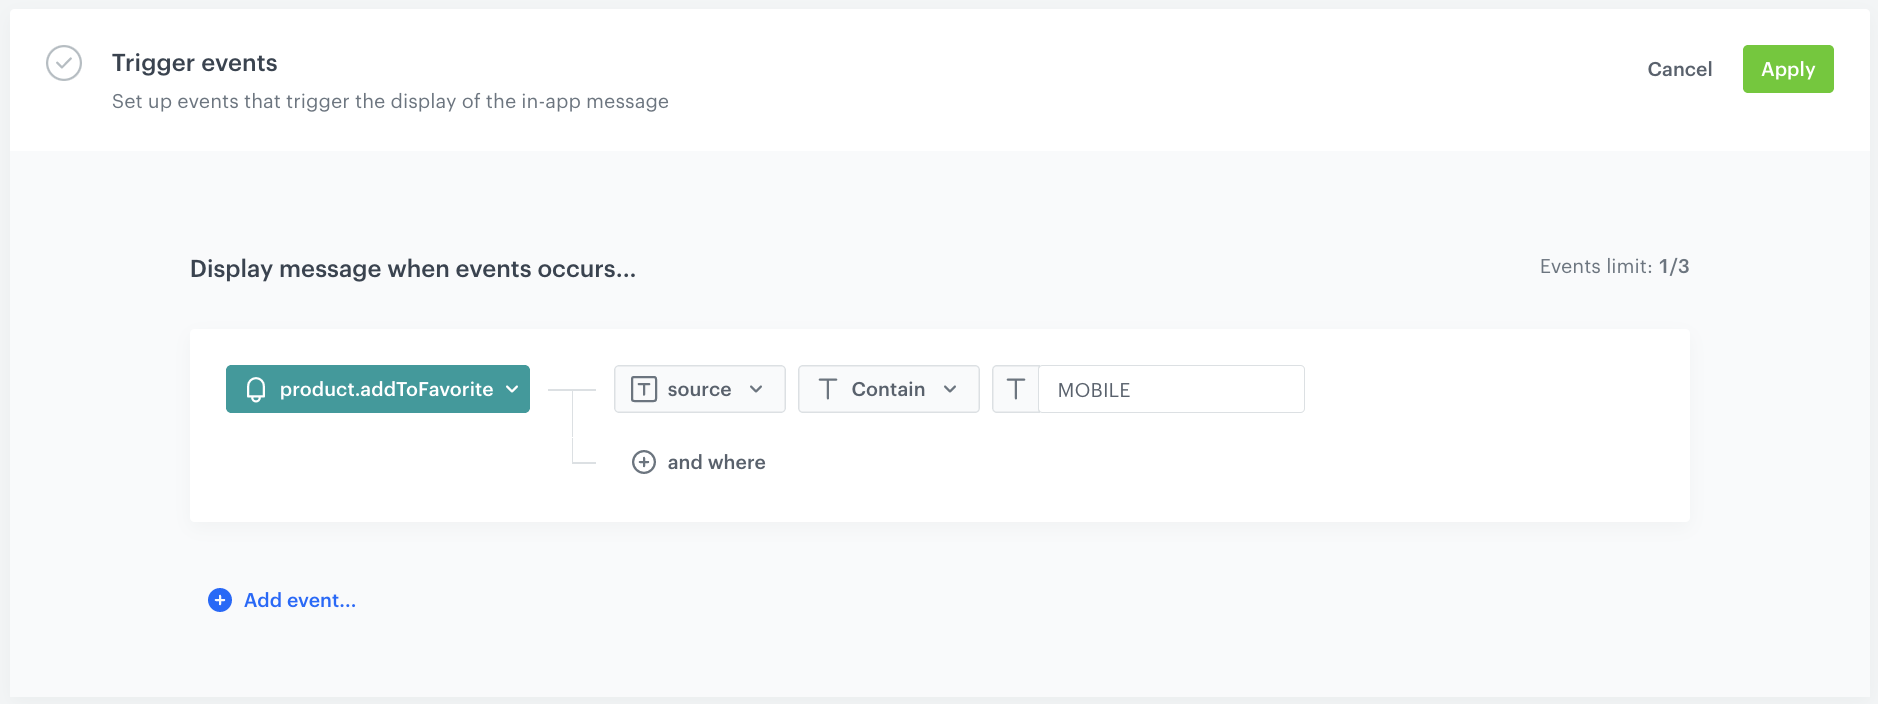
Trigger event settings -
In the Schedule section:
- Click Define.
- Choose the Run immediately option.
- Click Apply.
-
In the Display settings section:
- Click Change.
- Define the Delay display as 0 and Priority index as 2.
Note: The mobile application can display one in-app message at a time. If the conditions allow the triggering of several in-apps at a time, the priority is a decisive factor for displaying the message. The messages with lower priority aren’t queued for displaying after the first one is closed.
- Enable the Frequency limit toggle to manage the frequency of in-app message display in the application.
In our case, we set it to once per day. - Click Apply.
-
Optionally, you can define the UTM parameters. Otherwise, click Skip step.
-
Optionally, you can add the custom parameters in the Additional parameters section. Otherwise, click Skip step.
-
To start your campaign, click Activate.

In-app campaign settings
Create an in-app campaign to display the swiping mechanism
In this part of the process, you create an in-app campaign triggered by the preferences.trigger event.
After that, the AI recommendation campaign with top products will be displayed. The campaign lets the customer swipe and like or reject displayed products. The ready-to-use code presented below generates a custom event telling you which products the customer liked/disliked.
-
Go to
Communication > In-app messages > Create in-app -
Enter a meaningful name for the in-app campaign.
-
In the Audience section:
- Click Define.
- Select the Everyone tab.
- Click Apply.
-
In the Content section:
- Click Define.
- Click Create message and select Code Editor.
- In the right upper corner, change the Bottom bar default option to Fullscreen by using the dropdown menu.
- Create the content of your in-app campaign. You can reuse the code snippets presented below in your in-app template.
Check the HTML code<div class="in-app-close" style="width: 100%;text-align: right;width: 90%;"> <svg viewBox="0 0 24 24" class="close-m"> <path fill="none" d="M0 0h24v24H0z"></path> <path d="M13.06 12l4.72-4.72a.75.75 0 00-1.06-1.06L12 10.94 7.28 6.22a.75.75 0 00-1.06 1.06L10.94 12l-4.72 4.72a.75.75 0 101.06 1.06L12 13.06l4.72 4.72a.75.75 0 001.06-1.06z"> </path> </svg> </div> <div class="frame"></div> <div class="icons"> <svg id="hate" xmlns="http://www.w3.org/2000/svg" viewBox="0 0 128.07 127.89"> <path class="a" d="M128.07,64.07c-.5,36.31-28,63.57-64,63.82S-.17,99.33,0,63.29C.17,28.25,29.23-.3,64.43,0A63.88,63.88,0,0,1,128.07,64.07ZM45.32,38.54c-2.44.36-4.63,1.12-6,3.68a6.39,6.39,0,0,0,.94,7.83A143,143,0,0,0,50.42,60.36c2.73,2.48,3.44,4.31.2,7a98.44,98.44,0,0,0-9.52,9.53c-3.62,4-3.66,7.48-.47,10.59,2.82,2.76,7.12,2.54,10.7-.79,3.05-2.83,5.91-5.86,8.85-8.8,2.58-2.57,5.16-2.53,7.73,0,2.83,2.81,5.62,5.67,8.52,8.42,3.87,3.68,8.08,4.08,11,1.15,3.23-3.21,3-6.85-.83-11C83.57,73.21,80.44,70,77.1,67c-2.37-2.13-2.71-3.65-.13-5.91,3.24-2.85,6.15-6.08,9.2-9.15,4.17-4.2,4.66-8,1.45-11.34-2.93-3-7.58-2.61-11.49,1.19-3.34,3.25-6.66,6.52-9.85,9.91-1.64,1.74-2.85,1.73-4.49,0-3.32-3.5-6.84-6.81-10.21-10.26A9,9,0,0,0,45.32,38.54Z" /> <path d="M45.32,38.54a9,9,0,0,1,6.26,2.87c3.37,3.45,6.89,6.76,10.21,10.26,1.64,1.73,2.85,1.74,4.49,0,3.19-3.39,6.51-6.66,9.85-9.91C80,38,84.69,37.52,87.62,40.57c3.21,3.34,2.72,7.14-1.45,11.34-3,3.07-6,6.3-9.2,9.15-2.58,2.26-2.24,3.78.13,5.91,3.34,3,6.47,6.24,9.53,9.52,3.87,4.16,4.06,7.8.83,11-2.95,2.93-7.16,2.53-11-1.15-2.9-2.75-5.69-5.61-8.52-8.42-2.57-2.54-5.15-2.58-7.73,0-2.94,2.94-5.8,6-8.85,8.8-3.58,3.33-7.88,3.55-10.7.79-3.19-3.11-3.15-6.6.47-10.59a98.44,98.44,0,0,1,9.52-9.53c3.24-2.72,2.53-4.55-.2-7A143,143,0,0,1,40.28,50.05a6.39,6.39,0,0,1-.94-7.83C40.69,39.66,42.88,38.9,45.32,38.54Z" /> </svg> <svg id="like" xmlns="http://www.w3.org/2000/svg" viewBox="0 0 128.06 127.99"> <path class="a" d="M128.06,63.83a63.65,63.65,0,0,1-64,64.16A63.57,63.57,0,0,1,0,64a64,64,0,0,1,128.06-.13ZM96,56.53c0-5.82-3.9-13.3-10.19-16.05-6.9-3-13.67-2.67-19.37,2.82-2,1.9-3.16,1.41-4.93-.17-2.34-2.08-4.86-3.89-8.25-4.24-9.13-.92-15.31,2.3-19.11,10.25-3.89,8.11-2.42,17.27,4,23.34,7.5,7,15.22,13.88,22.77,20.89,2.06,1.92,3.76,2.27,6,.21C74.36,86.7,82,80,89.39,73.09,93.57,69.21,96.06,64.45,96,56.53Z" /> <path d="M96,56.53c.08,7.92-2.41,12.68-6.59,16.56C82,80,74.36,86.7,66.93,93.58c-2.23,2.06-3.93,1.71-6-.21-7.55-7-15.27-13.84-22.77-20.89-6.46-6.07-7.93-15.23-4-23.34,3.8-8,10-11.17,19.11-10.25,3.39.35,5.91,2.16,8.25,4.24,1.77,1.58,2.95,2.07,4.93.17,5.7-5.49,12.47-5.84,19.37-2.82C92.08,43.23,96,50.71,96,56.53Z" /> </svg> </div>Check the CSS code@import url("https://fonts.googleapis.com/css2?family=Nunito:wght@400;600;700;900&display=swap"); html, body { display: flex; flex-direction: column; align-items: center; justify-content: center; width: 100%; height: 100%; overflow: hidden; font-family: "Nunito", sans-serif; background-color: rgba(0, 0, 0, 0.4); } .frame { position: relative; width: 90%; height: 70%; max-width: 400px; max-height: 600px; z-index: 1; } .icons { margin-top: 3vh; user-select: none; z-index: 1; } .icons>svg { width: 10vh; height: 10vh; max-width: 60px; max-height: 60px; border-radius: 50%; box-shadow: 0 5px 15px rgba(0, 0, 0, 0.1); cursor: pointer; } .icons>svg:nth-child(1) { fill: #fb4f68; margin-right: 2vh; } .icons>svg:nth-child(2) { fill: #4dca93; } .icons>svg>path:nth-child(1) { fill: #fff; } .card { background-color: #fff; position: absolute; display: flex; align-items: flex-end; justify-content: center; width: 100%; height: 100%; color: #f1f1f1; border-radius: 10px; user-select: none; cursor: pointer; overflow: hidden; background-size: cover; background-repeat: no-repeat; background-position: center; touch-action: none; } .card .is-like { width: 100%; height: 100%; position: absolute; opacity: 0; } .card .is-like::after { position: absolute; left: 50%; bottom: 30%; transform: translateX(-50%) rotate(-10deg); width: 30%; height: 13%; font-size: 3em; letter-spacing: 0.2em; font-weight: 600; border-radius: 0.15em; display: flex; align-items: center; justify-content: center; } .card .like::after { content: "👍"; } .card .nope::after { content: "👎"; } .card .bottom { width: 100%; height: 25%; background: linear-gradient(to top, #000000b8, #00000000); display: flex; flex-direction: column; align-items: flex-start; justify-content: center; padding-left: 7%; font-weight: 400; padding-bottom: 25px } .card .bottom .title>span:nth-child(1) { font-size: 2em; font-weight: 700; margin-right: 0.2em; } .card .bottom .title>span:nth-child(2) { font-size: clamp(13px, 1.5em, 25px); } .card .bottom .title>span:nth-child(2)>b { font-size: 0.6em; margin-right: 0.2em; } .card .bottom .info { margin: 0; } @media screen and (max-height: 540px) { .frame { width: 90%; height: 70%; font-size: 13px; } } @media screen and (max-height: 440px) { .frame { font-size: 8px; } } .in-app-close svg { width: 32px; height: 32px; cursor: pointer; background-color: #000; fill: #fff; } .in-app-close { max-width: 400px; margin-bottom: 16px; }Check the JS codelet imgCount = 0; const data = {% set arr = [] %}{% recommendations3 campaignId=CAMPAIGN-ID %}{% for p in recommended_products3 %}{% set obj = {itemId: p.itemId, img: p.image_link, name: p.title, price: p.price, distance: p.category} %}{% do arr.append(obj) %}{% endfor %}{{arr|tojson}}{% endrecommendations3 %} const frame = document.body.querySelector(".frame"); data.forEach((_data) => appendCard(_data)); let current = frame.querySelector(".card:last-child"); let likeText = current.children[0]; let startX = 0, startY = 0, moveX = 0, moveY = 0; document.querySelector("#like").onclick = () => { moveX = 1; moveY = 0; complete('like'); }; document.querySelector("#hate").onclick = () => { moveX = -1; moveY = 0; complete('hate'); }; function appendCard(data) { const firstCard = frame.children[0]; const newCard = document.createElement("div"); newCard.className = "card"; newCard.setAttribute('data-sku', data.itemId); newCard.setAttribute('data-brand', data.name); newCard.setAttribute('data-title', data.distance); newCard.style.backgroundImage = `url(${data.img})`; newCard.innerHTML = ` <div class="is-like">LIKE</div> <div class="bottom"> <div class="title"> <span>${data.name}</span> <span>${data.price}<b>zł</b></span> </div> <div class="info"> ${data.distance} </div> </div> `; if (firstCard) frame.insertBefore(newCard, firstCard); else frame.appendChild(newCard); imgCount++; } function initCard(card) { card.addEventListener("pointerdown", onPointerDown); } function setTransform(x, y, deg, duration) { current.style.transform = `translate3d(${x}px, ${y}px, 0) rotate(${deg}deg)`; likeText.style.opacity = Math.abs((x / innerWidth) * 2.1); likeText.className = `is-like ${x > 0 ? "like" : "nope"}`; if (duration) current.style.transition = `transform ${duration}ms`; } function onPointerDown({ clientX, clientY }) { startX = clientX; startY = clientY; current.addEventListener("pointermove", onPointerMove); current.addEventListener("pointerup", onPointerUp); current.addEventListener("pointerleave", onPointerUp); } function onPointerMove({ clientX, clientY }) { moveX = clientX - startX; moveY = clientY - startY; setTransform(moveX, moveY, (moveX / innerWidth) * 50); } function onPointerUp() { current.removeEventListener("pointermove", onPointerMove); current.removeEventListener("pointerup", onPointerUp); current.removeEventListener("pointerleave", onPointerUp); if (Math.abs(moveX) > frame.clientWidth / 2) { current.removeEventListener("pointerdown", onPointerDown); complete(String(moveX).match('-') ? 'hate' : 'like'); } else cancel(); } function complete(type) { try { const flyX = (Math.abs(moveX) / moveX) * innerWidth * 1.3; const flyY = (moveY / moveX) * flyX; setTransform(flyX, flyY, (flyX / innerWidth) * 50, innerWidth); SRInApp.trackCustomEvent('preferences.action', { actionType: type, itemId: current.getAttribute('data-sku'), title: current.getAttribute('data-title'), brand: current.getAttribute('data-brand') }, 'Preferences action'); const prev = current; const next = current.previousElementSibling; if (next) initCard(next); current = next; likeText = current.children[0]; // appendCard(data[imgCount % 4]); setTimeout(() => frame.removeChild(prev), innerWidth); } catch(error) { document.querySelector('body').style.backgroundColor = 'rgba(0, 0, 0, 0.6)'; document.querySelector('body').innerHTML = '<h1 style="color: #fff; width: 90%; max-width: 400px;">Thank you!<br>We will reach out to you</h1>'; setTimeout(function(){ SRInApp.close(); }, 3000) } } function cancel() { setTransform(0, 0, 0, 100); setTimeout(() => (current.style.transition = ""), 100); } var close = document.querySelector('.in-app-close svg'); close.addEventListener('click', function () { SRInApp.close(); }) initCard(current);Important: In the JS code section, replace the CAMPAIGN-ID with the ID of your campaign created in the previous step. -
In the Trigger events section:
-
Click Define.
-
Select Add event and from the dropdown list, choose the
preferences.triggerevent. -
Click the + where button and as the parameter, choose
source.Note: If you cannot find thesourceparameter on the dropdown list, go to Data Management > Events, findpreferences.triggerevent on the list and addcourceparameter by clicking Add property button. -
As the logical operator, select Contain and as the value add MOBILE to analyze events only from the mobile application.
-
Click Apply.
-
-
In the Schedule section:
- Click Define.
- Choose Run immediately option.
- Click Apply.
-
In the Display settings section:
- Click Change.
- Define the Delay display as 0 and Priority index as 1.
Note: The mobile application can display one in-app message at a time. If the conditions allow the display of several in-apps at a time, the priority is a decisive factor for displaying the message. The messages with lower priority aren’t queued.
- Click Apply.
-
Optionally, you can define the UTM parameters. Otherwise, click Skip step.
-
Optionally, you can add the custom parameters in the Additional parameters section. Otherwise, click Skip step.
-
To start your campaign, click Activate.
What’s next
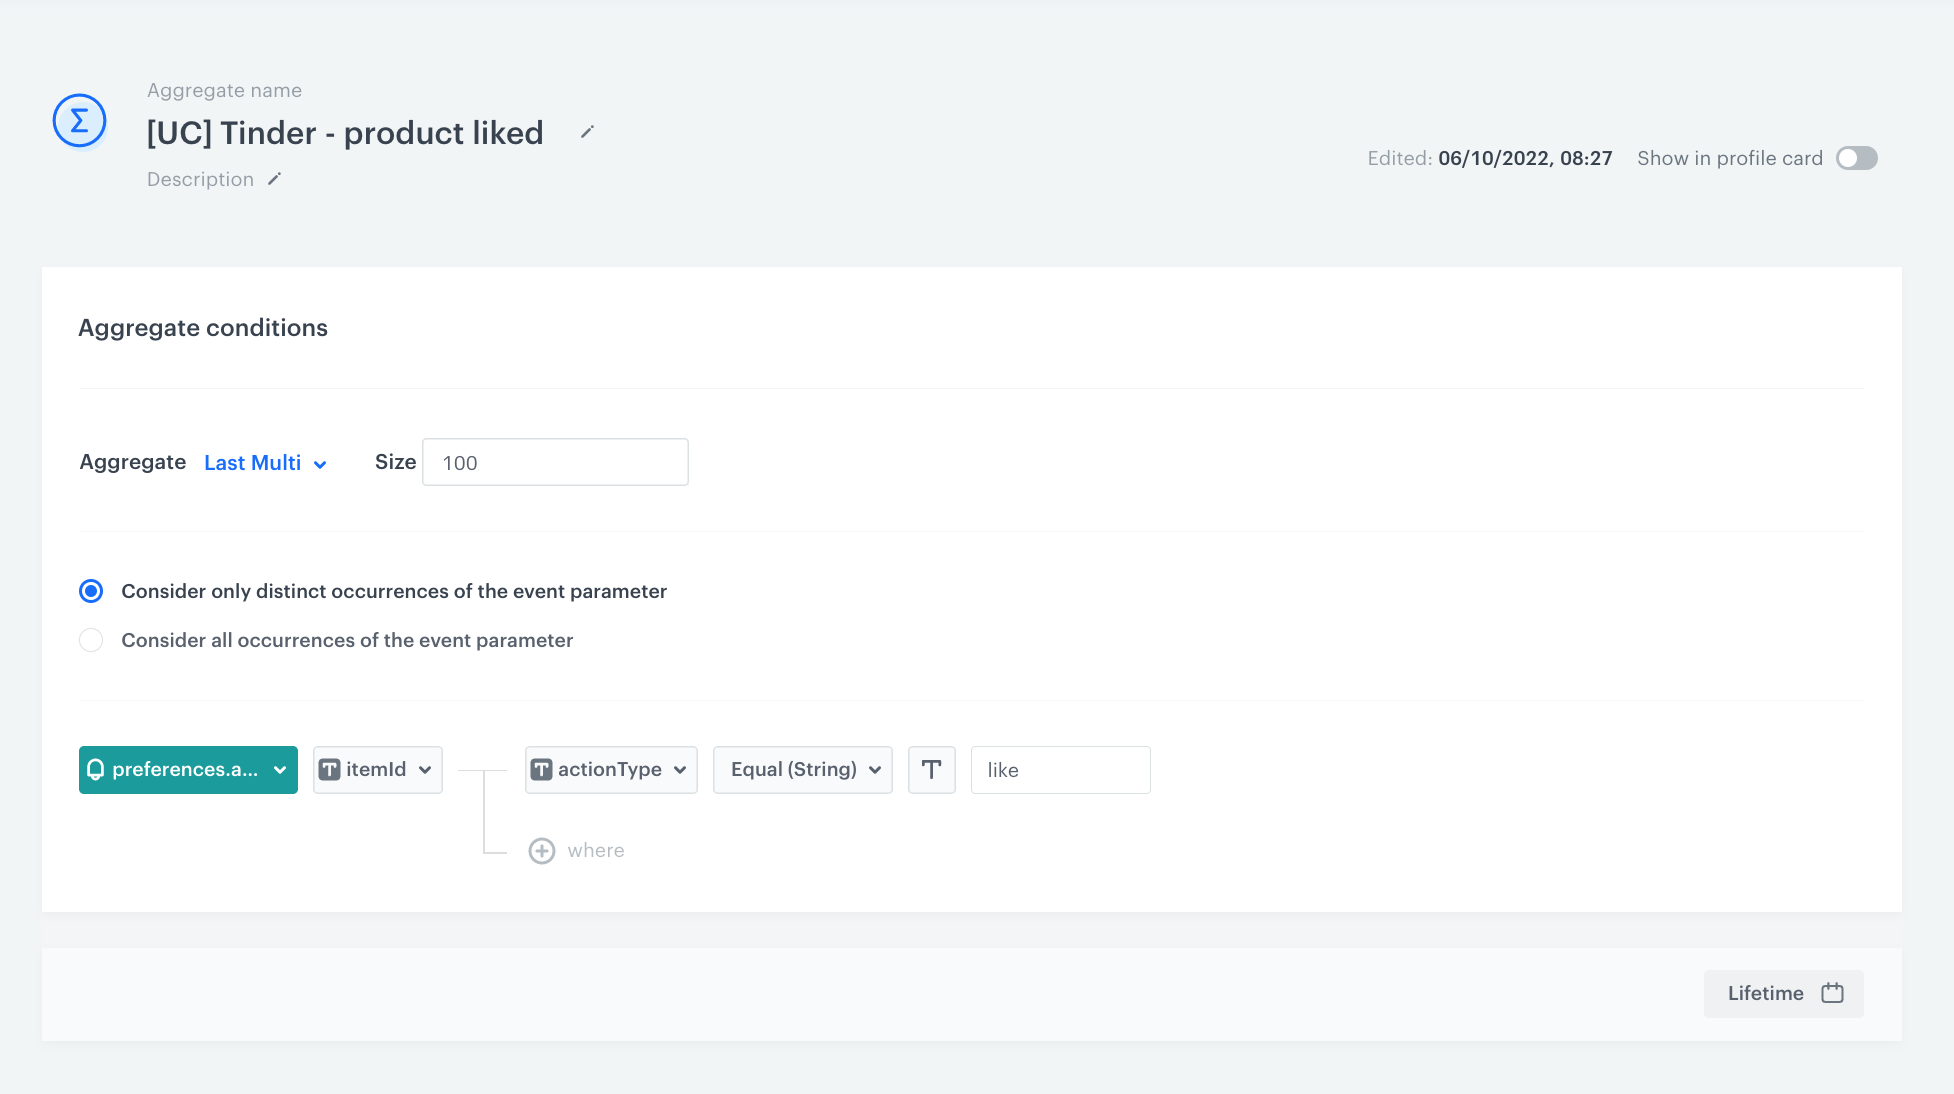
After the campaign is implemented, the event preferences.action is added on the client’s card. This event has an itemId (product id) and actionType parameter with a value like or hate.
Based on this event, you can create an aggregate with products liked or rejected by the customer. Remember, that before creating an aggregate, you should either have this event already somewhere in your history, or have its definition added in Data Management module in Synerise. Otherwise it will not be available in analysts.
- Go to
 Analytics > Aggregates > New aggregate.
 - Enter the name of the aggregate.
- As the type of the aggregate select Last Multi.
- In the Size field choose how many values you would like to return - in this case it might be 100.
- Select Consider only distinct occurrence of the event parameter.
- Select the
preferences.actionevent. - Select the itemId parameter.
- Click the + where button, and add the actionType parameter.
- Choose operator Equal.
- Define the parameter value as
like. - Save the aggregate.
hate.Here are some ideas for using the aggregate:
- You can add such an aggregate to the Boosting section in other recommendation campaigns and enrich the proposed recommendations with products that have been liked by the customer, or to exclude those which they have rejected.
- You can use the aggregate with the customer’s favorite products and display them as the section on the website or in the cart, as an incentive to buy products that the customer liked and in this way - increase the value of the basket.
- You can use this aggregate also in the price drop campaign. If the customer does not buy a specific product they liked and its price drops, you can send them this information to encourage them to come back and make a purchase.
- You can use disliked products in AI search filters, and in this way - exclude those products from the search results.
Check the use case set up on the Synerise Demo workspace
You can check the configuration of the campaign components directly in Synerise Demo workspace:
- AI recommendation configuration,
- in-app campaign with the bottom bar,
- in-app campaign with the swiping mechanism,
- additional aggregate with liked products.
If you don’t have access to the Synerise Demo workspace, please leave your contact details in this form, and our representative will contact you shortly.