Show basket value needed to enable a promotion
Personalized in-app campaigns within a mobile application can improve your customers’ experience and help you increase your revenue from mobile shopping. Targeted in-app marketing campaigns are most effective when they’re personalized based on each individual’s in-app behavior and provide a better customer experience than campaigns developed for a general audience.
Using inserts in your in-app campaigns, you can refer to analyses results, customer’s attributes, prediction results, and so on created in the platform. It can be used in the content of various campaigns such as discount threshold campaign, which offers a discount to customers when the total value of a cart reaches a specified amount.
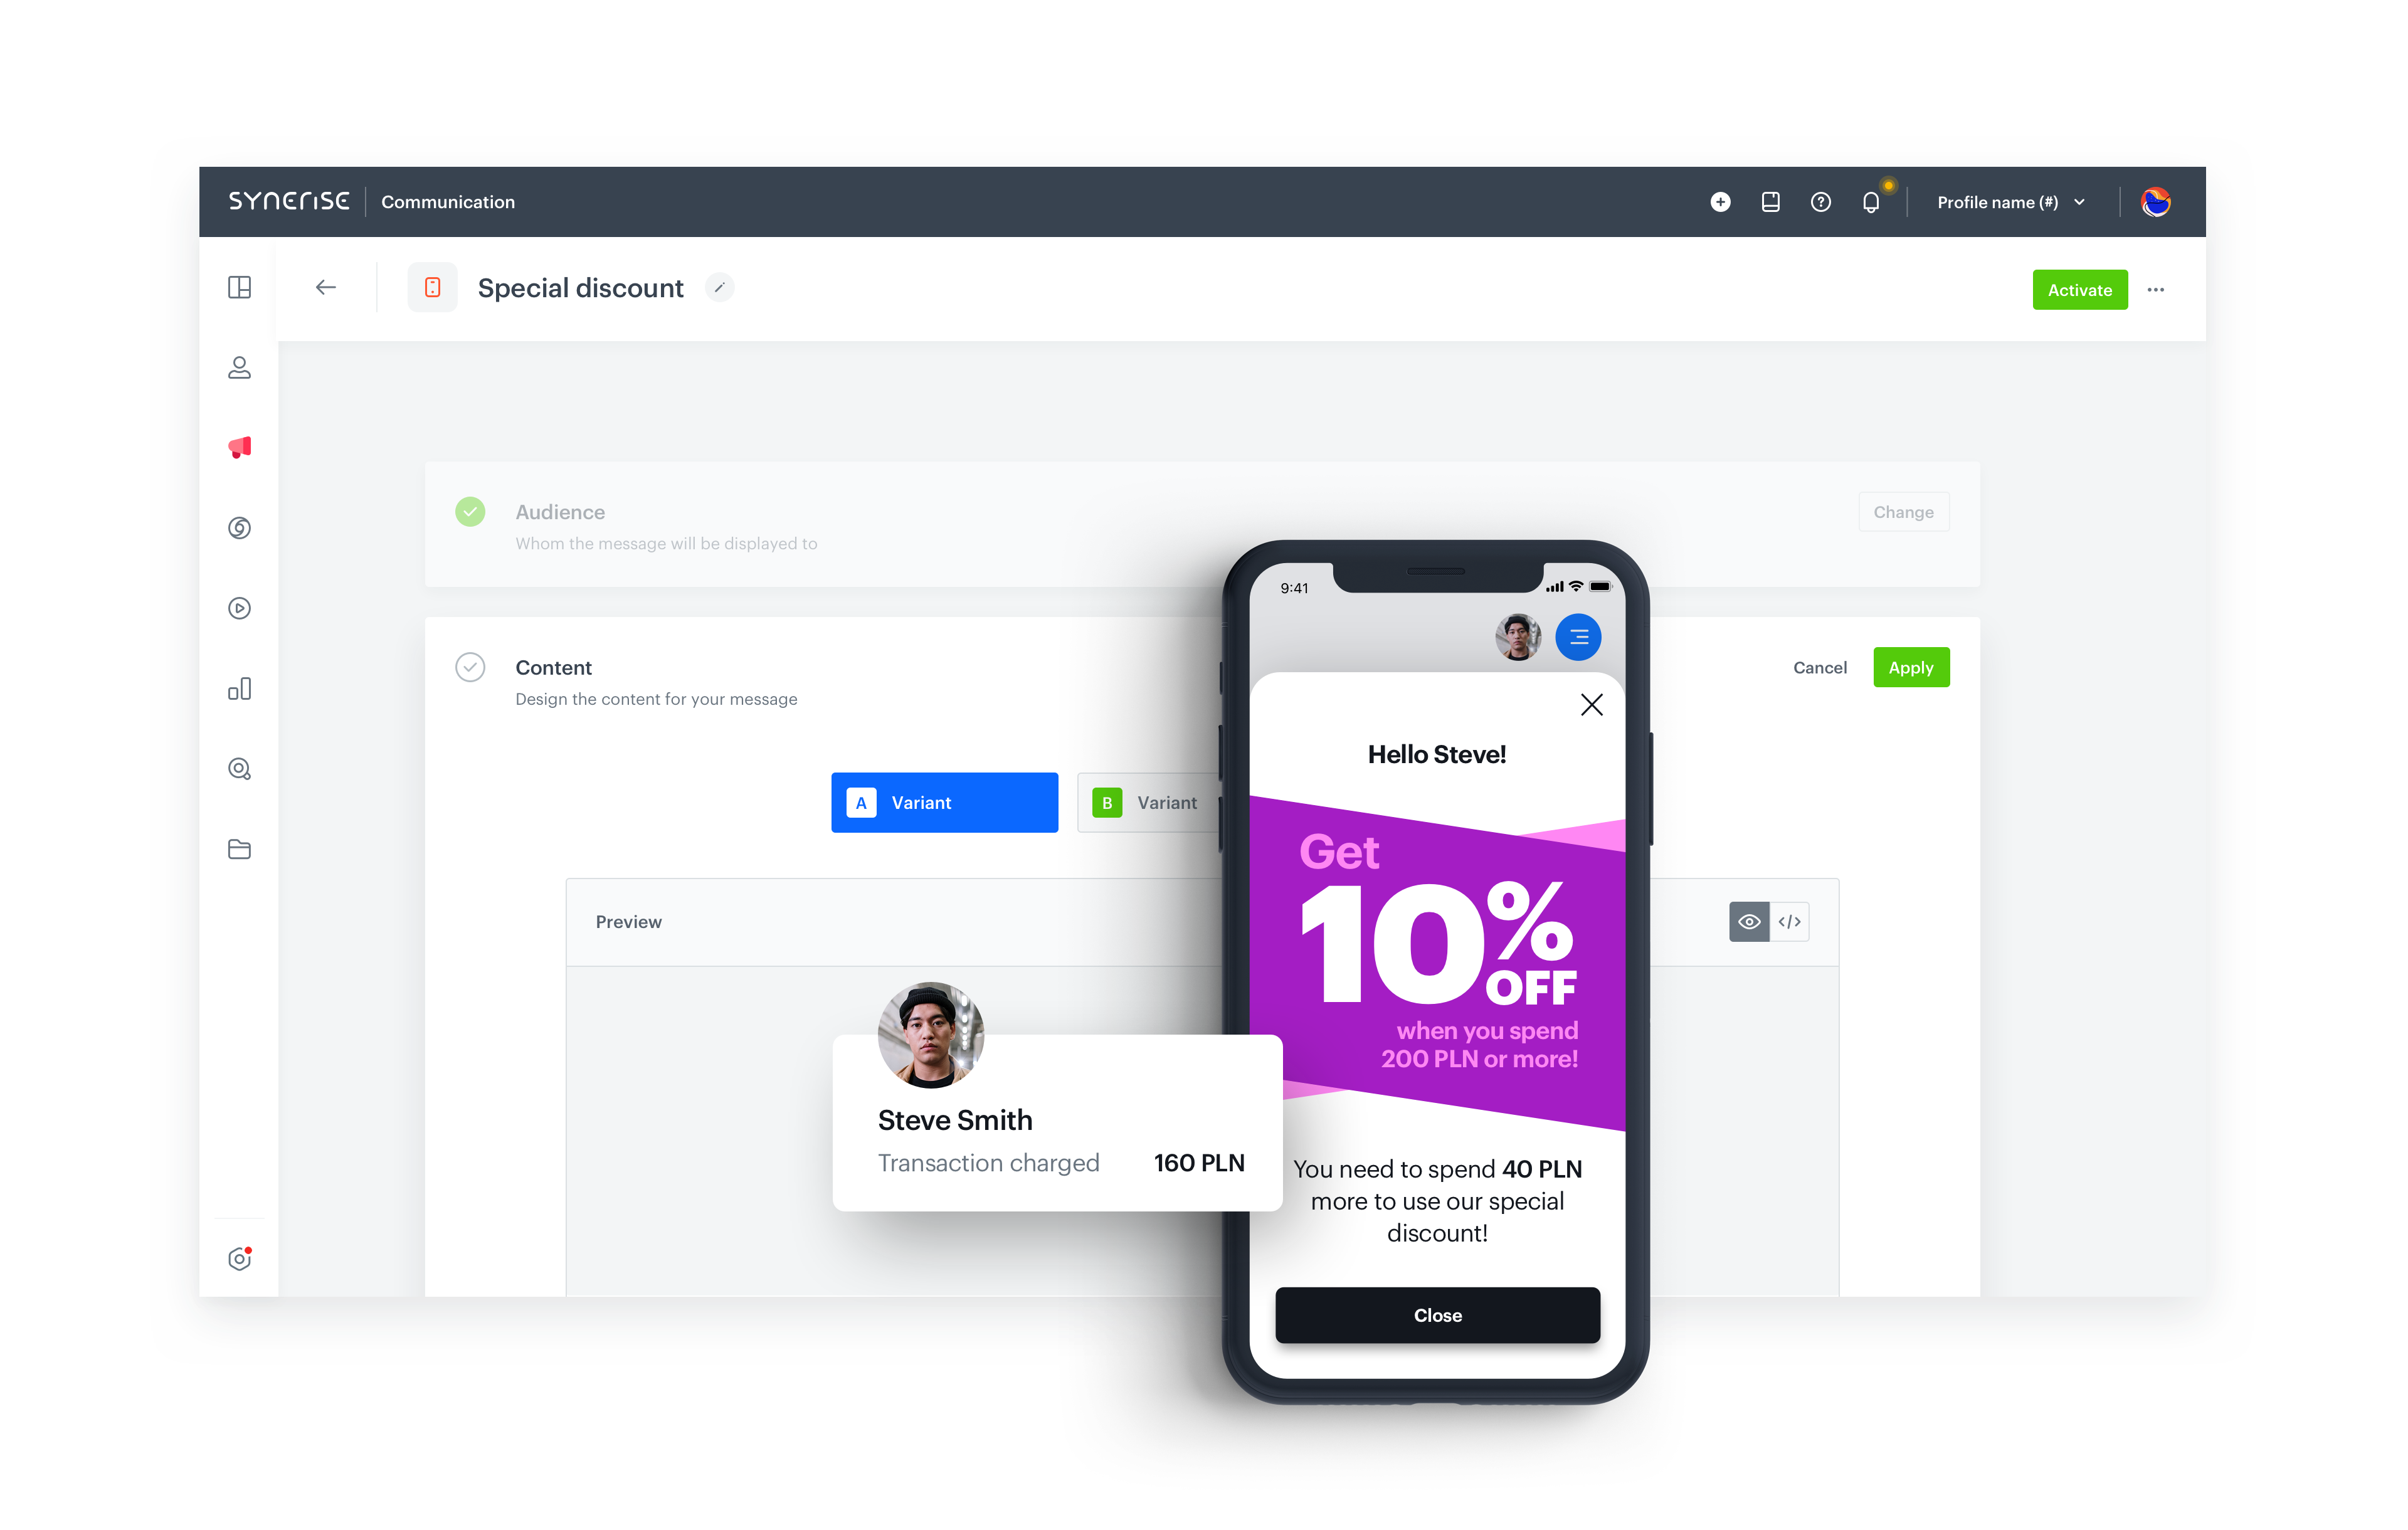
In this use case, you will create an in-app campaign displayed in your mobile app. In the content of the message, you will inform the mobile app user about the amount of money they still have to spend to be able to use the discount. The campaign will be triggered when a product is added to a cart. This way you will encourage app users to spend more money and increase the value of the basket in the mobile application. Additional benefit of this campaign is a promotion support as every customer who adds the first product to the basket is informed about this campaign.
The promotion used as an example in this use case is a 10% discount triggered when the cart value reaches 200 PLN.
Prerequisites
- Implementation of Synerise SDK in your mobile app.
- Implementation of the transaction events using SDK or API.
- Implementation of the
cart.statusevent, which stores the current status of the basket in the form of an event on the customer’s card. Event has to be sent to Synerise, after every change in the cart status. - Collect product.addToCart event.
- Implement a promotion which gives a discount after the customer reaches the discount threashold. In our case we assume a 10% discount for 200 PLN (or more) basket value.
Process
In this use case, you will go through the following steps:
- Create an aggregate which shows the last cart status with the information about the total value of the cart.
- Create an expression which returns information on how much money the customer has to spent to reach the discount threshold.
- Create an in-app message triggered by the
product.addToCartevent with information about the amount of money the customer still needs to spend to get the discount.
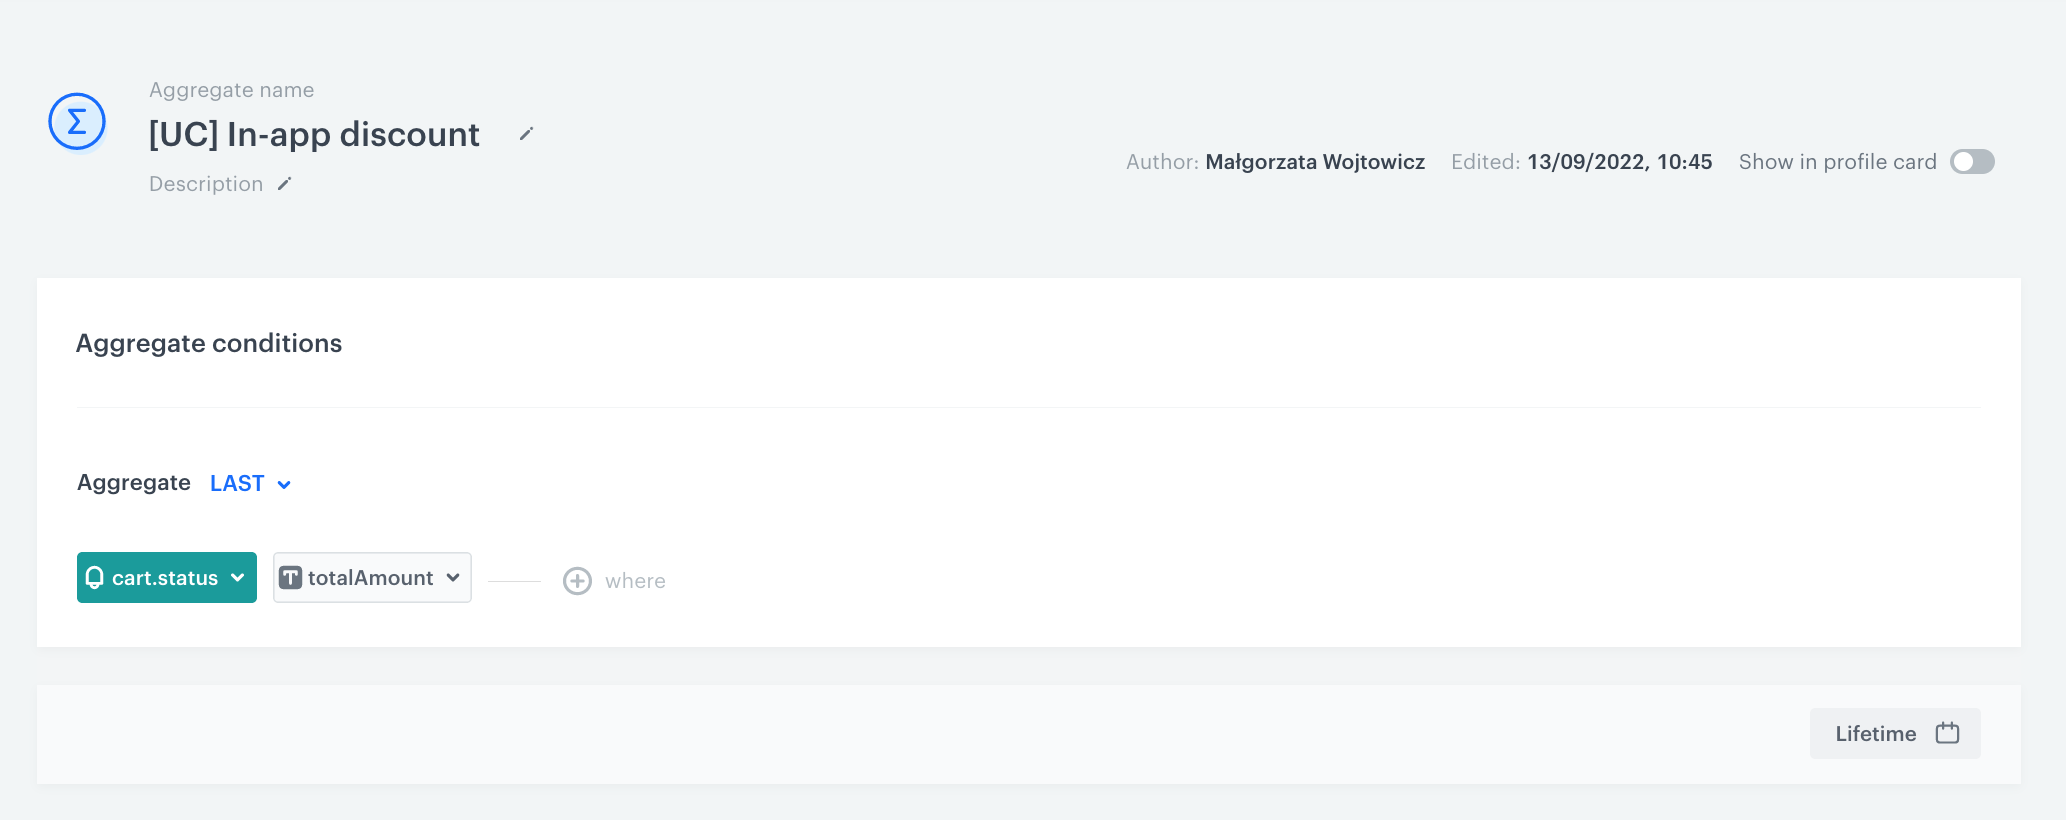
Create an aggregate
In this part of the process, create an aggregate, which returns the last cart status with the information about the current value of the customer’s cart. This aggregate will be used later in an expression that counts the remaining amount of money that must be spent to get the discount.
- Go to
 Analytics > Aggregates > New aggregate
 - Enter the name of the aggregate.
- Set Aggregate to Last.
- From the Choose event dropdown list, select the
cart.Statusevent. - As an event parameter, select
totalAmount. - Set the date range to Lifetime.
- Save your aggregate.
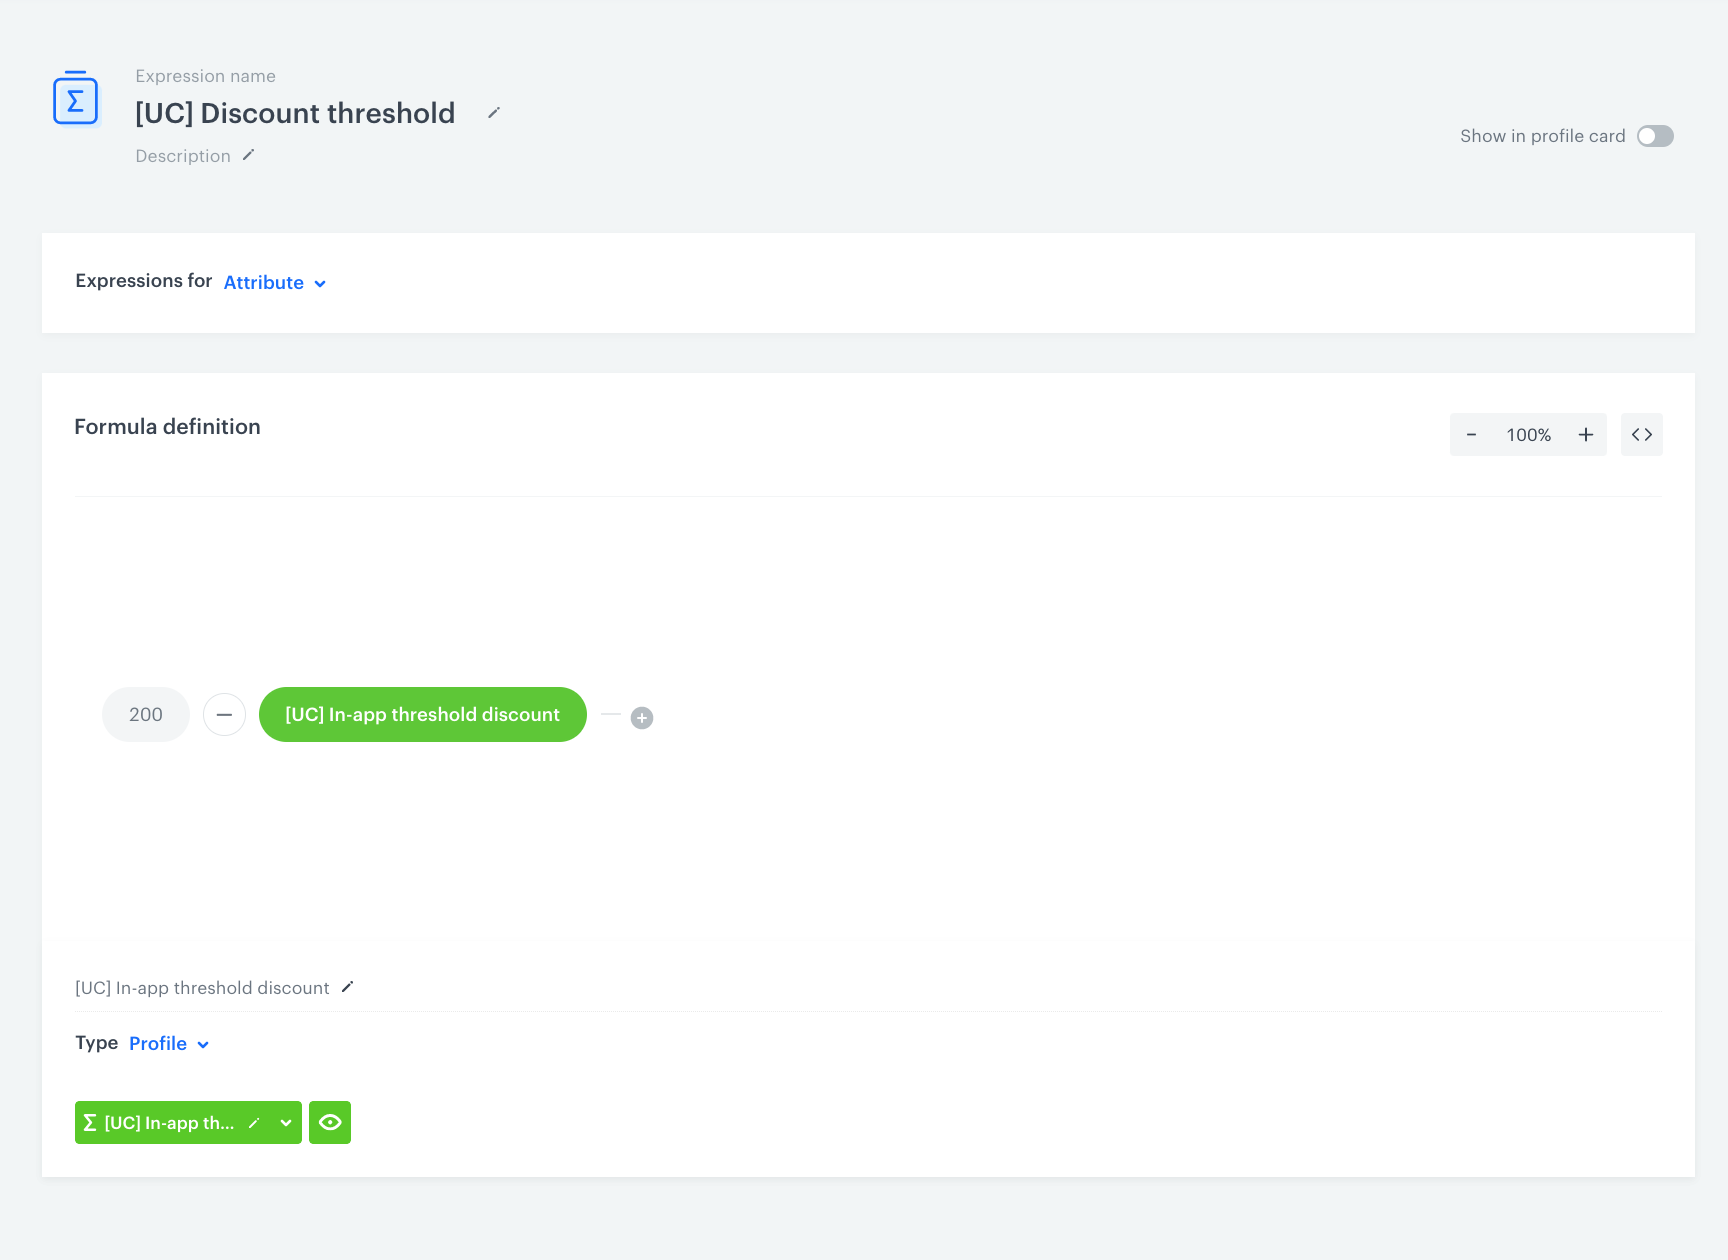
Create an expression
In this step, you will create an expression which returns the difference between the current basket value and the discount threshold (in our case 200 PLN or more). If the basket value exceeds the discount threshold, the result of the expression is a negative number (for example, -40, which means that the customer exceeded the threshold by 40). If not, the result of the expression is higher than 0 and it means that the customer hasn’t reached the threshold yet.
- Go to Analytics > Expressions > New expression.
- Enter the name of the expression.
- As a type of expression, select Attribute.
- In the Formula definition section, click Select.
- From the list that opens, select Constant and set its value to the discount threshold value.
- Click + button and from the dropdown list select Profile.
- Click the unnamed node that appeared.
- At the bottom of the page, click Choose attribute.
- On the list of attributes, choose Aggregates, find and select the aggregate you have prepared in the previous part of the process.
- Click the + button and change it to
-. - In the upper-right corner, click Save.
- In the upper-right corner, click Publish.
Create an in-app message
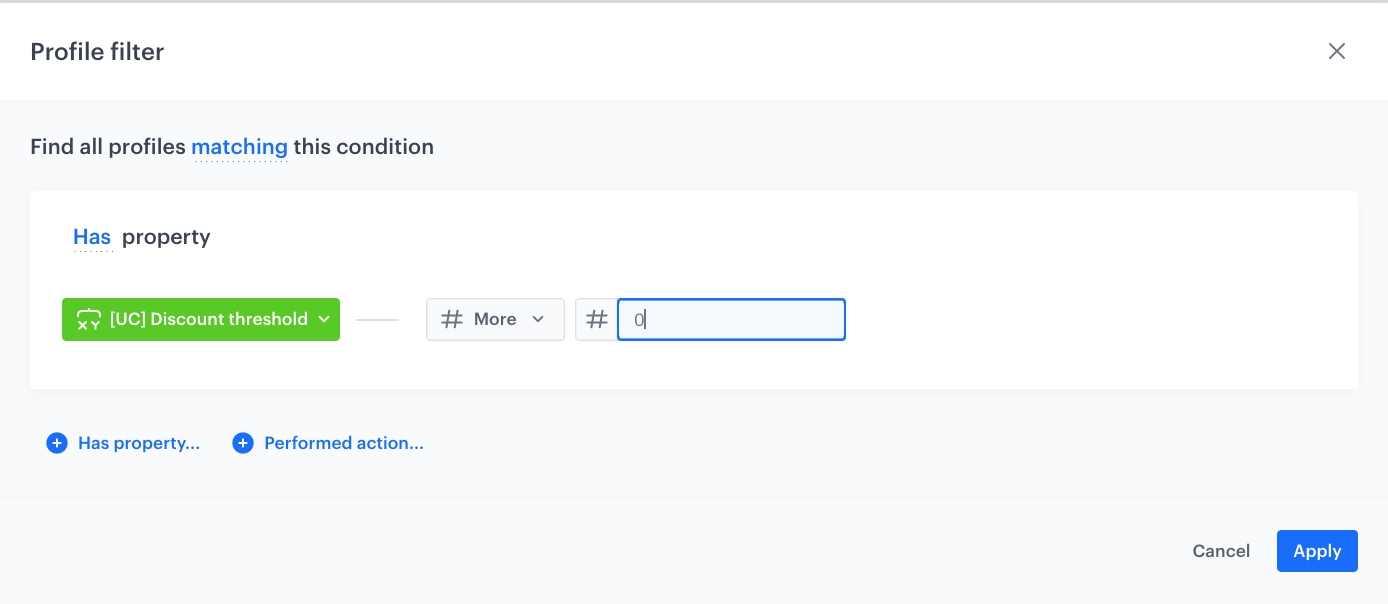
In this part of the process, you create an in-app campaign triggered by the product.addToCart event. The message contains information about the amount of money the customer needs to spend to get the discount. The audience of this campaign are the customers for whom the expression result is higher than 0.
The capping for the in-app campaign is set to 1 time a week.
-
Go to
 Communication > In-app messages > Create in-app
 -
Enter a meaningful name for the in-app campaign.
-
In the Audience section:
- Click Define.
- Select the New audience tab.
- Select Define conditions.
- Choose Has property and find the expression created in the previous part of the process.
- As an operator, choose More and set the value to
0. This way, the message will be displayed to the customers who haven’t reached the threshold yet. - Click Apply.
Audience settings -
In the Content section:
- Click Define.
- Click Create message and select Code Editor
- Create the content of your in-app campaign. You can reuse the code snippets presented below in your in-app template. The code snippet includes the expression that returns the amount of money customer has to spend to be given a discount.
Check the HTML code<div class="in-app-wrapper"> <div class="in-app-wrapper-inner"> <div class="in-app__upper"> <div class="in-app-close"></div> <p class="in-app-title"> Hello {% customer firstname %}</p> </div> <div class="in-app__middle"> <div class="in-app__content"><h1>Get</h1> <div class="in-app__flexbox"> <div class="in-app__number">10</div> <div class="in-app__off">% <br> OFF</div> </div> <p>When you spend <br> 200 PLN or more! </p> </div> </div> <div class="in-app__lower"> <p class="in-app__lower--text">You need to spend <span class="in-app__lower--span">{% expression %} d3b58957-febf-4374-b96e-85f1f3e462a0 {% endexpression %} PLN</span><br> more to use our special<br>discount!</p> <button>Close</button> </div> </div> </div>Check the CSS code.in-app-wrapper * { font-family: sans-serif; } .in-app-wrapper { text-align: center; position: relative; background: #00000045; box-shadow: 0 30px 80px 0 rgba(35, 41, 54, 0.2); width: auto; height: 100vh; display: flex; flex-direction: column; flex-wrap: nowrap; align-content: center; justify-content: center; align-items: center; } .in-app-title { font-size: 21px; font-weight: bold; font-stretch: normal; font-style: normal; line-height: 1.5; letter-spacing: -0.67px; text-align: center; color: black; margin: 0; padding-top: 45px; } .in-app-close { position: absolute; z-index: 1; width: 50px; height: 50px; border: 0; top: 10px; right: 10px; cursor: pointer; background-color: transparent; } .in-app-close:after, .in-app-close:before { content: ''; position: absolute; height: 2px; width: 50%; top: 50%; left: 12px; margin-top: -1px; background: black; } .in-app-close:after { -webkit-transform: rotate(-45deg); -moz-transform: rotate(-45deg); -ms-transform: rotate(-45deg); -o-transform: rotate(-45deg); transform: rotate(-45deg); height: 2px; margin-top: -2px; } .in-app-close:before { -webkit-transform: rotate(45deg); -moz-transform: rotate(45deg); -ms-transform: rotate(45deg); -o-transform: rotate(45deg); transform: rotate(45deg); height: 2px; margin-top: -2px; } .in-app-wrapper-inner { background: #fff; border-radius: 6px; position: relative; border-radius: 20px; width: 100%; height:90%; top:5%; } .in-app-wrapper-inner button { margin-top: 25px; border-radius: 6px; background-color:#13171E; padding: 18px; color: #fff; border: 0; width: 100%; font-size: 18px; font-weight:bold; cursor: pointer; } .in-app__upper { height: 15%; } .in-app__middle > div > h1 { font-size:40px; margin:0; padding:0; color:#E0E1E4; opacity: 0.9; text-align:left; position:relative; top:20px; } .in-app__content{ width:160px; margin:0 auto; margin-top:40px; } .in-app__middle { height: 50%; overflow:hidden; background-image:url(https://upload.snrcdn.net/89c52a4790962b58713e7212f2c9a015cacb1536/default/origin/5f084662f612418c91f6badfa9f8368b.png); color:white; background-position: center; background-repeat:no-repeat; } .in-app__middle > div > p { position:relative; left:10%; color:#E0E1E4; opacity: 0.9; margin:0; text-align:right; } .in-app__lower { height:20%; margin-left:30px; margin-right:30px; } .in-app__lower > p{ margin:0; padding:0; } .in-app__upper--text { font-size: 20px; color: white; } .in-app__lower--text { font-size: 17px; color: black; padding-top:20px !important; } .in-app__flexbox{ display:flex; justify-content:center; flex-direction:row; } .in-app__number{ font-size: 76px; font-weight: 900; } .in-app__off{ font-size:40px; font-weight: 900; } .in-app__lower--span{ font-weight:bold; }Check the JS code(function () { var closeButton = document.querySelector(".in-app-close"); closeButton.addEventListener("click", function () { SRInApp.close(); SRInApp.trackCustomEvent( "inapp.custom", { action: "close", }, "Custom event from In-App message" ); }); var ctaButton = document.querySelector('.in-app-wrapper-inner button'); ctaButton.addEventListener('click', function () { SRInApp.trackCustomEvent('inapp.custom', { 'action': 'call to action' }, 'Custom event from In-App message'); SRInApp.close(); }); var modalBackground = document.querySelector(".in-app-wrapper"); modalBackground.addEventListener("click", function (event) { if (event.target.getAttribute("class") == "in-app-wrapper") { SRInApp.close(); SRInApp.trackCustomEvent( "inapp.custom", { action: "click outside modal", }, "Custom event from In-App message" ); } }); })();Important: The CSS and JS codes snippets presented above let you create ready-to-use in app campaign presented in the example. In the HTML code snippet, replace the expression ID with the expression you created in your workspace. -
In the Trigger events section:
- Click Define.
- Select Add event and from the dropdown list, choose the
product.addToCartevent. - Click the + where button and as the parameter, choose
finalUnitPrice. - As the logical operator, select Less than and set the value to the discount threshold value.
- Click Apply.
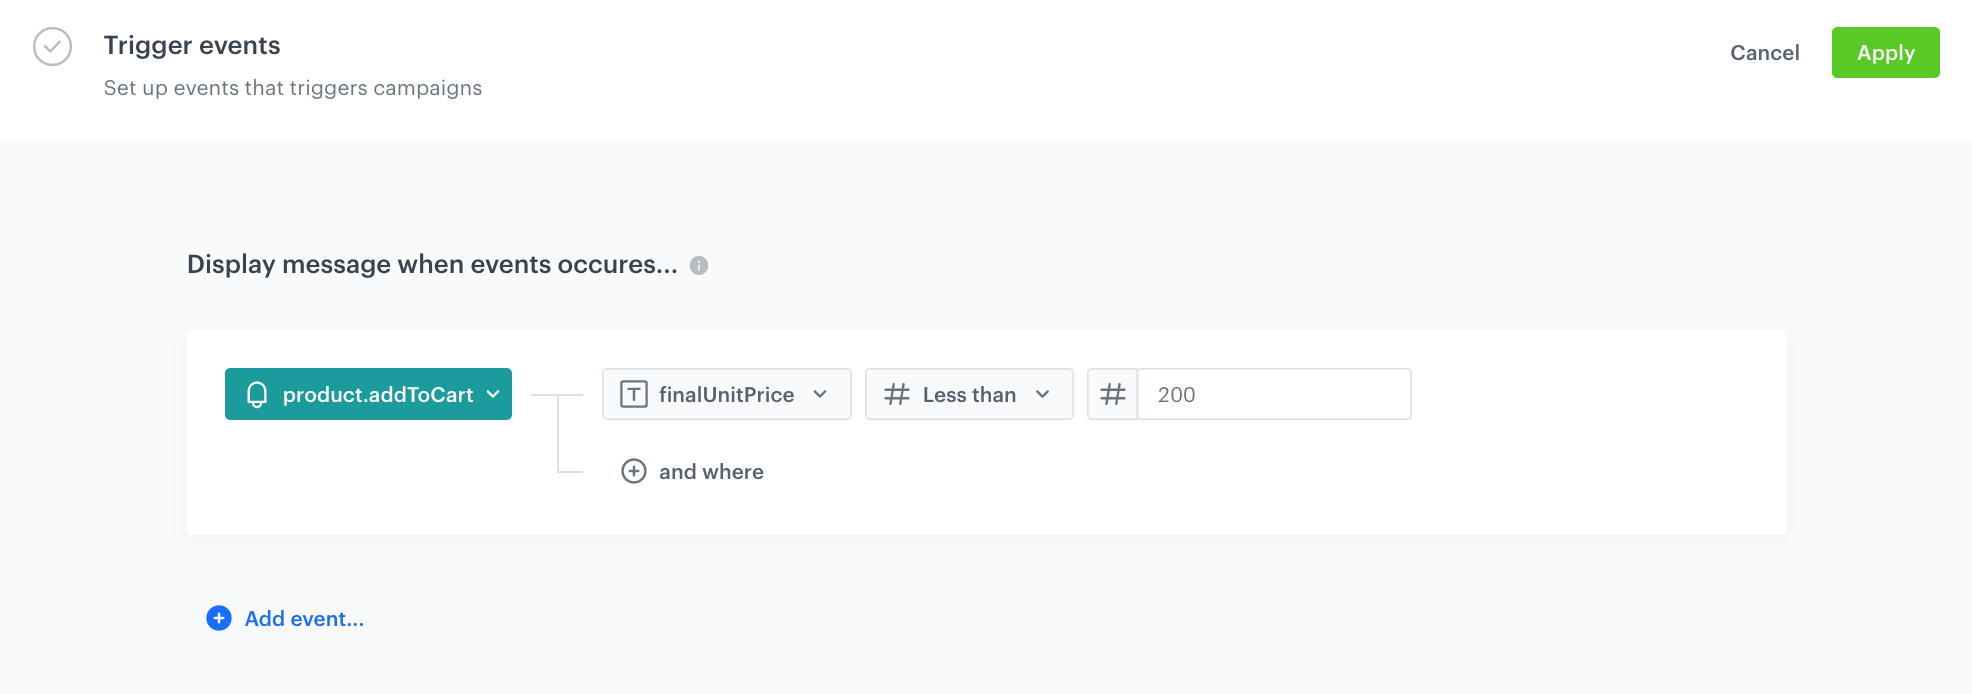
Trigger event settings -
In the Schedule section:
- Click Define.
- Choose Run immediately option.
- Click Apply.
-
In the Display settings section:
- Click Change.
- Define the Delay display and Priority index option according to your business requirements. Enable the Frequency limit toggle to manage the frequency of in-app message display in the application, and set it to once per week.
- Click Apply.
Note: The mobile application can display one in-app message at a time. If the conditions allow the display of several in-apps at a time, the priority is a decisive factor for displaying the message. The messages with lower priority aren’t queued. -
Optionally, you can define the UTM parameters. Otherwise, click Skip step.
-
Optionally, you can add the custom parameters in the Additional parameters section. Otherwise, click Skip step.
-
To start your campaign, click Activate.
Check the use case set up on the Synerise Demo workspace
You can check the aggregate, expression and the final in-app campaign configuration directly in Synerise Demo workspace.
If you don’t have access to the Synerise Demo workspace, please leave your contact details in this form, and our representative will contact you shortly.