Extra points for purchase from specific category during specific time
The pre-Christmas period is a very suitable moment for temporary actions to diversify basic loyalty programs, as it usually works well for your customers who have promised to themselves to buy a gift. You can launch a special time-limited promotion for a selected product category during the weekend right before Christmas for the purchase of which the customer can gain twice as many points.
In this use case, we will present an example of an action that doubles points for the purchase of all products from the Christmas category during the pre-Christmas weekend. Customers who make such a purchase will receive an email with information about doubling of points for the specific purchase and the current points balance.
Prerequisites
-
Implement basic loyalty program based on which you granted customers with 1 point for every 1 PLN spent.
-
Create an email template with the information about current point balance.
Note: To add the current point balance dynamically to your email template, use the expression insert and use the ID of the expression created in the next step. The example usage of the expression insert: Your current loyalty points balance is {% expression %}EXPRESSION ID{% endexpression %} points.
Security configuration
Before you start working with this module, if you are a Synerise customer or partner, consider reading the section about denylisting events. This natively accessible configuration will allow you to manage the restrictions in points management that may help you prevent fraud.
Process
- Create an aggregate that returns the sum of loyalty points for an individual customer.
- Create an expression with points balance.
- Create a workflow which doubles the points for every product from the
Christmascategory purchased during the specific weekend and sends the email with the final point status.
Create an aggregate
Create an aggregate that returns the sum of loyalty points for an individual customer.
- Go to
 Analytics > Aggregates > New aggregate.
 - Enter a meaningful name of the aggregate.
- Set the Aggregate option to Sum.
- Click the Choose event dropdown list.
- From the dropdown list, select the event that is generated every time the customer is awarded with loyalty points, in this use case it’s the
points.loyaltyevent. - From the + where dropdown list, select the
pointsparameter. - Using the date picker in the lower-right corner, set the time range to Lifetime.
- Save the aggregate.
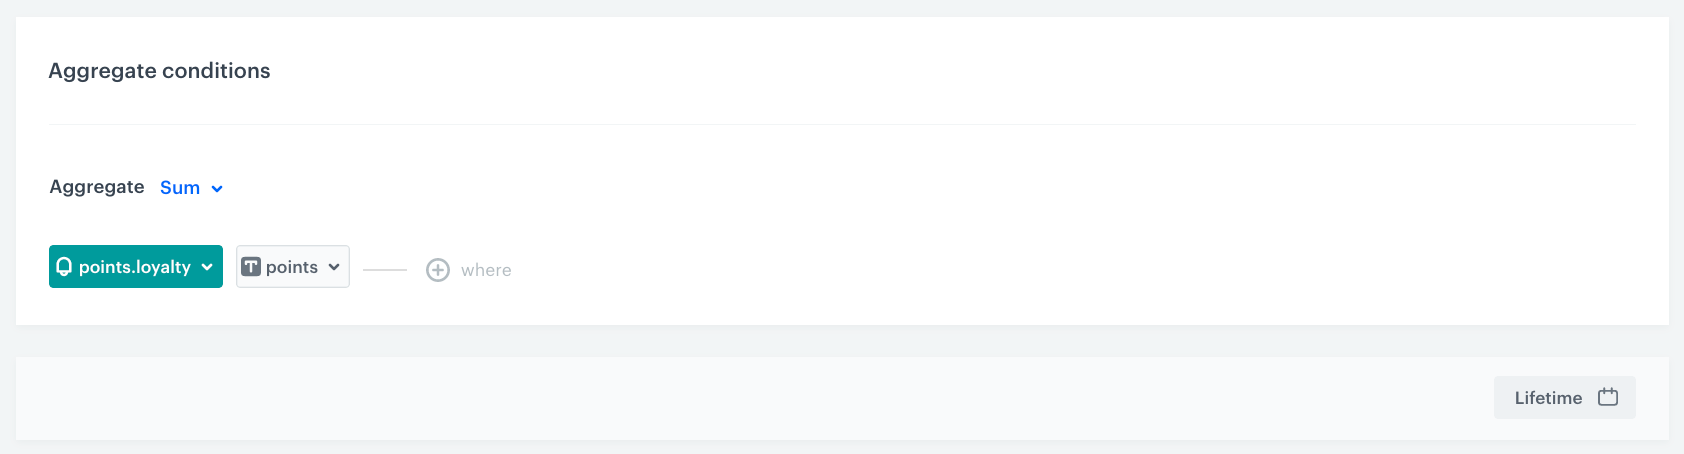
The aggregate that sums points from the points.loyalty event
Create an expression with points balance
In this part of the process, create an expression which will be used to calculate points balance for the customer.
In this use case, the expression is built based on the aggregate that returns the sum of loyalty points gained.
- Go to Analytics > Expressions > New expression.
- Enter a meaningful name of the expression.
- Leave the expression type at default (Attribute).
- Build the formula of the expression.
- Click the Select node.
- From the dropdown list, select Profile.
- Click the unnamed node that appeared on the canvas.
- Scroll down the page and click Choose attribute.
- On the dropdown list, select the aggregate for
points.loyaltythat you created earlier. - Save the expression.
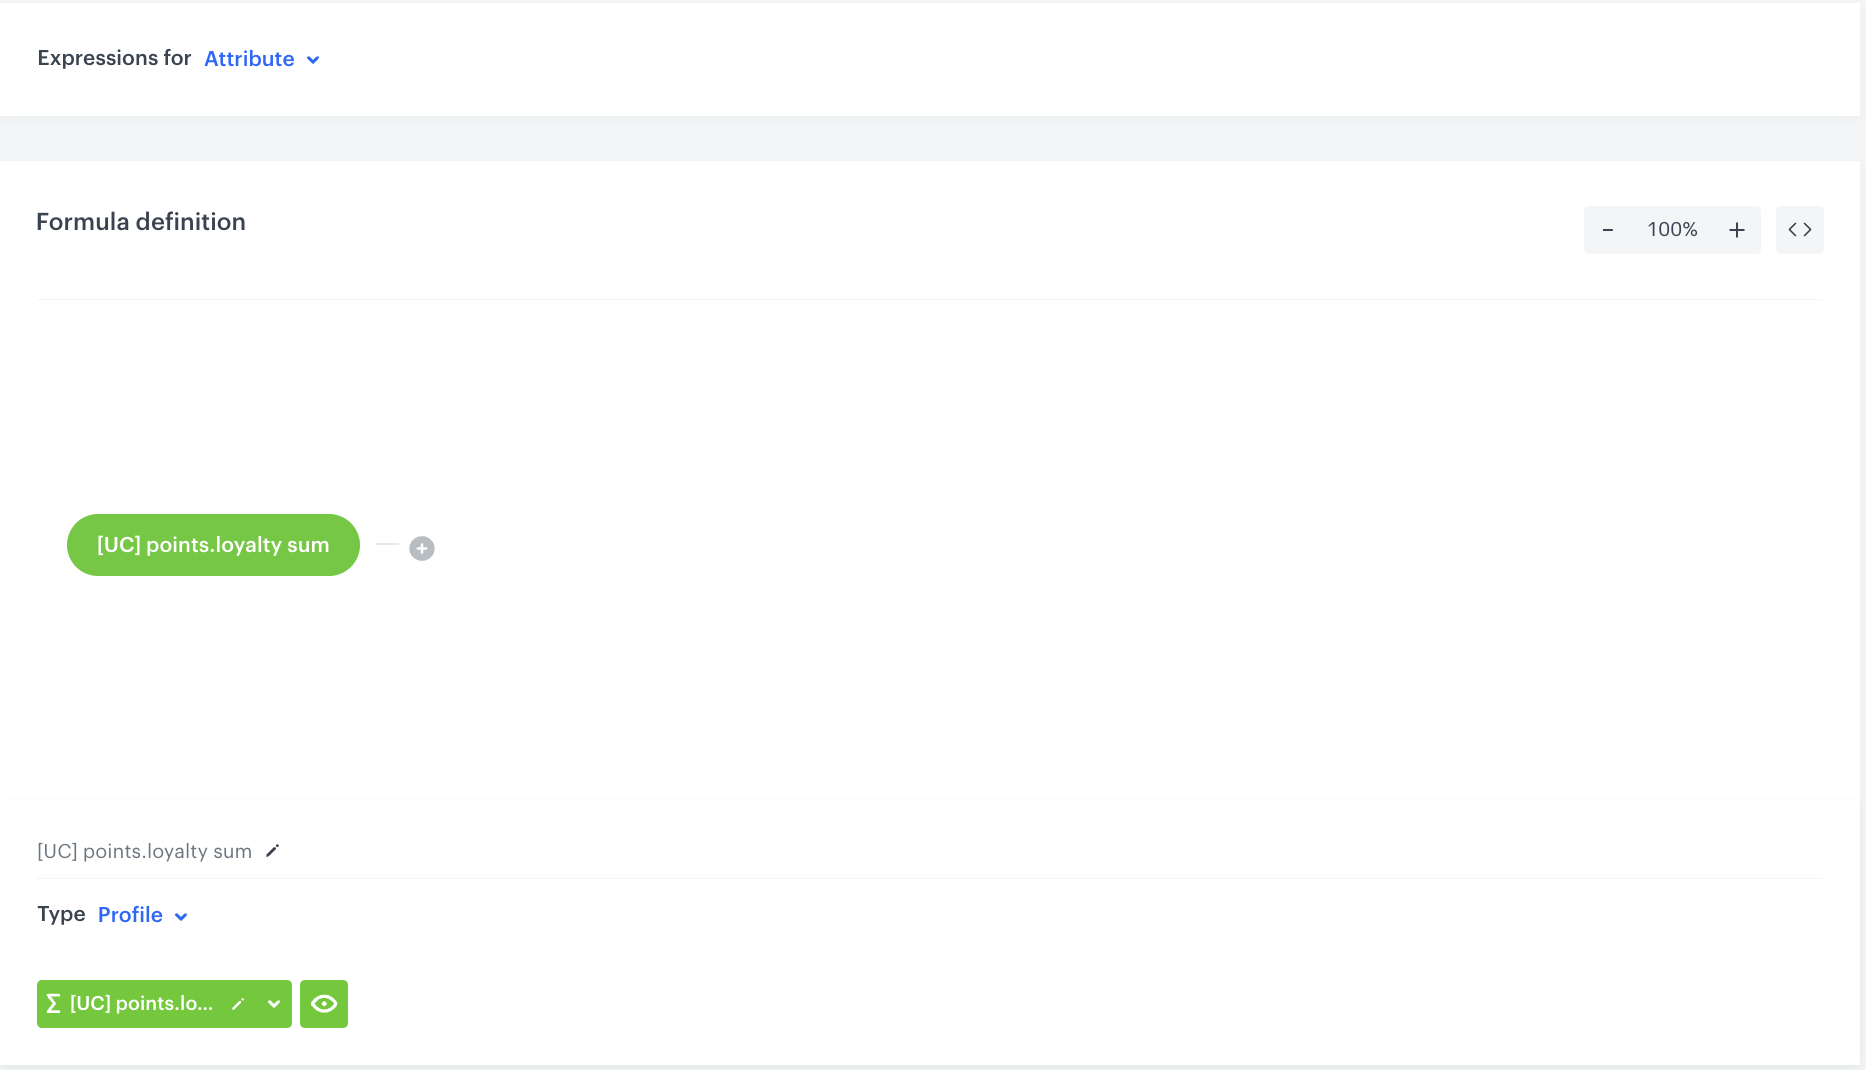
The configuration of the expression
Create a workflow
Create a workflow which:
- doubles the points for the purchase of every product from the
Christmascategory during the specific weekend, - sends the email message with the current point balance
- Go to
 Automation > Workflows > New workflow.
 - Enter the name of the workflow.
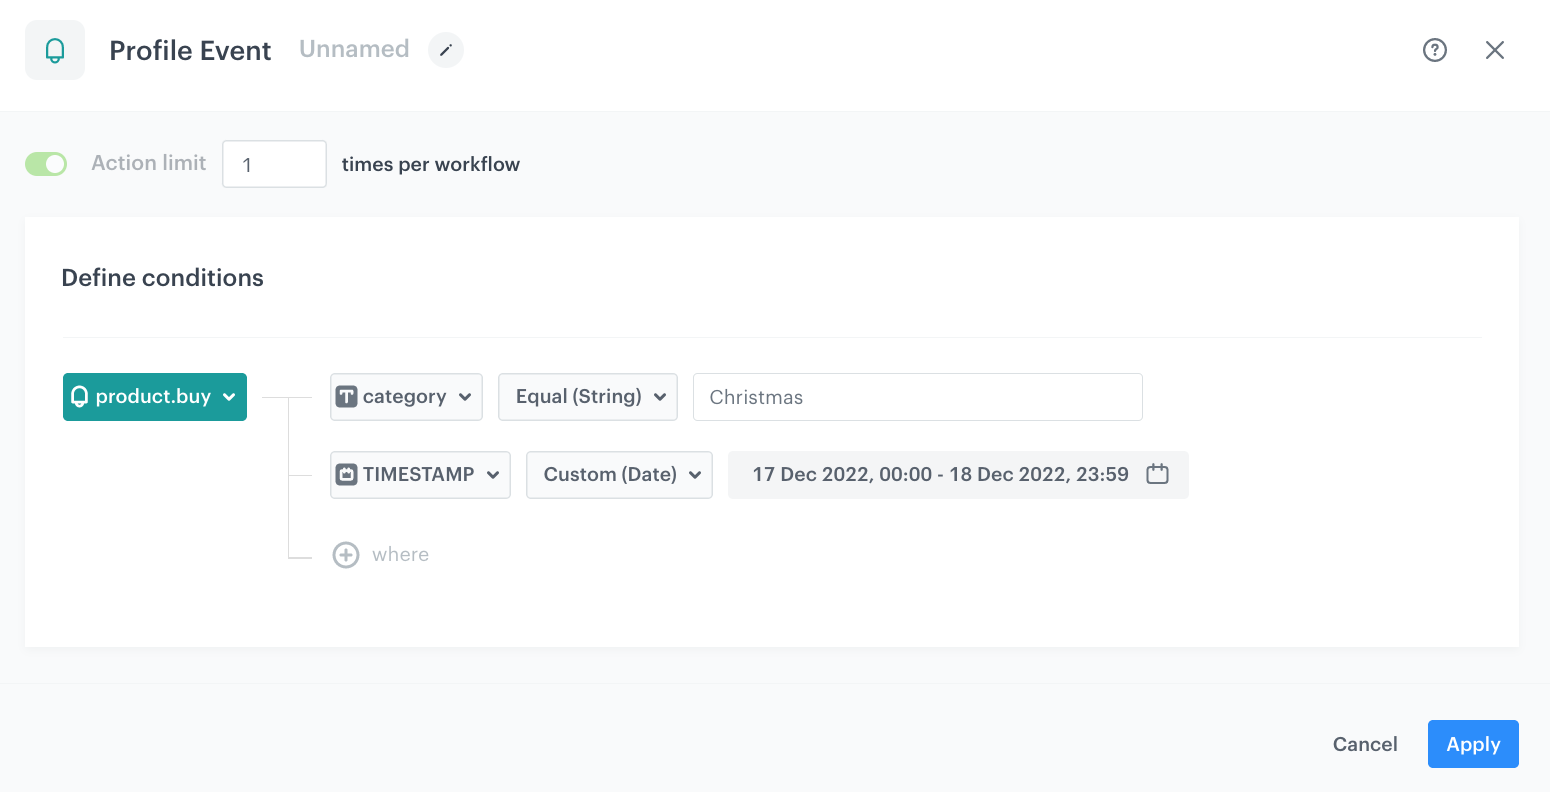
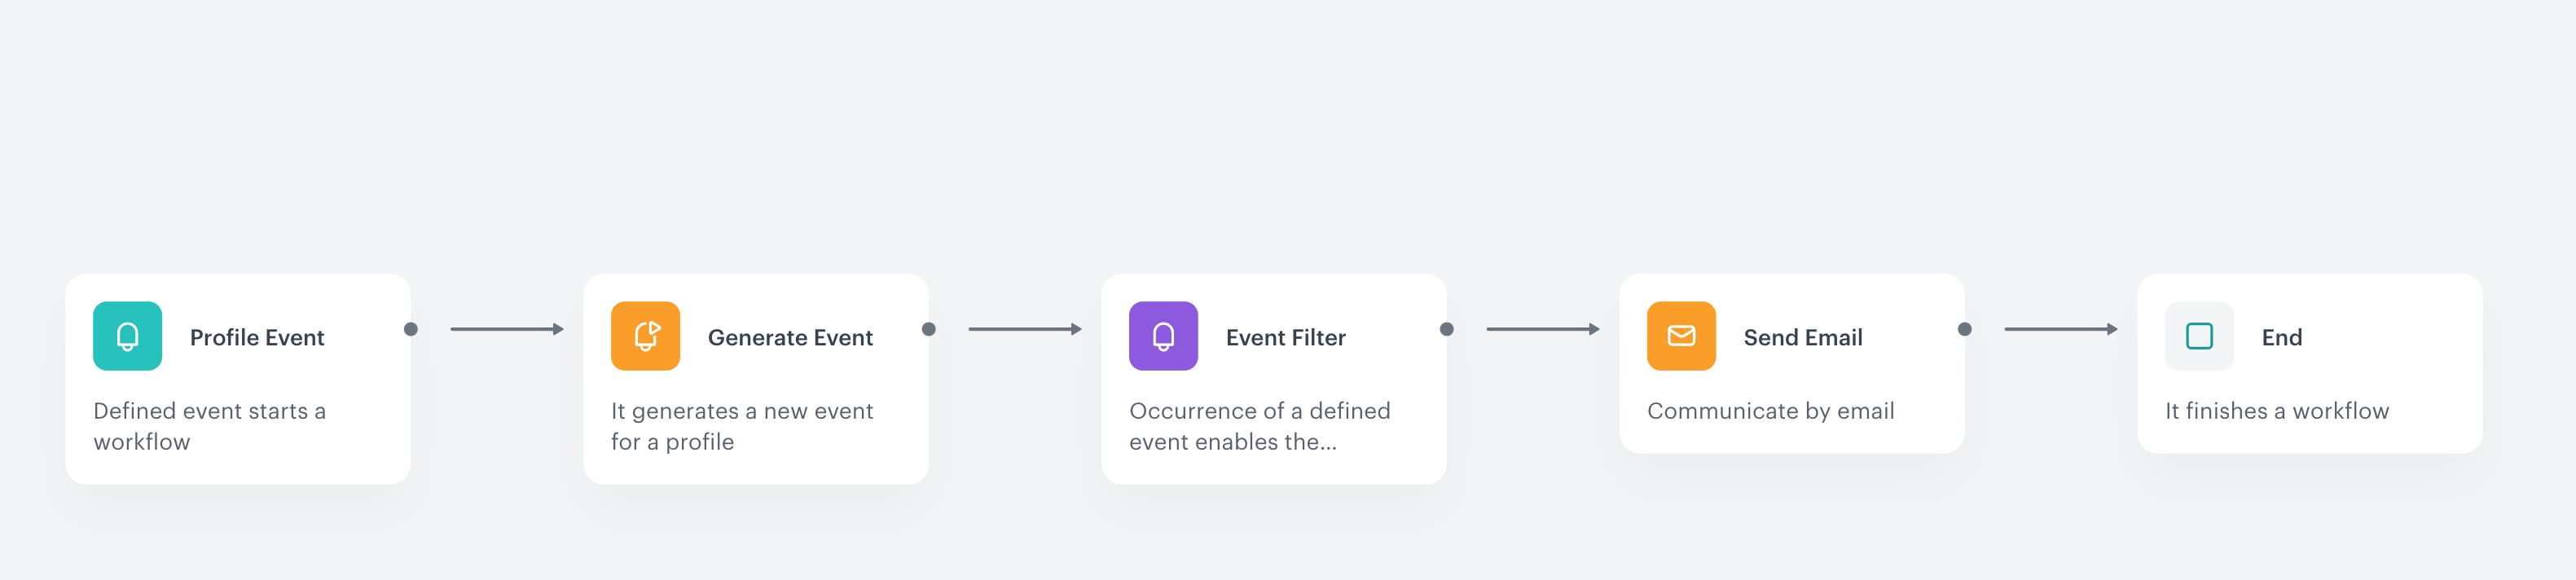
Define the Profile Event trigger node
At this stage, we will configure the conditions that launch the workflow. As a trigger, we will use the product.buy event.
- As the first node of the workflow, add Profile Event. In the configuration of the node:
- From Choose event dropdown menu, choose the
product.buyevent. - Click the + where button and from the dropdown list, choose category.
- From the Choose operator dropdown, select Equal.
- In the text field, type the name of the category. In our case it will be
Christmas. - Click the + where button and from the dropdown list, choose TIMESTAMP.
- From the Choose operator dropdown, choose Custom (Date).
- Click Select date range.
- Set the time range in which your promotion is active. In this use case, it will be the weekend before Christmas.
- Confirm by clicking Apply.
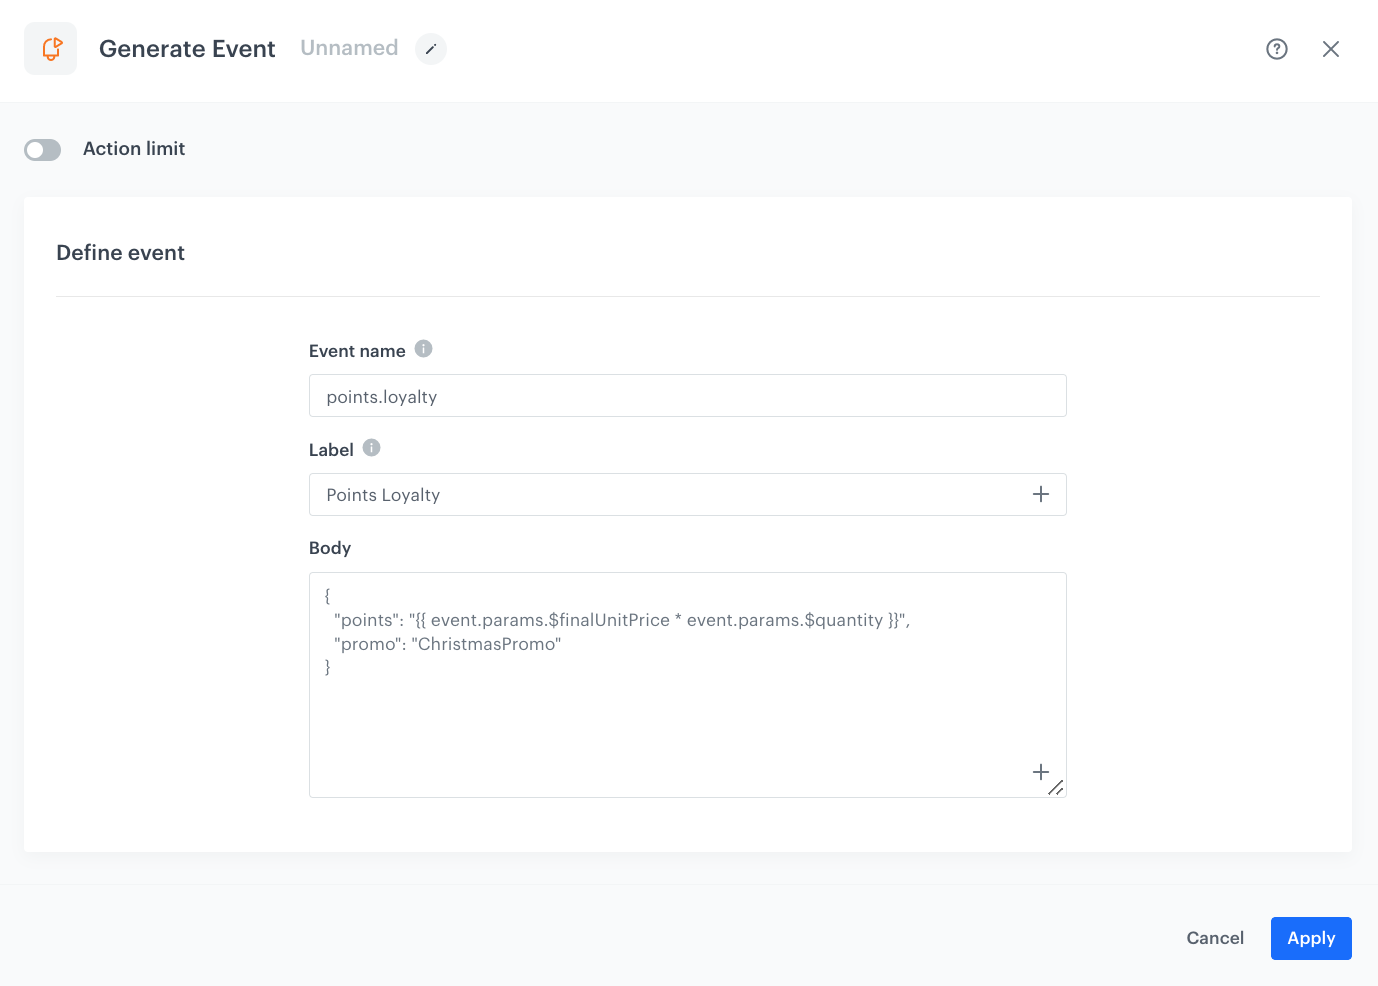
Configure the Generate Event node
In this part of the process, you will create a node which generates a points.loyalty event which adds extra loyalty points. This event is created in addition to the regular points.loyalty event. In result, the customer receives points for a purchase from the Christmas category twice:
-
Points based on the loyalty points schema described as a part of prerequisites.
-
Extra points through this workflow. The body of the additional event will contain the
pointsparameter calculated by multiplying the value of the$finalUnitPriceand$quantityparameters from theproduct.buyevent. -
As the second node of the workflow, add Generate Event.
-
In the Event name, enter
points.loyalty. -
In the Label field, add the text which will be visible in the header of the event details on a profile card.
-
In the Body section, define the parameters of this event, and click Apply.
Example content of Body section:
{
  "points": "{{ event.params.$finalUnitPrice * event.params.$quantity }}",
  "promo": "ChristmasPromo"
}
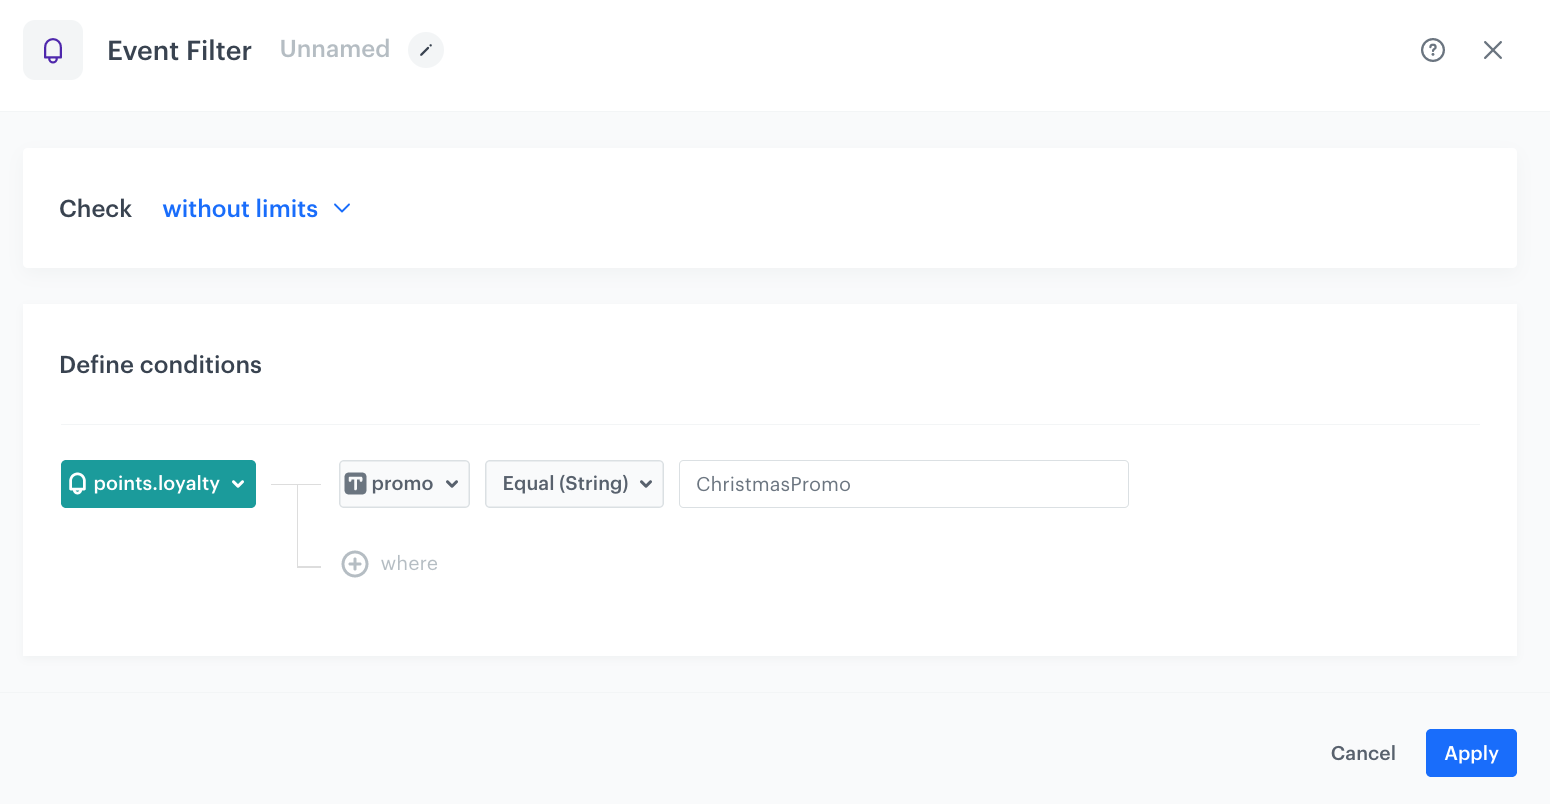
Configure the Event Filter node
At this stage, we make sure the points have beed awarded to the customer before sending an email.
- Add the Event filter node.
- Check without limits.
- From the Choose event dropdown list, select the
points.loyaltyevent (the same you generated in the previous step. - As the event parameter, select promo (the same parameter as in the body of the Generate Event node).
- From the Choose operator dropdown list, select Equal.
- As the value, enter
ChristmasPromowhich is the value of thepromoparameter from the body of the Generate Event node. This way you make sure that a customer got extra points for the purchase. - Confirm by clicking Apply.
Configure the Send Email node
- Add a Send Email node to the matched path.
- In the settings of the node:
- Define the settings of the Sender details section.
- In the Content section, enter the subject of the email and select choose the template of the email you have prepared as a part of the prerequisites.
- Optionally define the settings in the UTM & URL parameters and Additional parameters sections.
- Click Apply.
Prepare the final settings
- After Send Email, add the End node as well as to the NOT MATCHED path.
- Optionally, define capping.
- Optionally, add titles to each node so the workflow will be more understandable to your colleagues.
- Activate the workflow by clicking Save & Run.
Check the use case set up on the Synerise Demo workspace
You can check the configuration of the:
- aggregate with the points balance
- expression with the points balance
- workflow doubling the points directly in Synerise Demo workspace.
If you don’t have access to the Synerise Demo workspace, please leave your contact details in this form, and our representative will contact you shortly.