

Send data from Google Spreadsheet to Synerise
In your business you probably use various tools to store customer information from different sources. With the help of Incoming Integration, Synerise can collect this data and store it in your workspace in any way you want - for example as customer data (attributes, events) or in a catalog.
This use case describes how to prepare an automated workflow that synchronizes an updated list of customers opinions on your company stored in Google Spreadsheet with Synerise. The workflow is triggered with an incoming webhook and it creates an event with opinion on the customers’ profiles. In Google Spreadsheet, we use Apps Script to send data every day to the incoming webhook. This article describes the example of custom events but you can perform other actions in Synerise using the data in Google Spreadsheet depending on what you store there, for example, you can update data in a Synerise catalog or add new customers.
Prerequisites
Create a Google Spreadsheet with data you would like to synchronise with Synerise. In our case, the spreadsheet document contains two columns:
opinionwhich contains information about the feedback that customer gave about the companyemailwhich contains the customer’s email.
Process
In this use case, you will go through the following steps:
Create an incoming integration
In this part of the process, create an incoming integration to which you will send the data submitted through Google Spreadsheet.
-
Go to
 Automation > Incoming > New integration.
 -
On the pop-up, select Without authentication.
-
Enter the name of the webhook.
-
In the Endpoint section, click Define.
Important: The URL field is already filled in with the endpoint to which the data submitted throught the form will be sent.- Optionally, you can add an icon to this integration.
- Confirm by clicking Apply.
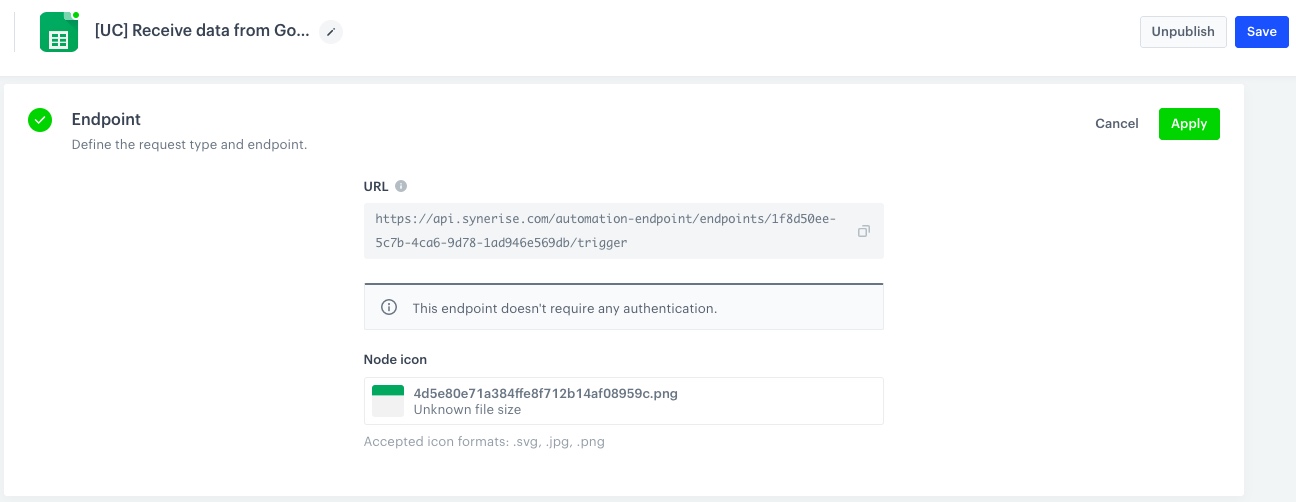
Configuration of the Endpoint section -
In the Incoming data section, click Define.
-
Click Retrieve data. Right after you click the button, send a request to the endpoint in the Endpoint section with the sample of data that will be sent through forms. The system waits for the incoming request for 1 minute and 30 seconds. Example request:
Important: Replace the endpoint URL from the example with the endpoint URL from step 4.curl --location --request POST 'https://{SYNERISE_API_BASE_PATH}/automation-endpoint/endpoints/END_ID/trigger' \ --header 'Content-Type: application/json' \ --data-raw '{ "opinion": "Great company", "email": "xyz@test.com" }' -
When the endpoint receives data from the request, verify the list of variables. If the variables include those which are in the payload (in this case, opinion and email), click Define. If not, click Start again re-send request, and wait for the results.
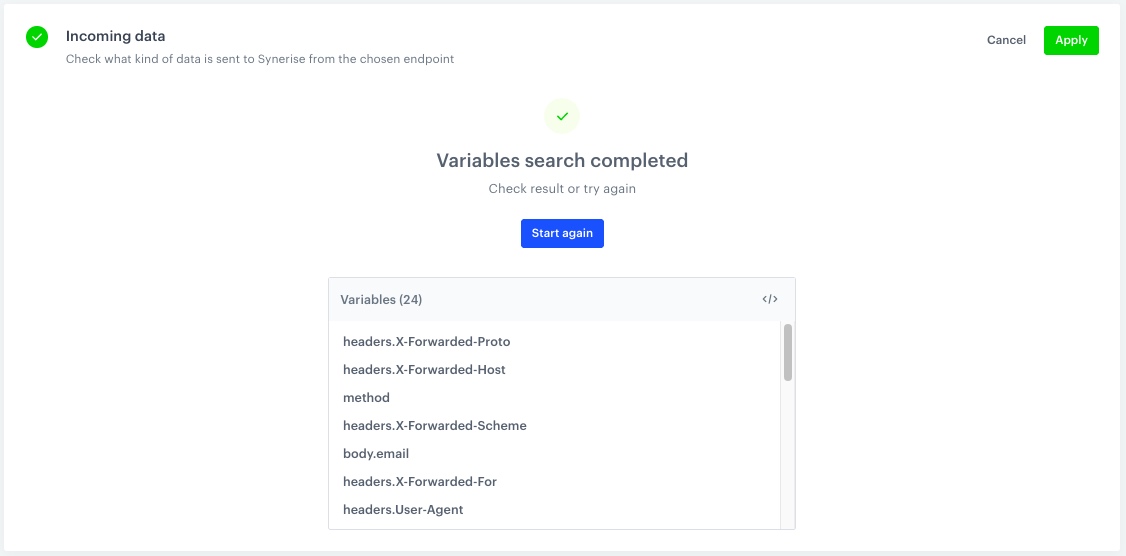
Collected variables from the request -
Click Save & publish.
Configure a Google Spreadsheet
In this part of the process, you will create and schedule a script that sends data from your spreadsheet to Synerise at a specific time, everyday. The script will be created in Apps Script - one of the extensions available in Google Spreadsheets.
-
Go to your Google Sheets account and select the Spreadsheet with customers’ opinions.
-
Click on Extensions and from the dropdown list, selct Apps Script.
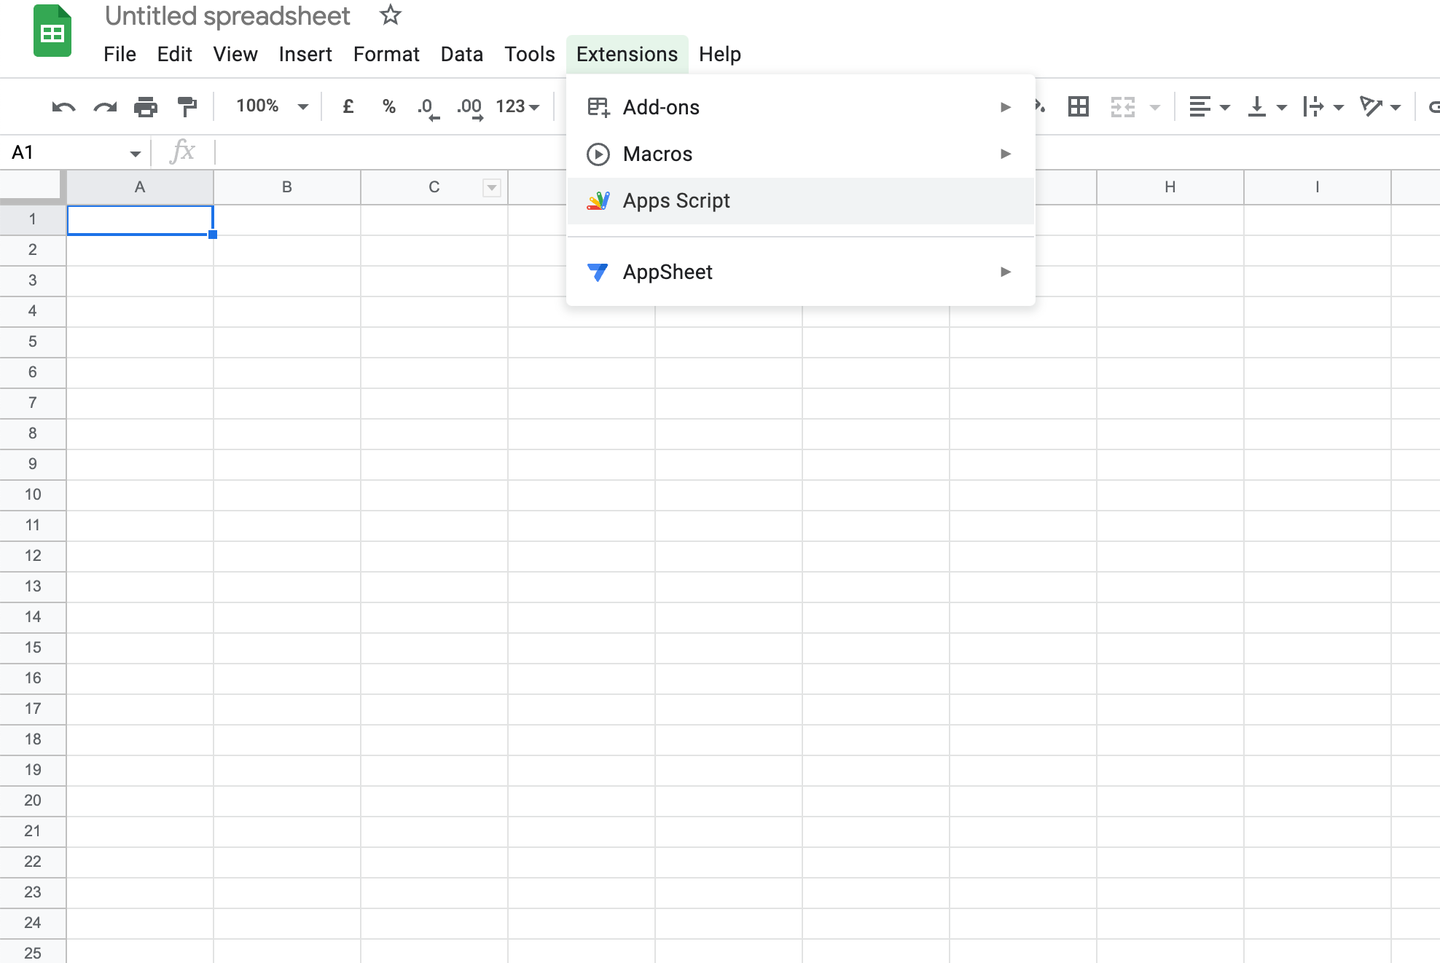
Google Sheet toolbar Result: A window opens.
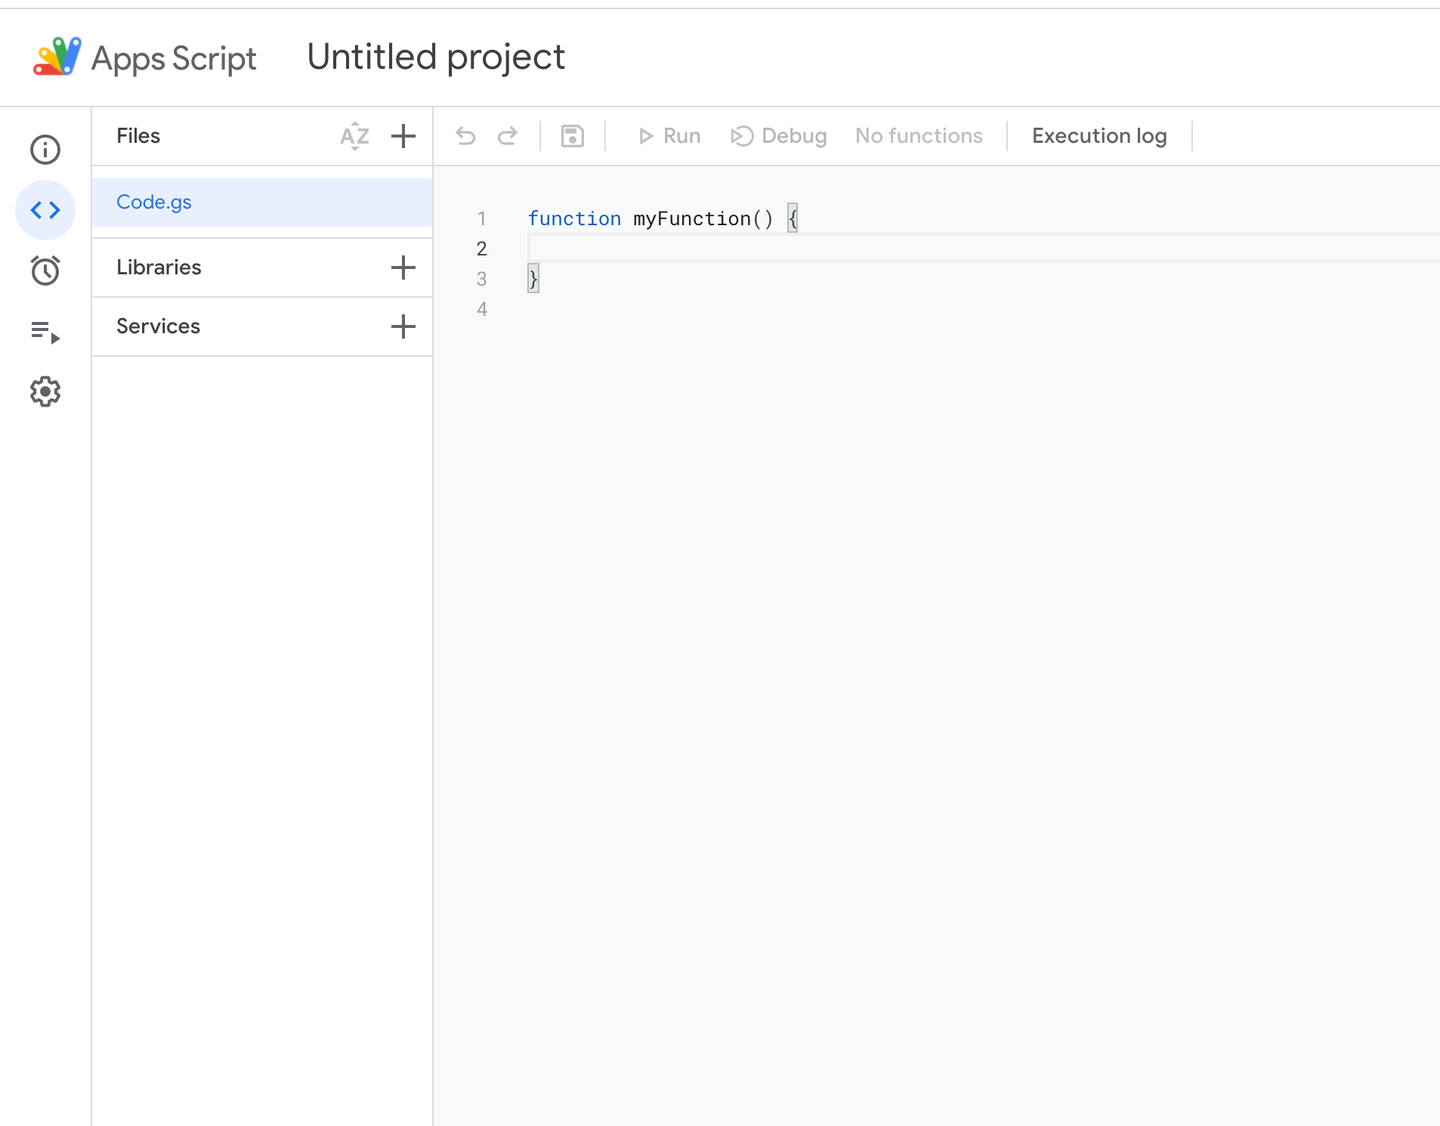
Apps Script view -
Paste the below JavaScript into code window.
-
In the fragment of the code marked as
#insert_endpoint_URL_here#, insert the endpoint URL from first step. This script is responsible for sending requests to the incoming webhook with maximum 1000 rows (this limit is configurable in the below code), if theemailoropinioncolumns are not empty.function onOpen() { var ss = SpreadsheetApp.getActiveSpreadsheet(); var menuEntries = [ { name: "Send to Synerise ", functionName: "doGet" }, ]; ss.addMenu("Export to Synerise", menuEntries); } function doGet() { var ss = SpreadsheetApp.getActiveSpreadsheet(); var sheet = ss.getSheets()[0]; var range = sheet.getRange(2, 1, 1000, 2); // 1000 is number of last row var values = range.getValues(); for (var row in values) { if (values[row][0].length != 0 && values[row][1].length != 0) { var obj = {}; obj.email = values[row][0] obj.opinion = values[row][1] UrlFetchApp.fetch('#insert_endpoint_URL_here#', { "method": "post", payload: JSON.stringify(obj), headers: { "content-type": "application/json" } }) } } } -
To save the script, in the program controls bar, click the disk icon.
-
In the menu on the left side, click the clock icon > Triggers .
-
In the right bottom corner, click the Add Trigger button.
-
Configure as below:
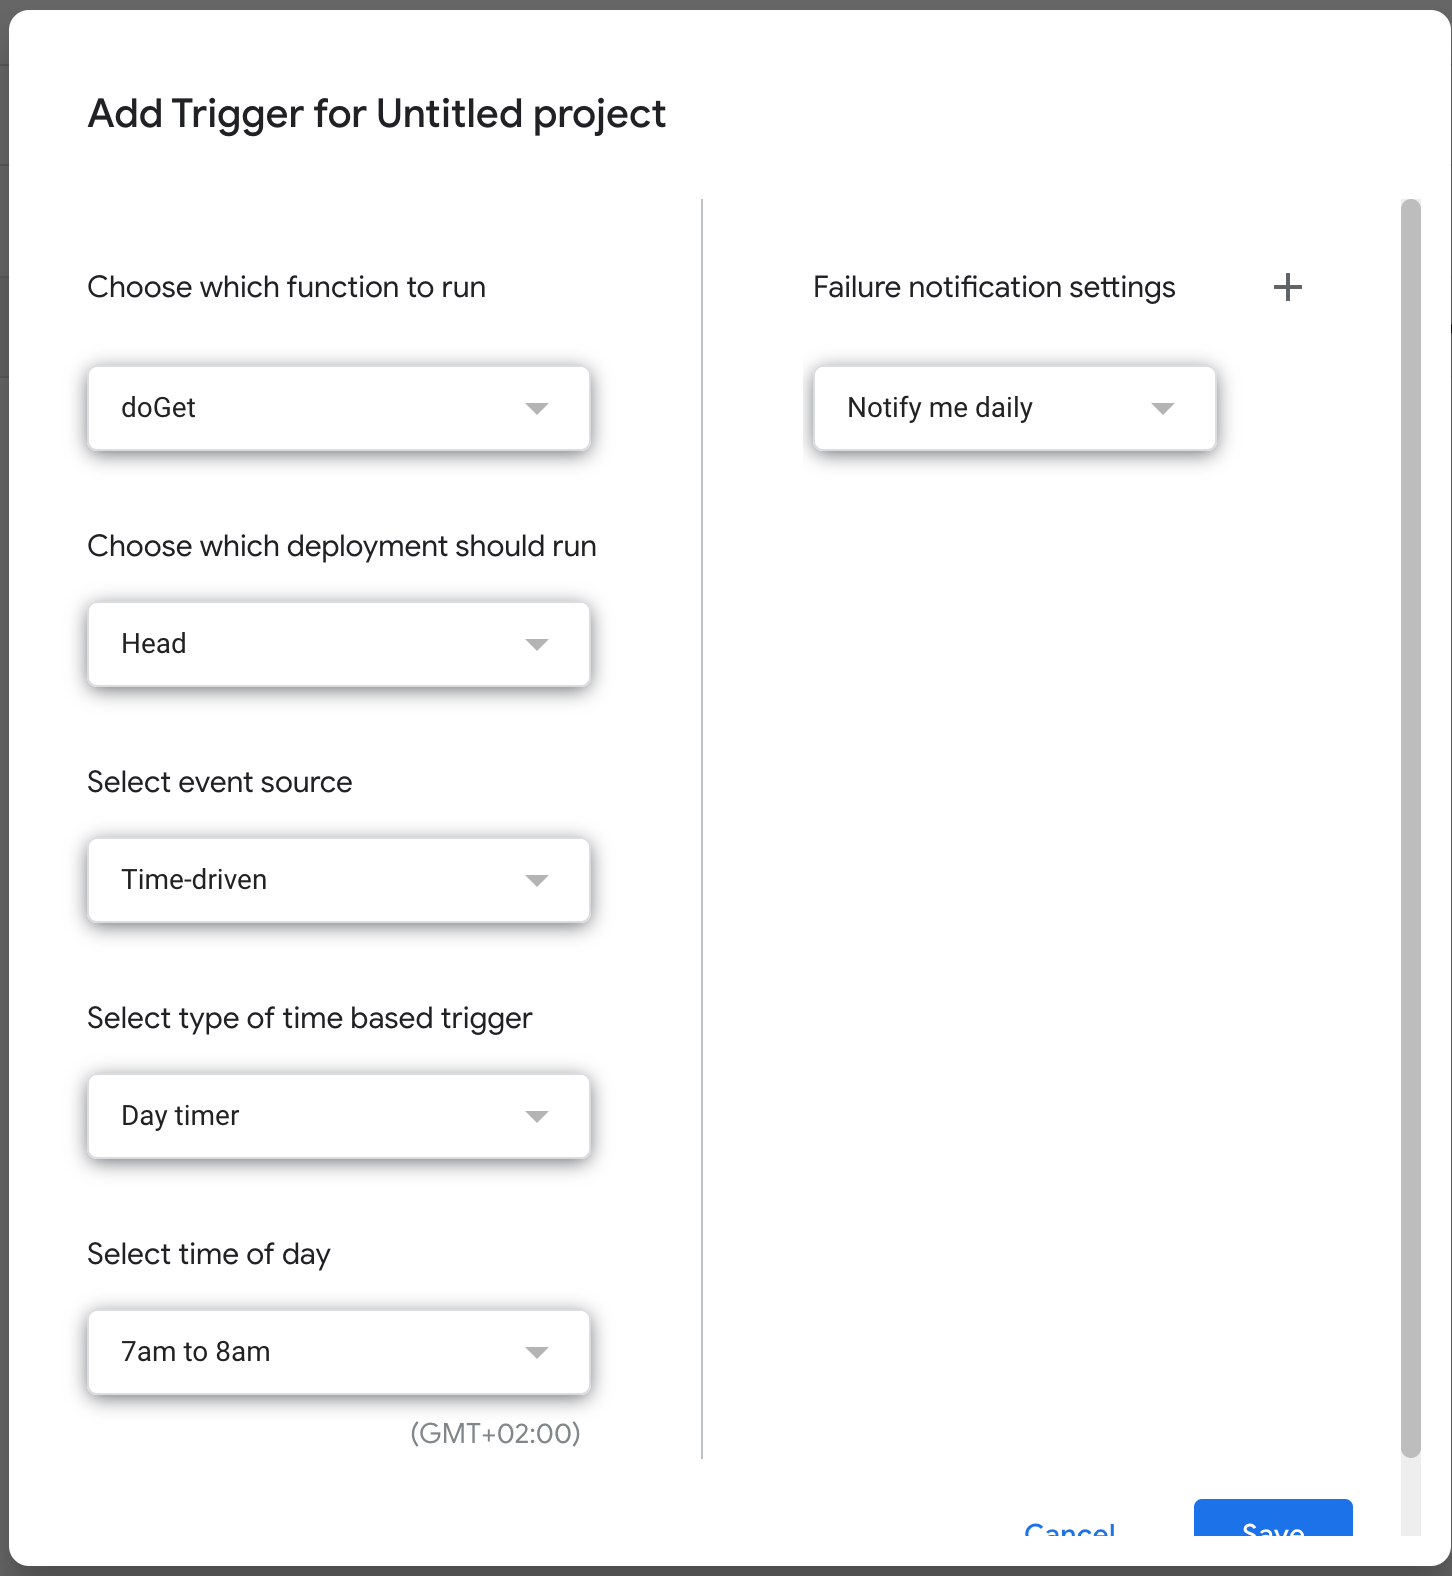
Time trigger configuration in Apps Script -
Click Save.
Result: The data from your Google Sheet spreadsheet will be sent to the endpoint in Synerise everyday between 7 and 8 A.M.
Create a workflow
As the final part of the process, create a workflow which captures data sent to incoming integration and creates custom events on the customers’ profiles. The workflow starts with the business event trigger that is launched every time the data from Google sheet is sent to Synerise. In response to that, a custom event with an opinion about the company is created.
- Go to Automation > Workflows > New workflow.
- Enter the name of the workflow.
- As the first node, select Business Event. In the configuration of the node, select the incoming integration you created as the first part of the process.
- Confirm by clicking Apply.
- On the Buisness Event node, click then.
- From the dropdown list, select the Outgoing integration node.
- Click the node. In the configuration of the node:
-
Select the Custom webhook.
-
Enter the name of the webhook.
-
Select the POST method.
-
Enter the endpoint URL:
- For workspaces hosted in Microsoft Azure:
https://api.synerise.com/v4/events/custom - For workspaces hosted in Google Cloud Platform:
https://api.geb.synerise.com/v4/events/custom
- For workspaces hosted in Microsoft Azure:
-
Enter the following headers:
- set the
content-typeheader toapplication/json(default), - set the
acceptheader toapplication/json, - set the
api-versionheader to4.4
- set the
-
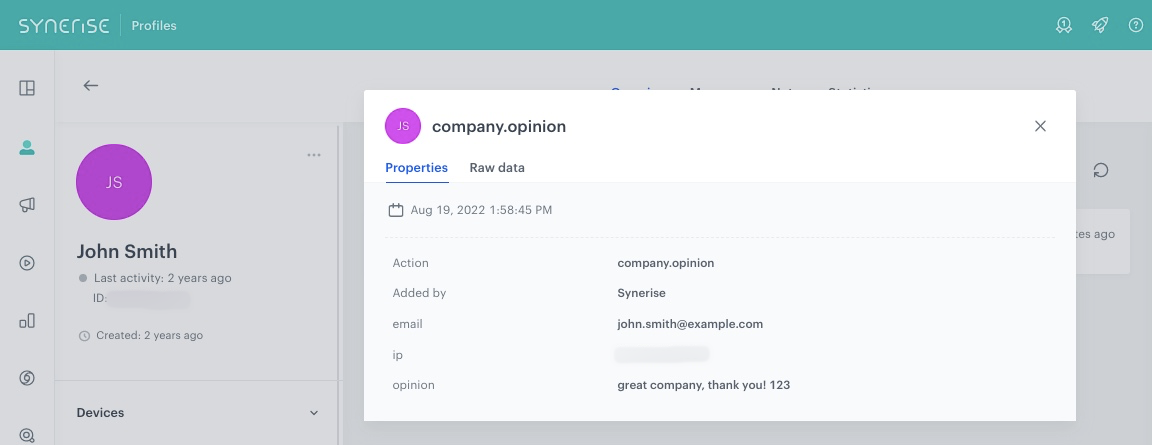
Enter the request body. For the sheet used in this case, the body is as follows:
        {
    "label":"customer made an opinion about company",
    "client":{
        "email":"{{ request.body.email }}"
    },
    "action":"company.opinion",
    "params":{
        "opinion":"{{ request.body.opinion }}"
    }
    }
Note: This is just an example, you can create JSON according to your business needs. In the example request body, we used the event context from the trigger which inserts an email address and opinion received in the Business Event trigger. You can read more about it here. -
In the Authorization section, select By API key.
-
From the dropdown list, select API key that has permissions to create custom events.
-
- Confirm by clicking Apply.
- On the Outgoing integration node, click then.
- From the dropdown list, select End.
- In the upper right corner, click Save & Run.
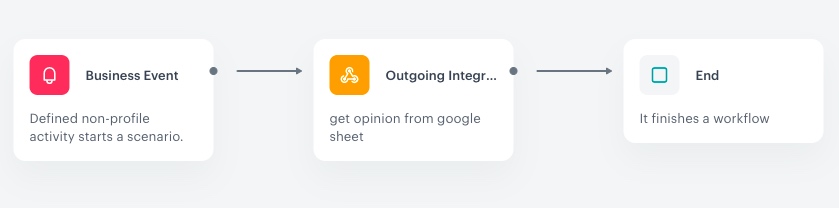
Result: A company.opinion event is saved to the profiles of the customers.
Check the use case set up on the Synerise Demo workspace
You can check the incoming webhook configuration and workflow configuration directly in Synerise Demo workspace.
If you don’t have access to the Synerise Demo workspace, please leave your contact details in this form, and our representative will contact you shortly.