

Send a mobile push to customers who are most likely to buy
In order to increase conversions, you might look into the use of lookalike predictions to identify the customers comparable to prior successful target audiences. Lookalikes let you compare two segments of customers and find those who display similar qualities of performance. Marketers may extend reach of campaigns by incorporating these lookalike audiences into their communication.
This use case describes a workflow that sends a mobile push notification to customers who did not receive it before, and might be likely to purchase after receiving it. Those customers are chosen using highest lookalike prediction score which is calculated on the basis of the segment of customers who reacted well to a previous iteration of that campaign. The workflow is triggered by the session.start event in the mobile application, and sends a mobile push after 48 hours if the customer did not make a purchase.
Prerequisites
- Enable the Lookalike prediction type.
- Select a campaign sent in the past, on the basis of which we will create a segment for lookalike prediction.
- Implement transaction events.
- Implement Synerise SDK in your mobile application.
- Implement mobile push notifications in your mobile application: iOS, Android.
- Create a mobile push template.
Process
- Create a lookalike prediction.
- Create a workflow that sends the mobile push.
Create a lookalike prediction
In this step, we will calculate the prediction. As a result, on the customers’ profiles from the target segmentation a snr.lookalike.score event will appear. It contains a score.label parameter, which determines the similarity between the customers in the target and the source segmentations. The workflow configuration, will be based on this parameter. We will select customers who have the highest similarity to people who previously converted after receiving a given campaign.
- Go to
 > New prediction.
 - Enter a meaningful name for the prediction.
- In the Select prediction type window that appears, click Lookalikes.
- Click Apply.
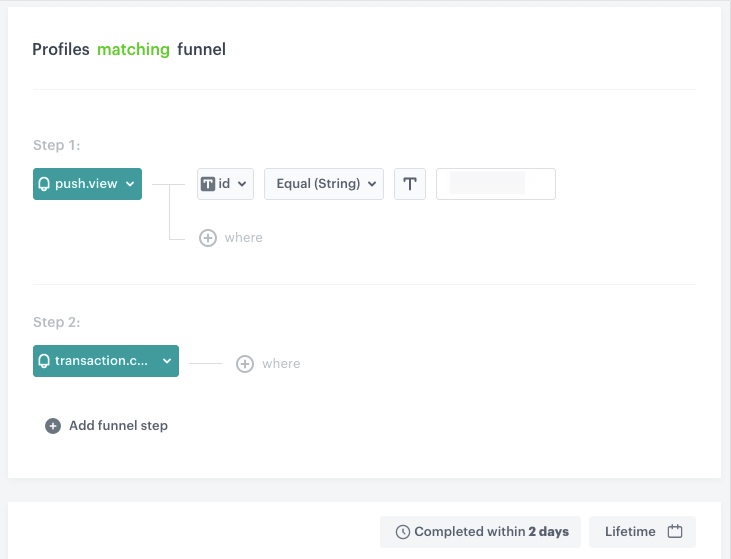
Create a source segmentation
A source segmentation is a group of model customers to whom you compare the target group of customers in order to find similar customers in the target group. In this scenario, customers who made a purchase during past marketing campaign will be the source segmentation.
- In the Audience section, click Define.
- In the Source segmentation sub-section, click Choose segmentation.
- On the dropdown list, click Create new.
- In the Segmentation name field, enter a meaningful name of the segmentation.
- Click Netx step.
- Click Choose filter:
- From the dropdown list, select the
push.viewevent. - Click the + and where button and select
id. - As the logical operator, select Equal.
- Type the campaign ID.
- From the dropdown list, select the
- Click + Add funnel step.
- Click Choose filter:
- From the dropdown list, select the
transaction.chargeevent.
- From the dropdown list, select the
- In the lower-right corner, click the clock icon.
Result: Completed within section will appear. - Type
2and from the dropdown list, select Days. - Using the date picker in the lower-right corner, select the Lifetime value.
- Save the segmentation by clicking Create segmentation.
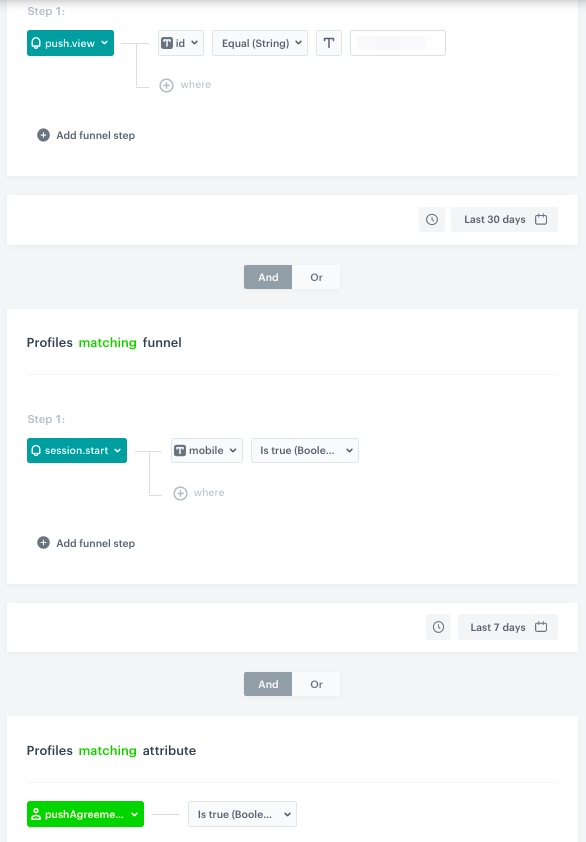
Create a target segmentation
A target segmentation is a group of customers among which you want to find customers who are similar to those included in the source group. In this scenario, we are looking for customers who visited a mobile application in the specified time period and did not receive the previous campaign.
- In the Audience section, click Define.
- In the Target segmentation sub-section, click Choose segmentation.
- On the dropdown list, click Create new.
- In the Segmentation name field, enter a meaningful name of the segmentation.
- Click Netx step.
- Click Choose filter:
- From the dropdown list, select the
push.viewevent. - Click the + and where button and select
id. - As the logical operator, select Equal.
- Type the campaign ID.
- Change Profiles matching funnel to not matching.
- From the dropdown list, select the
- Using the date picker in the lower-right corner, specify the time period:
- Set the time range in Relative date range to Custom.
- Type 30 below, and from the dropdown list next to the field, choose Days.
- Click Apply.
- Click Choose filter:
- From the dropdown list, select the
session.startevent. - Click the + and where button and select
mobile. - As the logical operator, select Is true.
- From the dropdown list, select the
- Using the date picker in the lower-right corner, specify the time period:
- Set the time range in Relative date range to Last 7 d.
- Click Apply.
- Click Choose filter:
- From the dropdown list, select the attribute for push agreement.
- As the logical operator, select Is true.
- Save the segmentation by clicking Create segmentation.
- Confirm the settings in the Audience section by clicking Apply.
Configure further settings
- In the Settings section, click Change.
- Choose Set up recurring prediction calculation:
- Set the frequence of model training to 7 days.
- Change the scale from 5 point scale to 2. The scale a customer reached will be available in the
snr.lookalike.scoreevent, as thescore_labelparameter. - Confirm the changes in the Settings section by clicking Apply.
- Click Save & Calculate.
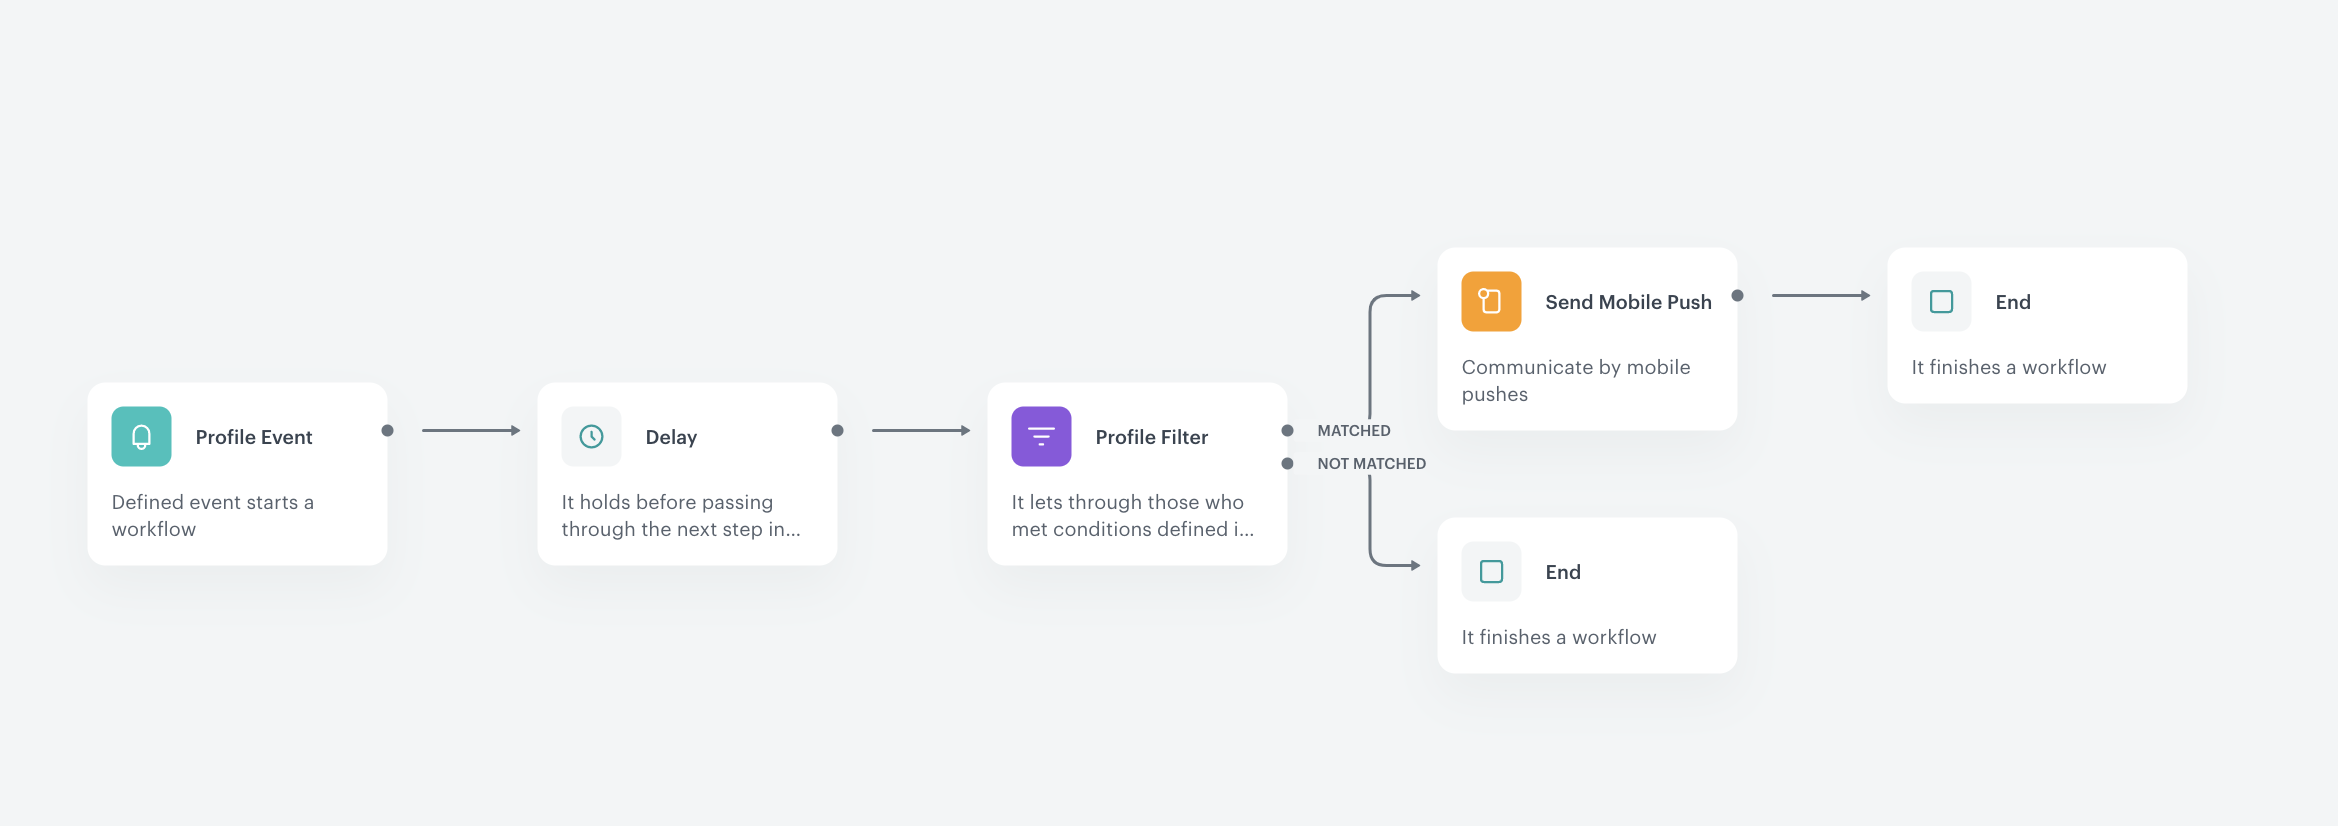
Create a workflow
As the final part of the process, create a workflow that manages the push notifications. Visiting the mobile app triggers the start of the workflow. The push notification will be sent after 48 hours to customers with high prediction score and who didn’t make a purchase.
- Go to Automation > Workflows > New workflow.
- Enter the name of the workflow.
Define the Profile Event trigger node
At this stage, we will configure the conditions that launch the workflow. As a trigger, we will use the session.start event.
- As the first node of the workflow, add Profile Event. In the node settings:
- From the dropdown list, select the
session.startevent. - Click the + and where button and from the dropdown list, select
mobile. - As the logical operator, select Is true.
- Click Apply.
- From the dropdown list, select the
Configure Delay node
This node will delay sending the push notification.
- Add the Delay node. In the node settings:
- In the Delay field, type
48. - From the dropdown list, choose Hour.
- In the Delay field, type
- Click Apply.
Configure the Profile Filter node
This node will filter the customers visiting the mobile application to those who received the high value of the score.label parameter and those who didn’t make a purchase in the last 7 days.
-
As the next node, add Profile Filter.
-
In the setting of the node, click Choose filter and from the dropdown list, select the
snr.lookalike.scoreevent:- For the event parameter, click the + where button and select
modelId. - As the logical operator, select Equal.
- Enter the ID of the lookalike prediction created in the previous step.
- Click the + and where button and select
score_label. - As the logical operator, select Equal.
- Type
high. - In the calendar in the right bottom of the page, in the Relative date range section, select Last 7 d.
- Click Apply.
- For the event parameter, click the + where button and select
-
Click Choose filter and from the dropdown list, select the transaction charge event:
- Change the Profiles matching funnel to not matching.
- In the calendar in the right bottom of the page, in the Relative date range section, select Last 7 d.
- Click Apply.
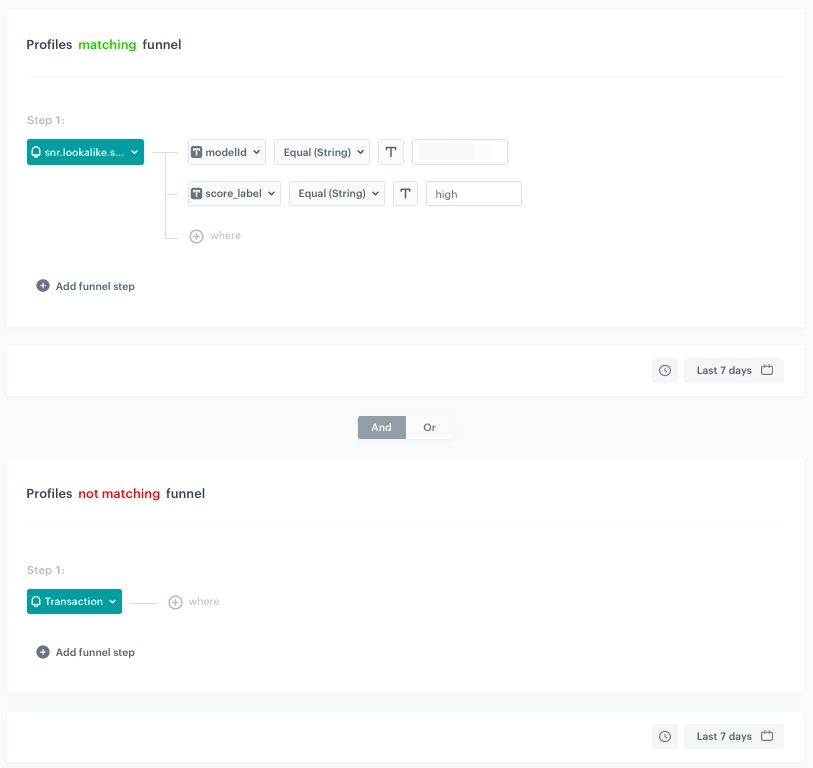
Profile filter node configuration -
For the Not matched path, add the End node .
Configure settings for mobile push
- As the next node for the Matched path, add the Send Mobile Push node. Configure it according to your business needs:
- Select the template type of mobile push.
- Select a template prepared earlier.
- Confirm by clicking Apply.
Add the finishing node and capping
- Add the End node.
- In the top right corner of the page, click the Set capping button. Define the settings:
- Type as follows Limit 1 Time 7, and from the dropdown list choose Day.
- Click Apply.
- In the upper right corner, click Save & Run.
Check the use case set up on the Synerise Demo workspace
You can check the configuration of each step from this use case in our Synerise Demo workspace:
If you don’t have access to the Synerise Demo workspace, please leave your contact details in this form, and our representative will contact you shortly.