
Send offline conversion to Google Ads
With Synerise, businesses can optimize their marketing strategies and bridge the gap between digital advertising and brick-and-mortar sales. By integrating online and offline operations, you can accurately track conversions from Google Ads when customers purchase through an ad and choose in-store pickup and payment. Thanks to Synerise’s integration with Google Ads, you can automate the process of sending offline conversions to your Google Ads account. This seamless attribution of offline conversions to specific ad campaigns empowers businesses to optimize their marketing strategies and successfully connect digital advertising with brick-and-mortar sales. It’s important to note that an offline conversion can encompass various offline events, such as visiting a store, restaurant, or any other conversion event your business recognizes.
In this use case, we will create a workflow to send offline conversion data to Google Ads. The workflow will be triggered by a custom event - purchase through an ad with in-store pickup and payment.
Prerequisites
- Implement SDK to a website to which a profile is referred after clicking the ad.
- Implement sending events about completing offline conversion. It can include
valueandcurrencyparameters (there is an option to send these addotional parameters to Google Ads) - Create a Google Ads account.
- Launch an ad campaign through Google Ads.
- Create an event expression to extract the
gclidparameter from the URL of visited website. - Create an aggregate that retrieves the value of the
gclidparameter from the latest page visit to your website (or according to your business needs).
Create a workflow to send conversion data to Google Ads
Create a workflow which sends offline conversion data to Google Ads, after a customer pays for an order in a brick-and-mortar store.
- Go to
 Automation > Workflows > New workflow.
 - Enter the name of the workflow.
Define the trigger node
As a trigger, we will use the offline.transaction custom event for a transaction made in brick-and-mortar store when picking up an order.
- As the first node of the workflow, add Profile Event.
- In the configuration of the node, from the Choose event dropdown menu, choose
offline.transactionevent. - Click Apply.
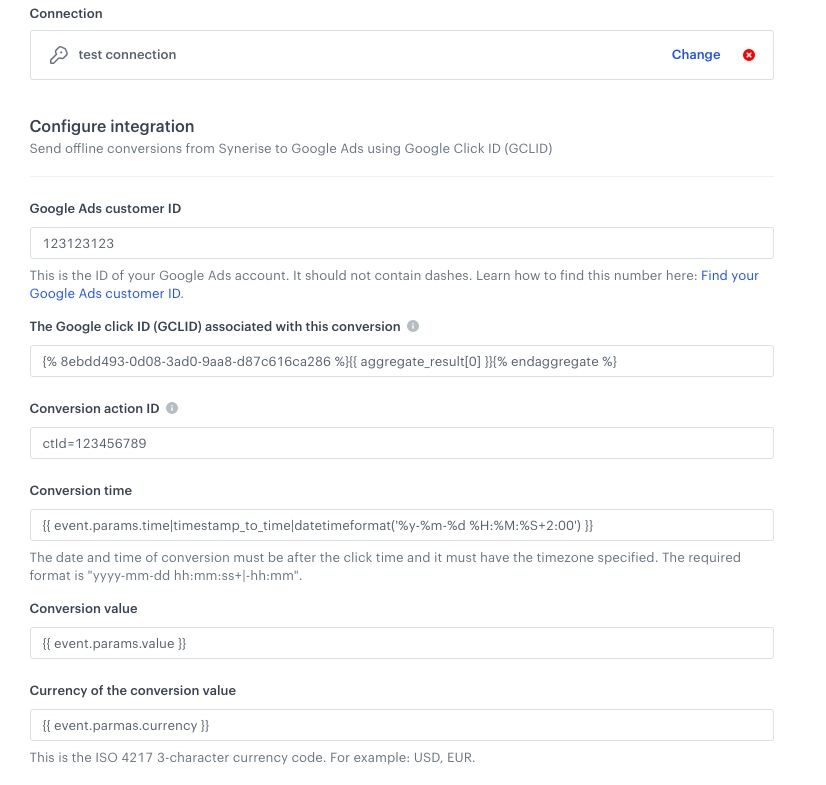
Configure the Send offline conversion node
- As the next node, add Google Ads > Send offline conversion.
- In the configuration of the node, from the dropdown list, select the connection.
- If no connections are available or you want to create a new one, see Create a connection.
- If you selected an existing connection, proceed to next step.
- In the Google Ads customer ID field, enter the ID of the Google Ads account. It can’t contain dashes. Learn how to find this number.
- In the The Google click ID (GCLID) associated with this conversion field, enter the part of the URL that starts with
?gclid=.
For that purpose, you can enter a Jinjava tag that inserts the value of the aggregate you created as the part of the prerequisites:{% aggregate AGGREGATE_ID %}{{ aggregate_result[0] }}{% endaggregate %}. Replace theAGGREGATE_IDwith an actual ID of the aggregate, you can find it in the URL while previewing the aggregate. - In the Conversion action ID field, enter the ID of the conversion. You can find it in the Google Ads panel. When you go to conversion action details, the URL contains the
ctIdparameter (for example,ctId=123456789) whose value is the conversion action ID. Learn more about conversion action in Google Ads. - In the Conversion time field, enter the time of the conversion in the following format:
yyyy-mm-dd hh:mm:ss+|-hh:mm.
For that purpose, you can use a Jinjava code that inserts date of conversion dynamically, from the trigger, that is, offline conversion. For example,{{ event.params.time|timestamp_to_time|datetimeformat('%y-%m-%d %H:%M:%S+2:00') }}. - Optionally, in the Conversion value for the advertiser field, enter the value. For that purpose, you can use a Jinjava code that inserts the value dynamically based on the event context from the trigger, that is, offline conversion. For example,
{{ event.params.value }}. - Optionally, in the Currency associated with the conversion value field, enter the currency. For that purpose, you can use a Jinjava code that inserts the value dynamically based on the event context from the trigger, that is, offline conversion
{{ event.parmas.currency }}. - Confirm the settings by clicking Apply.
Add the finishing node
- Add the End node.
- In the upper right corner, click Save & Run.
Result:
Workflow configuration
Check the use case set up on the Synerise Demo workspace
In Synerise Demo workspace, you can check the configuration of:
If you don’t have access to the Synerise Demo workspace, please leave your contact details in this form, and our representative will contact you shortly.