Creating recommendations
Once the model training is completed, you can create a recommendation. The recommendations you create and activate will not be visible until you indicate how and where the recommendations are to be displayed.
Because each recommendation is different for every customer, you can’t indicate exactly the items to be shown in the recommendations. However, you can preview the recommendation for any customer.
Distributing recommendations
You can use the ID of the recommendation and insert it in other types of communication, such as:
- dynamic content - this way you can show the recommendations on your website.
- email - this way you can send out recommended items through emails.
- mobile application - you can use documents to build your own mobile app and show the recommended items.
- mobile push - you can send recommendations through notifications in your mobile application.
- web push - this way you can send notifications to your customers through a web browser.
- SMS - this way you can reach your customers with recommendations on their mobile.
You may want to read
- Recommendation types
- How to build a filter in a recommendation
- Filters - examples of use
- Previewing recommendations
- Recommendation statistics
Prerequisites
- You must configure an item catalog for recommendations.
- You must have permissions from the following sets:
- Communications > Recommendations
Without these permissions, you can’t see the Recommendations module in the menu. - Assets > Catalogs
Without these permissions, the Recommendations module may not load.
- Communications > Recommendations
- If you want to create the Recent interactions recommendation, create an aggregate that gathers a group of items towards which a specific event has occurred
Click here to see example aggregate
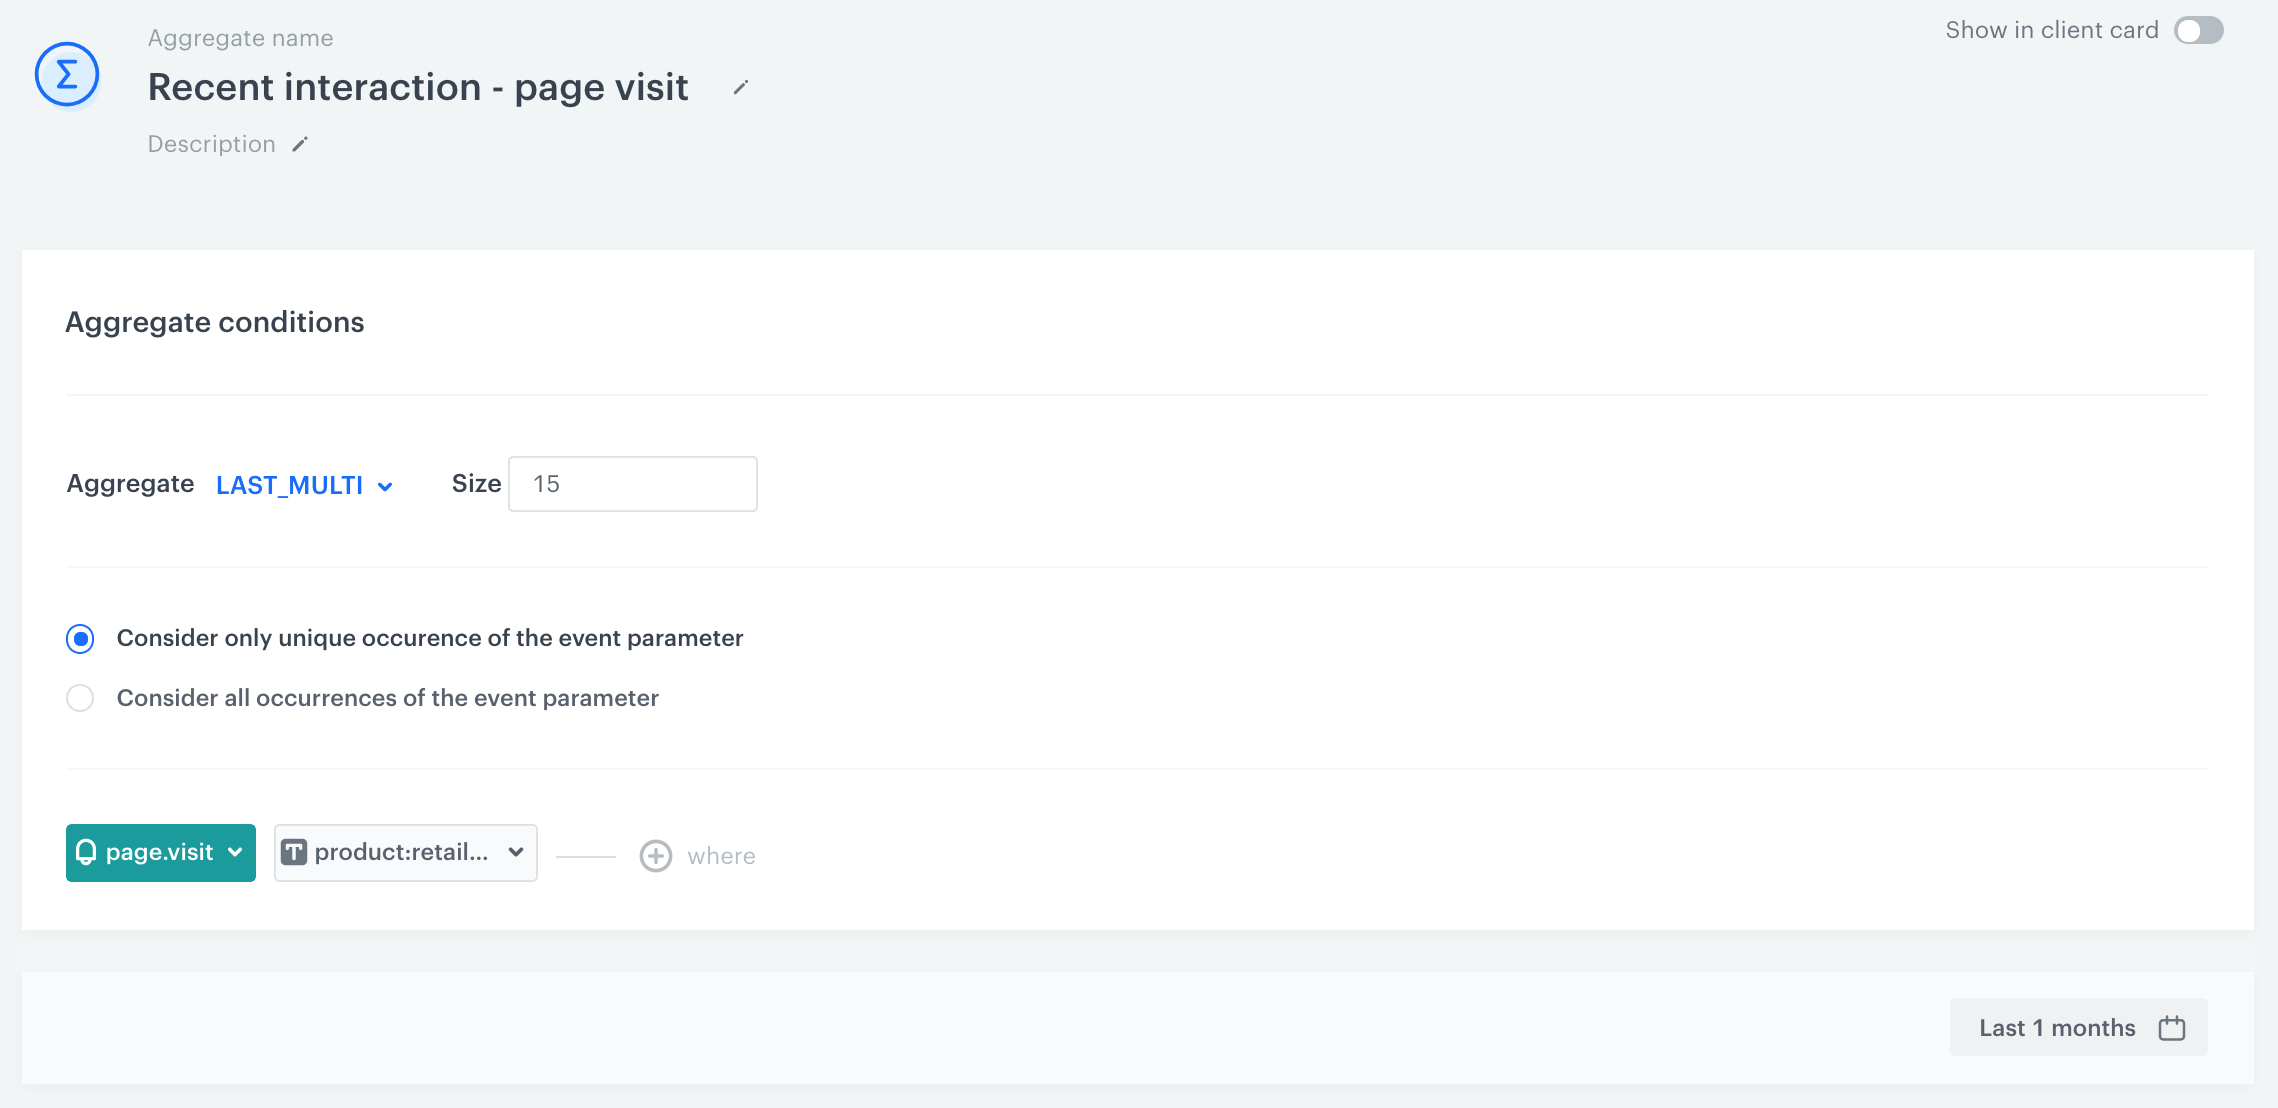
The Type & Source section Required in the configuration:
- Aggregate type set as Last Multi
- Event
- Event parameter connected to an item
Note: You can read more about aggregates here.
Creating recommendation
- Go to
 Communication > Recommendations > Add recommendation.
 - Enter the name of the recommendation (it is only visible on the list of recommendation).
Select feed and recommendation type
Start with selecting the feed from which items will be sourced to recommendations and the type of recommendations to be displayed.
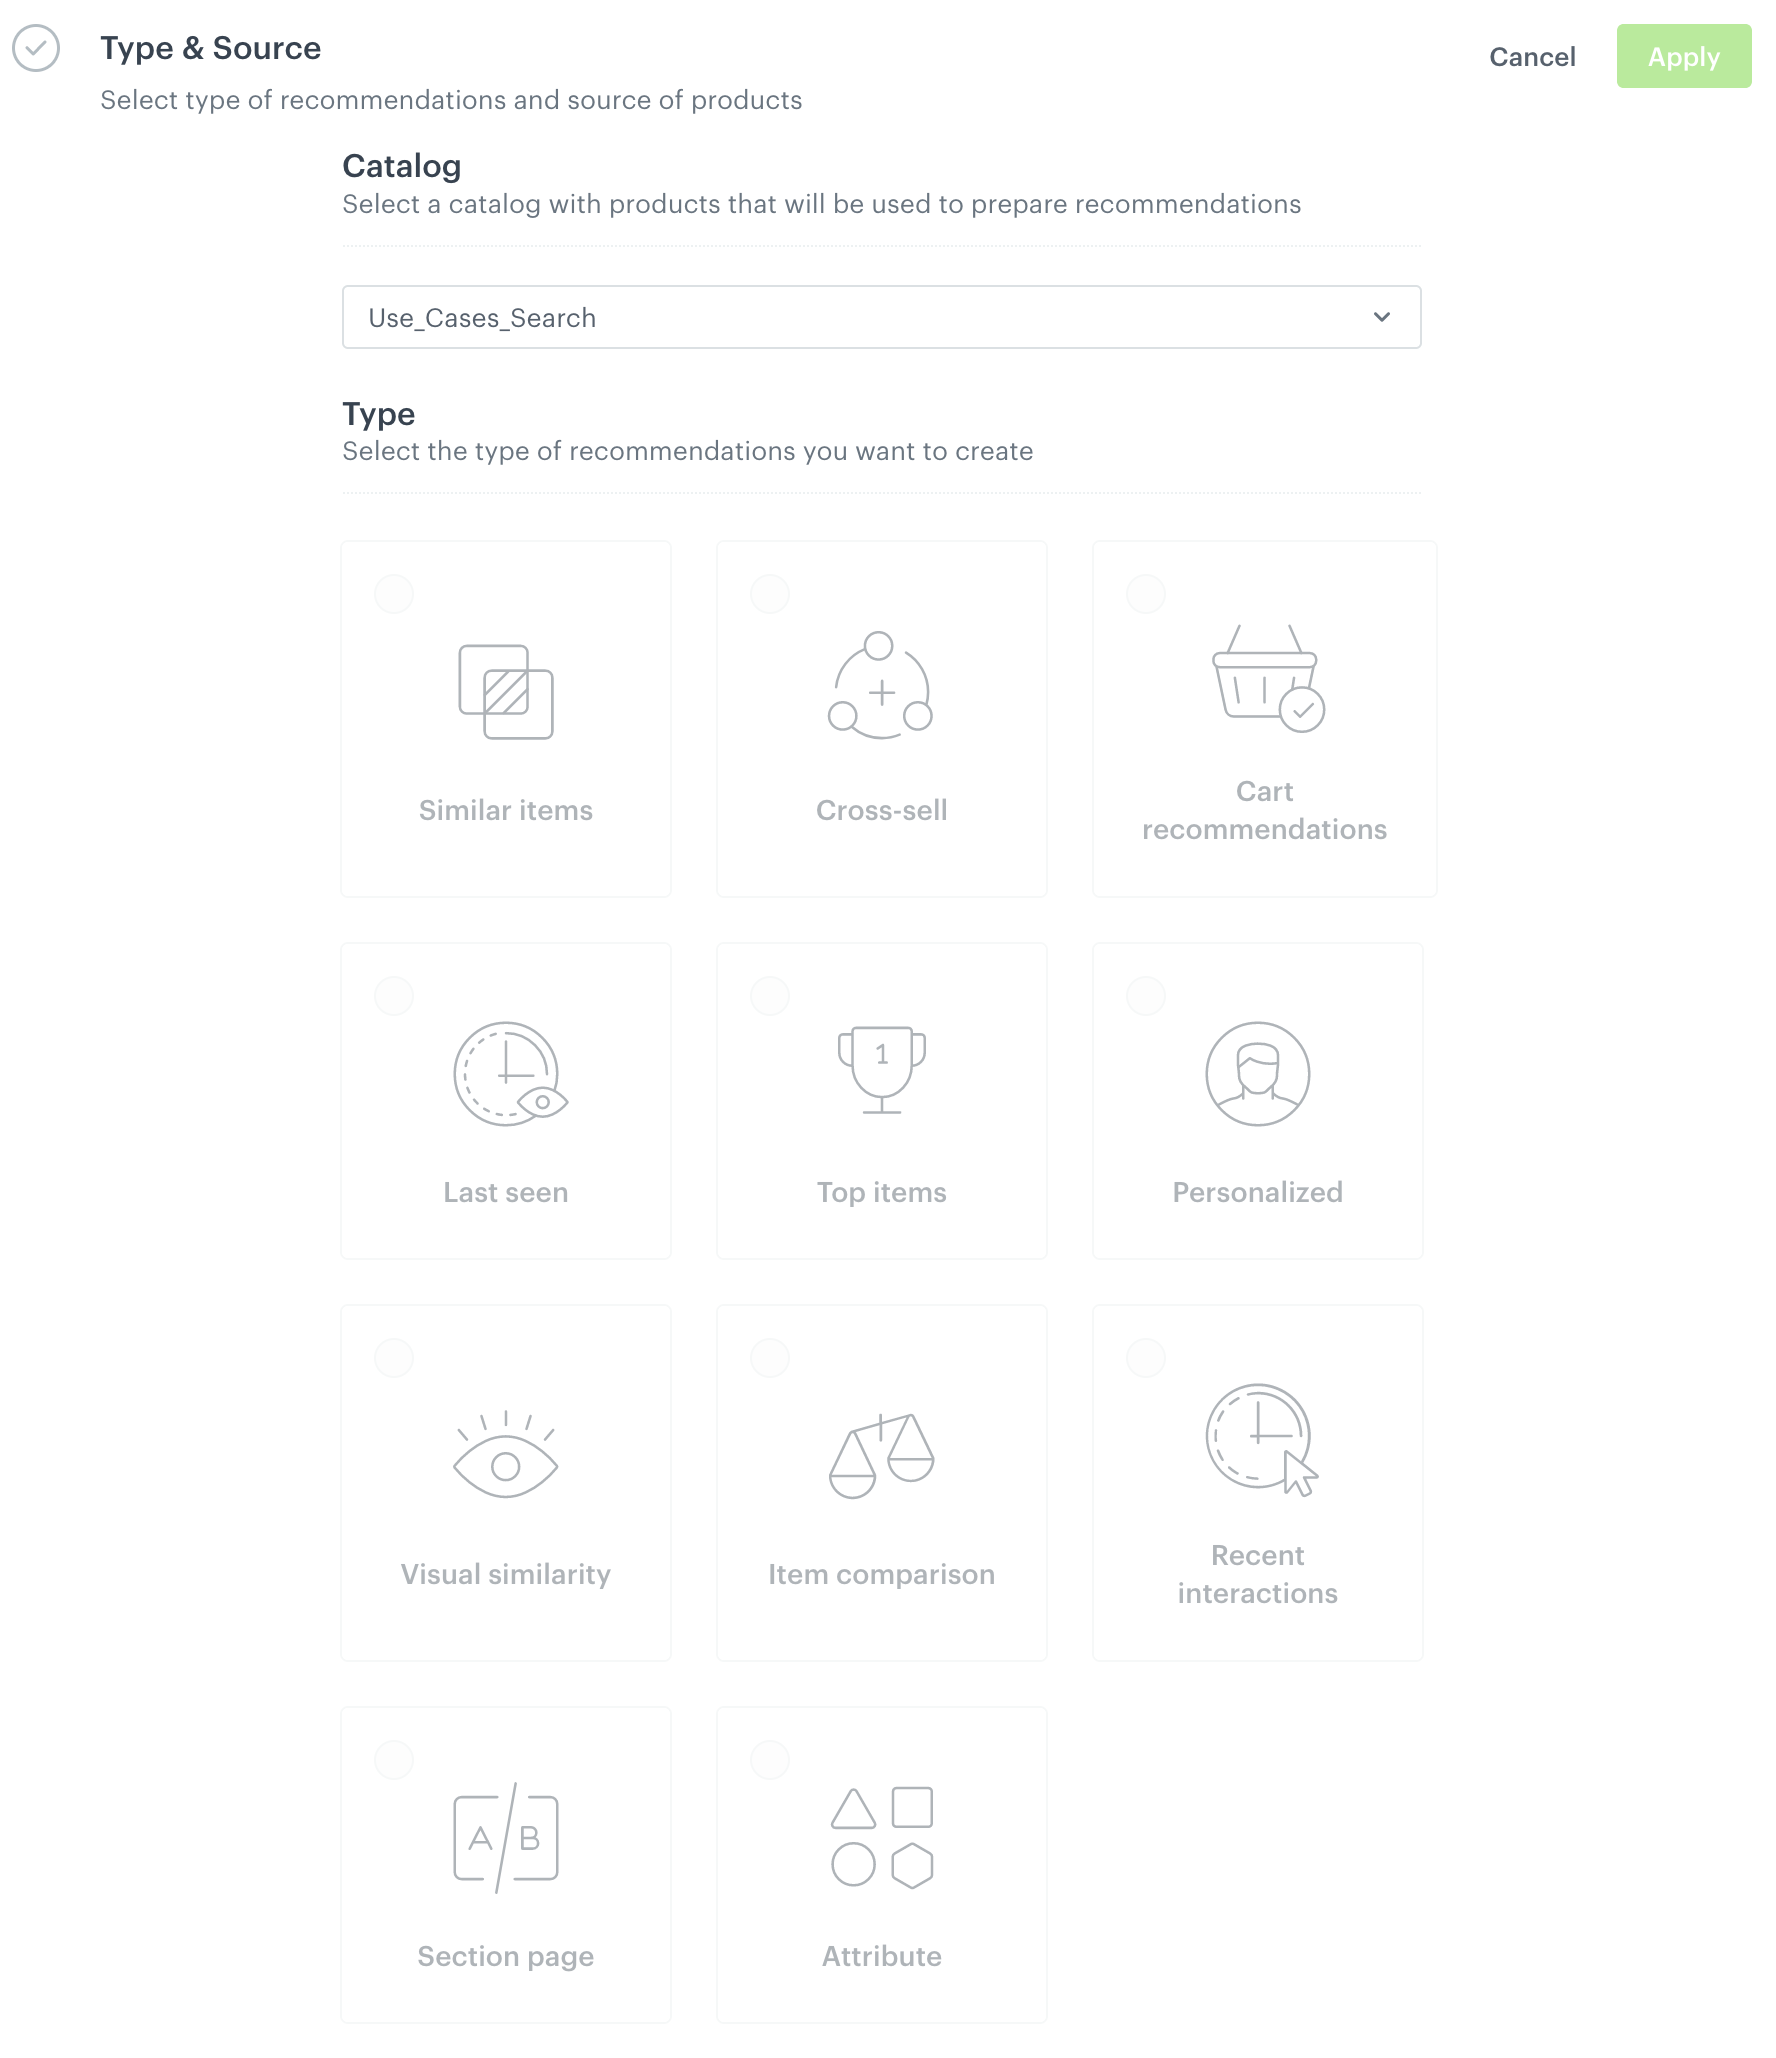
- In the Type & source section, click Define.
- From the Catalog dropdown list, select an item feed.
- Below, select the recommendation type.
If the recommendations are greyed out, it means the AI engine is not trained yet or that a recommendation type is not available for the particular catalog. - Confirm the settings by clicking Apply.
Select an aggregate (only recent interactions model)
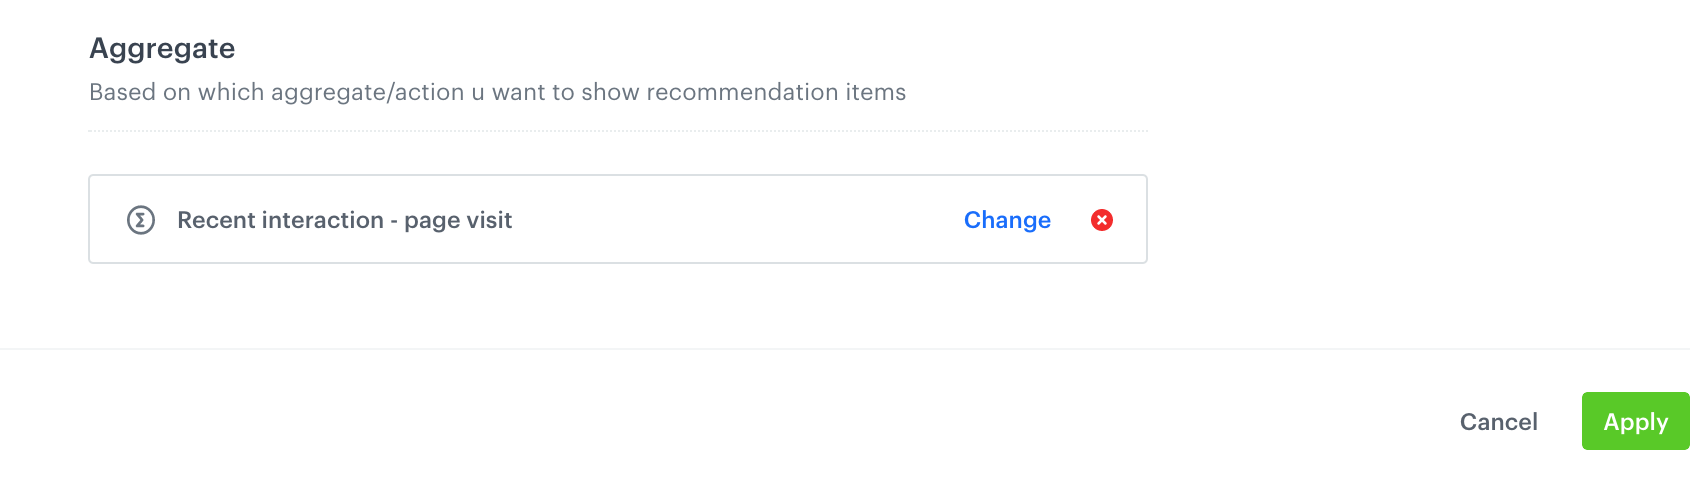
- Select the aggregate you created within the scope of Prerequisites
- Confirm the selection by clicking Apply.
- Proceed to Configuring comparison attributes.
Configure comparison attributes (only item comparison model)
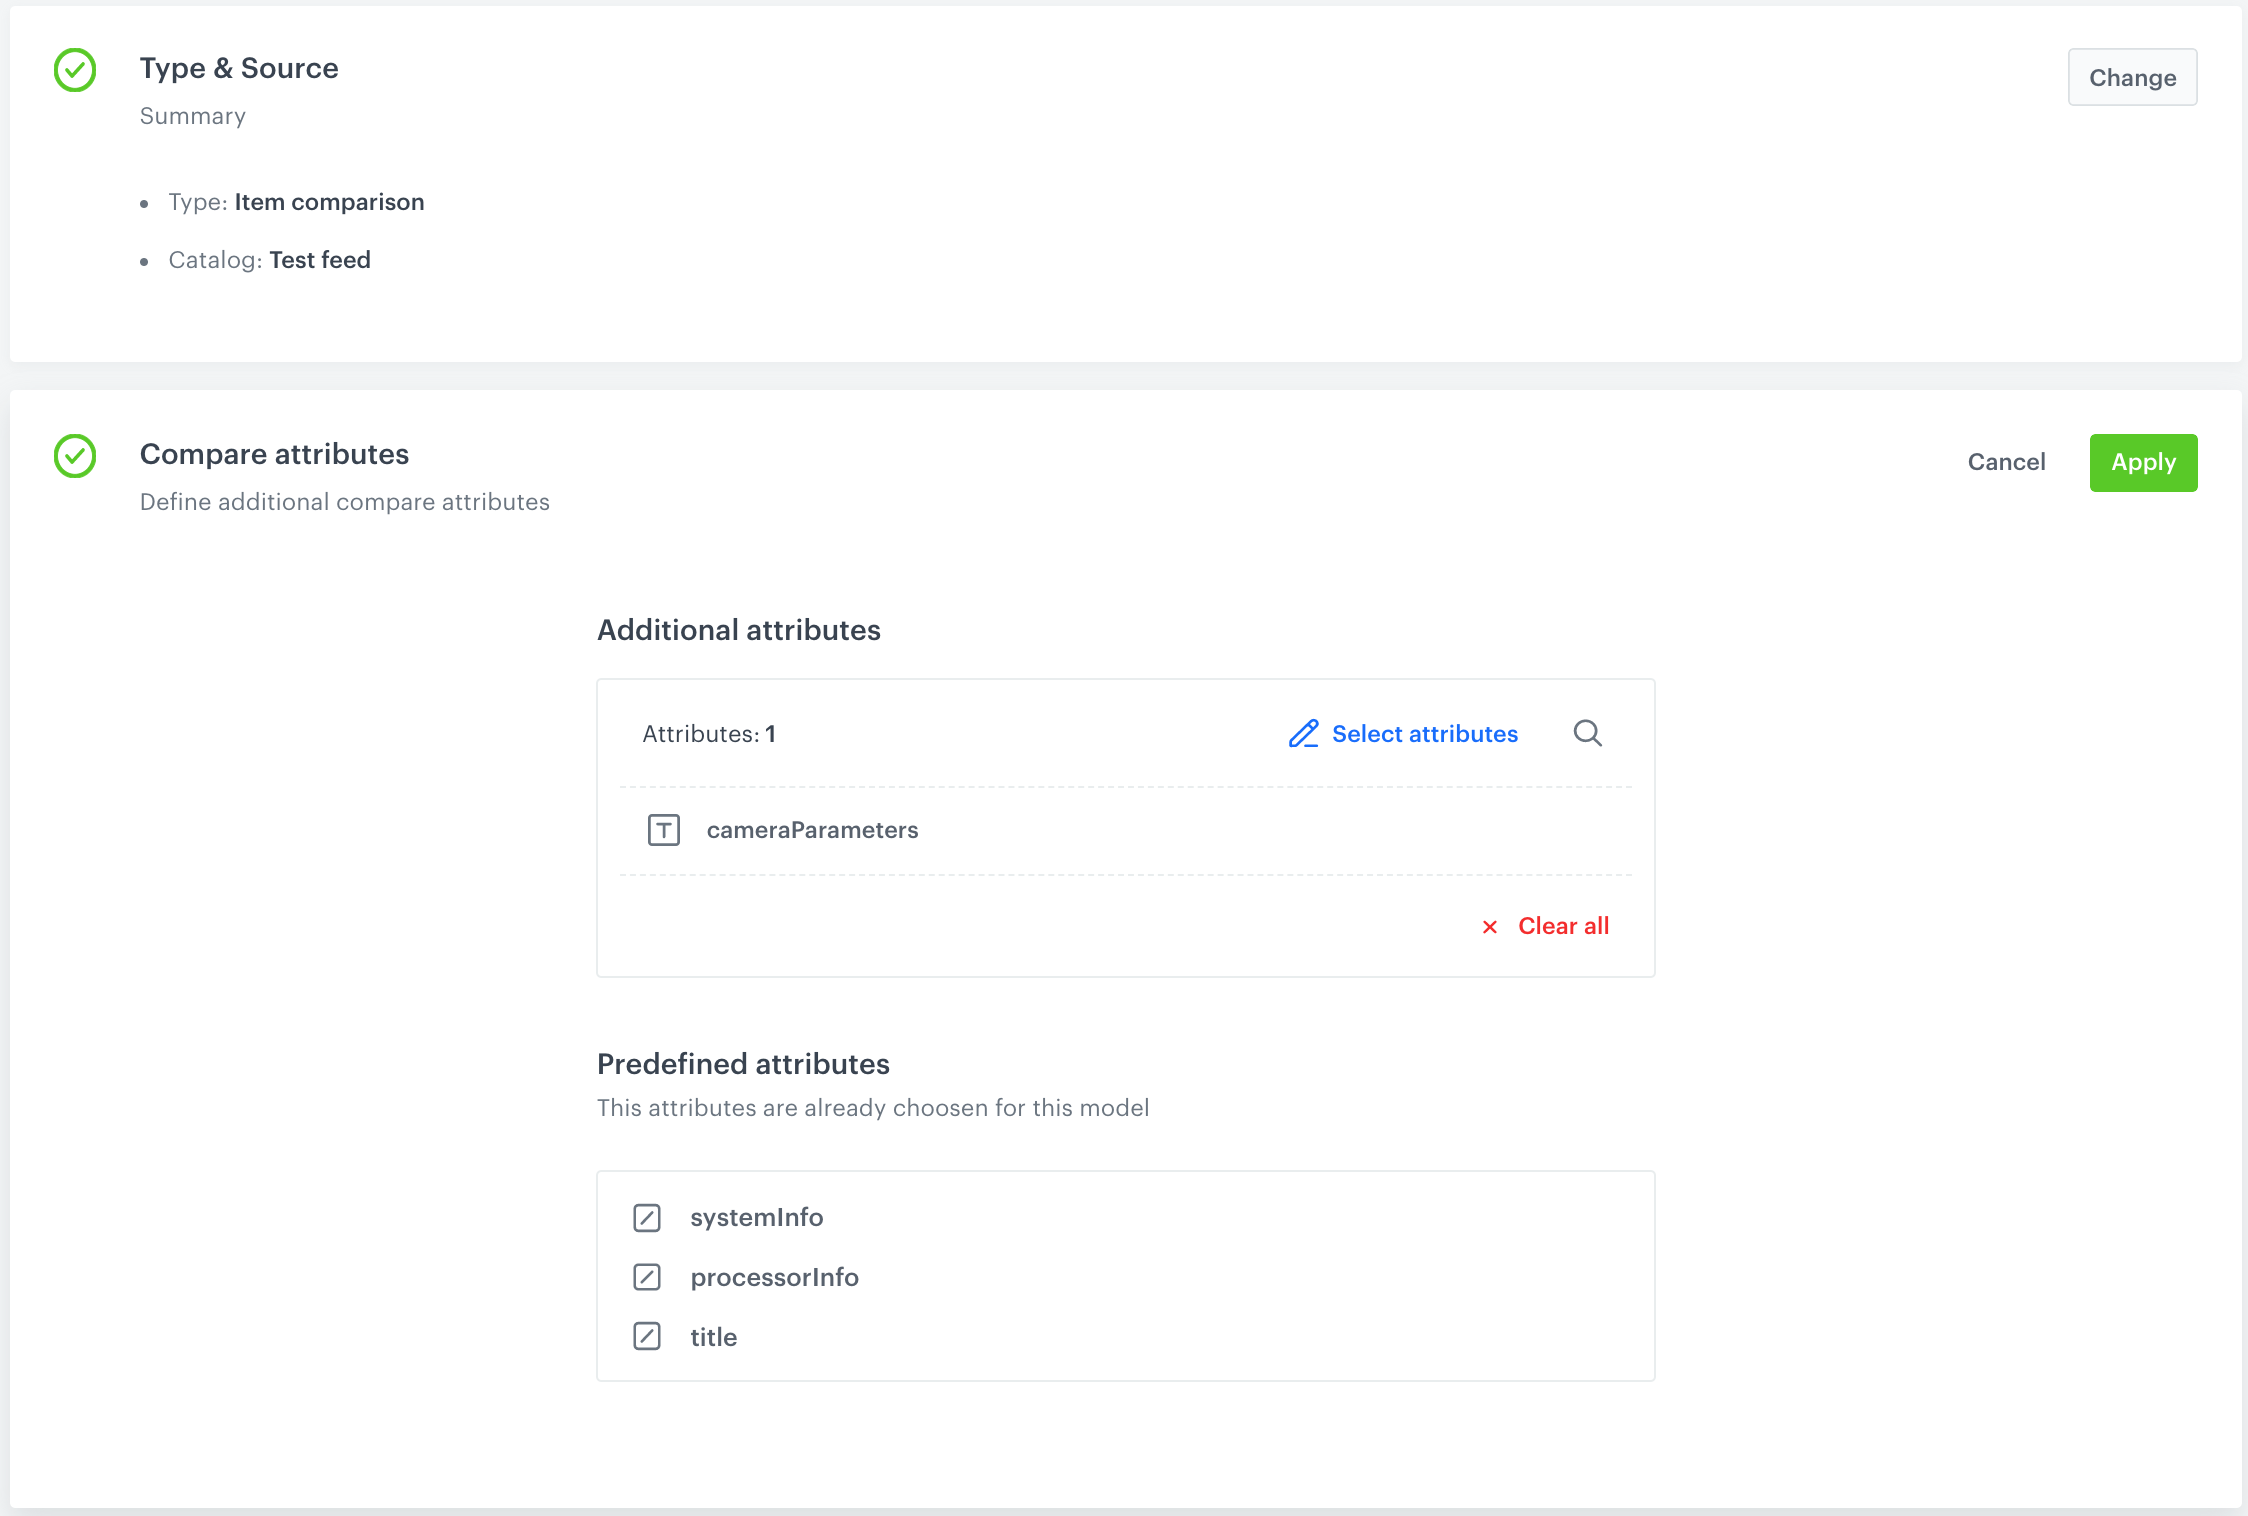
You can select the attributes of the items to be included in the comparison. The attributes in the Predefined attributes section are sourced from the Response attributes which can be edited in Settings > AI Engine Configuration.
- To add more attributes apart from the predefined ones to the comparison, in the Additional attributes, click Select attributes.
- On the pop-up, select the attributes.
- Confirm by clicking Apply.
Result: Example item comparison on a website (the context item is included in one of the columns):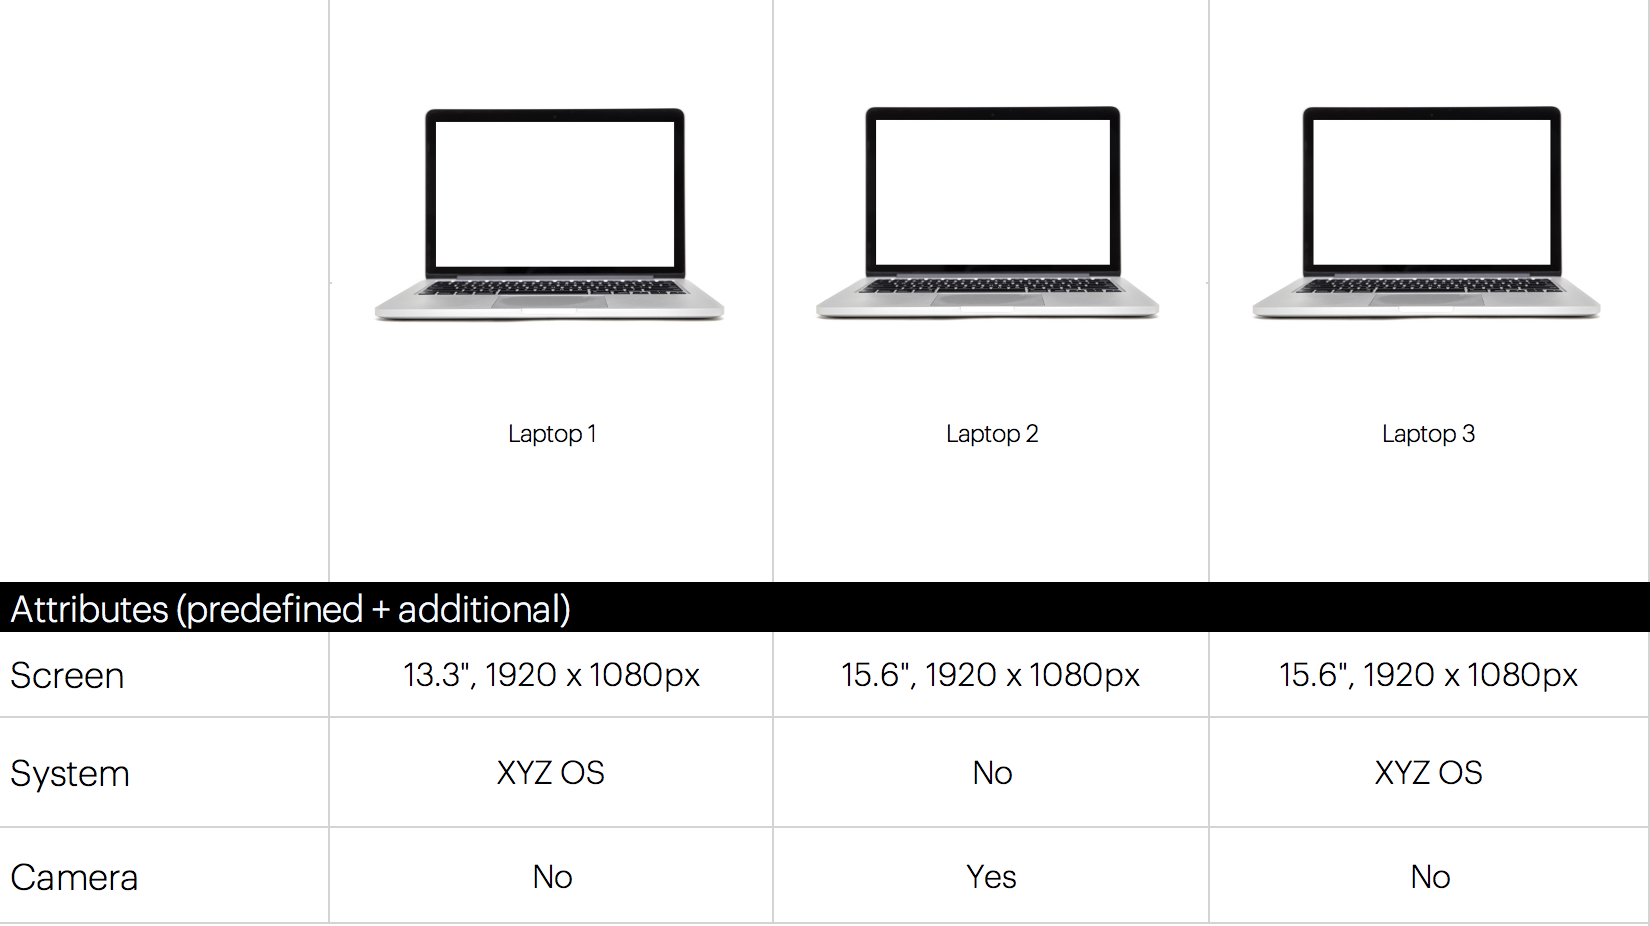
Example item comparison frame
Configure item slots
You can use slots to assign space in your recommendation frame to specific items. Each slot may include a different number of items and have its own filtering rules.
For example, you can use three slots to display:
- Items of specific brand - This allows you to use space in your recommendation slots by items of your partners and suppliers.
- Items of specific category,
- Items of specific color
A recommendation must include at least one slot.
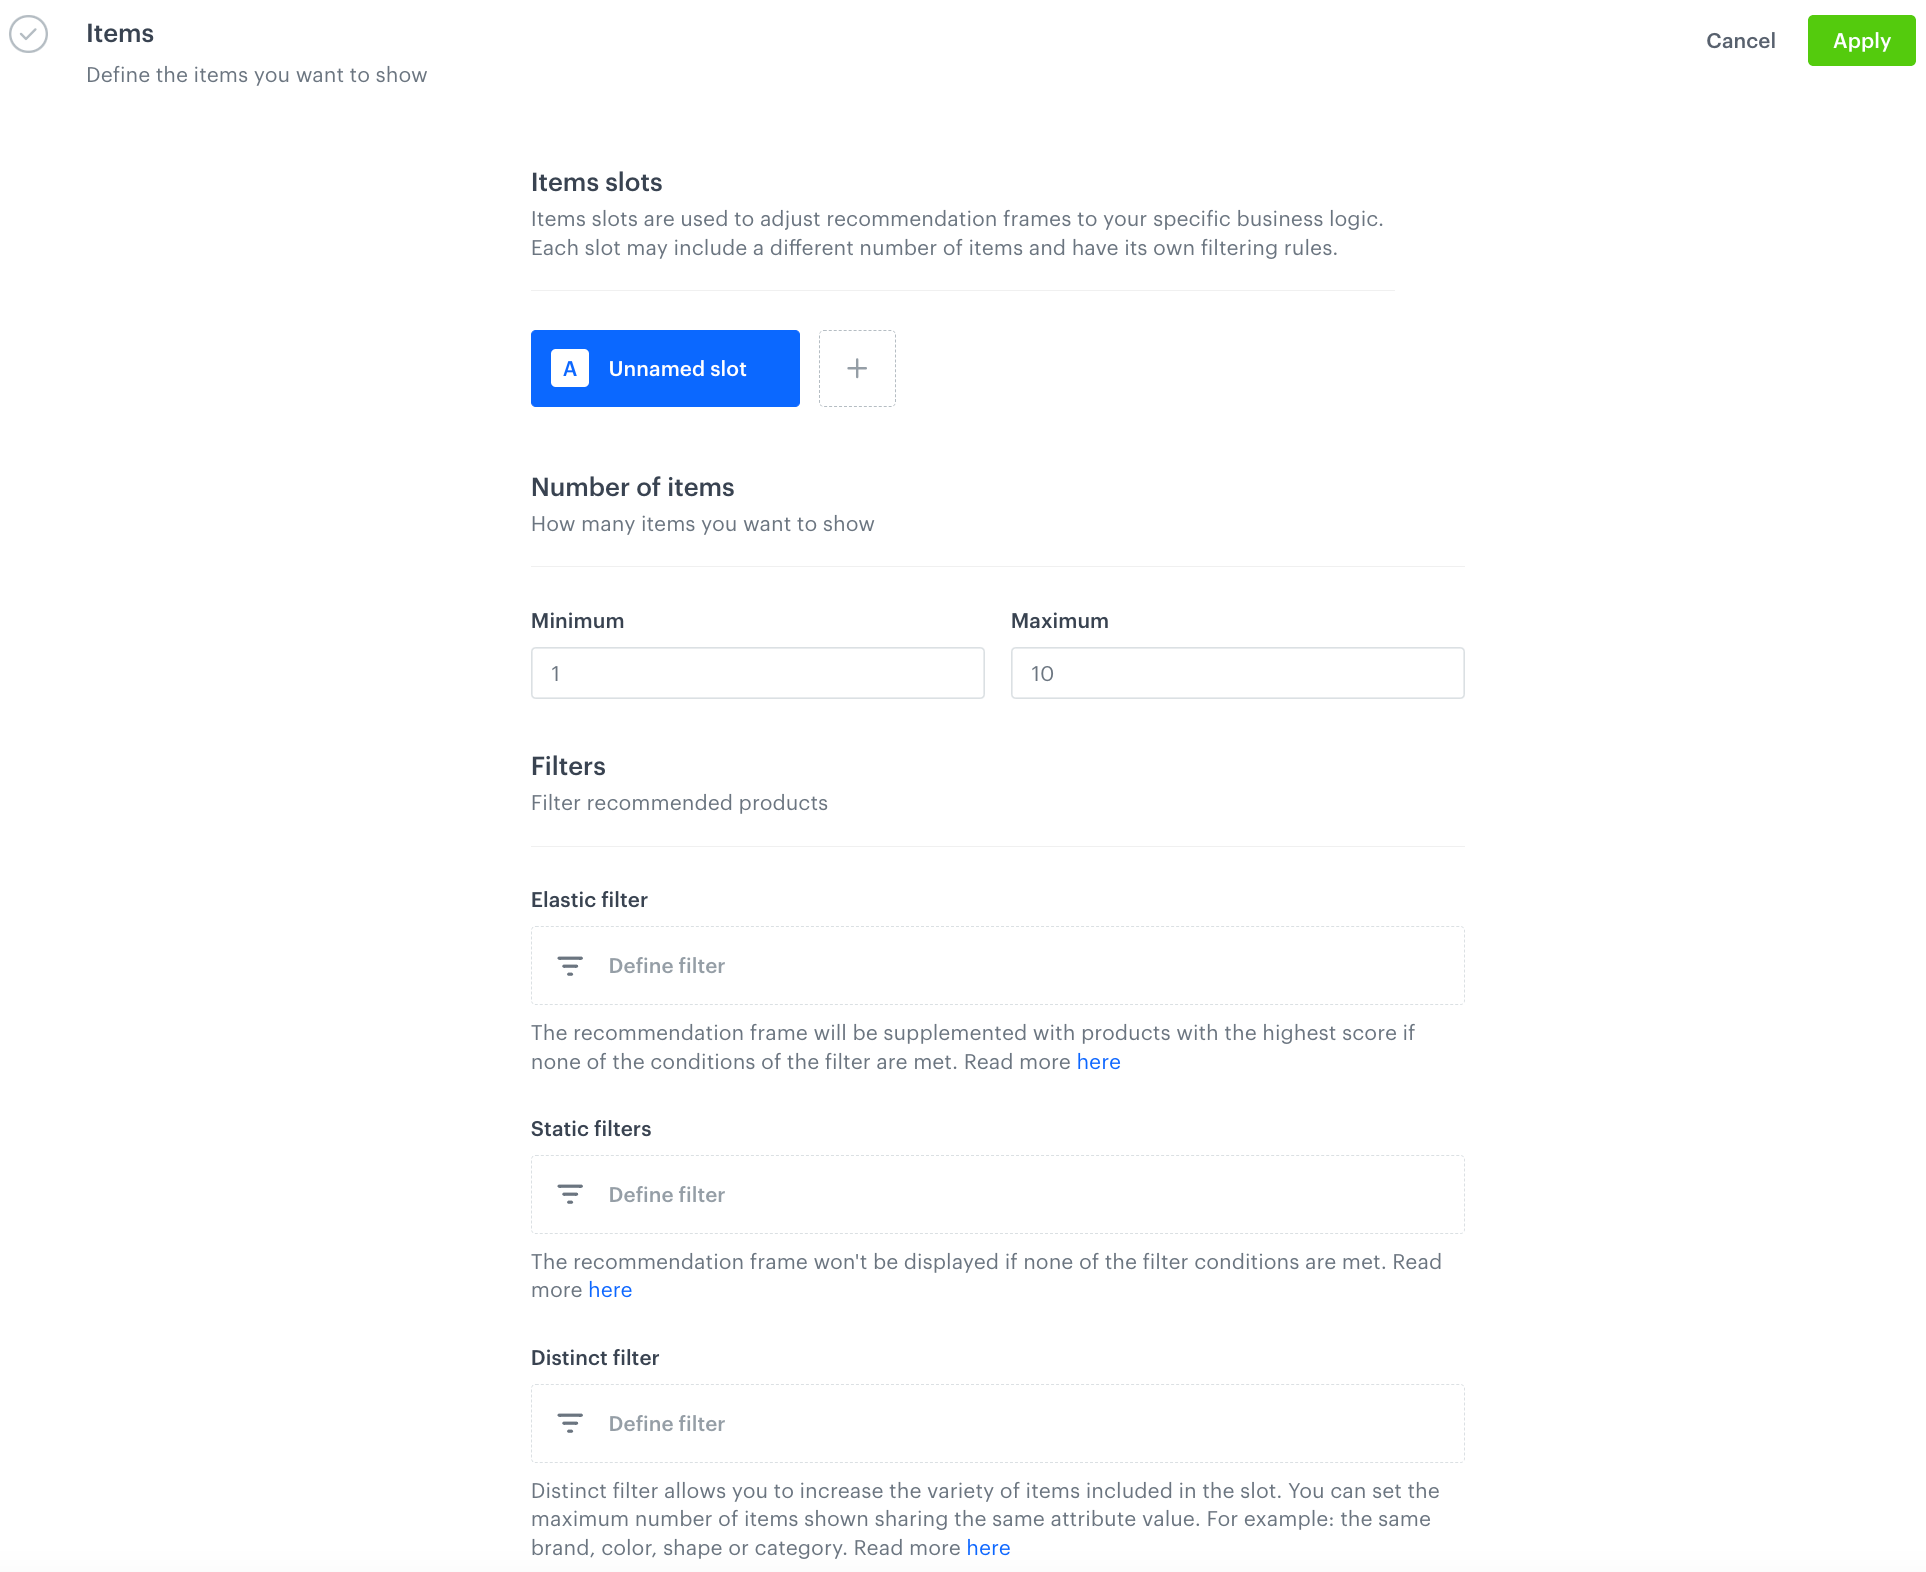
Adding slots
- In the Items section, click Define.
- Click
 button.
 - If you want to name the slot, hover over the Unnamed slot tab and double click it.
- When adding multiple slots, you can define their order by dragging and dropping the tabs into the desired sequence. The slot represented by the leftmost tab is considered the first slot. For more slot order options, refer to the Define slot and item ordering section.
- To proceed to the slot settings, click the tab with the slot.
- In the Number of items subsection, enter the minimum and maximum number of items to include in the slot.
- Add the filters for this slot.
- Confirm the settings by clicking Apply.
Elastic filters
This type of filter allows you to select the items to be included in the slot and supplement the slot if it’s not entirely filled up with the items.
For example, if you select to display up to 10 items, and you have only 5 items that meet the conditions of elastic filter to be included in the slot, then the slot will be filled with additional items which do not match the elastic filter (based on scoring).
- Click Define filter.
- Select one of the filter creators:
Static filters
This type of filter allows you to show a fixed number of items that match the conditions of the filter.
- If the applied filter conditions (that don’t include any customer context) are too strict and there are not enough items to fill in the recommendation slot, the slot is not generated at all.
- If the filter conditions include customer context from one of the following sources: aggregate, expression, or a profile attribute, and the context cannot be retrieved for any reason:
- By default, the filter is ignored and the slot will be generated without applying the filters.
- If Fail slot when the context is missing is selected from the Ignore filter dropdown list, the slot is not generated at all.

- Click Define filter.
- Select one of the filter creators:
Distinct filter
This type of filter allows you to increase the variety of items included in the slot. You can define the allowed number of items that share the same attribute value to be shown, for example, a number of items that have the same brand, color, shape, category, and so on.
-
For all recommendation types except for Last seen, the engine considers up to 1000 items with the highest score that match the recommendation type. For example, if you selected the Cross-sell type, the engine analyzes up to 1000 items that match the cross-sell recommendation type, and then selects the number of items you chose to include in the slot.
-
For the Last seen recommendation type, the engine considers the last 100 page visit events. Based on the data from these events, the engine selects the number of items you chose to include in the slot.
-
Click Define filter.
- If you want the distinct filter to supplement the slot with non-matching items in case not enough matching items are found, enable the Mark filter as elastic option.
- From the list, select an attribute.
- In Max no. of occurrences, define the number of items with the same value of the attribute (for example, a brand) that can be included in the slot.
Result:
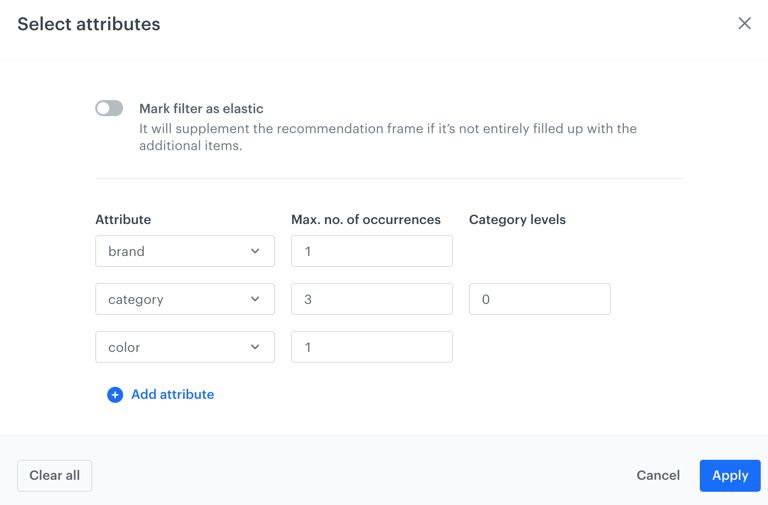
Attributes defined in the distinct filters Explanation: In the example in the screenshot, a slot displays items of various brands (a brand cannot be repeated more than once), various colors (each item in the slot is in a different color), and only 3 items in the slot can be taken from the lowest category level.
Define slot and item ordering
In this section, you can define the order of slots and the order of recommended items in the slot.

-
In the Slots and items ordering section, click Define.
-
To define the order of slots and order of items within the slots, in the Slots and items ordering subsection, select one of the following options:
-
Arrange items in slot order:
- the slots will be presented in the order defined in the Items section.
- the order of items within the slot is defined by the scoring method selected in Items sorting method within slots. By default, the items are arranged based on the results of the recommendation model.
-
Arrange items in personalized slot order:
- the order of slots is arranged based on the results from the Personalized recommendation model. The higher the score, the higher position the slot takes.
- the order of items within the slot is defined by the scoring method selected in Items sorting method within slots. By default, the items are arranged based on the results of the recommendation model.
Important: This option is available only for Personalized recommendations.
-
Arrange items ignoring slots and its order: the slots will be ignored and the order of items will be arranged according to the score method selected in Items sorting method within slots. By default, the items are arranged based on the results of the recommendation model.
-
-
To define the method of sorting the items within slots, in the Items sorting method subsection, select one of the methods.
Important: This section is unavailable for Attribute and Section recommendations, however, the items in these recommendation types are arranged in the order defined by the Personalized recommendation model.You can select the following sorting methods:
- Sort by personalized score - The items are arranged in the order in which they were returned by the Personalized recommendation model (this sorting method is available only for the Personalized recommendation type).
- Sort by score - It’s a default method, the items are arranged in the order in which they were returned by the recommendation model (for example, if you create a Cart recommendation, then the items are organized based on the results of the Cart recommendation model).
- Sold items count in the last 30 days - The items returned by the model will be arranged from the most sold to the least sold in the last 30 days.
- Sold items value in the last 30 days - The items returned by the model will be sorted based on their price, with the most expensive ones sold in the last 30 days listed first.
- Page visit count in the last 30 days - The items returned by the model will be sorted based on the visits to the item page, with the most visited ones in last 30 days listed first.
- Conversion percent in the last 30 days - The items returned by the model will be sorted based on the conversion rate of the product (ratio of purchases to the number of users visiting product page) in the last 30 days, with those with the highest rate listed first.
- Conversion percent after clicking on the recommendations in the last 30 days - The items returned by the model will be sorted based on purchases after clicking the item in any communication channel in the last 30 days, with those with the highest rate listed first.
- Sold items count in the last day - The items returned by the model will be arranged from the most sold to the least sold in the last day.
- Sold items count from the same weekday last week - The items will be sorted in descending order based on their quantity sold on the same weekday as last week (for example, if today is Wednesday, items will be arranged according to their sales quantity from last Wednesday).
- Page visit count in the last 7 days - The items returned by the model will be sorted based on the visits to the item page, with the most visited ones in last 7 days listed first.
- Sold items count in the last 7 days - The items returned by the model will be arranged from the most sold to the least sold in the last 7 days.
-
Confirm the settings by clicking Apply.
Define the boosting factors
You can increase probability of appearing in the recommendation frame. You can boost the items in three ways (both can be used at the same time):
- Metric boosting uses pre-defined item popularity metrics to influence item scoring. Metric boosting is available only for the Similar, Cart, Visual similarity recommendation types.
- Attribute boosting influences item scoring depending on rules applied to the item’s attributes. This is done by applying a filter to items and adjusting the score of those items that match the filter. For example, you can increase the scoring of a particular brand without excluding other brands entirely.
- Personalization boosting uses the personalization model to influence the items’ scoring according to the preferences of each customer - items that fit their preferences have a higher probability of appearing in the recommendation frame. You can manage the influence of personalization model on boosting by using the Impact scrollbar. Personalization boosting is available for all recommendation types, except for Personalized, Section, and Attribute.
This element has a significant impact on the model’s outcome. For instance, if we set the personalization impact to 80% in the recommendation model based on Top items, the suggested items will be influenced mostly by the personalization model (making up 80% of the impact). Meanwhile, the Top items model will only contribute 20% to the recommendations (along with other factors like boosting attributes).
- In the Boosting section, click Define.
- Metric boosting:
- Click Select and select a metric to use for adjusting the score.
- Choose the Promote (default) or Demote option.
- Use the slider to determine how much you want the metric to influence the score of the items.
- Attribute boosting:
- Click Add rule.
- Click the created rule to open its settings.
- In the Items scope section, click Define filter.
Items that meet the filter will have their scores adjusted. To learn how to build filters, see Recommendation filters. - Choose the Promote (default) or Demote option.
- Use the slider to determine how much you want the metric to influence the score of the items.
- Personalization:
- Enable the Personalization toggle.
- From the Impact scrollbar, select how much you want the personalization model to influence the arrangement of items in the recommendation.
- Confirm the settings by clicking Apply.
Additional settings
- In the Additional settings section, click Define.
- If you want to exclude items that the customer already purchased, enable the Exclude already bought products option.
This option will exclude up to 100 items that were purchased within a specific number of days, as defined in the Since field, which appears after enabling the option.
Optionally, you can also set this option as elastic, which will work as an elastic filter. - If you want to sort the items, select a metric from the Sorting metric dropdown list.
- If the recommendation type you selected has default filters defined, you can disable them by using the Default filters toggle.
Important: When the default filters and the filters defined in the recommendation are mutually exclusive, recommendation filters take precedence. You can find more information on configuration of default filters here. - If you want to source the item context from an aggregate or expression results instead of the website, enable the Item context from analytics toggle. Then from the dropdown list, select the analysis whose result will be treated as the item context.
On the basis of the item context, the engine selects the items to display in the recommendation. By default, the recommendation sources the item context from the product page where it is implemented. This option lets you override this setting, so the item context will be taken from the result of the aggregate or expression that returns for example, a recently viewed item, favorite items, recently purchased items or items purchased the most frequently.Important: This option is available for all recommendation types except for Recent interactions and Last seen.
Saving the recommendation
To save the recommendation:
- as a draft, click Finish later.
- and activate the recommendation, click Save.
Once you activate the recommendation, you can use it as described in the Distributing recommendations section.