Sending SMS
After integrating SMS gateway, creating SMS account from which messages will be sent, and preparing SMS template, you can proceed to sending the text message.
In Synerise, you can send a text message in two ways:
- You can send it manually in the form of a one-off campaign
- You can send it automatically by the Automation module
Requirements
Meet all requirements listed in Introduction to SMS
Send manually
- Go to Communication > SMS > Create new.
- Type the name of the communication definition (it will only display on the list of definitions).
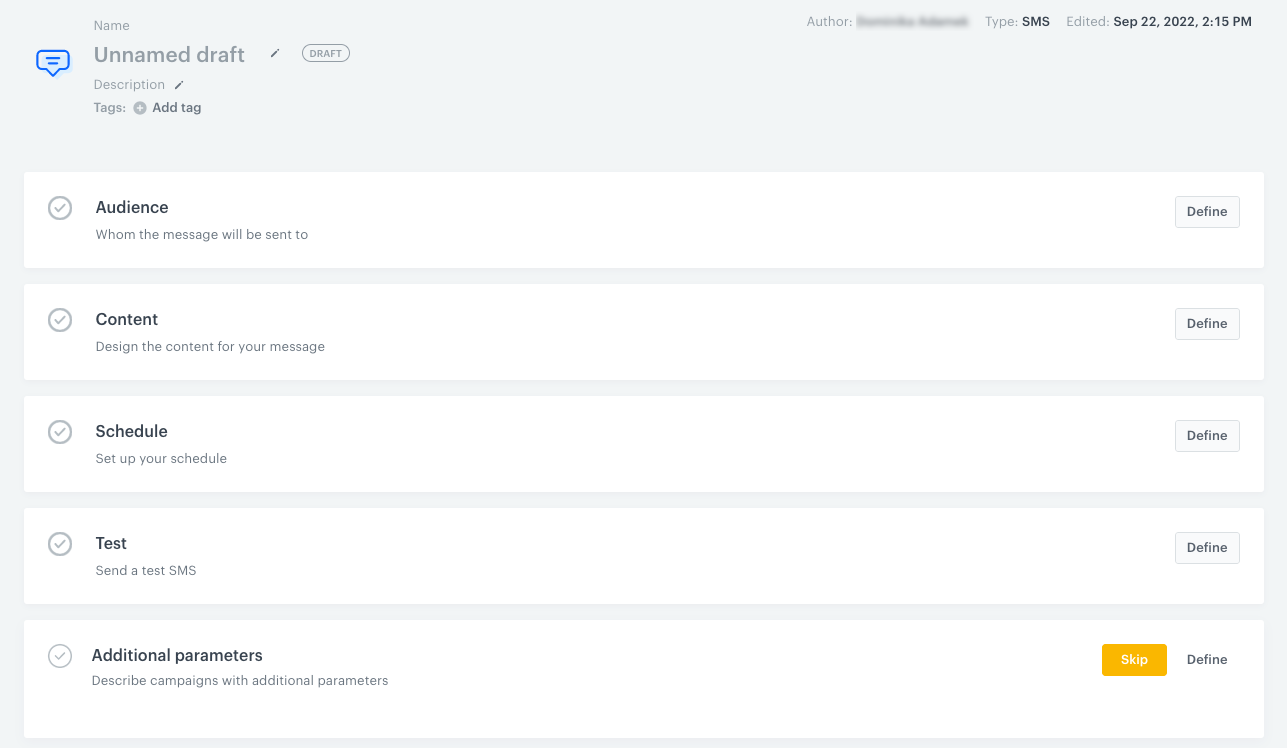
Select recipients
- In the Audience section:
- Choose the recipients:
- Everyone - Everyone who gave marketing consent will receive your message. The estimated reach takes into account the number of customers who have given marketing consent to this type of communication (this means that in the case of communication such as mobile push, the estimated reach may be higher than the number of customers who have your mobile application).
- Segment - You can send the message to one or more existing segments in the system.
- New Audience - Create new segments and specify the conditions which the target must meet.
Important:
- Regardless of the way of selecting the audience, the system limits the audience to those who have the marketing agreement on, unless you override this behavior in the advanced options.
- If the audience is larger than 500000 profiles, consider using Batch delivery in the advanced options to avoid timeouts.
- Optional: Open Advanced options and configure additional settings.
Advanced options - explanation-
Batch delivery - You can use this option to prevent sending the message to all recipients at once. When to use it? When the target audience is so large that the messaging provider might not be able to process all messages at once.
Important: If you plan to send messages to a large audience, this option is recommended.For example, if the expected performance of your messaging provider is 1 million messages per hour and the expected audience is 5 million profiles, you can split the communication into 60 batches sent 5 minutes apart: every batch will include ~83000 profiles sending all messages will take 5 hours.
If a batch is too large (or the batch delivery option is not used), it may time out in your messaging provider’s system and the messages may not be delivered. For details on provider performance, contact the provider.
If a batch takes more than 8 hours to complete for any reason, it is cancelled in Synerise. -
Enable control group - You can use this option to create a subgroup of the recipients who won’t receive any communication variant. When to use it? When you send one or several variants of a communication (A/B/x testing). When a customer is assigned to a control group, the information is available in their Profiles card as an event.
-
Include audience changes - You can use this option only for scheduled communication. It recalculates the number of recipients right before sending the communication. By default, the size of the customer segment chosen for the communication is the same as in the moment of sending, even if the number of customers in the chosen segment changed between scheduling the communication and sending it. When to use it? When the size of the segments of customers selected as the audience of the communication can change dynamically.
-
Ignore limits - You can use this option to send this message to a customer, even if it exceeds the global limit of this type of messages for a single customer per day (more information is available here), enable the Ignore limits toggle. You may apply it to system messages such as a transaction confirmation, notifications about order delays, and so on.
-
- To save your changes, click the Apply button below.
WARNING: Remember that you can send SMS only to users who gave you their phone number and permission. This is the reason why estimated reach is lower than total audience. - Choose the recipients:
Select or create a template
- In the Content section, select or create a template of the SMS:
2. From the Sender name list, select the SMS account from which the message will be sent.
3. Click Create message.
- Create new - This option allows you to create a text message template from scratch - From template - This option allows you to select a template you already created. - If you want to add more variants:
- Click the
 icon.
icon. - Repeat step 1.
- Allocate variants to profiles by using the slider.
- Click the
- Click Next.
Schedule the date of sending
- In the Schedule section, define when your message is to be sent.
This section also allows you to enable silence hours - a time during the day when sending out messages is disabled.-
You can choose between two options:
- To send your message after clicking the Send button on the upper right corner, use the Immediately option.
To plan a message to be sent at a future date, use the Scheduled option. Set the start time and the time zone.
Synerise performs best with real-time data. This is why you can’t schedule a message for more than 10 days in the future.
To select the best time of sending the message, take a look at the suggestion from the AI engine that calculates the best time (for all recipients). If time optimization is disabled, click here to learn more how to enable it and use it.
-
- Select the Silence Hours setting:
-
Without silence hours - The communication can be processed and sent out to the recipients at any time during the day.
-
Include silence hours - With this option, you can set a time of day when the communication can’t be sent:
- In the From field, select when the silence hours start.
- In the To field, select when the silence hours end.
The period can’t be longer than 12 hours.
When a message can’t be sent due to silence hours, ansms.skippedevent is generated.
Important:- When silence hours are enabled, the Discard messages option is always enabled. This means that messages blocked by silence hours are discarded entirely. The discarded messages are not sent when silence hours end.
- If the Start time of the schedule is in the silence hours, you can’t apply the settings.
- If communication is scheduled for sending just before silence hours (for example, silence hours start at 22:00 and sending is scheduled at 21:59:59), the communication may be processed, sent, and logged in the events a short time after the silence hours start.
-
- To save the changes, click Apply.
Send a test SMS
In the Test section, you can select a profile or predefined list of profiles to which you want to send a test SMS.
When you send a test message to a test user who is not added to the Profiles in Synerise, the inserts will not display in the message.
When your message is ready to be sent, in the upper right corner click Send.
Adding custom parameters
You can add up to 10 custom parameters with constant values. They will be added to the following events generated by the communication:
sms.send,sms.notSent,sms.capping
-
To define the custom event parameters, in the Additional parameters section, click Define.
-
Click Add parameter.
-
In the Parameter field, enter the name of the parameter.
The following parameters cannot be sent:modifiedByapiKeyeventUUIDiptimebusinessProfileIdcorrelationIdclientIduuid
-
In the Value field, enter the parameter value.
The value is always sent as a string when the event’s JSON payload is generated. The maximum length of the string is 230 characters.WARNING: Dynamic values are not supported in the Parameter and Value fields. -
If you want to add more parameters, click Add parameter, and repeat steps 3-4.
Result: the parameters will be added to all events listed above with the values you entered. This is an example event saved in the database. The custom parameterseasonis located in theparamsobject:{ "action": ... ... "params": { "clientId": 1111111111, "season": "autumn", "campaignName": "Back to school", "time": 1662392318050, "title": "Have you prepared for coming back to school?", "businessProfileId": "xxx" } } -
Confirm the settings by clicking Apply.
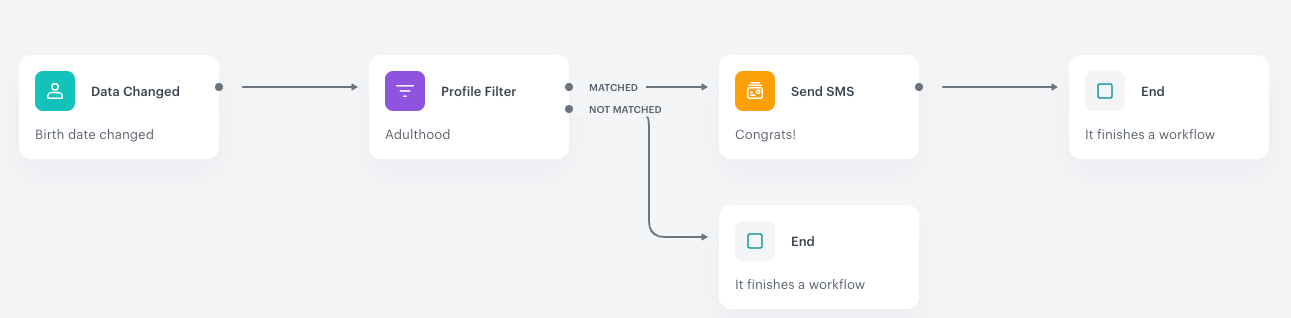
Send automatically
You can build a workflow that sends out text messages to the recipients in response to their behavior or select an audience and build a dedicated workflow for them.
To do so, use the Automation module and build the workflow by using the Send SMS node.
If you need an inspiration, you can check the Personalized SMS with last visited most expensive product use case that combines Automation and the SMS channel.