
Dynamic NPS survey
Net Promoter or Net Promoter Score (NPS) is a management tool that can be used to measure the loyalty of a brand’s customer relationships. It serves as an alternative to traditional customer satisfaction research and is correlated with revenue growth. If you send your NPS surveys right after the purchase, you increase the chances of getting an immediate reply with relevant feedback.
In this use case, we describe the process of sending a short NPS survey right after the customer makes a purchase in a mobile application. The survey consists of two fields: an NPS rating on a scale from 1 to 10 and a comment field. The customer can provide such a rating only within 48 hours after a purchase.
The campaign layout is different based on the conditions meet by the customer:
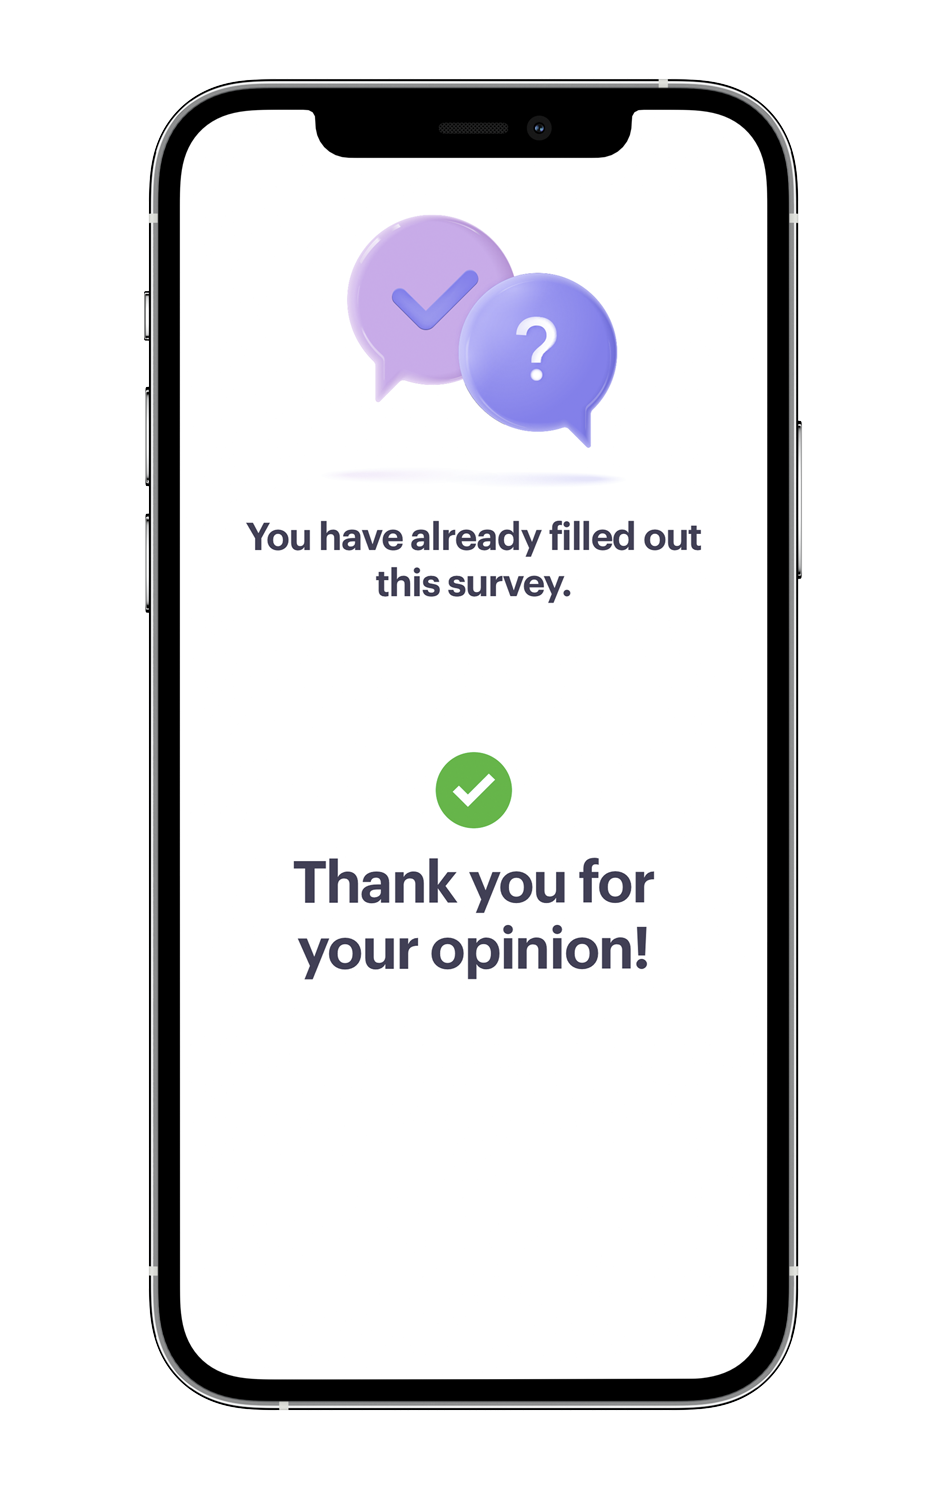
- If the customer has already filled out the survey within 48 hours after the purchase and clicks the link again, they will see a message which informs that they have already filled out this survey.
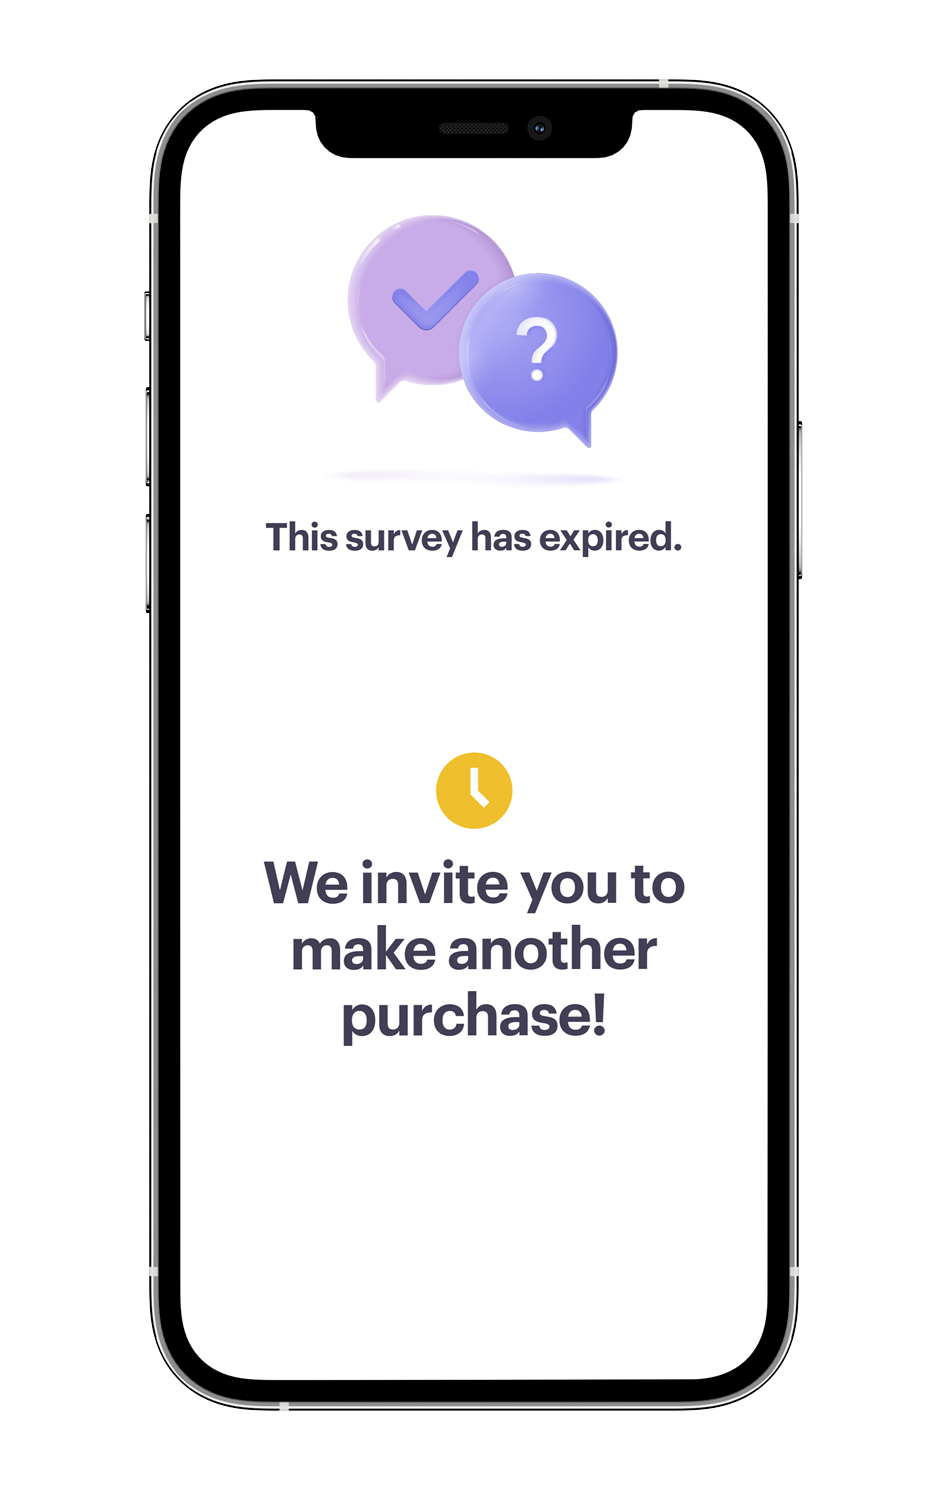
- If the customer has not filled out the survey within 48 hours after the purchase and clicks the link after more than 48 hours, they will see a message which informs that this survey has expired.
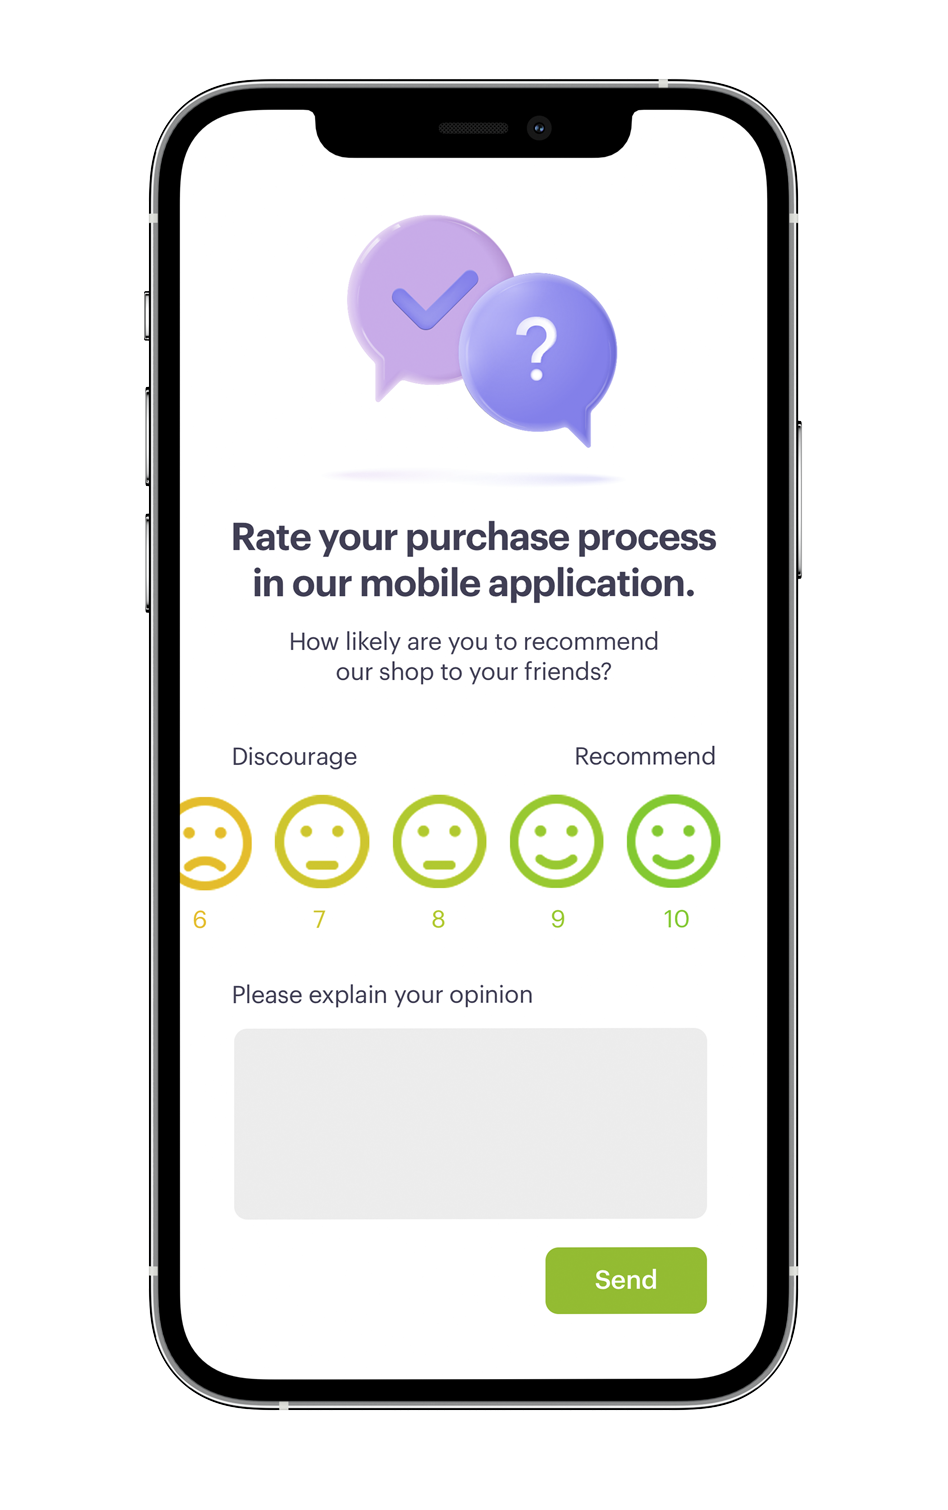
- If the customer has not filled out the survey within 48 hours after the purchase and clicks the link in less than 48 hours, a NPS survey is displayed.
In the further part of the process, we will also present you how to create basic analyses based on customers’ answers and results from the survey. Based on these analyses, we will create a Net Promoter Score, which is simply the percentage of customers who are promoters (those who scored 9 or 10) minus the percentage of customers who are critics (those who scored 1 to 6).
Prerequisites
- Implement tracking code into your website.
- Integrate Synerise mobile SDK in your mobile application.
- Implement mobile pushes in your mobile application: iOS and/or Android.
- Implement all additional information about the transactions based on the documentation for our transactional API. Check the documentation to see how you can set up the
transaction.chargeevent to track the mobile transactions directly via source parameter. - In this use case, we use the
form.submitevent, which is sent after filling out the NPS survey. You can send this event using the API or JS SDK.
Process
In this use case, you will go through the following steps:
- Create a landing page with 3 different layouts.
- Create an aggregate which returns the date of completing the survey - if it exists, it means that the user has completed the survey, if there is no date, it means that they have not completed it.
- Create an aggregate which returns the sending time of last mobile push with a survey which was sent to a user.
- Create an expression which checks if 48 hours have passed since the push message with the NPS survey was sent (expiration condition).
- Create a dynamic content campaign with the Jinjava code that checks the conditions which a user must meet to see one of the three landing page version.
- Create a mobile push with the link to the landing page.
- Create a workflow which sends a push notification with the NPS survey to a user after making the transaction.
- Create a basic segmentation with NPS score.
- Create a Net Promoter Score based on a metric.
Create a landing page
Prepare a landing page within the website of your mobile store, which will contain three different layouts (as it was present in the introduction):
- a message which informs that the survey has been already filled out (in this case marked as #COMPLETED),
- a message which informs that this survey has expired (in this case marked as #EXPIRED),
- a NPS survey in which the customer can rate the purchase or the whole shopping experience (in this case marked as #NPS).
function onSyneriseLoad() {
        SR.init({
            'trackerKey':'XXXXX-XXXXX-XXXXX-XXXXX-XXXXX',
        });
    }
    (function(s,y,n,e,r,i,se){s['SyneriseObjectNamespace']=r;s[r]=s[r]||[],
     s[r]._t=1*new Date(),s[r]._i=0,s[r]._l=i;var z=y.createElement(n),
     se=y.getElementsByTagName(n)[0];z.async=1;z.src=e;se.parentNode.insertBefore(z,se);
     z.onload=z.onreadystatechange=function(){var rdy=z.readyState;
     if(!rdy||/complete|loaded/.test(z.readyState)){s[i]();z.onload = null;
     z.onreadystatechange=null;}};})(window,document,'script',
'//web.snrbox.com/synerise-javascript-sdk.min.js','SR', 'onSyneriseLoad');- Replace the value of
trackerKeywith your own, generated tracking code.
nps.send with the score parameter that contains the number of points chosen for a particular customer. It should be a number. It will be important in the further analysis of the campaign results.Create an aggregate which returns the date of completing the survey
In this step, you will create an aggregate which returns the date of completing the NPS survey - if it exists, it means that the user has completed the survey, if there is no date, it means that the survey has not been completed.
- Go to
 Analytics > Aggregates > New aggregate.
 - Enter the name of the aggregate.
- Set Aggregate to Last.
- Select the
form.submitevent. - As the parameter, choose TIMESTAMP
- Click the + where button and from the Choose parameter list, select title to indicate the specific form.
- Choose the Equal operator and add the specific name of the form submitted as the value.
- Set the period from which the aggregate will analyze the results to the last 48 hours.
- Save the aggregate.

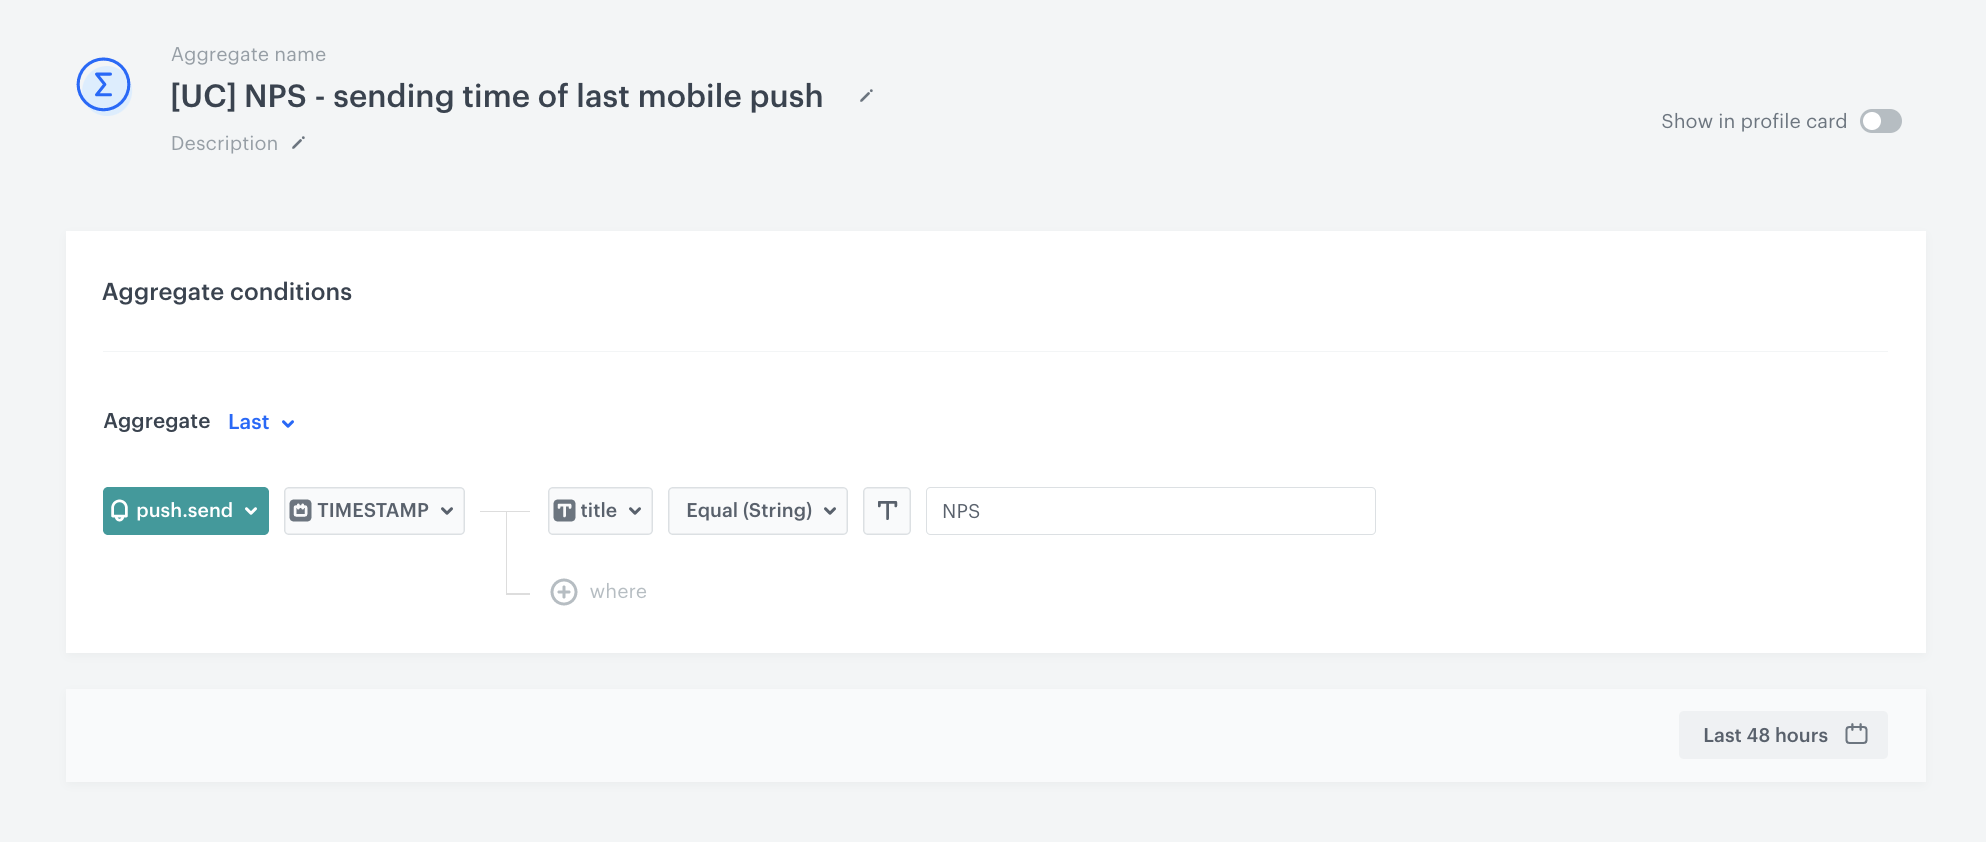
Create an aggregate which returns the sending time of last mobile push
In this step, you will create an aggregate which returns the sending time of last mobile push with a survey which was sent to a user.
- Go to Analytics > Aggregates > New aggregate.
- Enter the name of the aggregate.
- Set Aggregate to Last.
- Select the
push.sendevent. - As the parameter, choose TIMESTAMP
- Click the + where button and from the Choose parameter dropdown list, select title to indicate the specific form.
- Choose the Equal operator and enter the name of the latest push message campaign.
- Set the period from which the aggregate will analyze the results to the last 48 hours.
- Save the aggregate.
Create an expression
In this step, you will create an expression which checks if the customer has filled out the form in the last 48 hours.
- Go to Analytics > Expressions > New expression.
- Enter the name of the expression.
- Leave the Expression option at default (Attribute).
- Build the following formula of the expression:
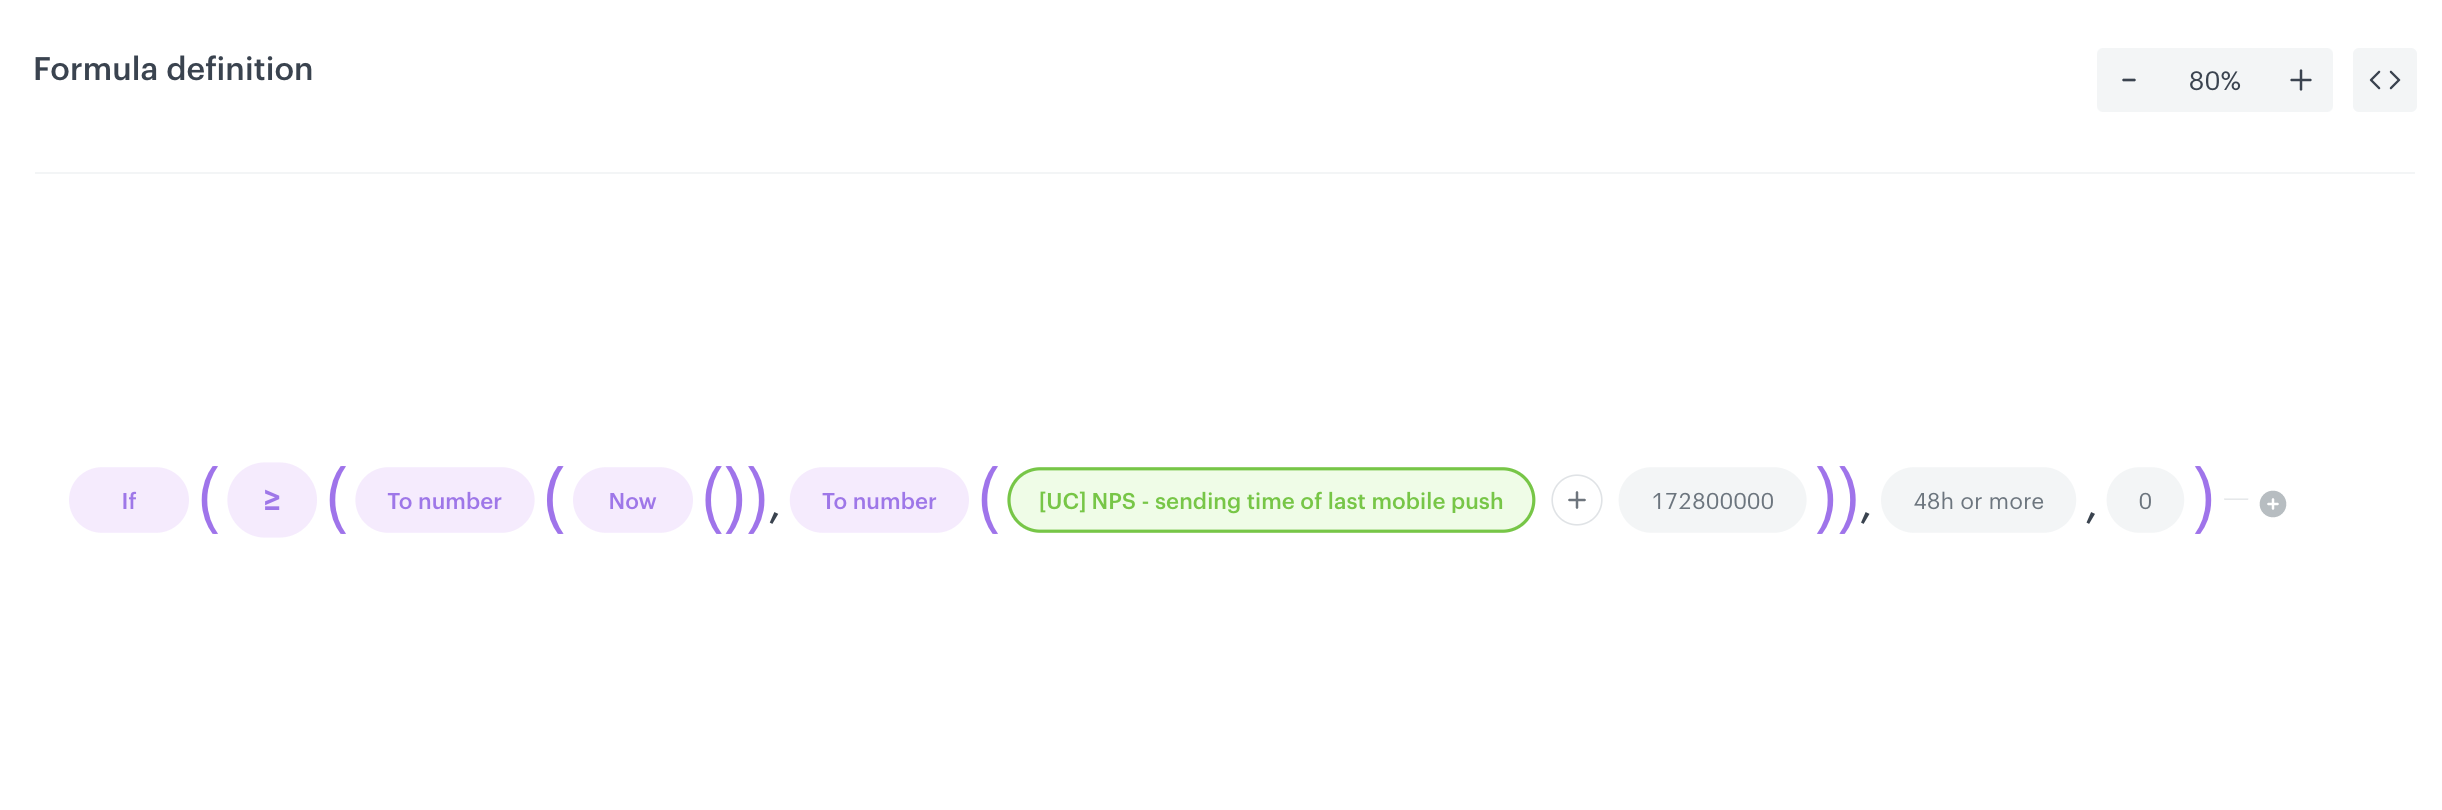
Configuration of the expression which checks if the customer has filled out the form in the last 48 hours Explanation of the expression logicThe expression formula contains the following logic:
- The expression checks if the current date is “higher” than the date of submitting the form (48 hours is added to the date of submission).
- If more than 48 hours have passed, returns
48h or more. - If less, returns
0.
- Save the expression.
Create a dynamic content campaign
In this part of the process, you will create the dynamic content campaign which will display the layout of campaign in accordance with the conditions met by the customer.
Create a dynamic content message
-
Go to
 Communication > Dynamic Content > Create new.
 -
Enter the name of the campaign.
-
Choose the Insert Object type.
-
In the Audience section, select the Everyone tab.
-
In the Content section, select Simple message, and in the CSS selector field, enter where you want to insert the content - in this case, select After (in div), and enter
.main. -
Click Create message and choose Code editor.
-
In the JS section add the following code, which will display the campaign layout based on conditions met by the customer.
{% expressionvar 90703adb-b985-4a67-abdf-337bd858c4f1 %}
    {% set showAfterDays = expression_result %}
    {% aggregate 492ba339-09b6-37bd-b368-7120275e54dc %}
    {% if aggregate_result[0] is truthy %}
        {% set isReviewCompleted = true %}
    {% else %}
        {% set isReviewCompleted = false %}
        {% if isReviewCompleted != false %}
        {showImage('#COMPLETED')}
        {% else if showAfterDays == '48h or more'%}
        {showImage('#EXPIRED')}
        {% else %}
        {showImage('#NPS')}
        {% endif %}
    {% endif %}
    {% endaggregate %}
    {% endexpressionvar %}
What is more, remember to change the ID of the aggregate and expression in the code to IDs of your own analyses built in your workspace.
Set up the schedule and display settings
- In the Schedule section, set the display time to Display immediately and save your changes.
- In the Display settings section, choose On landing.
- Click Advanced settings.
- In the Page targeting section, choose Others, and in the Display on pages section, click Add rule.
- Select Page URL containing and enter the name of your landing page created in the previous step.
- In the UTM & URL parameters section, click Skip step.
- Click Activate and start your dynamic content campaign.
Create a mobile push template
In this part of the process, you will create a mobile push template with the link to the landing page with the NPS survey.
- Go to Communication > Mobile > Templates.
- Create your mobile push in the code editor. In the content of the push notification:
- Add a message
- Add the link to landing page where you have display NPS survey
For more information on creating a simple mobile push, visit our User Guide.
Create a workflow
In this part of the process, prepare a workflow that sends the push message with the link to the survey to customers who made a transaction in the mobile application. The workflow excludes customers who have already received the link to this survey during last 30 days.
- Go to
 Automation > Workflows > New workflow.
 - Enter the name of the workflow.
Define the Profile Event trigger node
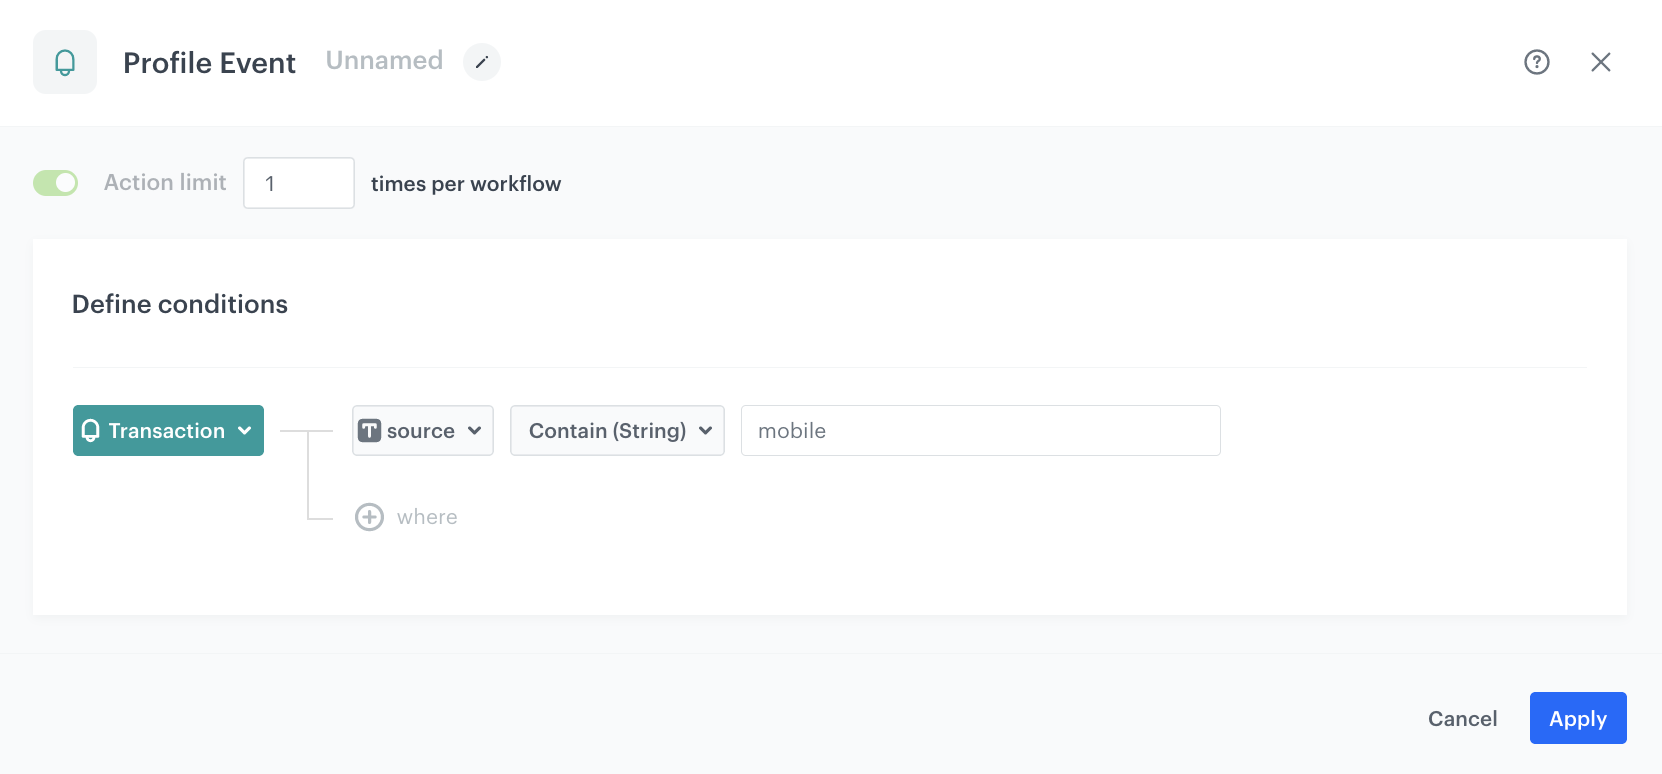
At this stage, we will configure conditions that launch the workflow. As a trigger, we will use the transaction.charge event in the mobile application.
- As the first node of the workflow, add Profile Event. In the configuration of the node:
- From the Choose event dropdown menu, choose the
transaction.chargeevent. - Click the + where button, from the Choose parameter dropdown menu, choose source.
- From the Choose operator dropdown, choose String, and then select Contain (String).
- In the next field, type the
mobileto analyze only transaction made in the mobile application.
- From the Choose event dropdown menu, choose the
- Confirm by clicking Apply.
Define the Profile Filter node
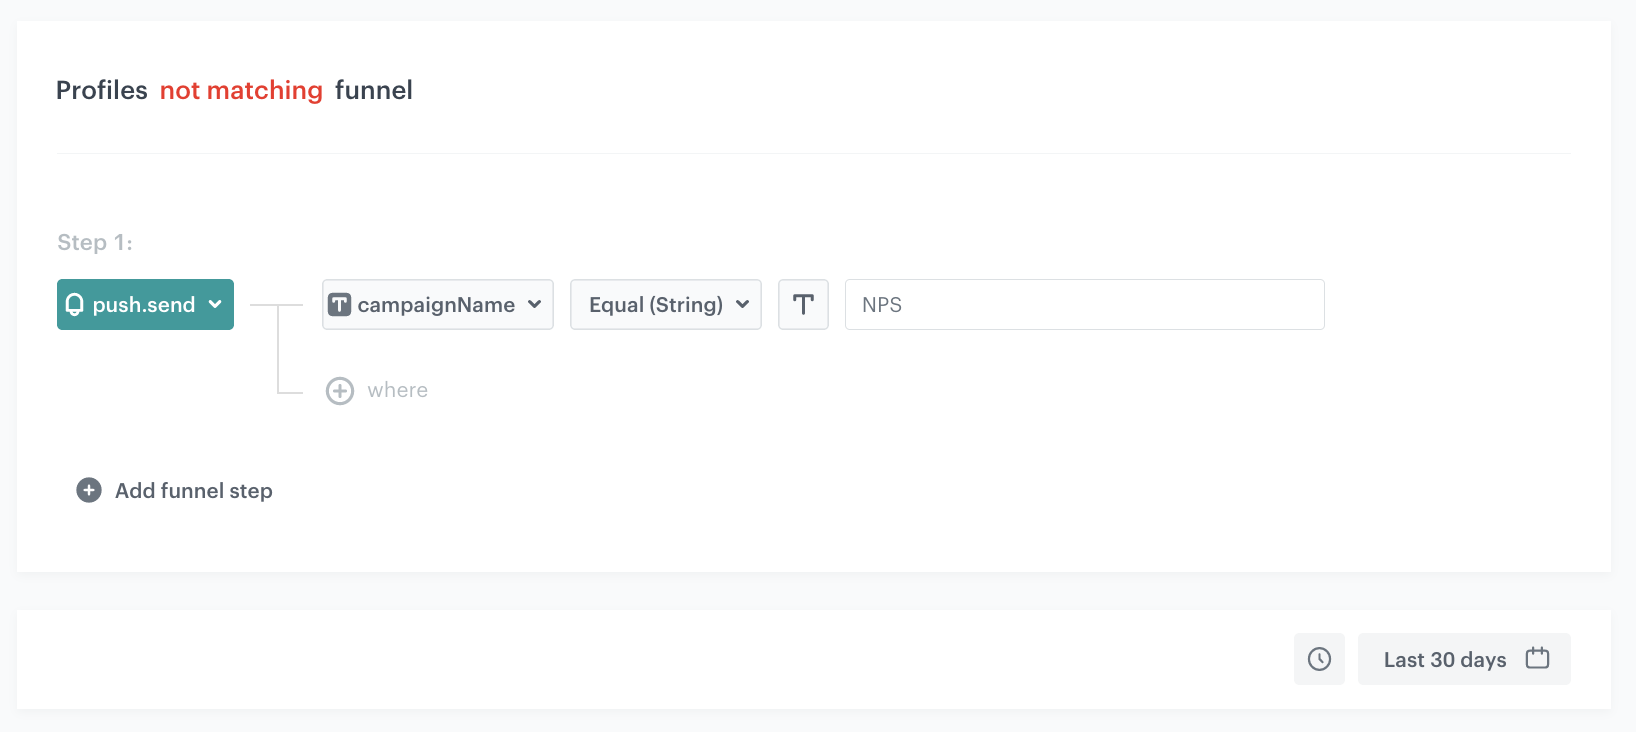
As the next step, add a Profile Filter node that checks whether the customer has previously received the NPS survey. In this case, we verify it by using the push.send event with a link to the NPS survey. This way, the customer who has already received a survey in the last 30 days will not receive another one.
- Add the Profile Filter node.
- To configure the node settings, click the node.
- Click the Choose filter button and choose the
push.sendevent. - Click the + where button and from the Choose parameter drop-down menu, choose campaignName.
- From the Choose operator drop-down, choose Equal(String).
- Enter the name of the mobile push campaign created in the previous step.
- Set the time range to Last 30 days.
- Change the Profiles matching funnel option to Profiles not matching funnel by clicking the matching word.
- Confirm by clicking Apply.
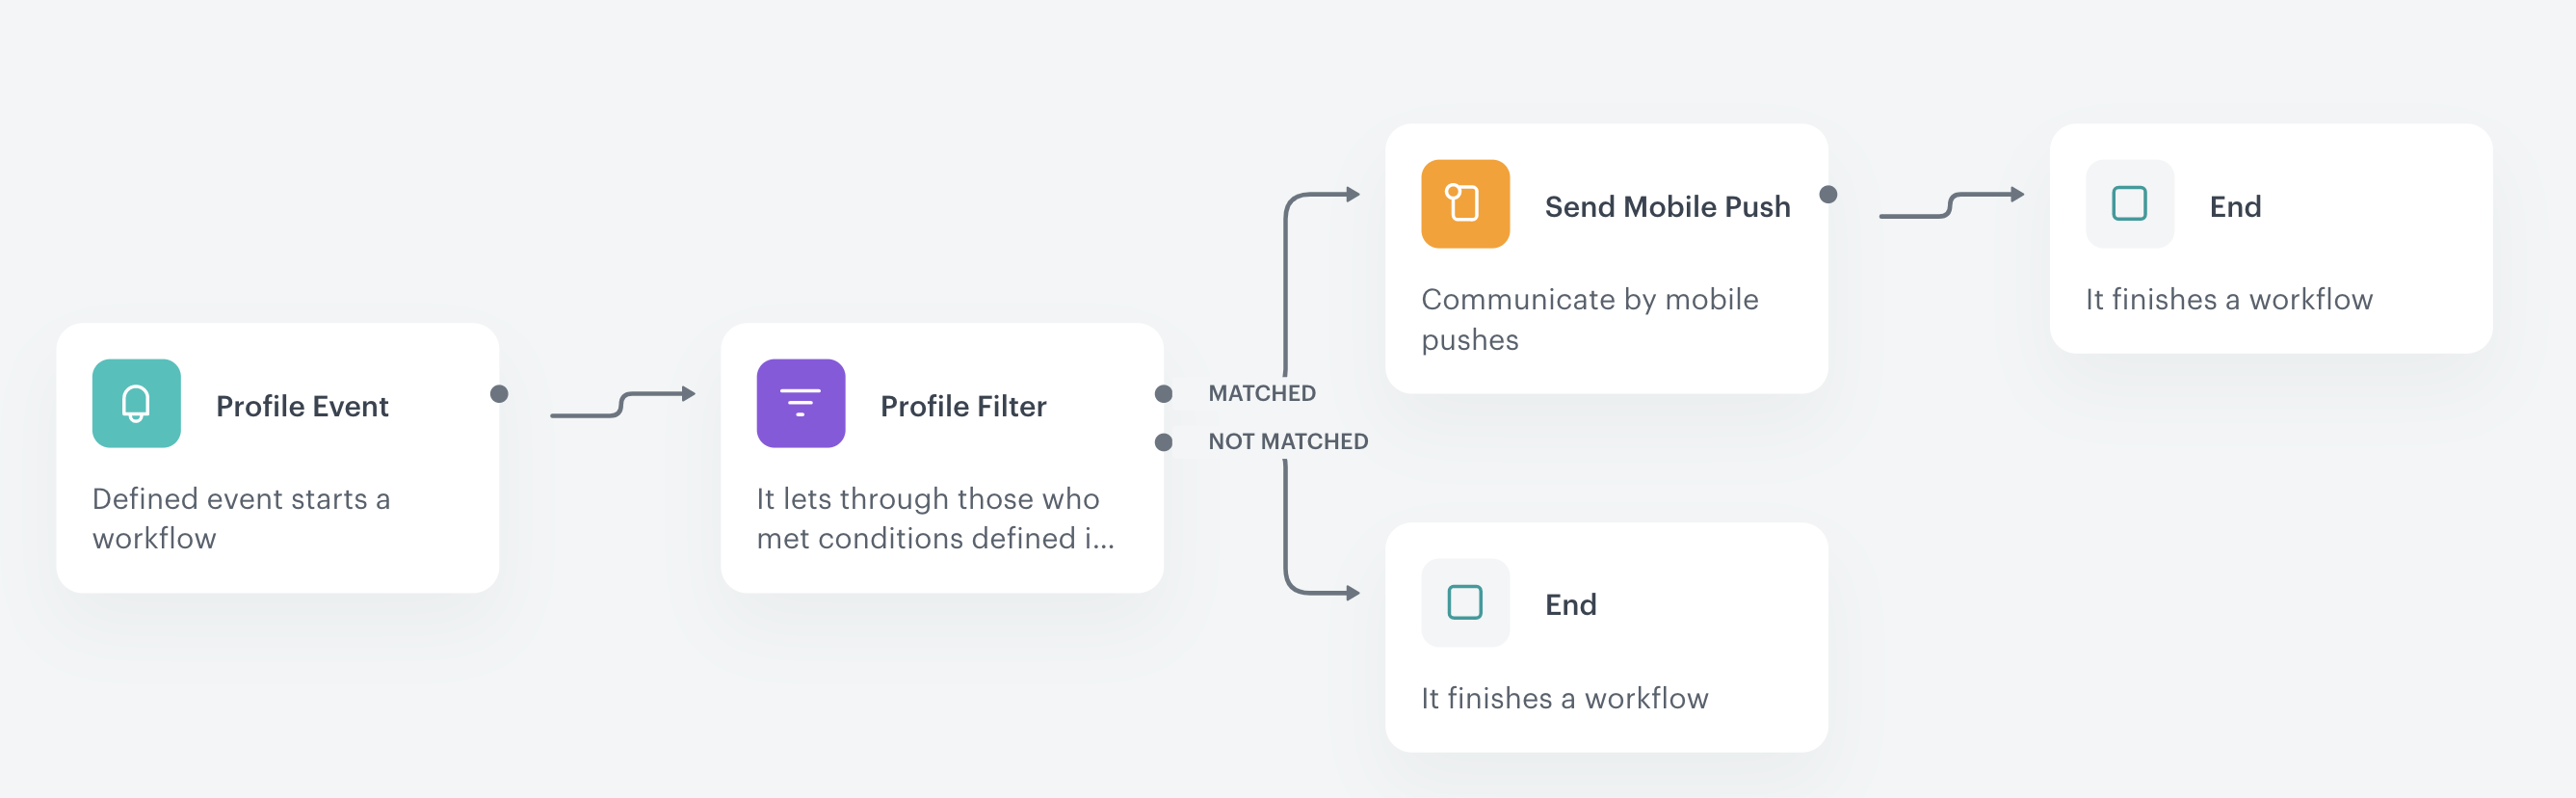
- For the Not matched path, add the End node.
Configure the Send Mobile Push node
- To the Matched path, add a Send Mobile Push node.
- In the settings of the node, from the Template type dropdown list, select the template you have prepared in the previous step.
- Click Apply.
Prepare the final settings
- To the Not matched path and after Send Mobile Push, add End nodes.
- Optionally, add titles to each node so the workflow will be more understandable to your colleagues.
- Activate the workflow by clicking Save & Run.
Create a basic segmentation with NPS score
In this step, create a basic segmentation which divides your customers into 3 groups based on results from your NPS survey and the event nps.send and its parameter score. In this case, we have three exemplary groups:
- Promoters: 9-10 points
- Indifferent: 7-8 points
- Critics: 1-6 points
Create a segmentation that includes all three groups.
Create the Promoters segment
Create a segment that includes only customers who assessed the purchase/shopping experience at 9 or 10 points.
- Go to Analytics > Segmentations > New segmentation.
- Enter the name of the segmentation.
- Optionally, switch the Show in profile card toggle on.
- Enter the name of the segment.
- From the Performed action dropdown list, select the
nps.sendevent. - Click + where button and select the score parameter.
- As the logical operator, select Less or equal.
- Next to the logical operator, in the text field, enter
10. - Click the and where button and select the score parameter.
- As the logical operator, select More or equal.
- Next to the logical operator, in the text field, enter
9.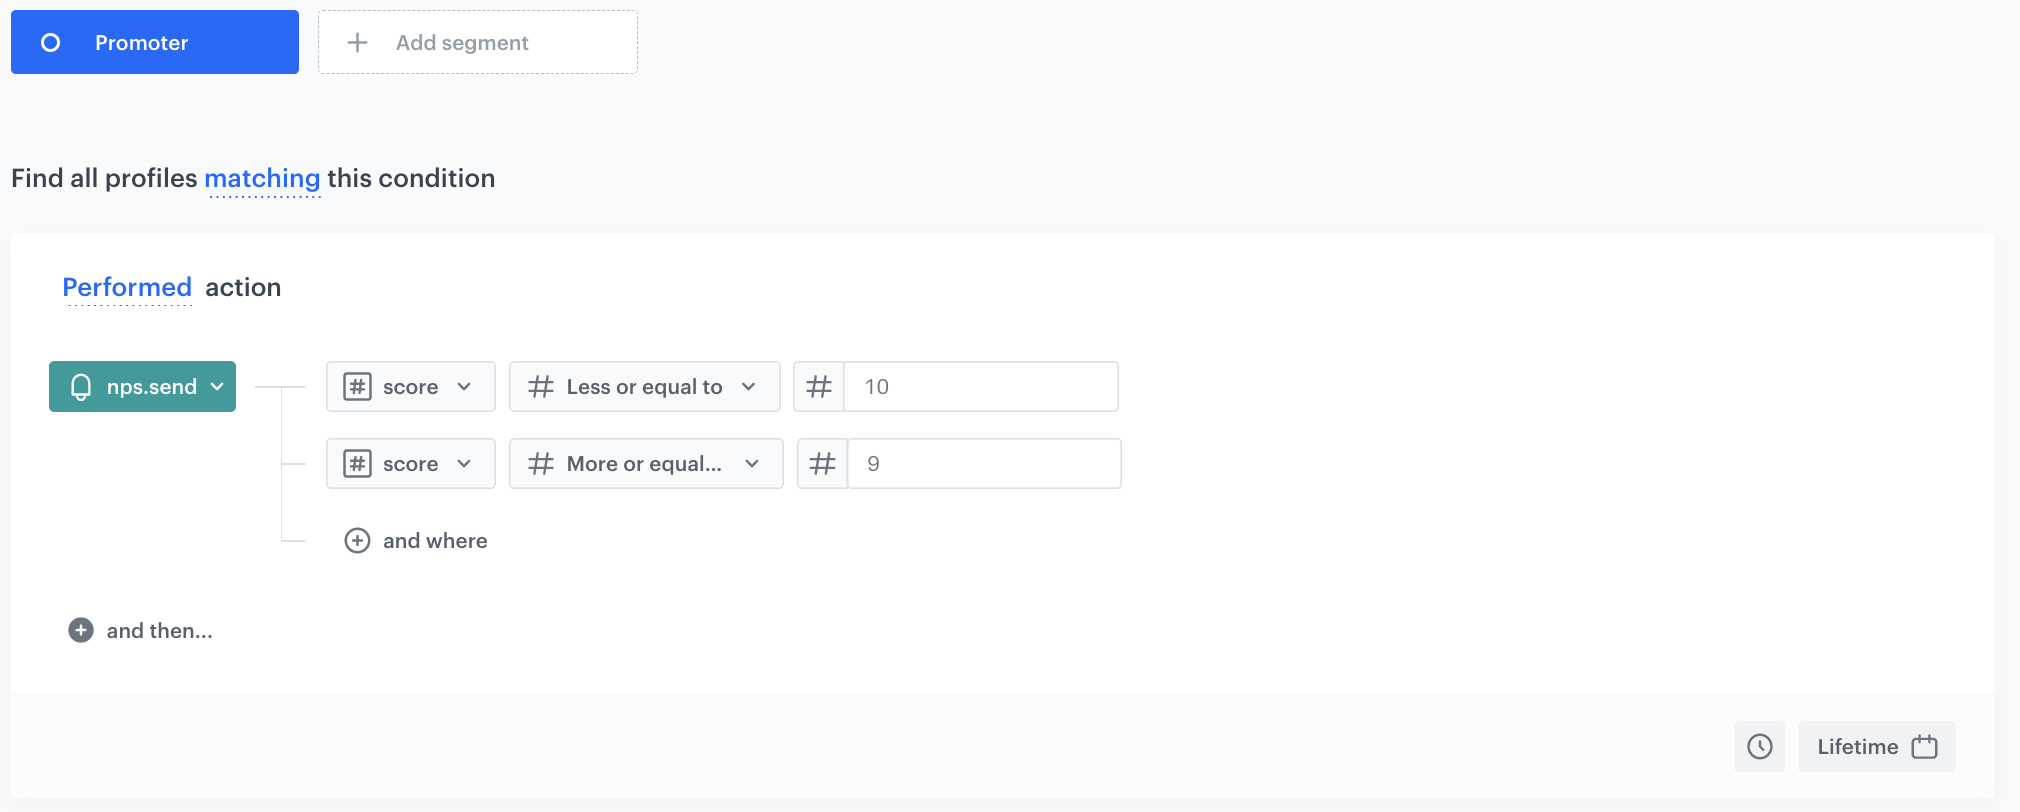
Configuration of the Promoters segment
Create the Indifferent segment
Create a segment that includes only customers who assessed the purchase/shopping experience between 7 and 8 points.
- Click Add segment.
- Enter the name of the segment.
- From the Performed action dropdown list, select the
nps.sendevent. - Click + where button and select the score parameter.
- As the logical operator, select Less or equal.
- Next to the logical operator, in the text field, enter
8. - Click the and where button and select the score parameter.
- As the logical operator, select More or equal.
-
- Next to the logical operator, in the text field, enter
7.
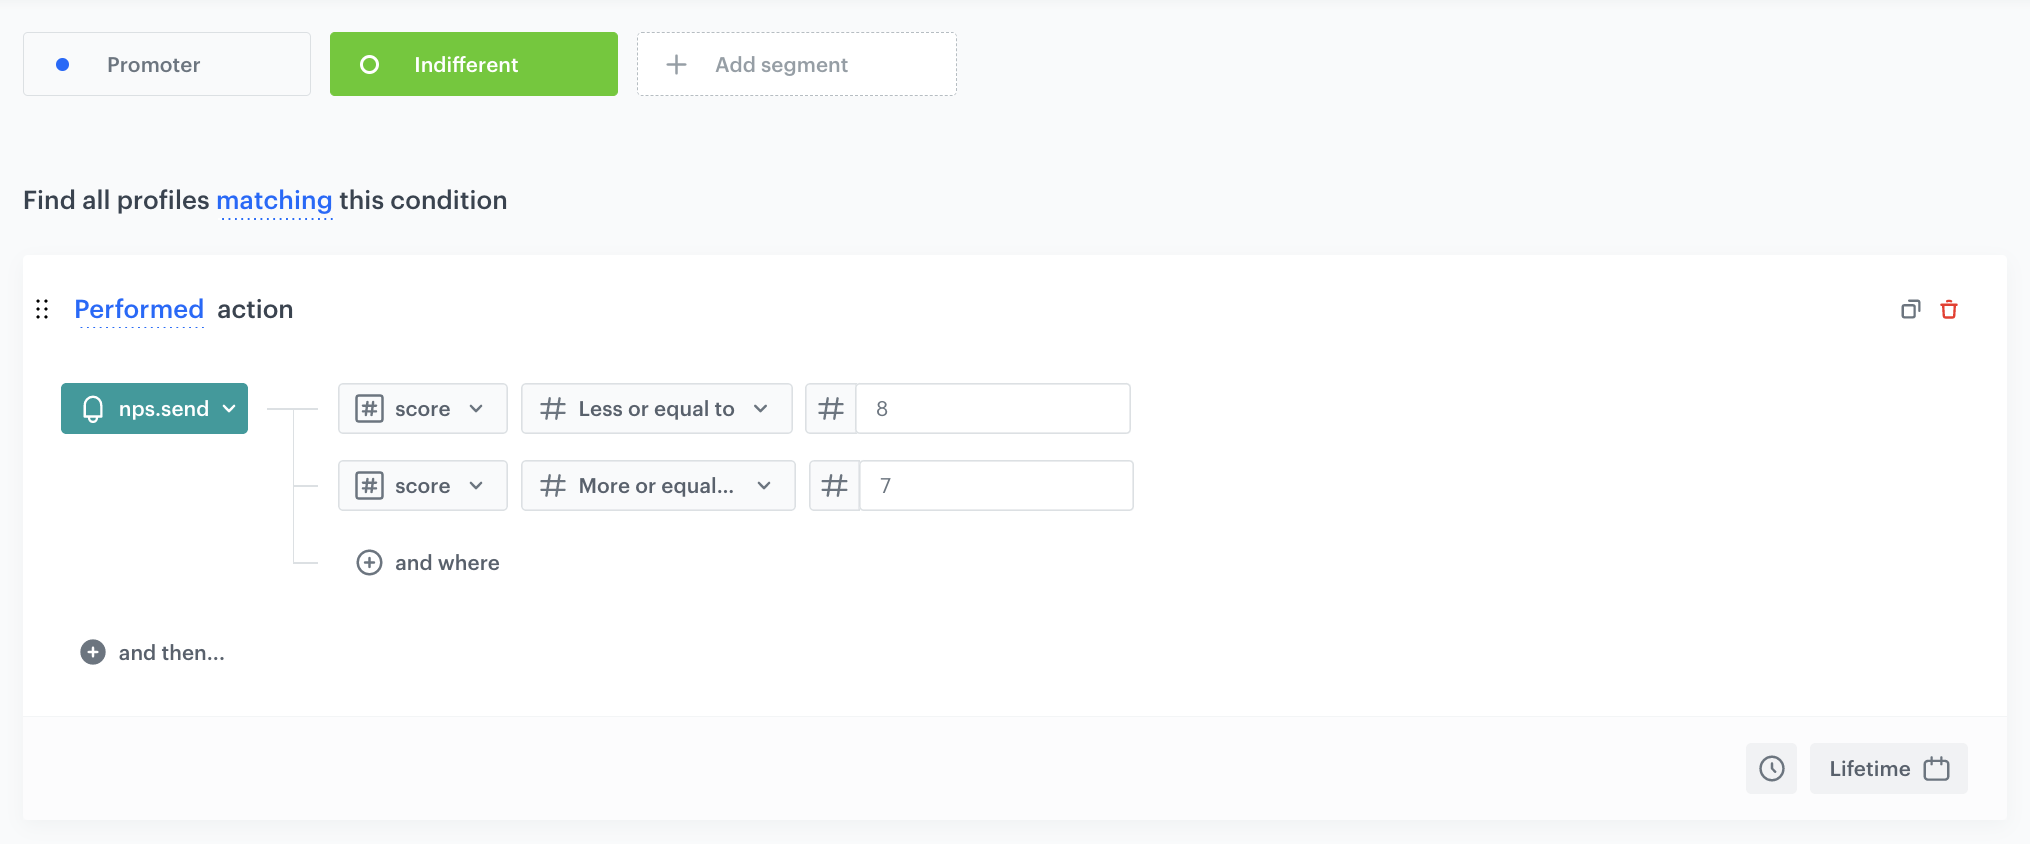
Configuration of the Indifferent segment - Next to the logical operator, in the text field, enter
Create the Critics segment
Create a segment that includes only customers who assessed the purchase/shopping experience between 1 and 6 points.
-
Click Add segment
-
Enter the name of the subsegmentation.
-
From the Performed action dropdown list, select the
nps.sendevent. -
Click + where button and select the score parameter.
-
As the logical operator, select Less or equal.
-
Next to the logical operator, in the text field enter
6.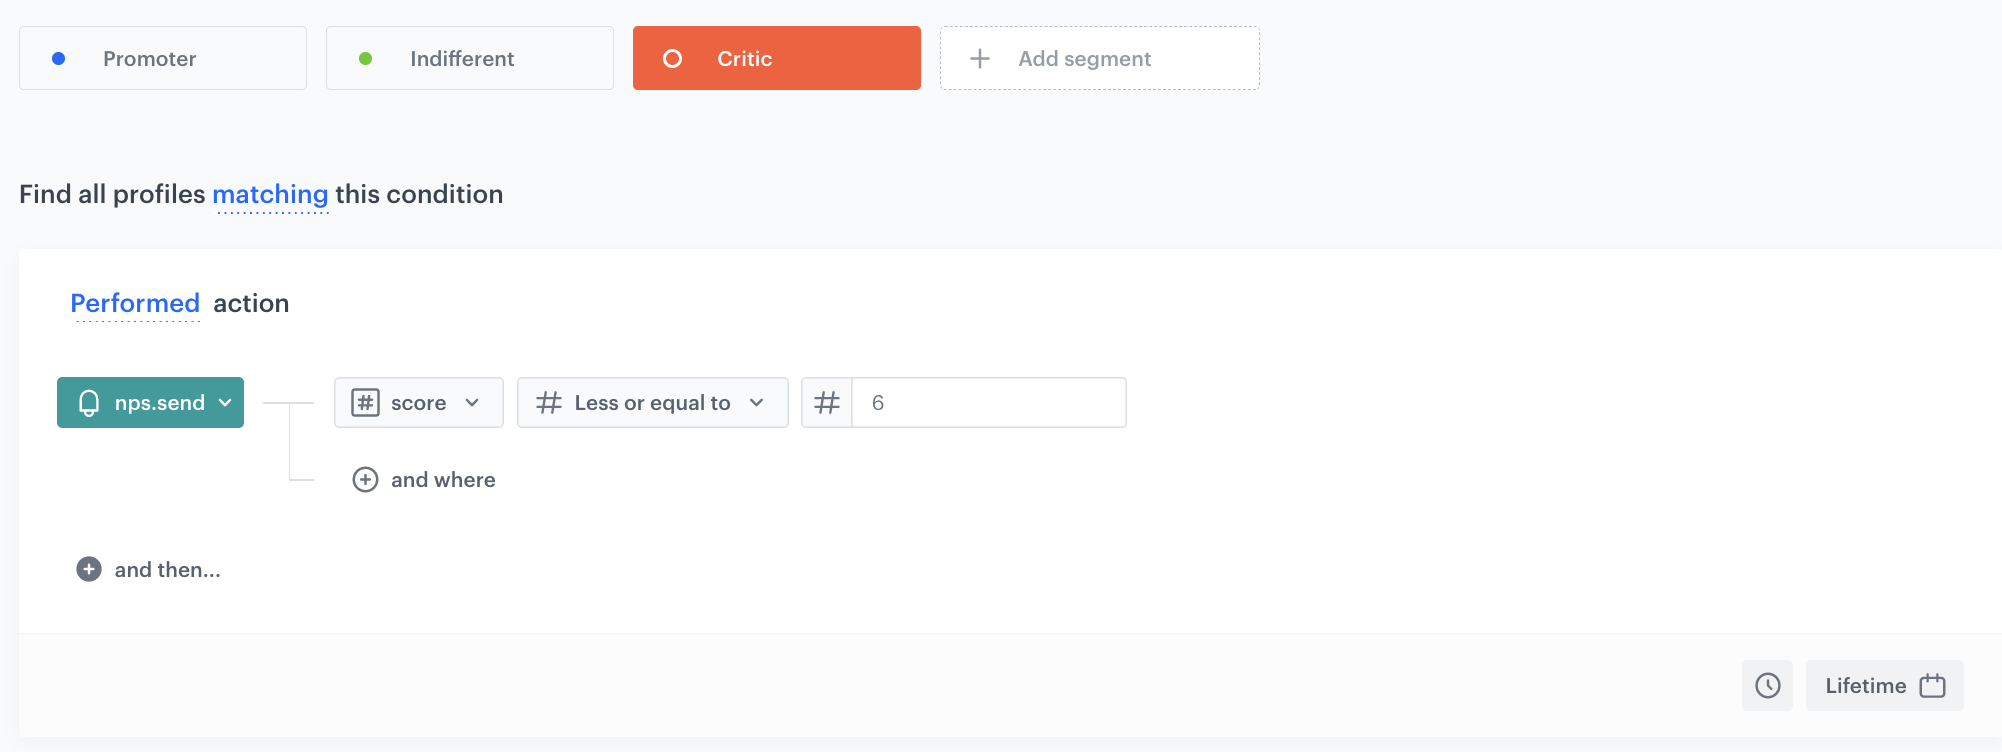
Configuration of the Critics segment -
Choose a time range as lifetime.
-
Save the segmentation.
Result: Now you can compare how many customers were in the specific segment.
Create a Net Promoter Score
In this step, create a metric which counts the example Net Promotor Score which is simply the percentage of customers who are promoters (those who scored 9 or 10) minus the percentage of customers who are critics (those who scored 1 to 6).
- Go to Analytics > Metrics > New metric.
- Enter the name of the metric.
- As a metric kind, select Formula metric.
- Build the formula of the metric as presented on the screen:
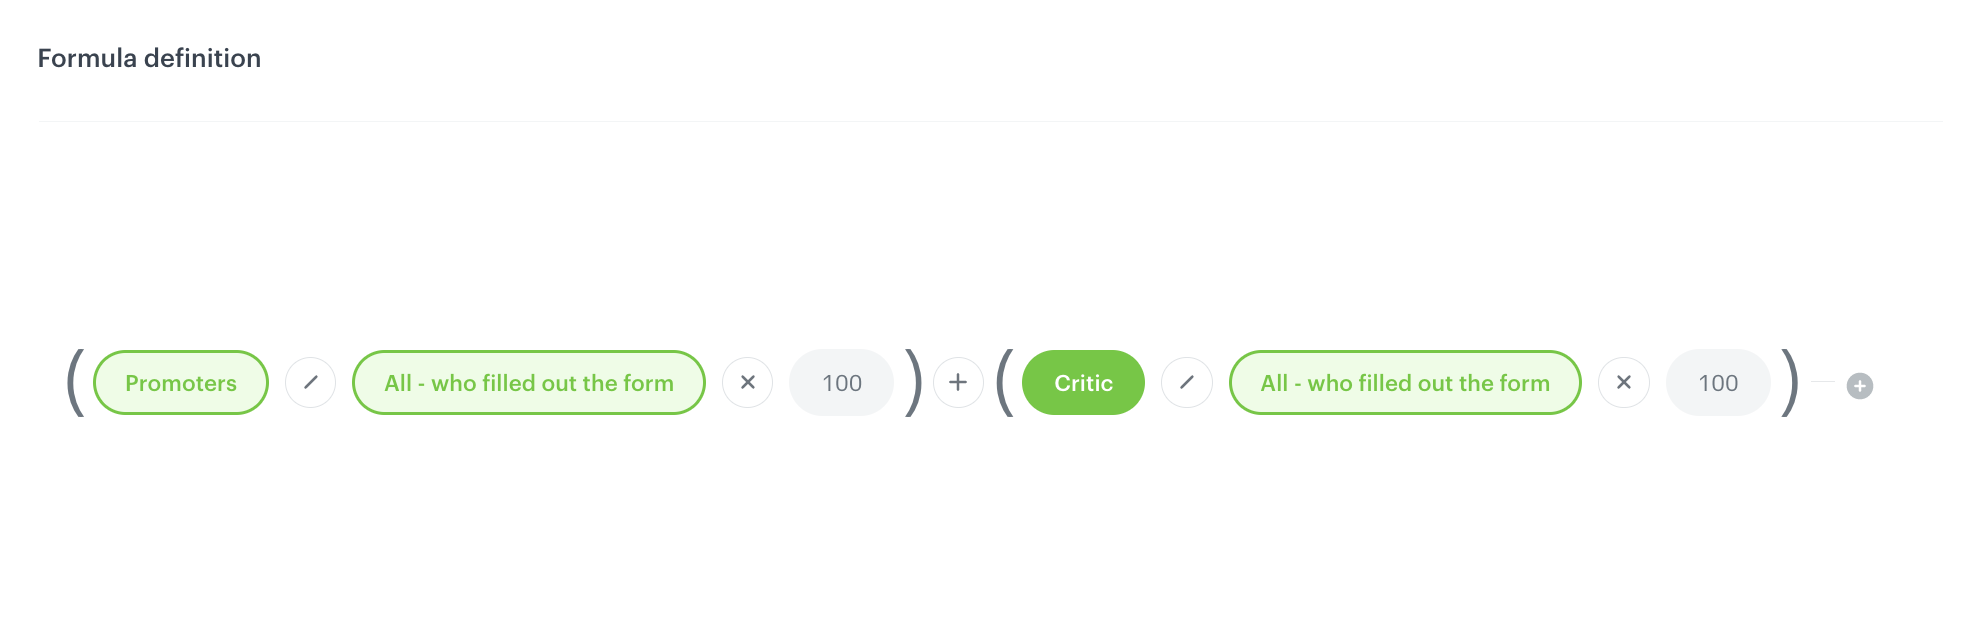
In this metric:
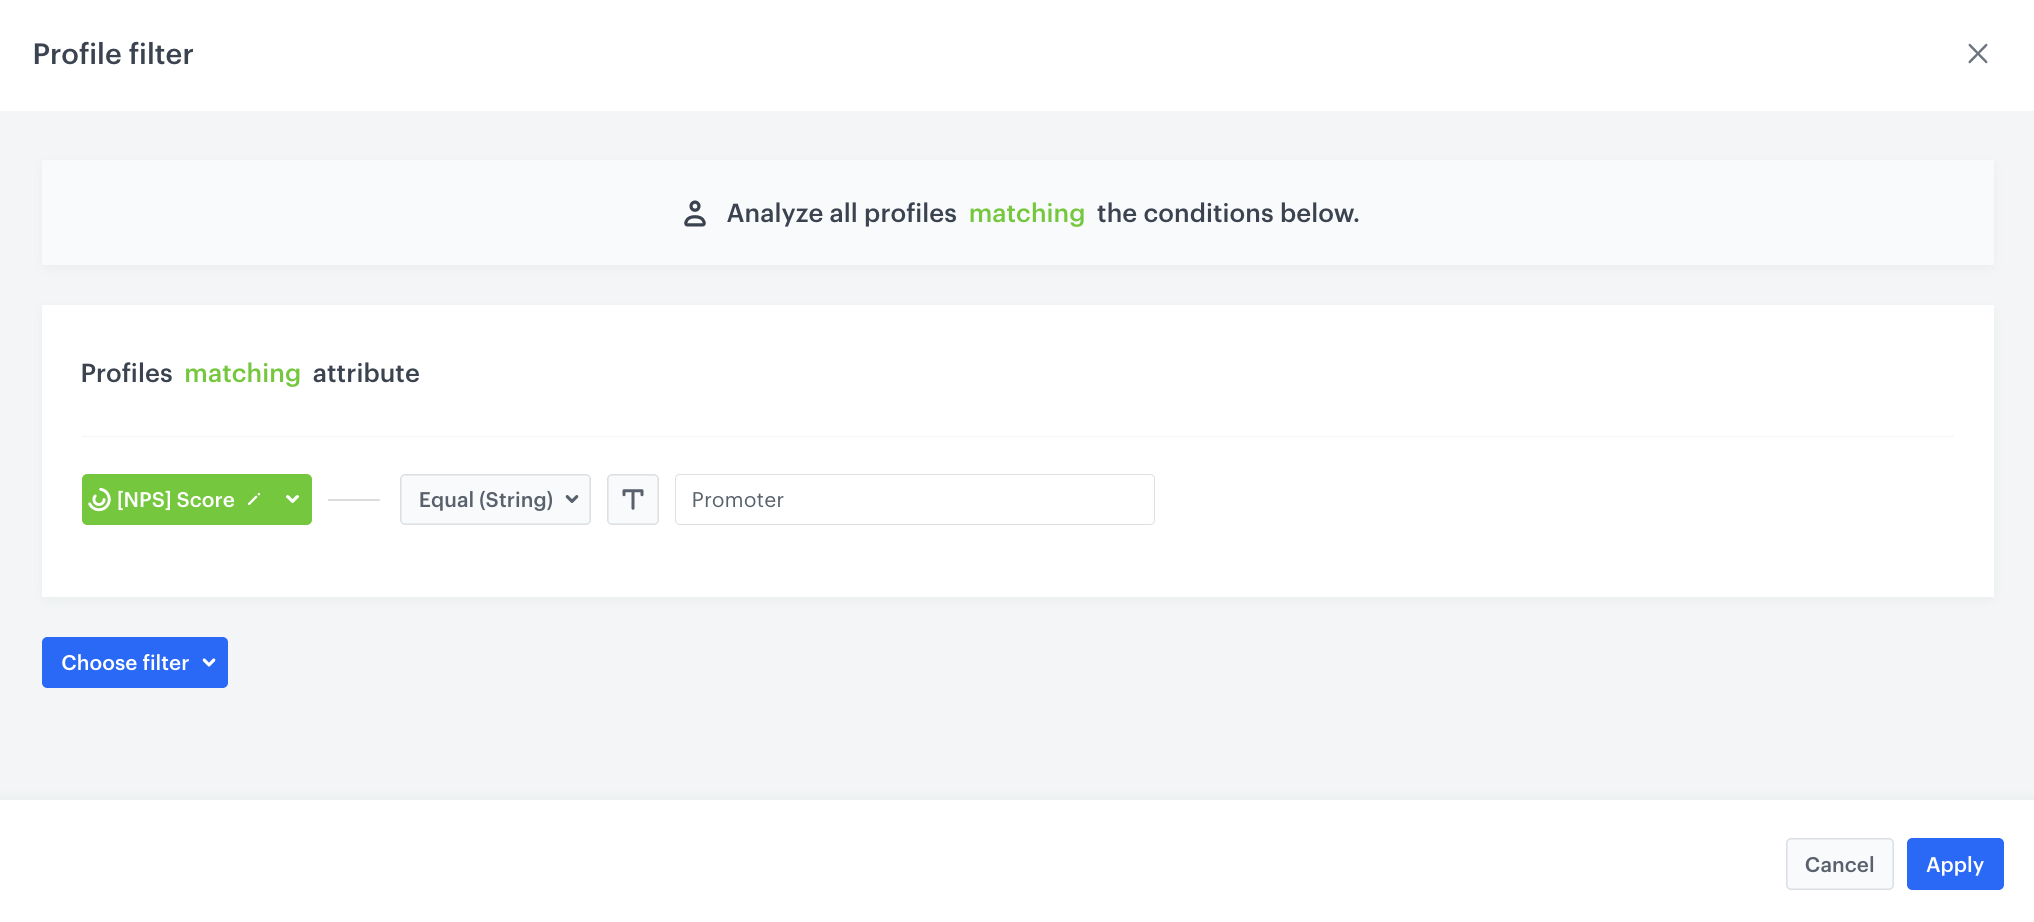
- Promoters are based on Profile filter.
-
Click Choose filter and select the segment created in the previous step.
-
Choose operator Equal.
-
As the value choose the name of the first subsegment, in our case Promoter.
-
Click Apply.
Metric settings
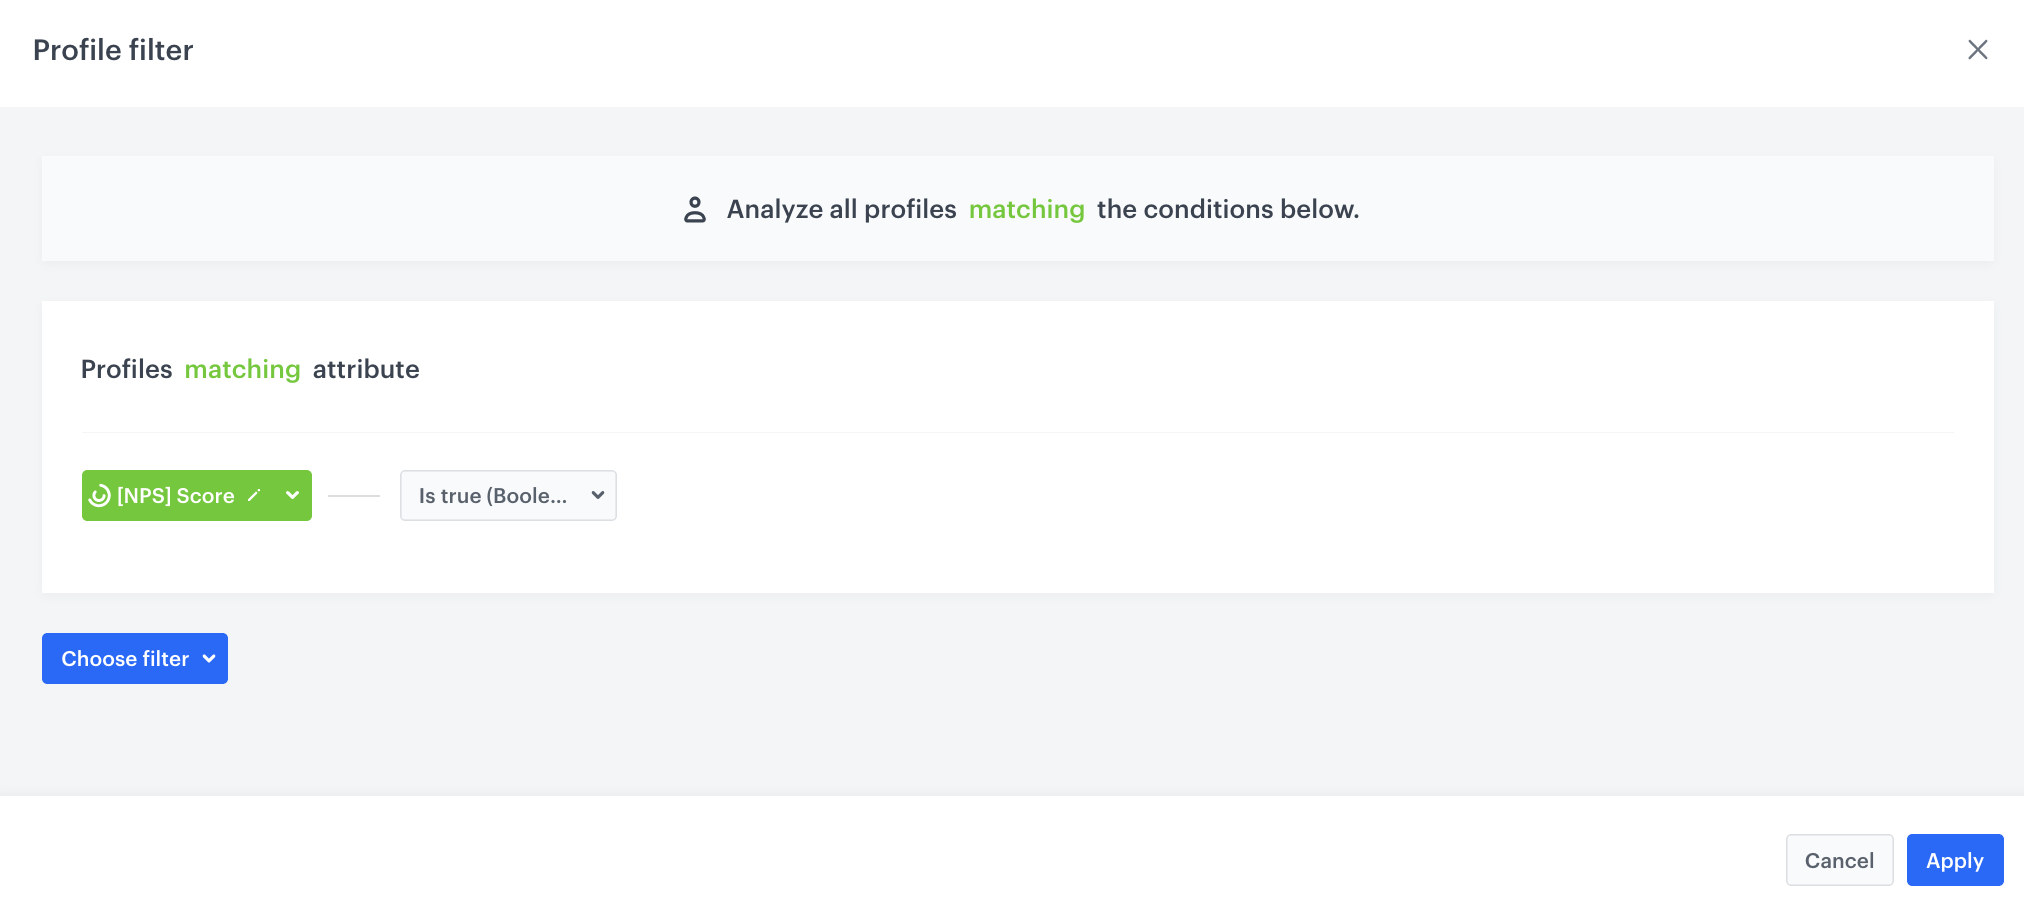
- All - who filled out the form are based on Profile filter.
-
Click Choose filter, and select the segment created in the previous step.
-
Choose operator is true. In this way you will analyze the whole group of users from every subsegment.
-
Click Apply.
Metric settings
- Critics are based on Profile filter.
-
Click Choose filter, and select the segment created in the previous step.
-
Choose operator Equal.
-
As the value choose the name of the last subsegment, in our case Critic.
-
Click Apply.

Metric settings
You can also enrich your analysis measuring:
- the average result from the NPS,
- the number of submitted forms with NPS,
- report with most often chosen notes in order,
and more analyses, which you can show on the dedicated dashboard.
What’s next
In case you need, you can prepare an export of your NPS results to external systems, for example to Google Sheets.
Check the use case set up on the Synerise Demo workspace
You can check the configuration of every element of this process directly in Synerise Demo workspace:
- Configurartion of the aggregate, which measure the date of filling out the survey
- Configurartion of the aggregate, which checks sending time of last mobile push
- Configurartion of the expression
- Dynamic content campaign
- Automation configuration
- Segmentation
- Metric with NPS score
If you don’t have access to the Synerise Demo workspace, please leave your contact details in this form, and our representative will contact you shortly.