Voucher-based referral program
Creating a solid loyalty program is key to building lasting relationships with customers. Among the countless strategies to achieve this, the use of discount codes stands out as a powerful tool. Implementing a referral program based on discount codes opens up many opportunities to attract new users, while encouraging current users to engage more deeply. These codes not only encourage customers to make additional purchases, but also serve as a channel to expand our customer base through word-of-mouth referrals.
What’s more, this referral system isn’t just advantageous for the invitee; it’s a win-win scenario that rewards both the inviter and the invitee when the shopping voucher is utilized.
In this use case, the loyalty program works by giving customers a discount code that they can share with their friends after they’ve made a purchase. If a friend then uses this code to buy something, the original customer gets a reward, usually in the form of another discount. These discount codes are shared through email. This approach keeps customers engaged and encourages them to spread the word, benefiting both the business and its customers.
Prerequisites
- Create an email account which you will use to send emails.
- Implement transaction events using SDK or API. Additionally, implement a custom parameter for the transaction.charge event, which will contain the coupon code that was used in the transaction. In our case, we will use the
discountCodeparameter. - Create two different voucher pools:
- One pool is for voucher codes that customers can share with their friends.
- The second pool contains rewards for customers after someone they shared a voucher code with makes a purchase using the code from the first pool.
Tip: To easily identify discount codes in the next process steps, you can start each voucher with the same set of letters. For example, use prefixes like
SPR_F45670,SPR_J20948.
- Meet all requirements necessary to redeem a voucher
- Make two types of email templates:
- One for customers who have made a purchase and will get a voucher code to share with friends.
- Another for customers whose shared voucher code was used by a friend, so they get a new voucher code for themselves.
Note:
We recommend using Jinjava in templates to retrieve the voucher code for the customer. To get the same voucher code, use this Jinjava code:
{% voucher assign=false %} pool-uuid {% endvoucher %}
Process
- Create a workflow that sends a discount code to customers who have made a transaction to share the code with another person.
- Create a workflow that checks the use of the code by the recipient of the code.
- Create a workflow that will reward a customer from the first workflow who gifted someone with the code.
Create first workflow
This workflow is used to send a discount code to customers who have made a transaction to share the code with another person.
- Go to Automation > Workflows > New workflow.
- Enter the name of the workflow.
Define the Profile Event trigger node
- As the first node of the workflow, add Profile Event. In the node settings:
- Click Choose event and from the dropdown list, select the
transaction.chargeevent. - Confirm by clicking Apply.

Profile Event trigger configuration - Click Choose event and from the dropdown list, select the
Configure the Send email node
In this part of the process, send email communication to customers who have made a transaction. Following the allocation of a voucher to a customer, a voucherCode.assigned event will be recorded in their customer profile.
- Add the Send Email node and open its settings.
- In the Sender details section, choose the email account from which the email is sent.
- In the Content section, select the template that you prepared as a part of the prerequisites.
- Optional: In the UTM & URL parameters section, define the UTM parameters added to the links included in the email.
- Optional: In the Additional parameters section, assign additional parameters to the events generated by interactions with the message.
- Confirm by clicking Apply.
Configure the Event filter node
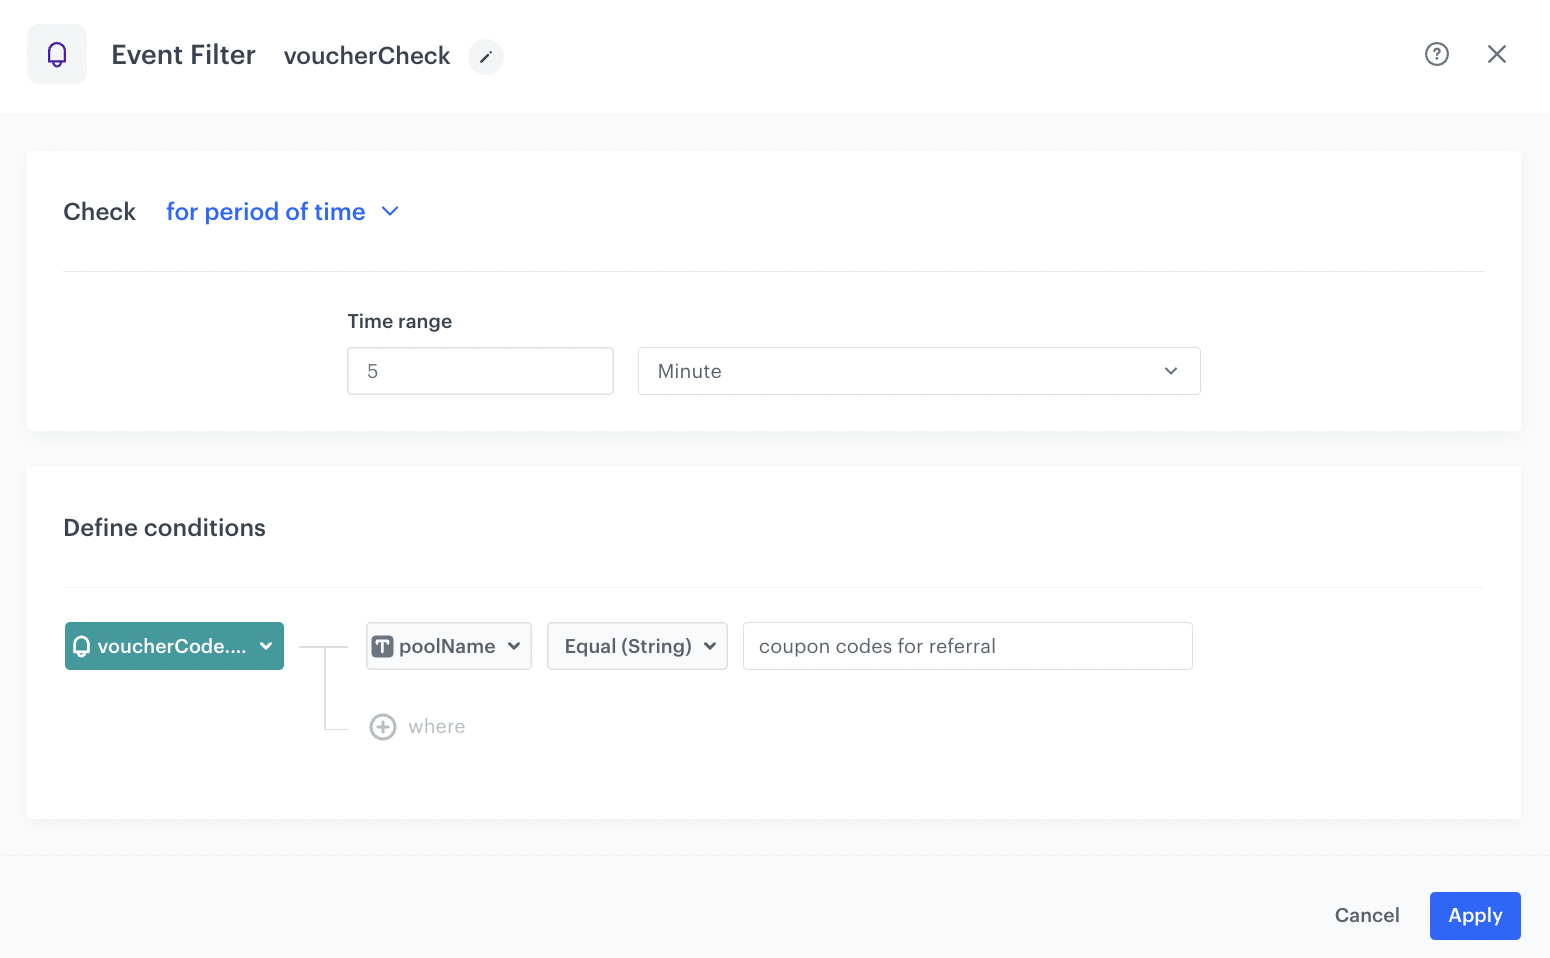
In this step, we verify if the voucherCode.assigned event has been generated for a customer.
- Add the Event Filter node. In the configuration of the node:
- Enter the title of the node, (for example, we use
voucherCheck). - Check event for period of time.
- Define the time range to 5 Minute.
- From the Choose event dropdown list, select the voucherCode.assigned event.
- As the event parameter, select poolName.
- From the Choose operator dropdown list, select Equal.
- As the value, enter the name of the voucher pool you are referring to.
- Confirm by clicking Apply.
Event filter node configuration - Enter the title of the node, (for example, we use
- For the not matched path, select the End node.
- For the matched path, select the Update profile node.
Add the Update Profile node
In this step, assign an attribute to customer’s profile with the value of the voucher code. In our case, we use my_refferal_code attribute.
- For the Matched path, add the Update Profile node.
- Click dropdown list and create my_refferal_code attribute.
- From the next dropdown list, choose Change operator.
- In the Value section, insert the following jinjava which will display as the voucherCode:
Note that`{{ automationPathSteps['voucherCheck'].event.params.voucherCode }}`voucherCheckis the name of the Event Filter trigger added manually.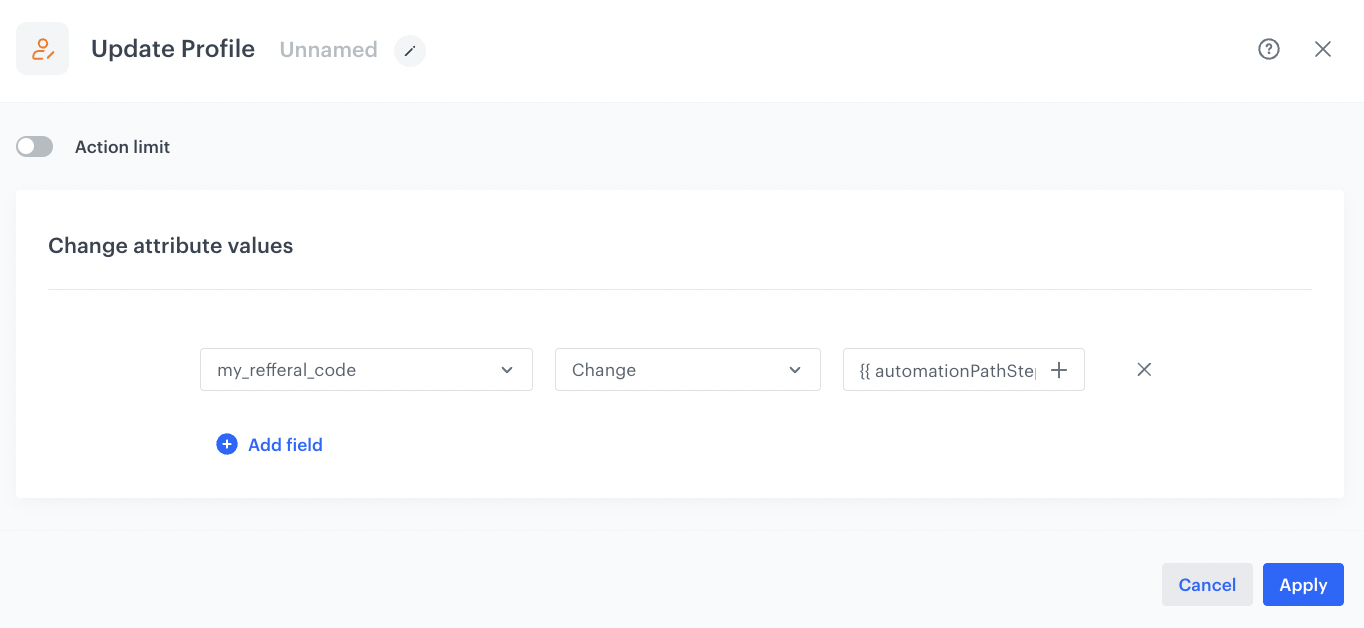
Update Profile node configuration - To save the changes, click Apply.
- Add the End node.

Final view of the workflow configuration
Create second workflow
This workflow will be used to redeem discount code.
- Go to Automation > Workflows > New workflow.
- Enter the name of the workflow.
Define the Profile Event trigger node
- As the first node of the workflow, add Profile Event. In the node settings:
- Create name for this node, as it will be used later in the workflow.
- Click Choose event and from the dropdown list, select the
transaction.chargeevent. - Click +where and from the dropdown list, select discountCode parameter.
- From the Choose operator dropdown list, select Starts with (String).
- In the Value section insert the prefix that is used in all codes from the first voucher pool you created as a part of prerequisites. In our case it’s
SPRprefix. - Confirm by clicking Apply.
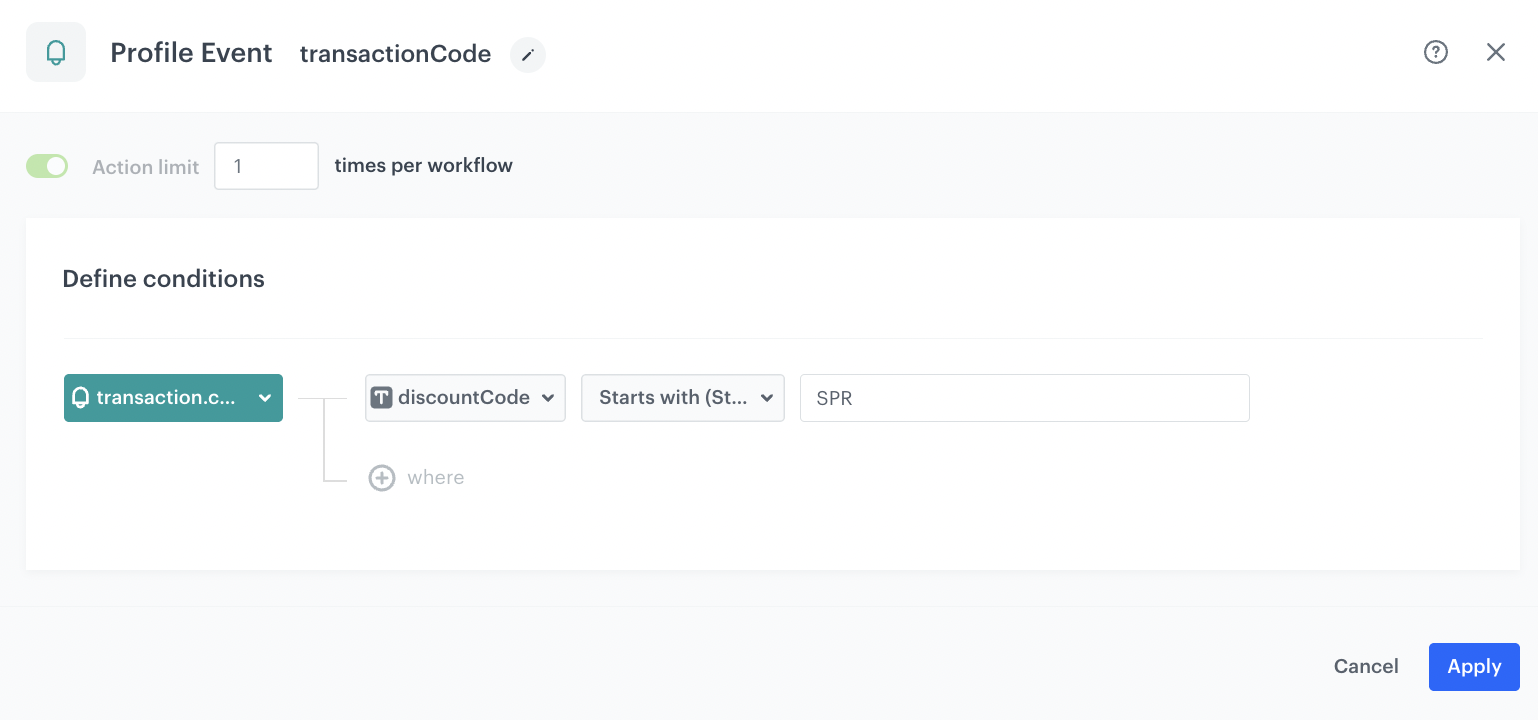
Profile Event trigger configuration
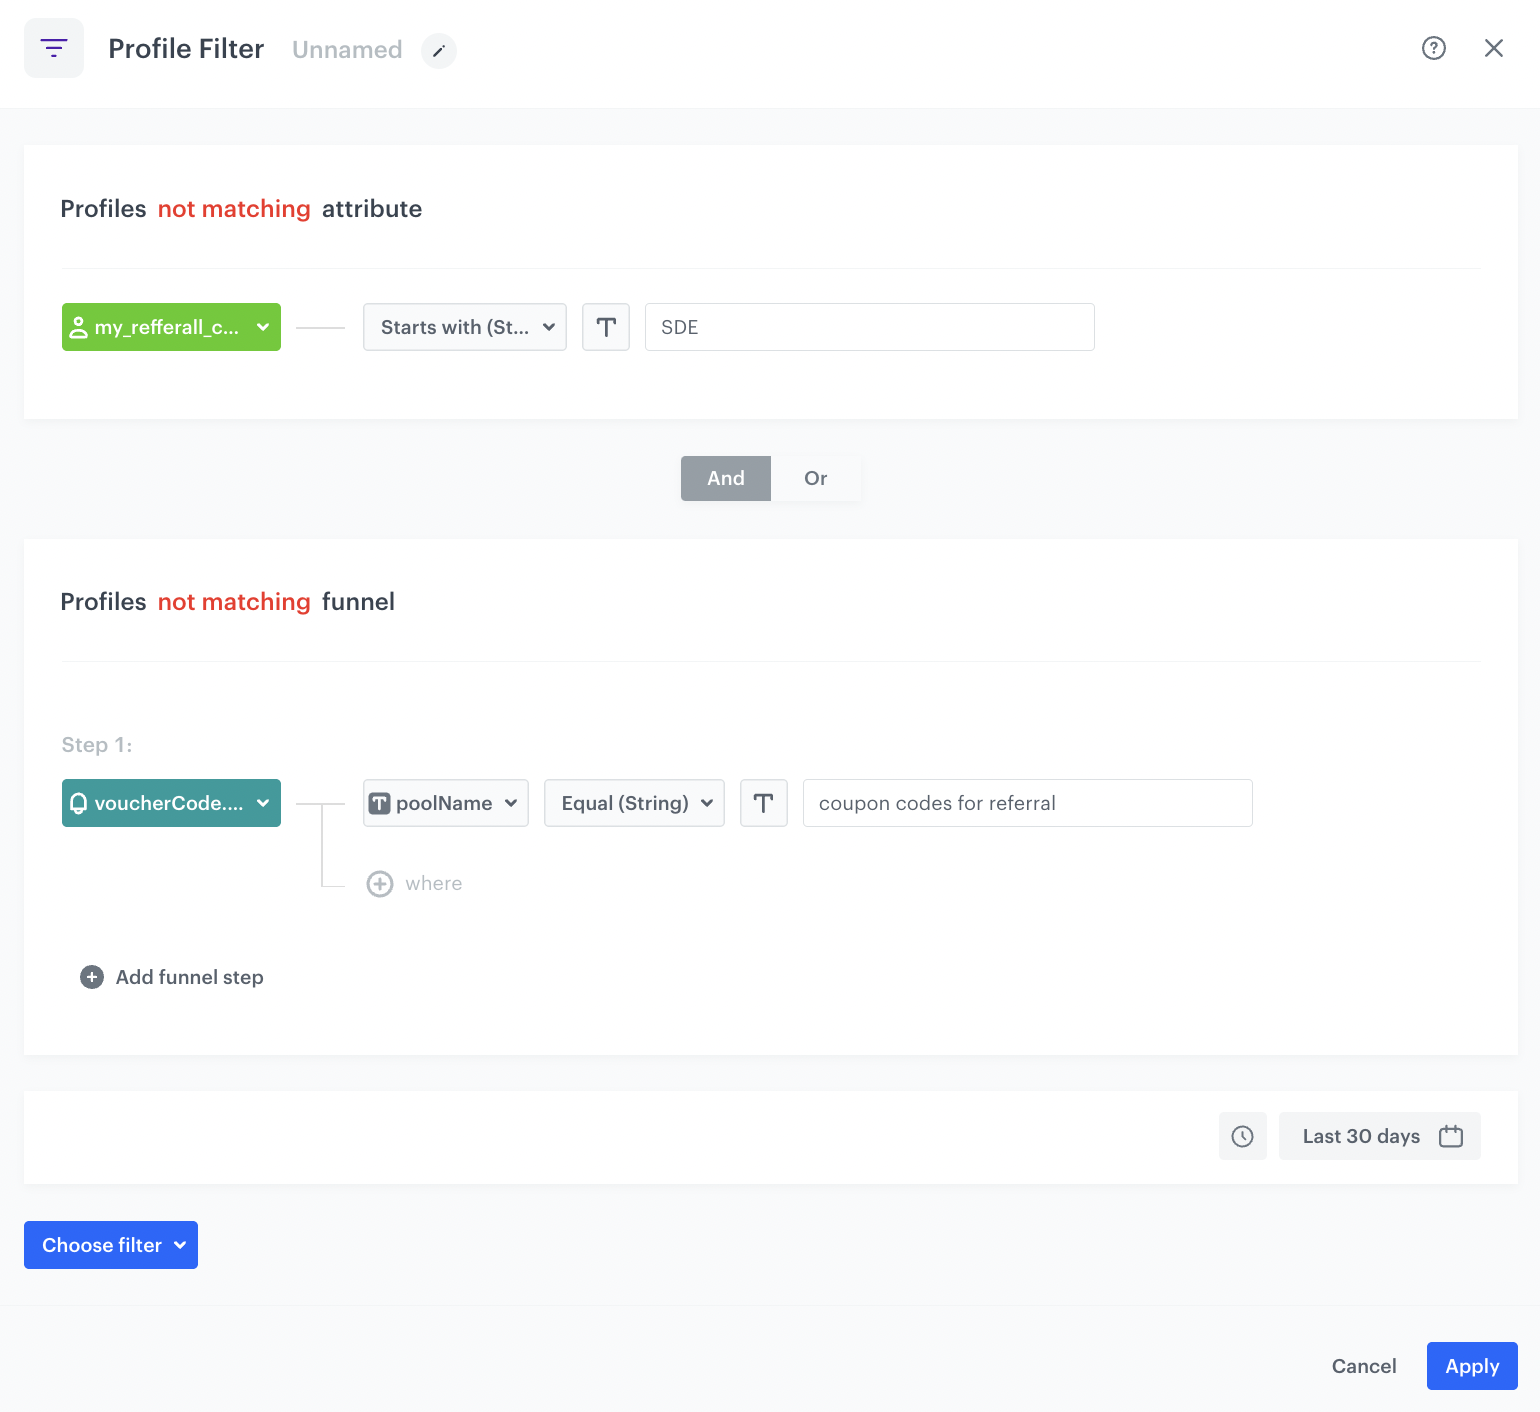
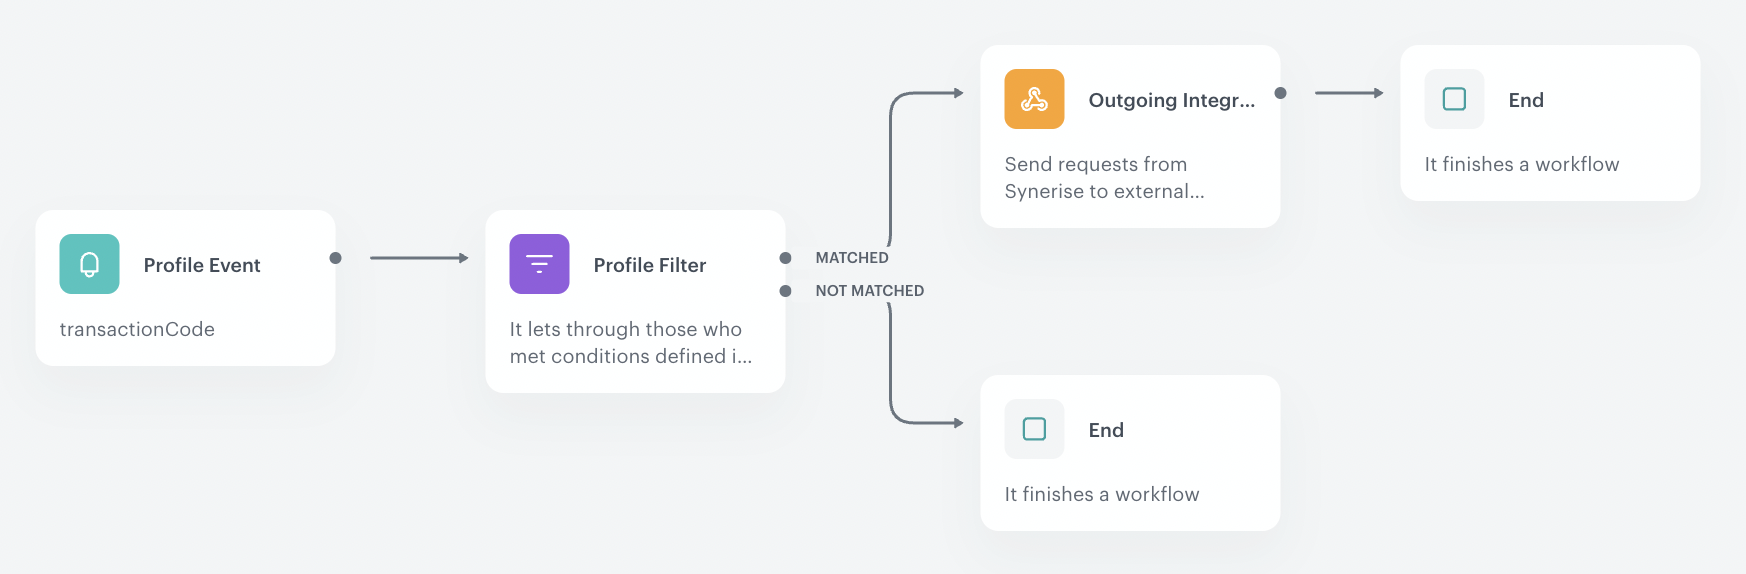
Configure the Profile filter node
This Profile filter creates a security measure so that this code cannot be used by people who received it through the first workflow.
- Add the Profile Filter node. In the configuration of the node:
- From the Choose filter dropdown list, select the my_refferal_code attribute.
- From the Choose operator dropdown list select Starts with (String).
- In the Value section, insert the prefix that is used in all codes from the first voucher pool you created as a part of prerequisites. In our case it’s
SPRprefix. - Modify the Profile matching attribute to Profile not matching.
- From the Choose filter dropdown list, select the voucherCode.assigned event.
- Click +where and from the dropdown list, select poolName parameter.
- From the Choose operator dropdown list, select Equal (String)).
- In the Value section insert the prefix that is used in all codes from the first voucher pool you created as a part of prerequisites. In our case it’s
SPRprefix. - Modify the Profile matching attribute to Profile not matching.
- Define the time period for which the event will be calculated.
- Use the AND logical operator to connect set rules.
- Confirm by clicking Apply.
Event filter node configuration - For the not matched path, select the End node.
- For the matched path, select the Outgoing integration node.
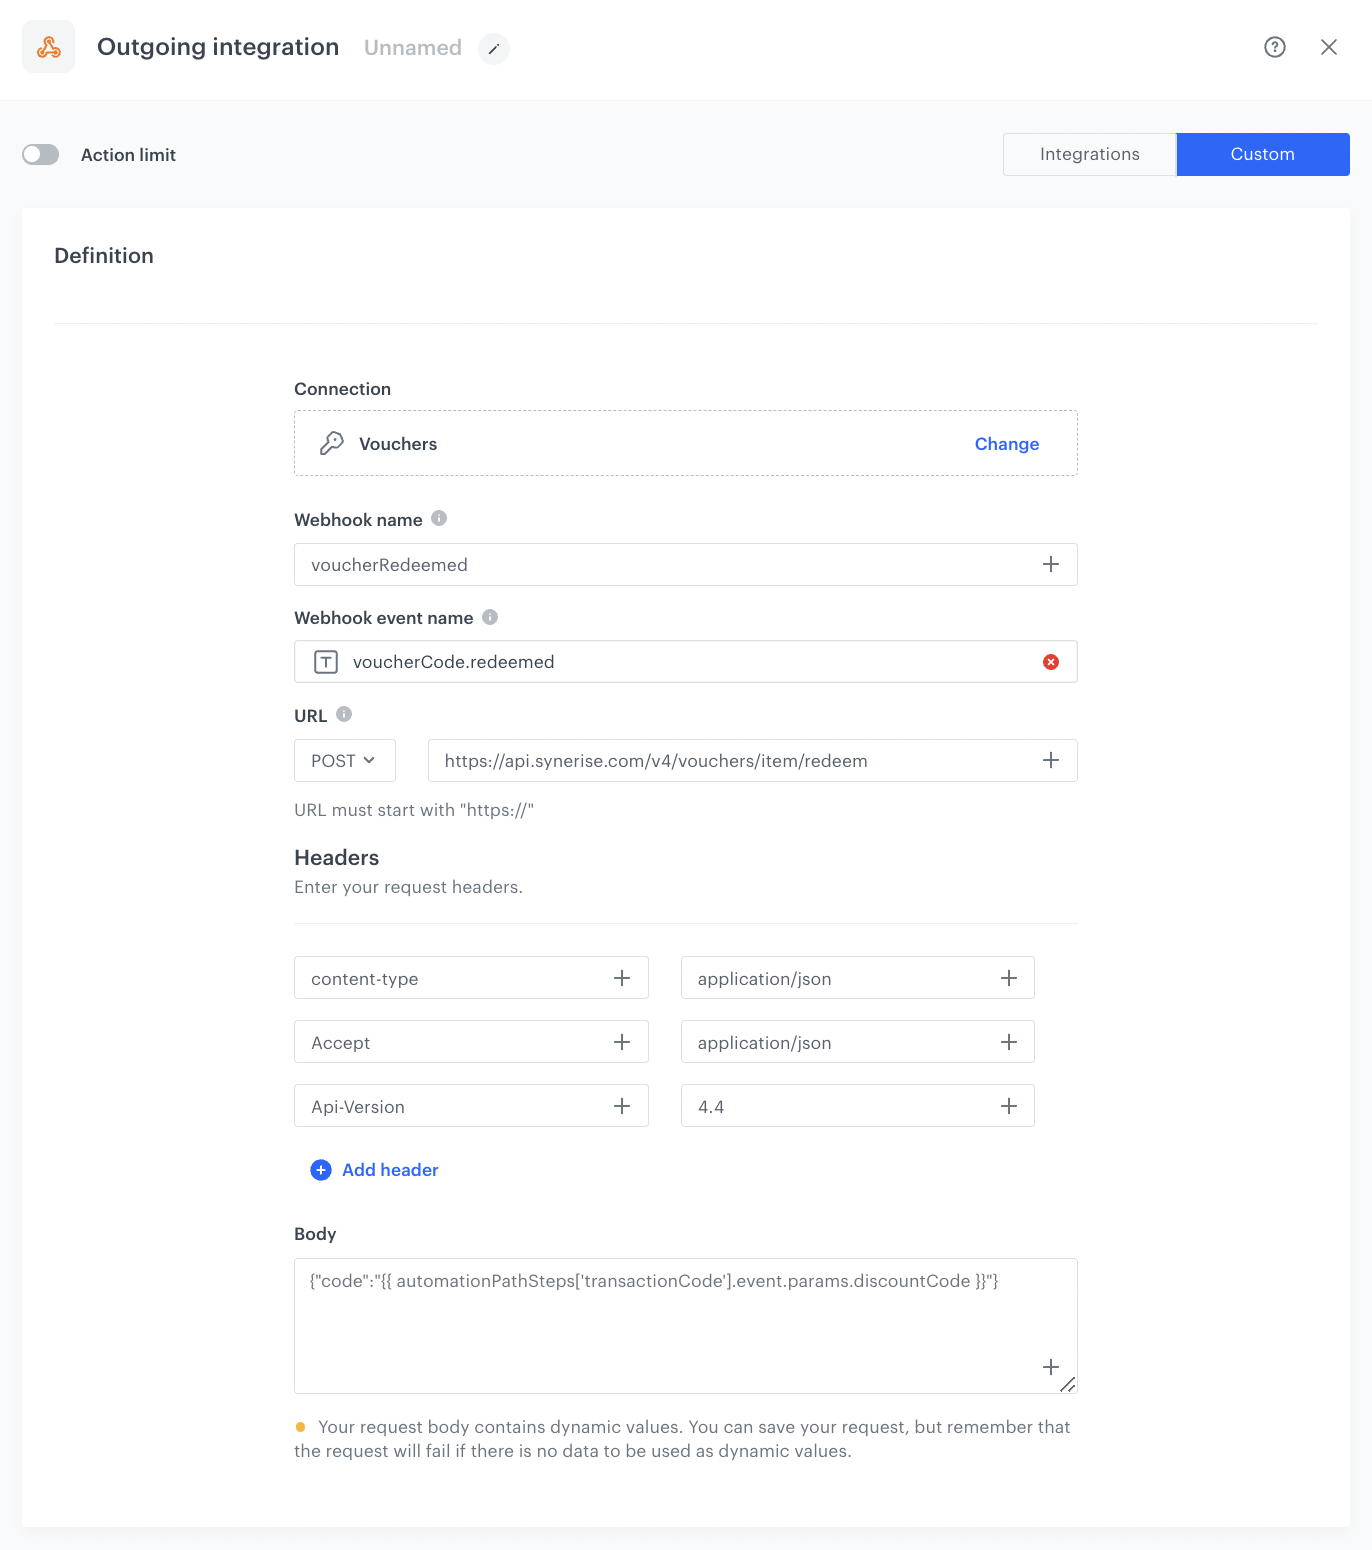
Configure the Outgoing Integration node
In this step, we will redeem the used coupon during the transaction using Synerise API reference.
- Add Outgoing Integration node.
- In Definition section, choose the Custom tab.
- Choose Webhook connection type.
- Select a connection.
If you haven’t created any connection yet, see instructions in “Set up a connection” section. - In the Webhook name, enter your preferred name. The value of this field will be stored as a Name parameter in the response event. It makes it easier to identify the event and is useful for creating analysis. In our use case, we will use the following name
voucherRedeemed. - Define the Webhook event name. In our use case, we use the
voucherCode.redeemedevent.Note: This is the event key. While naming it, follow the pattern used for the default events in the application such as page.visit, product.buy and so on. - In the URL section, choose the POST method.
- Enter the following URL:
https://api.synerise.com/v4/vouchers/item/redeem - In the Key field, enter
Acceptand in the Value field, enterapplication/json - Click Add header.
- Add Accept with
application/json - In the Key field, enter
Api-Versionand in the Value field, enter4.4 - In the Body section, enter the following Jinjava:
{"code":"{{ automationPathSteps['transactionCode'].event.params.discountCode }}"}
Note thattransactionCodeis the name of the Profile Event trigger added manually.
In this Jinjava we reference to code that has been used. Because this code was assigned in the first workflow to the user who shares it, the voucherCode.redeemed event (which is the result of using this API request) is assigned to the profile of the person who shares the code. Such configuration is crucial for the third workflow which sends out reward discount code which is based on thevoucherCode.redeemedevent. - Confirm by clicking Apply.
Outgoing integration node configuration - Add the finishing End node.
Final view of the workflow configuration
Create third workflow
This workflow will send a reward to a customer from the first workflow after the code they shared with someone has been used.
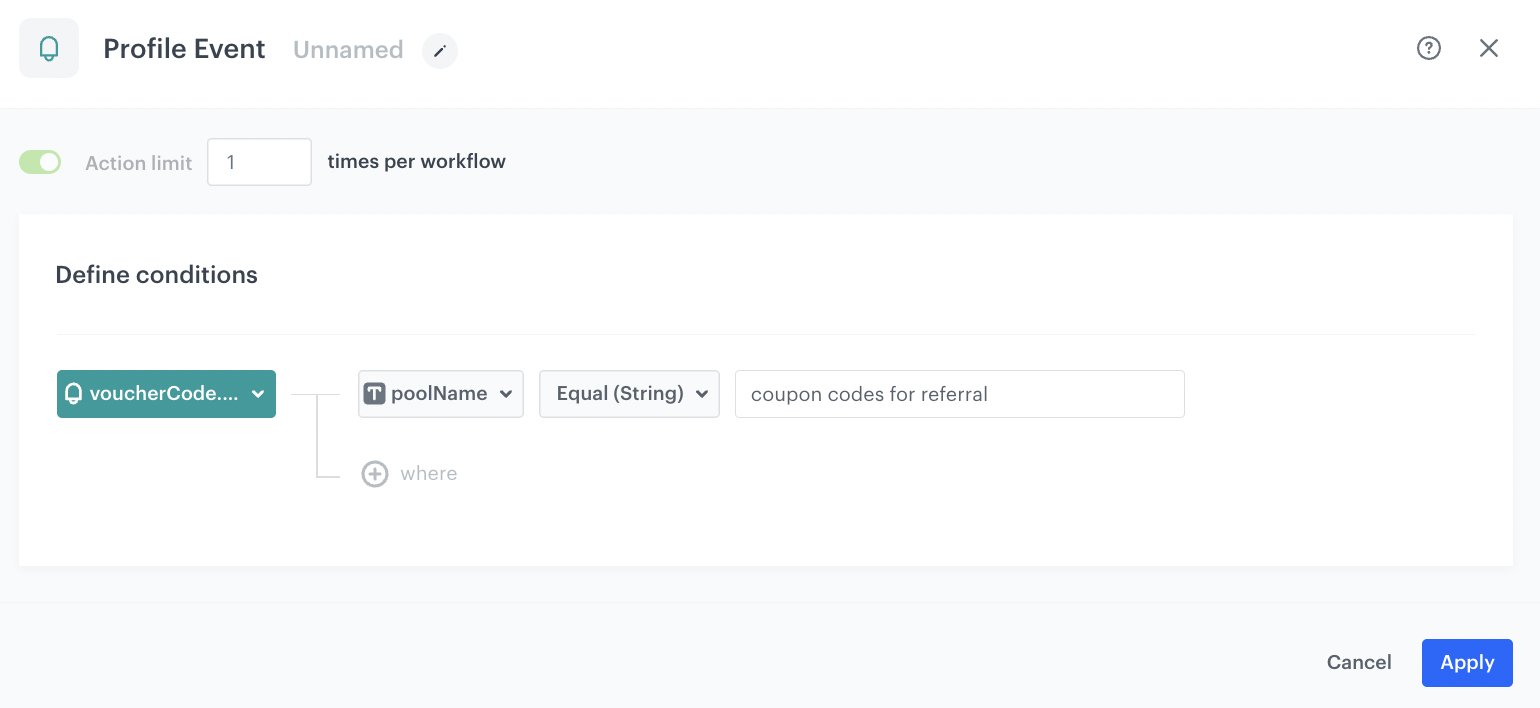
Define the Profile Event trigger node
The worflow is triggered by the voucherCode.redeemed event which was generated in the previous workflow.
- As the first node of the workflow, add Profile Event. In the node settings:
- Click Choose event and from the dropdown list, select the
voucherCode.redeemedevent. - Click + where and from the dropdown list, select poolName.
- From the Choose operator dropdown list select Equal (String).
- As the value, enter the name of the voucher pool you are referring to.
- Confirm by clicking Apply.
Profile Event trigger configuration - Click Choose event and from the dropdown list, select the
Configure the Send email node
In this part of the process, send email communication to customers who previously shared the code. They’ll receive a reward in the form of a voucher code for their own use.
- Add the Send Email node and open its settings.
- In the Sender details section, choose the email account from which the email is sent.
- In the Content section, select the template that you prepared as a part of the prerequisites.
- Optional: In the UTM & URL parameters section, define the UTM parameters added to the links included in the email.
- Optional: In the Additional parameters section, assign additional parameters to the events generated by interactions with the message.
- Confirm by clicking Apply.
- Add the End node.
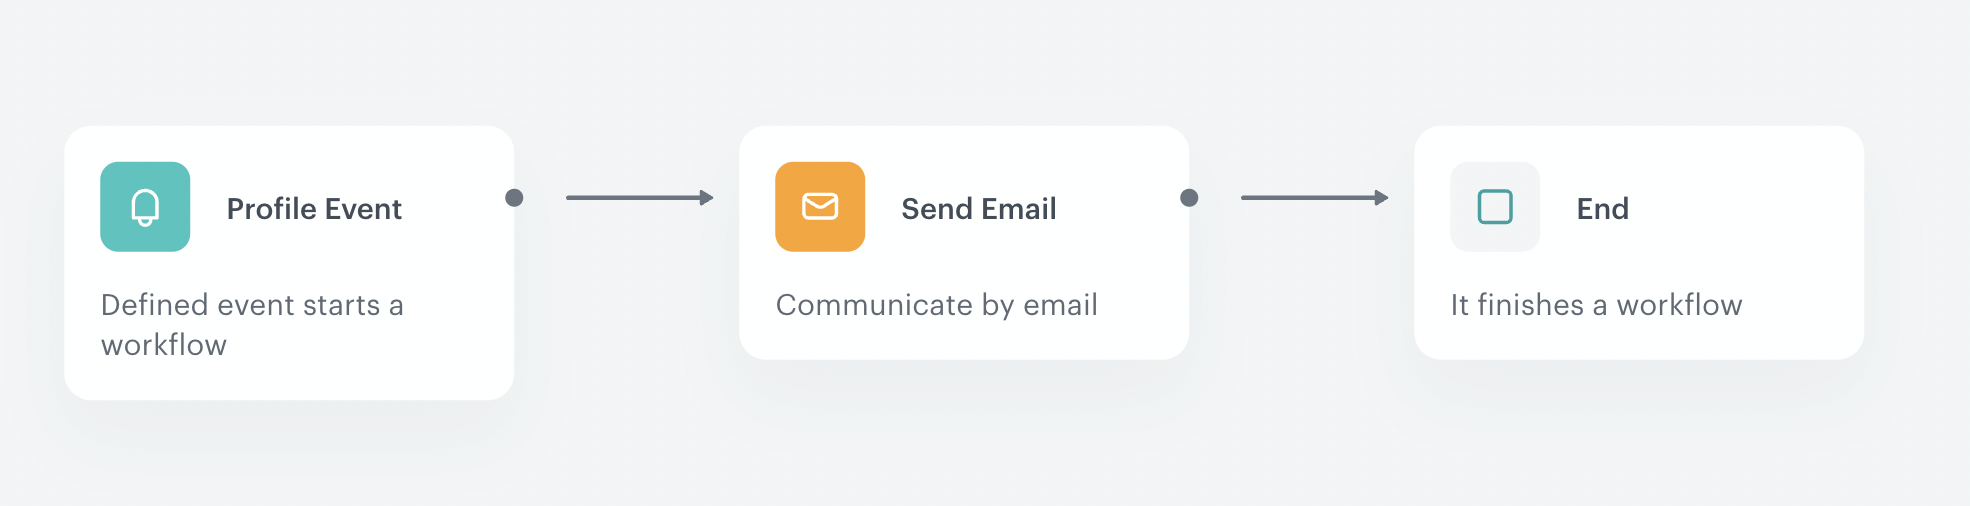
Final view of the workflow configuration
Check the use case set up on the Synerise Demo workspace
Check all items (metrics and dynamic content) created in this use case in our Synerise Demo workspace:
- Workflow 1
- Workflow 2
- Workflow 3
- Voucher codes for referral
- Voucher codes for those who shared the code