"Filter rows" node
This node allows you to define rules which include or exclude specific rows from the file in result of the transformation. The Filter rows node is useful as a means of data cleaning to meet the requirements for data import for example.
Node configuration
- Double-click the Filter rows node.
- Click Add rule.
- Select the columns which contain the values you want to filter by.
- From the dropdown list, select the condition for the parameter (row value) in the columns:
- Equal
- Not equal
- Ends with
- Starts with
- Contain
- Not contain
- In the text field, enter the value.
- To add more conditions, click Add rule.
- Repeat steps 2-4.
- To define what happens if rows contain errors, select one of the options available in the Error handling section.
Handle errors
You can define what to do with failed values (for example, as a result of Jinja rendering or in other cases) in cells where data type modification failed. In the Error handling section, select one of the following options:
- Skip row if error occurred - It omits the row when an exception occurs.
- Skip if result is null or empty string - It omits rows with empty strings and
null(which may be the result of rendering Jinja) - Stop further transformation - The transformation stops at the row with an error. The data before the line that caused the error is transformed (and imported if the transformation rule is used in the Data Transformation node).
- Insert null if error occurred - Wrong values are replaced with
null. If you use such a transformation for the import of profiles, the existing value of an attribute is cleared and replaced with thenullvalue. - Insert empty string if error occurred - Wrong value is removed and the cell remains empty.
Example of use
Let’s assume you want to import a file with USA customers to Synerise, however, the file contains customers from all around the world. To prepare such a file for import, you can modify it by creating a data-transforming workflow that includes the Filter rows node. Later on, you can use this data workflow in a workflow that imports selected customers. Both stages (preparing data transforming workflow and a workflow that imports customers)
email,name,surname,country
john.doe@example.com,John,Doe,USA
john.smith@example.com,John,Smith,Germany
stella.woods@example.com,Stella,Woods,USA
rajesh.doe@example.com,Rajesh,Doe,Singapour
rajesh.smith@example.com,Rajesh,Smith,India
marco.gomez@example.com,Marco,Gomez,Spain
kate.johnson@example.com,Kate,Johnson,USA
jane.williams@example.com,Jane,Williams,USA
rachel.brown@example.com,Rachel,Brown,England
frank.davis@example.com,Frank,Davis,USA
pierre.perez@example.com,Pierre,Perez,France
rob.harris@example.com,Robert,Harris,Wales
lee.lewis@example.com,Lee,Lewis,USA
Creating rules for modifying the file with customer data
-
Enter the name of the data transformation.
-
Start the data transformation workflow with the Data Input node. In the configuration of the node, upload the file with customers.
-
As the second node, add the Filter rows node. In the configuration of the node:
- Click Add rule.
- Leave the Include option at default (Include these).
- From the dropdown list, select Equal.
- Next to the dropdown list, in the text field, enter the name of the country. In this example, it’s
USA.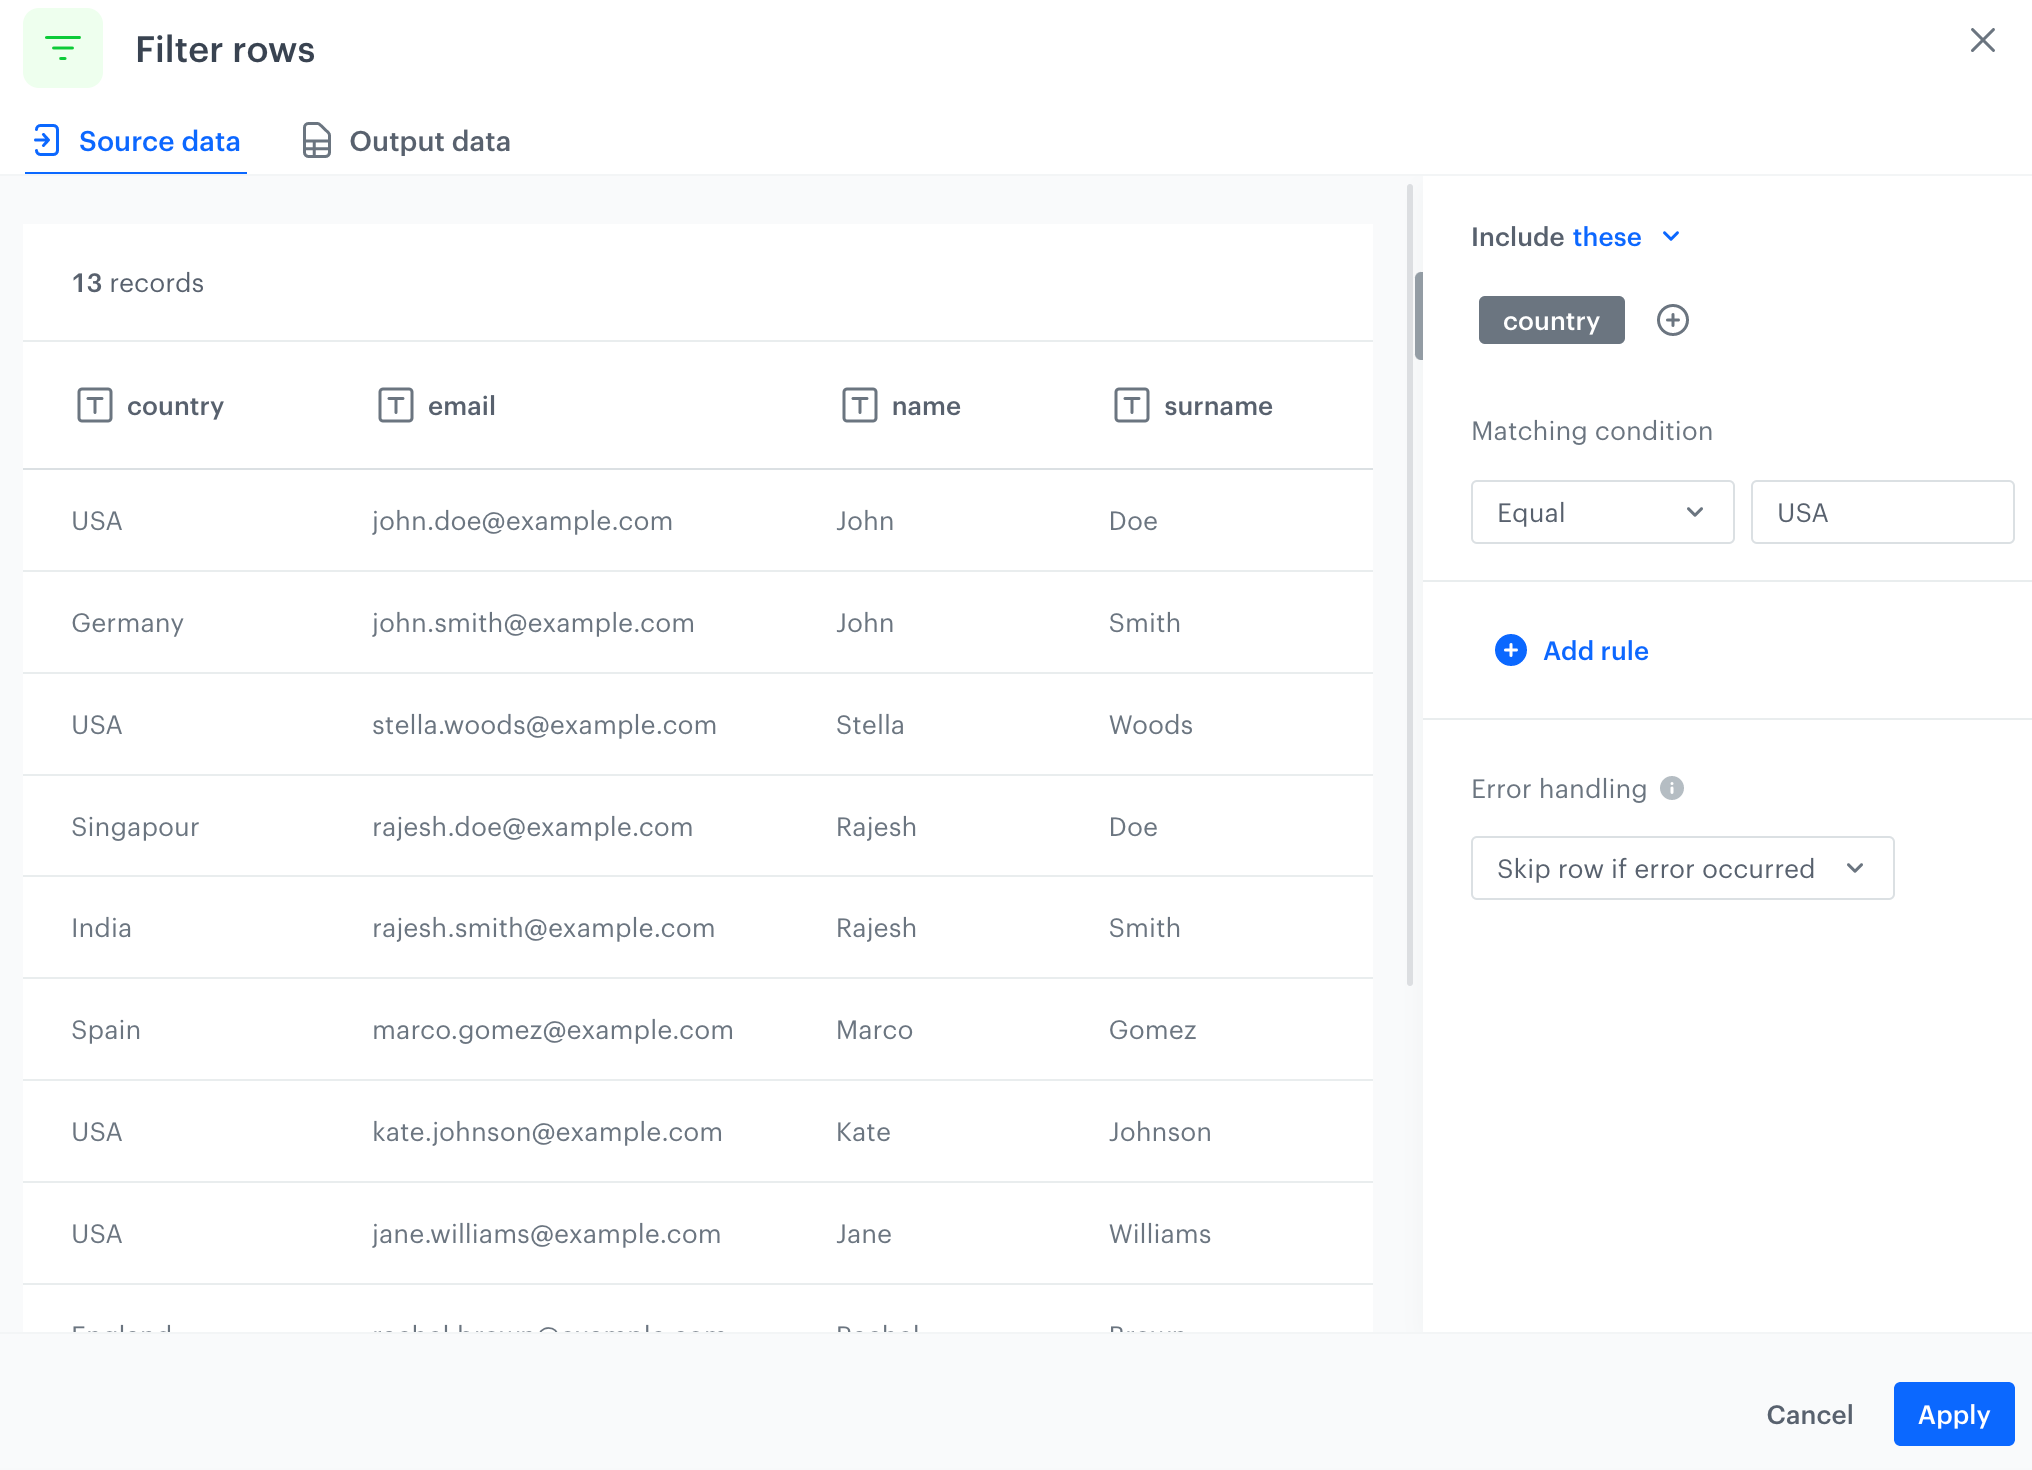
The configuration of the Filter rows node - Confirm by clicking Apply.
-
Add the Data Output node. In the settings of the node, you can see the outcome of the modification.
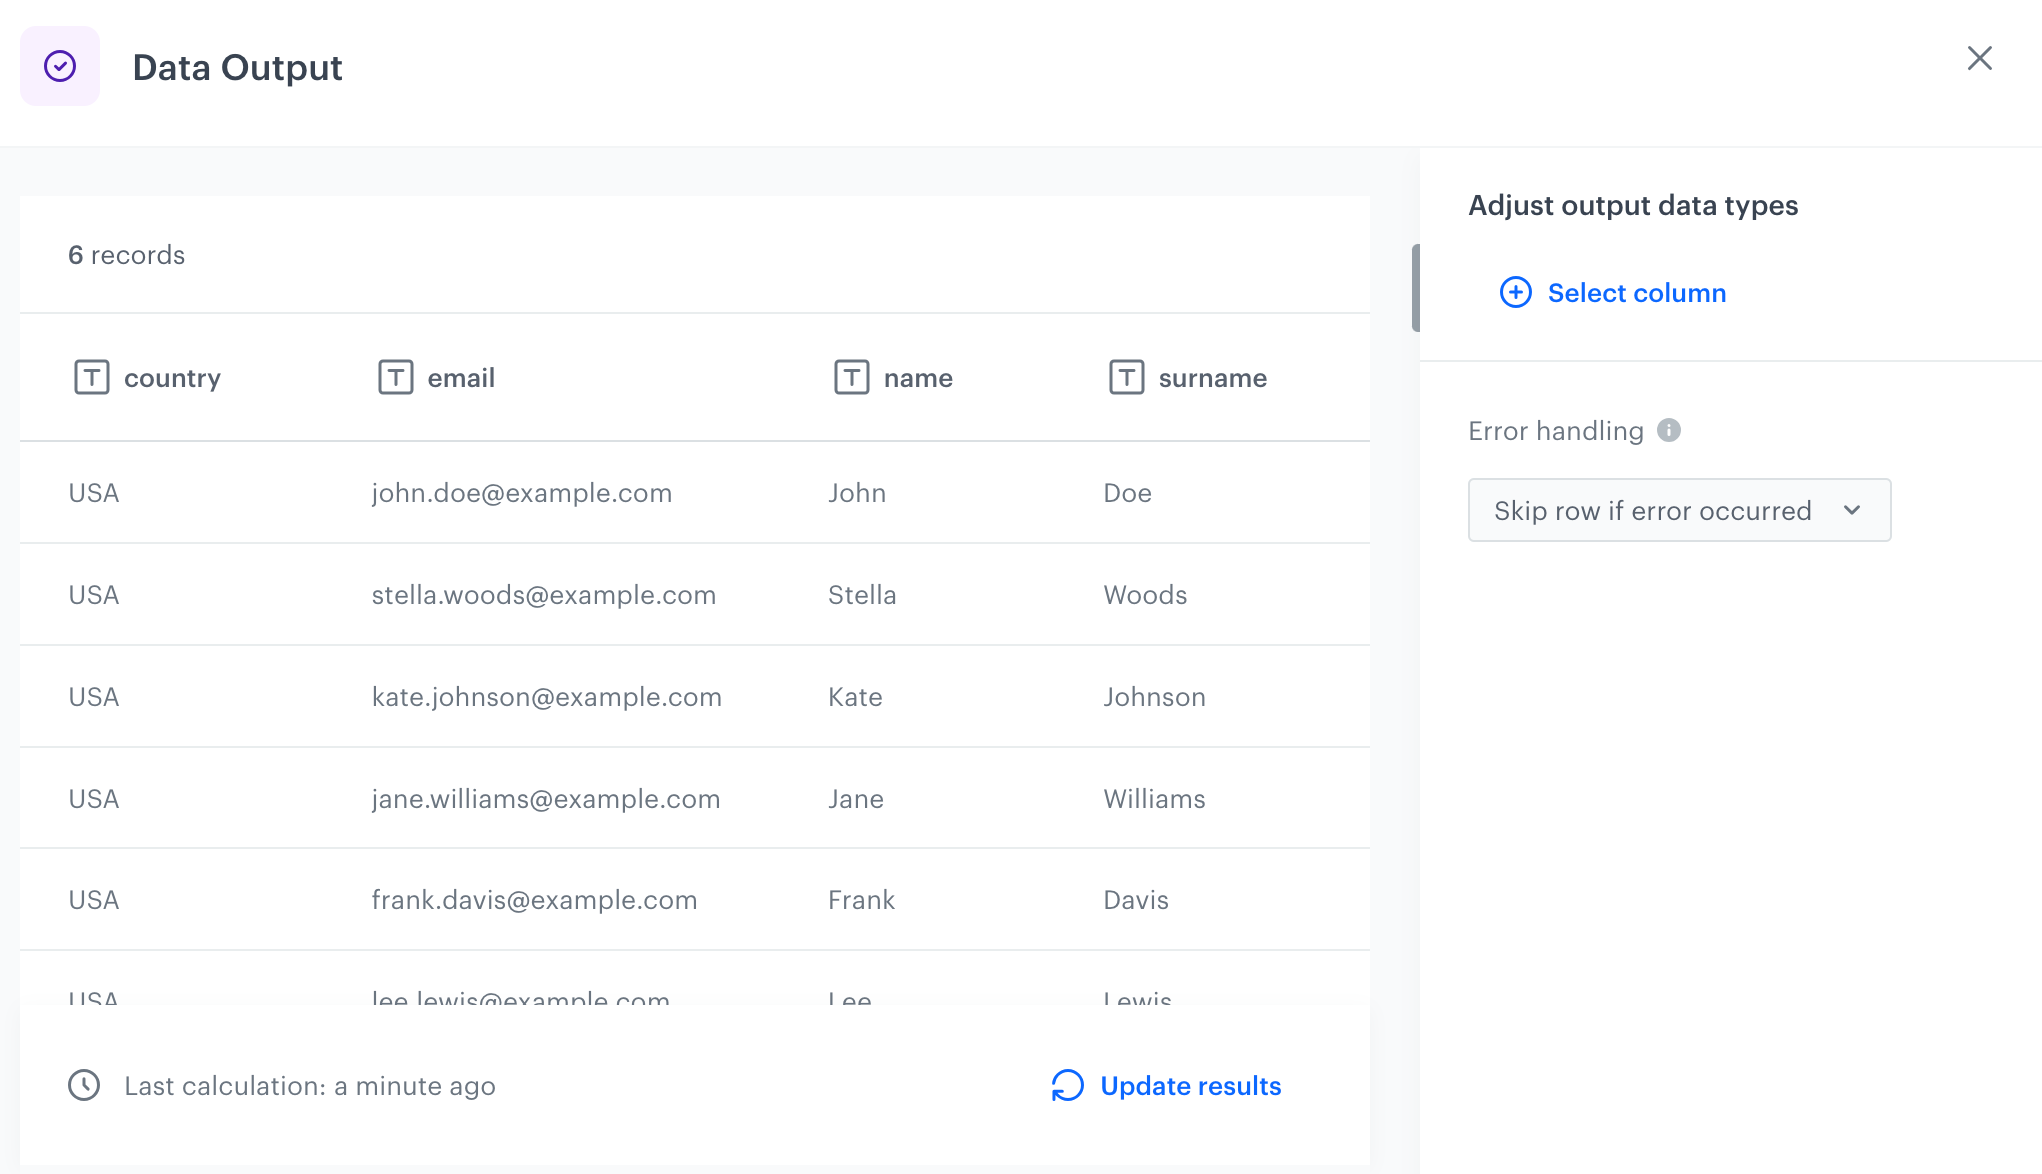
The outcome of the data transformation -
Click Save and publish.

The final configuration of the data transformation workflow What’s next: You have created a workflow (data transformation) that contains the rules of transforming the file of a defined structure. The file used in the example contains a column with a unique identifier (in this case,
email) which is required for importing customers, so it is possible to proceed to creating a workflow that uses this data transformation and imports the USA customers.
Importing selected customers
- Go to Automation > Workflows > New workflow.
- Enter the name of the workflow.
- Start with the Scheduled Run. In the configuration of the node:
- Set the Run trigger option to one time.
- Select the Immediately tab.
- Confirm the settings by clicking Apply.
- Add the Local File node. In the configuration of the node, upload the original file which you used as input in the data transformation workflow.
- Add the Data Transformation node. In the configuration of the node, from the dropdown list, select the data transformation you prepared before.
- Add the Import profiles node. This node doesn’t require configuration.
- Add the End node.

The final configuration of the import profiles workflow - Click Save and publish.