In-app message with application update walkthrough
In-app walkthrough messages provide a seamless and user-friendly way to guide your customers through key features and updates within your application. Ensure your users stay informed about the latest enhancements, functionalities, and essential tips to maximize their experience. Enhance user engagement, foster a smooth onboarding process, and keep your audience effortlessly connected to the most valuable aspects of your application through strategically crafted in-app messages.
This scenario describes the process of creating an in-app message with information about new application updates in a walkthrough form for customers who have a new version of the application.
This use case provides you with an instruction how to use a ready-made in-app template that can be used 1:1 in a business scenario.
Prerequisites
Implement Synerise SDK in your mobile app.
Create an in-ap message
In this part of the process, you create an in-app campaign triggered by the client.applicationStarted event. We will adapt a predefined template for the message with information about new application updates, so there is no need to create a template from scratch.
- Go to
 Communication > In-app messages> Create in-app.
 - Enter a meaningful name for the in-app campaign.
Define the audience
As the first step, define the target group of customers for the in-app message.
- In the Audience section:
- Click Define.
- Select the Everyone tab.
- Click Apply.
Define content
- In the Content section, click Define.:
- Click Create message.
- Go to Predefined templates folder and choose Walkthrough template.
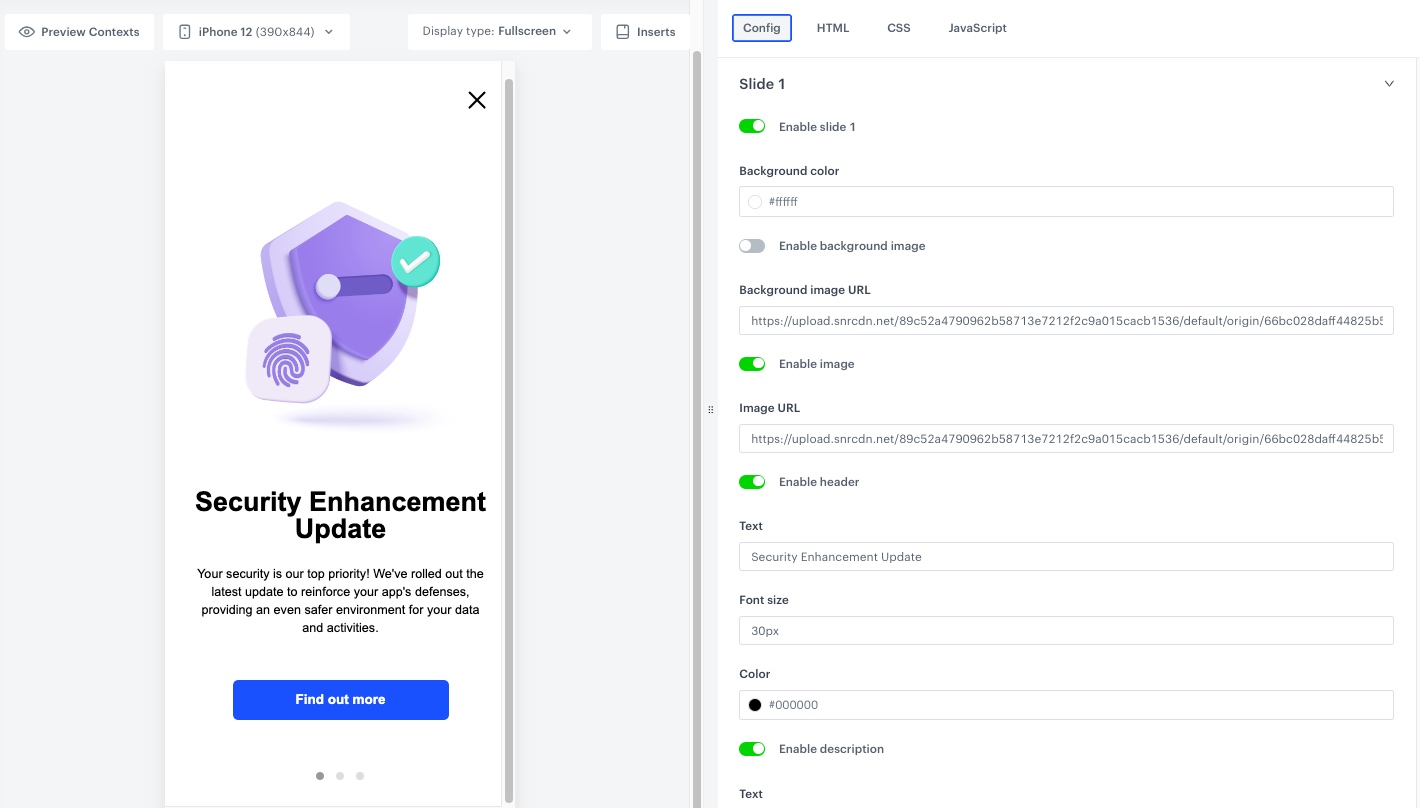
Edit form in the Config tab
The form in the Config tab is already filled in with default values. You can keep them or change them to fit your business needs. These fields affect only the visual layer of the in-app message.
- In the Background section, use the color picker to select the color of the background or enable background image and enter the link to this image (add the image to Data Management > Files and then you can find there the URL to this image).
- In the Image section, enable the image in your banner campaign and add the link to this image (add the image to Data Management > Files and then you can find there the URL to this image).
- In the Header section, enable header and add the text, font size and color of the header you want to display in the in-app message.
- In the Description section, enable description and add the text, font size and color of the description you want to display in the in-app message.
- In the CTA button section, enable the CTA and add the text on the button, corner radius, color, background color of the button, and add the URL to which you want to redirect users afer clicking the button.
- In the Close button section, enable this option and set up the close position.
- In the Slide 2 and Slide 3 sections, enable slide options and repeat steps 1-6. You can create up to 5 slides.
- After you make changes to the template, you can check the preview.
- Click the Preview button on the upper left side.
- Enter the ID of a customer or a product.
- Click Apply.
- To continue the process of configuring the in-app campaign, click Next.
- To save your content changes, click Apply.
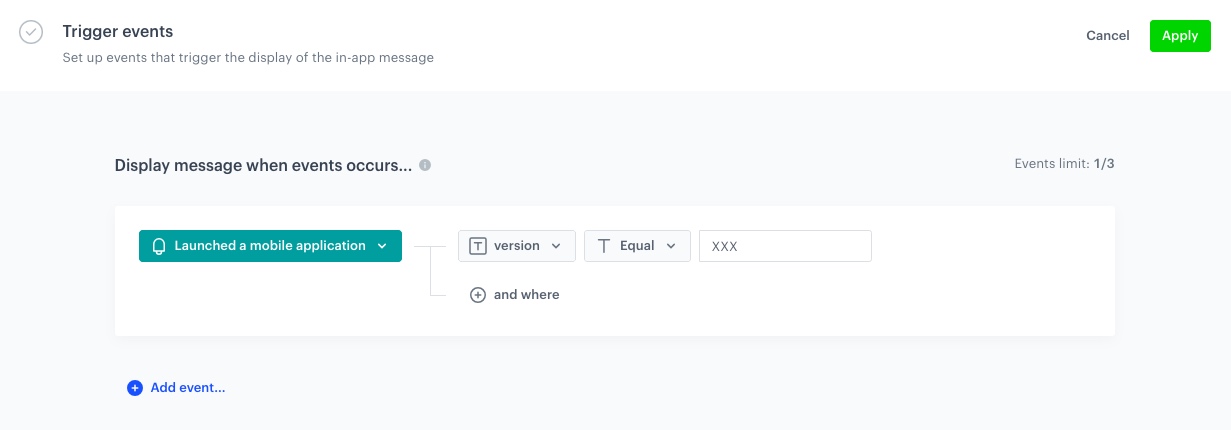
Select events that trigger the in-app message display
In this part of the process, you will define the event triggering the display of the in-app message.
- In the Trigger events section, click Define.
- Select Add event and from the dropdown list, choose
client.applicationStartedevent.Note: Eventclient.applicationStartedis retained (can be seen on the activity list in the customer profile), and it only generates when the application was closed, and then opened again. - Click the + where button and select
version. - As the logical operator, select Equal.
- In the text field, type the latest version of the application.
- Click Apply.
Schedule the message and configure display settings
As the final part of the process, you will set the display settings of the in-app message such as schedule, capping, priority of the message among other in-app messages.
- In the Schedule section, click Define and set the time when the message will be active.
- In the Display Settings section, click Change.
- Define the Delay display, Priority index according to your business needs.
- Enable the Capping limit toggle to limit the amount of time the in-app message can be displayed to a user in general, set it to 1.
- Click Apply.
- Optionally, you can define the UTM parameters and Additional parameters for your in-app campaign.
Note:
You can find more on the in-app message settings in our documentation:
- Click Activate.
Check the use case set up on the Synerise Demo workspace
You can check the in-app message directly in Synerise Demo workspace.
If you don’t have access to the Synerise Demo workspace, please leave your contact details in this form, and our representative will contact you shortly.