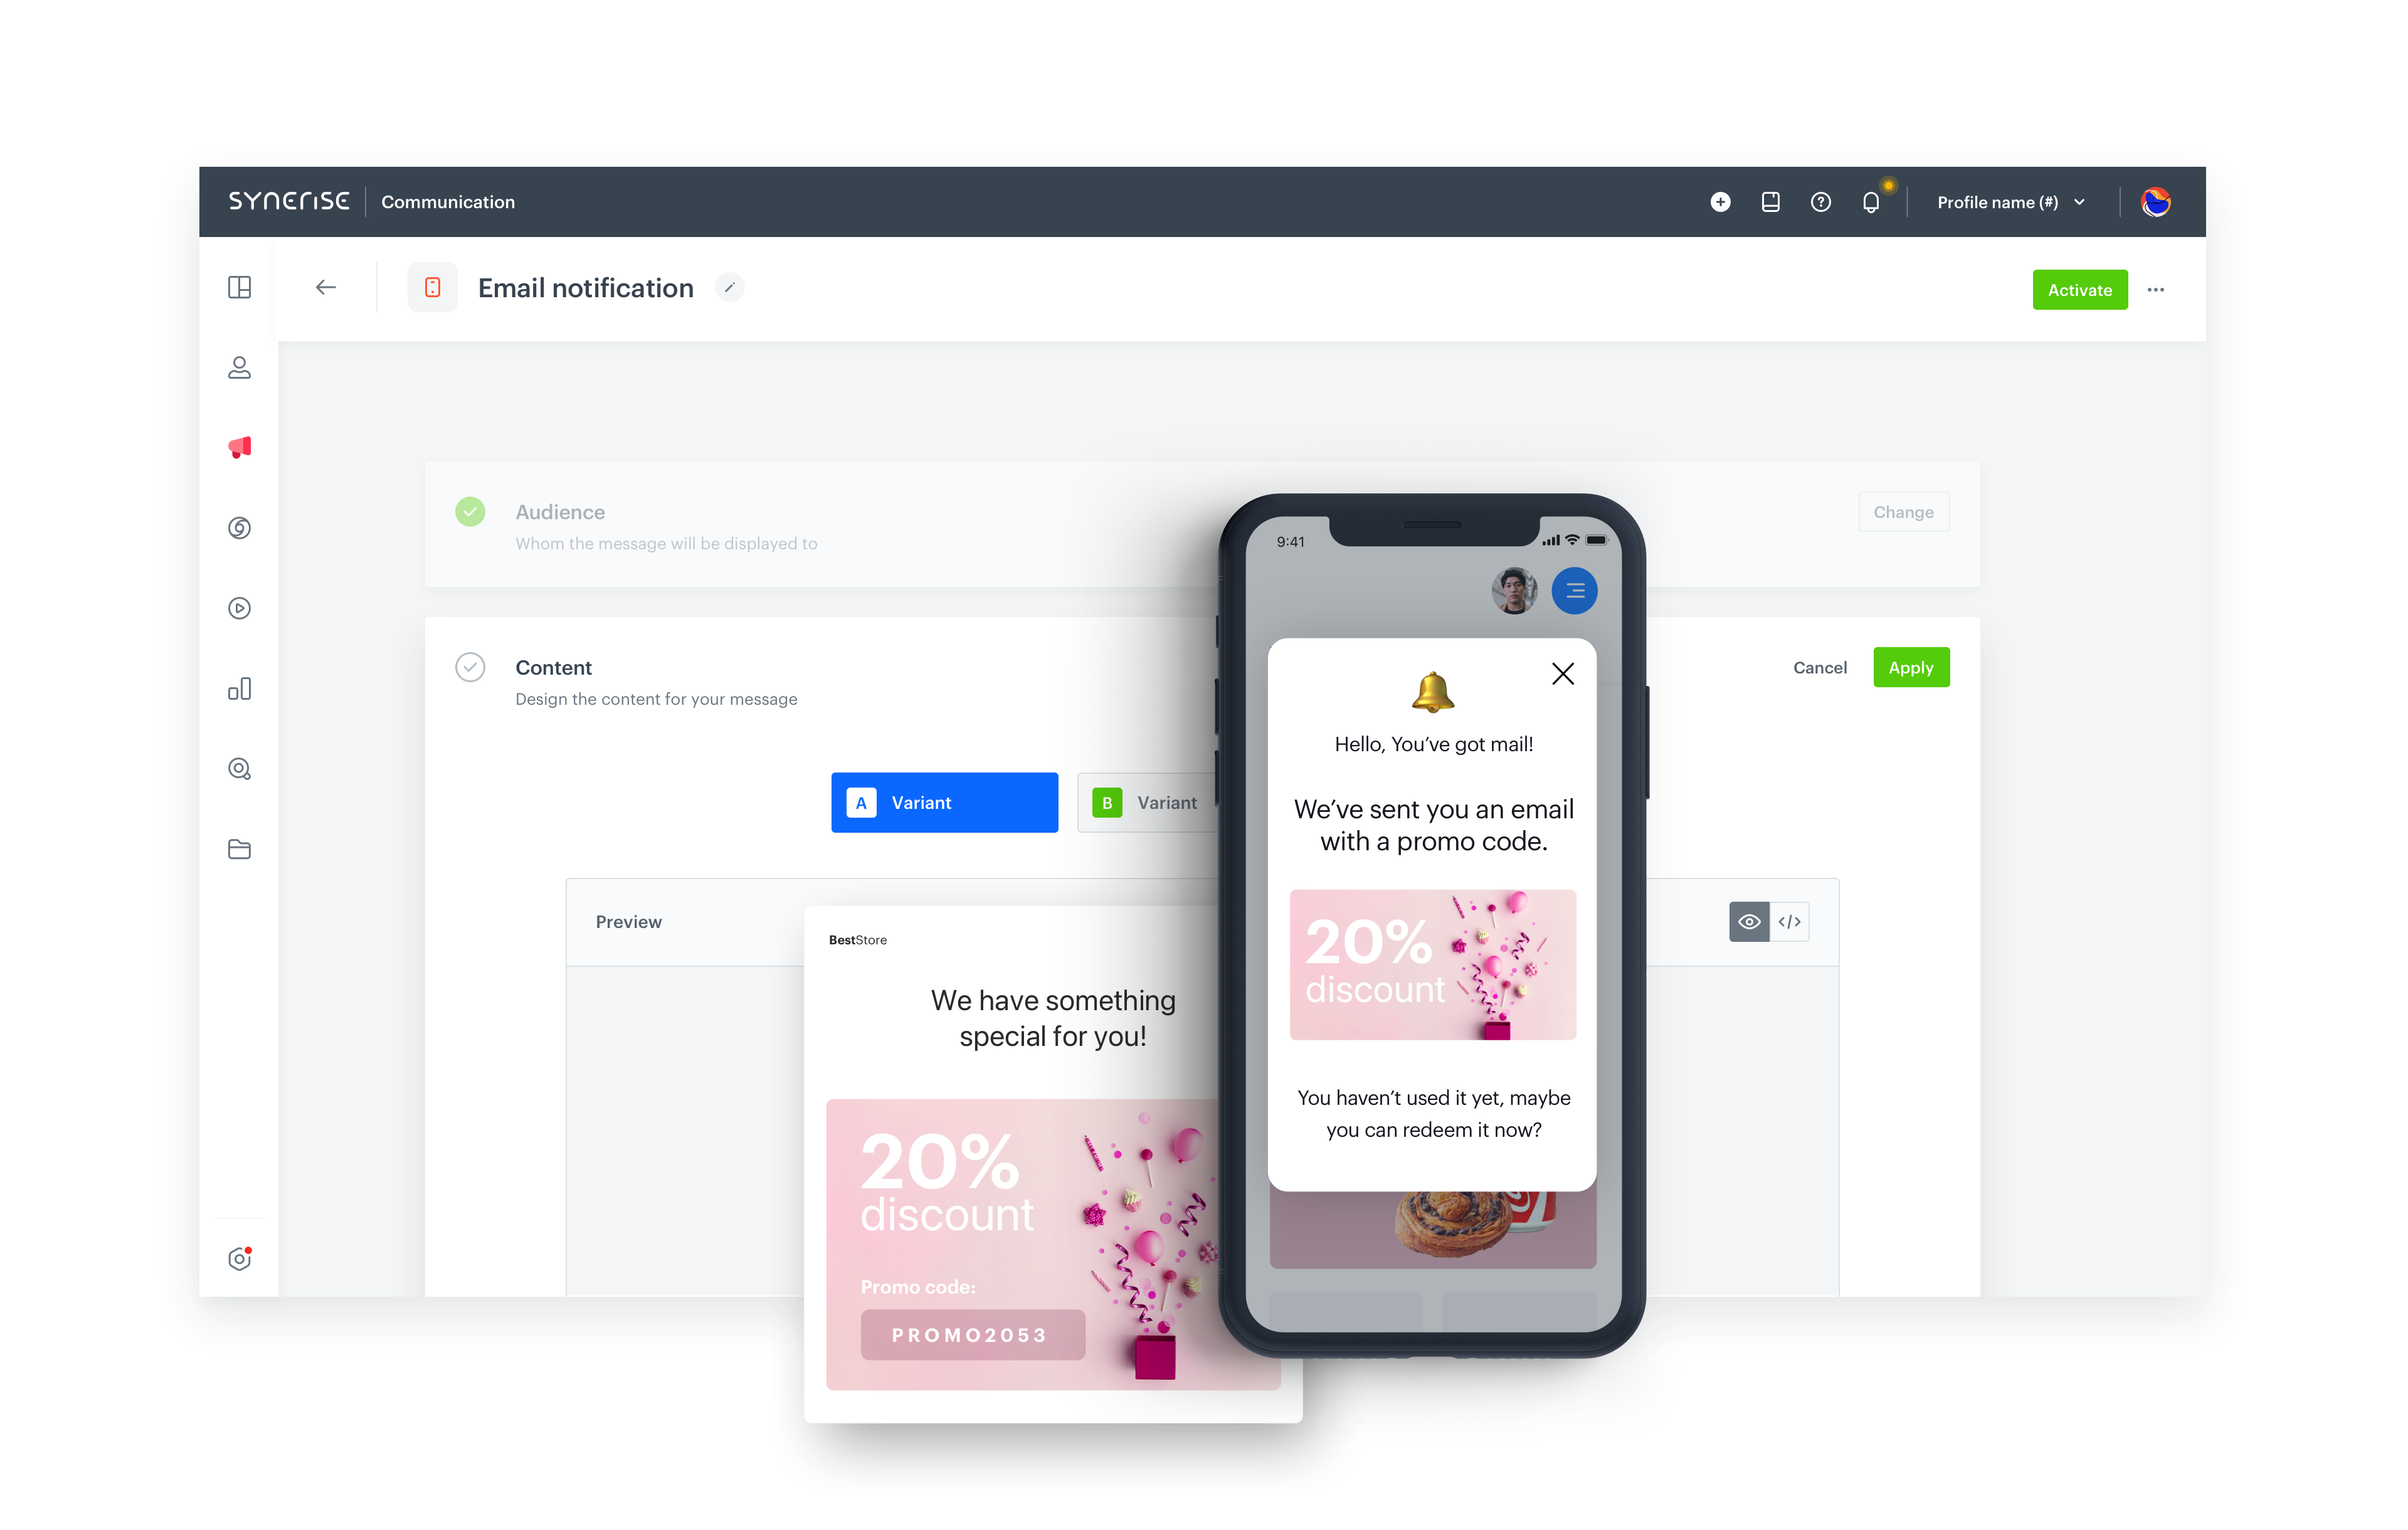
In-app message with a reminder about a promo code
In-app messages are another efficient way to reach your customers in the mobile app. By providing targeted and relevant messages to users who are actively using your app, in-app messages can assist you in retaining their attention. They can be used, for example, to remind your customers they have a promo code they can use for their cart.
This use case describes the process of creating a reminder that a customer received a promo code and sending it through an in-app message. In this case, we assume that the promo code was sent by an email and the customer hasn’t redeemed it yet.
In this use case we provide you with a ready-made campaign code that can be used 1:1 in a business scenario.
Prerequisites
- Implement Synerise SDK in your mobile app.
- Implement transaction events using SDK or API.
Important: Transactions that were made using a promo code must have an additional parameter that will store the code content. In this case,
coupon. - Send an email campaign with a promo code to customers.
Note: It can be any channel, in this use case we assume that the voucher was sent by an email. Learn more about communication module in Synerise.
Create an in-app message
- Go to
 Communication > In-app messages> Create in-app.
 - Enter the name of the in-app.
Define the audience
As the first step, define the target group of customers for the in-app message. In this case, the group will consist of the customers who received an email with a promo code and didn’t redeem it in the last 30 days.
-
In the Audience section, click Define.
-
Click New Audience and then Define conditions.
-
Click Performed action…, from the dropdown list, select the
message.sendevent. -
Click the + and where button and select
idas the parameter. -
As an operator, choose Equal and enter the ID of the email campaign that was sent to customers as a part of prerequisites.
-
Click and then…. Result: A dropdown menu and an input field appear below.
-
From the dropdown, select
transaction.chargeevent. -
Click the + and where button and select a parameter assosciated with promo codes. In this case,
coupon. -
As an operator, choose Regular expression and in the text field, enter
.. -
Change Performed to Not performed.
-
Click Performed action…, and from the dropdown list, select the
message.sendevent. -
Click the + and where button and select
idas the parameter. -
As an operator, choose Equal and enter the ID of the email campaign that was sent to customers as a part of prerequisites.
Note: This way the audience will exclude customers who made the transactions using the promo codes. To include purchases from a specific campaign with codes, you can use a fixed prefix or suffix for every promo code. -
In the calendar in the right bottom of the page, define the period from which the segmentation will return the customers. In this case, last 30 days.
-
Click Apply.
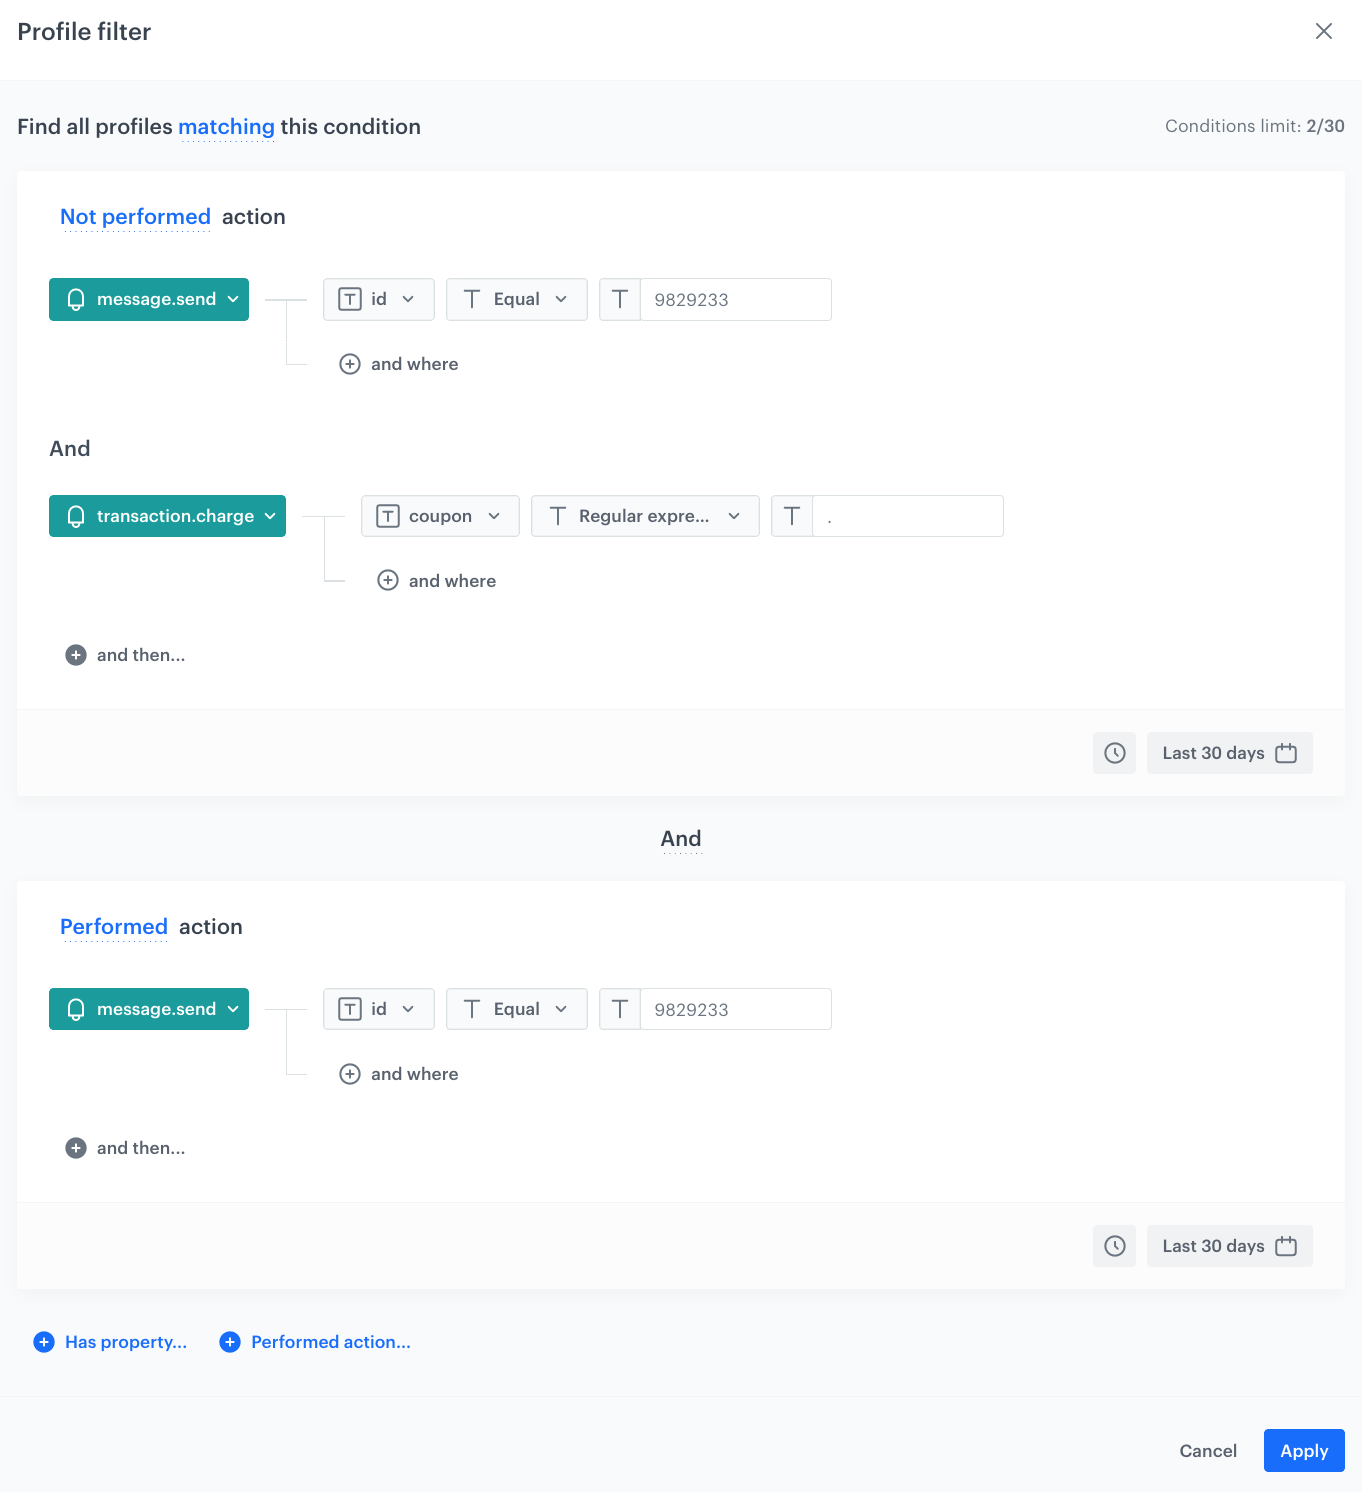
In app campaign configuration -
To save the audience, click Apply.
Define content
In this part of the process, you will create the content of the in-app message that will appear in the mobile application.
-
In the Content section, click Define.
-
Click Create Message and select Code Editor to create the code for your in-app message.
-
Style the message according to your design assumptions by using the HTML, CSS, and JS sections. Below you can find an example of the code that you can use to create in-app message.
HTML<div class="in-app-wrapper"> <div class="in-app-wrapper-inner"> <div class="in-app__upper"> <div class="in-app-close"></div> <p class="in-app-title"> Hello {% customer firstname %}</p> <p class="in-app__upper--text">We've sent you an email with the promo code.</strong></p> </div> <div class="in-app__lower"> <p class="in-app__lower--text changeDate">20% discount!</p> <p class="in-app__lower--text--second">You haven't used it yet,</br>maybe you can redeem it now?</p> </div> </div> </div>CSS.in-app-wrapper * { font-family: sans-serif; } .in-app-wrapper { text-align: center; position: relative; background: #00000045; box-shadow: 0 30px 80px 0 rgba(35, 41, 54, 0.2); width: auto; height: 100vh; display: flex; flex-direction: column; flex-wrap: nowrap; align-content: center; justify-content: center; align-items: center; } .in-app-title { font-size: 20px; font-weight: normal; font-stretch: normal; font-style: normal; line-height: 1.5; letter-spacing: -0.67px; text-align: center; color: white; margin: 0; padding-top: 20px; } .in-app-subtitle { font-size: 16px; font-weight: normal; font-stretch: normal; font-style: normal; line-height: 1.43; letter-spacing: -0.47px; text-align: center; color: #13171e; } .in-app-close { position: absolute; z-index: 1; width: 50px; height: 50px; border: 0; top: 10px; right: 10px; cursor: pointer; background-color: transparent; } .in-app-close:after, .in-app-close:before { content: ''; position: absolute; height: 2px; width: 50%; top: 50%; left: 12px; margin-top: -1px; background: white; } .in-app-close:after { -webkit-transform: rotate(-45deg); -moz-transform: rotate(-45deg); -ms-transform: rotate(-45deg); -o-transform: rotate(-45deg); transform: rotate(-45deg); height: 2px; margin-top: -2px; } .in-app-close:before { -webkit-transform: rotate(45deg); -moz-transform: rotate(45deg); -ms-transform: rotate(45deg); -o-transform: rotate(45deg); transform: rotate(45deg); height: 2px; margin-top: -2px; } .in-app-wrapper-inner { background: #fff; border-radius: 6px; position: relative; border-radius: 20px; margin-left: 20px; margin-right: 20px; width: 300px; } .in-app__upper { background-color: #0b68ff; border-radius: 4% 4% 50% 50% / 4% 4% 15% 15%; height: 170px; } .in-app__lower { height: 200px; } .in-app__upper--text { font-size: 20px; color: white; word-spacing: 2px; } .in-app__lower--text { font-size: 17px; color: black; padding-top:20px; } .in-app__lower--text--second{ font-size: 17px; color: black; margin-top:50px; }JS(function () { var closeButton = document.querySelector(".in-app-close"); closeButton.addEventListener("click", function () { SRInApp.close(); SRInApp.trackCustomEvent( "inapp.custom", { action: "close", }, "Custom event from In-App message" ); }); var modalBackground = document.querySelector(".in-app-wrapper"); modalBackground.addEventListener("click", function (event) { if (event.target.getAttribute("class") == "in-app-wrapper") { SRInApp.close(); SRInApp.trackCustomEvent( "inapp.custom", { action: "click outside modal", }, "Custom event from In-App message" ); } }); })(); -
Click Next.
-
Click Apply.
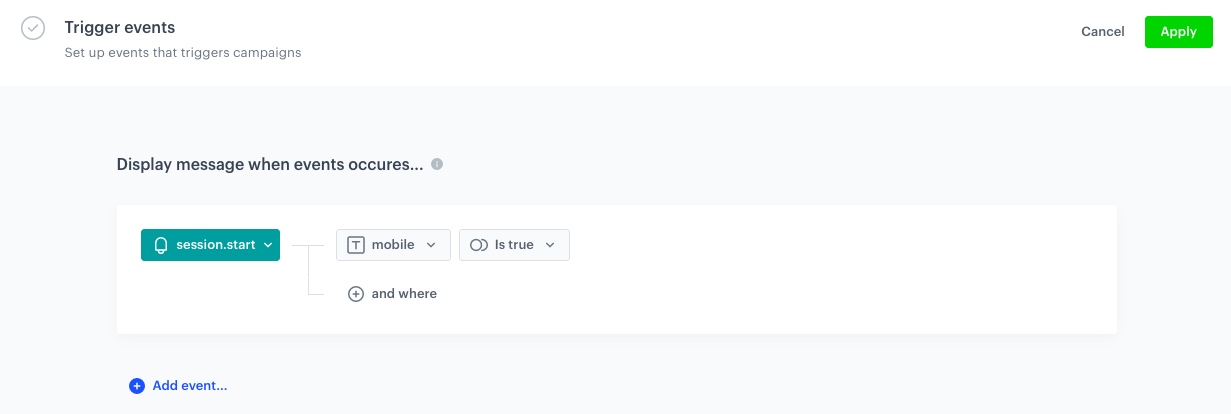
Select events that trigger the in-app message display
In this part of the process, you will define the event triggering the display of the in-app message.
- In the Trigger events section, click Define.
- Select Add event and from the dropdown list, choose
session.startevent. - Click the + and where button and select
mobile. - As the logical operator, select Is true.
- Click Apply.
Schedule the message and configure display settings
As the final part of the process, you will set the display settings of the in-app message such as schedule, capping, priority of the message among other in-app messages.
-
In the Schedule section, click Define and set the time when the message will be active.
-
In the Display Settings click Change.
-
Define the Delay display, Priority index and enable the Frequency limit toggle to manage the frequency of in-app message display in the application.
In our case, we want to display the massage to the customer a maximum of 1 time in period of 7 days.Note: You can additionaly enable the Capping limit toggle to limit the amount of time the in-app message can be displayed to a user in general. -
Click Apply.
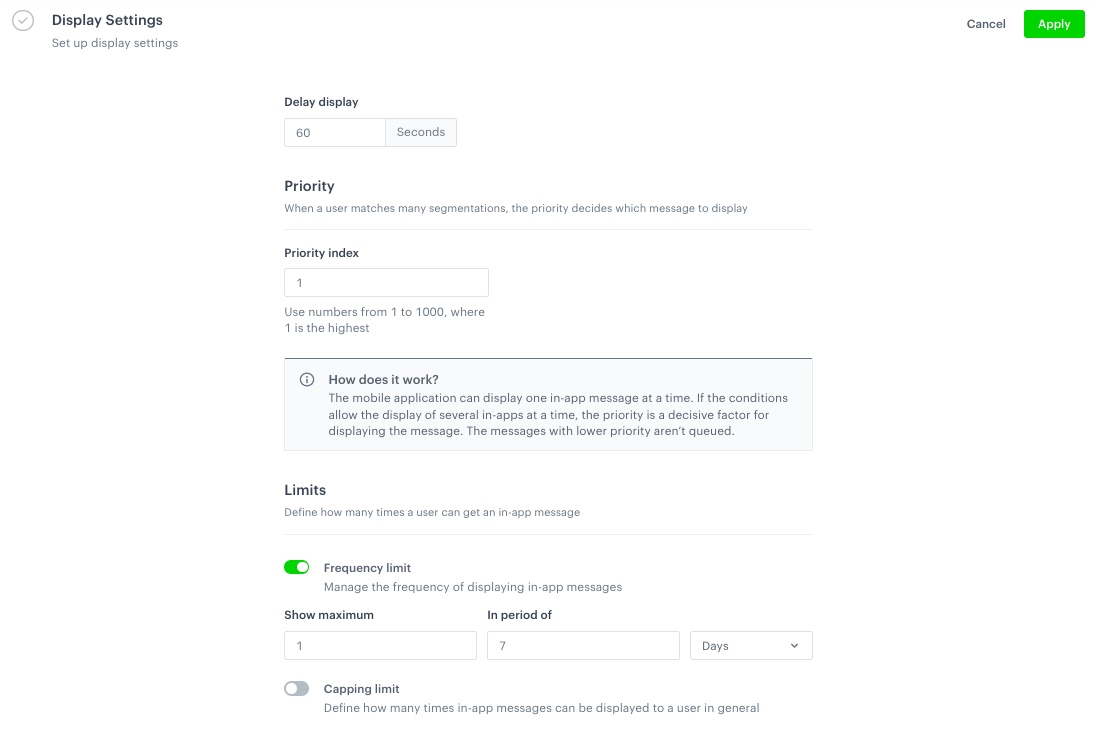
In app schedule and display configuration -
Optionally, you can define the UTM parameters and Additional parameters for your in-app campaign.
-
Click Activate.
Check the use case set up on the Synerise Demo workspace
You can check the In-app message configuration directly in the Synerise Demo workspace.
If you don’t have access to the Synerise Demo workspace, please leave your contact details in this form, and our representative will contact you shortly.