Creating emails
The next step after preparing an email template or templates (if you plan to send more variants and perform A/B testing) or importing it to Synerise, is picking the recipients, scheduling sending of the message, defining UTM parameters and testing.
The process consists of 5 steps out of which only 3 are obligatory. After that, you can send an email or save it as a draft.
Requirements
- To be able to send the email, you must configure a sender account.
- The audience to which you send an email (especially if it’s marketing content) must give their consent (in Synerise we call it a marketing agreement). You can check the status of the marketing agreement for each customer on their customer card in Profiles.
- Optionally, you can prepare a segment of customers before creating an email to have a list of recipients ready.
Creating an email
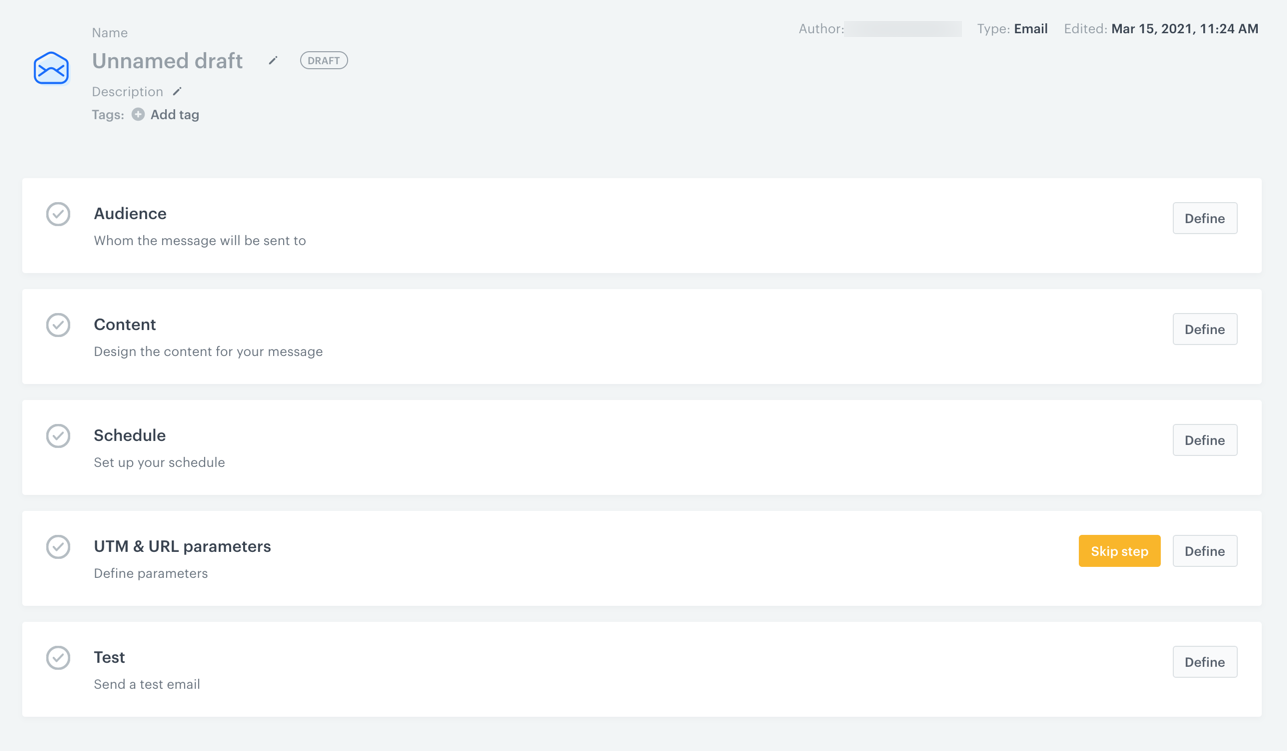
- Go to
 Communication > Email > Create new.
 - Enter the name of the email (it is only visible on the list of emails).
Select recipients of the message
- In the Audience section:
- Choose the recipients:
- Everyone - Everyone who gave marketing consent will receive your message. The estimated reach takes into account the number of customers who have given marketing consent to this type of communication (this means that in the case of communication such as mobile push, the estimated reach may be higher than the number of customers who have your mobile application).
- Segment - You can send the message to one or more existing segments in the system.
- New Audience - Create new segments and specify the conditions which the target must meet.
Important:
- Regardless of the way of selecting the audience, the system limits the audience to those who have the marketing agreement on, unless you override this behavior in the advanced options.
- If the audience is larger than 500000 profiles, consider using Batch delivery in the advanced options to avoid timeouts.
- Optional: Open Advanced options and configure additional settings.
Advanced options - explanation-
Batch delivery - It prevents sending emails to all recipients at once. When to use it? When the target audience is so large that the email provider might not be able to process all messages at once.
Important: If you plan to send messages to a large audience, this option is recommended.For example, if the expected performance of your messaging provider is 1 million messages per hour and the expected audience is 5 million profiles, you can split the communication into 60 batches sent 5 minutes apart: every batch will include ~83000 profiles sending all messages will take 5 hours.
If a batch is too large (or the batch delivery option is not used), it may time out in your messaging provider’s system and the messages may not be delivered. For details on provider performance, contact the provider.
If a batch takes more than 8 hours to complete for any reason, it is cancelled in Synerise. -
Enable control group - It creates a subgroup of the recipients who won’t receive any email variant. When to use it? When you send one or several variants of an email (A/B testing). When a customer is assigned to their control group, the information is available in their Profiles card as an event.
-
Send without marketing agreement check - To comply with GDPR resolutions, Synerise by default filters out the recipients with marketing agreement off. This option, however, allows to send an email to those whose marketing agreement is off (after ticking this option, the number in the estimated reach don’t refresh). When to use it? While sending messages that don’t contain marketing content, for example, information about delays in shipping.
-
Include audience changes - Available only for scheduled emails. It recalculates the number of recipients right before sending the email. By default, the size of the customer segment chosen for the email is the same as in the moment of sending, even if the number of customers in the chosen segment changed between scheduling the email and sending. When to use it? When the size of the segments of customers selected as the audience of the email can change dynamically.
-
Ignore limits - If you want to make sure that this message is sent to a customer, even it exceeds the global limit of this type of messages for a single customer per day (more information is available here), enable the Ignore limits toggle. You may apply it to system messages such as a transaction confirmation, notifications about order delays, and so on.
-
- Confirm the selection by clicking Apply.
- Choose the recipients:
Select or create an email template
- To select email templates and attachments, in the Content section, click Define.
- In the From email address field, select an email account from which the email will be sent.
- In the From name field, enter the sender name that is displayed in the mailbox.
- In the Subject field, enter the subject of the email that is displayed in the mailbox.
- In the “Reply to” email address, enter the email address to which replies to the email will be delivered to.
- In the “Reply to” name, enter the name that is displayed in the mailbox.
- In the Attachments, by dragging and dropping you can add files up to 20kB. Accepted formats:
.png,.jpg,.pdf. - To create or add a ready template, click Create message.
Schedule the send date

- To set the date for the email, in the Schedule section, click Define.
- Select a scheduling mode:
- To send the email at once, select Immediately.
- To send the email later, select Scheduled and configure the following parameters:
Tip: To select the best time of sending the email, take a look at the suggestion from the AI engine that calculates the best time (for all recipients). If time optimization is disabled, click here to learn more how to enable it and use it.
- In the Start field, from the calendar, pick the day.
Synerise performs best with real-time data. This is why you can’t schedule a message for more than 10 days in the future. - To select hour of the day, click Select time.
- Confirm the date by clicking Apply.
Result: The pop-up closes. - Select the time zone.
- In the Start field, from the calendar, pick the day.
- Select the Silence Hours setting:
-
Without silence hours - The communication can be processed and sent out to the recipients at any time during the day.
-
Include silence hours - With this option, you can set a time of day when the communication can’t be sent:
- In the From field, select when the silence hours start.
- In the To field, select when the silence hours end.
The period can’t be longer than 12 hours.
When a message can’t be sent due to silence hours, amessage.skippedevent is generated.
Important:- When silence hours are enabled, the Discard messages option is always enabled. This means that messages blocked by silence hours are discarded entirely. The discarded messages are not sent when silence hours end.
- If the Start time of the schedule is in the silence hours, you can’t apply the settings.
- If communication is scheduled for sending just before silence hours (for example, silence hours start at 22:00 and sending is scheduled at 21:59:59), the communication may be processed, sent, and logged in the events a short time after the silence hours start.
-
- To save the changes, click Apply.
Define UTM and URL parameters
- To define UTM parameters, in the UTM & URL parameters section, click Define.
- Fill in the following fields: UTM campaign, UTM medium, UTM source, and UTM term.
- To send a test email, in the Test section, click Define. You can send a test email up to 10 recipients.
- Enter the email address to which the test email is sent.
WARNING:
- If you send a test email that contains dynamic content (inserts and/or jinjava snippets that refer customer data) to users who are not in the database, these users won’t be able to preview the email through the View in browser option.
- A test email that contains inserts and/or Jinjava snippets that refer customer data won’t be sent if it is addressed to a person not available in database.
- The system doesn’t count clicks from test messages. If you click a link in the test message, an event will be not generated.
- To send the test, click Send test.
- Enter the email address to which the test email is sent.
Adding custom parameters
You can add up to 10 parameters which will be added to every event generated by this communication. Their values are the same for every event in the communication. You can use this, for example, to create a common parameter for events from different types of communication that belong to one marketing campaign.
The list below contains the events to which additional parameters are added:
message.send,message.notSent,newsletter.click,newsletter.open,newsletter.cappingnewsletter.controlGroup
-
To define the custom event parameters, in the Additional parameters section, click Define.
-
Click Add parameter.
-
In the Parameter field, enter the name of the parameter.
The following parameters cannot be sent:modifiedByapiKeyeventUUIDiptimebusinessProfileIdcorrelationIdclientIduuid
-
In the Value field, enter the parameter value.
The value is always sent as a string when the event’s JSON payload is generated. The maximum length of the string is 230 characters.WARNING: Dynamic values are not supported in the Parameter and Value fields. -
If you want to add more parameters, click Add parameter, and repeat steps 3-4.
Result: the parameters will be added to all events listed above with the values you entered. This is an example event saved in the database. The custom parameterseasonis located in theparamsobject:{ "action": ... ... "params": { "clientId": 1111111111, "season": "autumn", "campaignName": "Back to school", "time": 1662392318050, "title": "Have you prepared for coming back to school?", "businessProfileId": "xxx" } } -
Confirm the settings by clicking Apply.
Sending an email
- To complete the email:
- To save as a draft, click Finish later.
Important:
Neither a test email nor the actual email are sent if:
- It contains Jinjava snippets with syntax errors.
- It contains dynamic content (inserts and/or jinjava snippets that refer customer data) that doesn’t return values for the recipient to which an email is directed to.
- To send the email, click Send.
- To save as a draft, click Finish later.