Introduction to mobile push notifications
Sending mobile push notifications offers plenty of benefits beyond merely delivering promotional content. These notifications serve as a powerful tool for providing users with valuable information, timely updates, helpful reminders, and captivating content, thus enhancing their overall app experience. By leveraging mobile push notifications, businesses can engage and connect with their users in a more personalized and impactful manner, increasing user engagement, retention, and satisfaction. Whether it’s sharing important news, delivering personalized recommendations, or offering exclusive rewards, the versatility of mobile push notifications unlocks a wealth of opportunities to optimize the user experience and drive meaningful interactions.
In Synerise, you can use the following types of mobile push notifications:
- Simple push - a notification that is displayed in the notification center on mobile devices.
- Silent push - a hidden notification that is delivered to the app on a user’s device. Unlike a typical push, it does not cause any interaction with the user. Silent notifications quietly deliver a certain set of data to the app. This is a great solution for letting apps know about changes in content.
Anatomy of mobile push notification
A mobile push notification consists of the following elements:
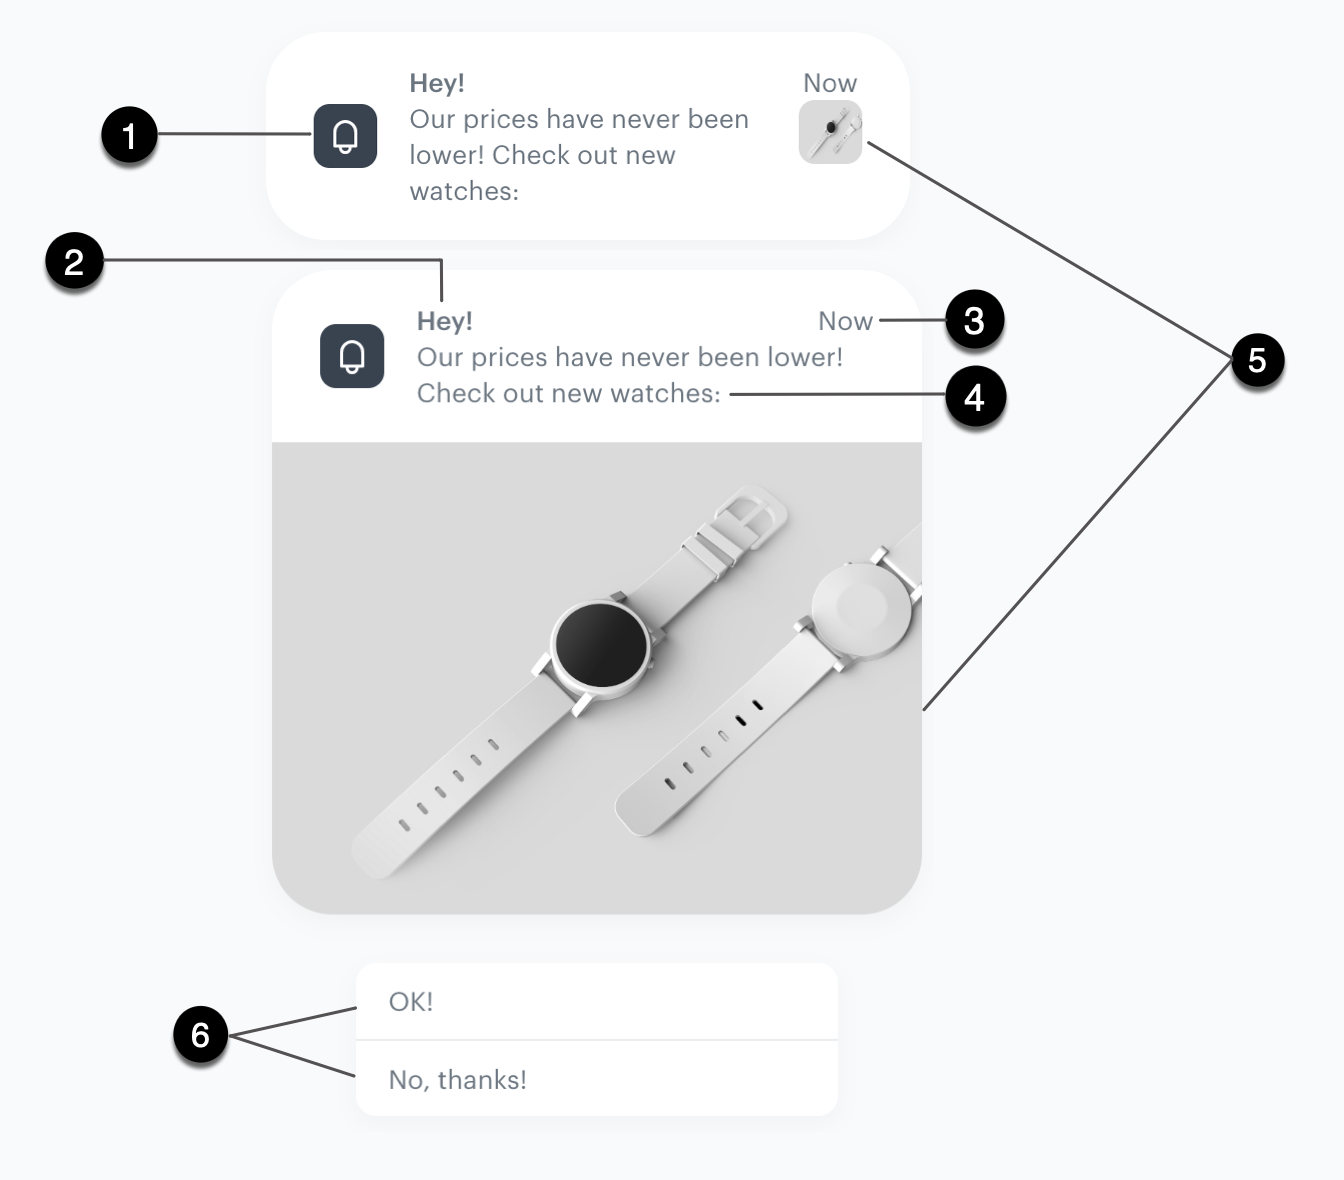
| No. | Mobile push element | Function | Recommendations & possibilities |
|---|---|---|---|
| 1. | Mobile app icon | The icon of a mobile application | n/a |
| 2. | Title | This is the top text of your notification | - We suggest a 50-character limit to avoid being shortened, but the length depends on the OS - You can personalize the title using inserts and emojis |
| 3. | Time of notification | Displays how old the notification is. | n/a |
| 4. | Message | This is the main content of your notification | - We suggest a 100-character limit to avoid being shortened, but the length of the text vary across different OS - You can personalize the message using inserts and emojis |
| 5. | Image | On macOS, it serves as an expanded icon, while on Android, it acts as a custom image | - To use a large image in the notification, upload the image first in Synerise > Data Management > File - You can personalize links to images by using Jinjava, this way an image will be different for every user, for example, you can display an image with recently seen product |
| 6. | Action buttons | They redirect users to a URL you indicate or to a view in a mobile application | - You can add up to 4 action buttons - You can personalize the text on the button by using inserts and emojis - You can add inserts to the URL and deep links |
Examples of use
You can browse the collection of mobile push notification use cases.
Requirements
- Configure mobile push notifications:
- If you are going to attach images to your push notifications:
- Prepare images; you can use external links or upload your images in the Data Management module.
- Android: Follow the instructions under this link.
- iOS: Configure and implement Notification Service Extension and Notification Content Extension. According to your business needs, implement Single media and/or Carousel.
- Implement URLs and deep links:
Events related to mobile push notifications
Sending mobile push notifications to customers generates various types of events. These events can be triggered by both the customer’s actions (such as clicking on the notification) and by the infrastructure (such as failed notification delivery). By analyzing these events, you can measure the effectiveness of your messages and their deliverability. Become familiar with:
- default events associated with mobile push notifications
- default events associated with mobile push campaigns
Mobile notification delivery flow
When a user opens the mobile application, a token is requested from Firebase Cloud Messaging (FCM). That token is passed on to Synerise to allow Synerise to authorize sending mobile push notifications to the user’s device.
The push is sent to the last device where the user opened the mobile application.
After the push is delivered and displayed, or if the delivery fails, information about that is saved as an event. See Mobile push events.

Conditions for sending and displaying mobile notifications
In order for mobile notifications to work, the following requirements must be met:
- The target profile must have an active marketing agreement for mobile push notifications.
You can check this agreement in the lower-left corner of the profile card, under Push.
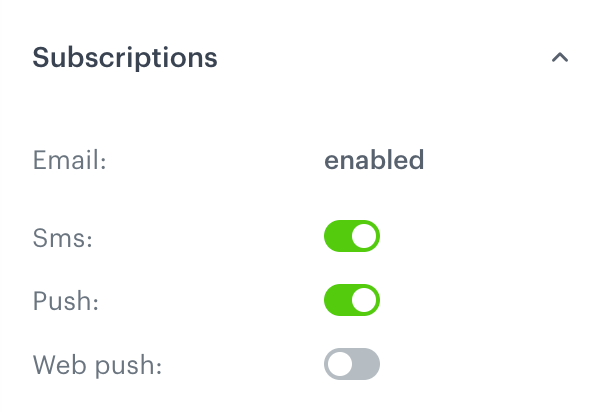
The Subscriptions section on a profile card - The target profile must have the
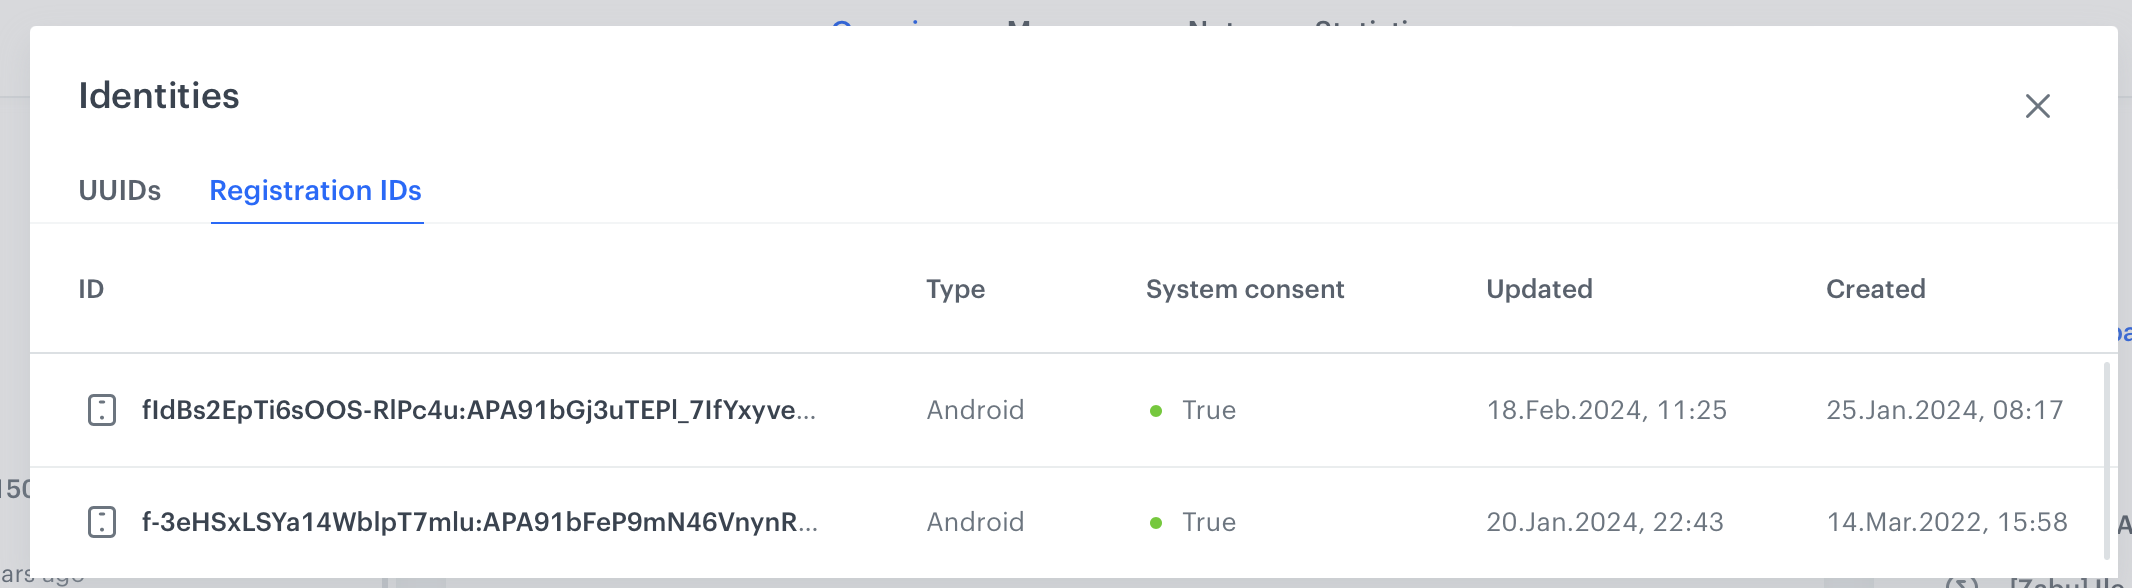
snrs_has_mobile_push_devicesattribute set totrue; the attribute sets totruewhen both of the following conditions are met:-
The device allows push notifications (in the system settings).
Information about this is included in the client.applicationStarted event, under thesystemPushConsentparameter. You can also find it on the profile card, in the Identities section:
The Identity section on a profile card Android 7.0 and above: When the device doesn’t allow push notifications, a push.notView event is generated after the push is sent.
-
The profile has an active Firebase Cloud Messaging (FCM) token.
A token is requested from FCM every time the mobile application is started.
Important: The Audience filter for the push notification should check if thesnrs_has_mobile_push_devicesattribute in the profile is set totrue. Without this filter, the audience size in the campaign’s statistics is larger than the real number of profiles to whom the push is sent.
Synerise stores the last known FCM token. The notifications are only sent to the last device where the user opened the app.
The token becomes invalid when:- The user opens the app on another device.
The new device receives a valid token and can receive push notifications. - The user uninstalls/reinstalls the app. Synerise doesn’t receive information about this.
To receive a new token, the user must open the app. - The user clears the app data. Synerise doesn’t receive information about this.
To receive a new token, the user must open the app.
If the token in Synerise is invalid:
- A mobile push is sent, but can’t be delivered to the device.
- A push.notRegistered event is generated.
- The
snrs_has_mobile_push_devicesattribute in the profile is set tofalse.
- The user opens the app on another device.
-
For more information on FCM and tokens, see Google documentation.
Common reasons for failed delivery
Using a large database of real profiles, we calculated that on average it takes 40 days for:
- the token to become invalid for any reason.
- the notification permissions for an app to be disabled on the device for any reason.
This is a rough estimate that may differ depending on the behavior of your mobile app users.
The following are the most common reasons for not delivering a push message:
- The profile doesn’t meet the conditions described above.
- The profile belongs to the control group.
In that case, a push.controlGroup is generated. - Do Not Disturb mode on the device.
- Power saving settings on the device.
- The device stops your mobile application from running in the background.
- The mobile application was uninstalled.
- Other reasons; check the profile’s activity history for the following events:
Sending push notifications
There are two ways of sending mobile notifications in Synerise:
- Manually - If you want to send a one-off notification campaign to a predefined group of customers or an entire customer base, go to Communication > Mobile > Create new. After filling out the campaign form, you can send it out to your customers.
- Using the Automation module - If you want to send a one-off push notification campaign or automate sending push notifications (for example, in response to a customer behavior), go to the Automation module. Create a workflow and use the Send Mobile Push node in it.
Analyzing notification performance
You can analyze performance of your push notifications by creating analyses in the Analytics module on the basis of mobile push events.