Creating dynamic content
Requirements
- Implement a tracking code into your website.
- Prepare a dynamic content template (or templates if you want to use several variants). If you configured Service approval for the Communication templates, the templates you created must receive an approval from the approver.
Procedure
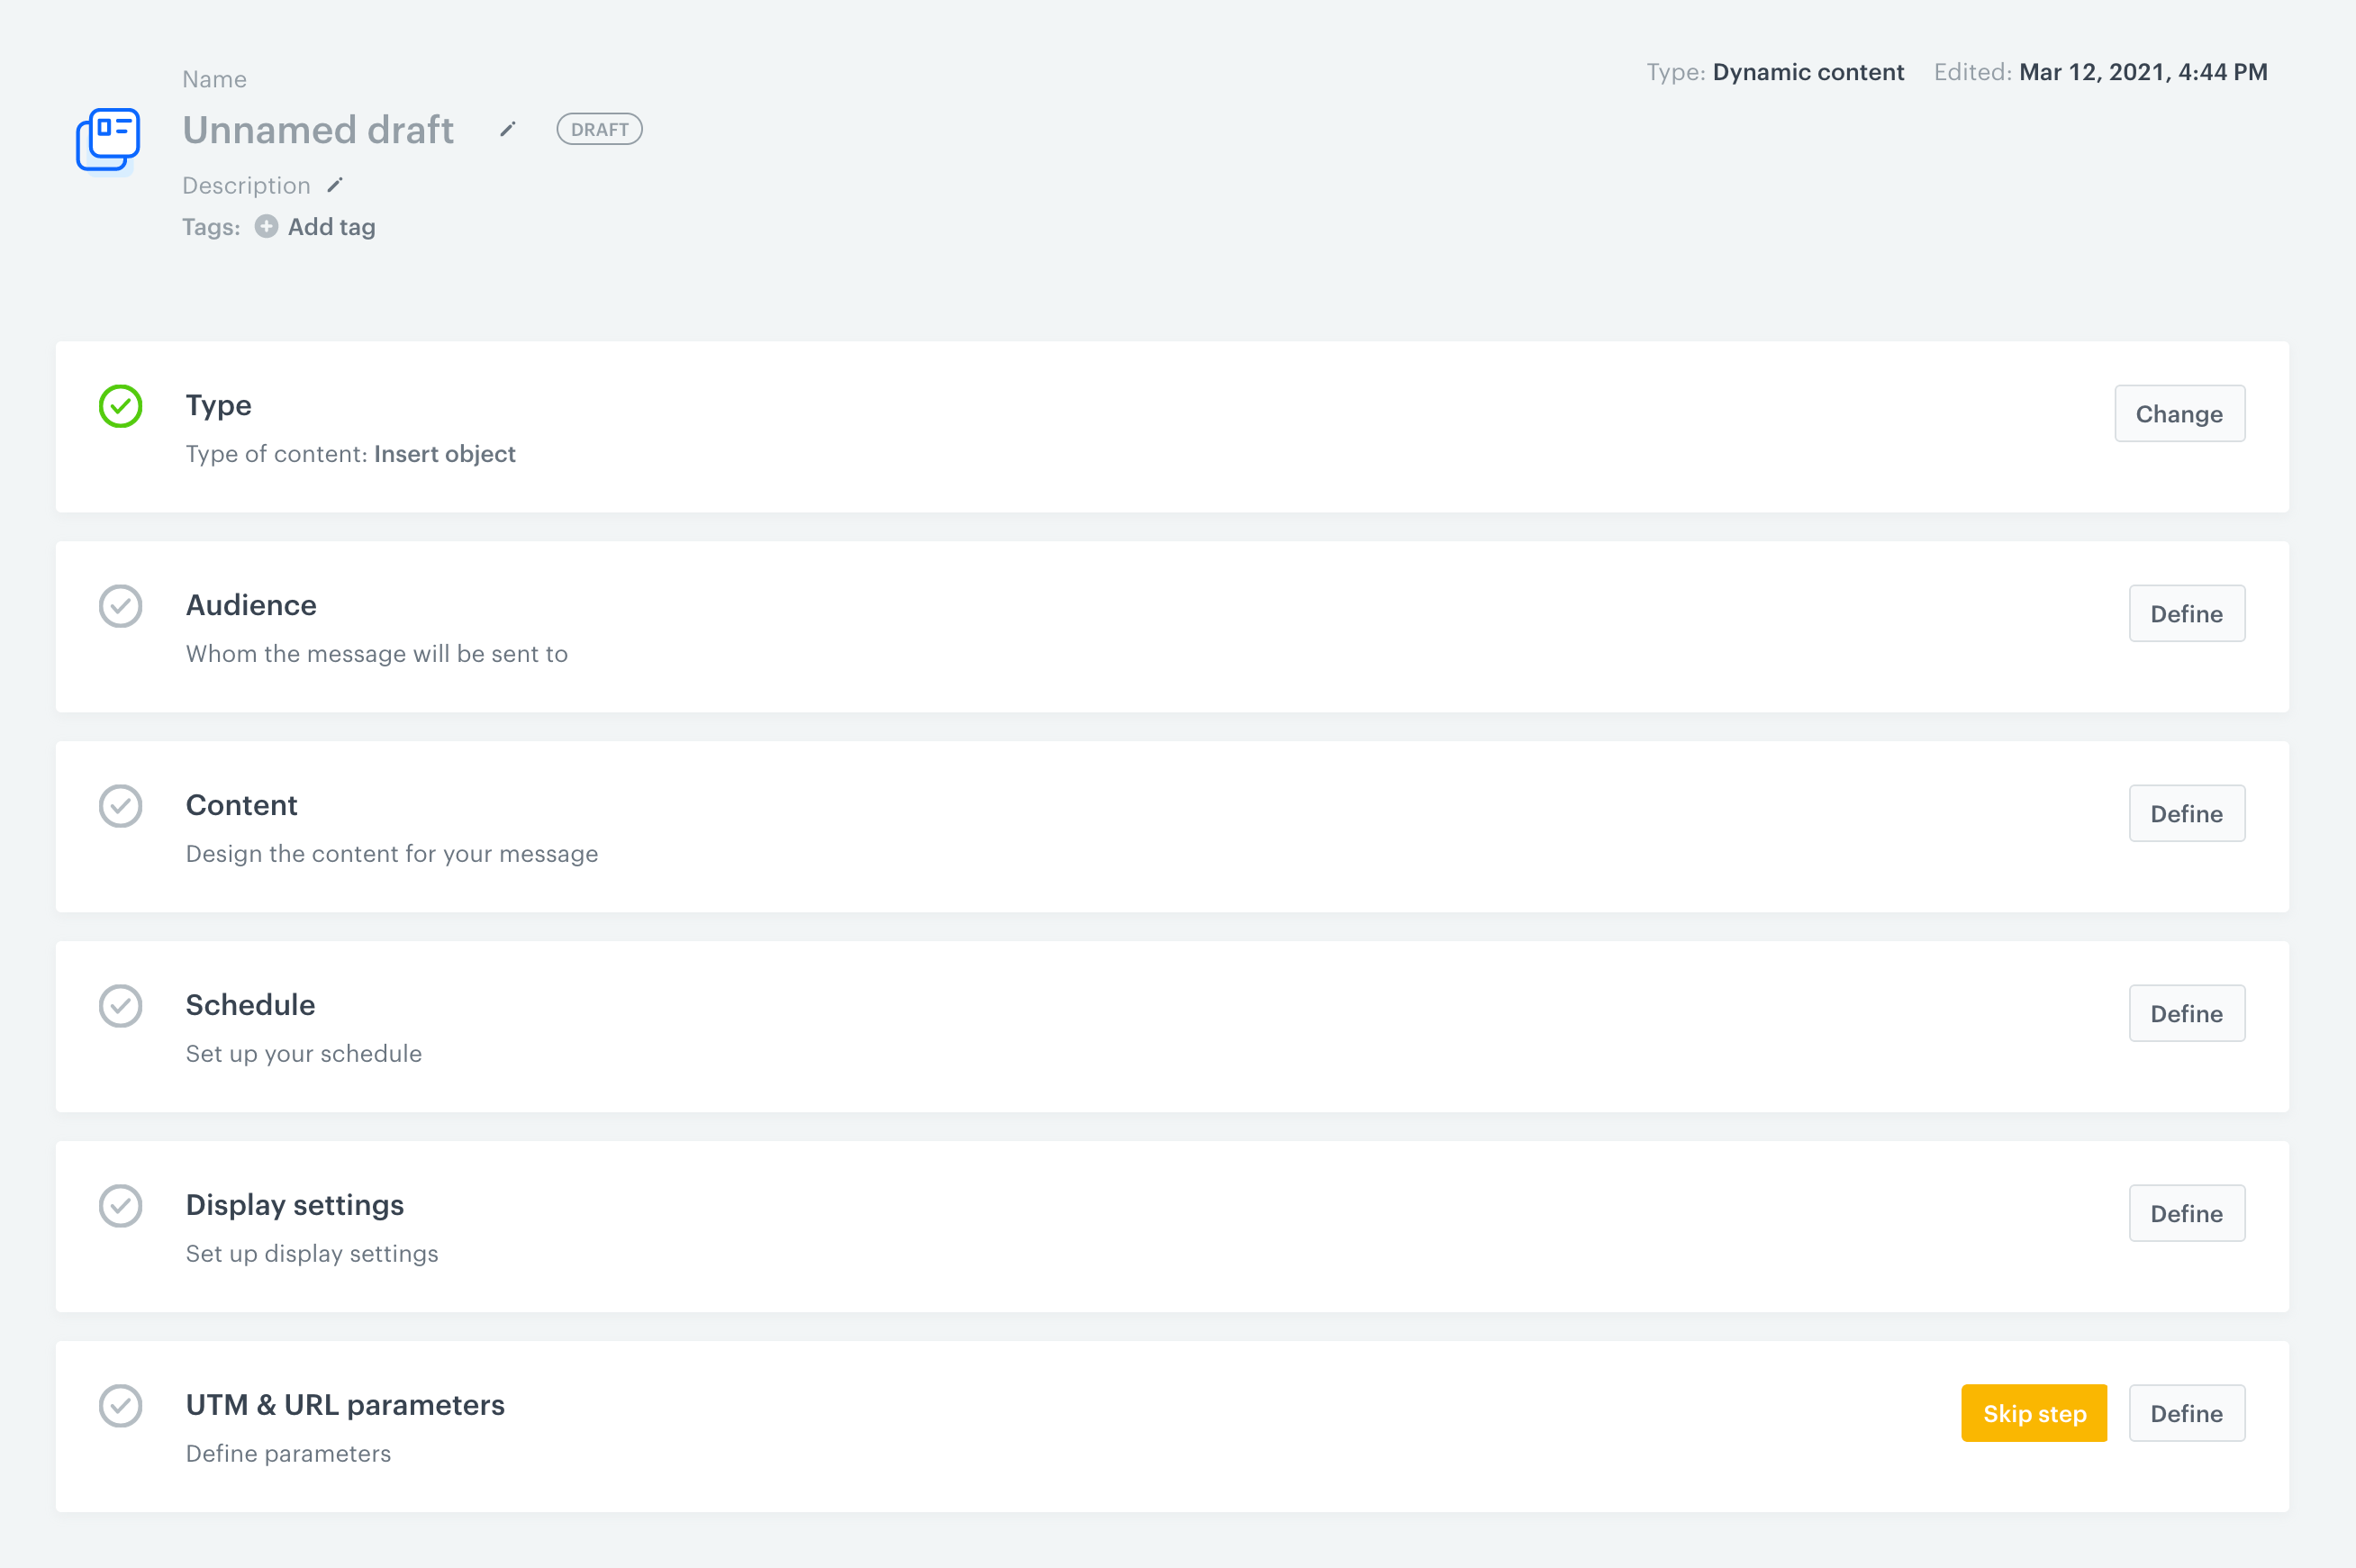
- Go to
 Communication > Dynamic Content > Create new.
 - Enter the name of the dynamic content.
- Optionally, to let other users know about the purpose of the dynamic content, enter a short description.
Define the type of dynamic content
Select the type of the dynamic content:
- Insert object - This type is an implementation of the dynamic content into the code of your website.
- Web layer - This type allows you to display an element that overlays the content of the website.
Important: AI-driven A/B tests are unavailable for Web layer content.
Define the recipients of dynamic content
-
Select an audience for the dynamic content by performing one of the following actions:
- If you want to create the dynamic content for everyone (default setting), in the Audience section, click Apply.
- If you want to create the dynamic content for customers from an existing segmentation:
- Select the Audience tab.
- Click Select segment.
Result: A pop-up shows up. - On the pop-up, select a group or groups of customers.
Tip: The dependency between the selected segments of customers is described by the
ORlogical operator. - Confirm your choice by clicking Apply.
- If you want to create the dynamic content for a new group of customers:
- Select the New audience tab.
- Click Define conditions.
- Follow the instructions available here.
- When you complete building the filter, click Apply.
-
Optionally, enable the control group by clicking Advanced options and selecting the Enable a control group check box. See detailed instructions on enabling a control group.
A user is assigned to the control group based on local storage (browser). Logging out/resetting user’s UUID won’t exclude the user from the control group. -
Confirm the settings by clicking Apply.
Create or select templates
In the Content section, you can create two types of dynamic content:
- Simple message - It is creating one version of the dynamic content.
- (Insert object content type only) A/B test - You can create up to 6 variants of the dynamic content and launch the automatic allocation controlled by the AI engine. The AI engine selects the best-performing variant for every customer to achieve the goal of the dynamic content which is defined in the Goals section.
WARNING: The Make allocation automatically option requires model training, that is why it may not be available for all workspaces. If this option is unavailable, contact the administrator.
Simple message
- (Insert object content type only) To define the place on the website where the dynamic content is displayed, in the CSS sub-section field, enter a CSS selector and use the dropdown to define the exact position of the inserted content in relation to that element.
Note: You can learn more about selectors in “CSS selector basics”. - To create the content or select a template, click Create message. Learn more about creating templates here.
Result: The template selection view opens.Important: A template needs an approval from the final approver. More about it here. - The approved template appears in the Content section.
A/B testing
A user is assigned to the dynamic content variant on the basis of local storage (browser). Logging out/resetting user’s UUID won’t result in reassigning the user to the different variant. If the user clears their local storage, they may be re-assigned to the same variant again.
-
To create more than one version of dynamic content, click

Result: The Make allocation automatically option appears. -
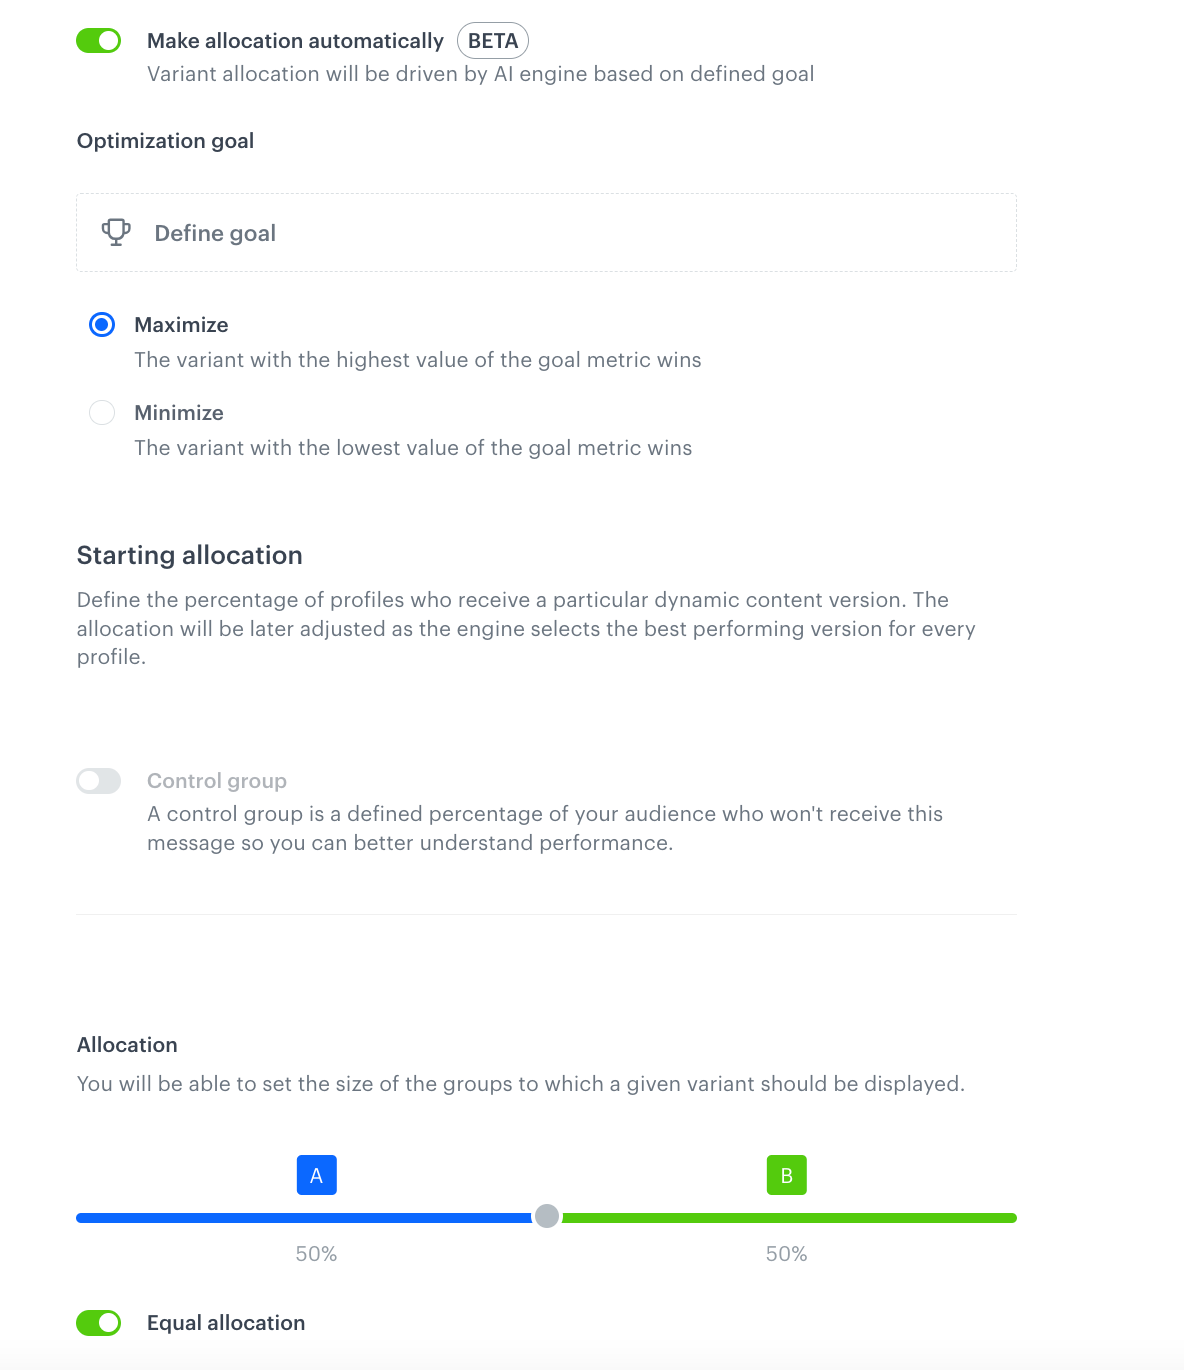
To let the AI engine allocate the content variants to customers, switch the Make allocation automatically toggle on.
Important: Enabling this option unlocks the Optimization goal section. -
Optionally, you can define the allocation of variants and control group.
-
To define the goal of dynamic content:
- Select one of the two options:
- Maximize - The variant which receives the highest score (calculated by the metric defined in the next step) wins and it is displayed to a customer. For example, you want to maintain the highest frequency of purchases over $20.
- Minimize - The variant which receives the lowest score (calculated by the metric defined in step the next step) wins and it is displayed to a customer. For example, you want to reduce the number of product returns.
- To define the metrics of the goal, click Define goal.
Result: A pop-up appears. - From the Aggregator dropdown list select:
- Sum - The total value of the event parameter counts.
- Count - The number of event occurrences counts.
- To select an event, click Choose event.
- After selecting the event, define its parameter and the value.
- Confirm the settings by clicking Apply.
- Select one of the two options:
-
To define the place on the website where the dynamic content is displayed, in the CSS sub-section field, enter the ID or class of an element. The DC will be displayed in relation to this element. Use the dropdown to define the exact position of the inserted content.
Note: You can learn more about selectors in “CSS selector basics”. -
To create the content or select a template, click Create message. Learn more about creating templates here.
-
When you select or create a message template or templates, they will appear in the Content section.
Allocating A/B test variants and enabling control group
You can use A/B/x testing to display various versions of one message to see which variant provides the best results. In addition to the variants, you can use control groups to measure the full impact of a campaign within which you send a message. For example, you can analyze the behavior of customers who didn’t receive the message and compare the analysis results with the behavior of the ones who did.
You can only define the size (allocation) of the control group and groups who will receive a particular variant. Profiles are assigned at the variants and the control group in the moment of displaying the dynamic content in the browser and assigning a specific profile to a specific group isn’t possible.
Control group, test variants, and events
When a profile enters a website and meets conditions that triggers a dynamic content, a variant of the dynamic content is displayed and the system generates a dynamicContent.show event (you can check the full reference of dynamic content events here).
This event is also generated in the same circumstances for a profile who has been assigned to a control group. However, the value of the variantName parameter of this event is Control group.
How long is a profile assigned to a control group and variants?
A profile remains assigned to a variant or a control group for 30 days, which means that after 30 days the profile can be assigned to a different variant. In addition, control group is assigned within a given campaign, so for individual campaigns a profile can be in the control group in campaign A, but at the same time can be in the target group in campaign B.
Defining allocation for variants and control group
- To enable a control group, in the Content section, enable Control group.
- Select the control group type:
- Global control group - this group is selected from all profiles you have in Synerise.
- Campaign control group - this group will be selected from the profiles in the audience of this specific dynamic content.
- Adjust the size of each variant and the control group by using the slider. The size of control group can be adjusted only for the Campaign control group option.
Variant size adjustment - Confirm by clicking Apply.
Schedule dynamic content
To define when you want to display dynamic content, go to the Schedule section.
- Select one of the display options:
- Display immediately - The dynamic content starts right after clicking the Activate button. It’s active until you switch it off.
- Scheduled - The dynamic content is active during a selected period.
- For Scheduled: Pick the start and end dates on the calendar and confirm a choice for each date by clicking Apply.
- For Scheduled: Select the time zone for the start and end dates.
- In Advanced options, define the days of week and/or times of day when you want to display the dynamic content.
- Confirm the settings by clicking Apply.
Define triggers
- To define the circumstances for displaying the content, go to Display settings.
- Select the customer behavior which triggers the display of the dynamic content:
- On landing - The dynamic content is displayed when the visitor enters the website.
- On exit - The dynamic content is displayed when a visitor to the website moves a mouse cursor outside the area of website.
- After scroll - The dynamic content is displayed after scrolling down a percentage of the website.
Define URL targeting
-
To define the pages where the dynamic content will be displayed or exclude some URLs from displaying the content, in the Display settings section, click Advanced options.
-
In the Page targeting section, change the selection to Others.
-
To define the pages where the dynamic content is displayed, under Display on pages, click Add rule.
-
From the left dropdown list, select one of the following options:
Option Description Example Page with URL This option lets you display dynamic content only on the provided URL. You must enter the whole URL. https://www.example.com/?black-fridayPage URL containing This option lets you display dynamic content on all pages that contain a specific phrase in URL. /?black-fridayRegExp This option lets you specify a regular expression to filter the pages where dynamic content will be shown. In the example, the provided regular expression demonstrates how to display dynamic content on pages with URLs that end with the word “friday”. .*friday$ -
In the field, next to the dropdown list, provide a value.
-
To define the pages where the dynamic content won’t be displayed, under Not display on pages, click Add exception.
-
Using the same options as described in the table above, specify which pages will be excluded from displaying the dynamic content.
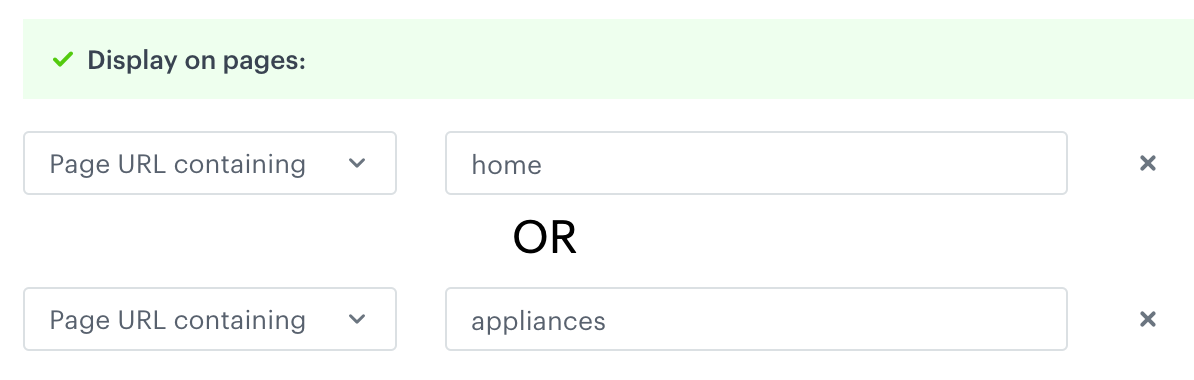
Dependency between conditions
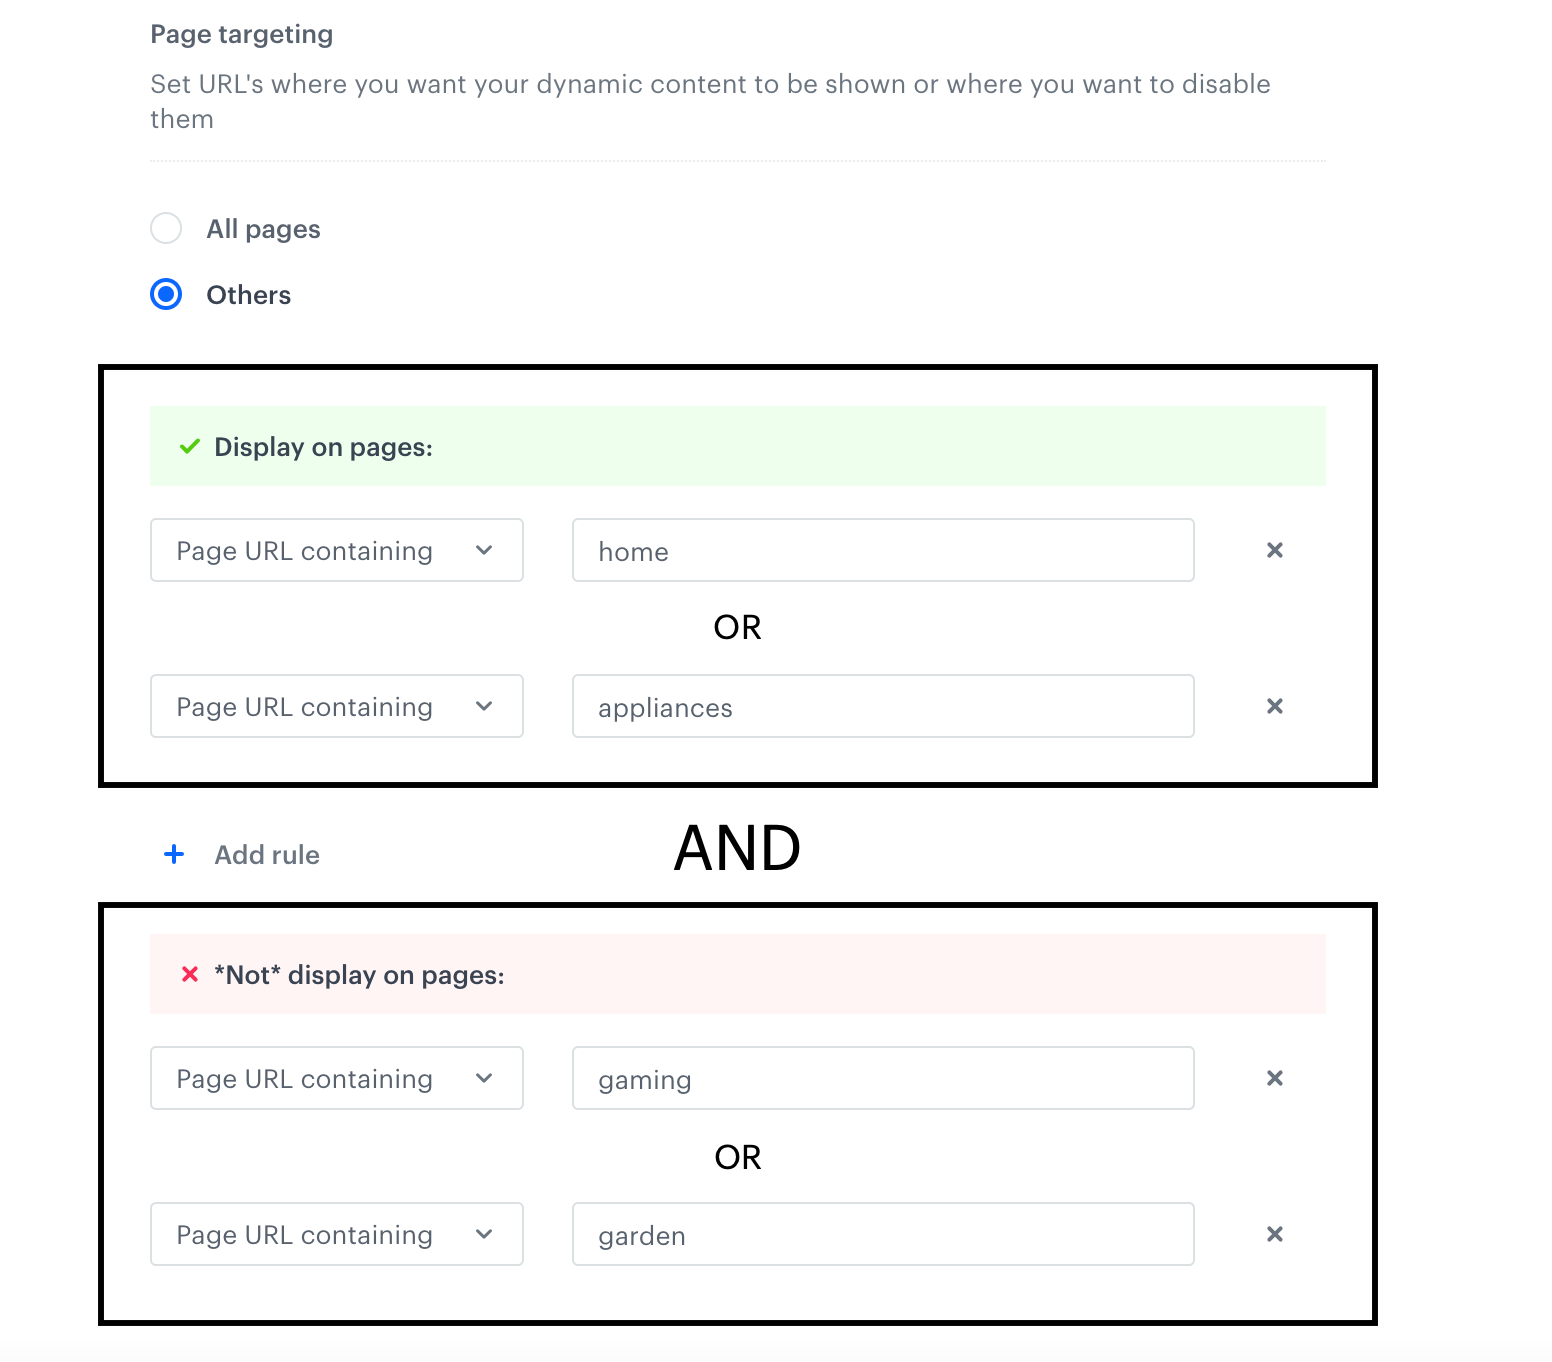
The OR logical operator is used to determine the dependency between conditions in the Display on pages section. In the following example, the dynamic content will be displayed on pages that contain the words home or appliances (or both these words) in URL address.
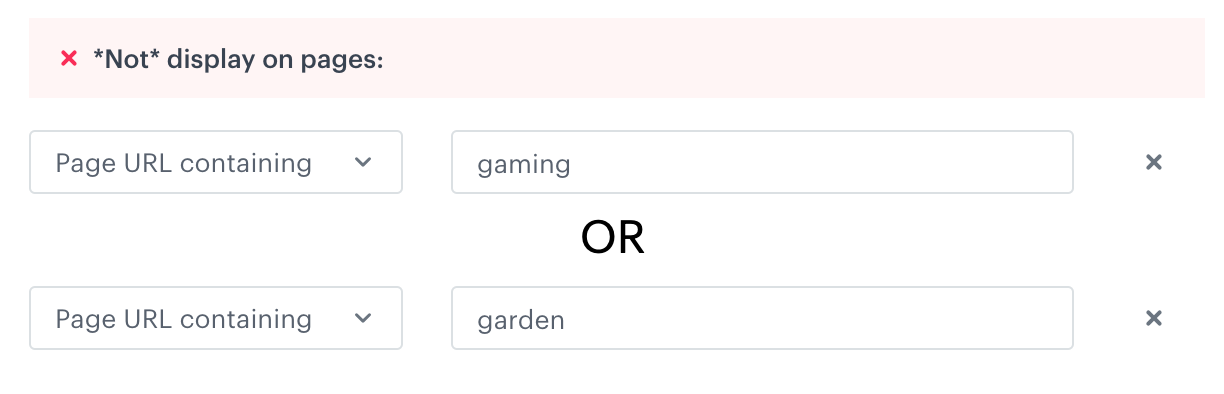
The OR logical operator is used to determine the dependency between conditions in the Not display on pages sections. In the following example, the dynamic content will not be displayed on pages which contain the words gaming or garden (or both these words) in URL address.
The AND logical operator is used to determine the dependency between conditions in the Display on pages and Not display on pages sections. This means that dynamic content will only be displayed if the conditions in both sections are met.
Conflicting conditions
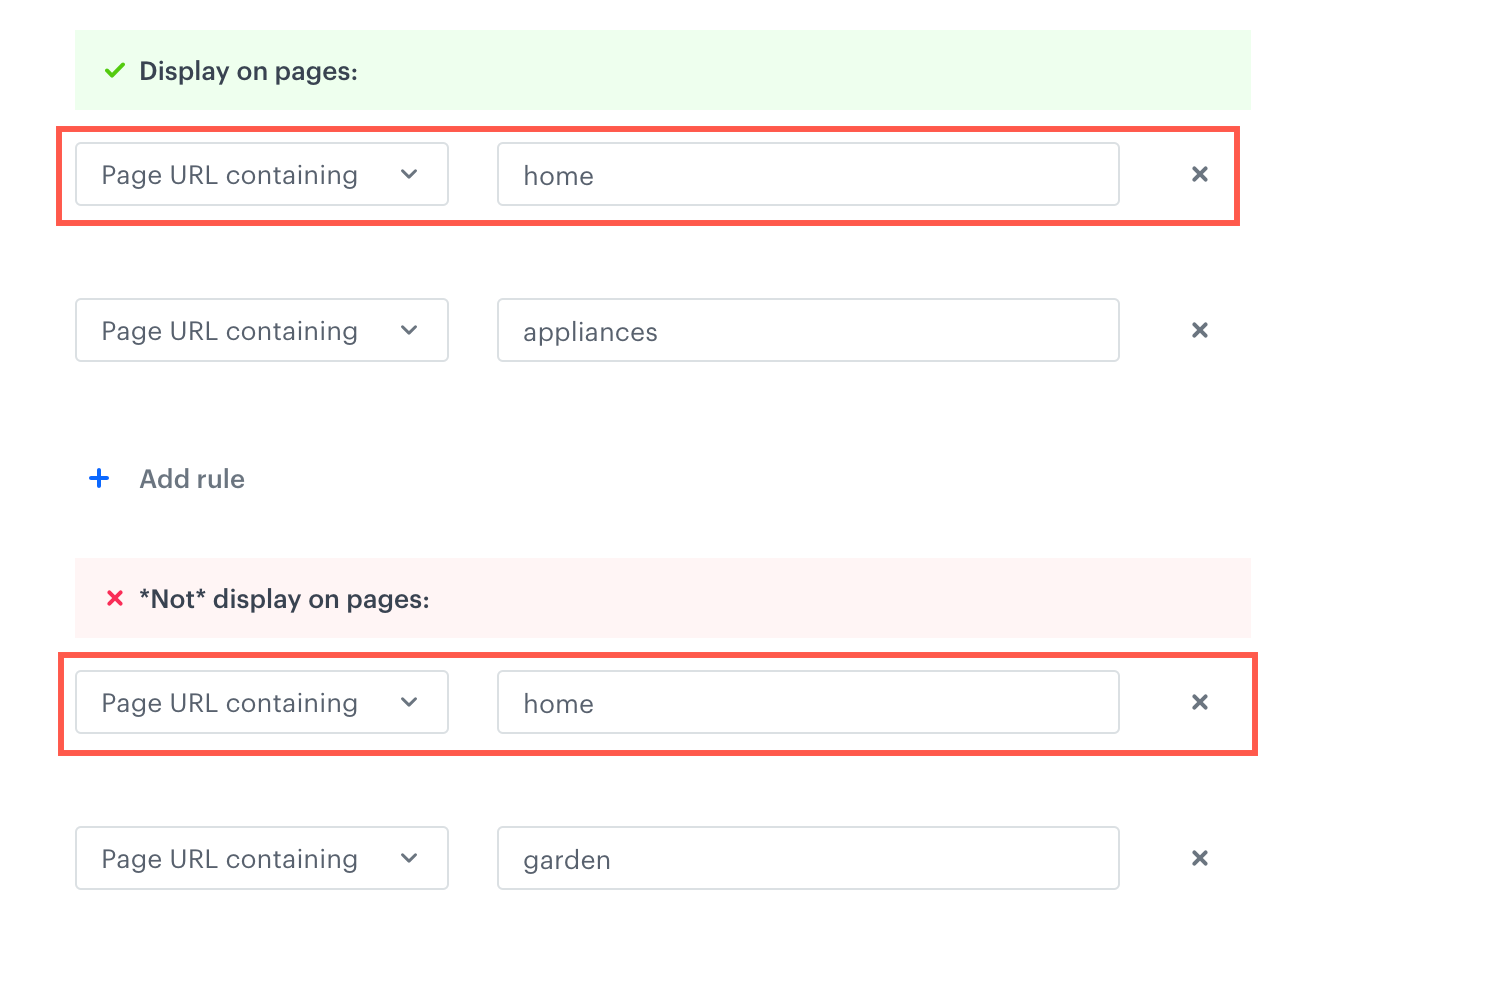
In the example above, there’s a conflicting condition where dynamic content is supposed to show and not to show on pages with home in the URL. As a result, the dynamic content won’t be visible on pages that have home or garden in the URL, but it will be visible on pages that have appliances in the URL.
Define visibility period
- To define when the dynamic content stops being visible, in Advanced options proceed to Stop display section.
- In the Stop display section, select one of the following options (this setting concerns individual viewers):
- Always display dynamic content - The dynamic content will be displayed all the time to a viewer until it expires or you stop the display dynamic content manually.
- A viewer clicks a button or a link in dynamic content - The dynamic content will be displayed to a viewer until they click a button on the dynamic content or a link contained in the dynamic content.
- Dynamic content was shown to a viewer X times - You can define the number of times a dynamic content is displayed to a viewer. After that, it won’t be displayed to that viewer anymore.
Define target devices
- Define the devices on which the dynamic content will be displayed.
- If you want to show the DC on both mobile and desktop devices, select both options or none of them.
- If you want to show the DC on only one type of device, select it.
- Confirm the settings by clicking Apply.
Define the UTM parameters
-
Optionally, to define the UTM parameters, go to UTM & URL parameters.
- Define the UTM parameters:
- Source - This parameter defines the source of incoming traffic, it can be a specific page such as
synerise,newsletter, and so on. - Medium - This parameter identifies whether the traffic is paid, free, or originates from newsletters. The examples of most popular tags are
sms,banner,email, and so on. - Term - This parameter is used to mark keywords.
- Campaign - This parameter allows you to mark a specific campaign, for example a summer sale, black friday, christmas, and so on.
- Source - This parameter defines the source of incoming traffic, it can be a specific page such as
- In advanced options, define your own URL parameters:
- Click Add parameter.
- In the Parameter field, enter the name of the parameter.
- In the Value field, enter the value of the parameter.
- Confirm the settings by clicking Apply
- Define the UTM parameters: