
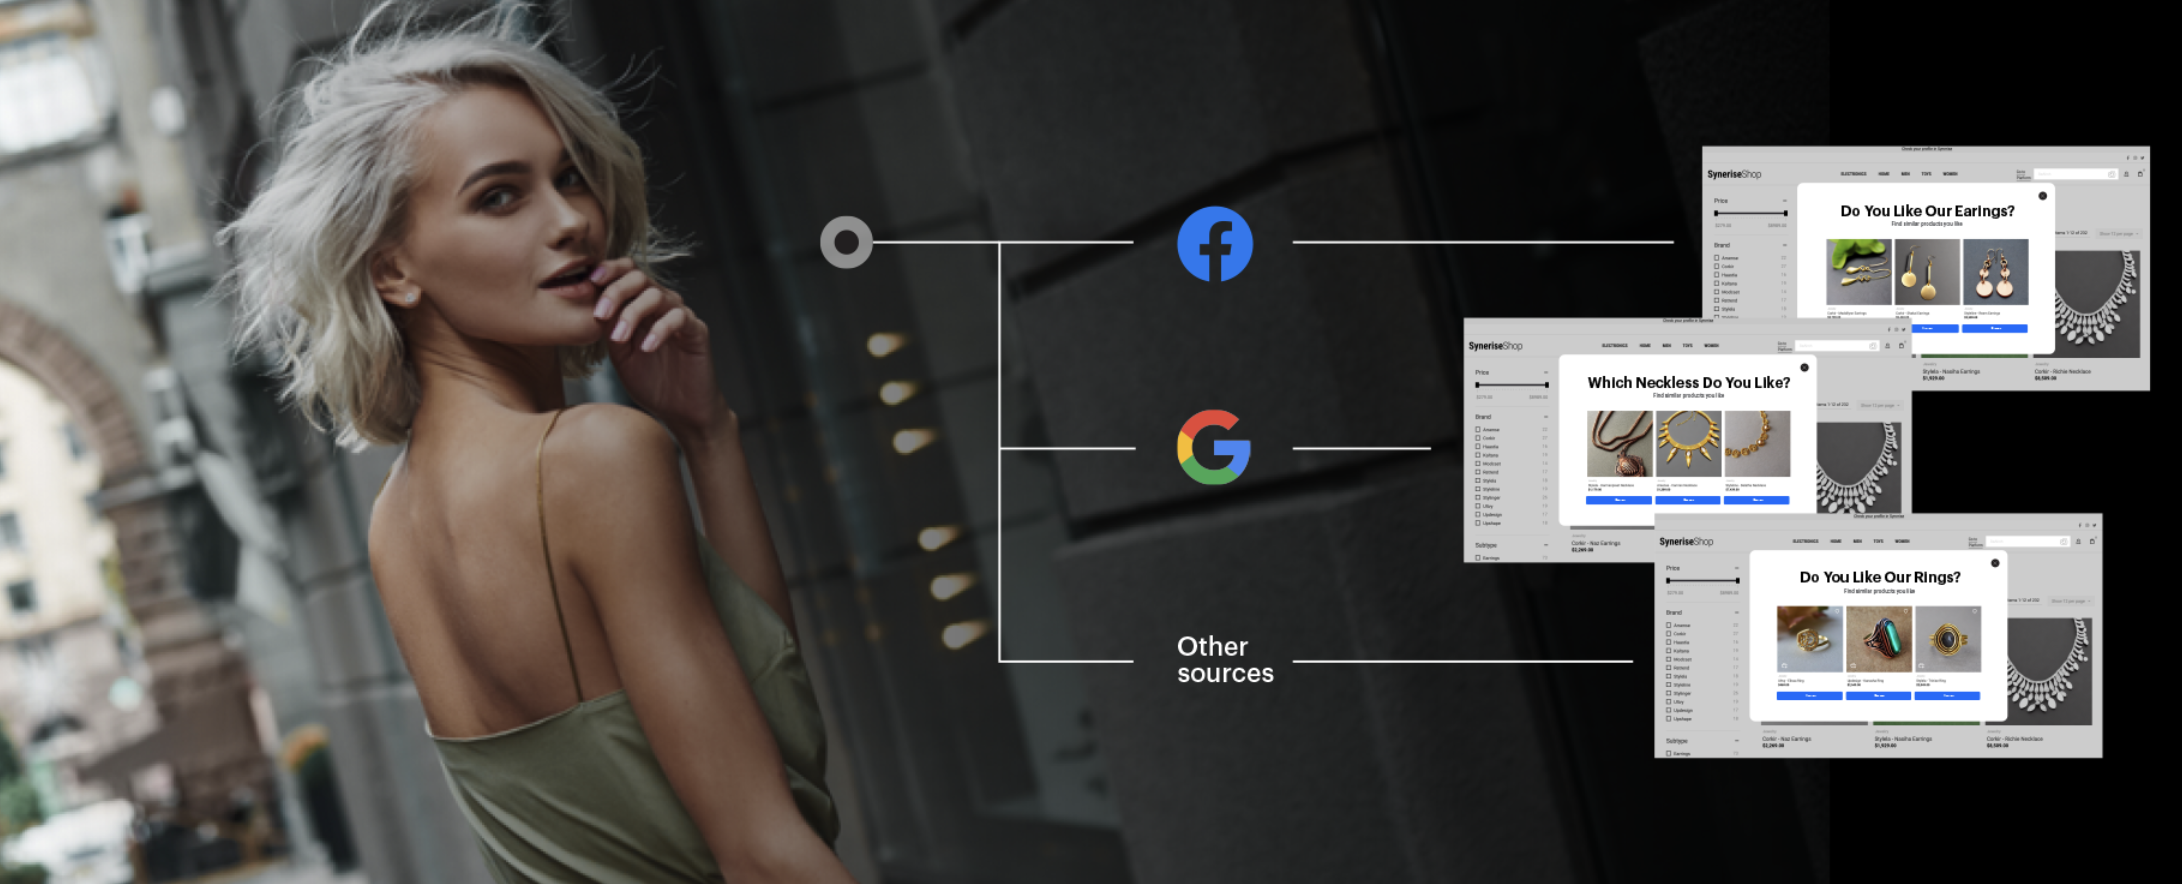
Personalize item suggestions based on a clicked advertisement
In today’s digital landscape, delivering personalized experiences to customers has become essential for businesses to stand out and engage their audience effectively. One powerful approach to personalization is tailoring the content and product offerings based on the traffic source that brings visitors to a personalized landing page.
This use case describes the process of implementing a dynamic content that displays item suggestions which are based on the clicked ad.
Before you proceed to implementing this use case, you must configure an external advertisement campaign within which UTMs are added to URLs. These UTMs will be used in the targeting options of the dynamic content campaign, enabling the display of items suggestions based on the clicked ad.
This use case provides you with an HTML code for the dynamic content to be edited in the dynamic content template builder. When you paste it to the editor, you will be able to configure the fields in the template by means of a user-friendly configuration form.
The HTML code of the dynamic content consists of the following configurable elements:
- The banner field in which you can paste a link to the image of the collection
- The field with the main title displayed in the dynamic content
- One object, dedicated to one item. The object let you define the title of the product, its description and price, and the link to the product’s image.
- Recommendation selection section.
Prerequisites
- Configure AI engine and enable it for personalized recommendations.
- Prepare an external advertising campaign for specific product category and configure UTM parameters for the ads.
- Create a landing page. The dynamic content will be displayed on this page.
Process
In this use case, you will go through the following steps:
- Create a recommendation campaign which promotes the specific product category.
- Create a dynamic content that will display the item collection based on the ad a customer has been redirected from.
Create a recommendation campaign
Create a recommendation campaign that will return the items of the specific category. Such recommendation will return the items based on customer’s behavior on the website and browsing history.
-
Go to
 Communication > Recommendations > Add recommendations
 -
Enter the meaningful name of the recommendation.
-
In the Type & Source section, click Define.
- From the Catalog dropdown list, select the main catalog with all products and categories.
- As the type, select Personalized.
- Click Apply.
-
In the Items section, click Define.
-
Click Add slot. You can name the slot for later reference.
-
In the Number of items subsection, set the minimum and maximum number of items to
6.
Tip: Setting the minimum and maximum number of items to the same number ensures that exactly this many items will appear in the slot. -
From the Statics filters dropdown, click define filter and choose Visual Builder.
-
In the visual builder, choose the category (or brand) attribute and set its value to the category from which the items will be presented in the recommendation.
-
Additionally, if you want to, you can apply other filters types to specify the range of items displayed in the recommendation.
-
In the Items section, click Apply.
-
In the Boosting section, you can enable define boosting rules.
-
Optionally, in the Additional settings section, you can exclude the items which were already purchased or select the metric according to which the items will be ordered in the recommendation.
-
Save the recommendation by clicking Save.
Create an editable dynamic content
In this part of the process, you will create a dynamic content campaign dedicated to a specific category. The provided HTML code has defined variables that can be easily customized to meet your unique business needs using the configuration form. The variables that are defined include: title, description, price, item link, and image link.
- Go to Communication > Dynamic Content > Create new.
- Enter the name of the content.
- Choose the Insert object type.
- In the Audience section, select Everyone.
- In the Content section, select Simple message, and specify the CSS selector where you want to insert dynamic content to your website.
- Click Create Message > New template.
- In the code editor, insert Jinjava with the configurable boxes and add your own CSS.
<h4>Intro</h4>
<div style="max-width: 360px">
        <img src="#### type: "string", groupName: "Intro", groupId: "Intro", label: "Banner", id: "image_1", defaultValue: "lorem_image" !####" />
        <p>#### type: "string", groupName: "Intro", groupId: "Intro", label: "Title", id: "intro_1", defaultValue: "lorem_title" !####</p>
    </a>
</div>
<hr>
<h4>Item 1</h4>
<div style="max-width: 360px">
    <a href="#### type: "string", groupName: "Item 1", groupId: "item_1", label: "Link", id: "link_1", defaultValue: "lorem_link" !####">
        <img src="#### type: "string", groupName: "Item 1", groupId: "item_1", label: "Photo", id: "image_1", defaultValue: "lorem_image" !####" />
        <p>#### type: "string", groupName: "Item 1", groupId: "item_1", label: "Title", id: "title_1", defaultValue: "lorem_title" !####</p>
        <p>#### type: "string", groupName: "Item 1", groupId: "item_1", label: "Description", id: "desc_1", defaultValue: "lorem_description" !####</p>
        <p>#### type: "string", groupName: "Item 1", groupId: "item_1", label: "Price", id: "price_1", defaultValue: "lorem_price" !####</p>
    </a>
</div>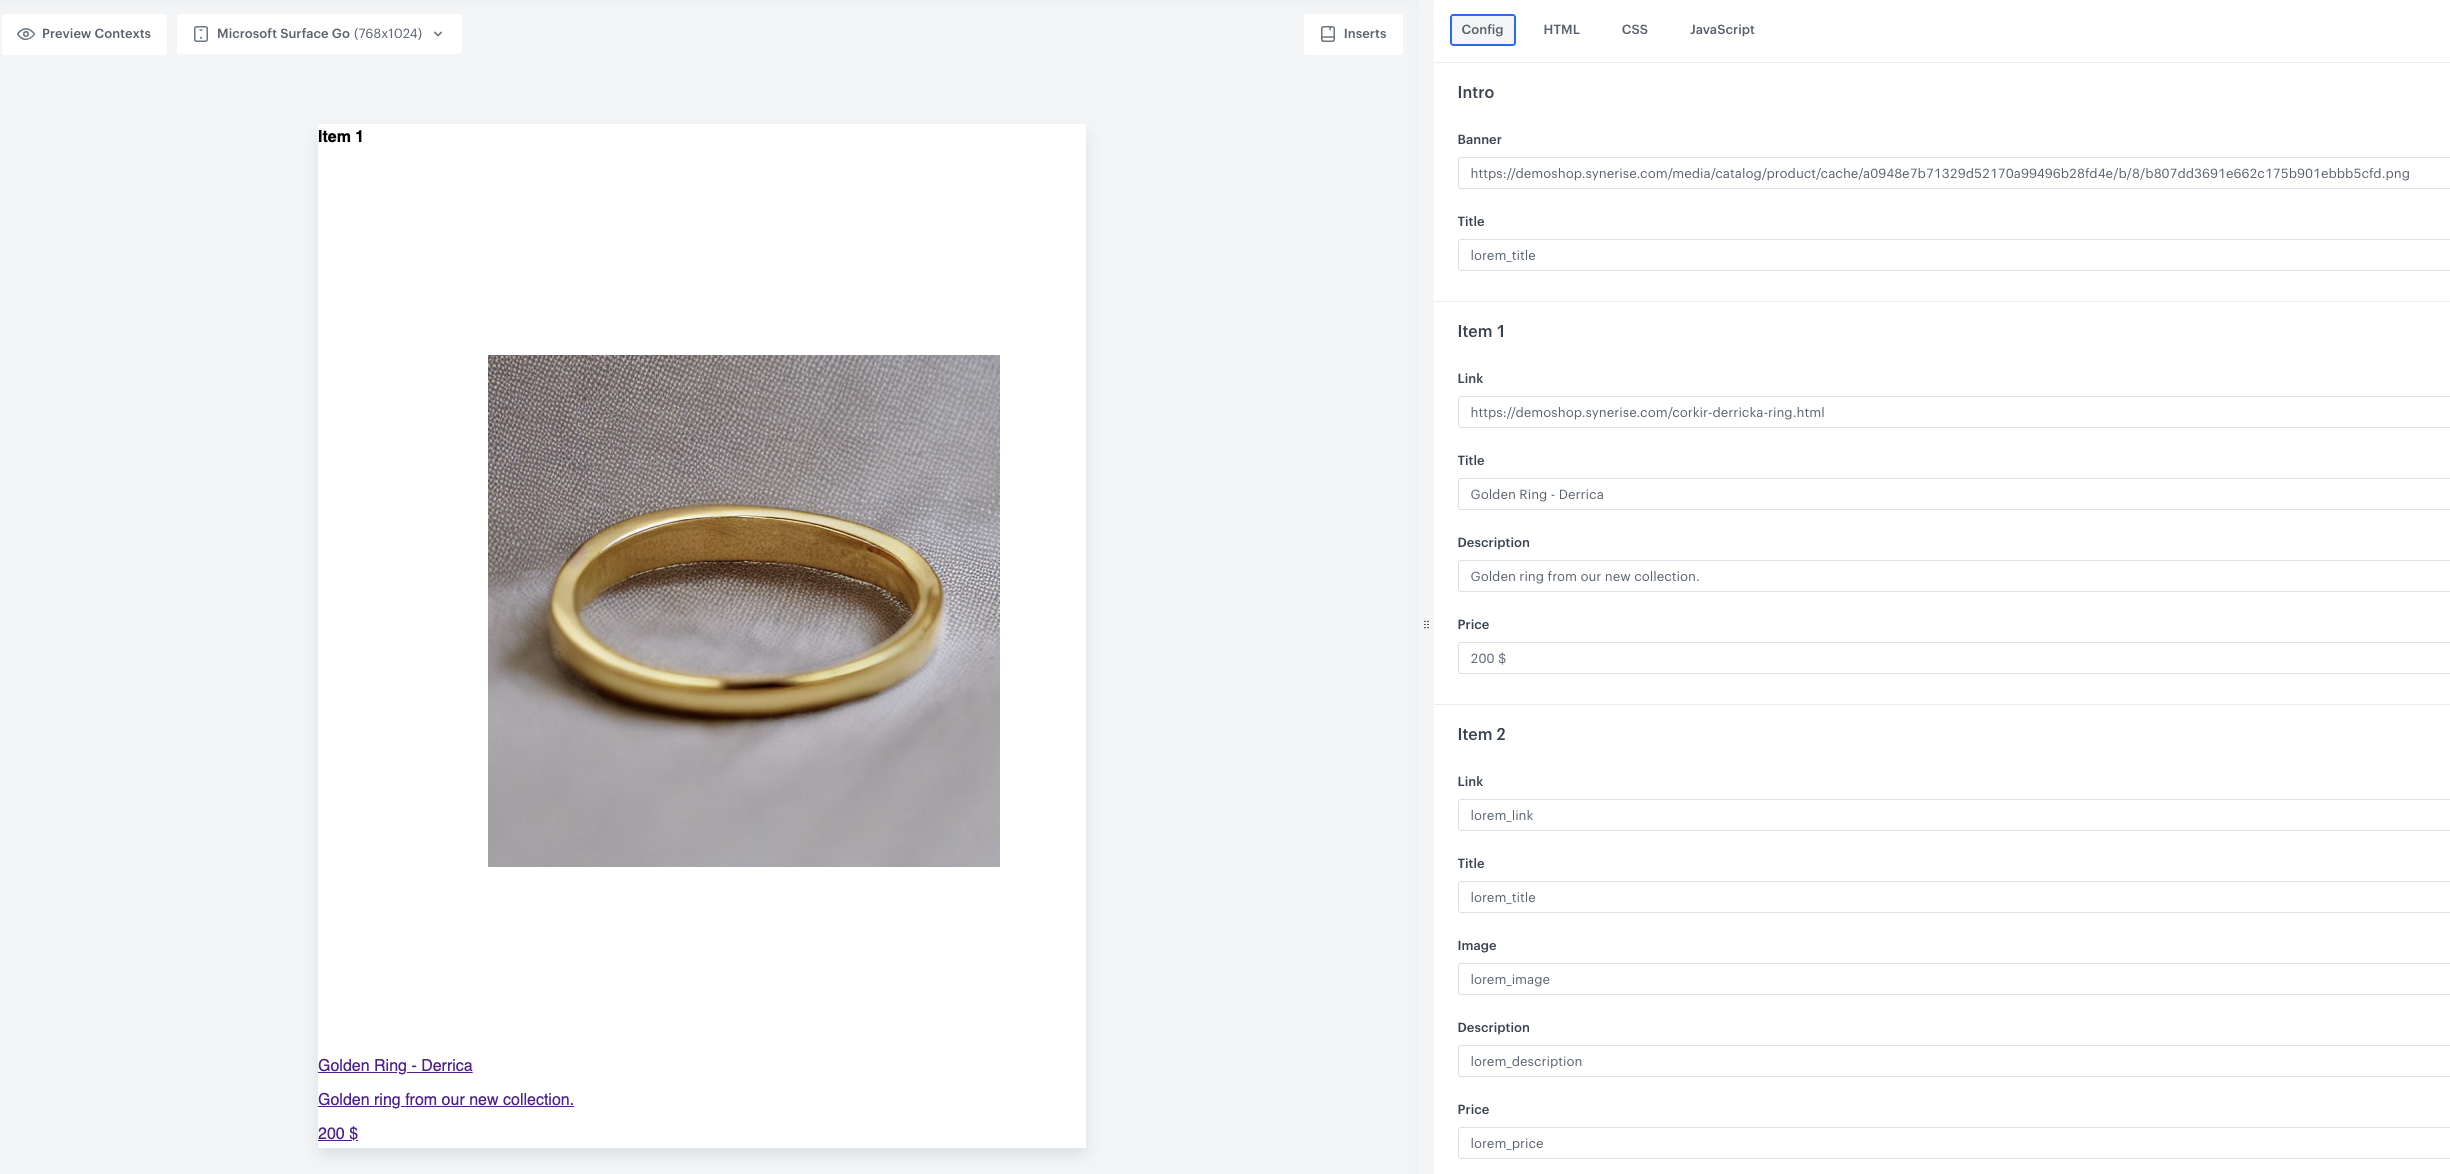
- Additionally, you can add to the campaign as an insert link to the recommendation campaign with products from a specific brand. Click Insert, select AI Recommendations 2 from the list and choose the recommendation campaign crated in the previous step.
- Click Get HMTL code, click Copy to clipboard button visible on the upper right side of the screen.
- Go to the HTML tab of the campaign editor on the right side of the screen and paste the code below the code added before.
- Add CSS styles based on your business assumptions.
- Save the template.
- In the Schedule section, select the date when the dynamic content is activated.
- In Display settings, define the circumstances for displaying the content.
- In the Triggers section, select on landing.
- Click Advanced options, go to the Page targeting section.
- Below the Display on pages banner, click Add rule.
- From the left dropdown list, select RegExp.
- In the right field set the URL where you want your dynamic content to be shown. Add the UTMs of the external campaign. It will decide which DC campaign should be displayed.
- In the Frequency section, select Always.
- In the stop display section, select Never.
- In the Device section, select on which device you want to show the dynamic content.
- Confirm by clicking Apply.
- In the UTM & URL parameters section, click Skip step.
- Activate dynamic content.

What’s next
To measure campaign performance, you can create various custom analytics. Once these analytics are created, they can be brought together in a single dashboard to provide a holistic view of campaign performance, allowing you to quickly assess whether the given results met your specific campaign goals and objectives.
Check the use case set up on the Synerise Demo workspace
You can check the configuration of every element of this process directly in Synerise Demo workspace:
If you don’t have access to the Synerise Demo workspace, please leave your contact details in this form, and our representative will contact you shortly.