WhatsApp abandoned cart message
Businesses should understand the importance of personalized communication and aim to provide a seamless shopping experience for their customers. With Synerise, you can leverage your business using WhatsApp to send personalized messages to customers who have abandoned their shopping carts. Sending customized messages through WhatsApp may increase your sales and reduce cart abandonment rates. You can use this integration to ensure that your customers receive timely reminders about their abandoned carts, with personalized offers and incentives to encourage them to complete their purchase.
In this use case, you will create a workflow sending a personalized message on WhatsApp encouraging customers who abandoned their cart to complete the transaction.

Prerequisites
- Make sure you meet all prerequisites to work with the Send a template message node.
- Implement the transaction events using SDK or API.
- Implement the
cart.statusevent, which stores the current status of the basket in the form of an event on the customer’s card. The event has to be sent to Synerise after every change in the cart status. - Collect product.addToCart event.
Process
In this use case, you will go through the following steps:
- Create an aggregate with abandoned products.
- Create a message template in the Meta portal
- Create a workflow to send message to customers on WhatsApp
Create an aggregate
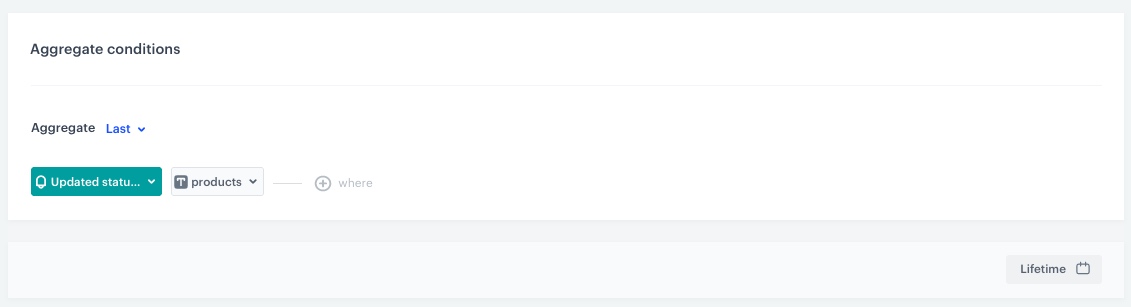
In this part of the process, create an aggregate that returns the list of the abandoned products. You will use the result of the aggregate as an insert to display products from the abandoned cart in your WhatsApp message.
- Go to
 Analytics > Aggregates > New aggregate.
 - Enter the name of the aggregate.
- As the type of the aggregate, select Last.
- From the Choose event dropdown list, select the
cart.statusevent. - As the event parameter, select products.
- Set the analyzed period to Lifetime.
- Save the aggregate.
Create a message template in the Meta portal
Create a message template in the Meta portal that you will use in the next part of the process. In the body of the message, mark places where the dynamic elements will be added.
In addition, if you would like to add a CTA at the end of the message, you can add a button and define its copy. The page to which the customer will be redirected after clicking the button can be defined in Synerise.
The example message used in this use case:
*{{1}}* Hi {{2}}, it looks like you forgot something. Go on and complete your purchase!
Where {{1}} and {{2}} are markers that will be replaced with the dynamic values. This step will be done in Synerise.
The screen below shows an example of creating a template message in the Meta portal:

In the following screen, you can see how a button can be defined in the Meta portal:

Create a workflow to send message to customers on WhatsApp
The workflow will be triggered by the product.AddToCart event. The delay is defined up to 1 day. If a customer does not make a transaction within one day, we will send a WhatsApp message with a reminder to buy products left in the cart.
- Go to
 Automation > Workflows > New workflow.
 - Enter the name of the workflow.
Define the trigger node
- As the first node, add the Profile Event. In the settings of the node, select the productAddToCart event.
- Click Apply.
Configure the Delay node
- Add the Delay node. In the node settings:
- In the Delay field, type
1. - From the dropdown list, choose Day.
- In the Delay field, type
- Click Apply.
Define the Profile Filter node
As the next node, choose Profile Filter to check if a customer have made a transaction in the last 24 hours.
- Add the Profile Filter node. In the node settings:
- From the Choose filter dropdown, select the
transaction.chargeevent. - Change matching to not matching.
- Set the date range to the last 1440 minutes.
Important: Use 1440 minutes instead of 1 day – use smaller granulation, as in this case 1 day would take the time from current hour till the midnight, so such an analysis would not take into consideration all customers who meet the meet the filter conditions.
- From the Choose filter dropdown, select the
- Click Apply.
Define the Send a template mesage node
-
To the Not matched path, add the WhatsApp Send a template message node.
-
Click Select connection.
-
From the dropdown list, select the connection.
- If no connections are available or you want to create a new one, see Create a connection.
- If you selected an existing connection, proceed to defining the integration settings.
-
In the Sender ID field, enter the phone number ID from which the message will be sent. You can find more information about phone number ID here.
-
In the Receiver field, enter the phone number of the customer who will receive this message. We recommend using the
{% customer phone %}insert, which inserts the phone number of an individual customer who goes through this node. -
In the Message template field, enter the name of the message template you created earlier in the Meta portal.
-
From the Language code dropdown list, select the language used in the message.
-
In the Message components field, insert the object that contains the dynamic values in the order defined in the message template. The example of object used in this use case:
Note: The aggregate ID is used as examples for the purpose of this use case.[ { "type": "body", "parameters": [ { "type": "text", "text": "{% aggregate 17d214c4-5644-33b1-b0c6-9fab96b26b3e %}{% for item in aggregate_result %}{% catalog.store-1(item.sku).name %}{% endfor %}{% endaggregate %}" }, { "type": "text", "text": "{% customer firstname %}" } ] }, { "type": "button", "parameters": [ { "type": "url", "text": "{% aggregate 17d214c4-5644-33b1-b0c6-9fab96b26b3e %}{% for item in aggregate_result %}{% catalogvar.store-1(item).url %}{{ catalog_result|replace('https://yourshop.com', '') }}{% endcatalogvar %}{% endfor %}{% endaggregate %}" } ] }, { "type": "header", "parameters": [ { "type": "image", "image": { "link": "{% aggregate 17d214c4-5644-33b1-b0c6-9fab96b26b3e %}{% for item in aggregate_result %}{% catalogvar.store-1(item).image %}{{ catalog_result }}{% endcatalogvar %}{% endfor %}{% endaggregate %}" } } ] } ] -
Click Apply.
The following table explains all the inserts used in the body, button and header sections shown above.
| Section | Insert value | Insert explanation |
|---|---|---|
| body | {% aggregate 17d214c4-5644-33b1-b0c6-9fab96b26b3e %}{% for item in aggregate_result %}{% catalogvar.store-1(item).image %}{{ catalog_result }}{% endcatalogvar %}{% endfor %}{% endaggregate %} |
The value of this insert is used as the value of {{1}} to return a product that the customer left in the cart and did not purchase within the estimated time period. |
| body | {% customer firstname %} |
The value of this insert is used as the value of {{2}}, so the name of a customer can be displayed in the message. |
| button | {% aggregate 17d214c4-5644-33b1-b0c6-9fab96b26b3e %}{% for item in aggregate_result %}{% catalogvar.store-1(item).url %}{{ catalog_result|replace('https://yourshop.com', '') }}{% endcatalogvar %}{% endfor %}{% endaggregate %} |
The value of this insert is used to return product url. Here we specify the URL omitting the domain, because we define the domain in the Meta platform, as you can see in the screenshot with the button creation. |
| header | {% aggregate 17d214c4-5644-33b1-b0c6-9fab96b26b3e %}{% for item in aggregate_result %}{% catalogvar.store-1(item).image %}{{ catalog_result }}{% endcatalogvar %}{% endfor %}{% endaggregate %} |
The value of this insert is used to return the url to the product image in the header. |
Add the finishing node
- Add the End node to the Send a template message node.
- To the Matched path, add the End node.
- In the upper right corner, click Save & Run.
Check the use case set up on the Synerise Demo workspace
You can check the aggregate and workflow configuration directly in Synerise Demo workspace.
If you don’t have access to the Synerise Demo workspace, please leave your contact details in this form, and our representative will contact you shortly.