Traffic dispatcher enabling the creation of a control group for multiple campaigns
A/B testing is a powerful tool for businesses to optimize their marketing campaigns. By testing different versions of a campaign with a randomly split audience, businesses can determine which version is more effective at achieving their desired outcome, such as increased conversions or engagement. This data-driven approach enables businesses to make informed decisions about their campaigns, improve their return on investment, and grow. Whether it’s testing different ad copy, visuals, or call-to-actions, A/B testing can help businesses fine-tune their marketing strategies and achieve greater success.
With our predefined Dynamic Content (DC) templates, you can easily create your own control group dispatcher. In this use case, we will use the DC campaign to run the dispatcher. The ready-to-use Java Script in the template will update the page body with data-test-snrs attribute according to predefined user allocation. The attribute can be later found in the customer profile with value A or B.
Prerequisites
- Implement a tracking code into your website.
Create dynamic content
The dispatcher will assign users to 2 groups in 2 areas:
- The group will be assigned as an attribute in the customer profiles. The attribute is called
test-snrsand takes the following values:- A - recommendation group (people in this group are able to see recommendations and personalized content),
- B - control group (people in this group should not get any recommendations and personalized content).
- It will add a
data-test-snrs(=”A” or =”B”) attribute to the page body, which you must use in any later campaign settings. You can find out more about this in the What’s next section.
- Go to Communication > Dynamic content > Create new.
- Enter the name of the dynamic content.
- Choose the Insert Object type.
- As the Audience, leave Everyone.
Define content
-
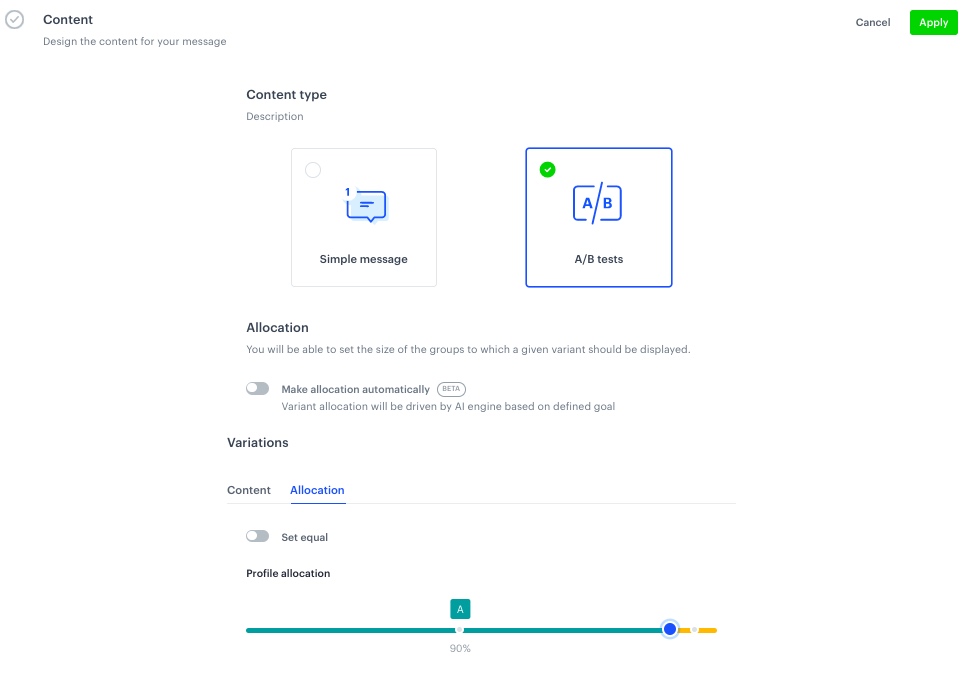
In the Content section, select A/B tests.
-
In the Variations section, click Allocation.
- Switch off the Set equal toggle.
- Set the Profile allocation to A-90% / B- 10%.
Manual profile allocation -
Switch back to Content and specify the CSS selector as Before (in div):
body > div. -
Click Create Message.
-
From the list of template folders, select a folder with the predefined script templates.
Result: You are redirected to the list of predefined templates.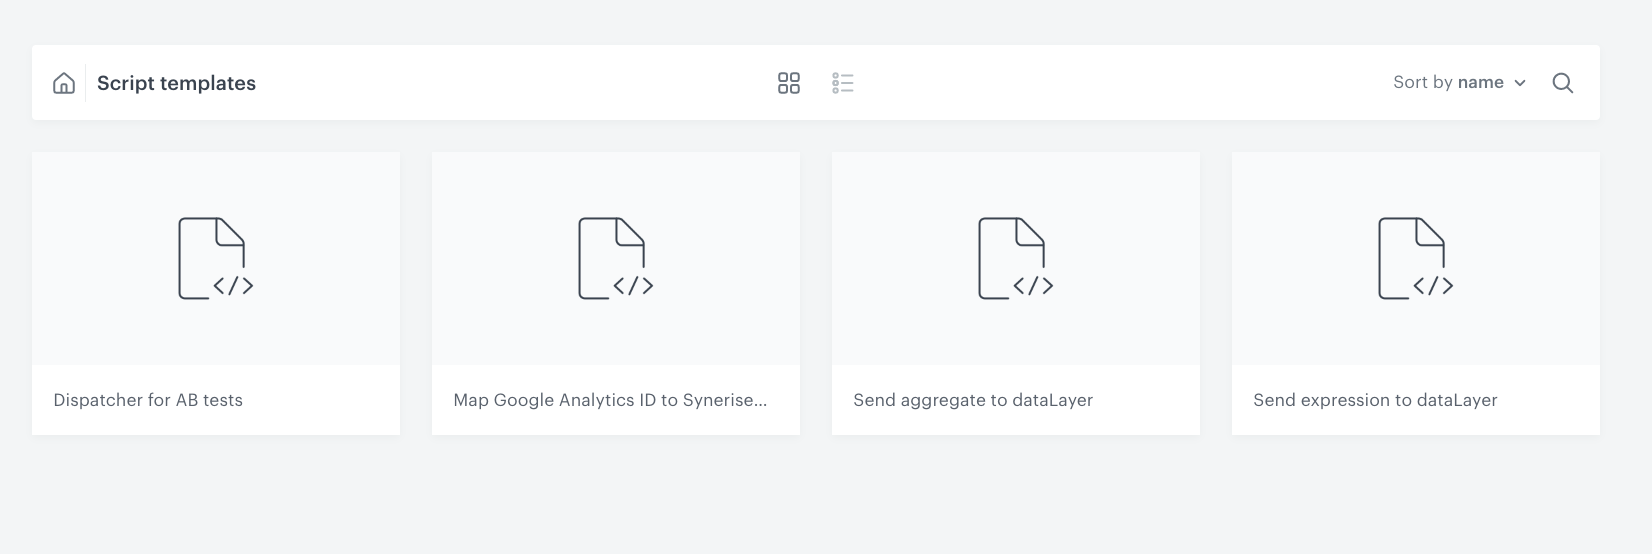
Script templates folder -
Select the Dispatcher for AB tests template.
Result: You are redirected to the template builder.Note: This template consists only of predifined JavaScript. When the customer is assigned to a group, there is always an attribute added to the body in your website HTML code that identifies in which group the customer is. -
Edit the form in the Config tab:
- From Variant to be assigned choose A.
- Click Next.
-
In the Content section, click Variant B and specify the CSS selector as Before (in div):
body > div. -
Click Create Message.
-
Repeat steps 5-6.
-
Edit the form in the Config tab:
- From Variant to be assigned choose B.
- Click Next.
-
Click Apply.
Define schedule and display settings
The dispatcher needs to be active all the time.
- In the Schedule section, click Define and choose Display immediately.
Important: If you have more that one dispatcher configured in your business profile (ex. for different percentages of audience) remember that two dispatchers cannot render on the website at the same time. In such case you need to make a delay for one of them. 1 second should be enough.
- Click Apply.
- In the Display Settings section, click Define.
- As the trigger, leave On landing.
- Skip the Advanced options configuration.
- Click Apply.
- Click Activate.
What’s next
The above DC campaign gives the data-test-snrs (=”A” or =”B”) attribute to the page body.
You can see the attributes in client profile in the Profiles Module. You can use this attribute in all sorts of analytics.
In order to send any DC campaigns to a recommendation group (group A), selector body[data-test-snrs="A"] should be placed in the campaign Content section, before the place where you want to render your DC campaign.

There must be a space after body[data-test-snrs="A"].
Example:
body[data-test-snrs="A"] .catalogsearch-result-index .message.notice
After (in div) can be modified depending on your business needs.
Check the use case set up on the Synerise Demo workspace
You can check the dynamic content configuration directly in Synerise Demo workspace.
If you don’t have access to the Synerise Demo workspace, please leave your contact details in this form, and our representative will contact you shortly.