
Tiered loyalty program
Tiered loyalty programs are a way to reward customers based on their level of interaction with your brand. We can help you create a structure that allows all members to enjoy benefits, but also ranks them into groups based on the total transaction value. This creates an environment of member engagement and loyalty that increases word-of-mouth recommendations and customer lifetime values.
Use case assumptions
-
Loyalty program is created for customers who have created an account (online and/or in point of sales (POS)).
-
Customers will be assigned to one of the four levels (tiers) of the loyalty program based on the total balance value (transactions value minus the value of returns) from the last 365 days.
- White (transactions under 300 PLN)
- Green (transactions from 300 PLN to 999,99 PLN)
- Silver (transactions from 1000 PLN to 1999,99 PLN)
- Golden (transactions above 2000 PLN)
-
Making a transaction of a specific amount lets you go automatically to the higher level.
-
Being in the specific group makes it possible to use specific discounts for your shopping (it can be for example 5% for Green, 8% for Silver, and 10% for Golden).
-
The process involves creating an expression that returns the number of the tier to which a customer belongs: 1 for White, 2 for Green, 3 for Silver, 4 for Golden. Further on, we create a segmentation that is divided into four segments (White, Green, Silver, Golden); the customers are assigned to each segment based on the result of the expression. You can use these segments in your communication.
Prerequisites
- Implement transaction events using SDK or API.
- Implement the custom event which is sent to Synerise when a customer joins a loyalty program (for example, the
loyaltyStatusevent with astatusparameter set toactive). Such an event with the appropriate status must be sent each time the membership status changes (when the customer resigns from the program or joins again).Note: In this case, when a customer joins the loyalty program, a custom event is generated on their profile card. However, these conditions and the scenario can be adapted to your business needs, for example, you can count the customers who joined the loyalty program using the registration event in the mobile application or on the website. - Implement the custom event which is sent to Synerise when a customer returns products (for example, the
product.returnevent with the$totalAmountparameter that contains the value of products which are returned). Such an event with the appropriate parameter must be sent each time the customer returns the products.
Process
The process of creating the tiered loyalty program based on the transactions value is divided into the following steps:
- Prepare an aggregate which returns the time of joining the loyalty program.
- Prepare an aggregate that counts the total transaction value.
- Prepare an aggregate that counts the value of returns.
- Prepare an expression counting the balance of a customer (transaction value minus the value of returns).
- Prepare an expression that returns the tier number to which a customer belongs to.
- Create a segmentation of customers in tiers of customers based on their loyalty level, which you can use to analyze the number of customers in tiers.
Prepare an aggregate which returns the time of joining the loyalty program
Start with creating an aggregate that returns the time of the first occurrence of the loyaltyStatus event. We recommend setting the analyzed period to Lifetime.
- Go to
 Analytics > Aggregates > New aggregate.
 - Enter the name of the aggregate.
- As the type of the aggregate, select First.
- Select the event
loyaltyStatus. - As a parameter, choose Timestamp.
- Select status.
- Use the Equal (String) operator and as the value, enter
active. - Set the analyzed period to Lifetime.
- Click Save.

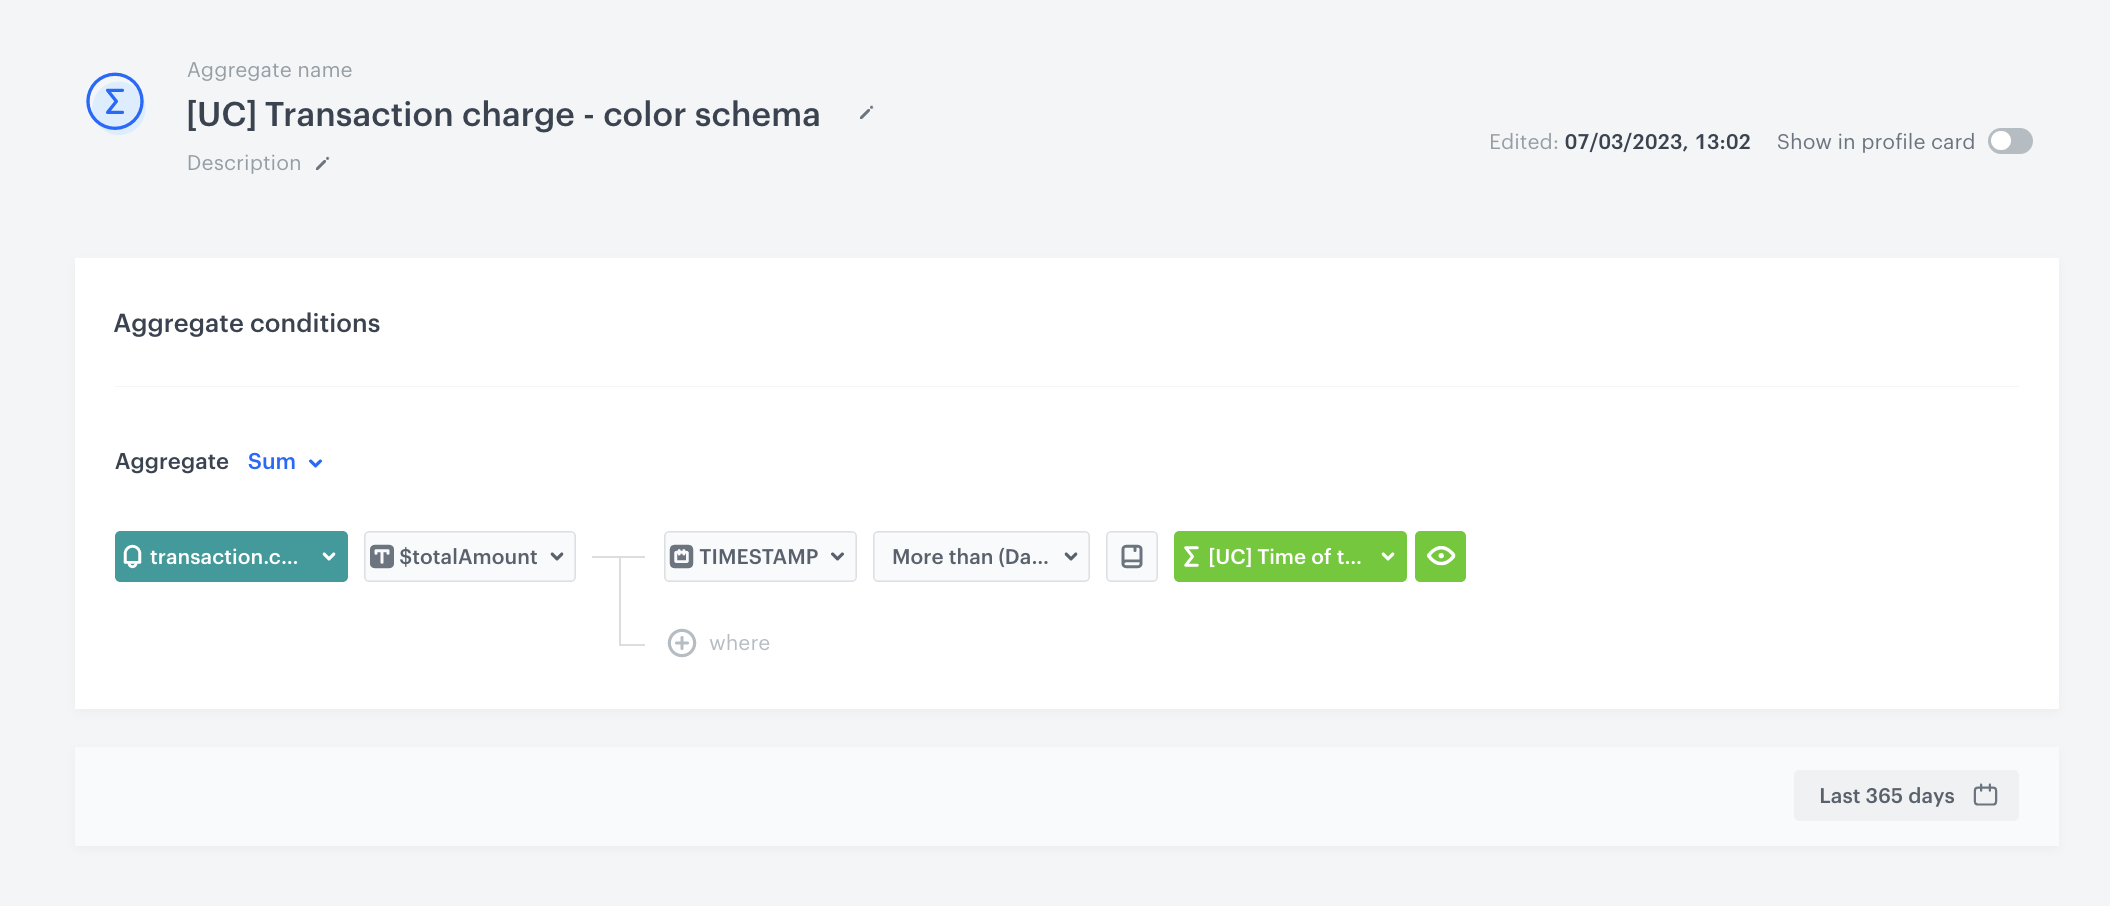
Prepare an aggregate that counts the total transaction value
In this part of the process, create an aggregate which counts the total value of transactions for a particular customer. It will be counted from the date of joining the loyalty program, but no longer than 365 days backwards from the current date.
- Go to Analytics > Aggregates > New aggregate.
- Enter the name of the aggregate.
- As the type of the aggregate, select Sum.
- Select the transaction.charge event.
- As the event parameter, select
$totalAmount, then choose TIMESTAMP. - Use operator More than (Date) and as the value add the aggregate which you have created in the previous step.
- Set the analyzed period to Last 365 days.
- Save the aggregate.
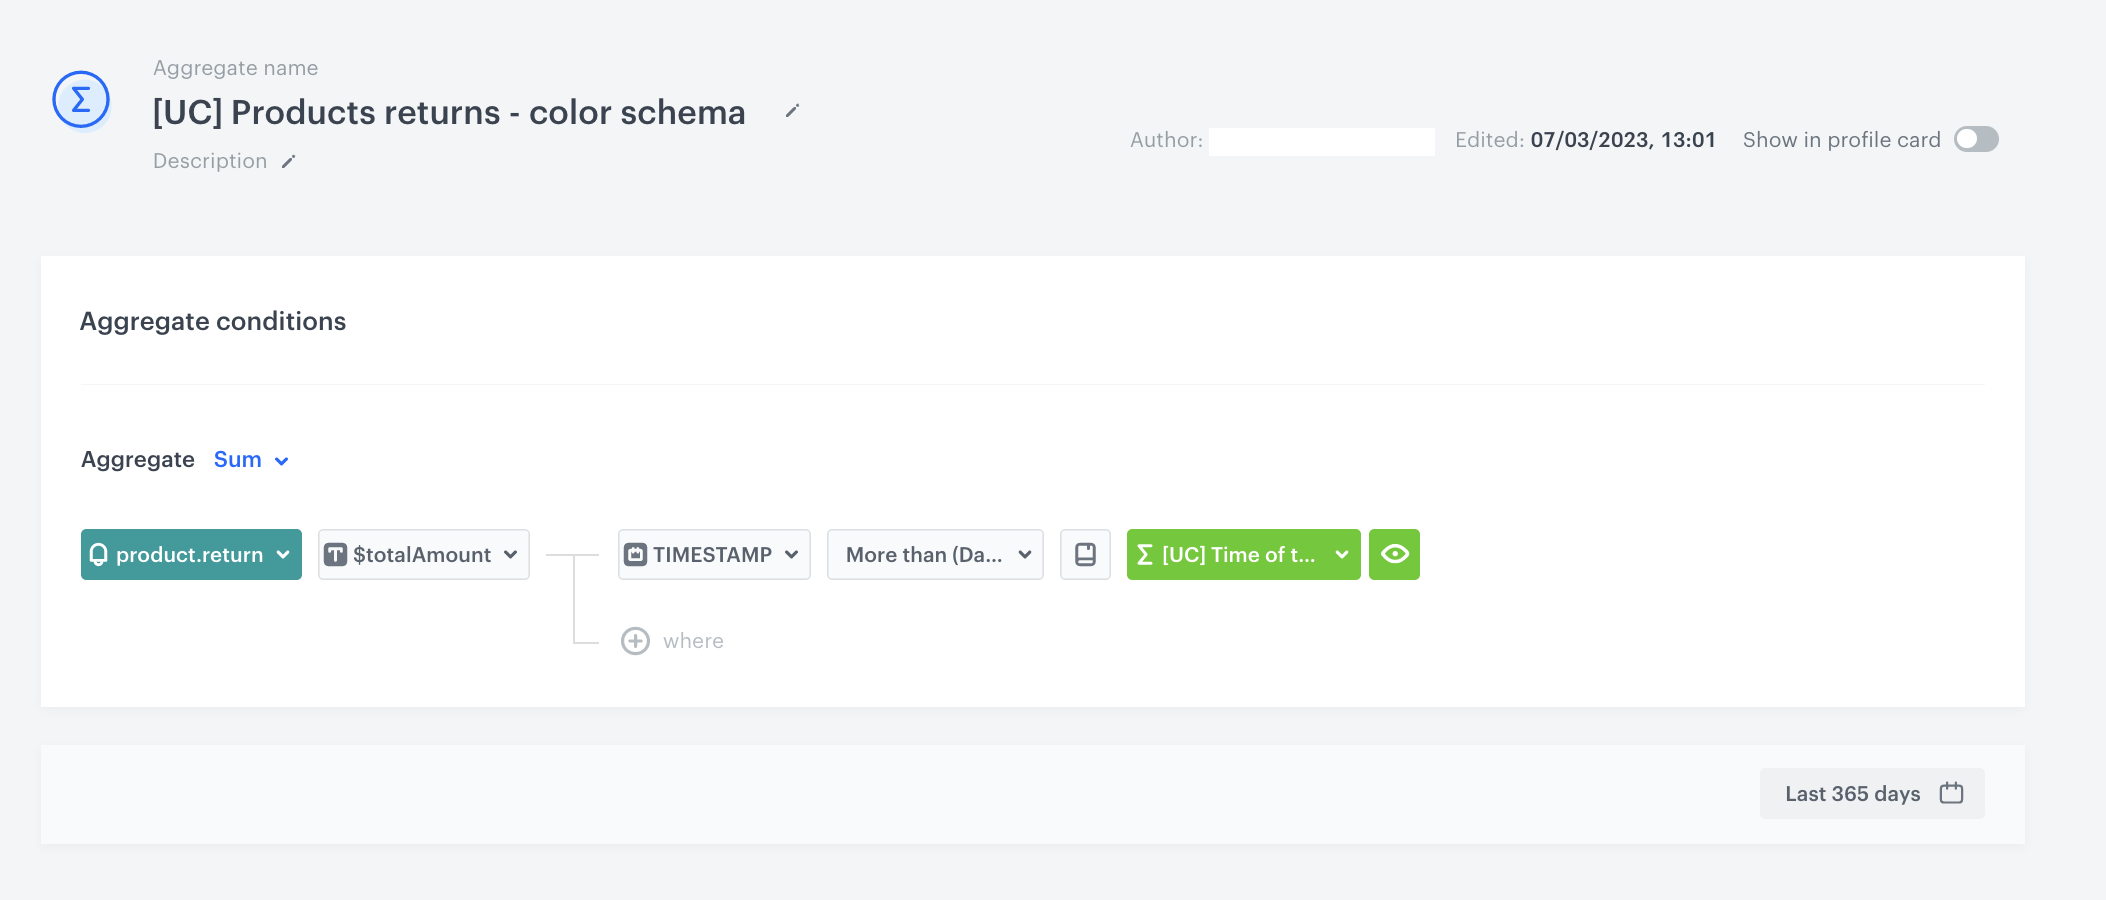
Prepare an aggregate that counts the value of returns
In this stage of the process, create an aggregate that counts the total value of returns made by a customer. It will be counted from the date of joining the loyalty program, but no longer than 365 days backwards from the current date.
- Go to Analytics > Aggregates > New aggregate.
- Enter the name of the aggregate.
- As the type of the aggregate, select Sum.
- Select the product.return event.
- As the event parameter, select
$totalAmount, then choose TIMESTAMP. - Use operator More than (Date) and as the value add the aggregate which you have created in the previous step.
- Set the analyzed period to Last 365 days.
- Save the aggregate.
Prepare an expression counting the balance
In this part of the process, prepare an expression which counts the account balance for a specific customer. The formula of the expression is a mathematical operation which deducts the value of returns from the total value transactions.
- Go to Analytics > Expressions > New expression.
- From the Expressions for dropdown list, select Attribute.
- Build the following formula of the expression:
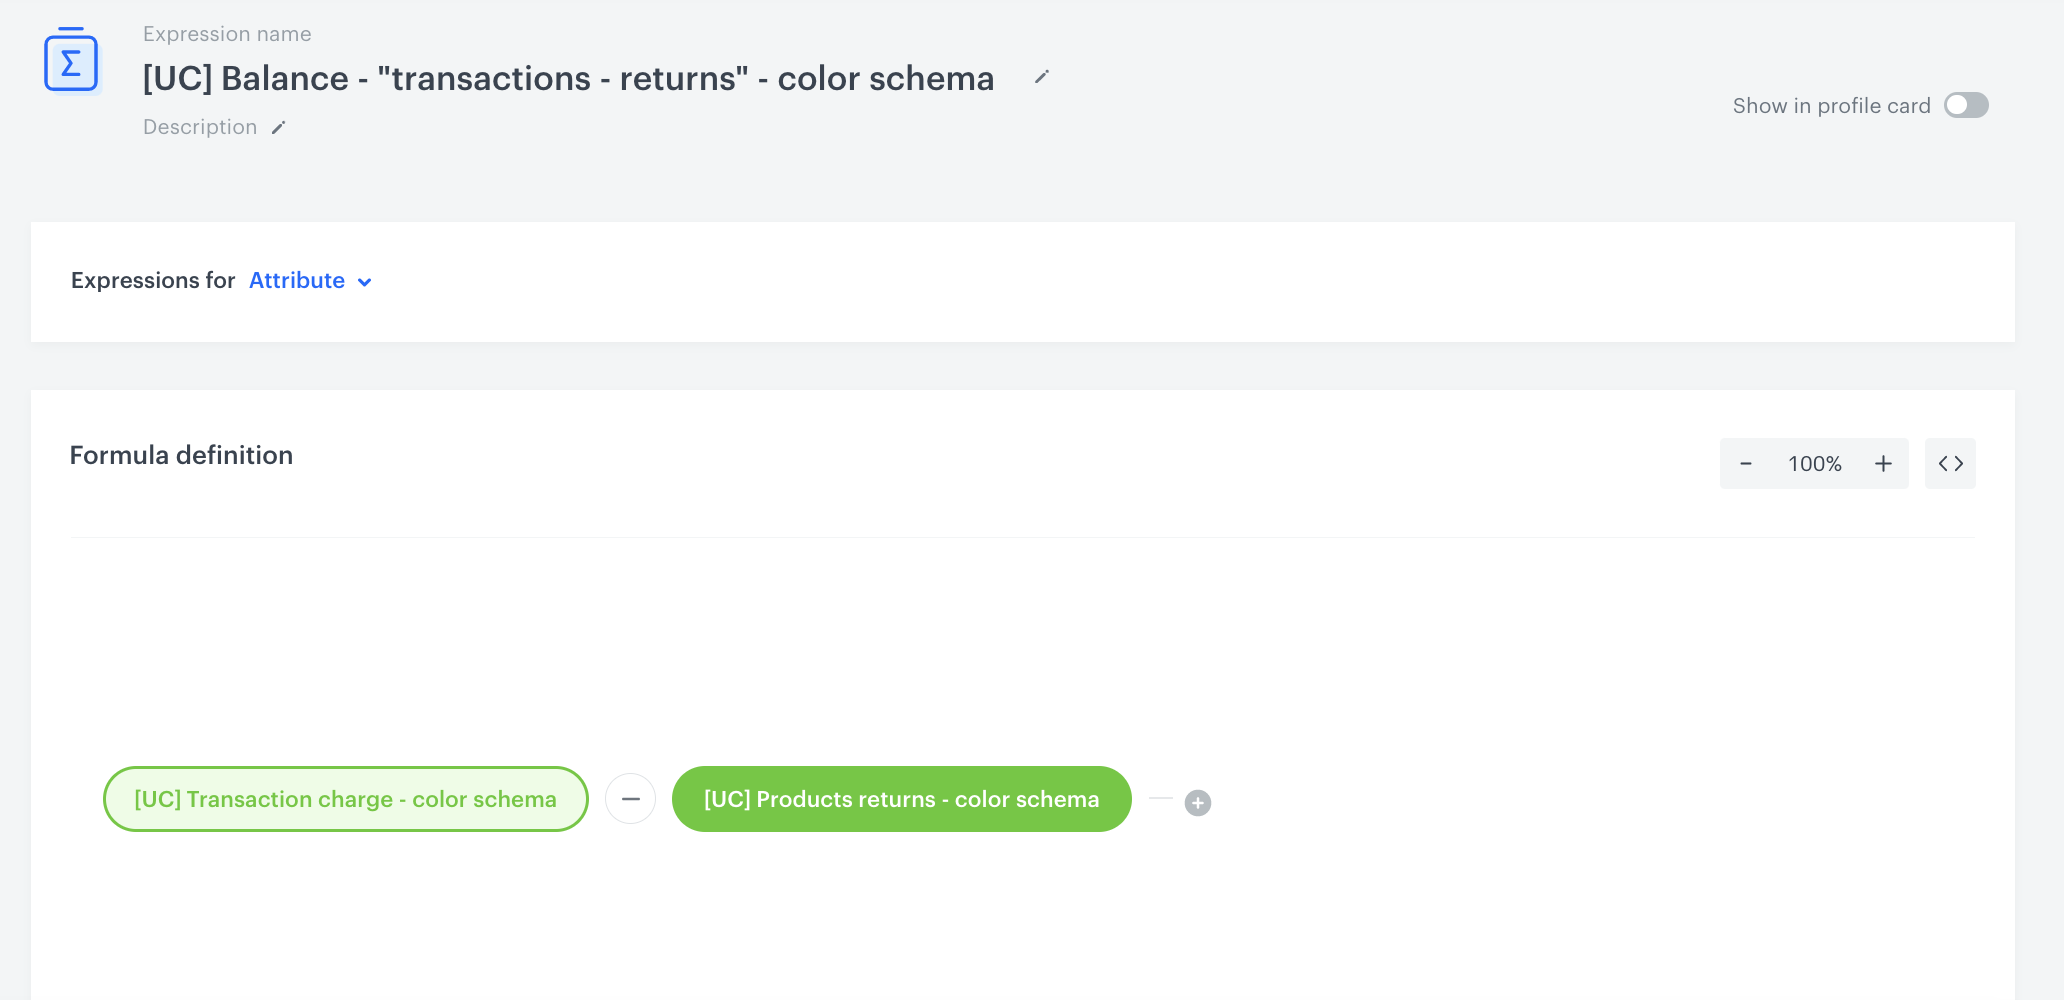
Formula of the expression - Save the expression.
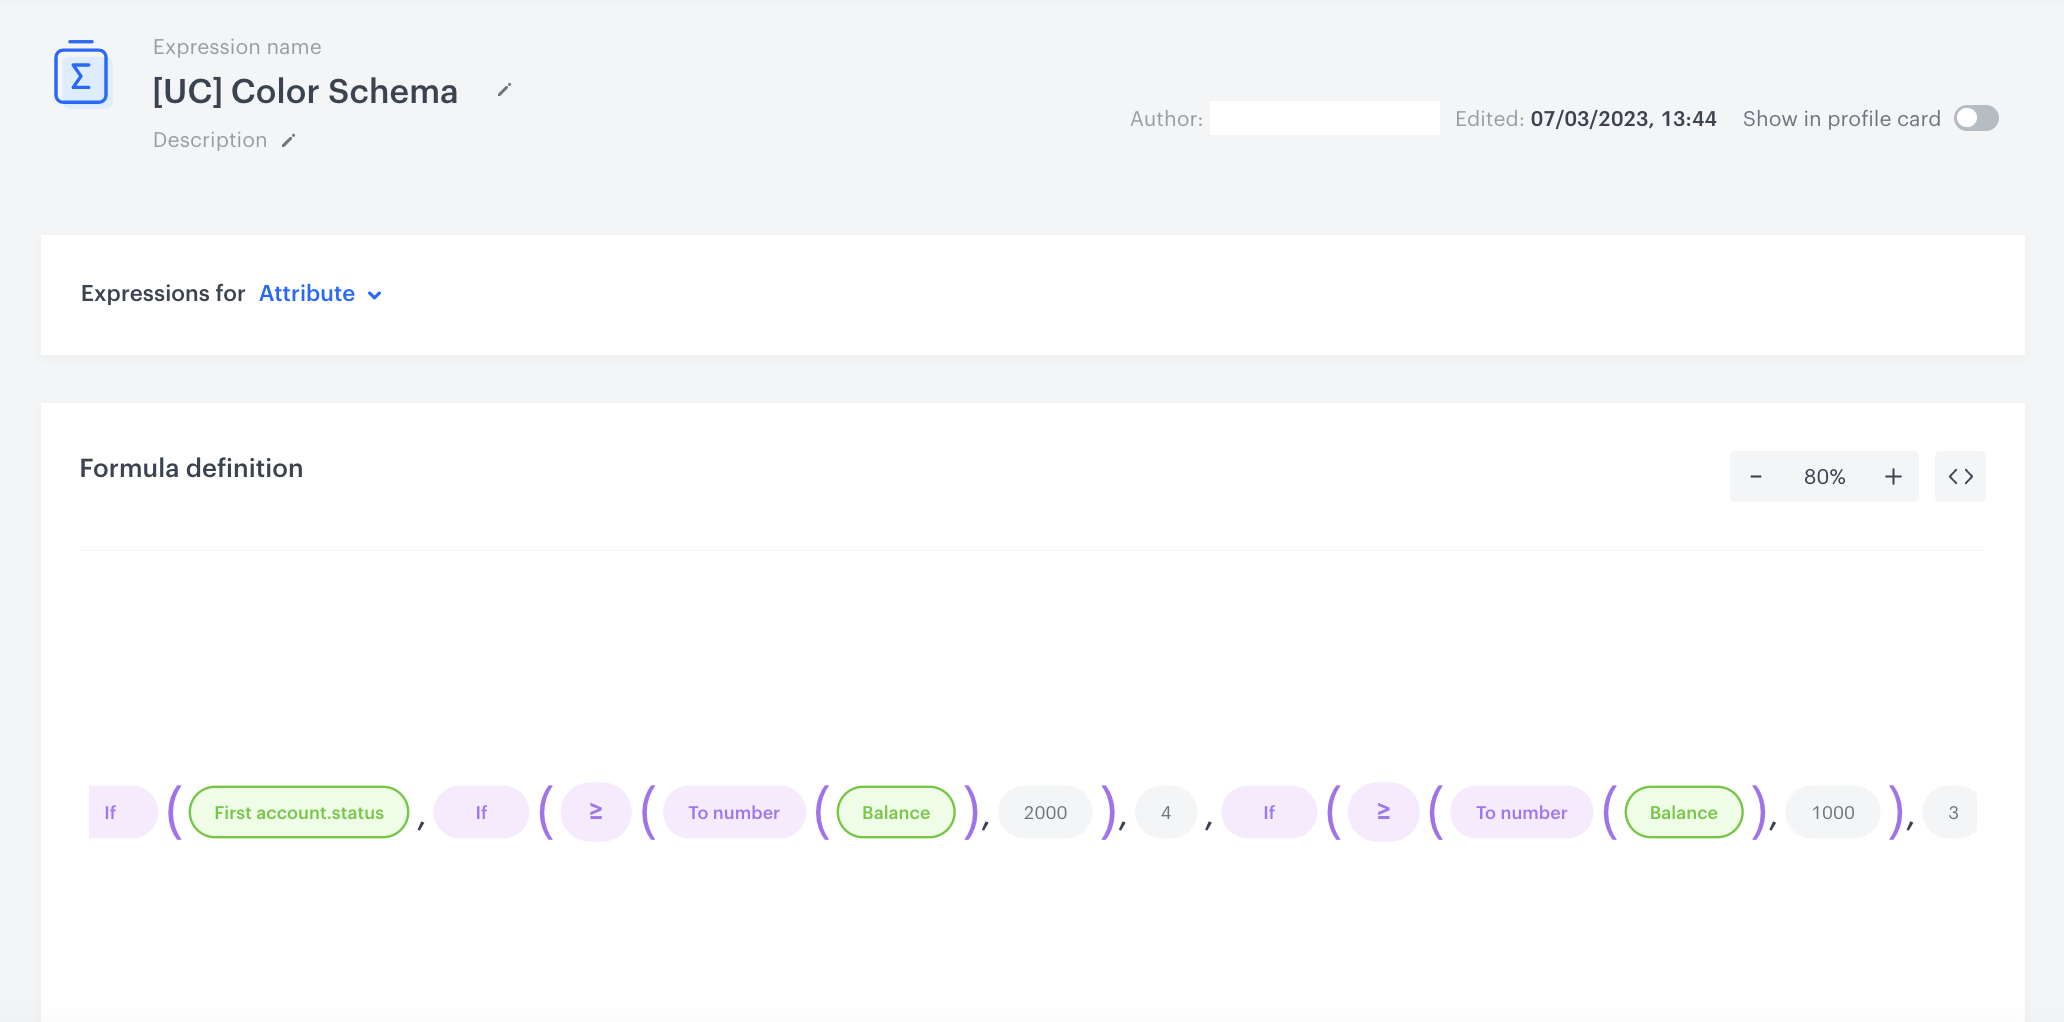
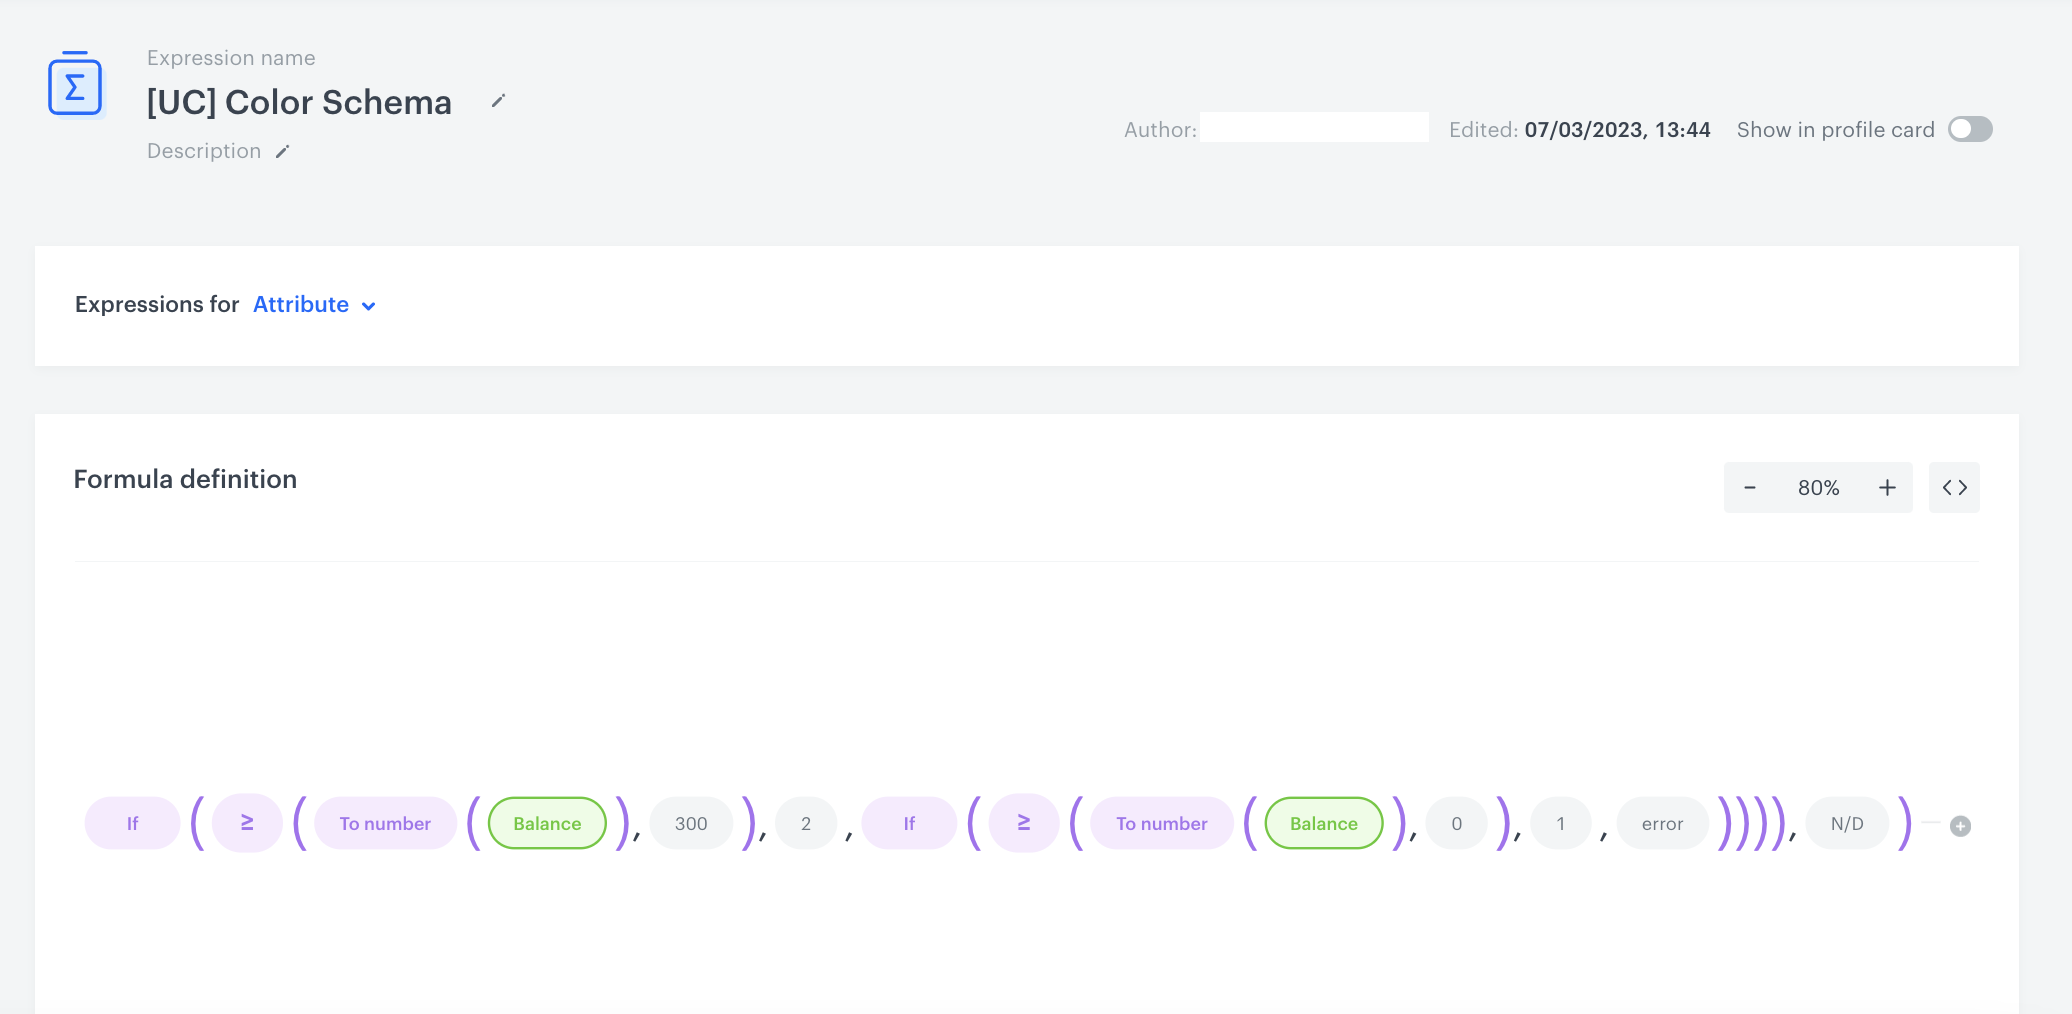
Prepare an expression that returns the tier number
Prepare the expression which returns the numerical value (from 1 to 4) which signifies the tier to which a customer belongs to. If the expression returns:
1- the customer belongs to theWhitetier (transactions under 300 PLN)2- the customer belongs to theGreentier (transactions from 300 PLN to 999,99 PLN)3- the customer belongs to theSilvertier (transactions from 1000 PLN to 1999,99 PLN)4- the customer belongs to theGoldentier (transactions above 2000 PLN)
The expression checks if the customer is part of a loyalty program, and then checks if they meet the conditions to join the highest level of the loyalty program. If not, conditions for the next level are checked, and so on until the lowest level. In the case of an error in the dat or when the customer is not assigned to any group, the expression returns error.
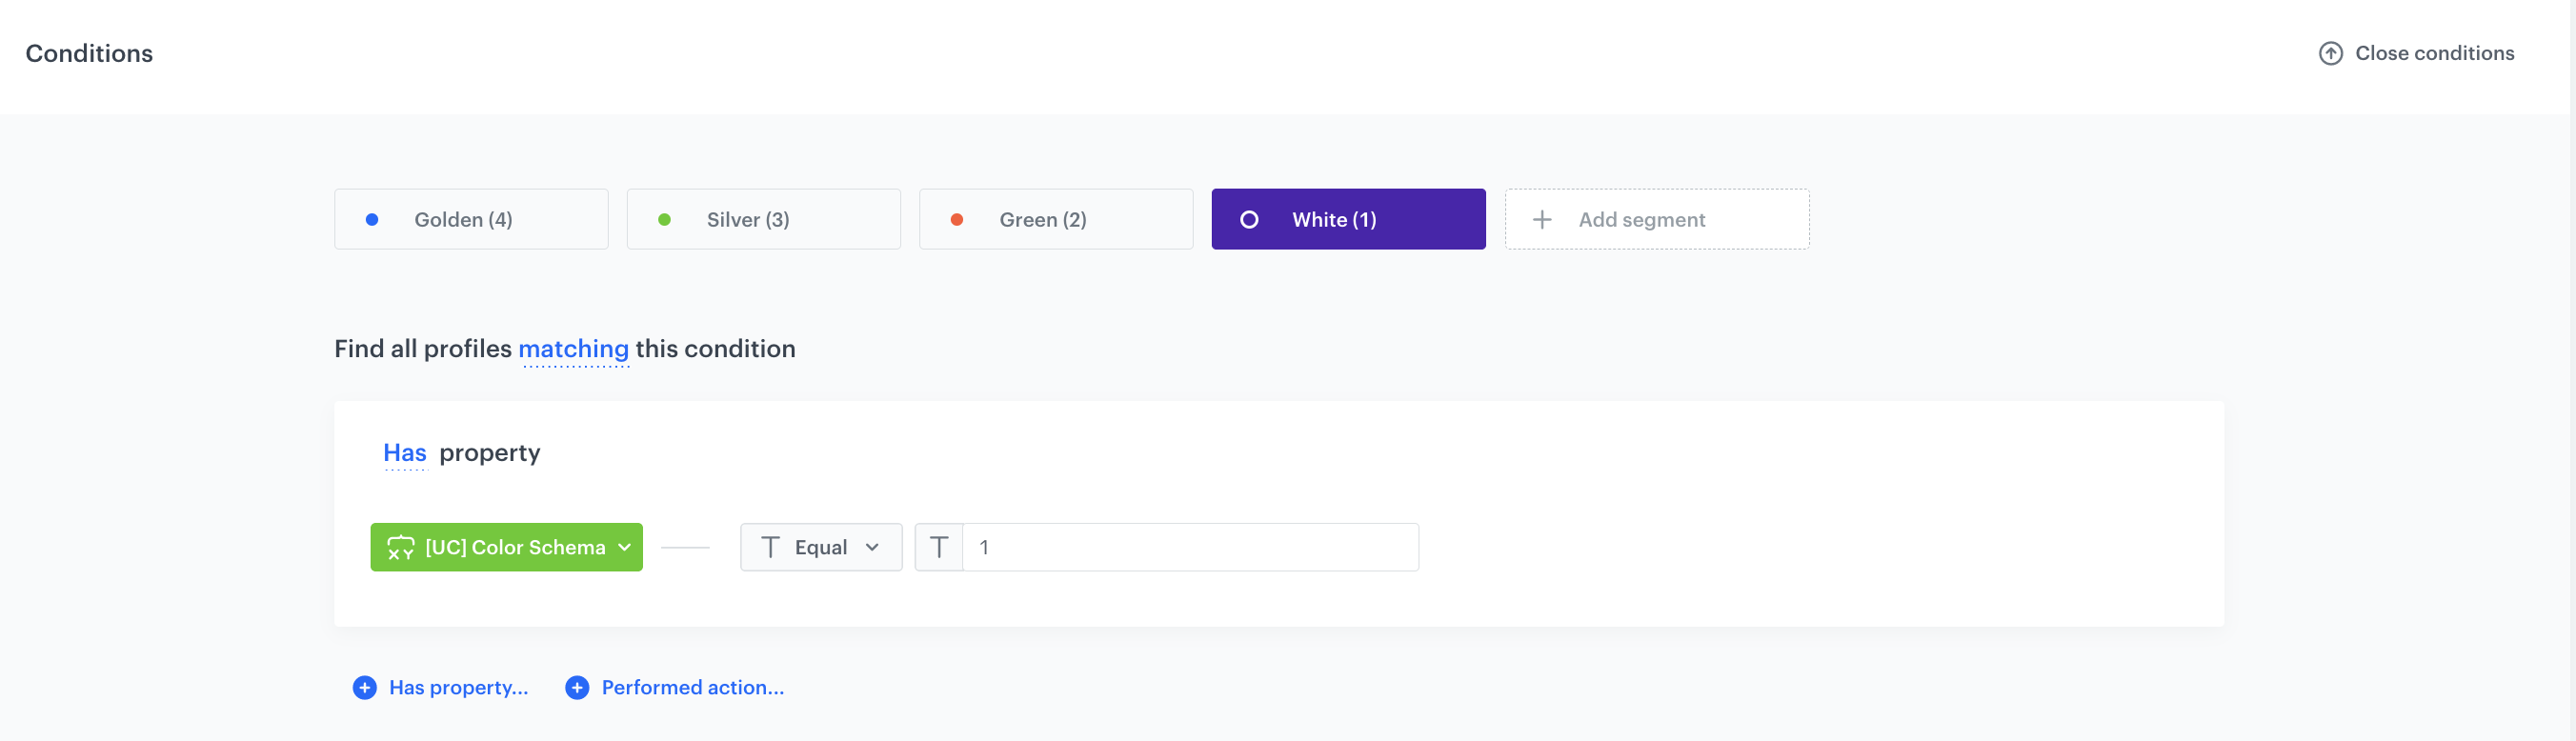
Create a segmentation of customers in tiers
As the next step, you can prepare a segmentation of customers who belong to the loyalty program. The segmentation will consist of 4 segments (white, green, silver, golden) and the customers will be assigned to each segment based on the result of the expression that returns the tier number they received.
- Go to Analytics > Segmentations v2 > New Segmentation.
- Enter the name of the segmentation.
- Choose Has property.
- From the dropdown list, find the expression that returns the tier number you have created in the previous part of the process.
- Select the Equal operator.
- In the text field, enter the number that signifies a tier. In our case, enter
4to include only customers from theGoldentier (total balance is equal or greater than 2000 PLN). - Set the name of the segment, for example
Golden. - Hover a mouse cursor over the segment and click the Duplicate option.
- Repeat steps 3-6 for the remaining 3 tiers. Enter the following values for the next segments:
3(for the Silver tier segment),2(for the Green tier segment),1(for the White tier segment). - Save the segmentation.
4 for the Golden tier).What’s next
This use case describes the basic assumptions of creating 4 tiers of loyalty. You can expand it by adding additional conditions, for example:
- Avoid abuse - You can add a condition based on which the customers who have spent a certain amount can advance to a higher level and benefit from discounts only after the maximum return period has expired (for example, 30 days).
- Set up a billing cycle - Suggested to be set to 12 months from achieving a particular level. During this time, a customer must make purchases for an amount specified in the terms and conditions to maintain the given level.
- Set up account validity - Consider account validity, for example, 3 years from creating an account. During this time, a customer must confirm/update their data and meet other requirements such as making a certain number of transactions to maintain the account status.
Check the use case set up on the Synerise Demo workspace
You can check all the analytics directly in the Synerise Demo workspace:
- aggregate returning the time of joining the loyalty program
- aggregate returning the total value of transactions for a specific customer
- aggregate returning the total value of returns for a particular customer
- expression returning the balance for specific customer
- expression which returns the numerical value of a tier a customer belongs to
- example segmentation that divides customers into four tiers in the loyalty program.
If you don’t have access to the Synerise Demo workspace, please leave your contact details in this form and our representative will contact you shortly.
Read more
Check our loyalty use cases:
- Award loyalty points for reaching a specific number of transactions
- Promotion for the first transaction after joining the loyalty program
- Promotion triggered by basket value
- Rewarding customers in loyalty program for custom activities
- Send mobile push notifications with birthday promotion
- Transfer loyalty points between customers