Promotion for the first transaction after joining the loyalty program
It is very important to engage new users who have just joined your in-app loyalty program and encourage them to make purchases. For this purpose, you can use a push notification that will automatically notify them about a promotion in the application that will give them a discount on their first purchase. This is a good way to generate profits, especially if the promotion is time limited and the first purchases must be made within a certain period.
This approach can lead to boosting customer satisfaction, increasing revenue and customer loyalty to your business.
In this use case, we will create a promotion for new loyalty program members and a workflow which will send a mobile push notification with the information about the special promotion in the mobile app (10% discount for the whole cart). The promotion will be available for 14 days from the date of joining the loyalty program and can be used only once.
Prerequisites
- Implement Synerise SDK in your mobile app.
- Implement the promotion module in your mobile application and through API.
- Implement mobile pushes in your mobile application: iOS, Android.
- Collect the custom event which sends information to Synerise about joining a loyalty program (for example
account.statuswith parameteraccountStatusequal toactive). Such an event with the appropriate status should be sent each time the membership status changes (when the customer resigns from the program or joins again).
Process
In this use case, you will go through the following steps:
- Create aggregates which return the time of joining the loyalty program and current status of customer’s membership.
- Create a segmentation of customers who have your mobile app and joined the loyalty program during last 14 days.
- Create a promotion.
- Prepare a mobile push notification with information about the promotion.
- Create a workflow to send the mobile push.
Create aggregates
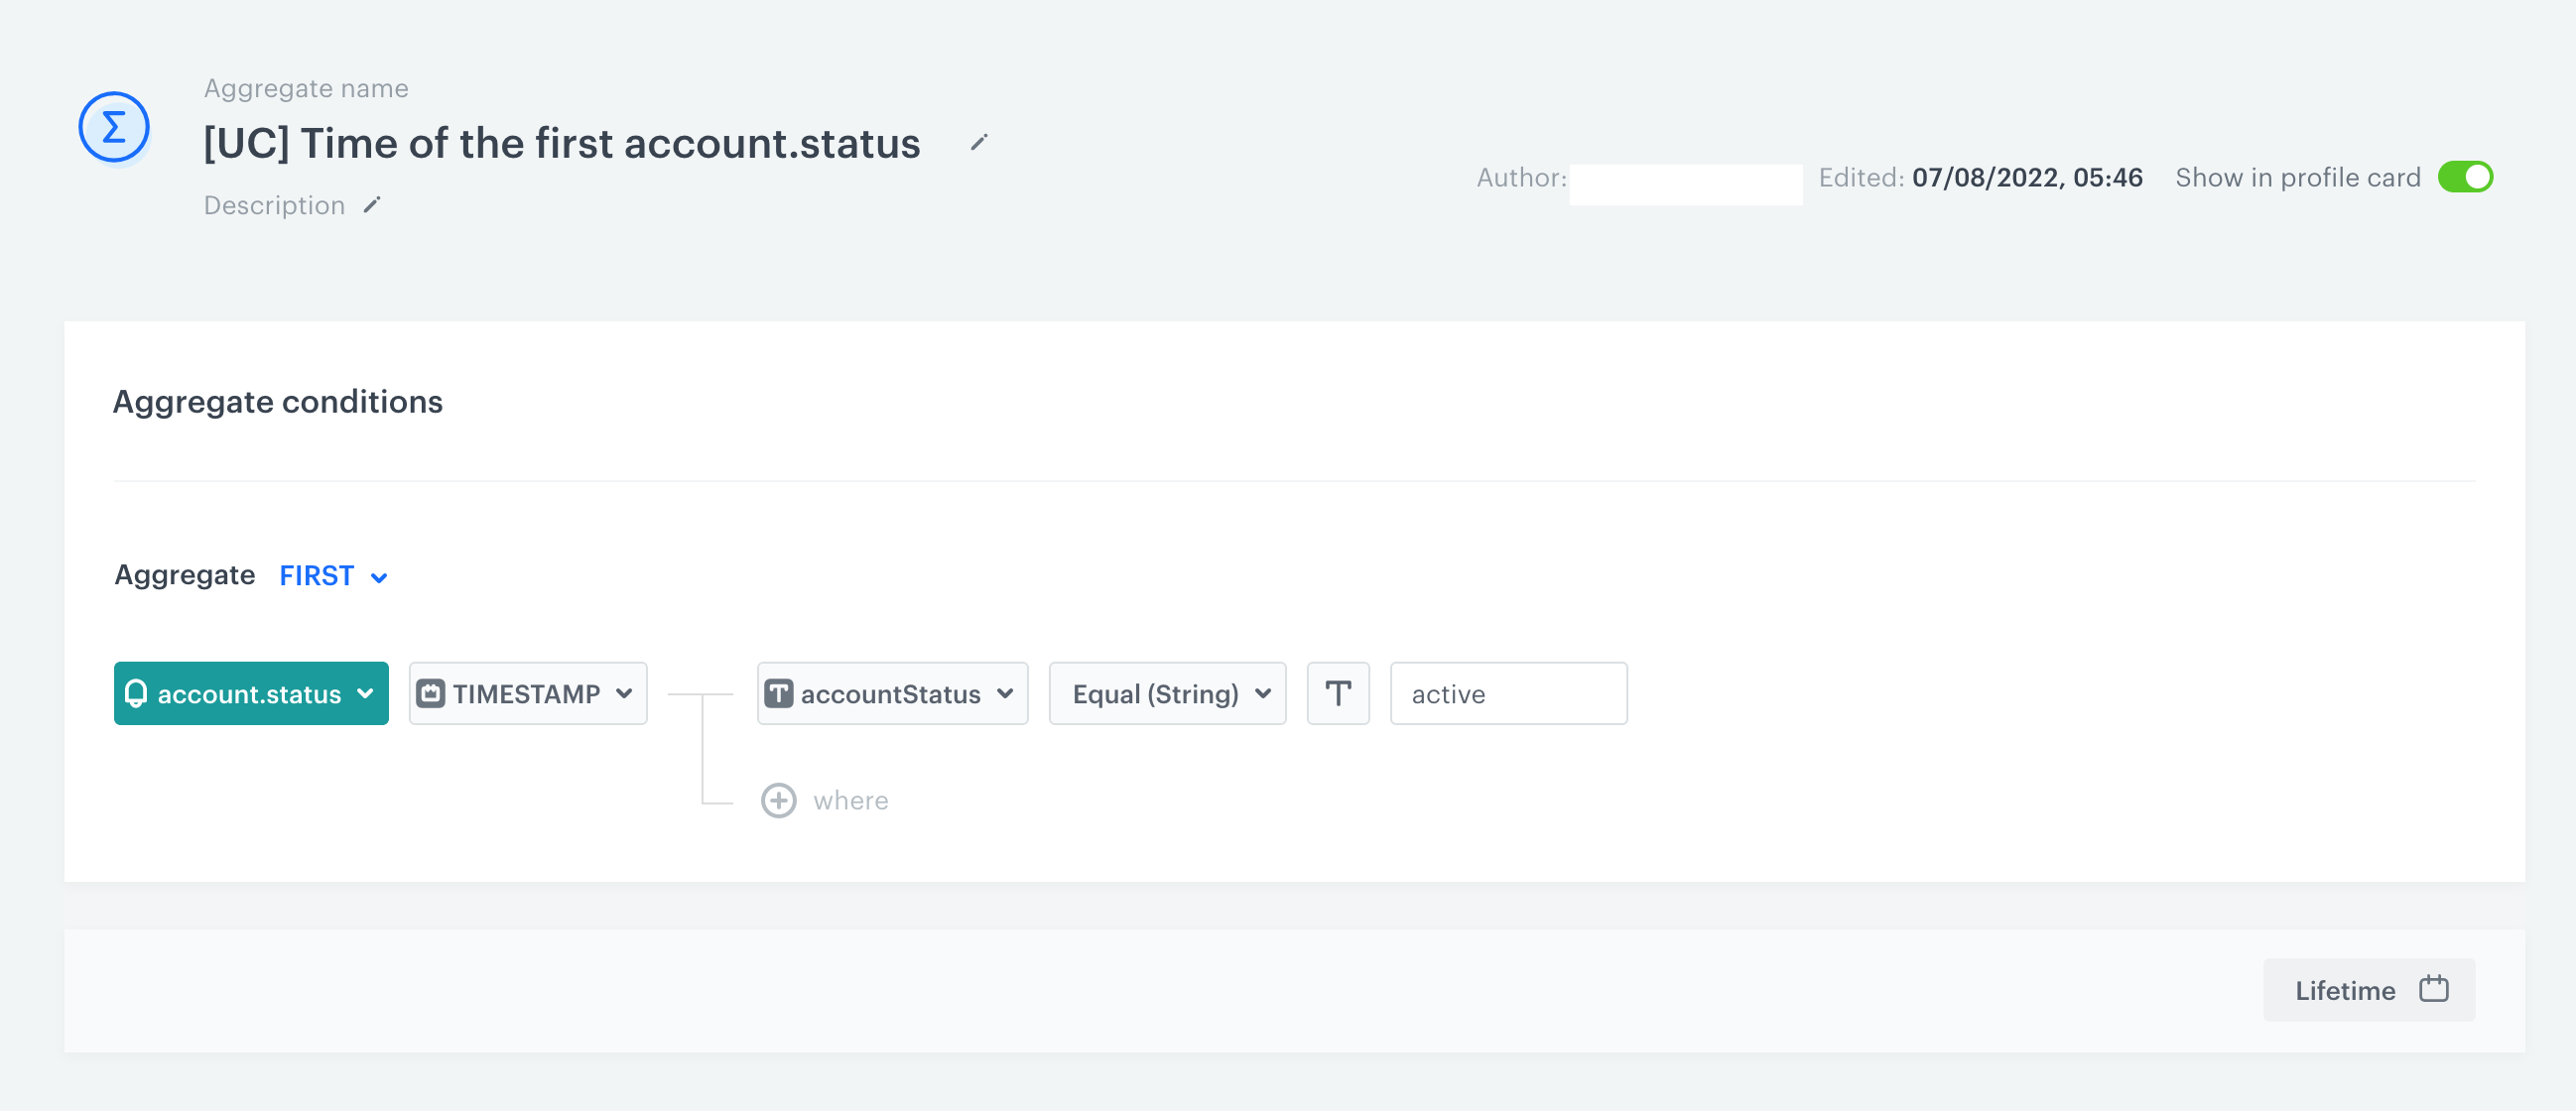
Time of joining the loyalty program
Start with creating an aggregate that returns the time of the first occurrence of the account.status event.
- Go to
 Analytics > Aggregates > New aggregate.
 - Enter the name of the aggregate.
- As the type of the aggregate select First.
- Select the event
account.status. - As a parameter choose Timestamp.
- Select the accountStatus.
- Use operator equal and add as the value
active. - Define the period for the event as Lifetime.
- Save the aggregate.
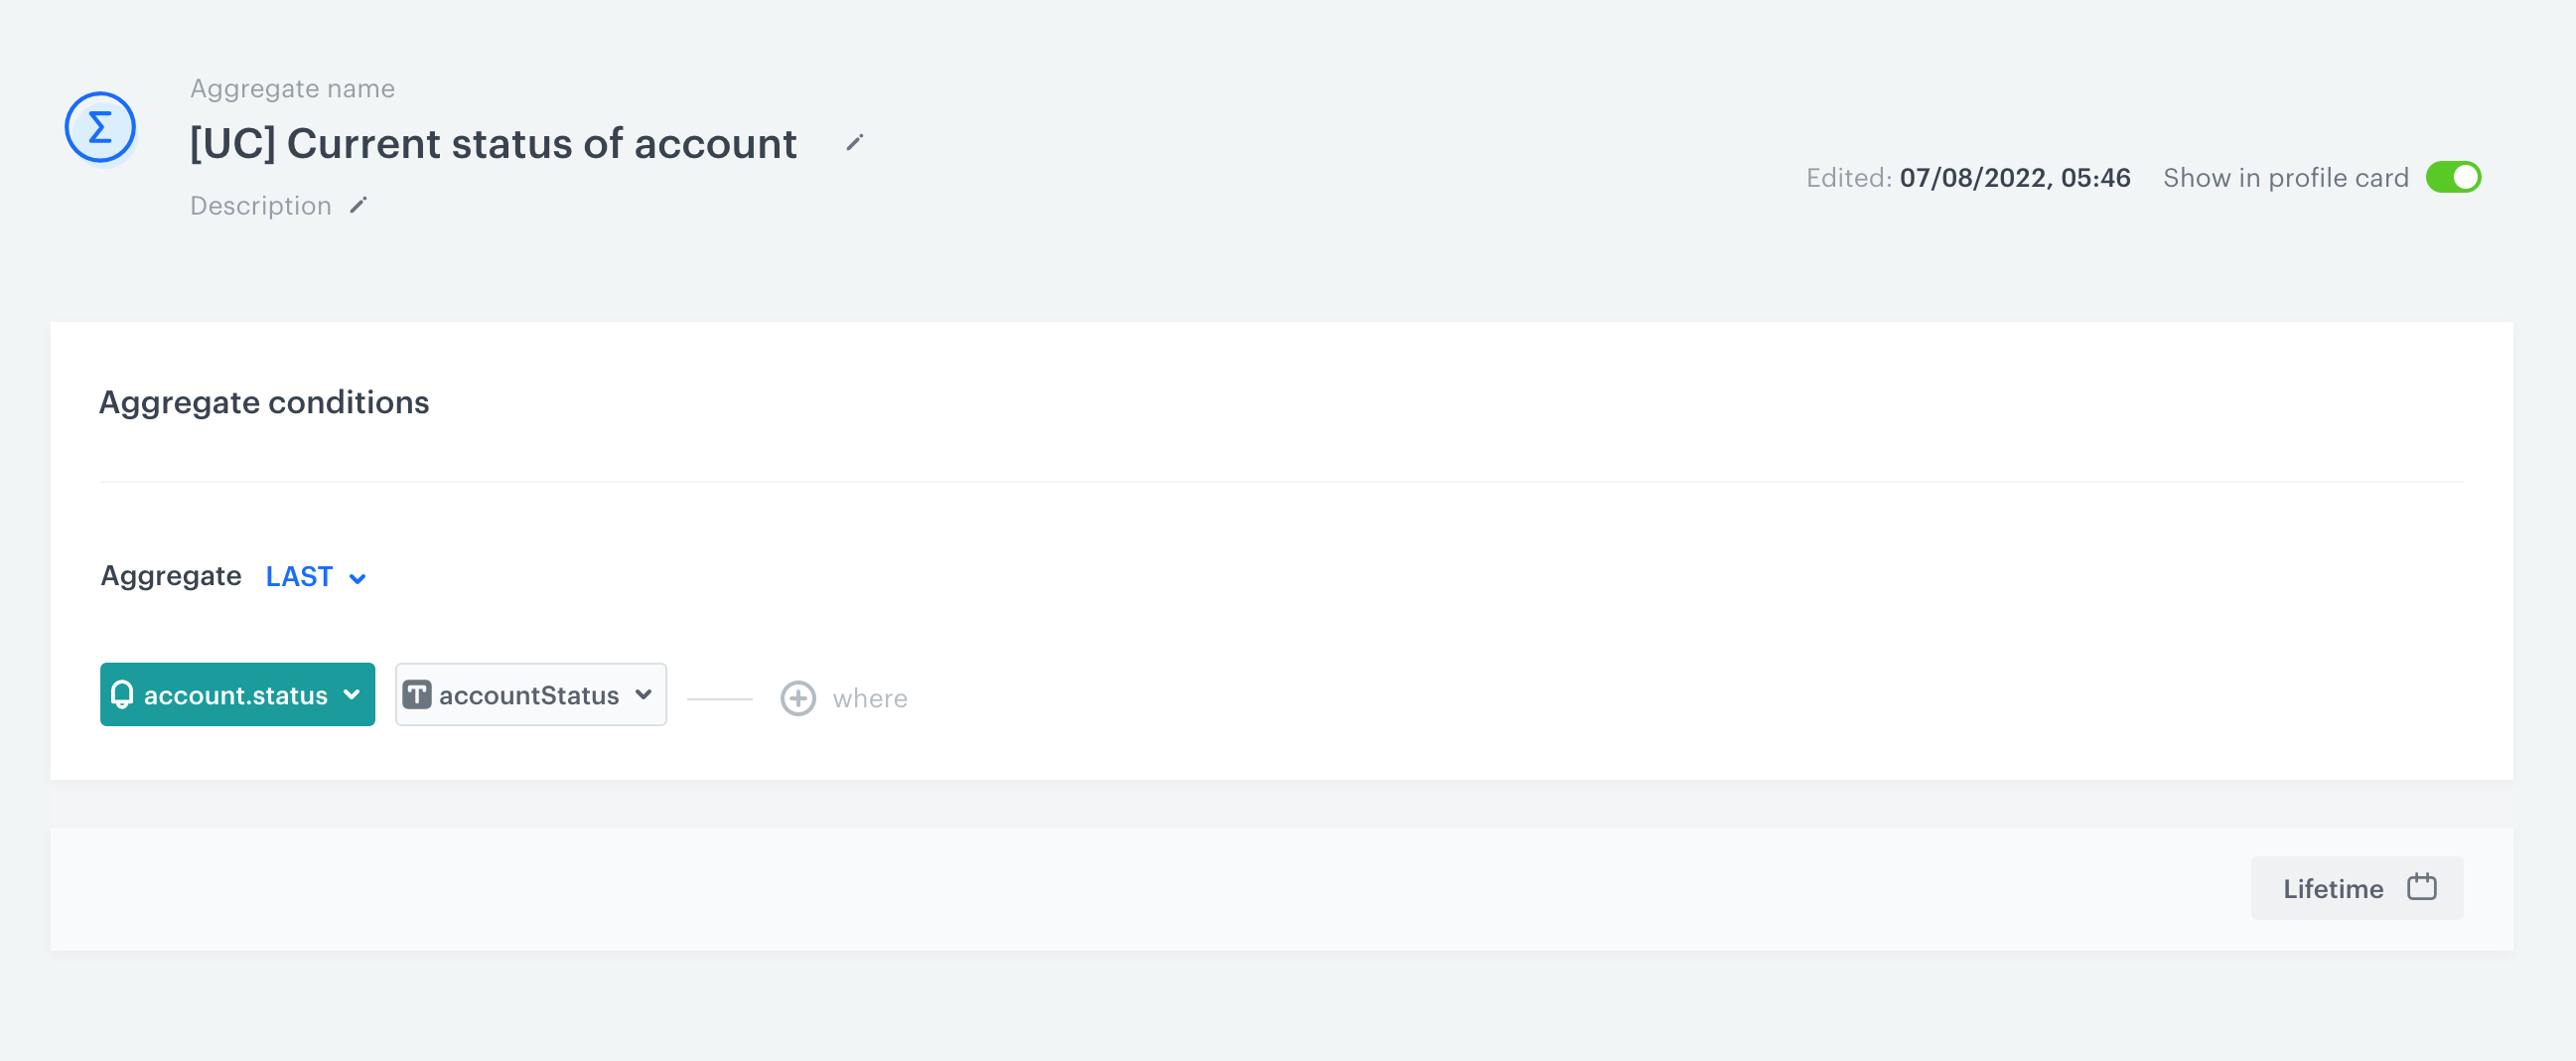
Current status of the membership
Create the second aggregate analyzing the current status of the customer’s membership.
- Go to Analytics > Aggregates > New aggregate.
- Enter the name of the aggregate.
- As the type of the aggregate select Last.
- Select the event account.status.
- As a parameter choose accountStatus.
- Define the period for the event as Lifetime.
- To save the aggregate, click Save.
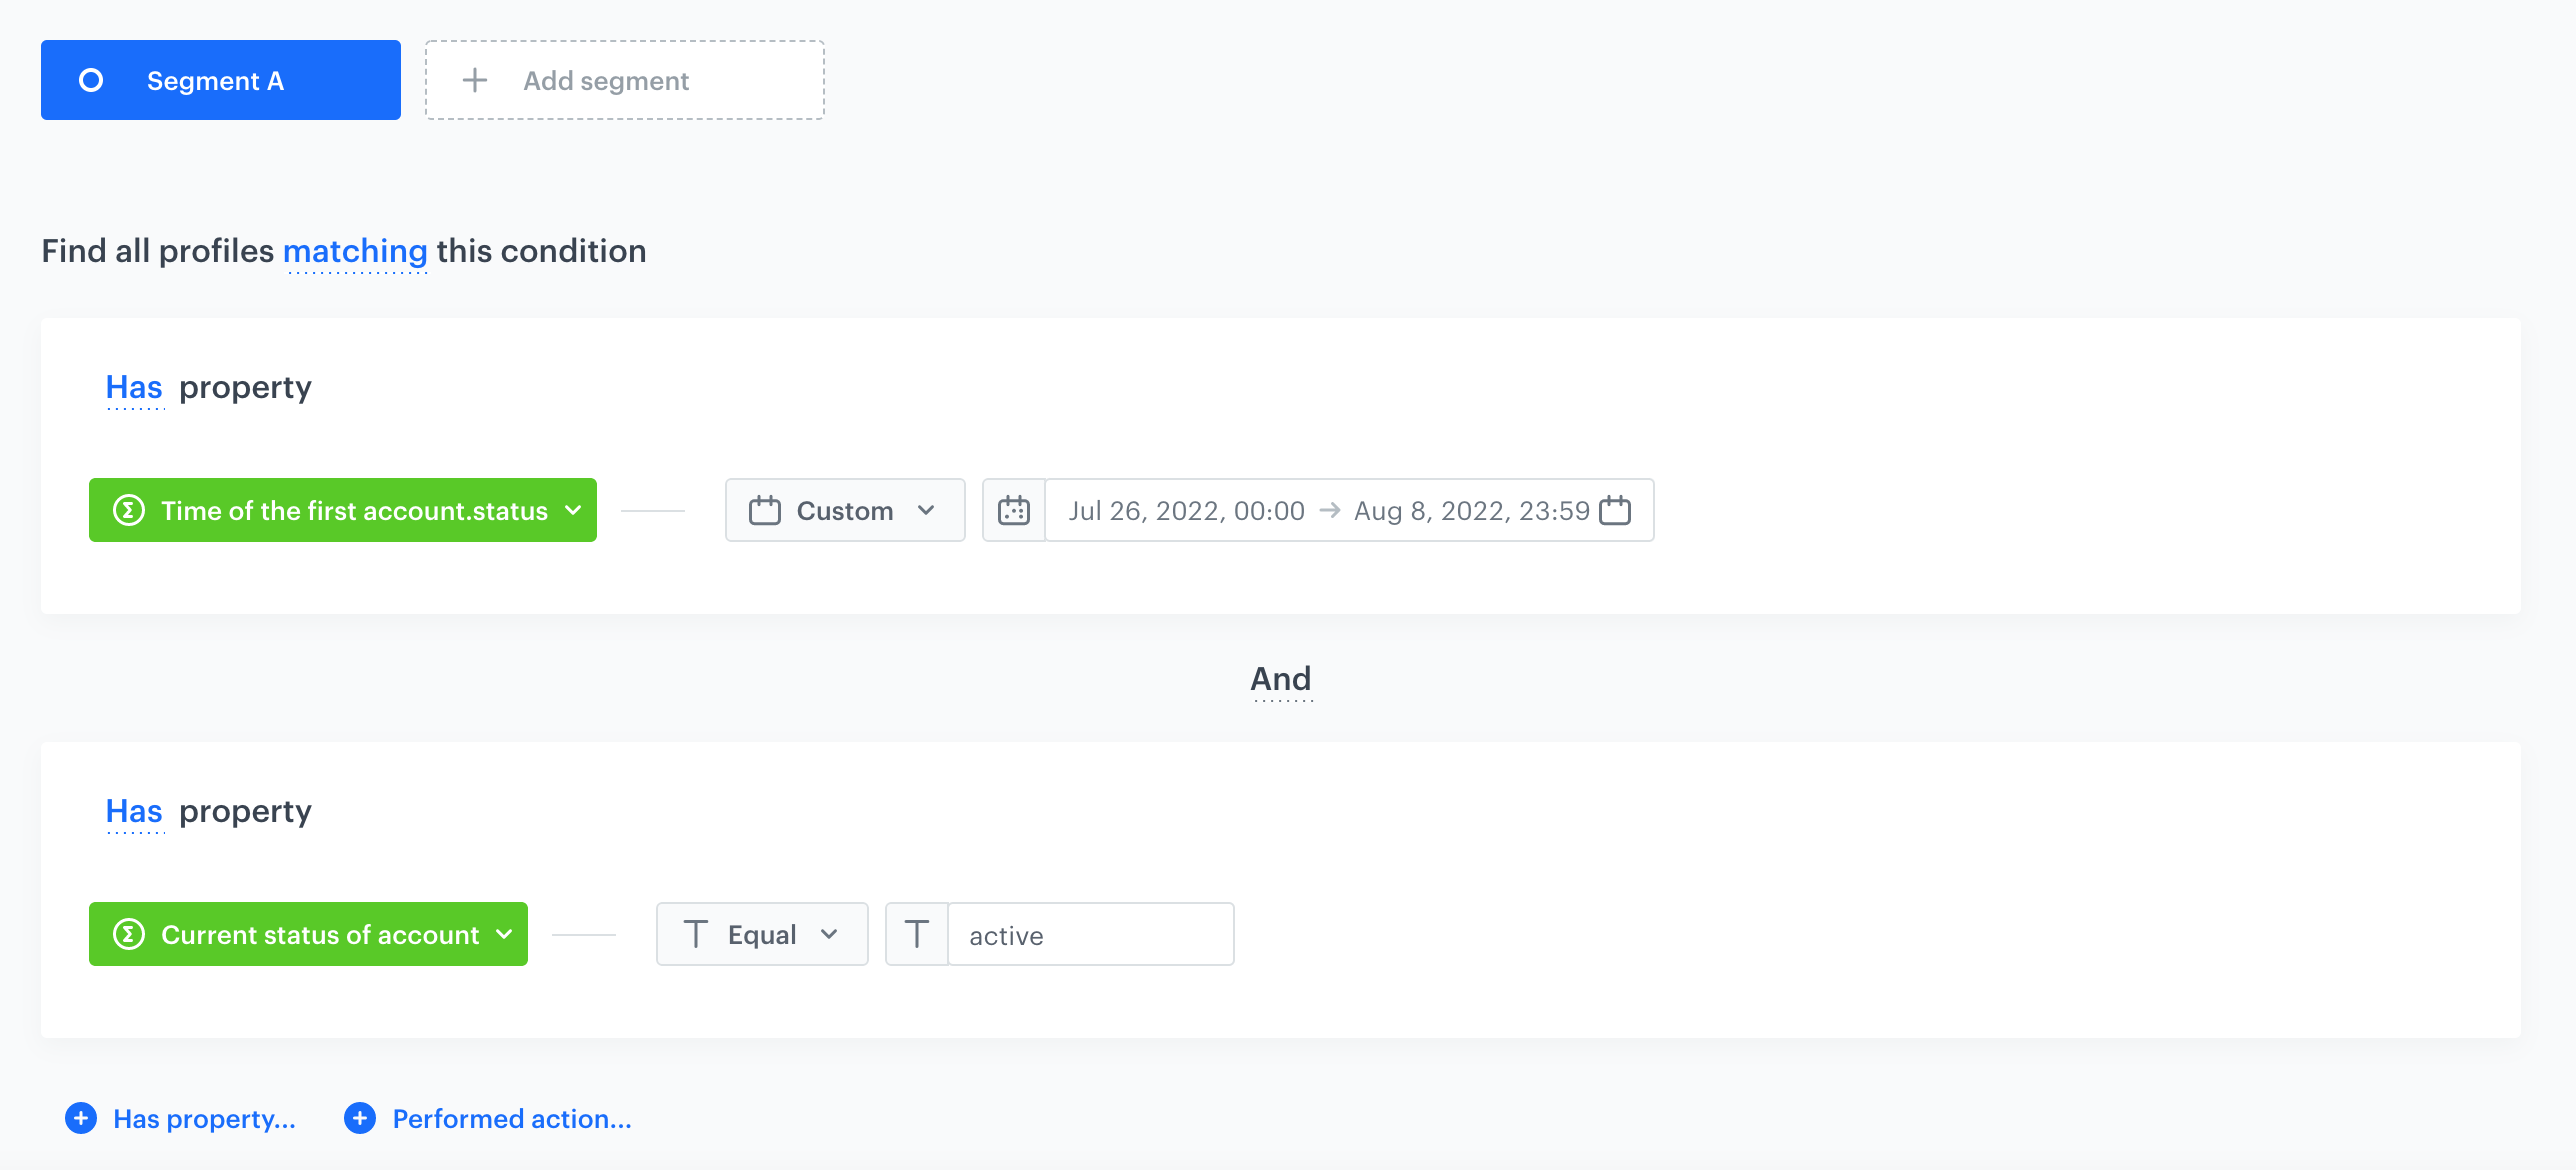
Create a segmentation
In this part of the process, you create a segmentation of customers who installed your mobile app and joined the loyalty program during last 14 days.
- Go to Analytics > Segmentations > New segmentation.
- Enter the name of segmentation.
- Choose Has property and find the aggregate counting the time of joining the loyalty program, created in the previous step.
- Choose option Custom and select the date range as last 14 days. This way we can be sure that we analyze only the customers who joined the loyalty club for the first time during last 14 days (time in which the promotion is available), and we exclude the customers who join the club, resign and try to join another time to use the promotion for the second time.
- Choose Has property and find the aggregate analyzing the active status of the customer’s membership, created in the previous step.
- As an operator, choose Equal and add the value
active. - Save the aggregate.
Create a promotion
Create a promotion for customers who joined the loyalty program. The promotion gives a 10% discount for the entire transaction and is valid only once per user. It will be targeted for the audience created in the previous step.
-
Go to Communication > Promotions > Add promotion.
-
Select the For entire cart option.
-
In the Audience section, select the segmentation created in this step. Your promotion will be activated only for this group of customers. Confirm your selection, by clicking Apply.
-
In the Content section, define the name, description, and an image of the promotion. Confirm the settings by clicking Apply.
-
In the Limit per profile field, enter
1to make sure that this discount can be used only once. -
In Type & limits section:
- As a Discount type, choose Percentage.
- In the Cart section, as the minimum value, enter
10, and click Apply.
-
In the Schedule section, define the distribution period.
-
Optional: In the Stores section, specify stores where the promotion is available.
Note: This is possible only if the list of stores is imported into a catalog. -
In Items section, choose the main product catalog with all products a customer can buy with this discount. If you want to narrow down the list of categories a customer can choose from, use one of the options presented below (Selected items/Filtered items). If discount should be active for all products, choose Entire catalog.
-
In Exclude items section, you can exclude a specific product or categories for which the discount is not active.
-
To apply all changes and run the promotion, click Publish.
Once the promotion is published, it will be visible immediately to all customers defined in the Audience section in your mobile app (users who joined loyalty program during last 14 days).
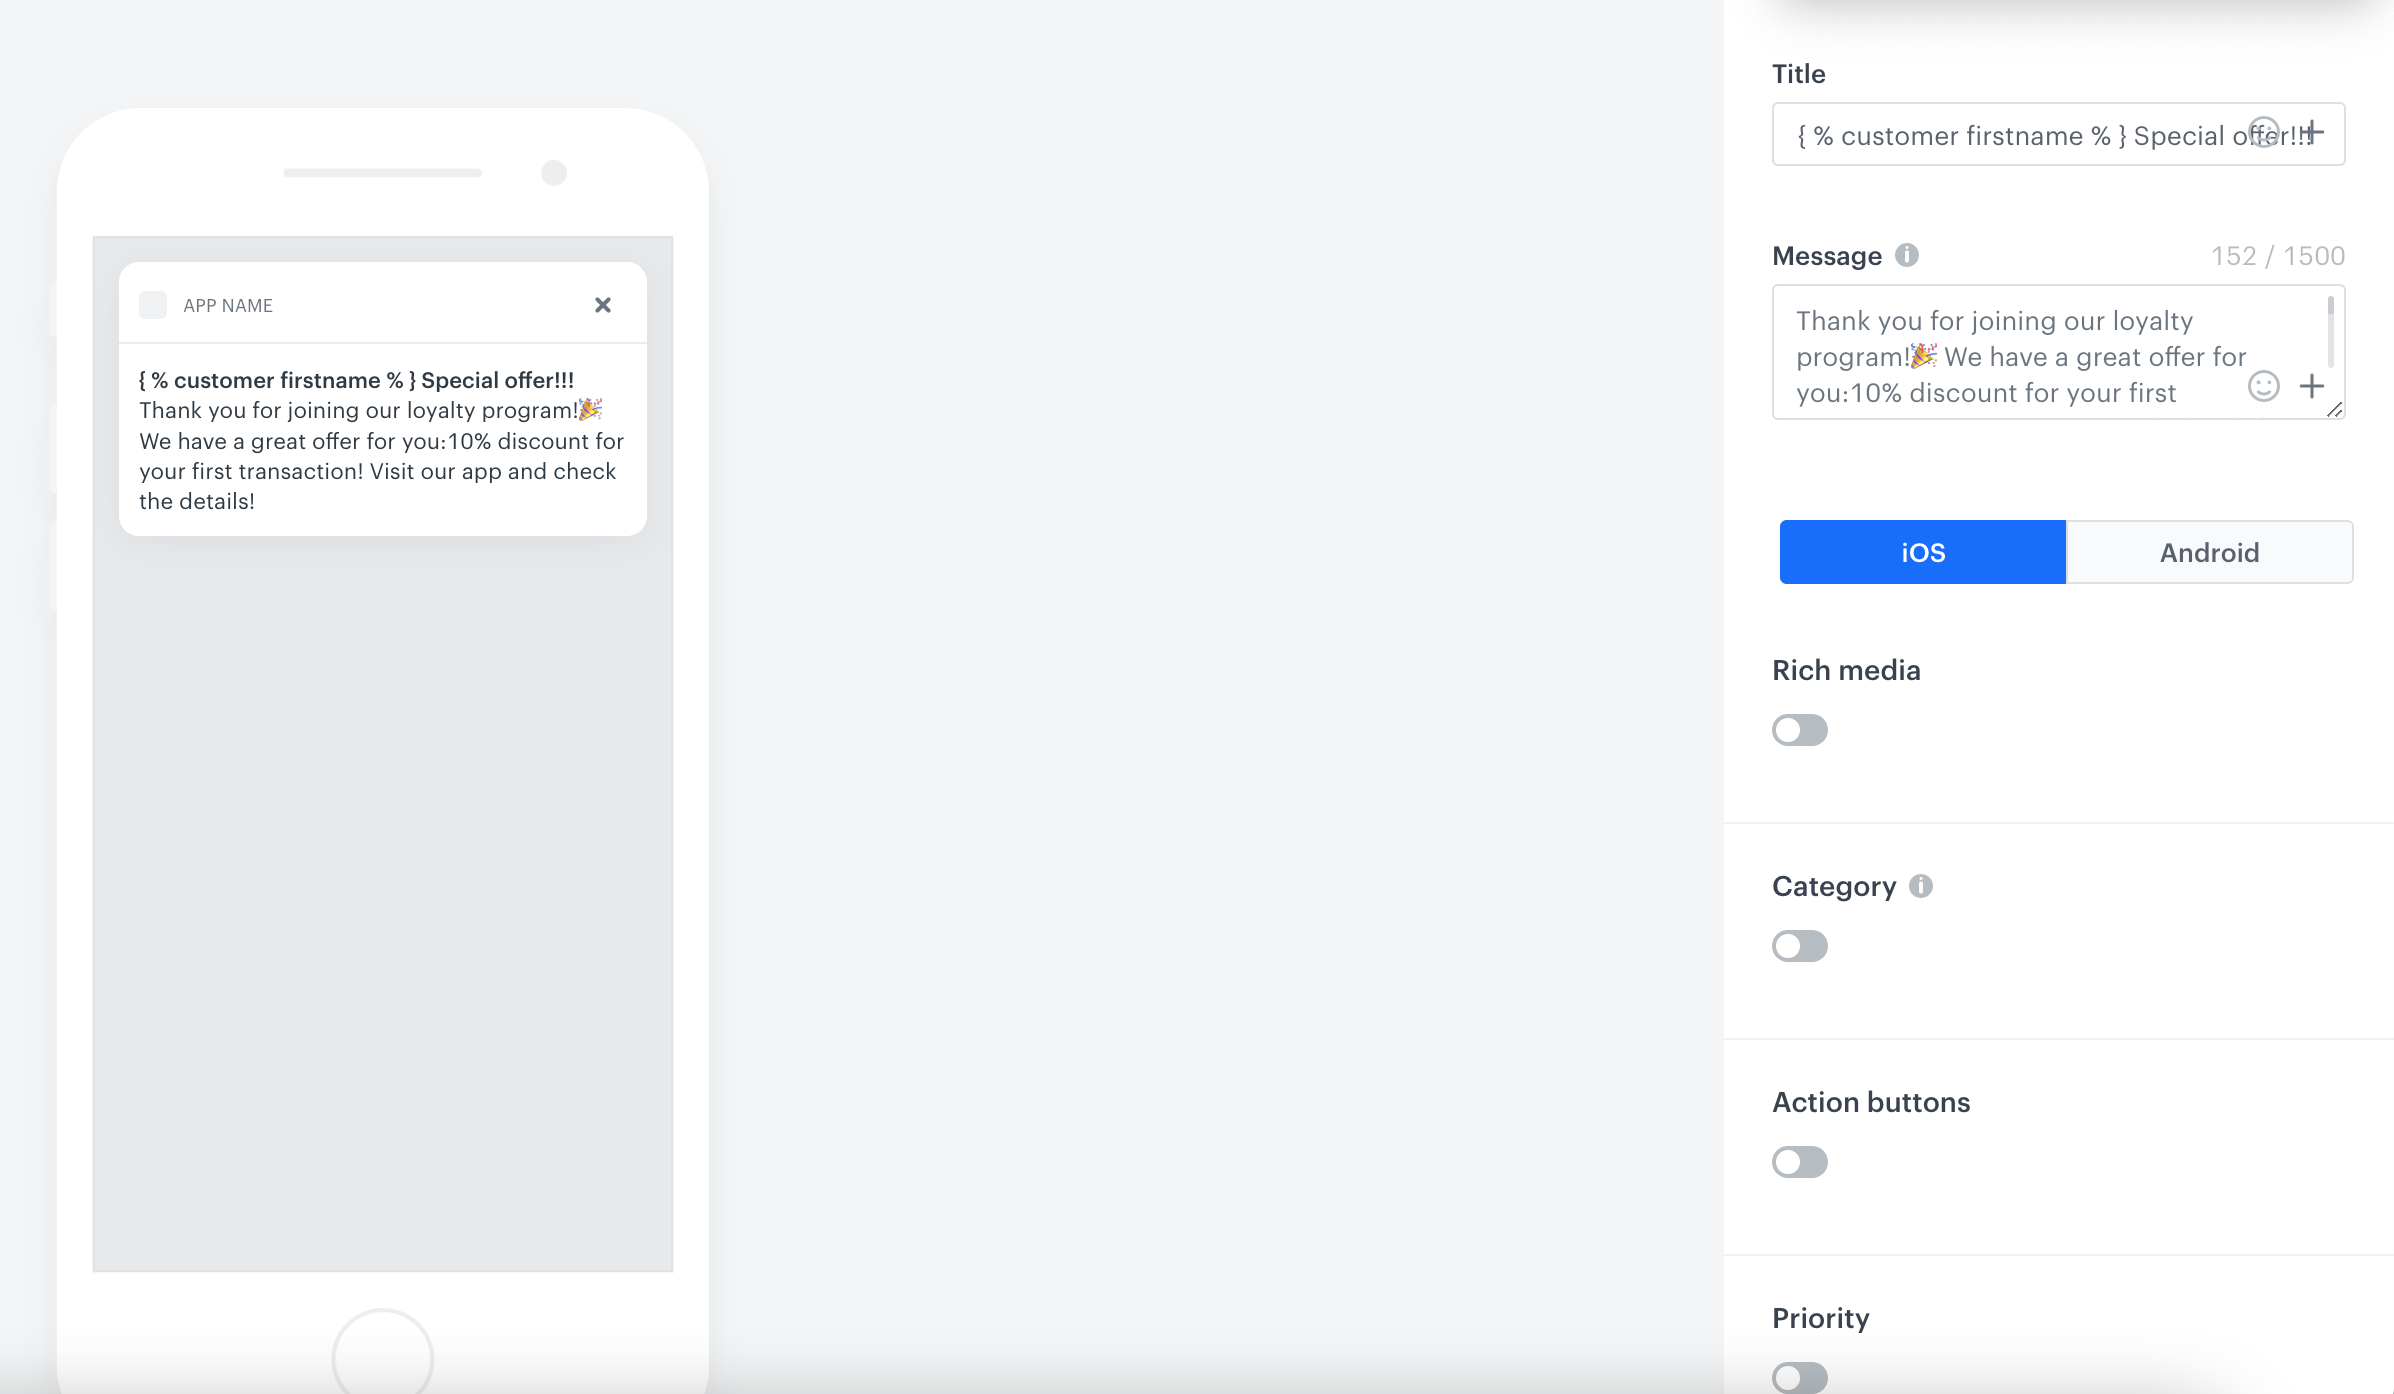
Prepare a mobile push notification
- Go to Communication > Mobile > Templates.
- Create your mobile push in the code editor.
For more information on creating a simple mobile push, visit our User Guide.
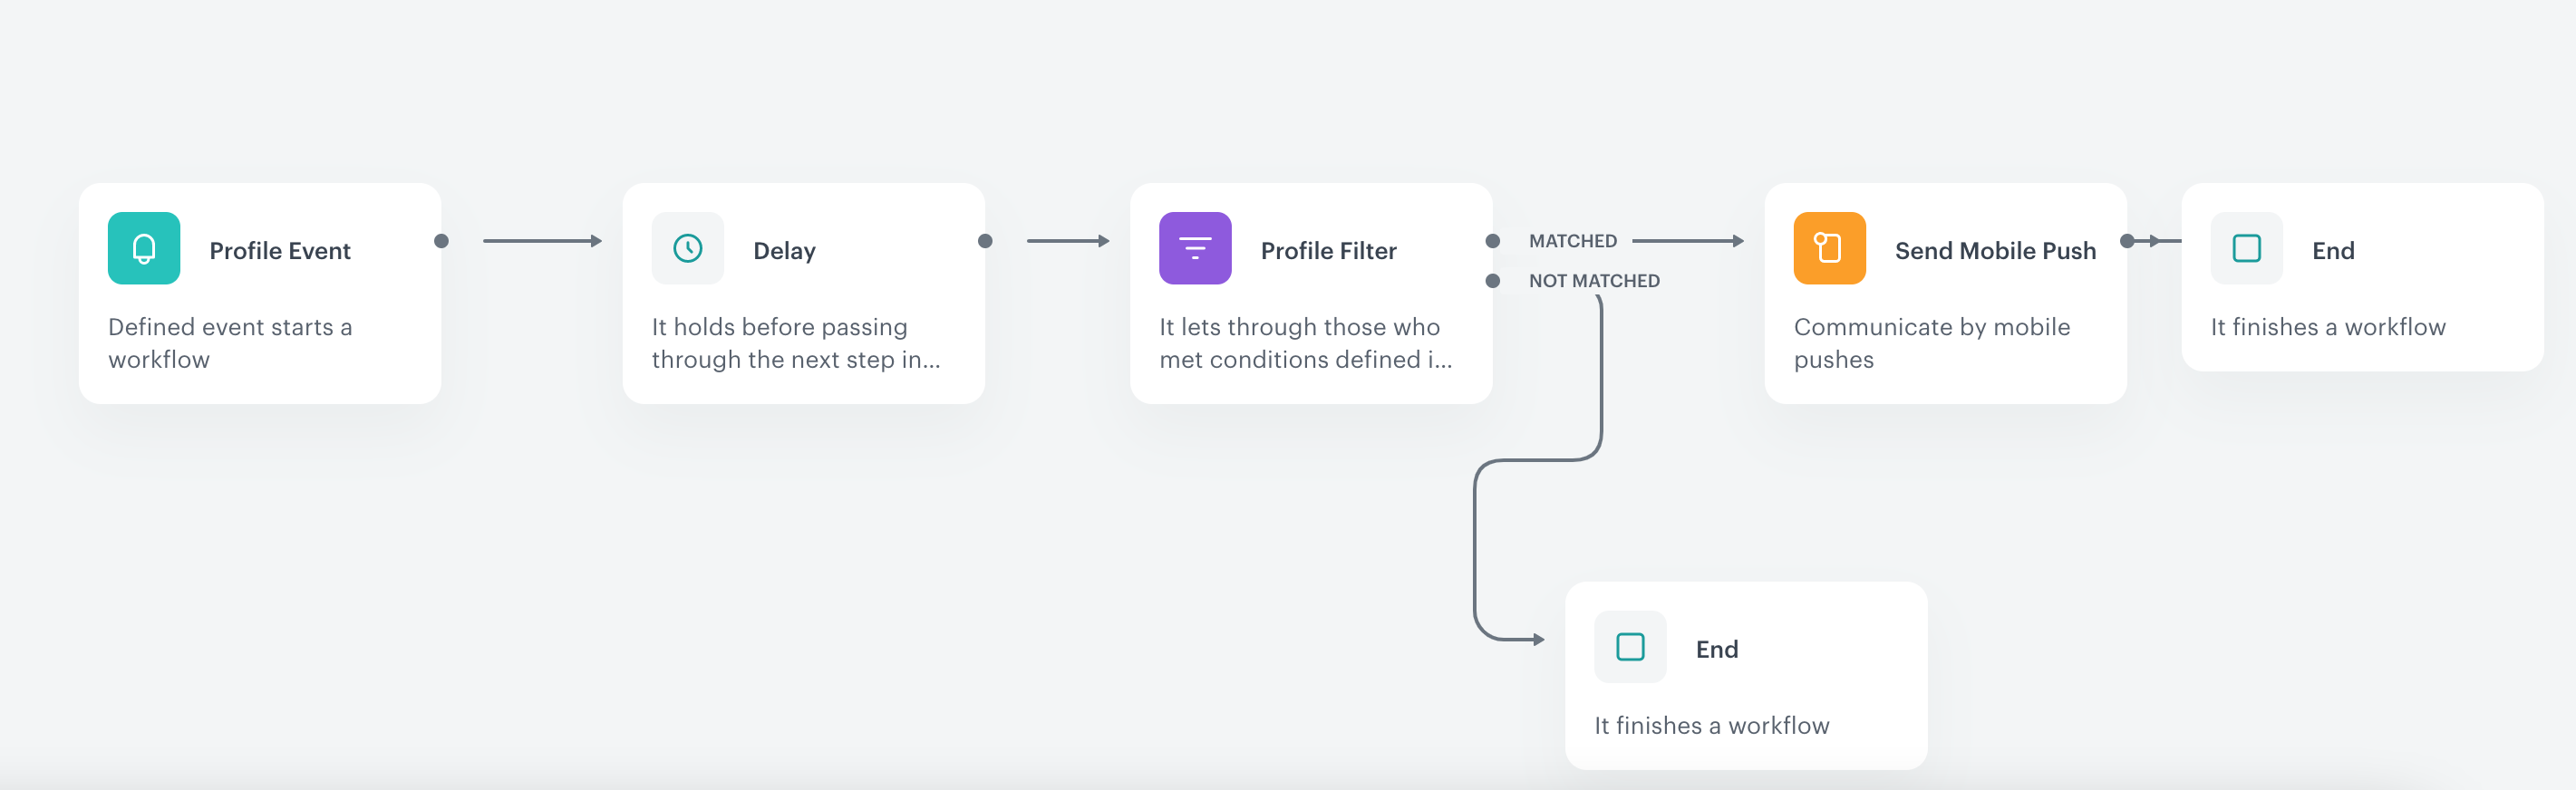
Create a workflow
In this part of the process, prepare a workflow that notifies customers who joined loyalty program about the promotion in the mobile app.
- Go to Automation > Workflows > New workflow.
- Enter the name of the workflow.
- As the first node of the workflow, add Profile Event, and choose the event which signifies joining the loyalty program.
- As the next node, choose Delay. In the settings of the node, set the delay period to 10 minutes.
- Add Profile Filter to check if the user made a transaction during last 10 minutes. To do it, select the
transaction.chargeevent and set up the time range as last 10 minutes. Mark this filter as not matched. - As the last node, add Send Mobile Push for users who matched used Profile Filter. In the configuration of the Send Mobile Push node:
- Select the type of the mobile push notification..
- Select the push template created in this part of the process.
- Set up the Action limit for the Send Mobile Push as one time per workflow.
- Set the capping for the workflow to make sure that it will be available once for every user (choose very distant date for example, once in 1000 months).
- Confirm the settings by clicking Apply.
- Add the End node to finish the workflow.
- Click Save & Run.
Check the use case set up on the Synerise Demo workspace
You can check the configuration of the segmentation directly in Synerise Demo workspace. Check also the aggregates returning the time of joining the loyalty program and current status of membership.
Check also the configuration of the promotion and workflow created for this use case.
If you don’t have access to the Synerise Demo workspace, please leave your contact details in this form, and our representative will contact you shortly.