Renewable quest
There are several ways to make a loyalty program an engaging experience for users. One way is to include personalized and frequently updated content, along with special promotions and attractive rewards. Another method can include gamification, which we will explore more deeply in this use case.
In Synerise, you can create gamification scenarios based on various user actions collected within the profile history like transactions, consents, form submissions, watching videos, rating products, and more. However, scenarios based on transaction events are the most popular. These scenarios involve completing quests that lead to rewards such as promotions, free products, extra loyalty points, or access to premium content.

In this use case, we will guide you through the process of building a renewable quest. This quest allows customers to earn 1000 loyalty points by purchasing 10 products from a specific category within a set timeframe.
Prerequisites
- Implement transaction events using SDK or API. Make sure that you implement category parameter in the transaction events and quantity of products.
- Integrate mechanism for awarding loyalty points. Find more in the Loyalty programs basics use case.
Security configuration
Before you start working with this module, if you are a Synerise customer or partner, consider reading the section about denylisting events. This natively accessible configuration will allow you to manage the restrictions in points management that may help you prevent fraud.
Process
In this use case, you will go through the following steps:
- Create a quest.renewableComplete event
- Create the aggregate that returns the timestamp of the last finished quest
- Create the aggregate with the number of product purchased
- Create an expression with the number of products required to complete the quest
- Create an expression that returns the number of products purchased
- Create an expression checking the conditions for completing the quest
- Create a workflow which adds points to the customer’s account
- Create a document with all necessary data conected with this loyalty scenario
Create a quest.renewableComplete event
In this part of the process, create a quest.renewableComplete event, which will be later generated in the workflow when the customer completes the quest. In addition, this event must contain a parameter that contains the name of the completed quest to facilitate identification of the quest. In our case, we use the gameName parameter.
- Go to
 Data Management > Events > Add event.
 - In the Name field, enter
quest.renewableComplete.
In the API and SDK, the name parameter is usually calledactionoraction name. - Optionally, define a human-friendly display name that will be shown in the Data Managament and Analytics modules.
- Optionally, in the Description field, enter the description of the event.
- Enable the Make this event available to anonymous profiles without JWT toggle.
- Click Apply.
- In the list of events, find the event you just created.
- On the right side of the screen, click Add property.
- In the Source parameter field, enter
gameName. - In the Property name field, enter a human-readable label for display in the Synerise platform.
- Optionally, in the Description field, you can add an explanation about the purpose of this parameter.
- In Property type and Link fields, leave the default
stringand-. - To complete the process, click Save.
Create an aggregate that returns the timestamp of the last finished quest
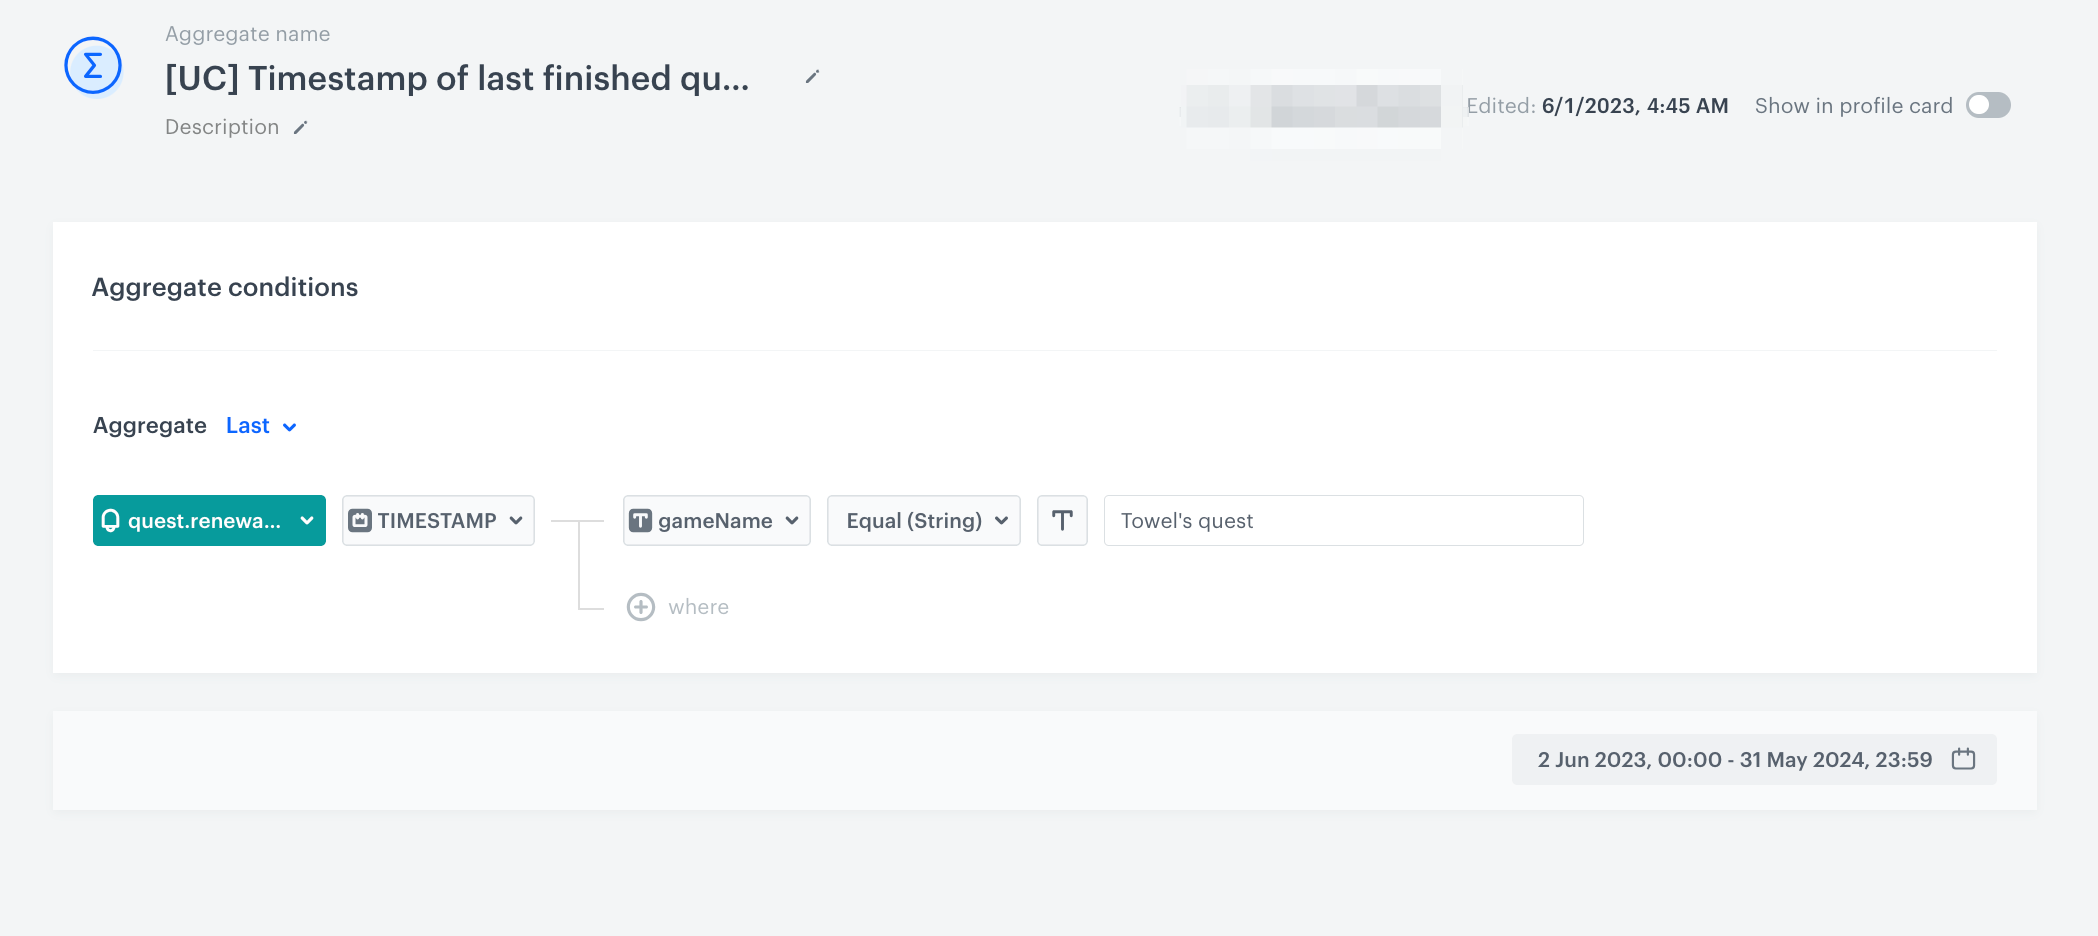
In this step, we create an aggregate that provides the timestamp of the most recently completed quest. The timeframe for the quest begins on the day it starts and continues until the expected completion time.
- Go to
 Analytics > Aggregates > New aggregate.
 - Enter the name of the aggregate as
[UC] Timestamp of last finished quest. - As the type of the aggregate, select Last.
- From the Choose event dropdown, select the
questRenewableCompleteevent, that you created in the previous step. - As the event parameter, choose TIMESTAMP.
- From the Choose parameter dropdown list, select the gameName parameter.
- From the Choose operator dropdown list, select Equal.
- Enter the name of the quest. In our case, it’s
Towel's quest. - Set the period for the aggregate to Custom and specify the desired data range. In this scenario, we will select the following time range
02.06.2023 - 30.05.2024. - To save the aggregate, click Save.
Create an aggregate that returns the number of products purchased from the defined product category
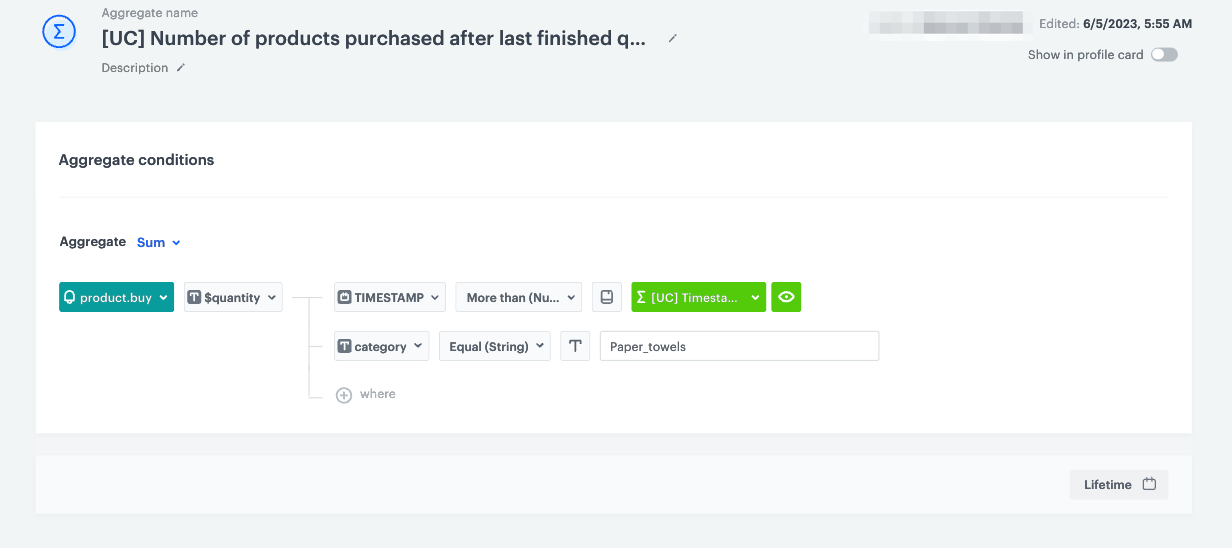
In this part of the process, create an aggregate that will calculate the number of products that were purchased from the Paper_towels category after the last quest was completed.
- Go to Analytics > Aggregates > New aggregate.
- Enter the name of the aggregate as
[UC]Number of products purchased after last finished quest. - As the type of the aggregate, select Sum.
- From the Choose event dropdown, select the product.buy event.
- As the event parameter, choose $quantity.
- Click the + where button and from the Choose parameter dropdown menu, choose category parameter.
- From the Choose operator dropdown menu, select Equal.
- Type the name of the product category -
Paper_towels. - Click the + where button and from the Choose parameter dropdown menu, choose TIMESTAMP parameter.
- From the Choose operator dropdown menu, select More than number operator.
- Click the
 (Choose value icon).
 - From the Choose value dropdown list, select the aggregate you created earlier in the process.
- Set the period for the aggregate to Lifetime.
- Save the aggregate.
Create an expression with the number of products required to complete the quest
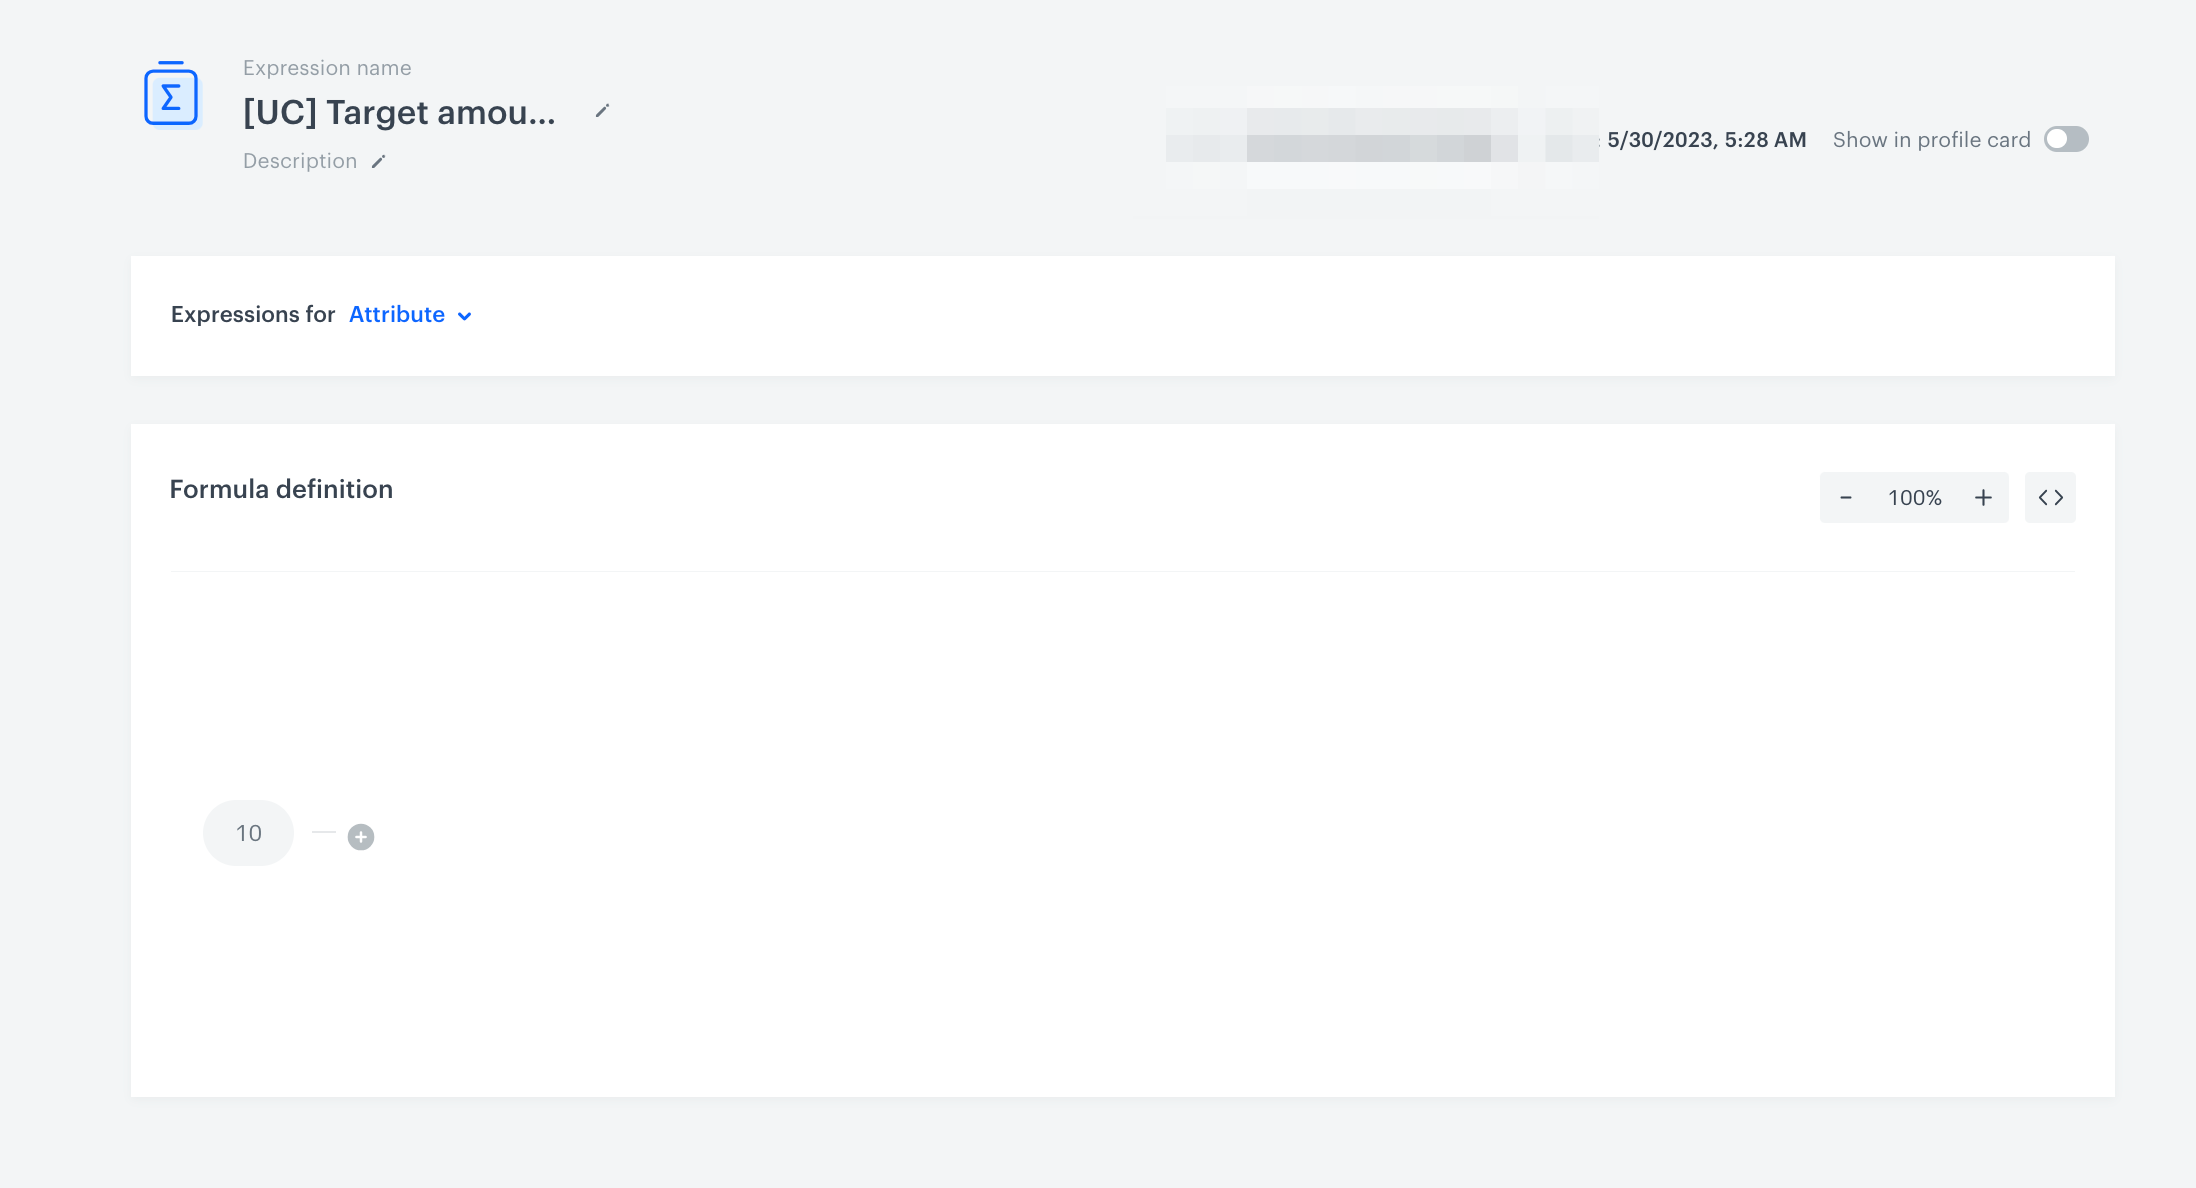
In this step, create an expression that determines the number of products needed to complete the quest. Based on the assumptions of this use case, the assumed requirement for purchase is 10 units.
- Go to Analytics > Expressions > New expression.
- Enter the name of the expression as
[UC]Target amount. - Leave the Expression option at default (Attribute).
- Click the Select button.
- Choose # Constant.
- Open the settings of Constant value by clicking
0. - In the field below, type
10 - Click Save.
Create an expression that returns the number of products purchased
In this part of the process, create an expression that returns the number of products purchased from the Paper_towels category. This expression uses the aggregate and expression created in the previous steps.
The logic in the expression compares the number of products purchased after the last finished quest to the target amount, which is 10 units needed to complete the quest. There are two possible scenarios:
- If the number of products purchased from the “Paper_towels” category is equal to or greater than the target (10), the expression will return 10, indicating that the quest has been successfully completed.
- If the number of products purchased from the “Paper_towels” category is less than the target, the expression will return the actual number of products purchased.
If the number of products purchased in a single transaction exceeds the target of 10, the surplus is not carried over to the next quest.
- Go to Analytics > Expression > New expression.
- Enter the name of the expression as
[UC]Products purchased - Leave the Expression option at default (Attribute).
- Build the following formula of the expression:
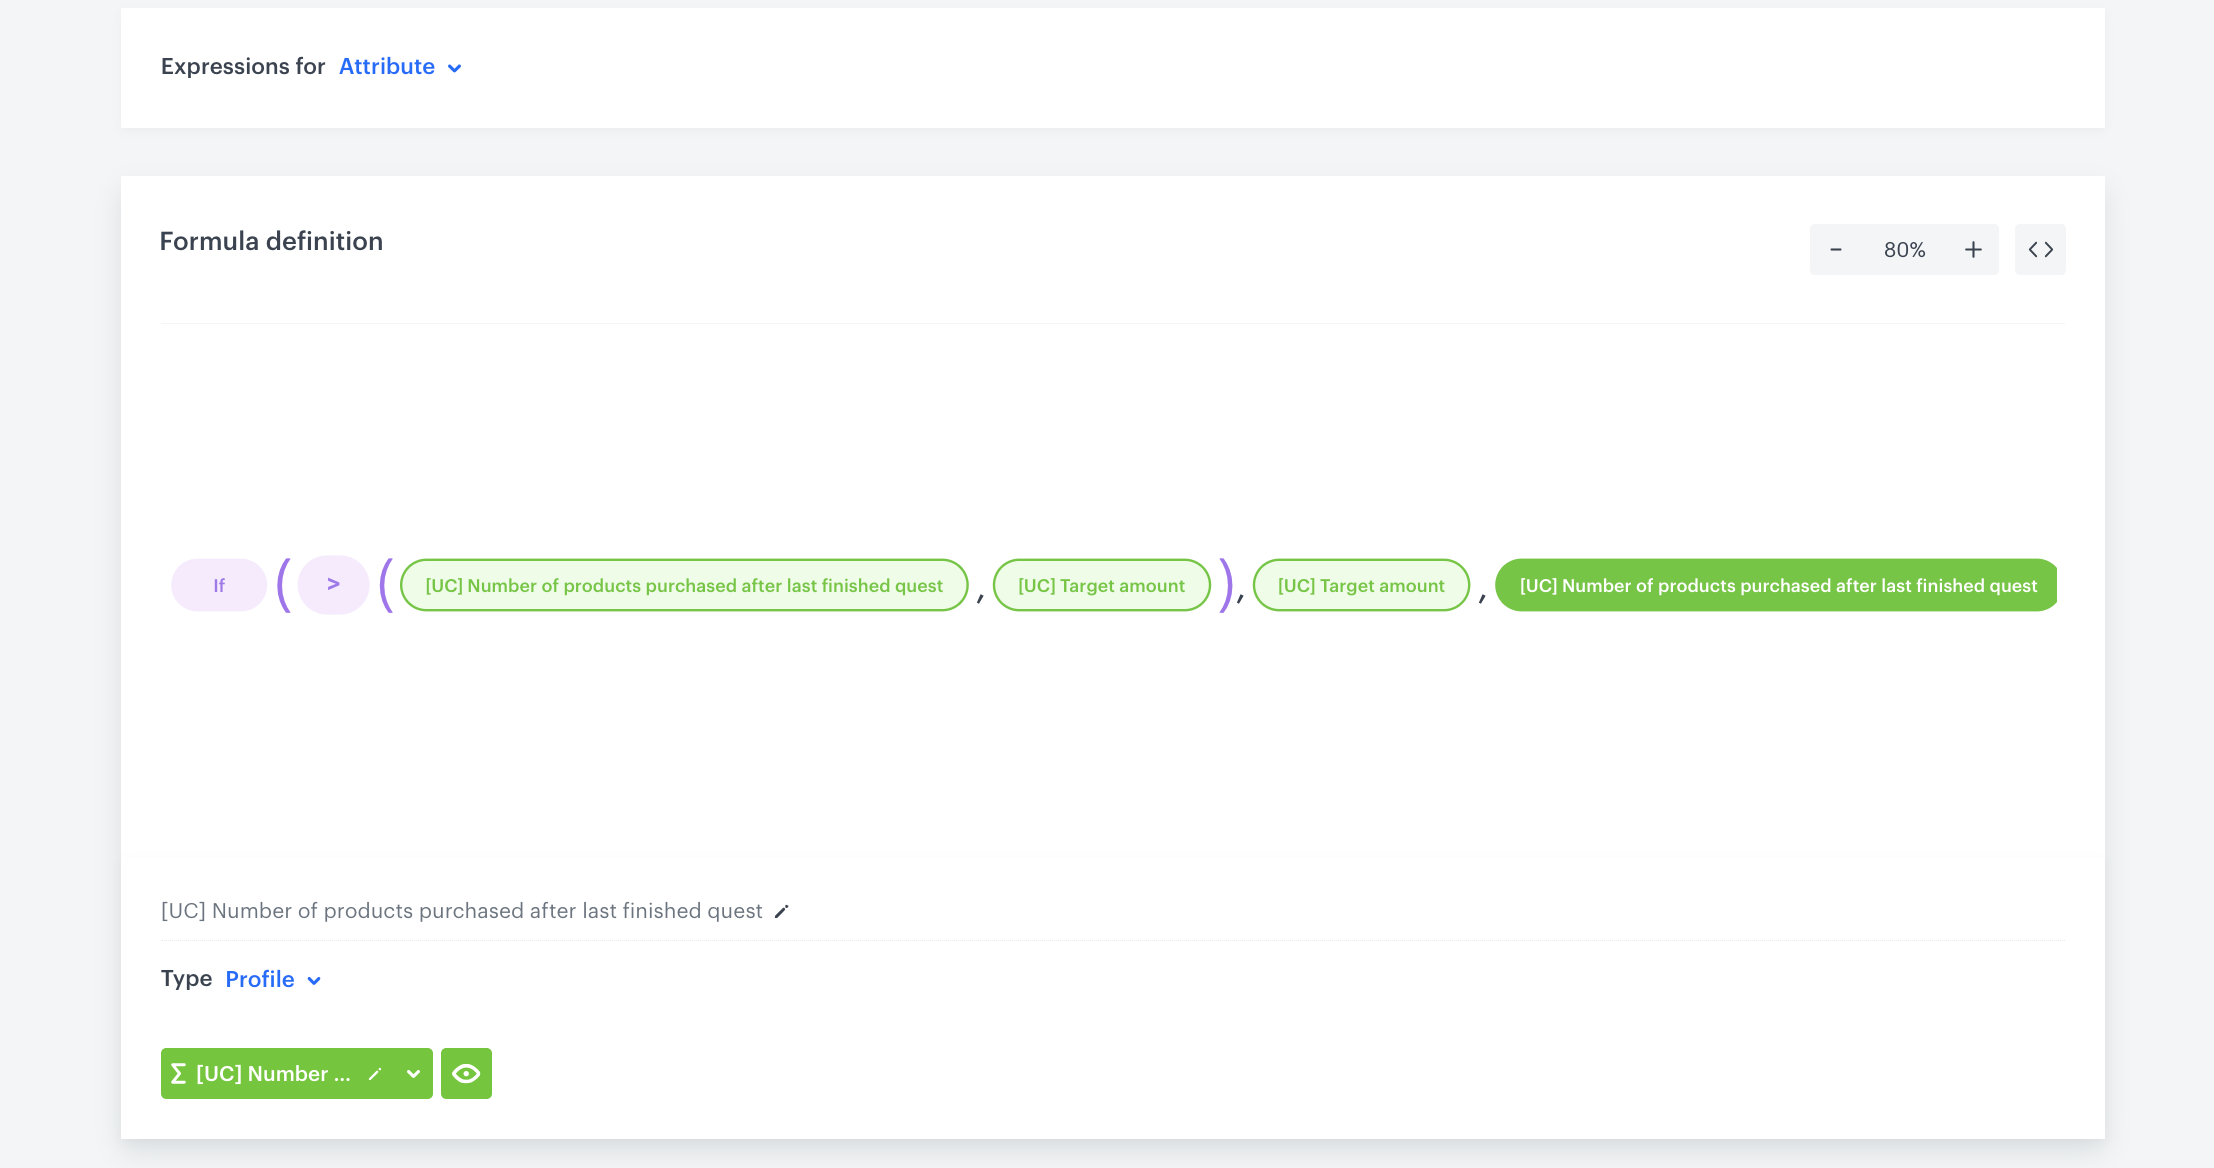
Final configuration of the expression - Save the expression.
Create an expression that determines the number of products required to complete the quest
In this step, create an expression that checks if the number of products bought is equal to or greater than the target amount, indicating whether the customer has met all the conditions to finish the quest.
The expression will produce one of two results based on certain conditions:
- If the number of products purchased from the “Paper_towels” category is 10 or greater, the expression will return true.
- If the number of products purchased from the “Paper_towels” category is less than 10, the expression will return false.
- Go to Analytics > Expression > New expression.
- Enter the name of the expression as
[UC]Comparing amount of products bought - Leave the Expression option at default (Attribute).
- Build the following formula of the expression:

Final configurationj of the expression - Save the expression.
Create a workflow
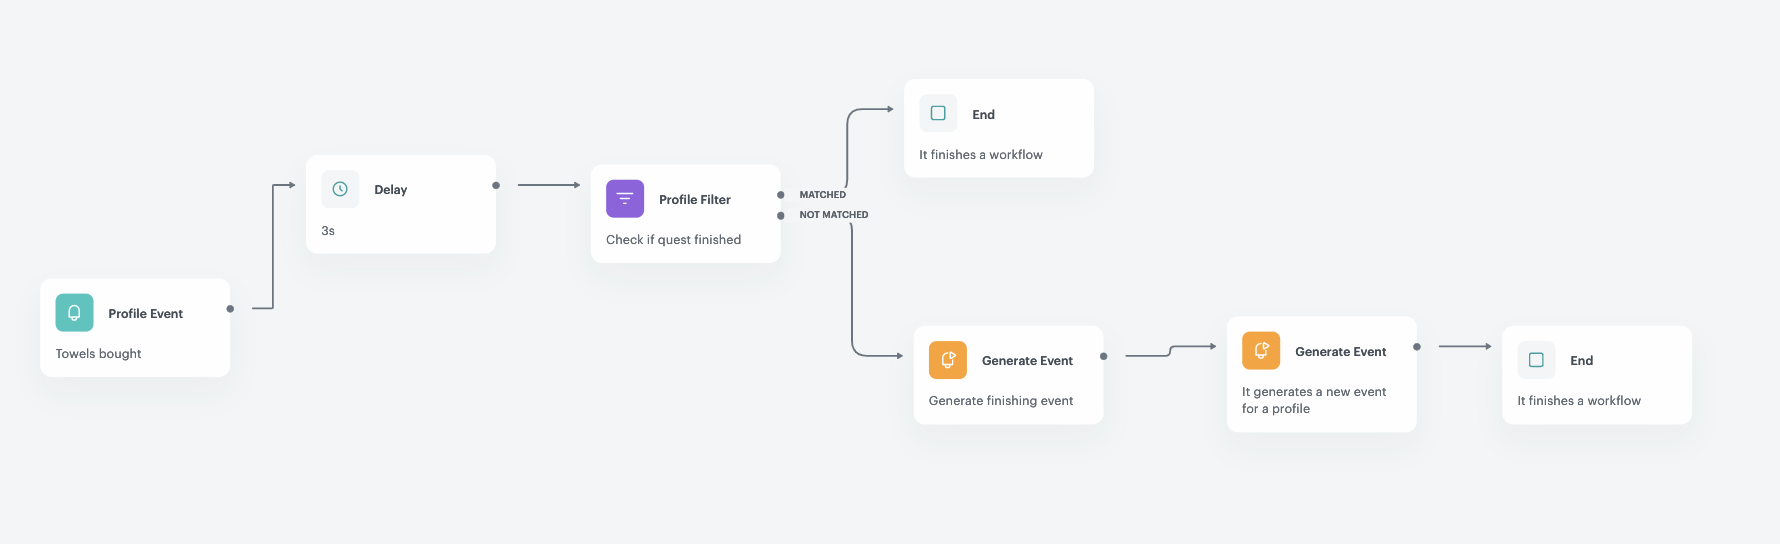
In this part of the process, create a workflow to determine if the customer has successfully completed the quest. The condition that needs to be met is the purchase of 10 products from the “Paper_towels” category. If the condition is met, two events will be generated for the customer:
- An event
quest.renewableCompletewill be generated to inform about the quest completion. - An event
points.upchargewill be generated to assign 1000 loyalty points to the customer.
- Go to
 Automation > Workflows > New workflow.
 - Enter the name of the workflow as
[UC]Renewable Quest.
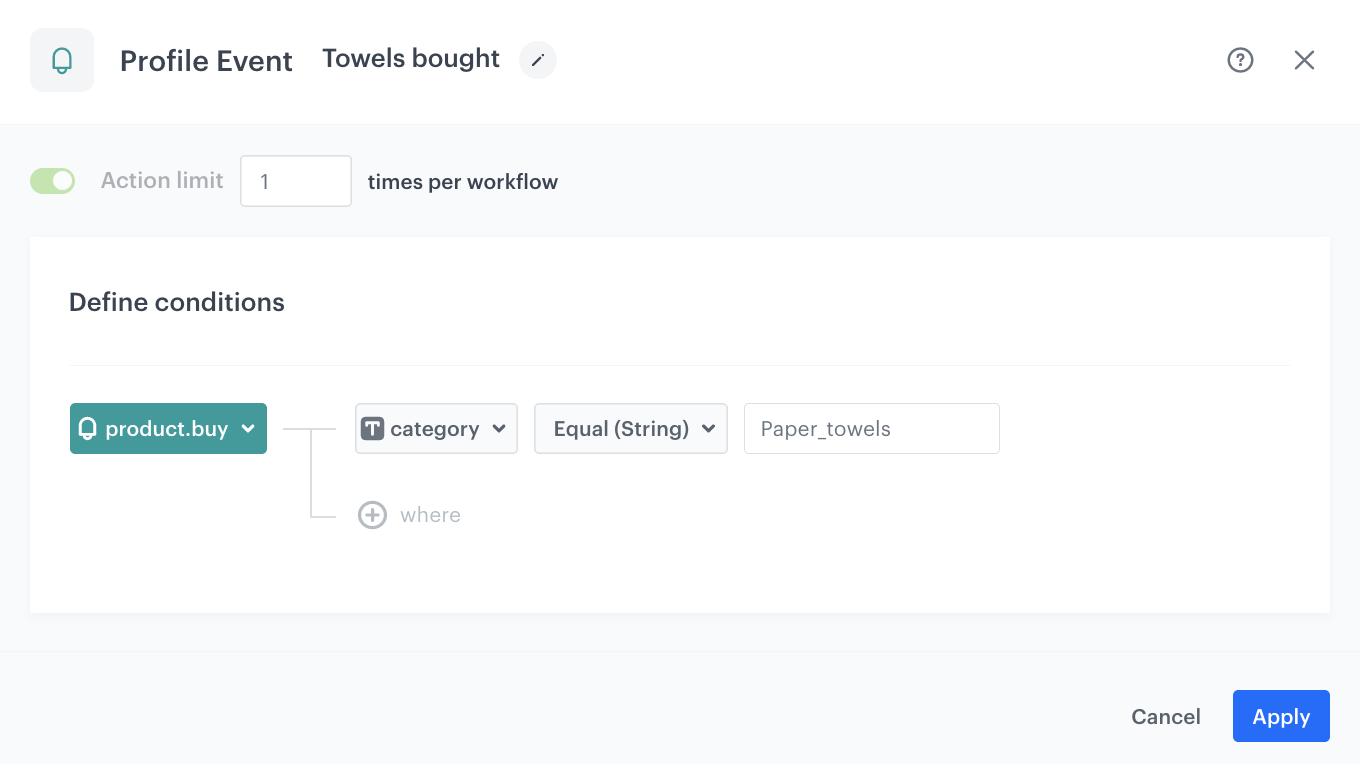
Define the Profile Event node
The workflow will be triggered by the product.buy when customers will purchase any product from the Paper_towels category.
- As the first node of the workflow, add Profile Event.
- From the Choose event dropdown menu, choose the
product.buyevent, - As the parameter, choose category,
- As the operator, choose Equal,
- As the value of the parameter, add
Paper_towels,
- From the Choose event dropdown menu, choose the
- Confirm by clicking Apply.
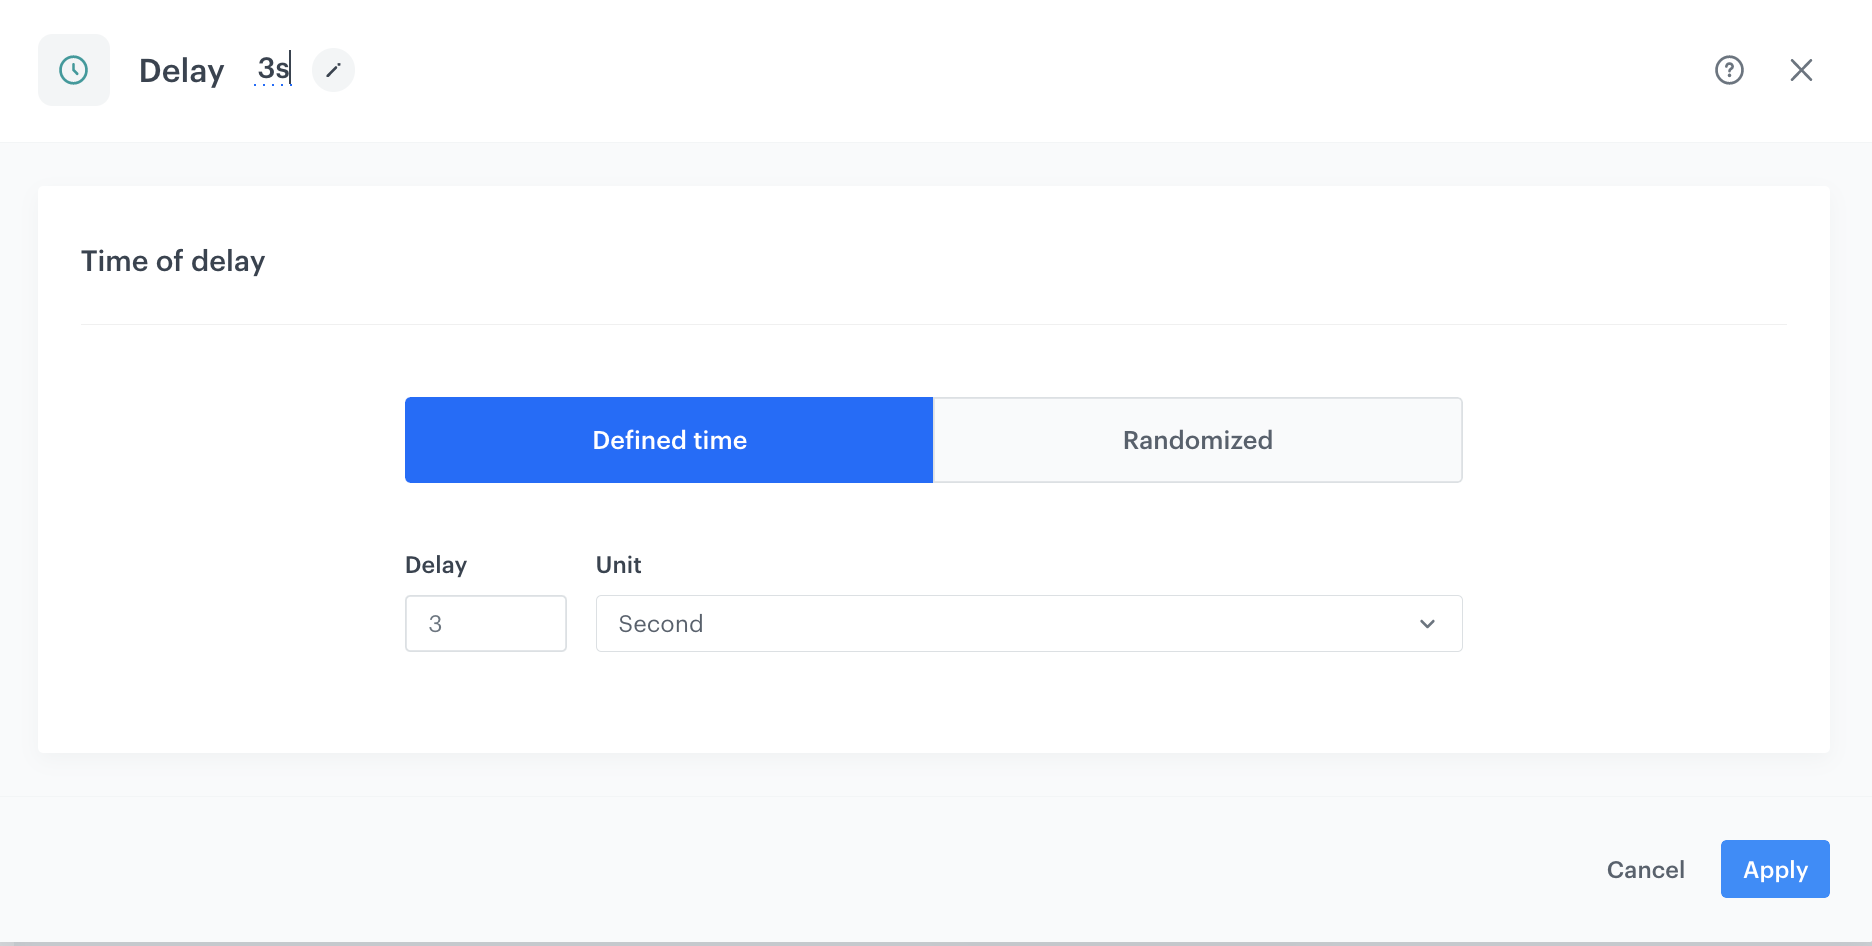
Define the delay
We need to set up a short delay of 3 seconds to ensure that events have been calculated before proceeding to the next condition in the workflow.
- Add the Deley node,
- Enter the name of the delay as
3s, - Set the Delay number as
3, - In Unit section choose Second,
- Enter the name of the delay as
- Confirm by clicking Apply.
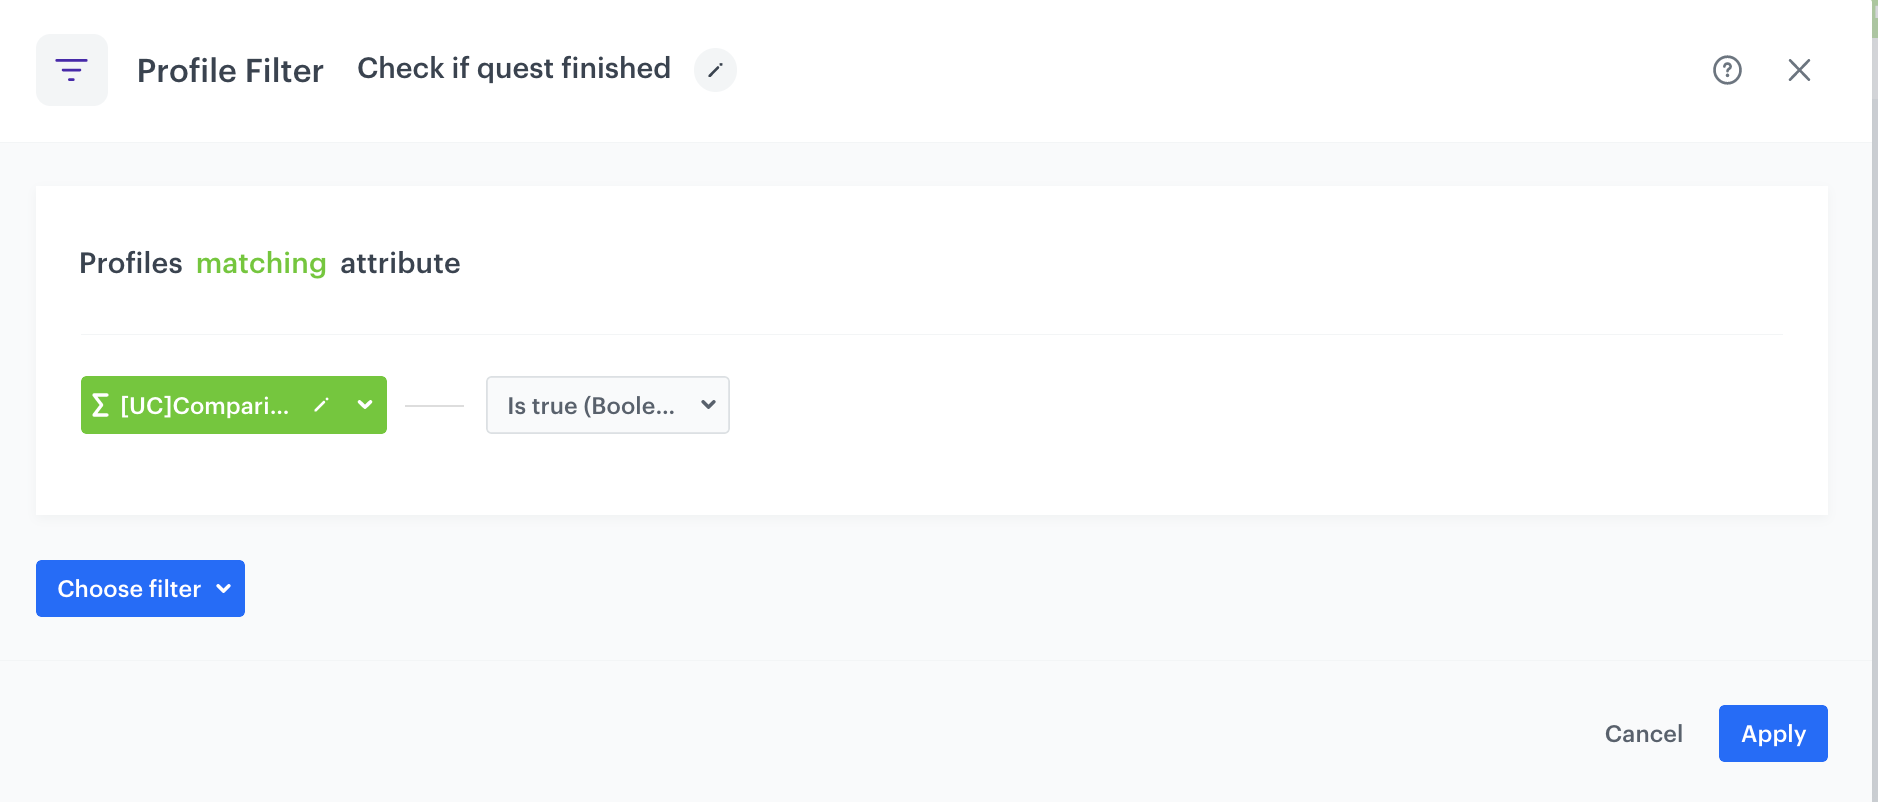
Define the Profile Filter node
In this part of the process, we will check if the customer has completed the quest. We will use the previously created expression that determines whether the customer has met all the conditions to finish the quest. If the quest has been completed, the next step in the workflow will generate the quest.renewableComplete event. Otherwise, the process ends.
- Add the Profile filter node. In the node settings:
- Click Choose event and select expression created earlier in the process,
- From the operator drop-down, choose Is true (Boolean),
- Confirm by clicking Apply.
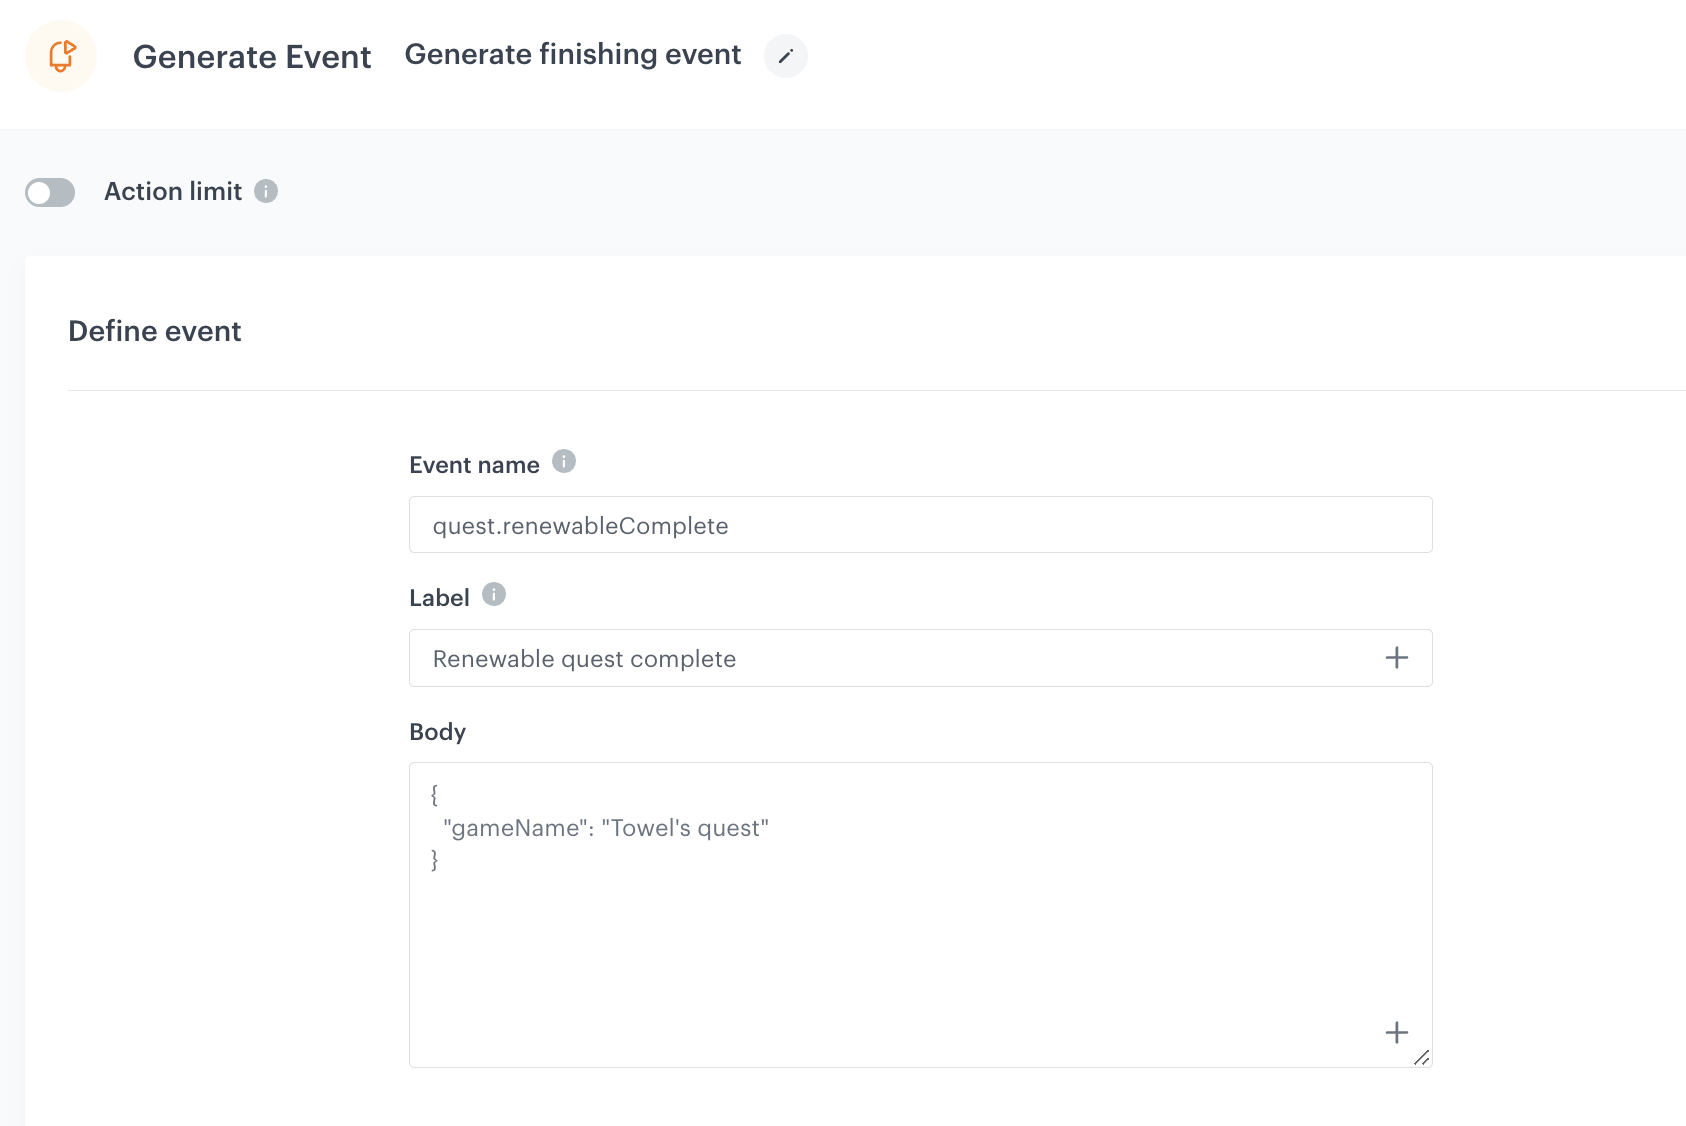
Define the Generate Event node
In this part of the process the quest.renewableComplete event is generated, which informs us about the completion of the quest.
- To the matched path, add the Generate Event node.
- In the configuration of the node:
-
Enter the Event name. In our case, we are using
quest.renewableCompleteevent.
The Label field exists for backwards compatibility. If your integration does not require this parameter, skip it. -
In the Body section, use the following Jinjava and modify it to your needs:
        {
            "gameName": "Towel's quest"
        }
-
- Confirm by clicking Apply.
Define the secound Generate Event node
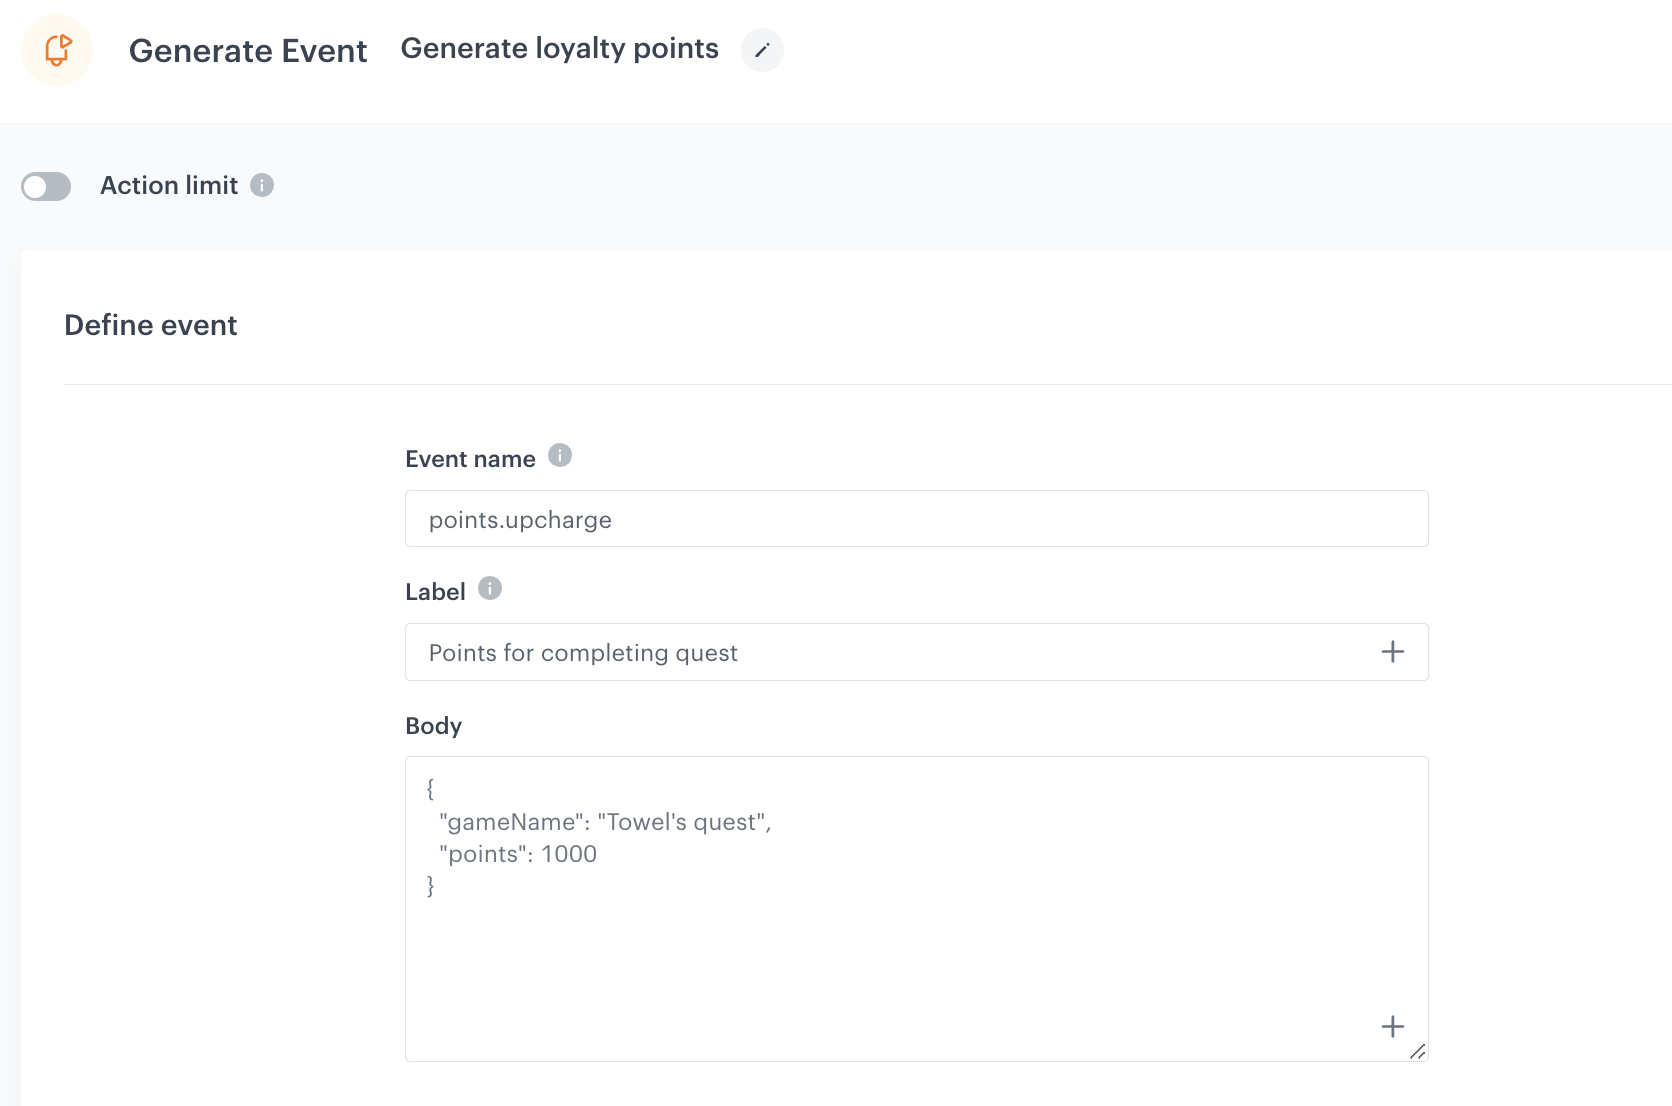
In this part of the process, a points.upcharge event will be generated, assigning 1000 loyalty points to customers who have finished the quest.
- Add the Generate Event node.
2. In the configuration of the node:
- Enter the Event name. In our case, we are using
points.upchargeevent. The Label field exists for backwards compatibility. If your integration does not require this parameter, skip it. - In the Body section, use the following Jinjava and modify it to your needs:
        {
            "gameName": "Towel's quest",
            "points": 1000
        }
- Enter the Event name. In our case, we are using
- Confirm by clicking Apply.
Add the finishing node and set capping
- Add the End node.
- In the upper right corner, click Set Capping and define the limit of workflows a profile can start in a specific time range.
- In the upper right corner, click Save & Run.
Create a document
In the final step of this process, you will create a document that will display in a selected channel (for example, a mobile application) the results of the expressions you created before, showing your customers how far are they in their quest.
- Go to
 Data Management > Documents > Add document.
 - Enter the name for your document.
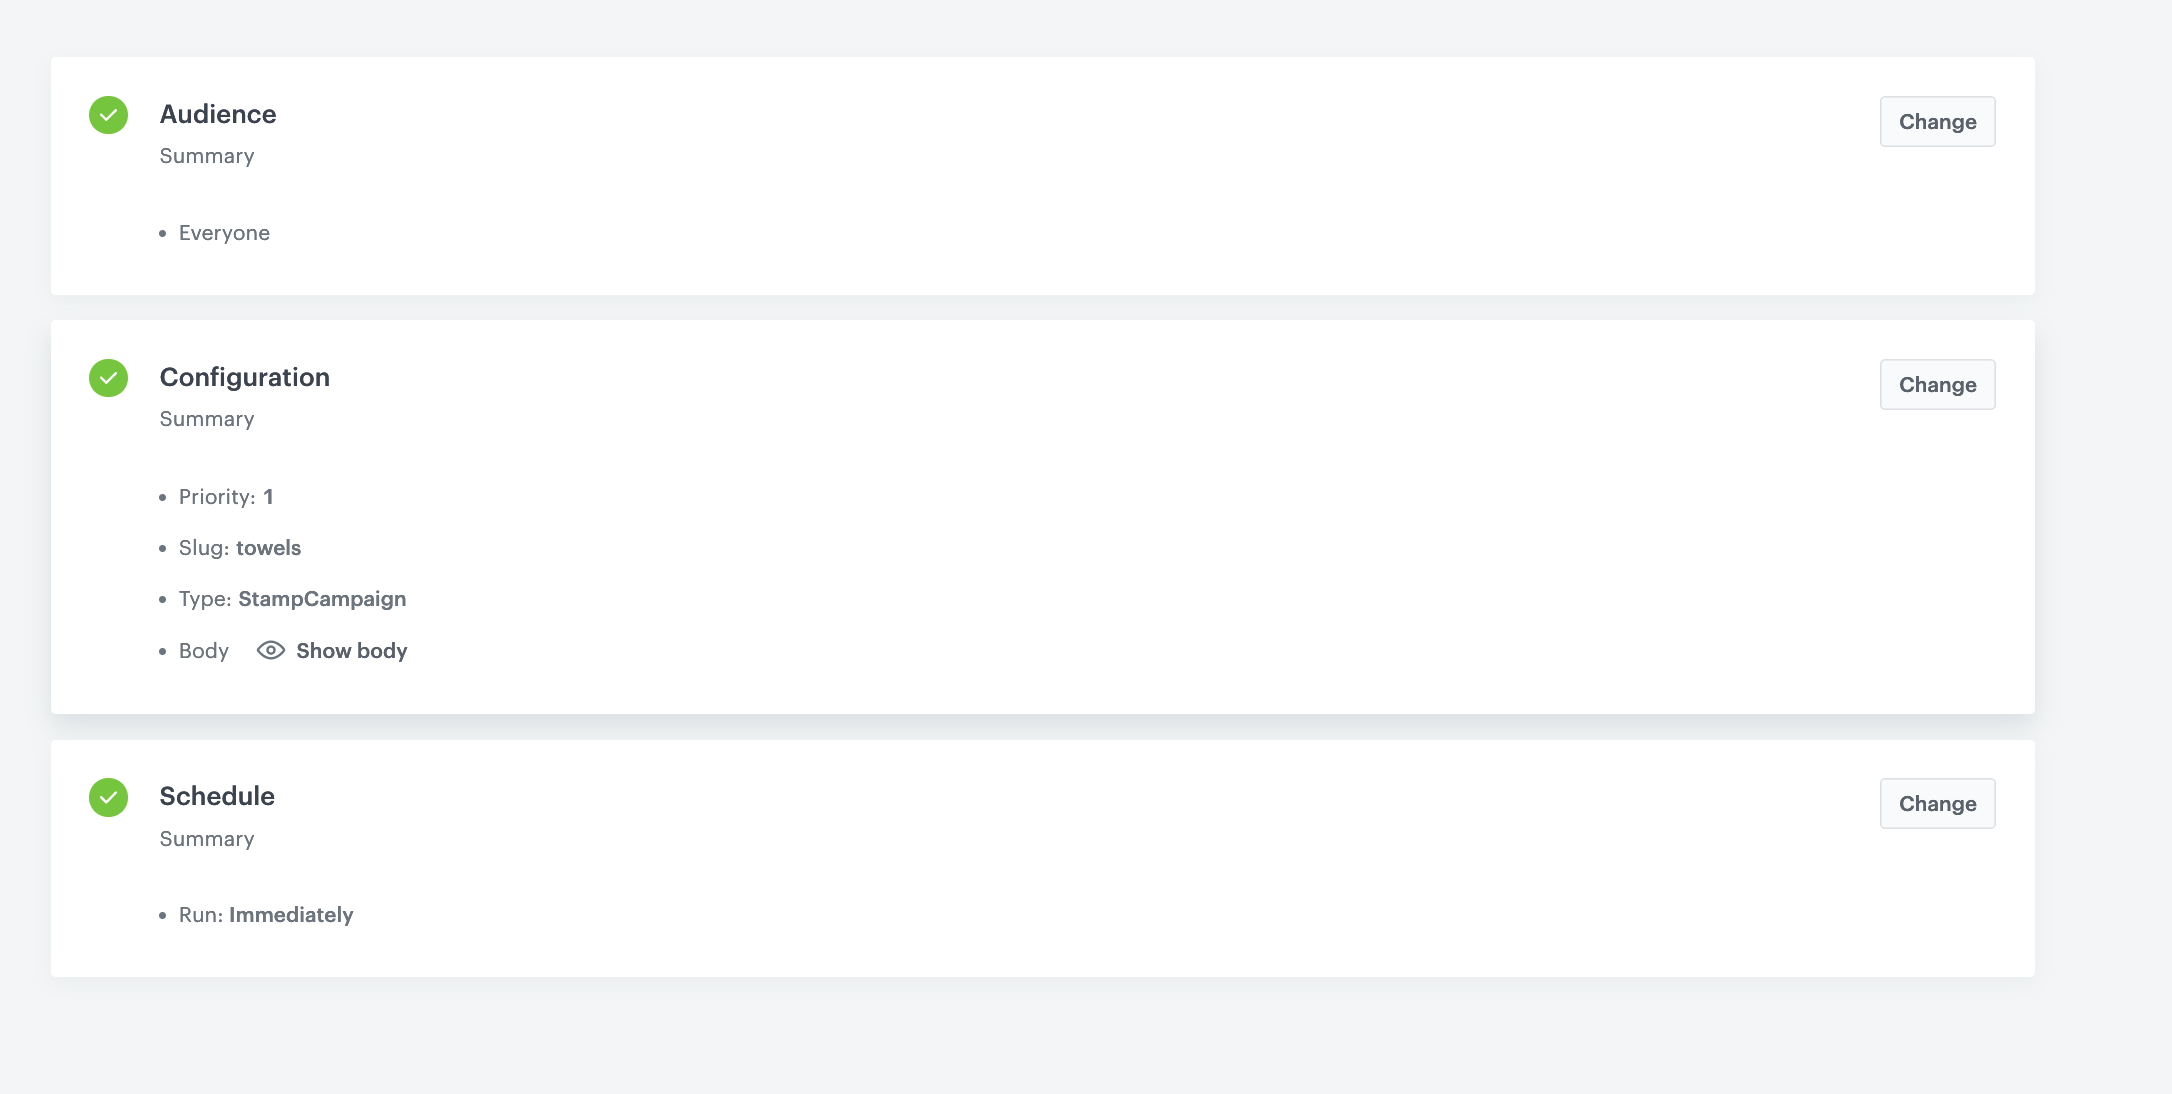
To create a document, you have to set up three steps of settings: audience, configuration, and schedule.
Set up Audience
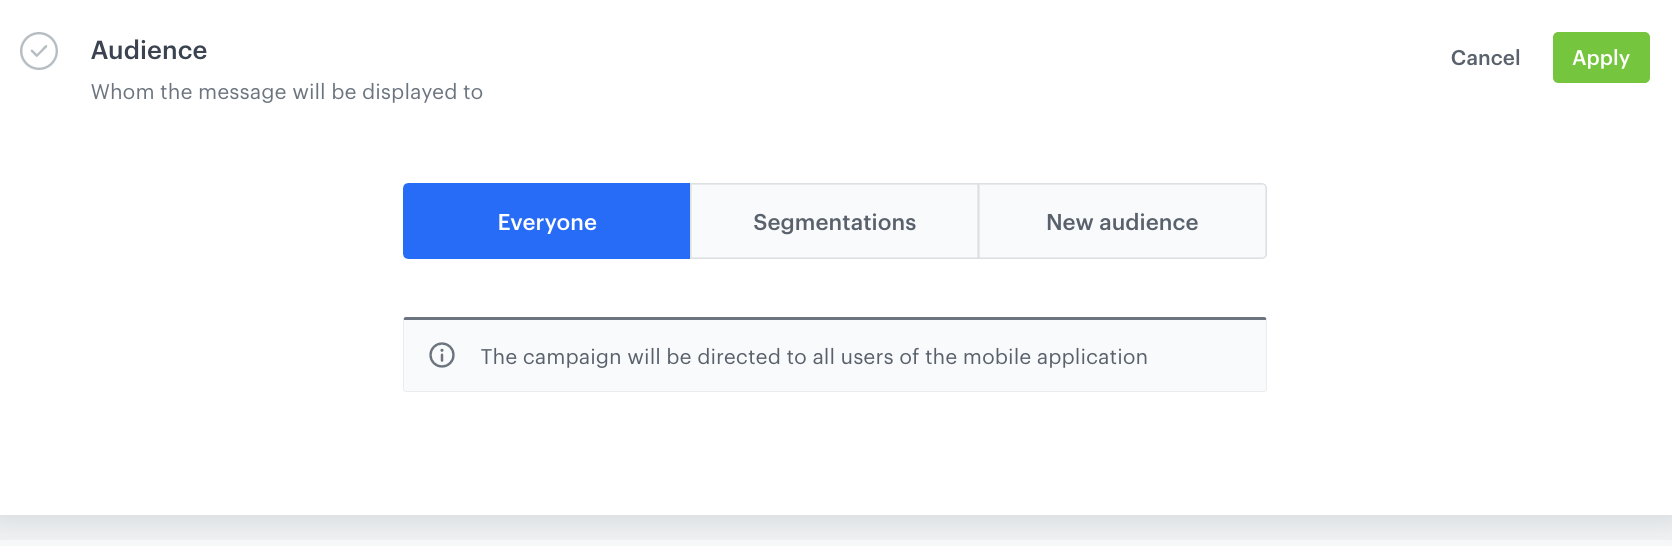
In the audience section, determine who will be the recipient of the document.
- Click Define,
- Select Everyone,
- Save by clicking Apply.
Set up the Configuration section
In the configuration section, determine the content of the document.
-
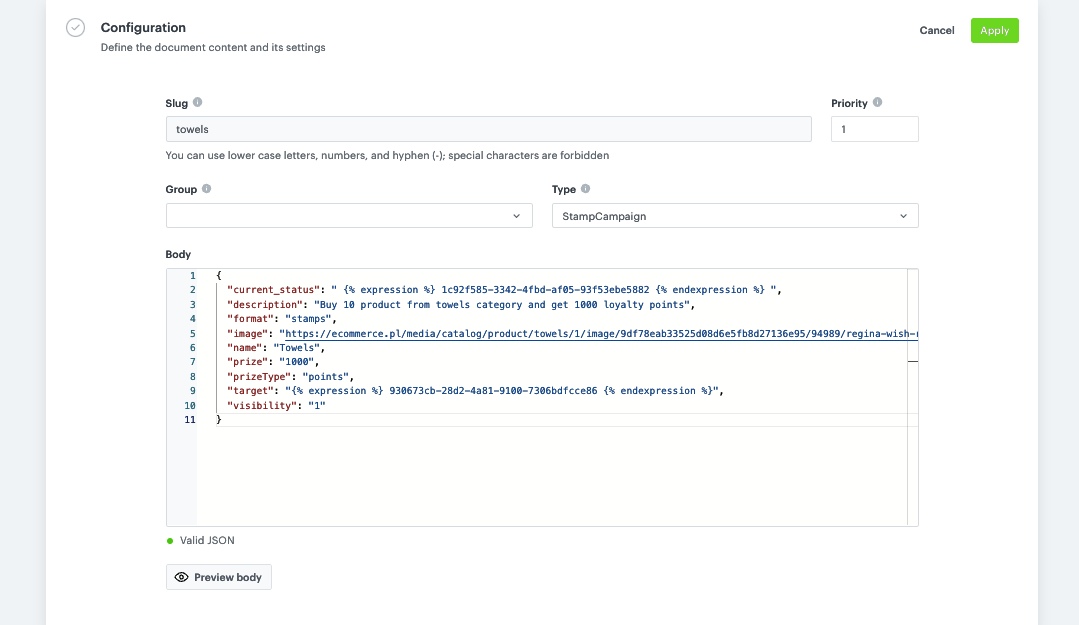
In the Slug field, enter the slug of the document, we recommend using the following name convention: this-is-slug-name. In our example enter the name of the event as
towels. -
In the Priority field, use a number to define the document priority. The order of documents is defined by the priority value (1 is the highest, 100 is the lowest). In our example it will be
1. -
From the Type dropdown list, select a document type. Document type defines how the document is validated by your mobile application. To create a new type, from the dropdown list, click Add type. In our example it will be
StampCampaign. -
In the Body field, add the content of the promotion in the JSON format. Body content will depend on the scenario of loyalty program. In our case, we display the results of the expressions created in previous parts of the process, a description, image, and some more information about the conditions of completing quest.
In the{ "current_status": " {% expression %} 1c92f585-3342-4fbd-af05-93f53ebe5882 {% endexpression %} ", "description": "Buy 10 product from towels category and get 1000 loyalty points", "format": "stamps", "image": "https://ecommerce.pl/media/catalog/product/towels/1/image/9df78eab33525d08d6e5fb8d27136e95/94989/regina-wish-recznik-papierowy-bialy-2-rolki-reczniki-papierowe-artykuly-higieniczne_0.jpg", "name": "Towels", "prize": "1000", "prizeType": "points", "target": "{% expression %} 930673cb-28d2-4a81-9100-7306bdfcce86 {% endexpression %}", "visibility": "1" }current_statusandtargetparameters, we are referring to the expressions created earlier in the process. Thecurrent_statusexpression returns the actual number of products bought by the client, while thetargetexpression determines the number of products needed to complete the quest. -
Save by clicking Apply.
Set up Schedule
In the schedule section, set the document activation date.
- Define the period as Run Imediately
- Save by clicking Apply.
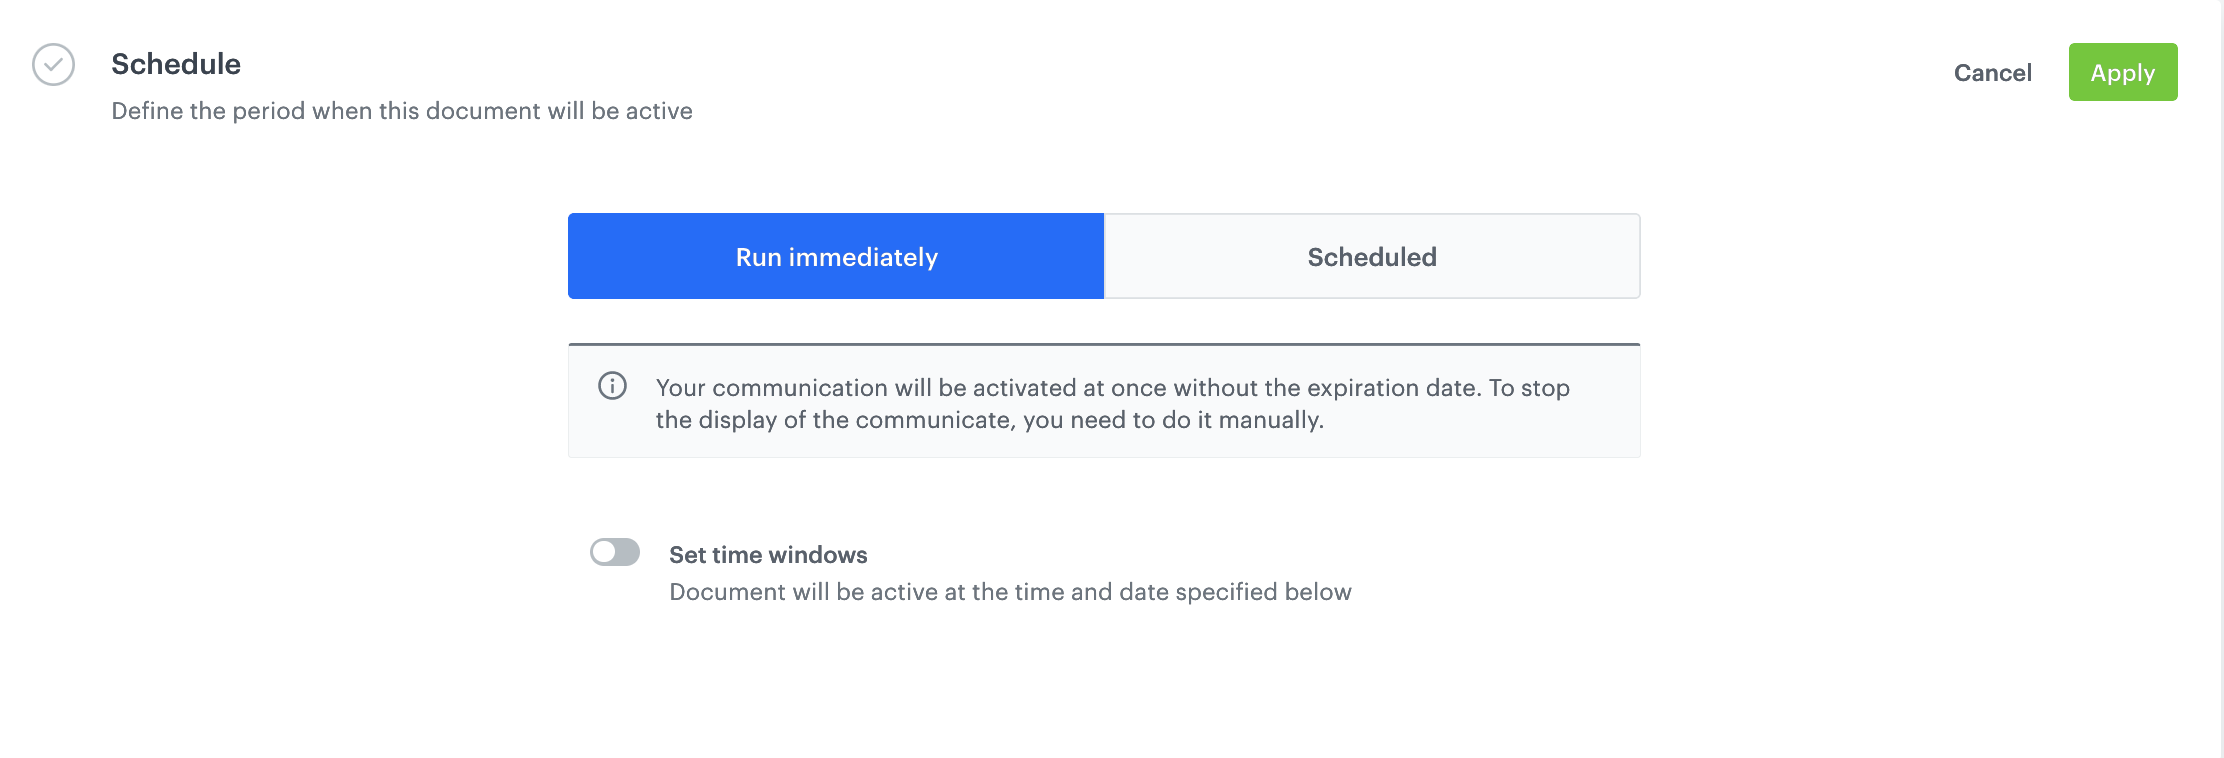
To activate immediately or at a scheduled date, click the Activate button.
What’s next
For a screen view to be visible in a mobile application, you must fetch it using the appropriate SDK method for:
Check the use case set up on the Synerise Demo workspace
You can check the configuration of every element of this process directly in Synerise Demo worksp,ace:
- Aggregates with timestamp of last finished quest
- Aggregates with number of products purchased after last finished quest
- Expressions with the number of products required to complete the quest
- Expressions that returns the number of products purchased
- Expressions checking the conditions for completing the quest
- Documents
- Workflow
If you don’t have access to the Synerise Demo workspace, please leave your contact details in this form, and our representative will contact you shortly.