Suggest heavy buyers higher-priced items from their most frequently purchased brands
The search engine is sometimes underestimated, even though it is a critical component of an e-commerce site’s user experience and directly affects customer satisfaction and conversion rates. Efficient search engine optimization is essential for e-commerce businesses looking to improve their site’s search functionality, increase customer engagement, and drive sales growth.
The main benefit of personalizing search results is improved relevance, which leads to increased engagement. By defining the recipients for search query rules, you can offer targeted and personalized search results to specific customer groups. By analyzing customer behavior and purchase patterns, you can identify customers who share similar preferences and interests, enabling you to tailor search results to meet their unique needs and preferences.
In this use case, we are targeting heavy buyers who frequently purchase products from specific brands. By creating a segmentation that contains these customers, we can use query rules to suggest higher-priced items from the brands they already know and trust.
Prerequisites
- Enable the AI Search Engine for your workspace.
- Create and configure search index and in the filterable attributes add
Priceas a range attribute. - Implement transaction events using SDK or API.
- Implement AI search in any of your channels (mobile app, website, and so on).
- Create an RFM analysis thanks to which you will be able to define the segmentation of heavy buyers. You’ll find a detailed process for creating the RFM analysis in this use case.
Process
In this use case, you will go through the following steps:
- Create segmentation of heavy buyers based on RFM analysis.
- Create an aggregate to calculate the average value a customer spent in the last 30 days.
- Create an aggregate to identify top-bought brands.
- Create a query rule based on the prepared segmentation and aggregates created in the previous steps. This rule will enforce showing heavy buyers higher-priced products from the top brands they most frequently purchase in search results.
Create a segmentation of heavy buyers
In this part of the process, create a segmentation of heavy buyers based on the RFM segmentation you created earlier.
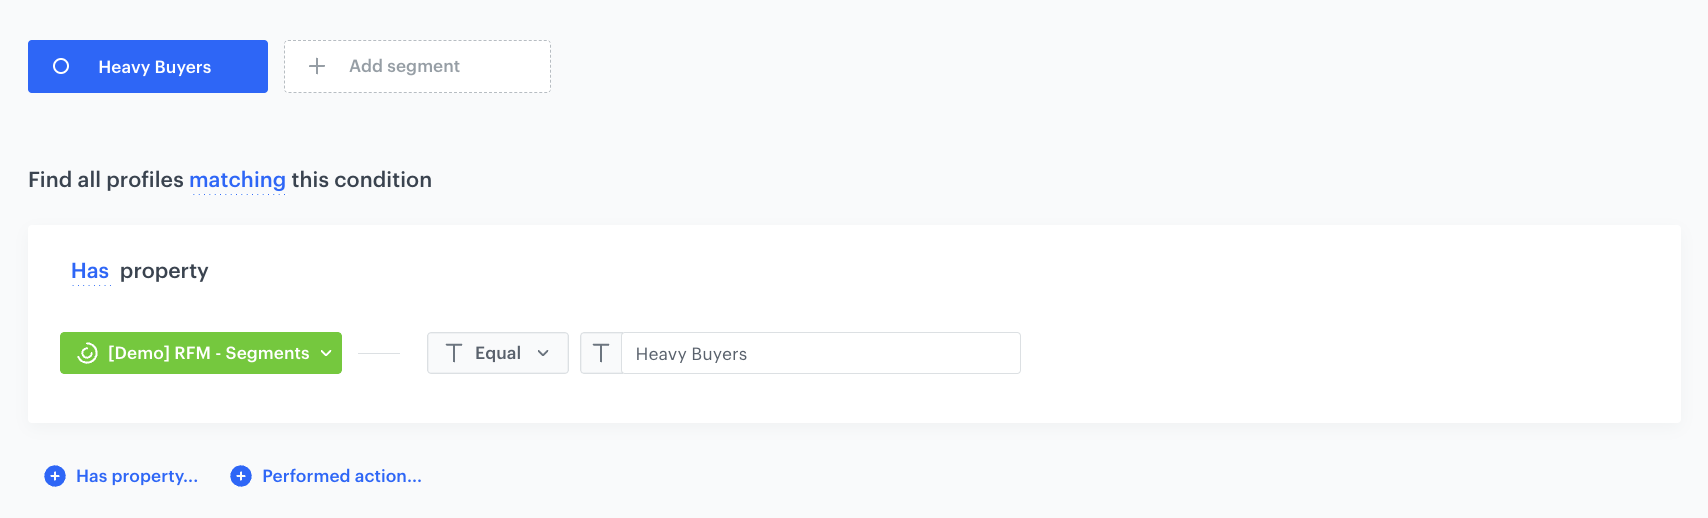
- Go to Analytics > Segmentations V2 > New segmentation.
- Enter the name of the segment.
- Choose Has property and find the RFM segmentation you created earlier.
- Select the Equal operator and in the right field enter the name of the sub-segment that defines the heavy buyers. In our case, we type -
Heavy Buyers - Save the aggregate.
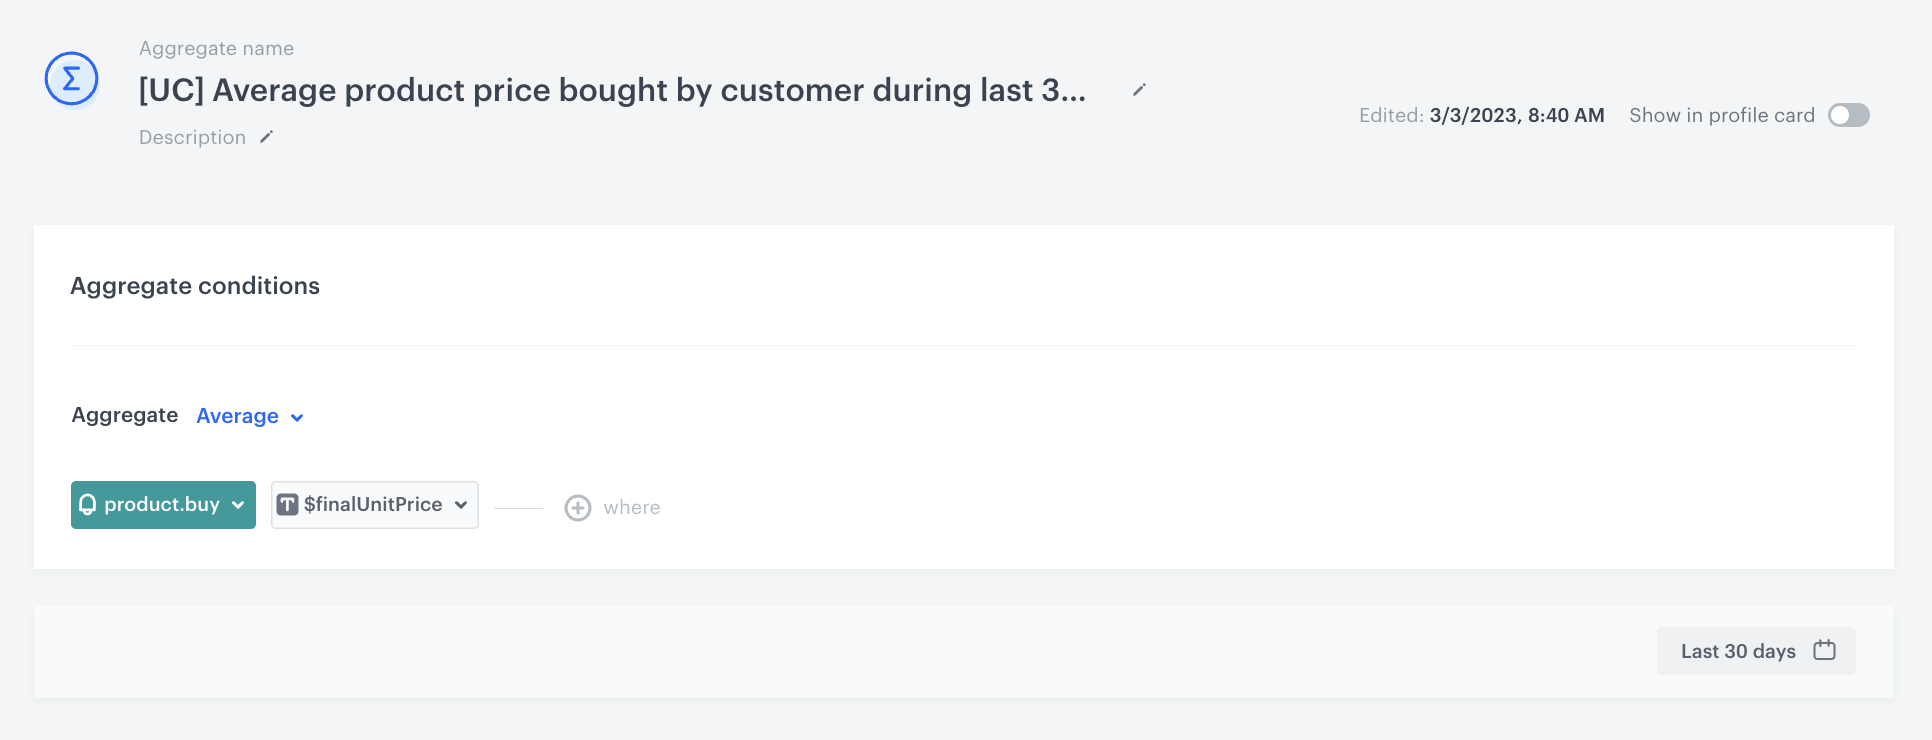
Create an aggregate for average customer purchase expenses
In this section, create an aggregate that returns the average value of products purchased by an individual customer in the last 30 days.
- Go to
 Analytics > Aggregates > New aggregate.
 - Enter the name of the aggregate.
- As the type of the aggregate, select Average.
- From the Choose event dropdown list, select the
product.buyevent. - As the event parameter, select $finalUnitPrice.
- Define the period from which data will be analyzed. In our case it will be last 30 days.
- Save the aggregate.
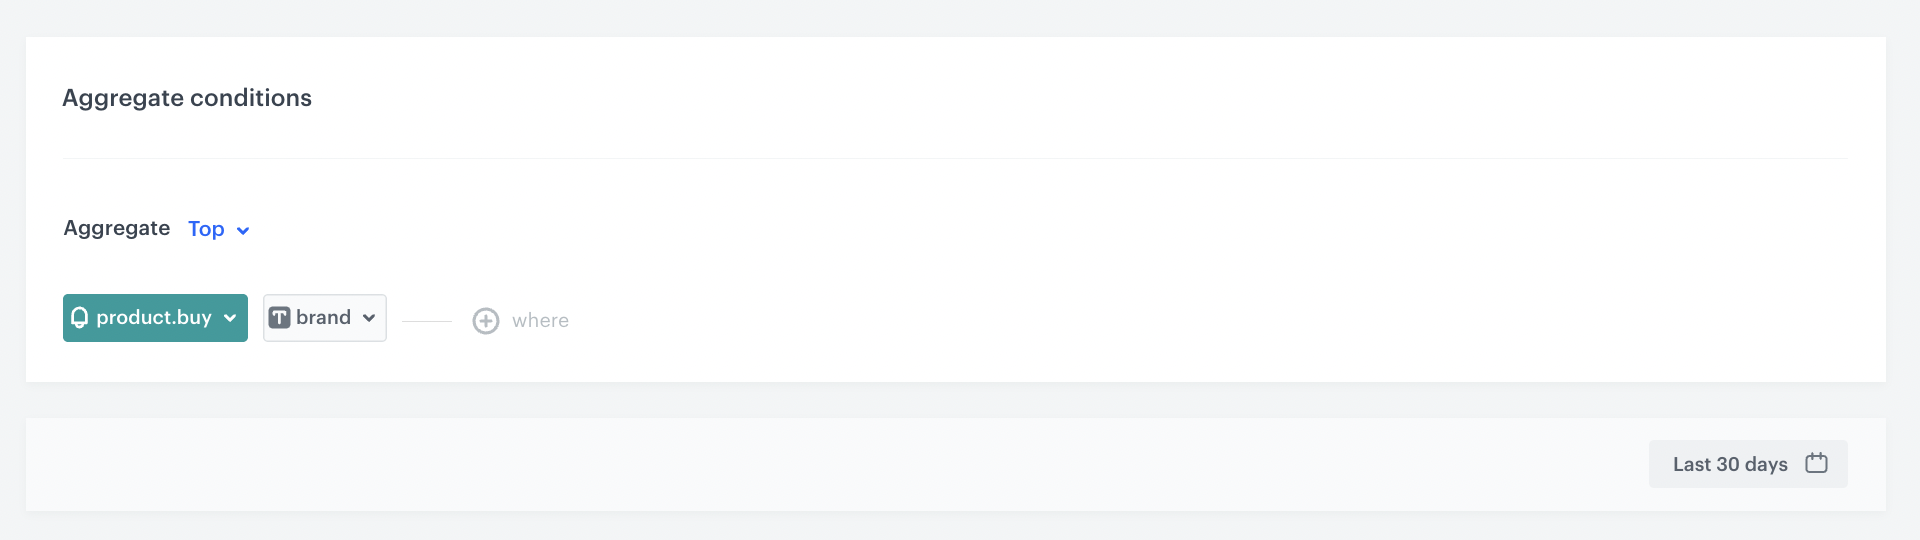
Create aggregates to identify top-bought brands
In this section, create an aggregate that returns the top-bought brands by an individual customer.
- Go to Analytics > Aggregates > New aggregate.
- Enter the name of the aggregate.
- As the type of the aggregate, select Top.
- From the Choose event dropdown list, select the product.buy event.
- As the event parameter, select brand.
- Define the period from which the aggregate will return products from the event.
- Save the aggregate.
Create a query rule
In this part of the process, create a query rule for heavy buyers that will enforce showing to them higher-priced products from the top brands they most frequently purchase in search results.
- Go to
 AI Search > Indexes.
 - Select an index from the list.
- Go to the Rules section.
- On the right side of the screen, click Add rule.
- Name the rule.
- To define the audience group for the rule, in the Audience section, click Change.
- Choose the Segments tab and click Add segments.
- Find the segment of heavy buyers you created earlier in the process and apply that segment.
- To adjust the query conditions, in the Conditions section, click Define.
- Choose the All queries tab.
- Click Apply.
- To define how the search engine reacts to the defined conditions, in the Consequences section, click Define.
- Click Add consequence and choose Filter query results from the dropdown list.
- From the Attribute dropdown list, choose
Price. - Choose the More than operator.
- In the left field, click the # icon and from the dropdown list, select Aggregate.
- From the list, choose aggregate created earlier in the process.
- Click Add filter and from the Attribute dropdown list, choose Brand.
- Choose the In operator.
- In the left field, click the T icon and from the dropdown list, select Aggregate.
- From the list, choose aggregate created earlier in the process.
- Enable the Mark as elastic option to make sure that the items you set will appear at the top of the search results. If you do not activate this option, search results will show only those products.
- Click Apply.
- In the Schedule section, you can define when the query rule applies.
- Click Save & Publish.

Check the use case set up on the Synerise Demo workspace
You can check the segmentation configuration directly in Synerise demo workspace:
- Segmentation of heavy buyers,
- Aggregate with the average value a customer spent in the last 30 days,
- Aggregate to identify top-bought brands,
- Query rule settings.
If you don’t have access to the Synerise Demo workspace, please leave your contact details in this form, and our representative will contact you shortly.