
Create email template with catalog-based banners
In today’s fast-paced digital landscape, email marketing has evolved into a powerful tool for businesses to connect with their customers. The effectiveness of email campaigns often hinges on personalization. The ability to tailor content, products, and offers to individual recipients can significantly impact Key Performance Indicators (KPIs) and enhance the overall user experience.
Email personalization goes beyond addressing the recipient by their first name; it’s about delivering content that speaks directly to their interests, needs, and preferences. Such personalization can be done based on any attributes or activities of the customer, such as, for example, the customer’s club status, transaction history, age in combination with any other variables, such as even the day of the month/week. The number of possible scenarios is huge, making it a great place to implement the most daring ideas.

This use case describes a scenario in which customers receive email banners tailored to the following criteria:
- Current Day of the Month: Depending on the day, customers receive banners with special promotions relevant to that day.
- Transaction History: Customers are segmented into two groups based on whether they have made a transaction in the last 180 days or not.
Assumptions:
- The email is part of a specific marketing campaign scheduled for a particular month.
- All banner graphics and their links are stored in a catalog, with each day of the month having its own banner graphic for the respective audience.
Scenarios:
Group 1: Customers with recent transactions
For customers who have made at least one transaction in the last 180 days:
- Days 1-15: They receive Banner 1, offering a special promotion.
- Days 16-31: They receive Banner 2, featuring a different special promotion.
Group 2: Customers with no recent transactions
For customers who have not made any transactions in the last 180 days:
- Days 1-15: They receive Banner 1, offering a specific discount for a particular product category.
- Days 16-31: They receive Banner 2, with a different discount for another product category.
Prerequisites
- Implement Synerise tracking code on your website.
- Permissions that allow access to Catalogs section and adding new catalogs.
- Implement the transaction events using SDK or API.
- Configure a sender account.
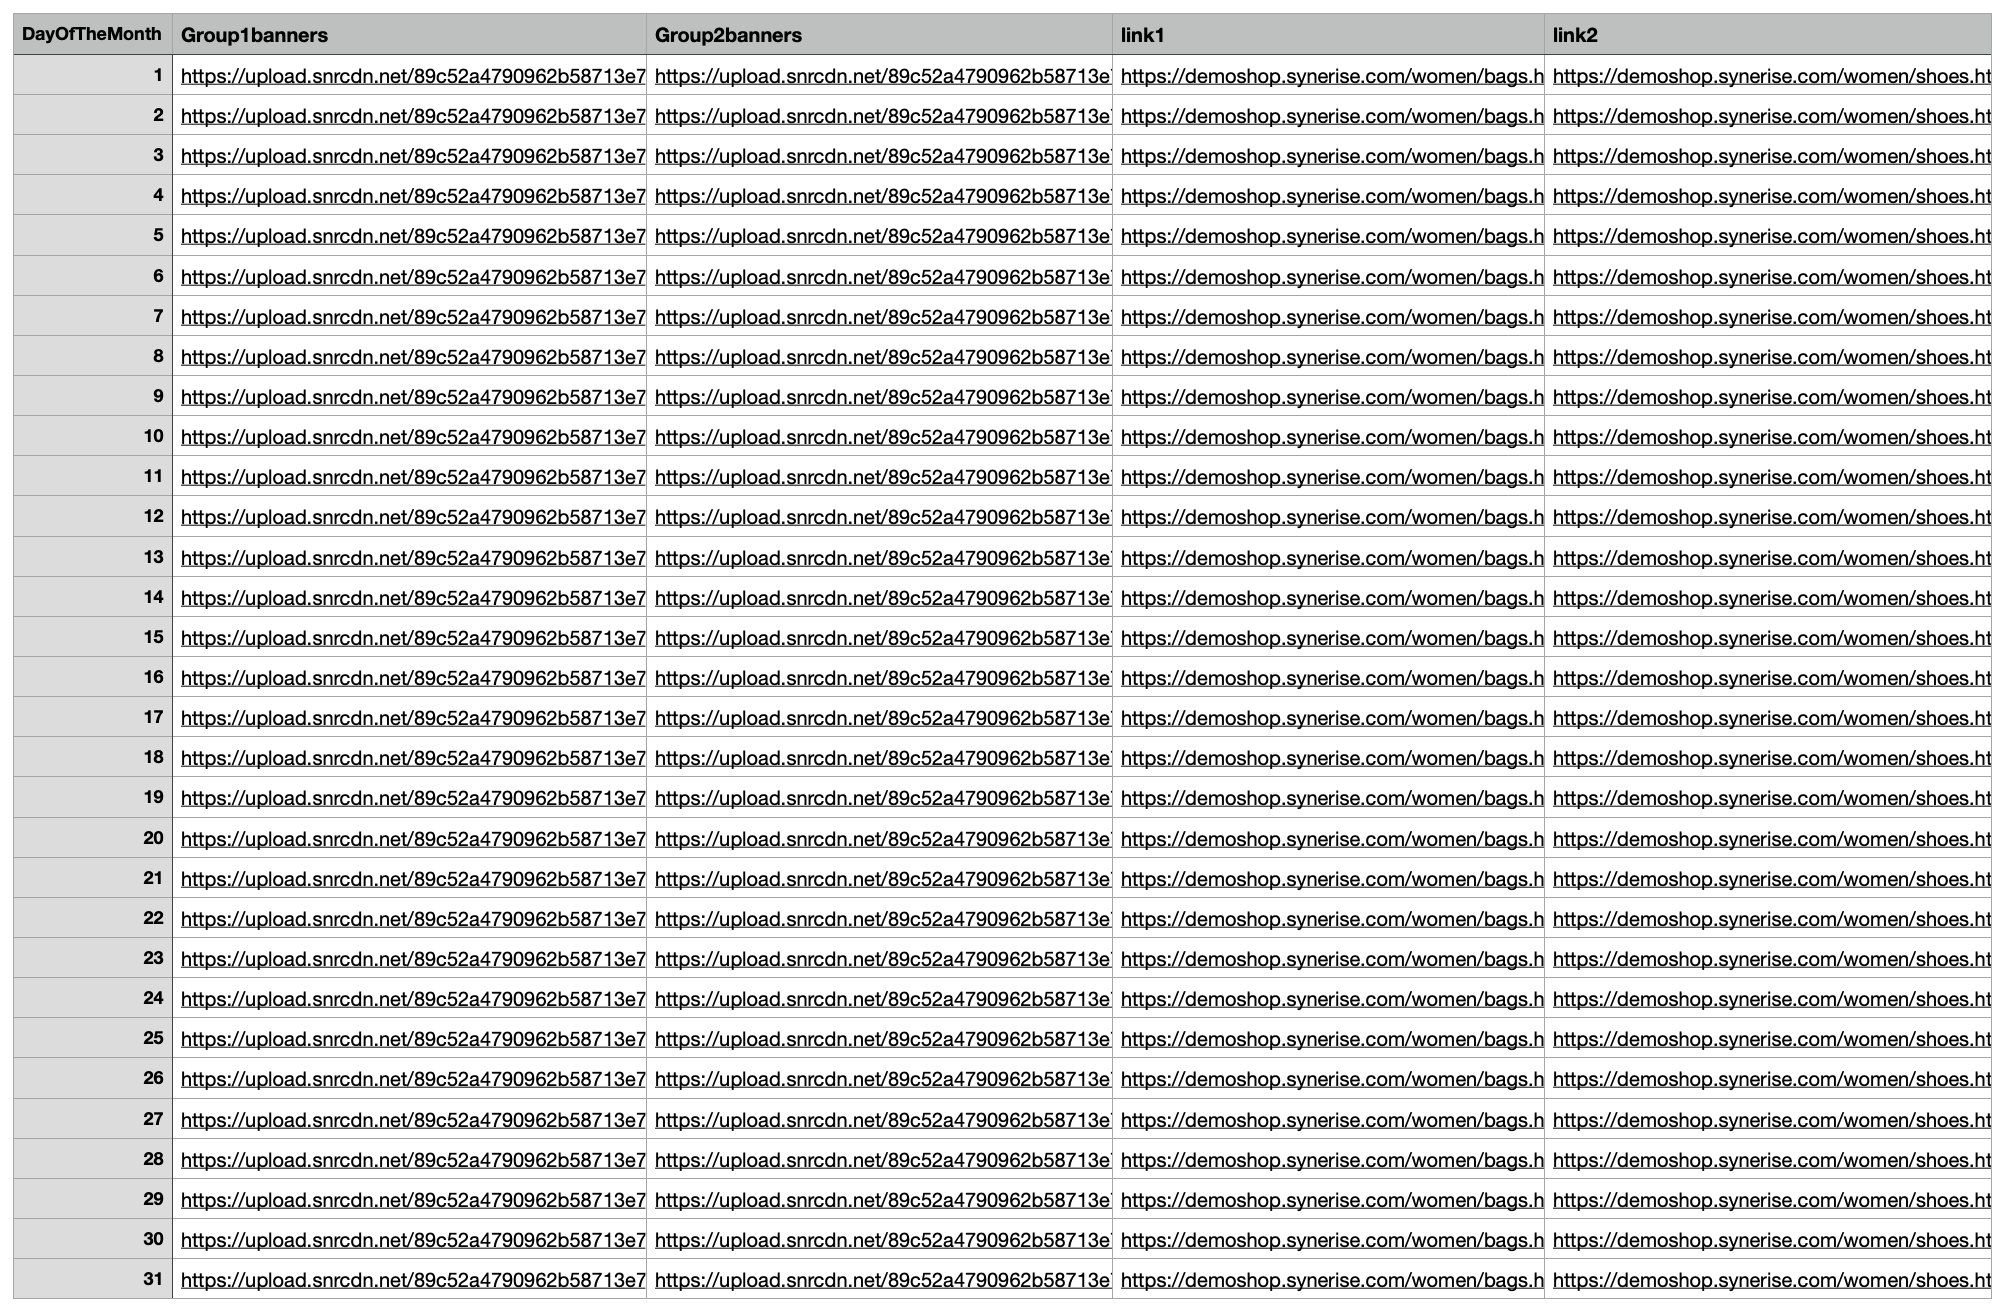
- Prepare a CSV file with banner graphics and corresponding links assigned to a specific day of the month and customer segment.
The file used in this use case contains the following columns:DayOfTheMonth- column that contains the days of the month (this column will be used as a catalog key)Group1banners- column that contains banners dedicated to Group 1 (customers who have made at least one transaction in the last 180 days)Group2banners- a column that contains banners dedicated to Group 2 (customers who have not made any transaction in the last 180 days)link1- column that contains links to banners dedicated for Group 1link2- column that contains links to banners dedicated to Group 2
Process
- Create a catalog with banners assigned to specific days of the week and customer segments.
- Create an aggregate showing whether a customer has made a transaction in the last 180 days.
- Create a jinjava insert to be used in the email template.
- Create an email template.
Create a catalog
In this part of the process, create a catalog and import there your CSV file you prepared as a part of prerequisites.
- Go to Data Management > Catalogs > New Catalog.
- Enter the name of the catalog and confirm it by clicking Apply.
Important: Don’t use diacritical letters, underscores (
_), and spaces. - Click the catalog on the list and click Import Local File.
Warning for MacOS users
If you prepared a CSV file in Excel, open it in a text editor to check whether commas are used as separators. If not, replace them with commas. - Click the Upload a new file button and select the file to be uploaded, then click Next button.
- You will see the information that your file has been successfully uploaded. Click Next button to continue the import process.
- In the Primary key field, type the name of the column whose values are treated as the key. In this case it will be
DayOfTheMonth. Click Next button to continue the process.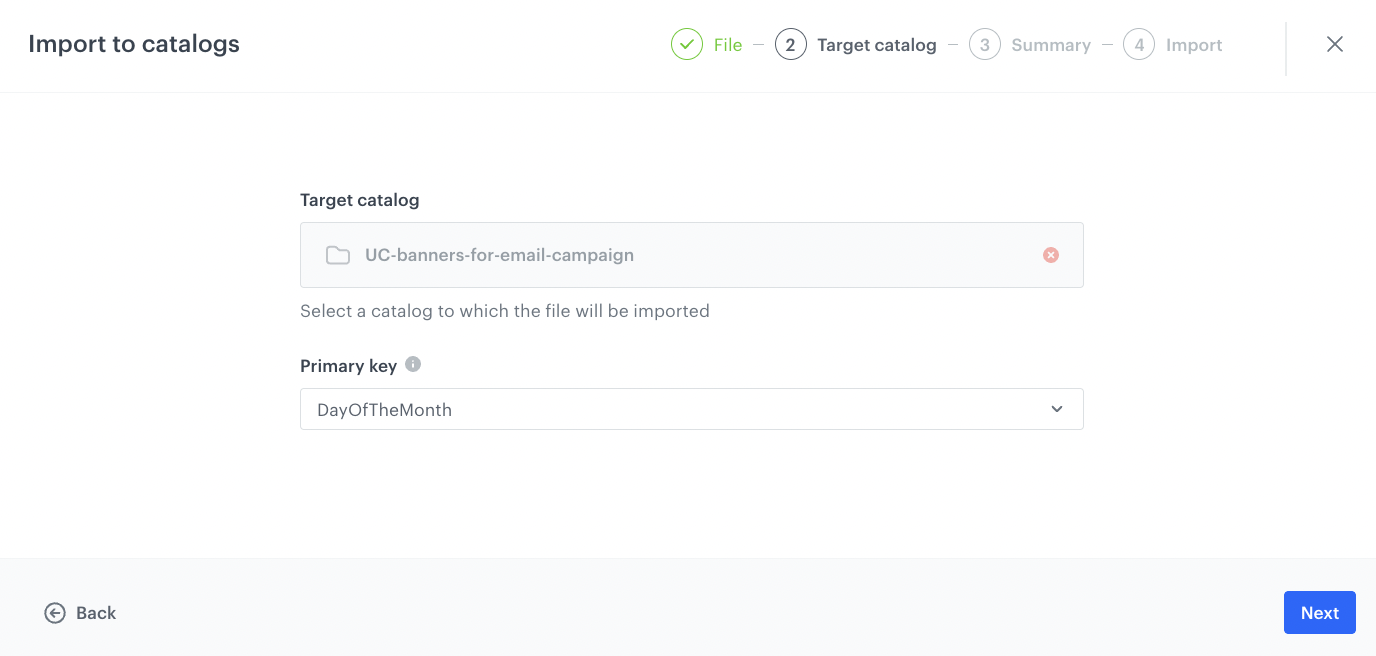
Catalog primary key configuration - In the next screen you will find the summary of your import. If no changes are needed click Run import button.
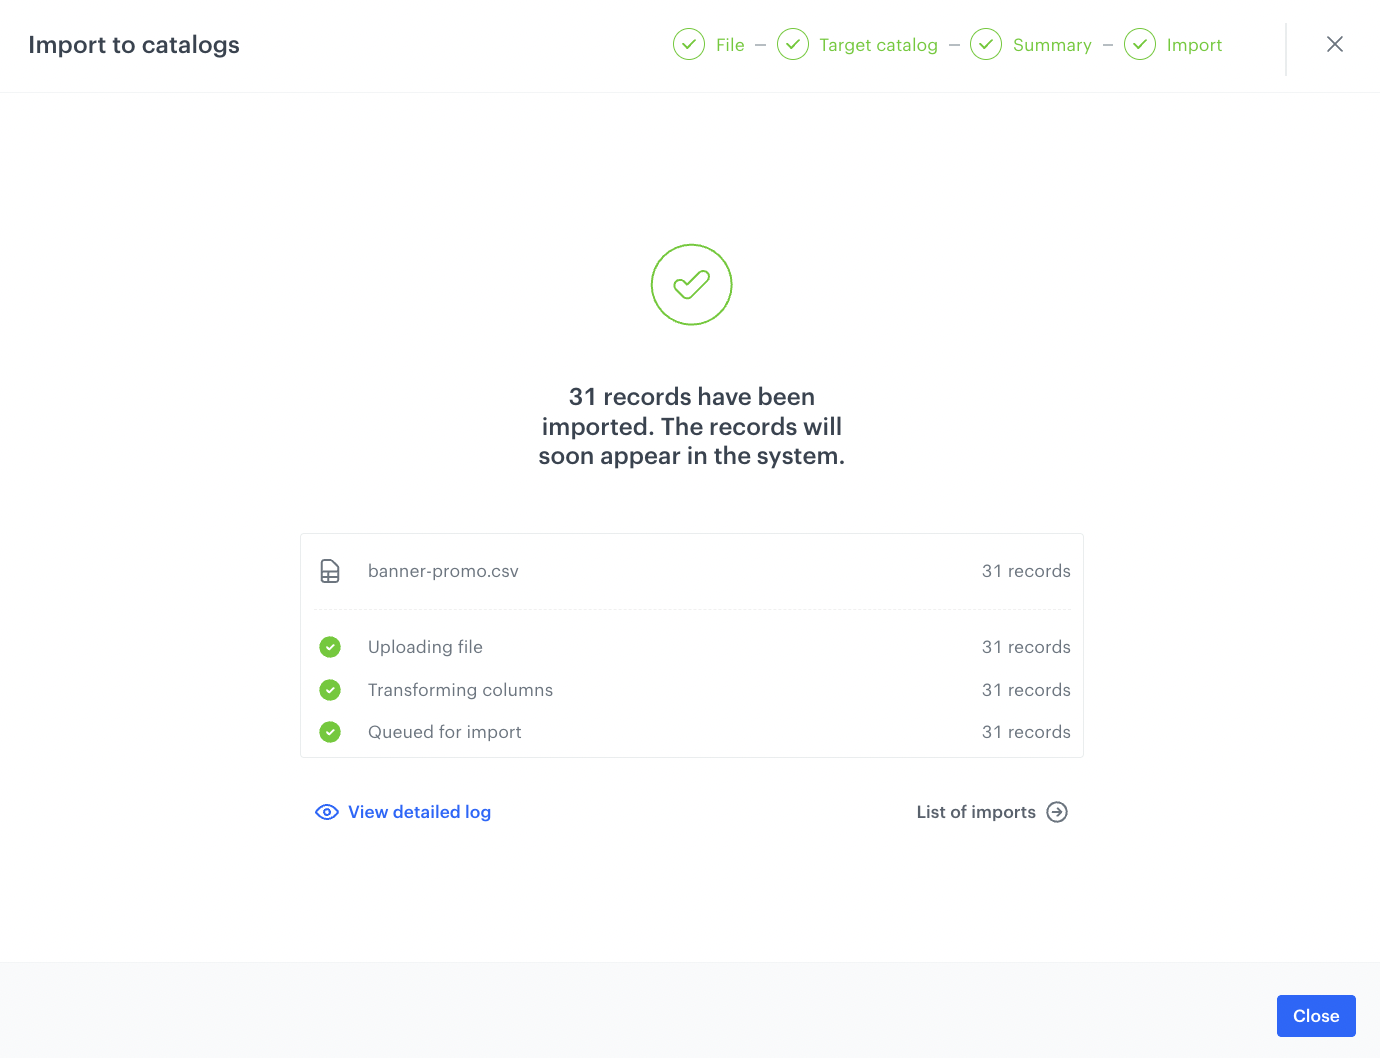
Import success
Create an aggregate
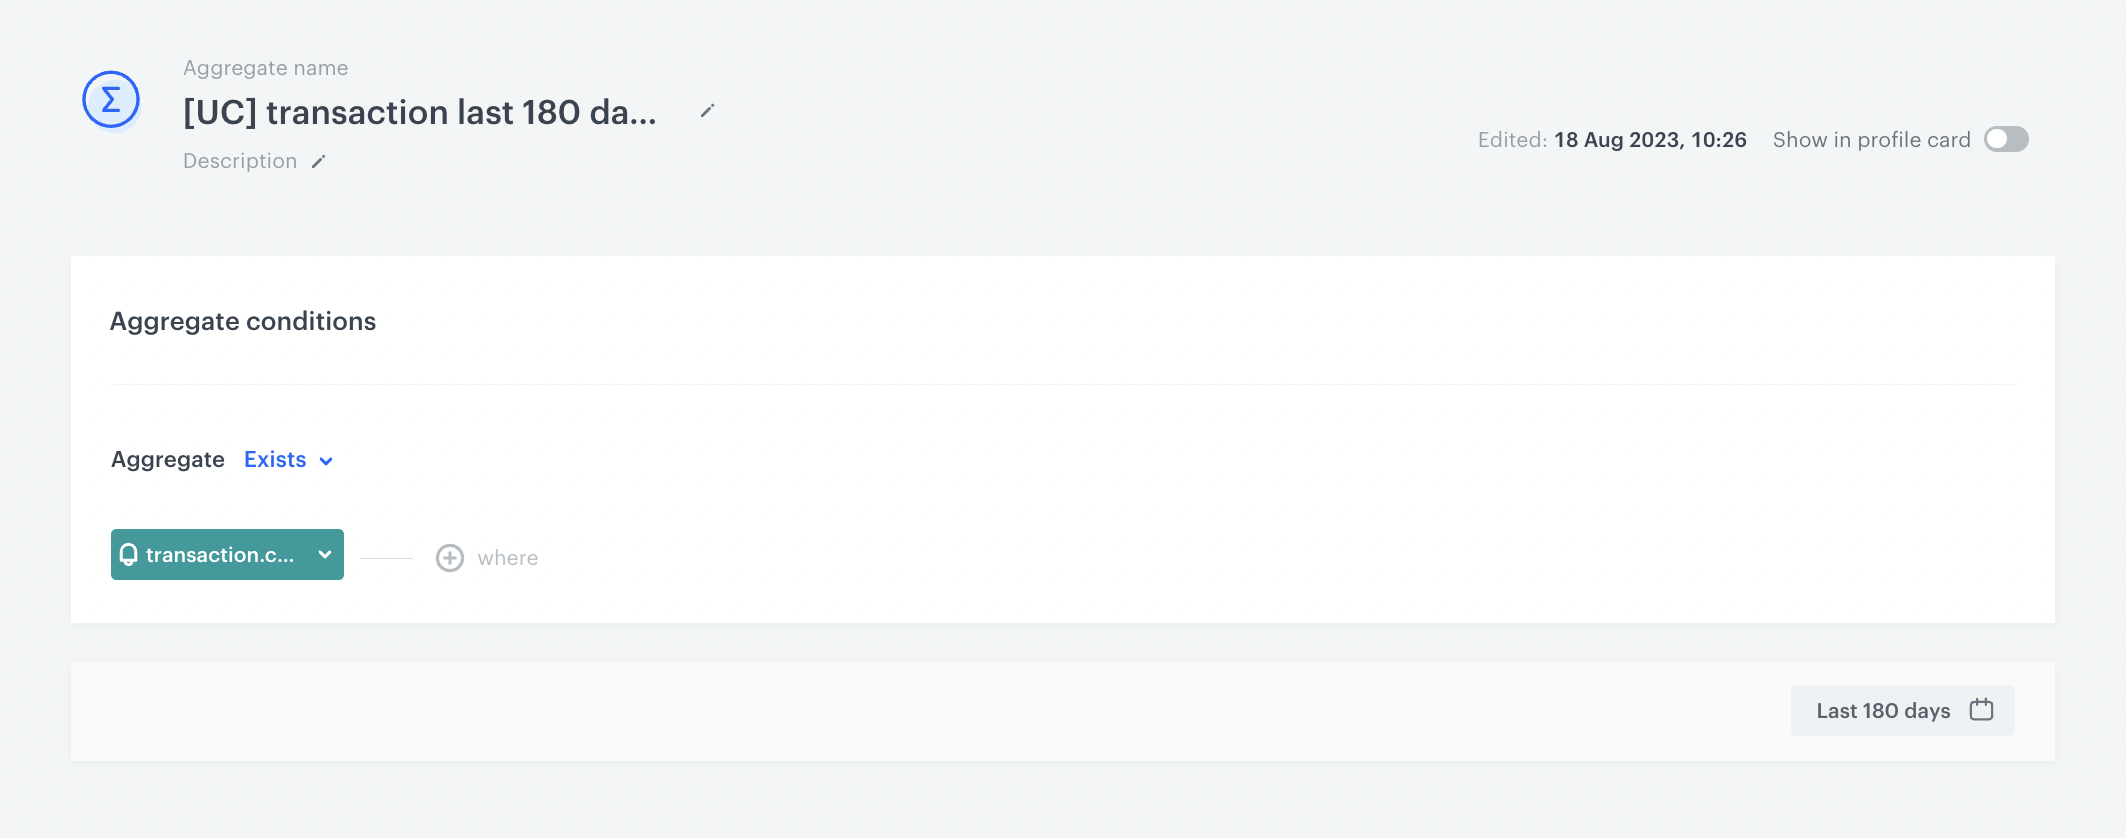
Create an aggregate that show whether a customer has made a transaction in the last 180 days. The ID of this aggregate will be later used in the Jinjava code.
- Go to
 Analytics > Aggregates > New aggregate.
 - Enter the name of the aggregate.
- As the type of the aggregate, select Exists.
- From the Choose event dropdown list, select the transaction.charge event.
- Set the period from which the aggregate will analyze the results to the last 180 days.
- Save the aggregate.
Create a Jinjava insert
In this part of the process, prepare a Jinjava insert that will be used in the email template to display the relevant banner from the current day of the month to the appropriate customer segment.
Below you can find the jinjava insert used in this use case. There is the list of used values that you need to replace to tailor this Jinjava to your campaign:
- replace
insert_aggregate_IDwith the ID of your aggreagate - replace
insert_aggregate_namewith any unique aggregate name - replace
insert_catalog_namewith your catalog name - in the
{{ catalog_result.link1 }},{{ catalog_result.link2 }}and{{ catalog_result.Group1banners }},{{ catalog_result.Group2banners }}replace thelink1,link2andGroup1banners,Group2bannerswith the names of respective columns from the created catalog.
<!-- The purpose of the following part of Jinjava is to calculate the day of the month that corresponds to the current date plus 1 hour and save it as a string.).-->
{% set now = (unixtimestamp(null)|plus_time(1, 'hours'))|unixtimestamp() %}
{% set now_sec = now|divide(1000) %}
{% set current_date = (now_sec|int*1000)|datetimeformat('%d.%m.%y') %}
{% set current_date_array = current_date|split('.') %}
{% set today = current_date_array[0] %}
{% set todayString = today|int|string %}
<!-- The logic behind the remaining part of Jinjava determines which set of HTML elements to generate based on the value of the aggregate result and the relevant links and image data from the catalog. This part divides customers into 2 groups based on their transaction activity (customers who have or have not made any transaction in the last 180 days).-->
{% aggregate insert_aggregate_ID  %}
{% set insert_aggregate_name = aggregate_result|last %}
{%if insert_aggregate_name =='true' %}
{% catalogitemv2.insert_catalog_name(todayString) %}
<a href="{% preparelink %}{{ catalog_result.link1 }}{% endpreparelink %}">
<img src="{{ catalog_result.Group1banners }}">
</a>
{% endcatalogitemv2 %}
{% else %}
{% catalogitemv2.insert_catalog_name(todayString) %}
<a href="{% preparelink %}{{ catalog_result.link2 }}{% endpreparelink %}">
<img src="{{ catalog_result.Group2banners }}">
</a>
{% endcatalogitemv2 %}
{% endif %}
{% endaggregate %}
Create an email template
In this part of the process, create an email template. You can use a predefined template or create your own template from scratch. In this case, we will use the predefined template.
- Go to
 Communication > Email.
 - On the left pane, click Templates and from the list of template folders, select Predefined simple templates.
- Select any template that mostly fits the campaign assumptions.
Result: You are redirected to the code editor. - Edit the template according to your needs and add the row dedicated to the banner section.
- Add HTML from the Content section to the created row and insert the Jinjava code you created in the previous step.
- After you make changes to the template, you can check the preview.
- Click the Preview Contexts button on the upper left side.
- Enter the ID of a customer.
- Click Apply.
- If the template is ready, in the upper right corner, click the arrow next to Next, and from the dropdown select Save as.
- On the pop-up:
- In the Template name field, enter the name of the template.
- From the Template folder dropdown list, select the folder where the template will be saved.
- Confirm by clicking Save.
Below you can find an example of email context preview.

What’s next
You can use this template in an email campaign by sending it manually or setting it up in the Automation module as part of your business scenario.
Check the use case set up on the Synerise Demo workspace
You can check the configuration of each step directly in the Synerise Demo workspace:
If you don’t have access to the Synerise Demo workspace, please leave your contact details in this form, and our representative will contact you shortly.