

Optimize sending sales campaigns by predicting the best time
While designing a sales campaign communication scenario, it’s good to send messages at the time when the customer is most likely to react to them . To achieve this, you can make use of the time optimizer feature.
This use case describes sending a sales campaign through the Automation module. The workflow starts with sending an email with a promotional code to all customers. The sending time of the email is adjusted to the customers’ activity related to the email channel.
If a customer makes a purchase within 3 days after sending the email, they end the workflow. In the case when a customer didn’t make the purchase, the system checks if they visited the website. If so, the system sends an email with recommendations of items from the last visit that have the same attributes as the items on sale.
The optimization of the sending date of the second email covers activity of your customers in all channels.
Prerequisites
- Implement a tracking code.
- Implement transaction events.
- Create a sender account.
- Enable time optimizer.
- Create email templates:
- Email with a discount code
- Email with recommendations of items from the last visit that match attributes with items on sale
Note: You can find instructions on preparing email templates here.
Process
In this use case, you will go through the following steps:
Create modes
As the first part of the process, create two time optimizer modes. They will be used in the workflow in further part of the process.
- Email mode - which analyzes only the interactions in the email channel
- Custom mode - which analyzes the interactions from all channels you use to communicate with your customers
Email mode
- Go to AI Engine Configuration.
- Select Time optimizer tab.
- Click Define.
- Click Add a new mode.
- On the pop-up, select Templates tab.
- Select Email.
- Click Apply.
Custom mode
- Go to AI Engine Configuration.
- Select Time optimizer tab.
- Click Define.
- Click Add a new mode.
- Select Custom.
- In the Mode name field, enter the name of the mode.
- From the Predicted event dropdown list, select page.visit.
- From the Input events dropdown list, select 6 events related with communication channels you use (for example,
newsletter.openandnewsletter.click(email),screen.viewandscreen.click(mobile),webpush.showandwebpush.click(web),sms.click(SMS) and so on). - Confirm by clicking Apply.
Create a workflow
As the second part of the process, create a workflow that manages email communication during your sales campaign.
- Go to Automation > Workflows > New workflow.
- Enter the name of the workflow.
Select audience
Select the customers for whom you want to run this workflow.
- As the first node, select Audience.
- In the configuration of the node:
- Leave the Run trigger option, at default (one time).
- As the audience, select New audience
- Click Define conditions
- Click Choose filter and from the list select the
email.agreement. Choose operatorBooleanand the value set astrue. - Click Apply.
- Confirm the settings of the audience by clicking Apply.
Add time optimizer
The time of sending the message for each customer is adjusted to their activity in the email channel.
- Add an Optimize time node.
- In the configuration of the node:
- Select the Email mode you created in previous part of the process.
- Select Custom time period.
- Set the period 48 hours.
- Confirm by clicking Apply.
Send email with discount code
- Add Send Email.
- In the configuration of the node:
- In the Sender details section, select the account from which you will send emails to your customers.
- In the Content section:
- Enter the subject of the email which will be visible in the inbox.
- Select the email template with a discount code.
- Optionally, in the URL & UTM paramters section, define the parameters. If you don’t want to do it, click Skip this step.
- Confirm by clicking Apply.
Wait for transaction event
The workflow waits for 72 hours (3 days) since the sending of the message, after this time the system verifies whether a customer made a purchase. If a customer made a purchase, the workflow ends.
- Add Event Filter.
- In the configuration of the node:
- Set the Check option to for period of time.
- Select 72 hours.
- From the Choose event dropdown list, select transaction.charge.
- Confirm by clicking Apply.
- To the matched path, add the End node.
- To the not matched path, add the Profile Filter node.
Check if customer visited website
If a customer didn’t make a purchase, the system checks whether they visited a website in the last 3 days. If not, the customer ends a workflow.
- In the configuration of the Profile Filter node:
- From the Choose filter dropdown list, select page.visit.
- As the date range, select Last 3 days.
- Confirm by clicking Apply.
- To the matched path, add the Optimize time node.
- To the not matched path, add the End node.
Add time optimizer
If a customer visited the website during last 3 days, an email will be sent to them. Before it happens, the system adjust the time of the sending by analyzing the activity of the customers in all channels you used to communicate with them before.
- In the configuration of the Optimize time node (after the Profile filter node):
- Select the Custom mode you created in previous part of the process.
- Select Custom time period.
- Set the period to 48 hours.
- Confirm by clicking Apply.
Send email with recommendations
An email with the recommendation of items visited during last visit is sent to a customer at the best time.
- Add Send Email.
- In the configuration of the node:
- In the Sender details section, select the account from which you will send emails to your customers.
- In the Content section:
- Enter the subject of the email which will be visible in the inbox.
- Select the email template with recommendations of items from the last visit that match attributes with items on sale.
- Optionally, in the URL & UTM paramters section, define the parameters. If you don’t want to do it, click Skip this step.
- Confirm by clicking Apply.
- After the Send Email node, add an End node.
- To run the workflow, click Save & Run.
Result: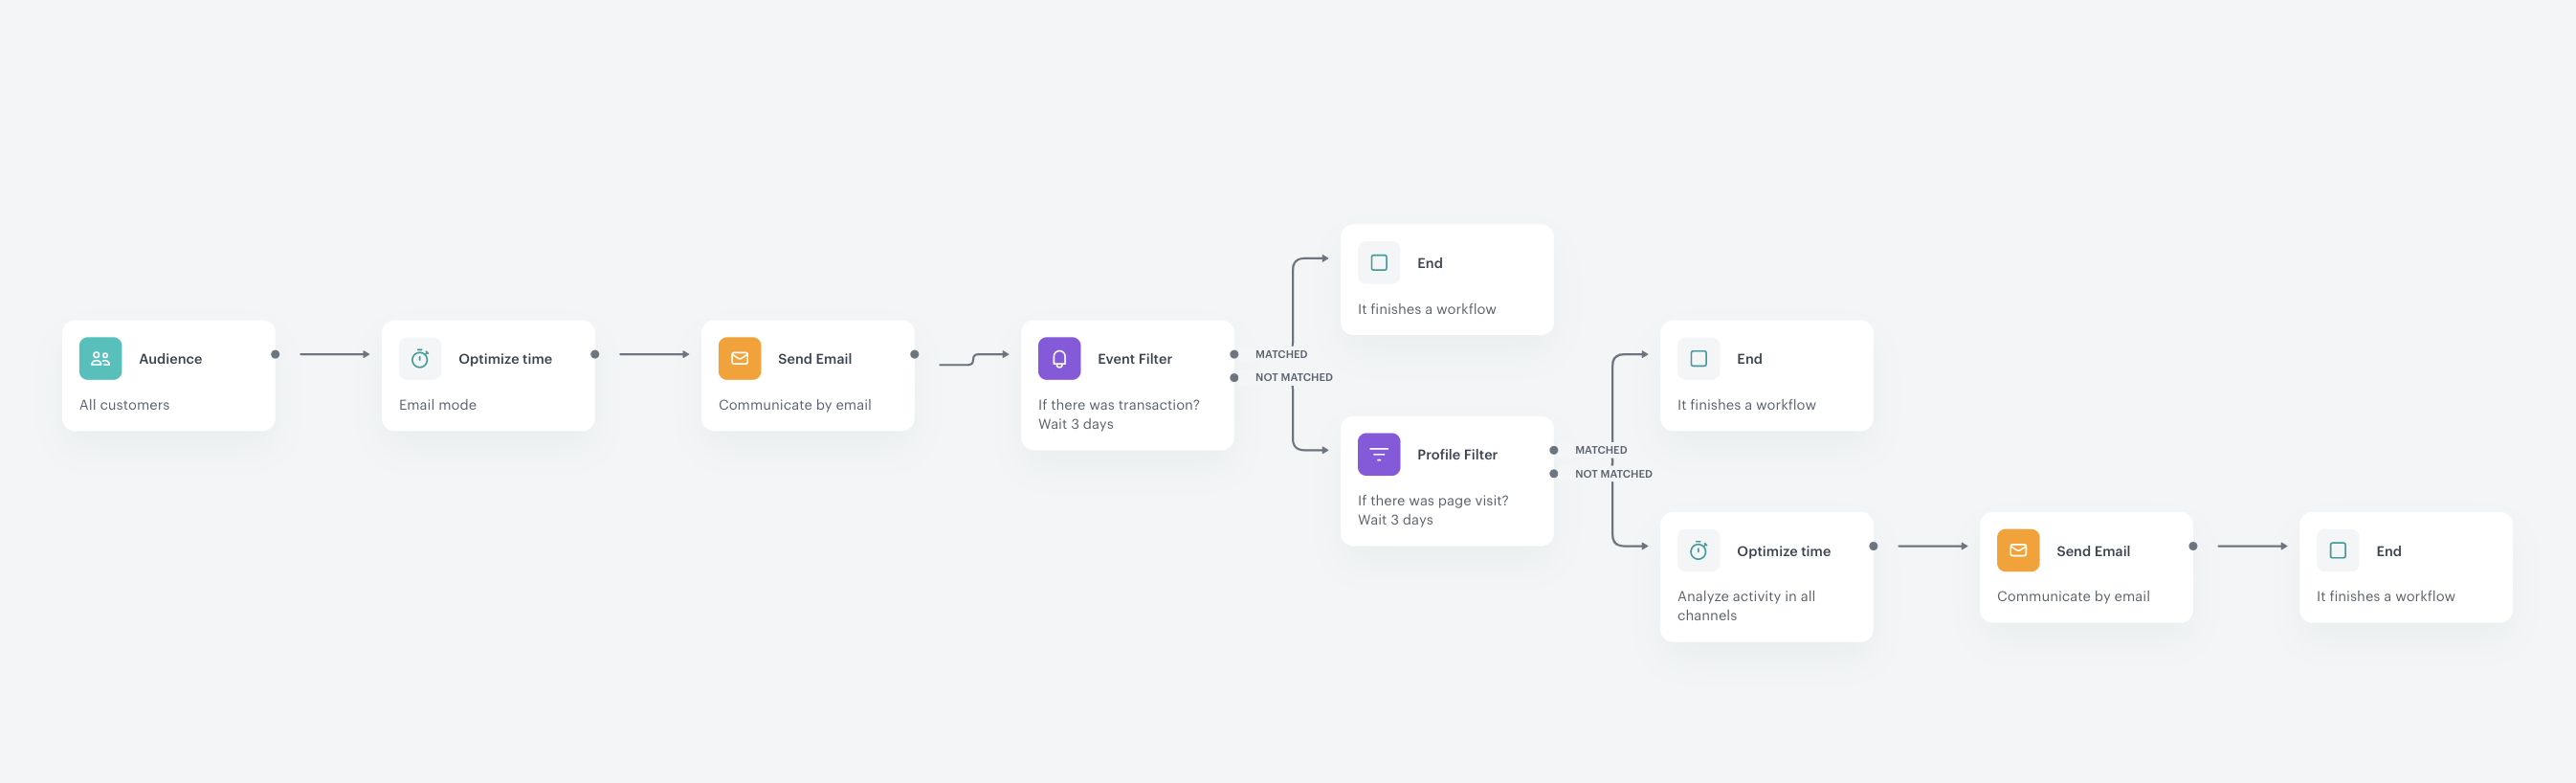
The final configuration of the workflow