Voucher pool alert
A voucher pool is a form of digital currency that allows businesses to provide rewards and incentives to their customers for engaging with their products or services. The pool of voucher codes can be redeemed for a variety of items, such as discounts, coupons, or special offers. While setting up a voucher pool, you typically add a certain number of codes to the pool, so it’s a good practice to implement a kind of monitoring system that alarms you when codes in the voucher pool are slowly running out.
In this use case, you will learn how to build a monitoring system for all voucher pools you have in your workspace. The system will alert you when the number of codes in a voucher pool drops below a predetermined threshold (500 codes in a pool). This alert serves as a reminder for the business to replenish the pool with more codes, as well as an alert to customer service teams to communicate with customers to ensure they are aware of the updated balance.
There are even more benefits:
- the monitoring system helps businesses avoid running out of vouchers, which can lead to customer dissatisfaction and loss of revenue.
- it helps businesses ensure they have enough vouchers available to meet customer needs and maximize sales.
- it allows businesses to plan ahead and easily adjust their voucher pool when needed.
- this system allows businesses to quickly and efficiently track their voucher pools, making it easier to identify any discrepancies or irregularities.
In this use case, we present a method in which we create a profile in the Profiles module for each voucher pool we want to monitor (1 voucher pool = 1 profile). This will enable us to set up a workflow which will monitor the number of active vouchers and send an alert when the number of codes in a pool drops below 500.
Prerequisites
- Implement a tracking code.
- Configure an email account.
- Depending on your needs, you can send to a customer a general code with promotion, eg. SHOPPING20%, or coupon code individually for each customer. If you decide on this second option, you will have to import coupons to Synerise prepared in your ecommerce platform which will apply the appropriate discount in the shopping cart. In this article, you will find the rules and procedures needed to create and use voucher pool in Synerise.
- You must have an API key of the Workspace type and in the permission matrix:
VOUCHERS_ITEM_LIST_BY_POOL_READpermission must be checked, otherwise the webhook response will return the 403 error code.
Process
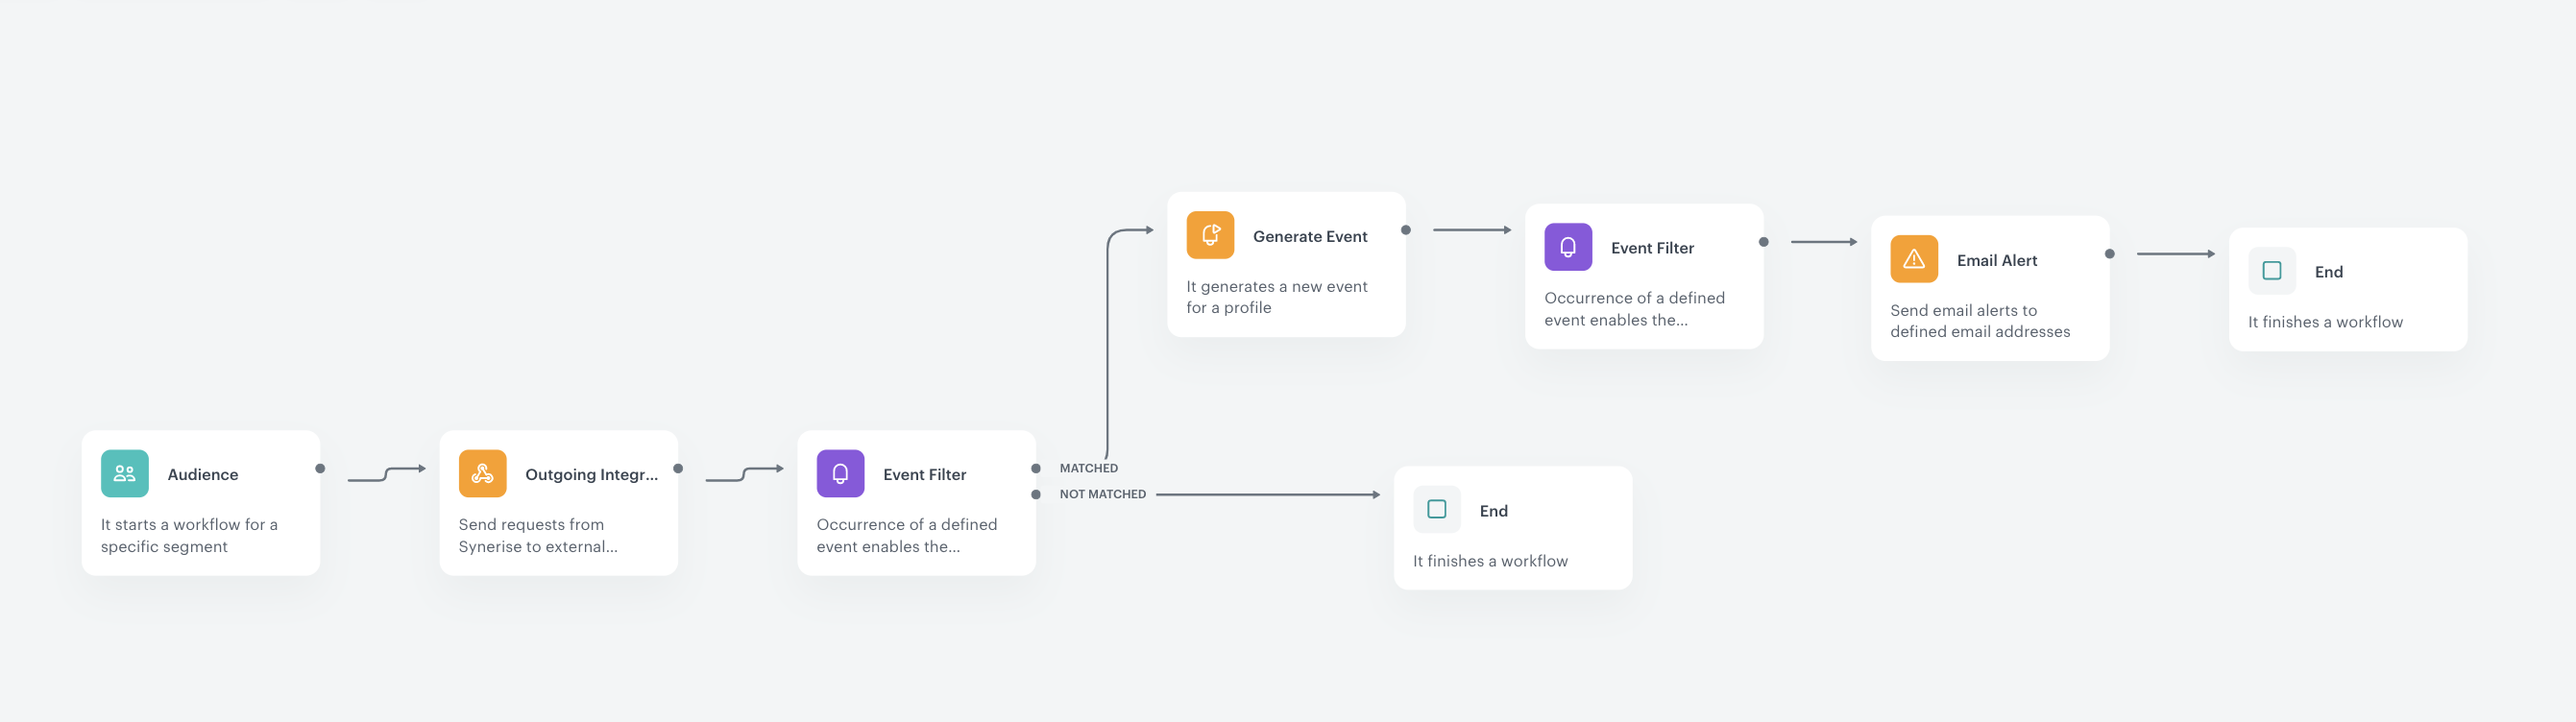
In this use case, you will go through the following steps:
- Add voucher pools to Profiles.
- Prepare an email template.
- Create a workflow which sends the email alert if the number of unassigned codes in a pool will be lower than 500.
Add voucher pools to Profiles
In this part of the process, you will create Synerise profiles for each voucher pool you want to monitor, where 1 voucher pool = 1 profile in the Profiles module. You can add them manually or using API. In this case, we present how to add them manually, API method is described below in the advanced section.
- Go to Profiles.
- Click Add new > Profile.
- In the
firstnamebox, addVoucher Pool 1. - In the
emailbox, add any fake email, for examplefakevoucher1@pool.com. - In the properties section, select the
voucherpool_idattribute, and as the value, add the ID of the voucher pool which you can find in the URL of a specific pool.
Tip: If your workspace lacks thevoucherpool_idattribute, you can add it in Data Management > Params Manager. - Click Create.
Result: The separated profile for the voucher pool will be generated in the Profiles module in Synerise.Advanced version of adding pools using APIBelow you will find cURL with a ready request, which you can use in the Postman tool, where:
token- authorization tokenfirstName- voucher pool namevoucherpool_id- voucher pool ID for a specific pool (in Data Management > Voucher Pools, enter the details of the voucher to retrieve its ID from the URL)customId- voucher pool ID for a specific voucher (in Data Management > Voucher Pools, enter the details of the voucher to retrieve its ID from the URL)- optionally,
tagin this case isvoucher_campaign
curl --location --request POST 'https://api.synerise.com/v4/clients/batch' \
--header 'Accept: application/json' \
--header 'Api-Version: 4.4' \
--header 'Authorization: Bearer xxx' \
--header 'content-type: application/json' \
--data-raw '[
    {

        "customId": "Insert a voucher pool ID here",
        "firstName": "Insert a voucher pool name",

        "agreements": {

        },
        "attributes": {

            "voucherpool_id": "Insert a voucher pool ID here"
        },
        "tags": [
            "voucher_campaign"
        ]
    }
]'
Note: In this code we used the specific method from our API. Read also about the authorization process.Send this request as many times as you need, just changing the
voucherpool_id,firstName, andcustomIdparameters. The voucher pools created in the Profiles module will be available on the list of unrecognized profiles.
Prepare an email template
In this part of the process, prepare an email alert template that includes the information about the number of unassigned codes remaining in a voucher pool.
- Go to
 Communication > Email.
 - On the left side of the screen, click Templates.
- Select the wizard.
- In the content of the message, add this insert:
{%set link = "https://app.synerise.com/assets/vouchers/pools/*/coupons"%} <p>{{customer.firstname}},</p> <h1> Alert for Voucher pool: {{customer.firstname}} </h1> <p> Remaining: {{ event.params['voucherCount'] }} vouchers </p> <a href='{{link|replace("*",customer.voucherpool_id)}}'> <p> Link to voucher pool {{customer.firstname}} </p></a> - Adjust the design of the template according to your needs.
- Save the template.
Create a workflow
In this step create a workflow which sends the email alert if the number of codes in a voucher pool is lower than 500.
- Go to Automation > Workflows > New workflow.
- Enter the name of the workflow.
Configure the Audience node
In this part of the process, select the audience for which you will run this campaign - all vouchers added as profiles. In our case, we start the workflow everyday at 7 A.M., for profiles (voucher pools) who has the voucherpool_id parameter defined.
voucherpool_id parameter, but you can use any other parameter or tag which is assigned to your profiles (voucher pools). In our case based on the contents of cURL presented in previous steps, it might be for example a tag: voucher_campaign.- Click Add trigger.
- From the dropdown list, select the Audience node.
- Leave the Run trigger option as default (repeatable).
- Define the values for the Interval (frequency), Begin at, and Timezone fields according to your business requirements. In our case, it will be every day at 7 A.M.
- In the Define audience section, click New audience.
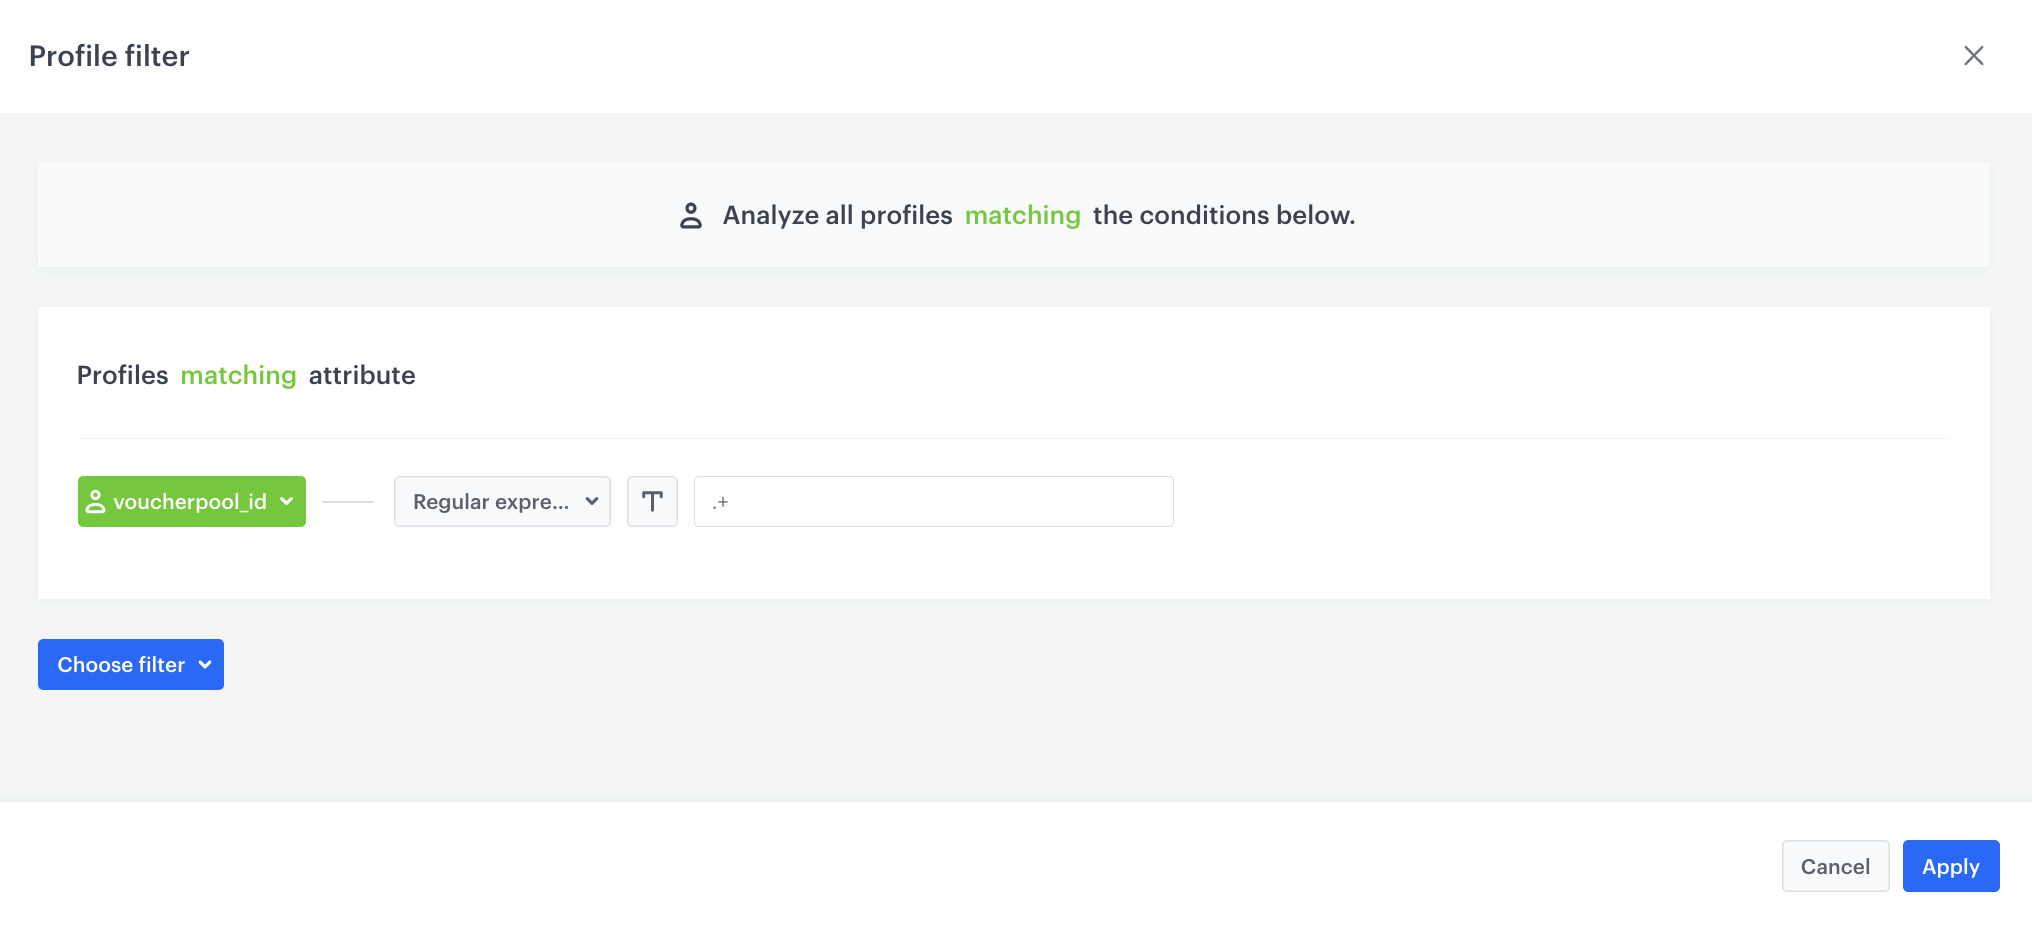
- Click Define conditions.
- From the Choose filter dropdown list, select the
voucherpool_id. - Choose operator Regular Expression (string).
- In the box add the value
.+. - Confirm by clicking Apply.
Add the Outgoing Integration node
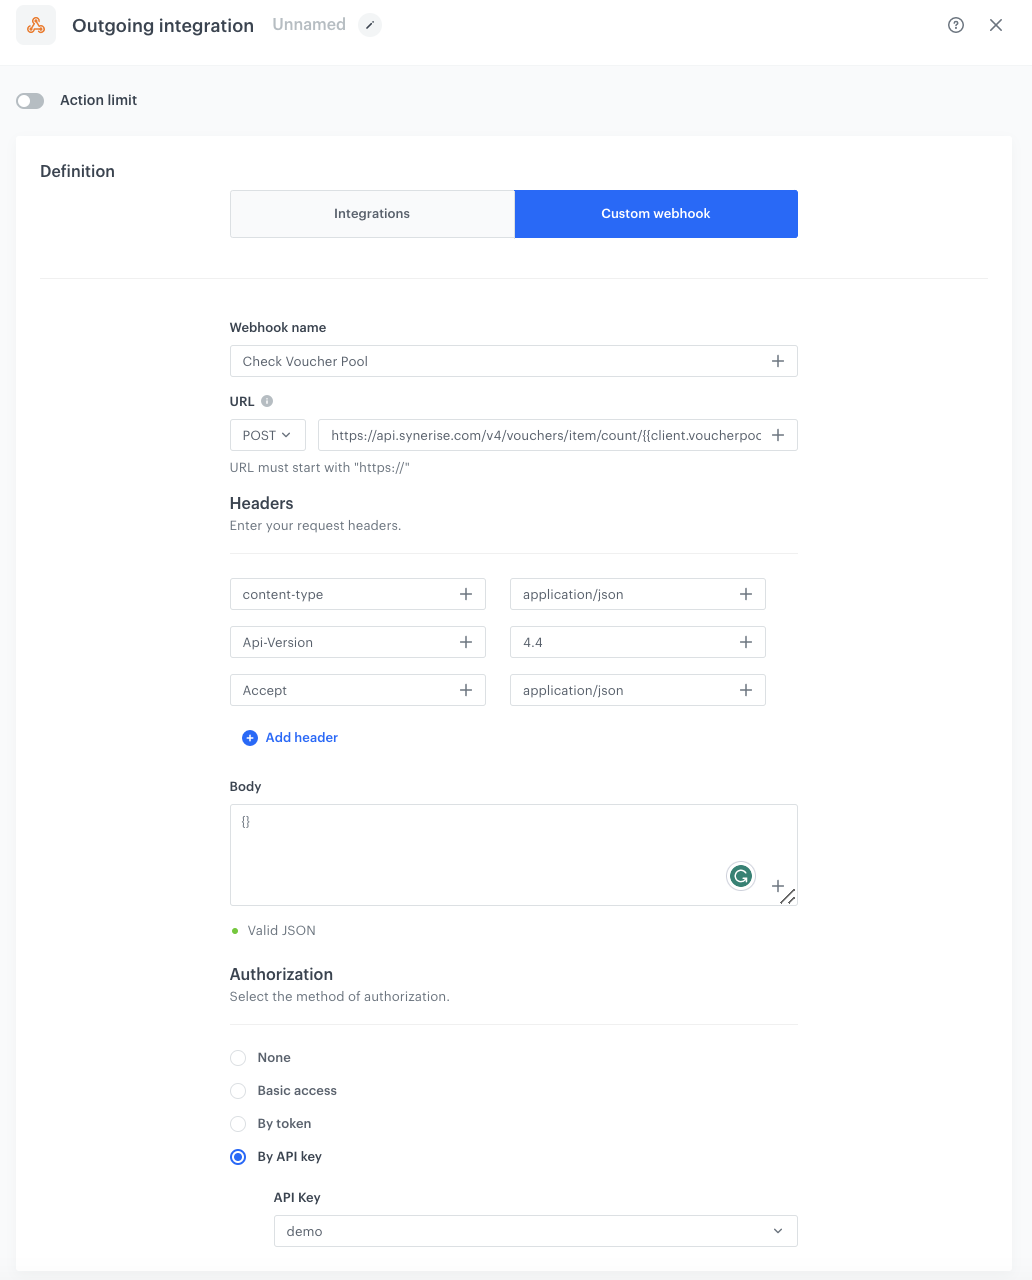
This node will be used to send a request to get the number of codes available in the voucher pools. You will use the following method: https://api.synerise.com/v4/vouchers/item/count/{{client.voucherpool_id}}.
- Click THEN.
- From the dropdown list, select Outgoing integration.
- Select the Custom webhook tab.
- In the Action name field, enter Check Voucher Pool (you can use different name, it’s just an example).
- Select the POST method.
- In the Endpoint field, enter
https://api.synerise.com/v4/vouchers/item/count/{{client.voucherpool_id}}where{{client.voucherpool_id}}will be dynamically replaced with the ID of the monitored voucher pool. - Leave content-type at default:
application / json. - Click Add header.
- Add Api-Version with the value set to
4.4 - Click Add header.
- Add Accept with the value set to
application/json. - Leave the request body at default (with
{}). - In the Authorization section, select By API key.
- From the dropdown list, select the Workspace API key that has enabled this permission:
VOUCHERS_ITEM_LIST_BY_POOL_READ. - Confirm the settings by clicking Apply.
Configure the Event Filter node
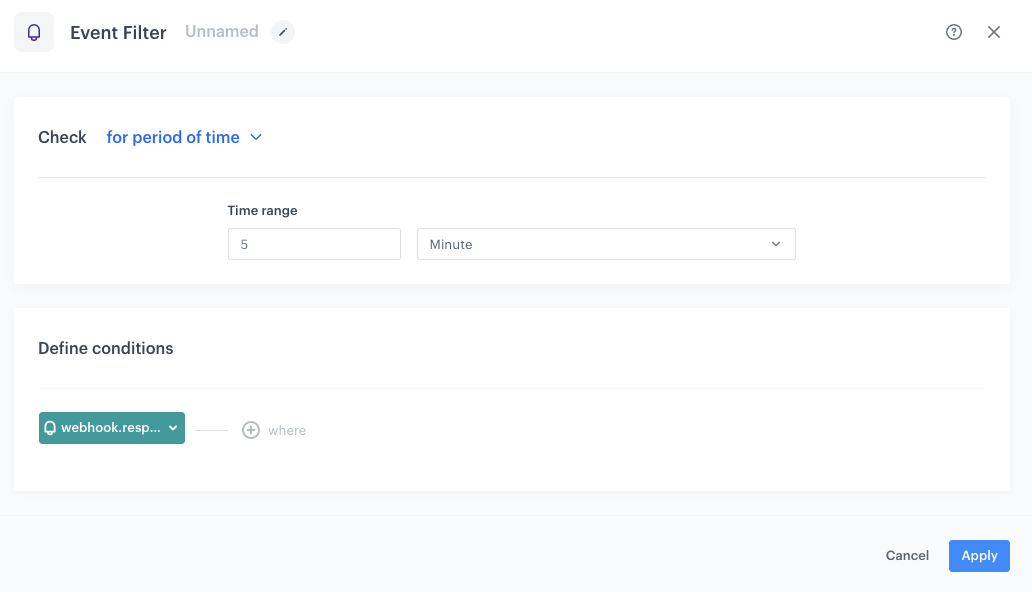
This node will be used to wait for the webhook response. Set the waiting time to 5 minutes, this period is recommended as it eliminates the possibility of the workflow completion due to lags in response.
- As the next node, add Event Filter. In the configuration of the node:
- In the Check field, from the dropdown menu choose for period of time.
- Set the time range. In our case, it is 5 minutes.
- In the Define conditions section, from the Choose event dropdown list, choose
webhook.responseevent.
- Confirm by clicking Apply.
- For the Not matched path, add the End node.
- For the Matched path, add the Generate Event node.
Define the Generate Event node
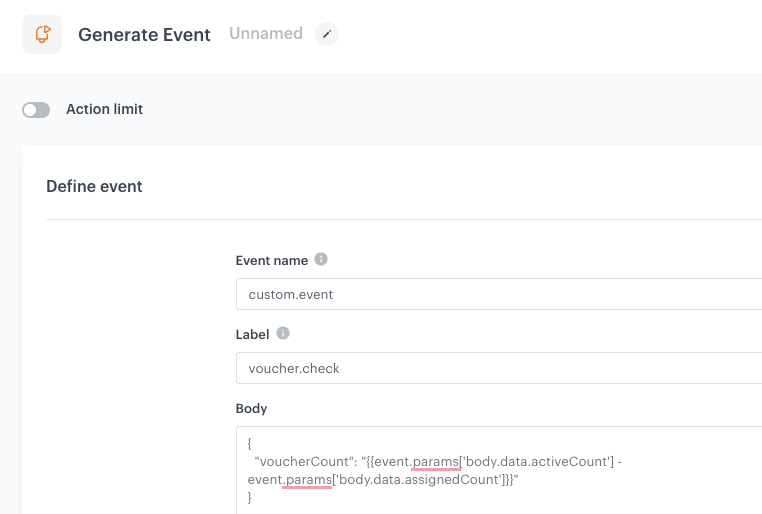
At this stage, we are checking the difference between the number of assigned and used codes. The parameter for the custom.event can be named in different way, in our case it will be voucher.check. It will be responsible for showing the difference between the vouchers. This event will be generated only for those persons/vouchers that are in this group.
-
To the Matched path, add Generate Event.
-
In the Event name, enter the name of the event that will be generated on the customer’s profile. In this case, it is
custom.event. -
In the Label add the text which will be visible in the raw data of the event, in our case it will be
voucher.check. -
In the Body section, use the code below, and click Apply.
{
  "voucherCount": "{{event.params['body.data.activeCount'] - event.params['body.data.assignedCount']}}"
}
Configure the Event Filter node
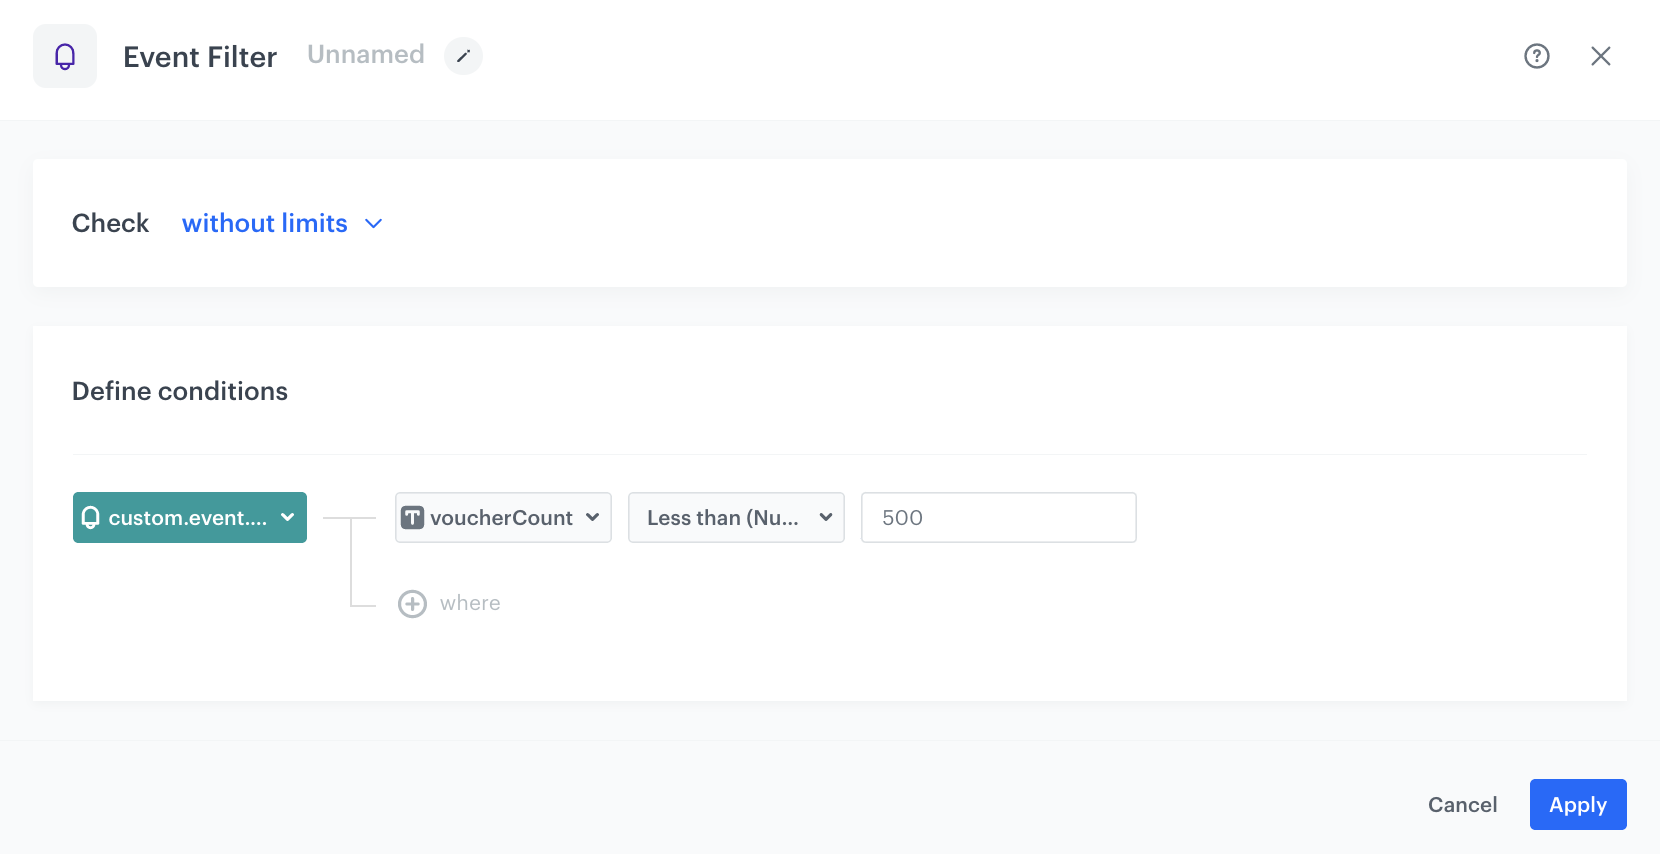
This node will check if the amount of codes dropped below a certain level. For us, it is 500. We will check it based on the event generated in the previous step.
- As the next node, add Event Filter. In the configuration of the node:
- In the Check field, from the dropdown menu choose for period of time.
- Set the time range. In our case, it is 10 minutes.
- In the Define conditions field, from the Choose event dropdown menu, choose
custom.event. - Click + where.
- As the parameter, choose
voucherCount - Choose Less than (Number).
- Set the value to
500.
- Confirm by clicking Apply.
Configure the Email Alert node
In this step, if the number of vouchers has decreased below 500, an email alert will be sent to email addresses selected in the configuration of the node. After sending the email alert, the workflow ends.
- Add Email Alert. Configure according to your business needs.
- Define Content:
- In the Template for content field, select an alert email template prepared earlier.
- In the Subject field, enter your message subject.
- In the Recipent section, create a list of recipients of the alert email.
- Confirm by clicking Apply.
- Add the End node.
- Click Save & Run.
Check the use case set up on the Synerise Demo workspace
You can check the workflow configuration directly in Synerise Demo workspace.
If you don’t have access to the Synerise Demo workspace, please leave your contact details in this form, and our representative will contact you shortly.