
Labeling products in the catalog as bestsellers
Automating the extraction of sales data and updating product catalogs with accurate information is vital for businesses aiming to streamline operations and improve customer experiences. In this specific scenario, the objective is to achieve precisely that by utilizing automation to identify best-selling products in the Synerise catalog and label them on the website.
Implementing this scenario offers several key advantages. Firstly, it enables the efficient transmission of sales data for frequently purchased products within a specific category directly to the catalog. By eliminating manual data extraction, this automated approach reduces human errors and saves valuable time and resources.
The goal of this use case is to - using automation - send the sales for a particular product category (in this instance: smartphones) and upload it to the Synerise catalog through automation. The data corresponds to the best-selling items from the last 30 days. The process involves generating a JSON report via an API, manipulating the response using Jinja, and sending a request to the Synerise catalog to add the sales data with sequential numbers. Additionally, a dynamic content script is utilized to verify if the Stock Keeping Unit (SKU) exists in the top 100 product catalog and apply a “Bestseller” label to the corresponding elements on a webpage daily, based on the most recent data.
Prerequisites
-
Create a catalog, that consists of two columns:
no(number) andsku. This catalog will serve as the foundation for importing data automatically. The objective is to import data of the top 100 bestselling products in thesmartphonescategory from the last 30 days. -
Create a Workspace API key that has the following permissions:
ANALYTICS_BACKEND_REPORT_READandCATALOGS_ITEM_BATCH_CATALOG_CREATE -
In order for the bestseller label to be added to an element, the SKU (Stock Keeping Unit) needs to be included as an attribute called
data-sku.On the webpage, there should be an element, preferably an<a>tag, with thedata-skuattribute whose value corresponds to the SKU from the list of bestsellers in the catalog.
Process
In this use case, you will go through the following steps:
- Create a metric that calculates the number of purchases within the
smartphonescategory over the last 30 days. - Create a report that presents the top 100 bestselling products based on the metric created in the previous step.
- Retrieve request body of the report and use it in the next step during creating a workflow (in the Outgoing Integration node).
- Create a workflow that facilitates the transmission of transaction data to the catalog, ensuring accurate and up-to-date information.
- Create a dynamic content campaign that adds labels to the bestselling products, enhancing their visibility and recognition.
Create a metric
To create a metric that counts the number of frequently purchased products in a specific category (in this case: smartphones) within the last 30 days, follow the steps below:
- Go to
 Analytics > Metrics > New mertic.
 - Enter a name of the metric.
- As a metric kind, select Simple metric.
- As the aggregator, set Count.
- As the occurrence type, set All.
- From the Choose event* dropdown list, select product.buy event.
- Click on the Where button.
Result: The Choose parameter button will appear. - Click the Choose parameter button.
Result: A pop-up window will appear. - Choose the
categoryparameter. - Click the Choose parameter button.
- From the dropdown, select Contain.
- In the text field, enter the name of the chosen category. In our case
smartphones. - To specify the analyzed period, click on the calendar icon.
- Choose the last 30 days.
- Confirm your selection by clicking the Apply button.
- Save the metric.

Create a report
To create a report that presents the top 100 bestselling products from the last 30 days, follow the steps below:
- Go to Analytics > Report > New report.
- Enter a name of the report.
- Select the metric you created in the previous part of the process.
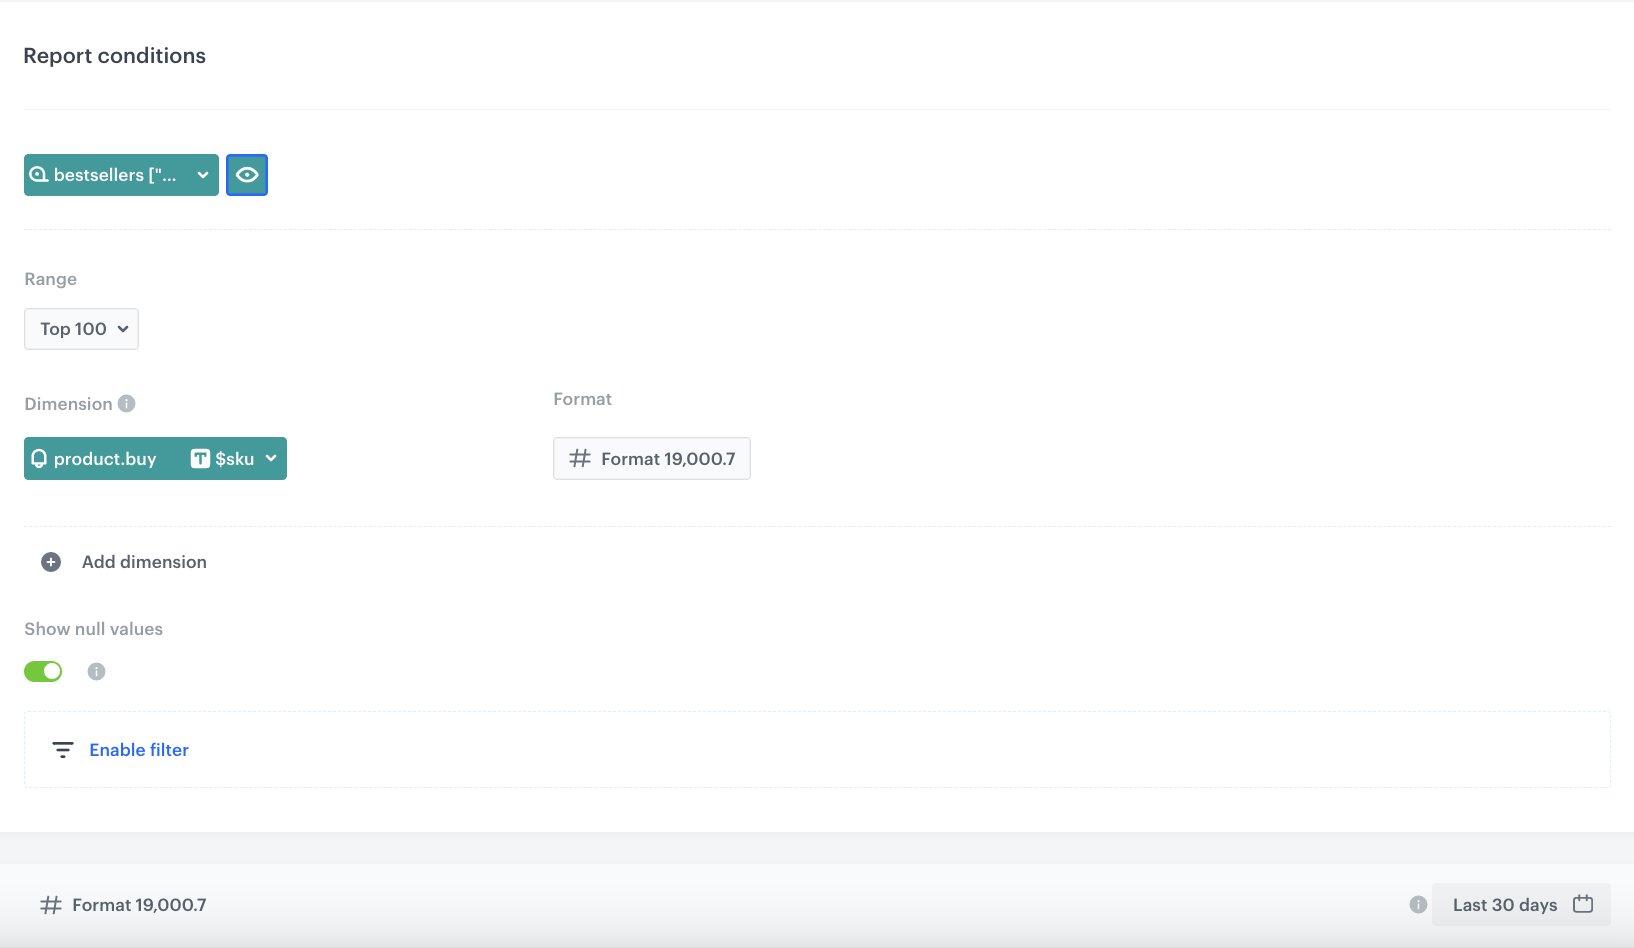
- From the Range dropdown list, choose 100 top to display the most frequently bought products in the report preview.
- In the Dimension section, select the parameter from the product.buy event and as the parameter, select $sku to display the SKU of each product.
- For the date range, select the time period you want to analyze. In this case, choose 30 days.
Important: Make sure to select the same date range as you previously selected for the metric.
- Save the report.
- Click on Preview to view the results.
Retrieve request body of the report
Download the request body of the report you created. You will use it in the next step during creating a workflow (in the Outgoing Integration node).
-
Go to the report created in the previous step.
-
Right-click and choose the option Inspect.
-
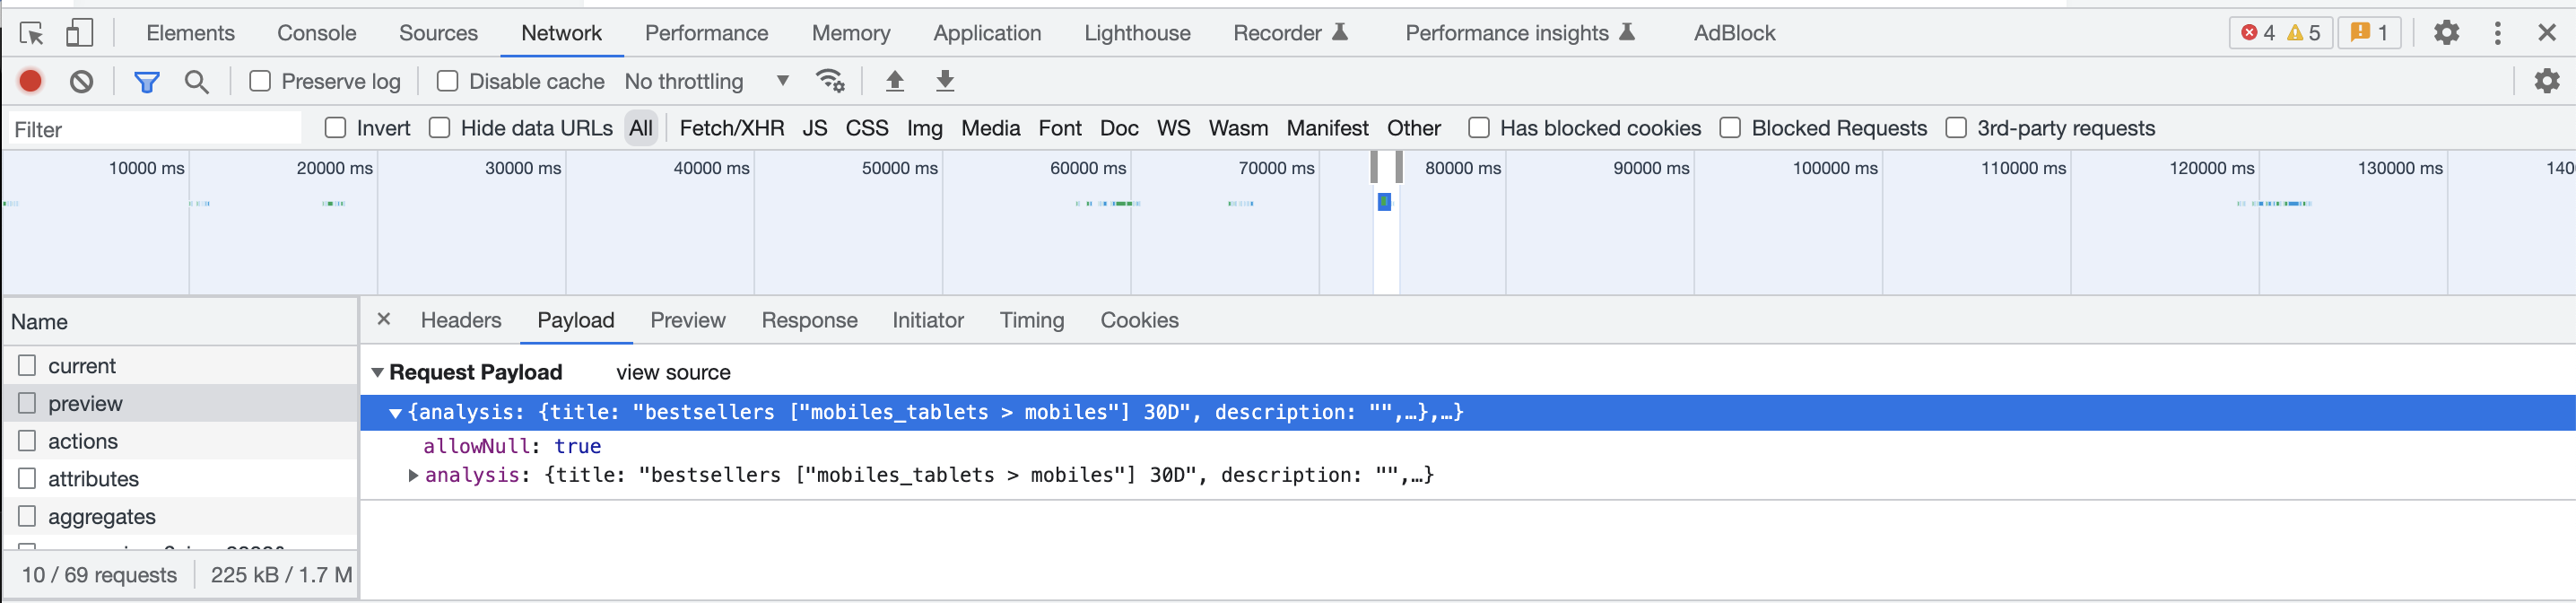
In the Developer Tools window that opens, navigate to the Network tab.
-
Click on the Preview tab within your report.
-
In the Network section locate the Preview element related to your report.
-
Click on the element to display its details.
-
Within the details, find the Payload section.
-
Click on the Payload element and select the option to copy the object.
-
Paste the copied object into the body of your request.
Request body - download
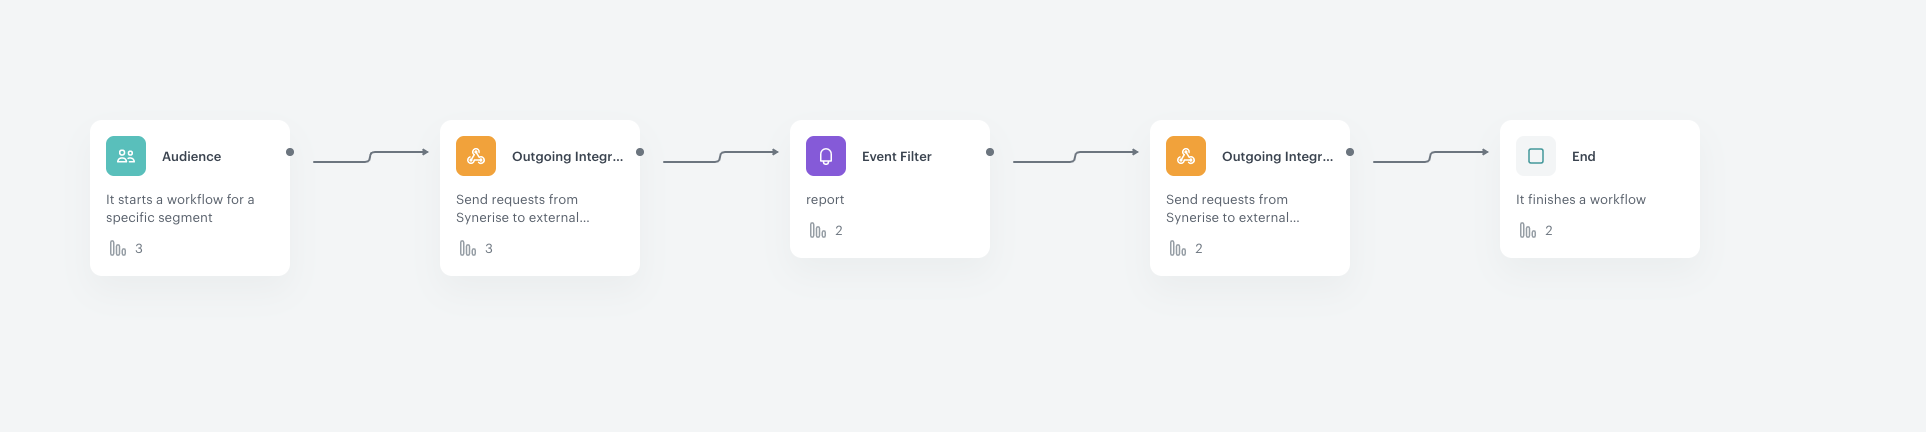
Create a workflow
In this part of the process, create a workflow that updated the catalog with 100 bestselling items during last 30 days.
- Go to
 Automation > Workflows > New workflow.
 - Enter a name of the workflow.
Define the trigger node
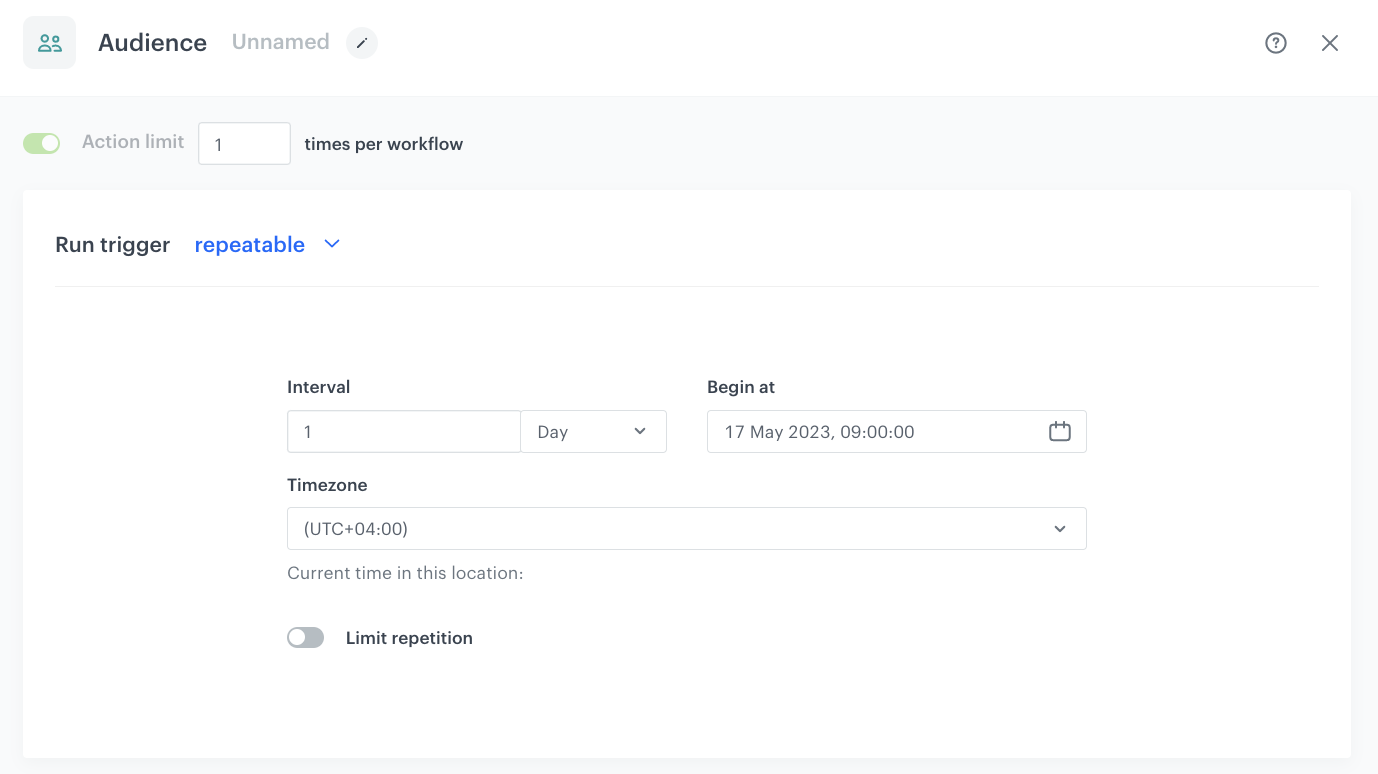
Set up the repetitive launch of the trigger to 9:00 A.M on a daily basis.
- Start the workflow with the Audience node.
- In the configuration of the node, set the Run trigger option to repeatable.
- Set the interval to
1 per day. - Choose the day and time when the process starts. Select 9 A.M.
- Select the appropriate time zone.
- Click Apply.
Configure the Outgoing Integration node
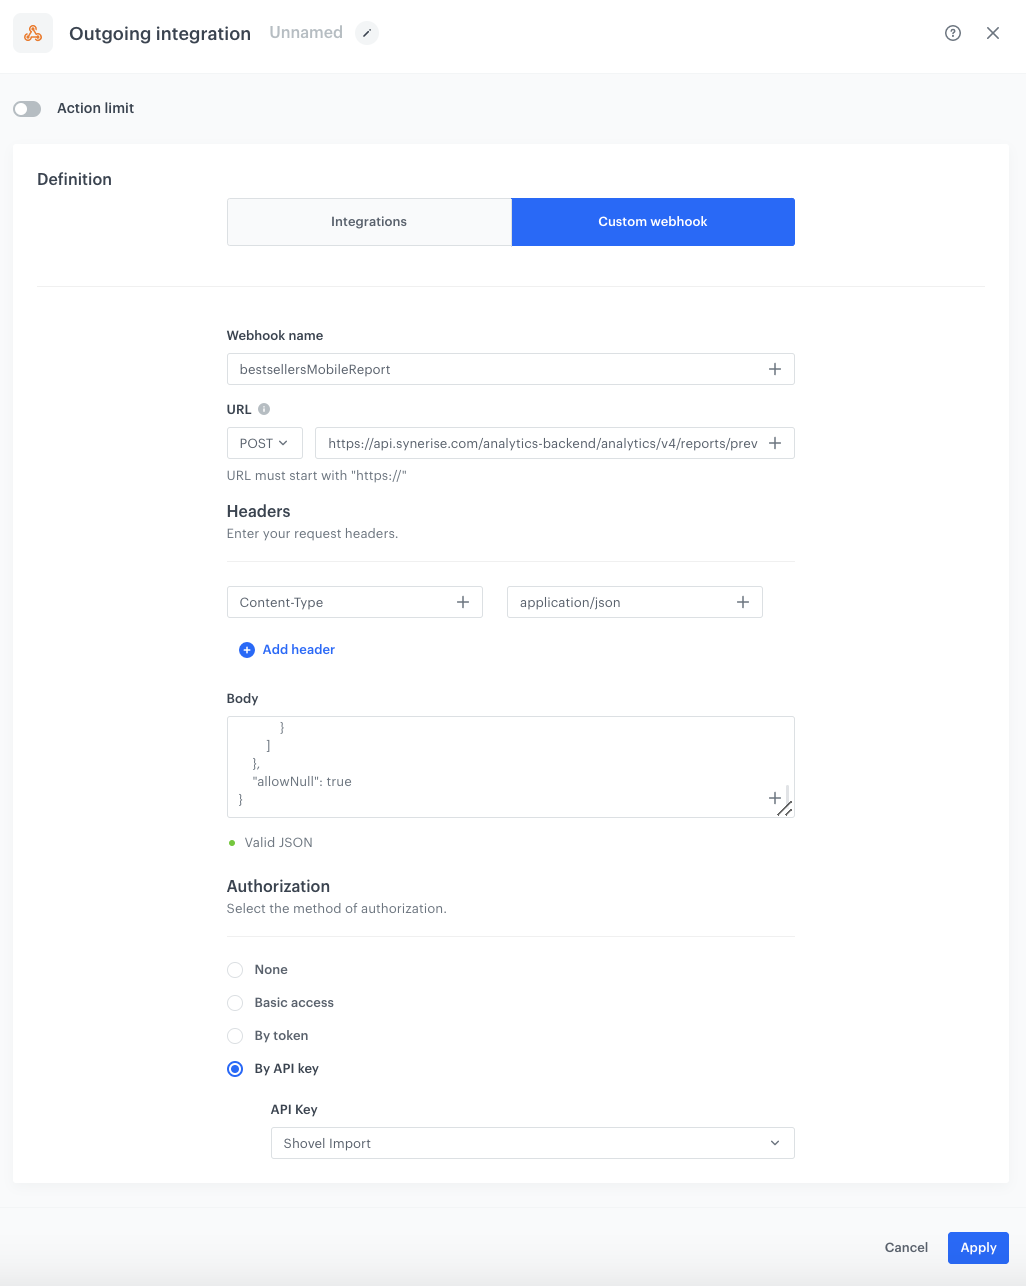
You will use the Outgoing Integration node to make a request to preview the report with 100 bestselling items in the last 30 days you created in the previous part of the process.
-
Add Outgoing integration. In the configuration of the node:
- Choose Custom webhook.
- Name the webhook. In our case
bestsellersMobileReport.
-
Select the POST method.
-
In the Endpoint field, enter
https://api.synerise.com/analytics-backend/analytics/v4/reports/preview -
Leave the content-type at the default value:
application / json. -
In the body of the request, paste the code you have retrieved in the previous step. Below, you can find an example code:
Check the example code{ "analysis": { "title": "bestsellers [\"mobiles_tablets > mobiles\"] 30D", "description": "", "filter": { "matching": true, "expressions": [], "expression": { "name": "", "type": "EMPTY" } }, "reportMetrics": [ { "metricId": "8e03bdb3-408a-4a3b-bc96-4e5392a08735", "dateFilter": { "type": "RELATIVE", "duration": { "type": "DAYS", "value": 30 }, "offset": { "type": "DAYS", "value": 0 } }, "comparison": { "dateFilter": { "type": "ABSOLUTE" } }, "action": { "id": 71248, "name": "product.buy" }, "format": { "dataFormat": "numeric", "useSeparator": true, "compactNumbers": false, "fixedLength": 1 }, "grouping": { "type": "TOP", "top": 100 }, "groups": [ { "title": "$sku", "type": "EVENT", "format": { "dataFormat": "numeric", "useSeparator": true, "compactNumbers": false, "fixedLength": 1 }, "attribute": { "type": "PARAM", "param": "$sku", "id": "parameters:551610043" } } ], "eventName": "product.buy" } ] }, "allowNull": true } -
In the Authorization section, select By API key.
-
In the Authorization section, select By API key.
-
Select the API key you created as a part of prerequisites.
-
Confirm the settings by clicking Apply.
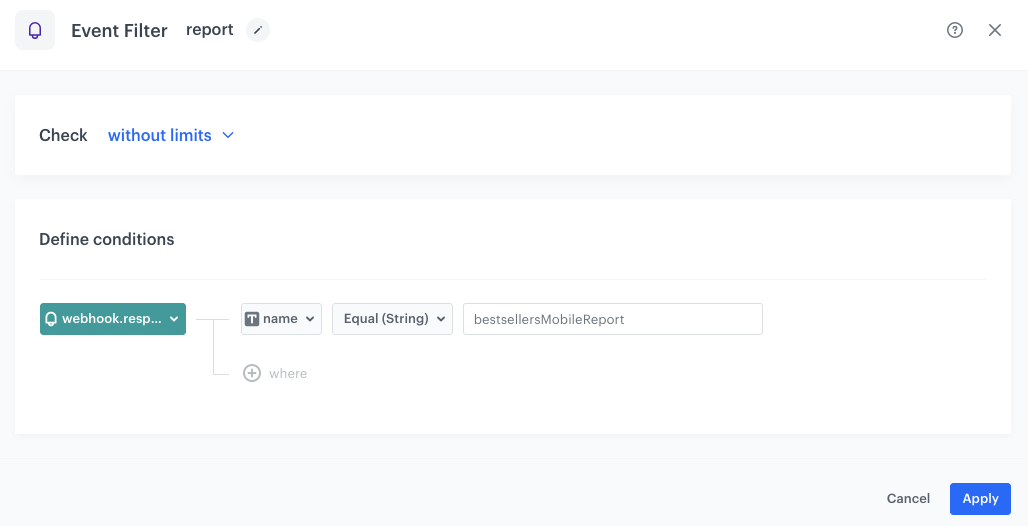
Configure the Event Filter node
Configure the Event Filter node that will wait for a webhook response with the report preview of the top 100 bestsellers.
- As the next node, add Event Filter. In the configuration of the node:
- In the Check field, from the dropdown menu choose without limits.
- In the Define conditions field, from the Choose event dropdown menu, choose the
webhook.responseevent. - Click + where button and select the name parameter from the list.
- From the Choose operator dropdown list, select Equal (String).
- In the text field, enter
bestsellersMobileReport.
- Confirm your settings by clicking Apply.
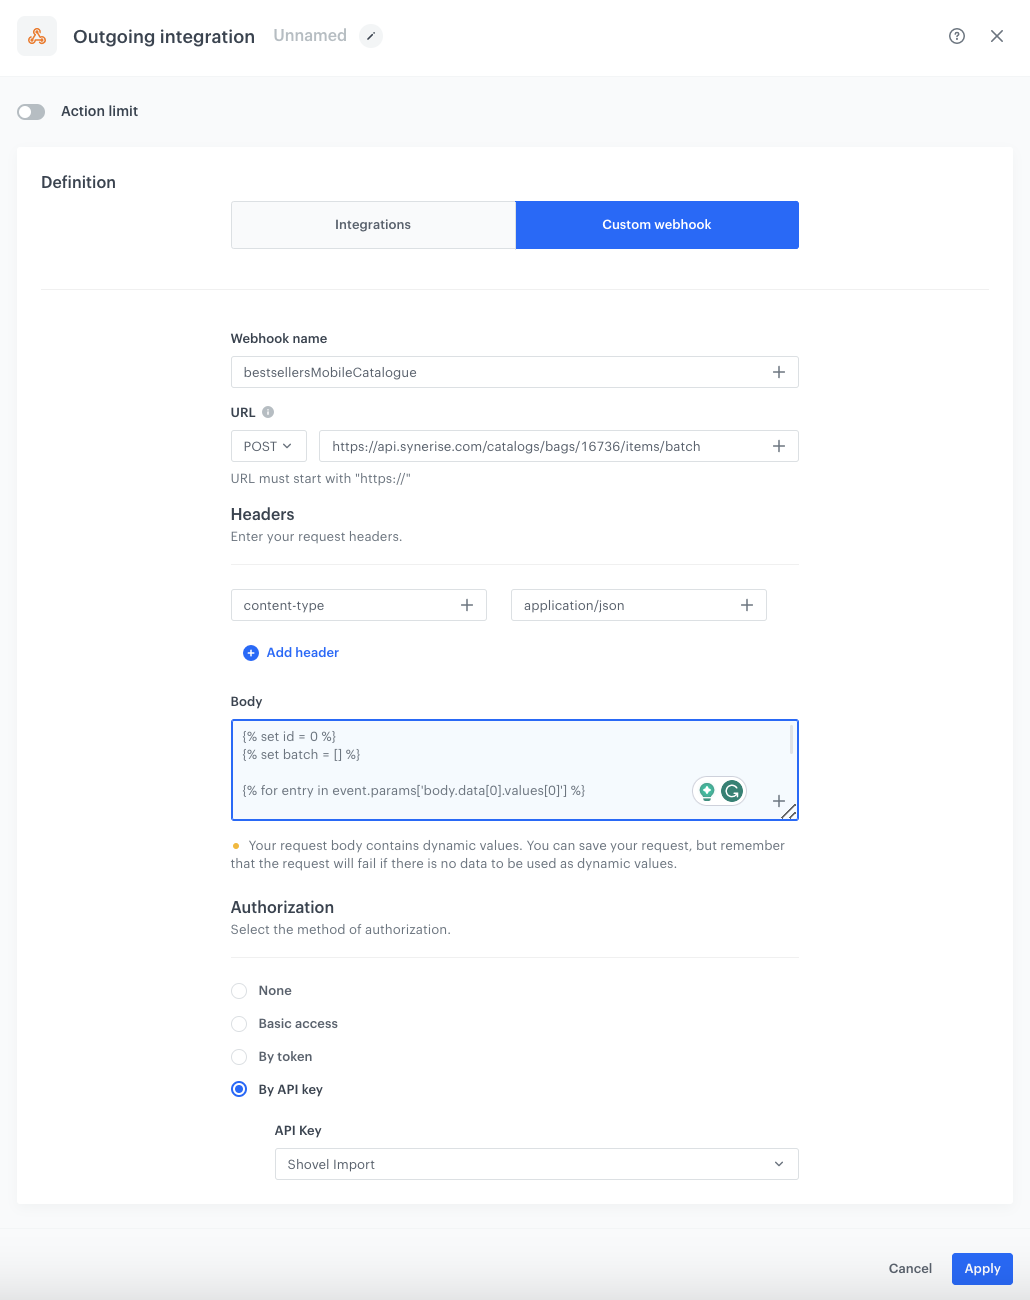
Configure the Outgoing Integration node
Use the Outgoing integration node to make a request to update a catalog you created as a part of prerequisites. As a result of the update, the sku column will be updated with the SKU of bestselling items in the last 30 days. The configuration of this workflow ensures overwriting the catalog with 100 bestselling items on a daily basis - the list will always have 100 and won’t be extended due to updates. The no column contains the ordinal numbers occupied by the items in the report and the values in this column are treated as keys.
- Add Outgoing integration. In the configuration of the node:
- Choose Custom webhook.
- Name the webhook. In our case
bestsellersMobileCatalogue.
- Select POST method.
- In the Endpoint field, enter
https://api.synerise.com/catalogs/bags/{YOUR_CATALOG_ID}/items/batch. Change the{YOUR_CATALOG_ID}for the ID of your catalog, created in the prerequisites (you can copy it from the URL which is available when you open the catalog). - Leave the content-type at the default value:
application / json. - In the body of the request, use the following code:
    {% set id = 0 %}
    {% set batch = [] %}

    {% for entry in event.params['body.data[0].values[0]'] %}

    {% set id = id|add(1) %}
    {% set item = {"itemKey":id|string,"value":{"no":id|string,"sku":entry.name[0], "transactions":entry.value}} %}

    {% do batch.append(item) %}

    {% endfor %}
    {{batch|tojson}}
- In the Authorization section, select By API key.
- Select the API key you created as a part of prerequisites.
- Confirm the settings by clicking Apply.
Prepare the final settings
To finalize the settings of your workflow, follow these steps:
- Add the End node. This node marks the end of the automation process.
- Optionally, you can define capping for the workflow if desired. Capping allows you to set limits on how many times the workflow can be triggered within a specific time frame.
- Add titles to each node to make the workflow more understandable to your colleagues and the code in the automation. Titles can provide descriptive information about the purpose of each node.
- Once you have configured all the nodes and made any desired optional settings, activate the workflow by clicking Save & Run.
Result: The actual catalog will be generated with the list of the top 100 bestsellers from the last 30 days, including the column with sequential numbers. This catalog reflects the updated and accurate information of the bestselling products, ensuring efficient and streamlined operations for your business.
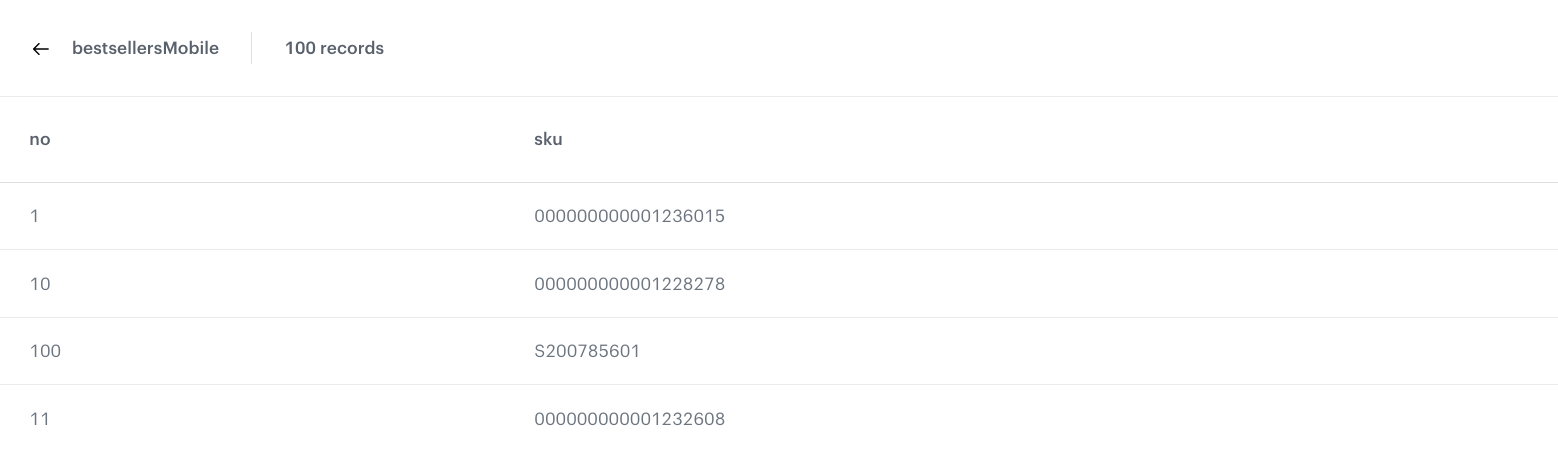
Note: The order of rows in the catalog is presented in the alphabetical order.
Create a dynamic content campaign
During this part of the process, create a dynamic content to assign the “Bestseller” label to the items from the catalog displayed on a webpage. In the settings of the dynamic content, use Jinjava (you can find it in the procedure below) to retrieve data from the catalog. Verify the presence of each SKU in the catalog and designate the corresponding elements on the webpage as “Bestsellers.” Additionally, you can assign a position value ranging from 1 to 100 for each record and cross-check the SKUs against the existing catalog to identify the top 100 best-selling products.
-
Go to
 Communication > Dynamic Content > Create new.
 -
Enter the name of the campaign.
-
Choose the Insert Object type.
-
Select your Audience. You can either target your communication to everyone or choose a specific user segment. For this example, we will target the communication to every visitor to the website.
-
In the Content section, click Simple message, then in the CSS selector field, specify the location where you want to insert the content. In our case, it is After (in div)
.snrs-modal-wrapper -
In the Content tab section, click Create message.
-
In the JavaScript tab, paste the following code:
Check the JavaScript code{% set positions = range(1,101) %} {% set bestsellersMobileList = [] %} {% for position in positions %} {% catalogitem.bestsellersMobile(position) %} {% do bestsellersMobileList.append(catalog_result.sku) %} {% endcatalogitem %} {% endfor %} var bestsellersMobileSKUs = {{bestsellersMobileList|tojson}}; var bestsellersMobileHTML = `<p style="text-align: left; font-size:14px; display: block; margin-top: 4px;"><span style="color:white;background-color: #1e815c;" class="mt-1 ps-2 pt-0 pb-0 pe-2 ">Bestseller </span></p>`; let bestsellersMobileURL = location.href; document.body.addEventListener('click', () => { requestAnimationFrame(() => { setTimeout(() => { bestsellersMobileURL !== location.href && showBestsellersMobile(); bestsellersMobileURL = location.href; }, 1000) }); }, true); function showBestsellersMobile() { var elements = document.querySelectorAll("a[data-sku]"); for (var i = 0; i < elements.length; i++) { if (bestsellersMobileSKUs.includes(elements[i].getAttribute("data-sku"))) { elements[i].insertAdjacentHTML('afterend', bestsellersMobileHTML); elements[i].addEventListener("click", function() { SR.event.trackCustomEvent( "dynamicContent.click", { "eventLabel": "Dynamic content click", "campaignName": "Label", "sku": this.getAttribute("data-sku"), "title": this.getAttribute("title"), "category": this.getAttribute("data-category") }, "Dynamic content click" ); }); } } } showBestsellersMobile(); -
In Display Settings, specify where the dynamic content should be displayed: Always, On landing, or on All pages.
-
Skip the UTM&URL parameters section.
-
In the Schedule section, click Define. Select the period when the dynamic content will be active.
-
To initiate your dynamic content campaign, click Activate.
Check the use case set up on the Synerise Demo workspace
In the Synerise Demo workspace, you can check the configuration of:
If you don’t have access to the Synerise Demo workspace, please leave your contact details in this form, and our representative will contact you shortly.