Enhance personalized recommendations by applying filter with aggregate
Personalized recommendations is a great way to enhance customers experiences while serving them with products tailored for their preferences. With Synerise, you can go a step further and narrow those already personalized recommendations to product attributes specific for each customer. These can be cusomers’ favorite color, style, size, or any other attribute. By enhancing personalized recommendations with those attributes, you can increase customers engagement, boost conversion rates and foster brand loyalty.
In this use case we will create a set of personalized product recommendations based on recently seen styles for customers who have not made a purchase in the last 30 days and send these recommendations through email.
This use case provides you with an instruction how to use a ready-made email template that can be used 1:1 in a business scenario.
Prerequisites
- Implement a tracking code into your website.
- Import an item catalog for recommendations. Enable Personalized recommendations.
- Implement OG tags, in this use case we use
product:style. You can implement any other data on which you want to base the aggregate. - Configure a sender account.
Process
In this use case, you will go through the following steps:
- Create an aggregate returning the top style of products visited by customer, it will be used in the recommendation configuration.
- Prepare an AI recommendation.
- Prepare an email template with recommendation.
- Create a workflow.
Create an aggregate
In this part of the process, create an aggregate that returns the most frequently seen style of products by a customer in the last 24 hours. Those products will not be displayed in the template, but the aggregate result will serve as a context for recommendations.
- Go to
 Analytics > Aggregates > New aggregate.
 - Enter the name of the aggregate.
- As the type of the aggregate, select Top.
- From the Choose event dropdown list, select the Visited page event.
- As the event parameter, select product:style.
- Click the + where button.
- From the Choose parameter dropdown list, select the product:style parameter.
- From the Choose operator dropdown list, select Is true (Boolean).
- Using the date picker in the lower-right corner, set the time range to Last 24 hours. Confirm your choice with the Apply button.
- Click Save.

Prepare an AI recommendation
In this part of the process, you will configure a personalized recommendation which will be later used in the email template. This recommendation will suggest items based on the results of the aggregate created in the previous step.
- Go to
 Communication > Recommendations > Add recommendation.
 - Enter the name of the recommendation (it is only visible on the list of recommendation).
- In the Type & source section, click Define.
- From the Catalog dropdown list, select an item feed.
- In the Type section, choose the Personalized recommendation type.
- Confirm the settings by clicking Apply.
- In the Items section, click Define.
- Click Add slot.
- Define the minimum and maximum number of items that will be recommended to the customer in each slot.
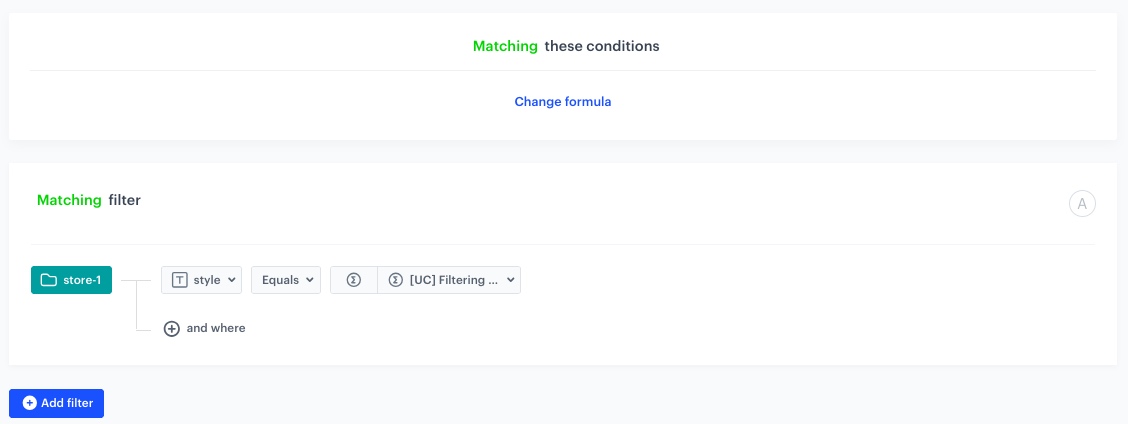
- Click Define filter in the Static filter section, and from the dropdown list choose Visual Builder.
- From the Select attribute dropdown list, choose style.
- From the Operator dropdown list, select Equals.
- Change the Value atribute to Aggregate.
- From the Select value dropdown list, select the aggregate created in the previous step.
- Click Apply.

Configuration of the static filter - Optionally, define Elastic filters.
- Click Apply.
- Optionally, you can define the Boosting factors and settings in the Additional settings section.
- In the right upper corner, click Save.
Prepare an email template
In this part of the process, you will create an email template. We will use a predefined template for the personalized recommendations, so there is no need to create a template from scratch. If you want to create a template from scratch, you can use the following email builders:
- Go to
 Communication > Email.
 - On the left pane, click Templates and from the list of template folders, select Predefined dynamic templates.
- Select the Recommended products template.
Result: You are redirected to the code editor.
Edit form in the Config tab
The form in the Config tab is pre-filled with default values, which you can modify to suit your business needs.
-
In the Logo section, you have the option to customize the logo’s height, link, title, and image source.
-
In the Main image section, you can specify the height, link, title, and the source of the main image.
-
In the First recommendation header section, you can type the header you want to display and define the background and font colors.
-
In the First recommendation products section:
- Set the value in the Number of product in row field.
- From the Recommendation id dropdown list select the recommendation you prepared in the previous step. You can find it by typing its name or ID in the search box.
- Customize the Product name font color, Font color, Button font color, Button background color, Button border radius and Button text options.
-
Optionally, repeat steps 3-4 for Second recommendation header and Second recommendation products and configure Category section, Contact section, Social media and Footer or hide them by switching off the respective toggle.
Note: To preview the template without switched off sections, use the Preview Contexts option. -
After you make changes to the template, you can check the preview.
- Click the Preview Contexts button on the upper left side.
- Enter the ID of a customer.
- Click Apply.
-
If the template is ready, click the arrow next to Use in communication in the upper right corner, and from the dropdown select Save as.
-
On the pop-up:
- In the Template name field, enter the name of the template.
- From the Template folder dropdown list, select the folder where the template will be saved.
- Confirm by clicking Save.
Create a workflow
In this part of the process, you will create a workflow which sends emails with personalized recommendations to customers, triggered when they finish their session on the site. The email will be sent maximum once a month, to customers who did not made a purchase in the last 30 days.
- Go to
 Automation > Workflows > New workflow.
 - Enter the name of the workflow.
Define the trigger node
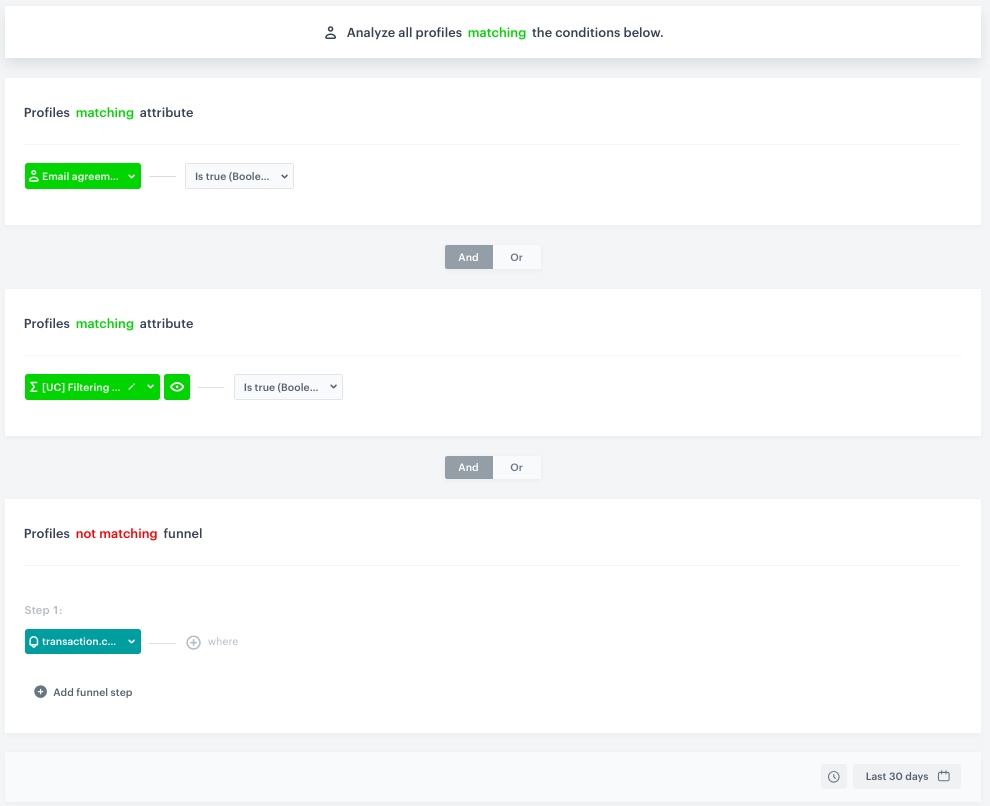
The workflow is triggered for specific group of customers every day at a defined time. In our case - customers with email marketing agreement who have not made a transaction, and for whom the the results of the aggregate created in the previous step is valid.
- As the first node, add the Audience node.
- In the configuration of the node, set the Run trigger option to repeatable.
- Set the interval to 1 per day.
- Choose the day and time when the process starts.
- Select the time zone.
- In Define audience, choose New Audience and click Define conditions.
- As the first condition, from the Choose filter dropdown menu, choose Email agreement attribute.
- From the Choose operator dropdown list, select Is true (Boolean).
- As the second condition, from the Choose filter dropdown menu, choose the aggregate created in the previous step.
- From the Choose operator dropdown list, select Is true (Boolean).
- As the third condition, from the Choose filter dropdown menu, choose the
transaction.chargeevent, and change condition to not matching. - Using the date picker in the lower-right corner, set the time range to Custom and set to 30 days. Confirm your choice with the Apply button.

Configuration of the Audience trigger node - Click Apply.
- Click Apply.
Define the Send Email node
- Add the Send Email node. In the node settings:
- In the Sender details section, choose the email account from which the email will be sent.
- In the Content section, type the Subject and from the Template dropdown, select the template you created in the previous step.
- In the UTM & URL parameters section, you can define the UTM parameters added to the links included in the email.
- In the Additional parameters section, you can assign additional parameters to the events generated by sending and interacting with this email.
- Click Apply.
Add the finishing node and set capping
- Add the End node.
- In the upper right corner, click Set Capping and define the limit of workflows a profile can start:
- Set Limit to 1.
- Set Time to 1 month.
- In the upper right corner, click Save & Run.

Check the use case set up on the Synerise Demo workspace
You can check the configuration of each step directly in Synerise Demo workspace:
If you don’t have access to the Synerise Demo workspace, please leave your contact details in this form, and our representative will contact you shortly.