Encourage customers with the highest propensity to join the loyalty club
By promoting our loyalty program, we want to reach with our communication mainly those who are most likely to join it. Thanks to such optimization, campaigns encouraging to become a member are better targeted - only to a specific, most promising group.
This use case describes the process of creating a segmentation of customers with the highest propensity for joining the loyalty club. This segmentation can later be used in selected campaigns that promote the loyalty club membership. It can help you optimize the cost of campaigns that are oriented toward users who will enjoy the loyalty program and the probability that this group of users will be really interested in joining is really high.
Prerequisites
- Create an email account.
- Collect the custom event which sends information to Synerise about joining a loyalty program (for example
account.statuswith parameteraccountStatusequal toactive). Such an event with the appropriate status must be sent each time the membership status changes (when the customer resigns from the program or joins again). - Enable the Lookalike prediction type.
- Create an email template with a message which encourages users to become your loyalty club members.
Process
In this use case, you will go through the following steps:
- Create an aggregate that returns the current status of the customer’s membership in loyalty program.
- Create source segmentation of customers who are members of loyalty program.
- Create target segmentation.
- Create a prediction.
- Create an email campaign.
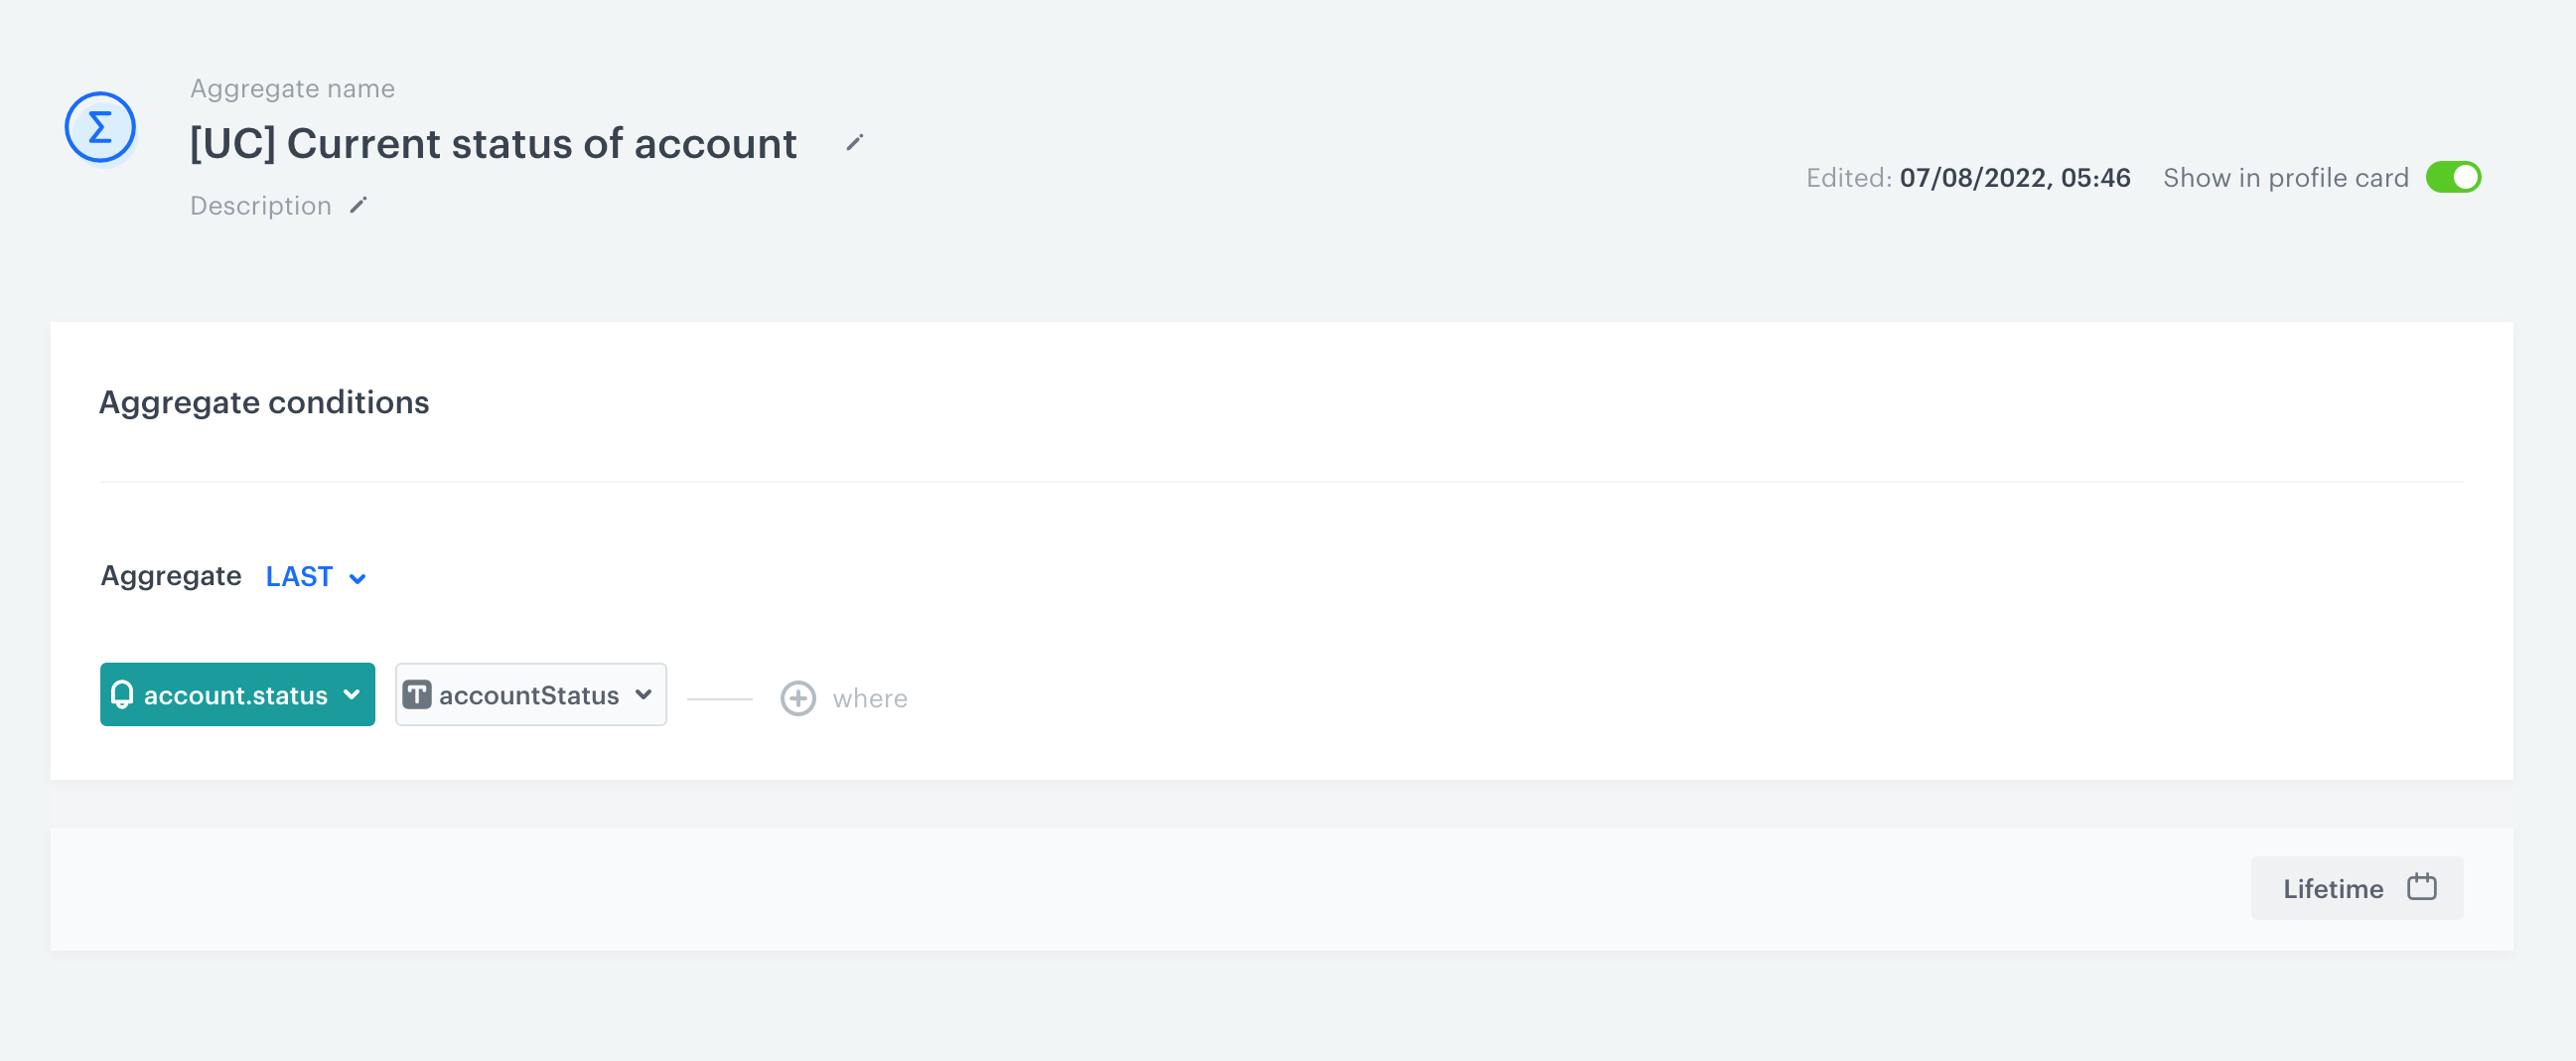
Create an aggregate
In this part of the process, you create an aggregate analyzing the current status of the customer’s membership.
- Go to
 Analytics > Aggregates > New aggregate.
 - Enter the name of the aggregate.
- As the type of the aggregate select Last.
- From the Choose event dropdown list, select the account.status event.
- As the event parameter, choose accountStatus.
- Define the period for the event as Lifetime.
- To save the aggregate, click Save.
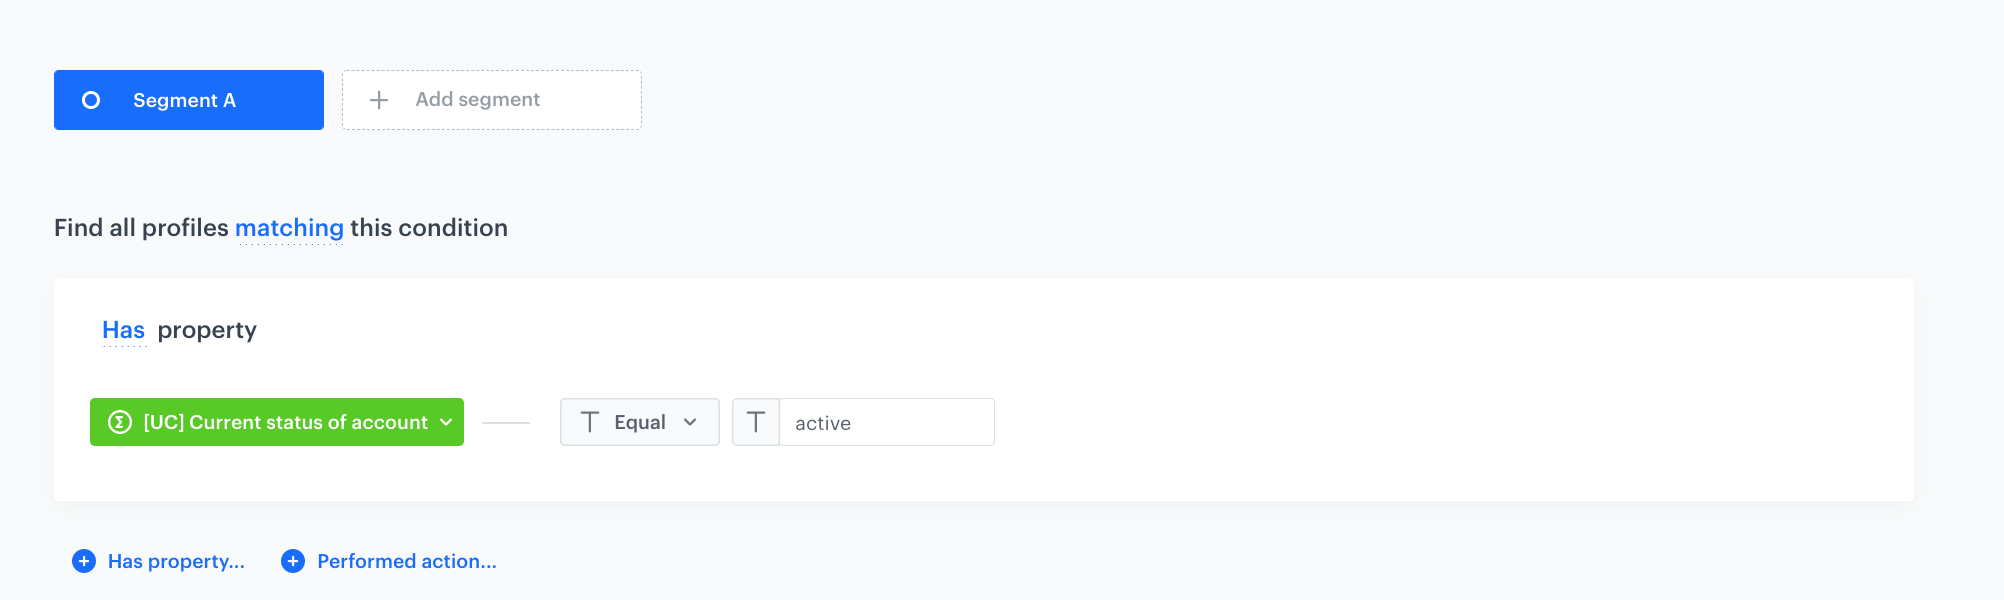
Create source segmentation
In this part of the process, create a source segmentation that contains model customers. These customers will be compared with those in the target segmentation to find the customers who are similar to the model group. This segmentation includes customers who currently are members of your loyalty club.
- Go to Analytics > Segmentations > New segmentation.
- Enter the name of segmentation.
- From the Has property dropdown list, select the aggregate analyzing the active status of the customer’s membership you created in the previous step.
- As an operator, choose Equal.
- In the text field, enter
active. - Confirm the settings by clicking Save.
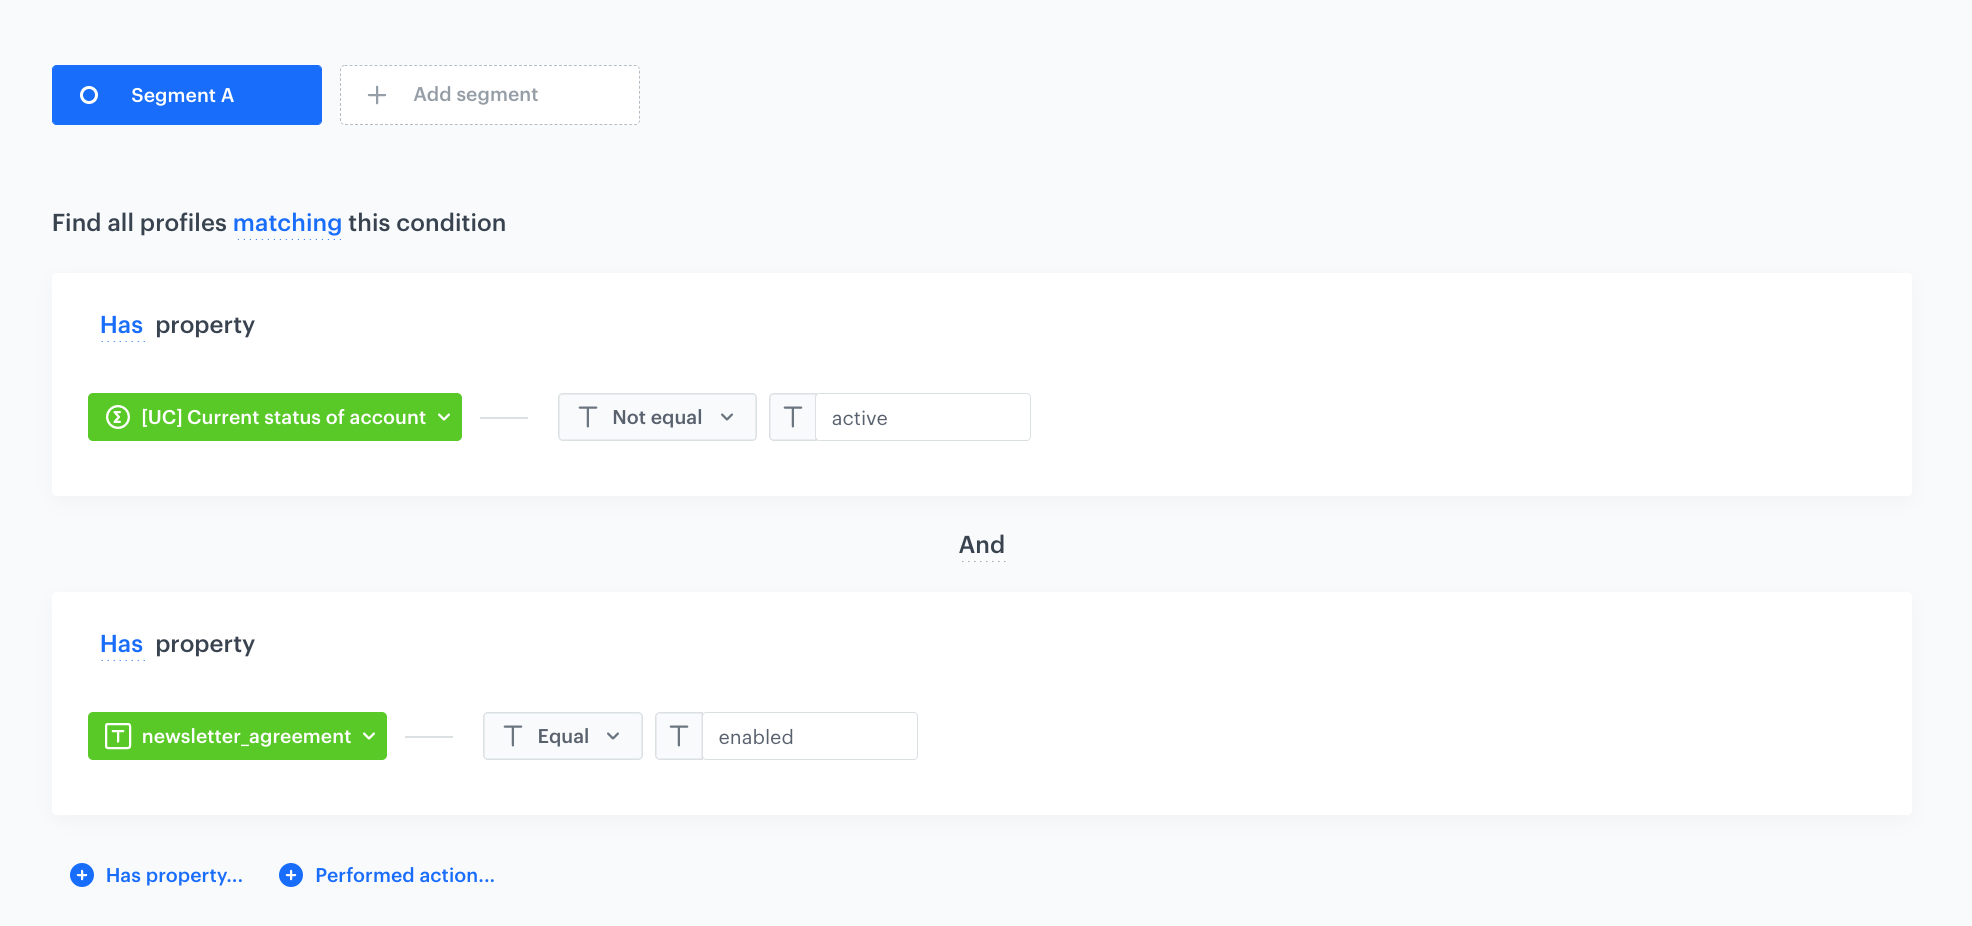
Create target segmentation
Create a segmentation of customers among whom you would like to find those who are most likely to become a member of your loyalty program. In our case, as we want to direct to such customers email communication, we will narrow down the segmentation to customers who agreed to receive newsletters.
- Go to Analytics > Segmentations > New segmentation.
- Enter the name of the segmentation.
- From the Has property dropdown list, select the aggregate analyzing the active status of the customer’s membership created in the previous step.
- As an operator, choose Not equal.
- In the text field, enter
active. - From the Has property dropdown list, select
newsletter_agreement. - As an operator, choose Equal.
- In the text field, enter
enabled. - Confirm the settings by clicking Save.
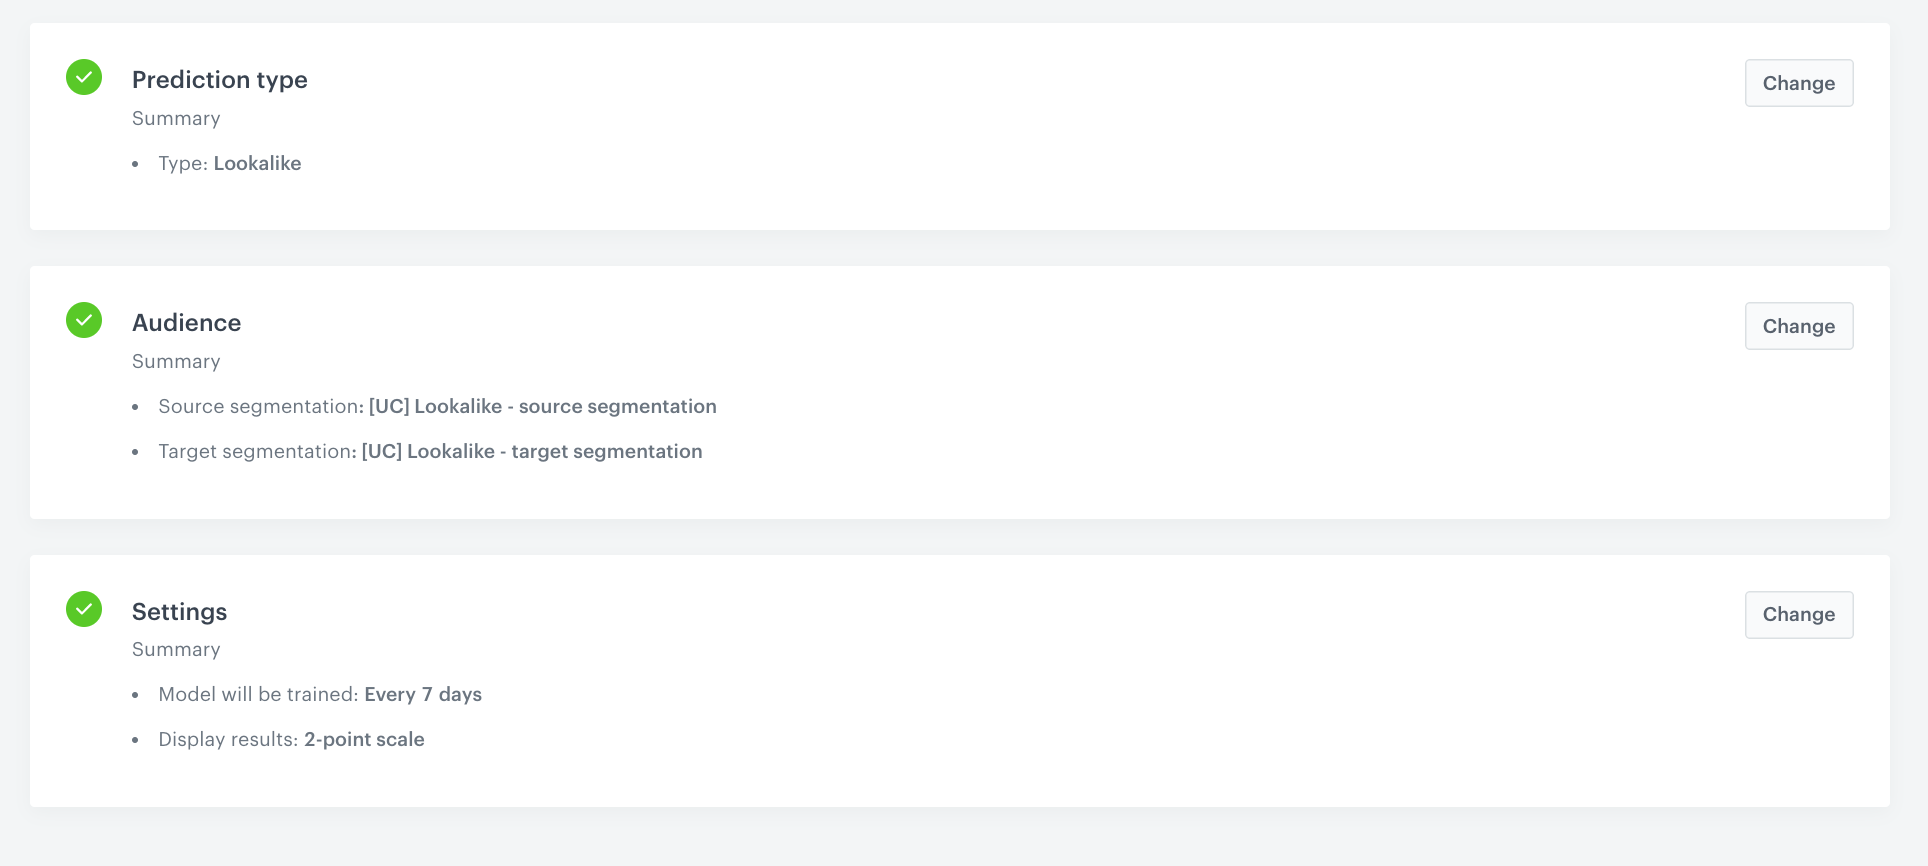
Create a prediction
In this part of the process, create a Lookalikes prediction which compares the two segmentations - the engine looks for customers in the target segmentation who are most similar to the customers in the source segmentation. On the profile cards of all customers from the target segmentation, a snr.lookalike.score event is generated. In the details of the event, you can find the score_label parameter that describes the similarity of a customer to the customers in the source segmentation. The score_label parameter for this particular prediction takes two values: low or high.
- Go to
 Predictions > New prediction.
 - As the type of prediction, select Lookalikes.
- In the Audience section, click Define.
- In the Source segmentation subsection, click Choose segmentation.
- From the dropdown list, select the source segmentation you created before.
- In the Target segmentation subsection, click Choose segmentation.
- From the dropdown list, select the target segmentation you created before.
- Confirm by clicking Apply.
- In the Settings section, click Change.
- Enable the Set up recurring prediction calculation option.
- Select the 2-point scale.
- Confirm by clicking Apply.
- Click Save & Calculate.
Create an email campaign
In this part of the process, you create an email campaign, targeted to customers with the high propensity to join the loyalty program. This campaign will encourage them to become a member.
- Go to
 Communication > Email campaign > Create new.
 - In the Audience section, choose the New audience.
- Define the conditions:
-
Choose event
snr.lookalike.score. -
As the parameter choose modelId.
-
As the operator, choose Equal.
-
In the text field, enter the ID of the prediction you created.
-
Click + where.
-
From the dropdown list, select source_label.
-
As the operator, choose Equal.
-
In the text field, enter
high.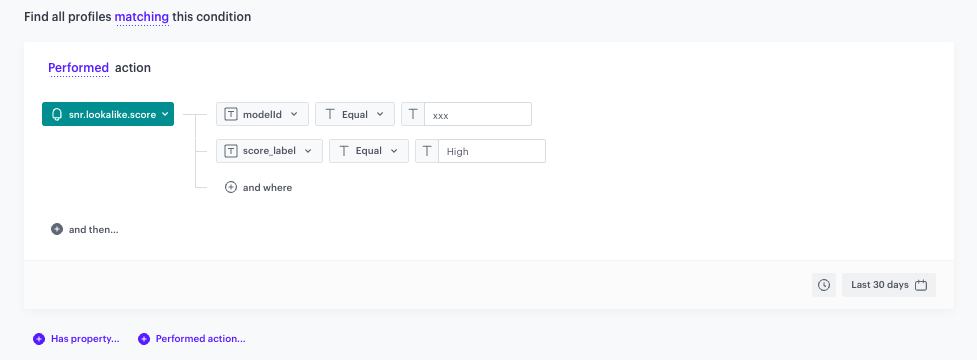
The conditions for the audience of the email -
Apply and save your changes.
-
- Configure the Content section.
- Choose the email account from which you want to send your message.
- In the Subject field, enter your message subject.
- Click Create message and choose an email template created as a part of prerequisites.
- Apply changes.
- In the Schedule section, specify the time when you want to send your communication.
- You can optionally define UTM & URL parameters. If not, click Skip step.
- Confirm by clicking Apply.
Check the use case set up on the Synerise Demo workspace
You can check the aggregate configuration, target segmentation, source segmentation, and prediction described in this use case, directly in Synerise Demo workspace.
You can also check the email campaign setting there.
If you don’t have access to the Synerise Demo workspace, please leave your contact details in this form, and our representative will contact you shortly.