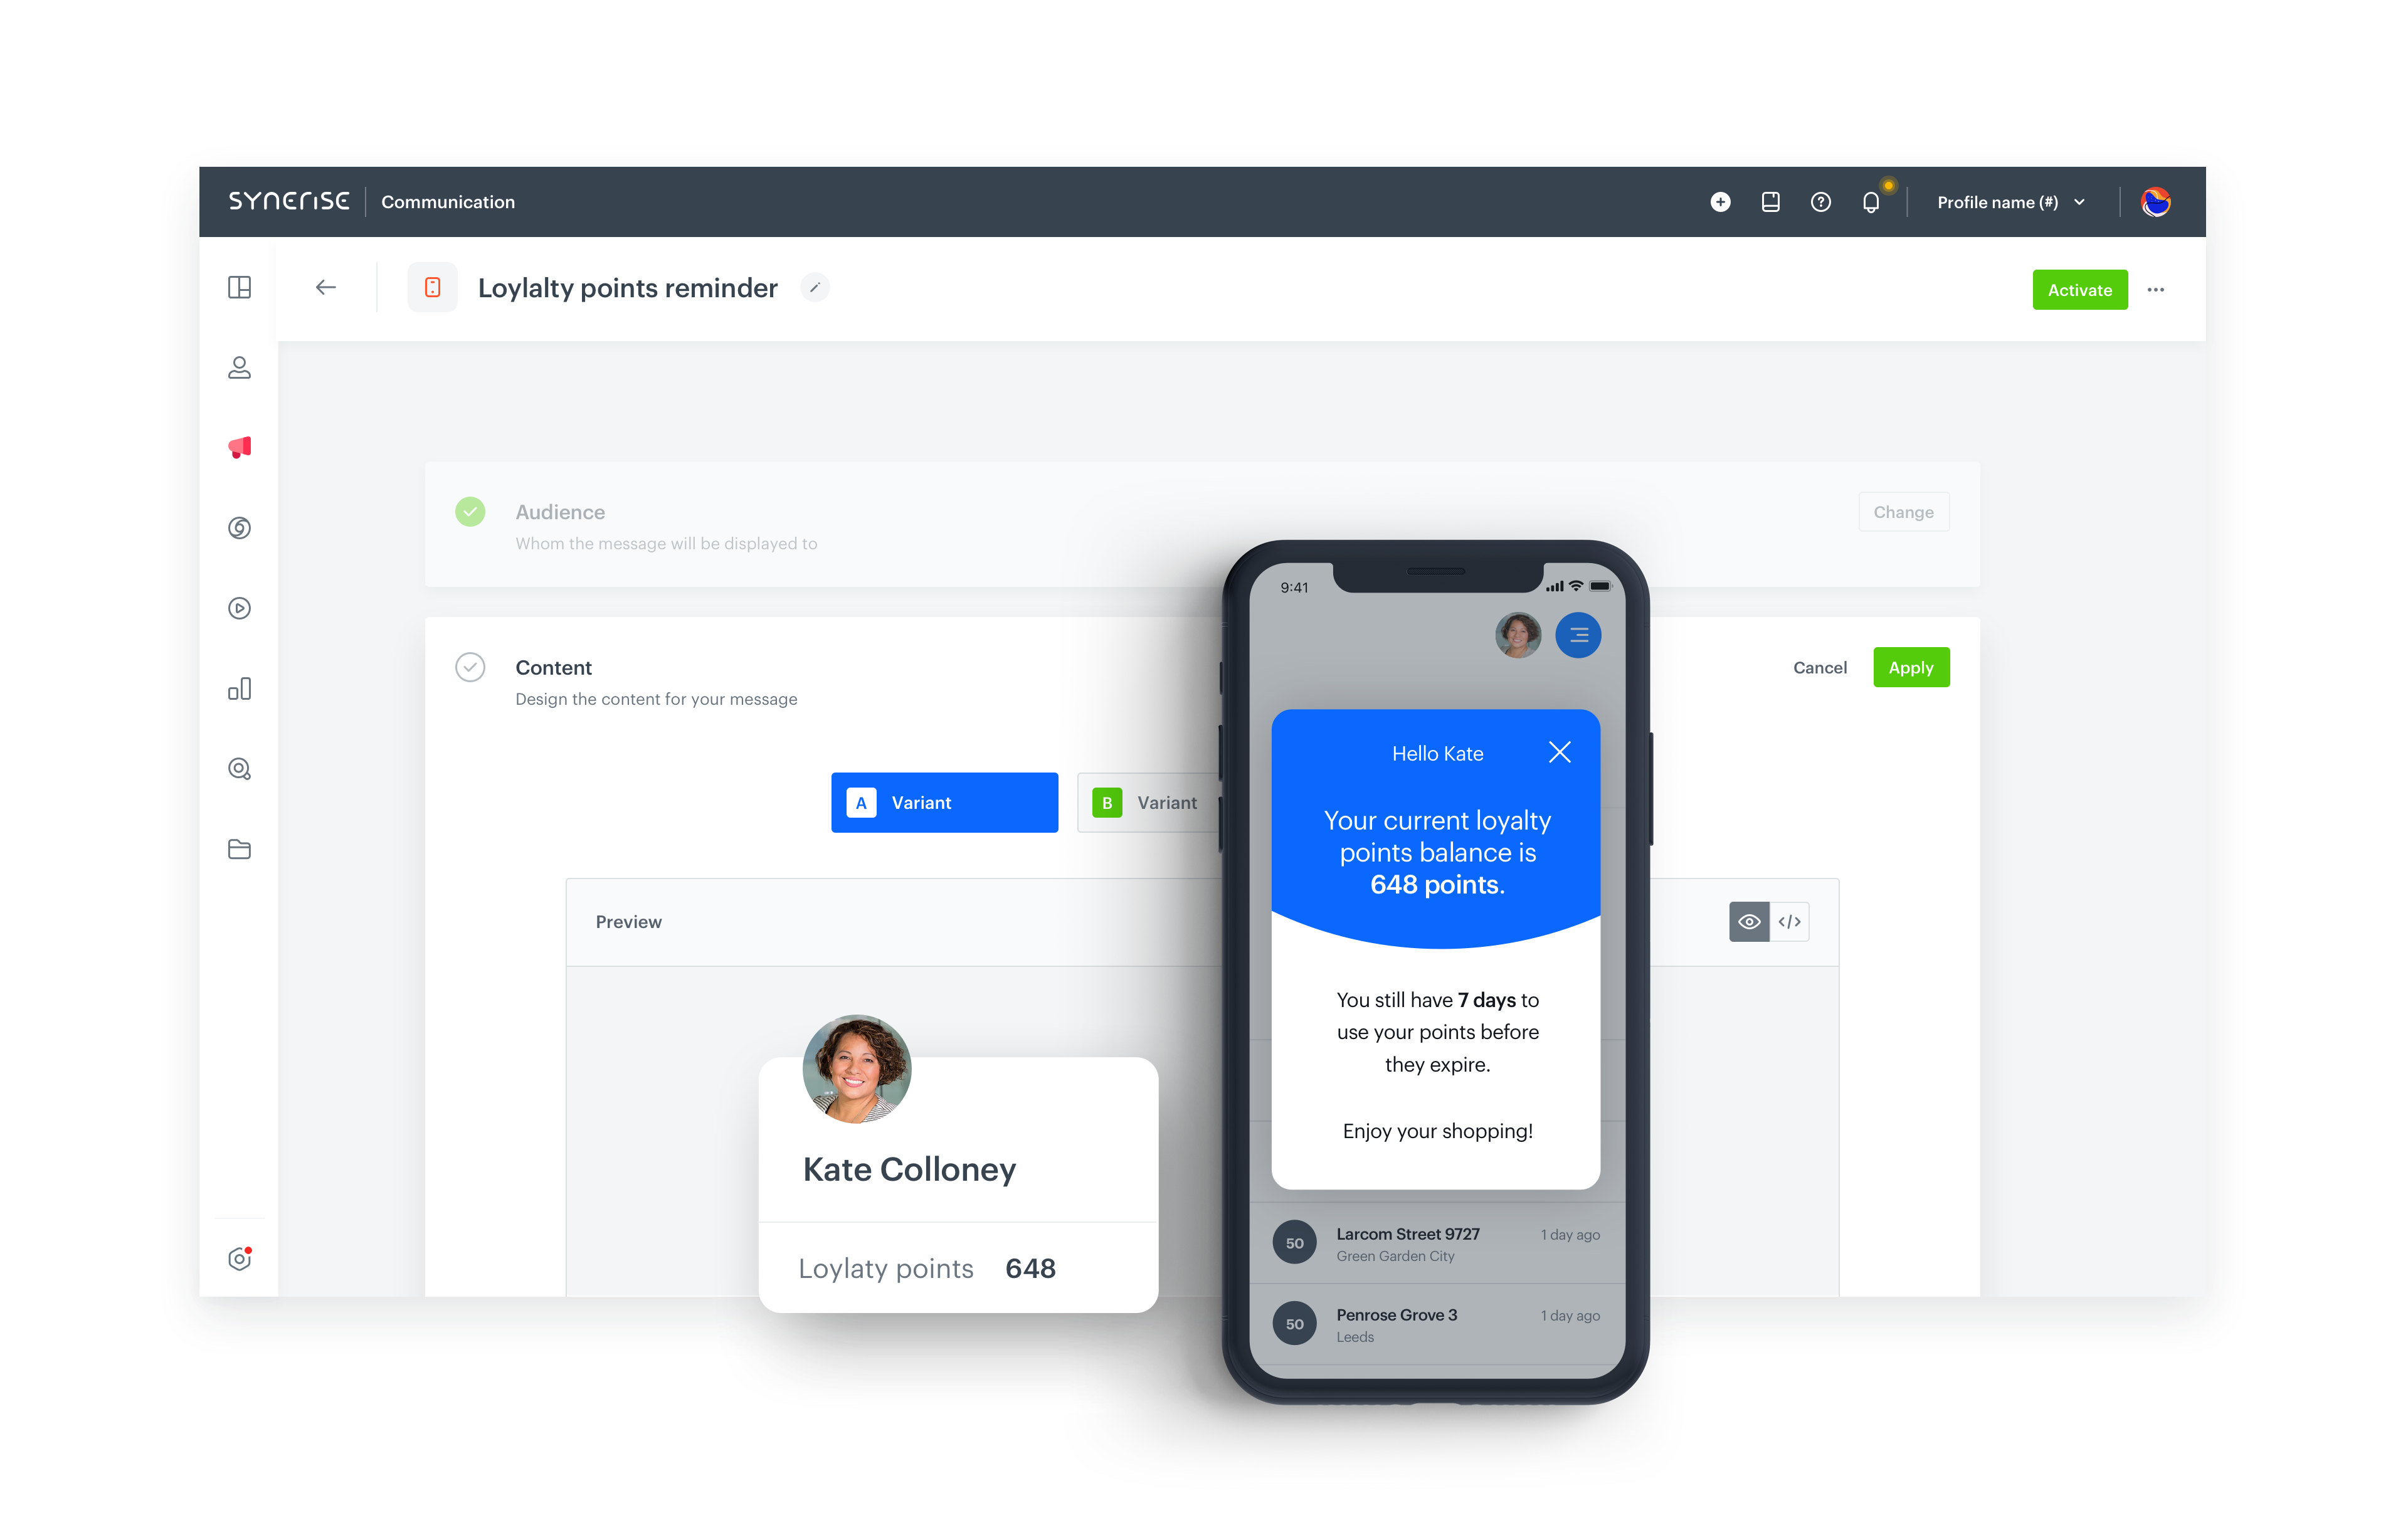
Loyalty program points balance reminder in in-app message
Loyalty programs are an important part of any business as they help companies build strong relationships with their customers. Every brand knows that the key to building a successful brand is building long-lasting relationships with customers. The strategies used by companies may vary, but most are based on earn&burn programs. This program is quite popular with both customers and companies, although it can sometimes lead to unforeseen consequences for the business.
The most common problem companies face is that customers are not spending their loyalty points. This raises the need to encourage customers to unlock this unredeemed value. To do this, you can remind customers when their points expire to encourage them to “burn” their points, while personalizing this message to the individual customer.
This use case describes the process of creating a reminder to customers about the balance of loyalty points they have in their account and the time left until points expire using an in-app message. The created in-app will be displayed on the trigger of adding the product to the shopping cart once a day. This is an effective form of communication with customers that allows for additional outreach in the mobile channel. In this case, we assume that the redemption of points takes place on a specific day each year.
In this use case, we provide you with ready-to-use campaign code that you can use 1:1 in your business scenario.
Prerequisites
- Implement Synerise SDK in your mobile app.
- Integrate mechanism for awarding loyalty points.
For example, you can award loyalty points after a transaction. In such case, create an expression that counts how many loyalty points are assigned to a customer for a transaction. Once you prepare the expression, please contact Support Team to configure materialization of loyalty points. After such configuration, every time loyalty points are assigned to a customer, thepoints.loyaltyevent will be generated in a customer’s profile with information about the number of loyalty points they received after a transaction (thepointsparameter).
Tip: Learn more about events here. - Collect the custom event which sends information to Synerise about joining a loyalty program (for example
account.statuswith parameteraccountStatusequal toactive). Such an event with the appropriate status should be sent each time the membership status changes (when the customer resigns from the program or joins again). - Implement point expiration logic
- Collect add to cart event.
Security configuration
Before you start working with this module, if you are a Synerise customer or partner, consider reading the section about denylisting events. This natively accessible configuration will allow you to manage the restrictions in points management that may help you prevent fraud.
Process
- Create an aggregate that returns the sum of loyalty points for an individual customer
- Create an expression with points balance
- Current status of the membership
- Create an In-app message
Create an aggregate
Create an aggregate that returns the sum of loyalty points for an individual customer.
- Go to
 Analytics > Aggregates > New aggregate.
 - Enter a meaningful name of the aggregate.
- Set the Aggregate option to Sum.
- Click the Choose event dropdown list.
- From the dropdown list, select the
points.loyaltyevent. - From the + where dropdown list, select
pointsparameter. - Using the date picker in the lower-right corner, set the time range to Lifetime.
- Save the aggregate.
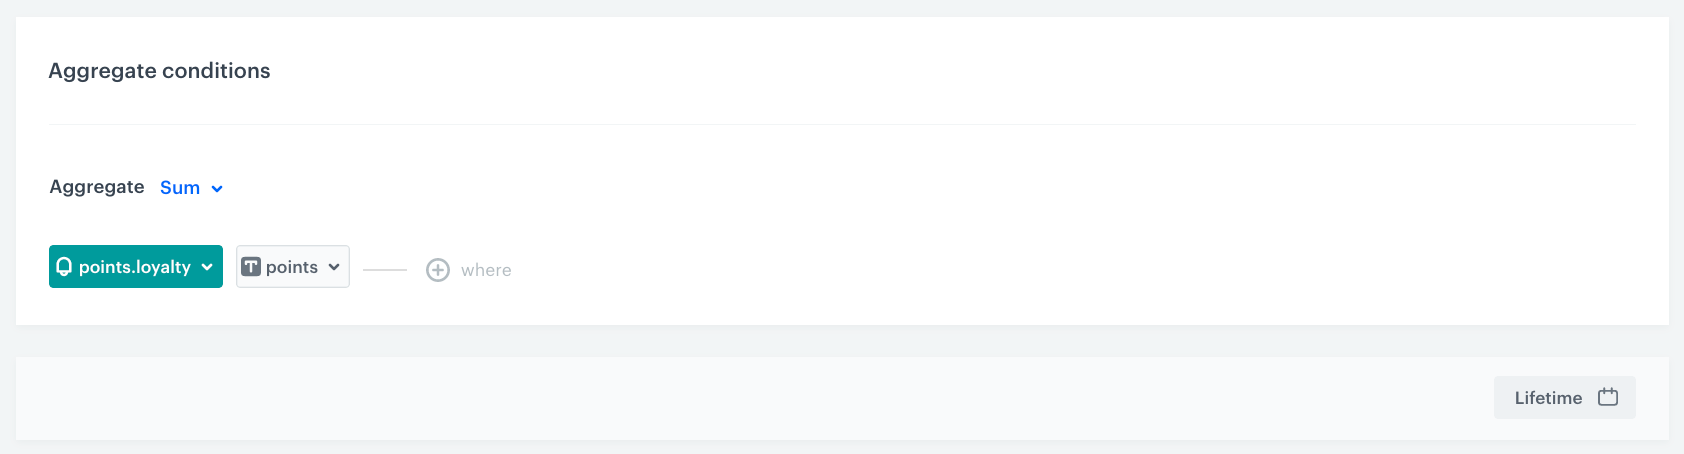
The aggregate that sums points from the points.loyalty event
Create an expression with points balance
In this part of the process, create an expression which will be used to calculate points balance for the customer.
In our case, the expression is built based on the points.loyalty event that is sent every time the customer is awarded with loyalty points.
For more advanced scenarios with loyalty points, check out this use case describing the process of configuring the transfer of loyalty points between customers.
- Go to Analytics > Expressions > New expression.
- Enter a meaningful name of the expression.
- Leave the expression type at default (Attribute).
- Build the formula of the expression.
- Click the Select node.
- From the dropdown list, select Profile.
- Click the unnamed node that appeared on the canvas.
- Scroll down the page and click Choose attribute.
- On the dropdown list select the aggegate for
points.loyaltythat you created earlier. - Save the expression.
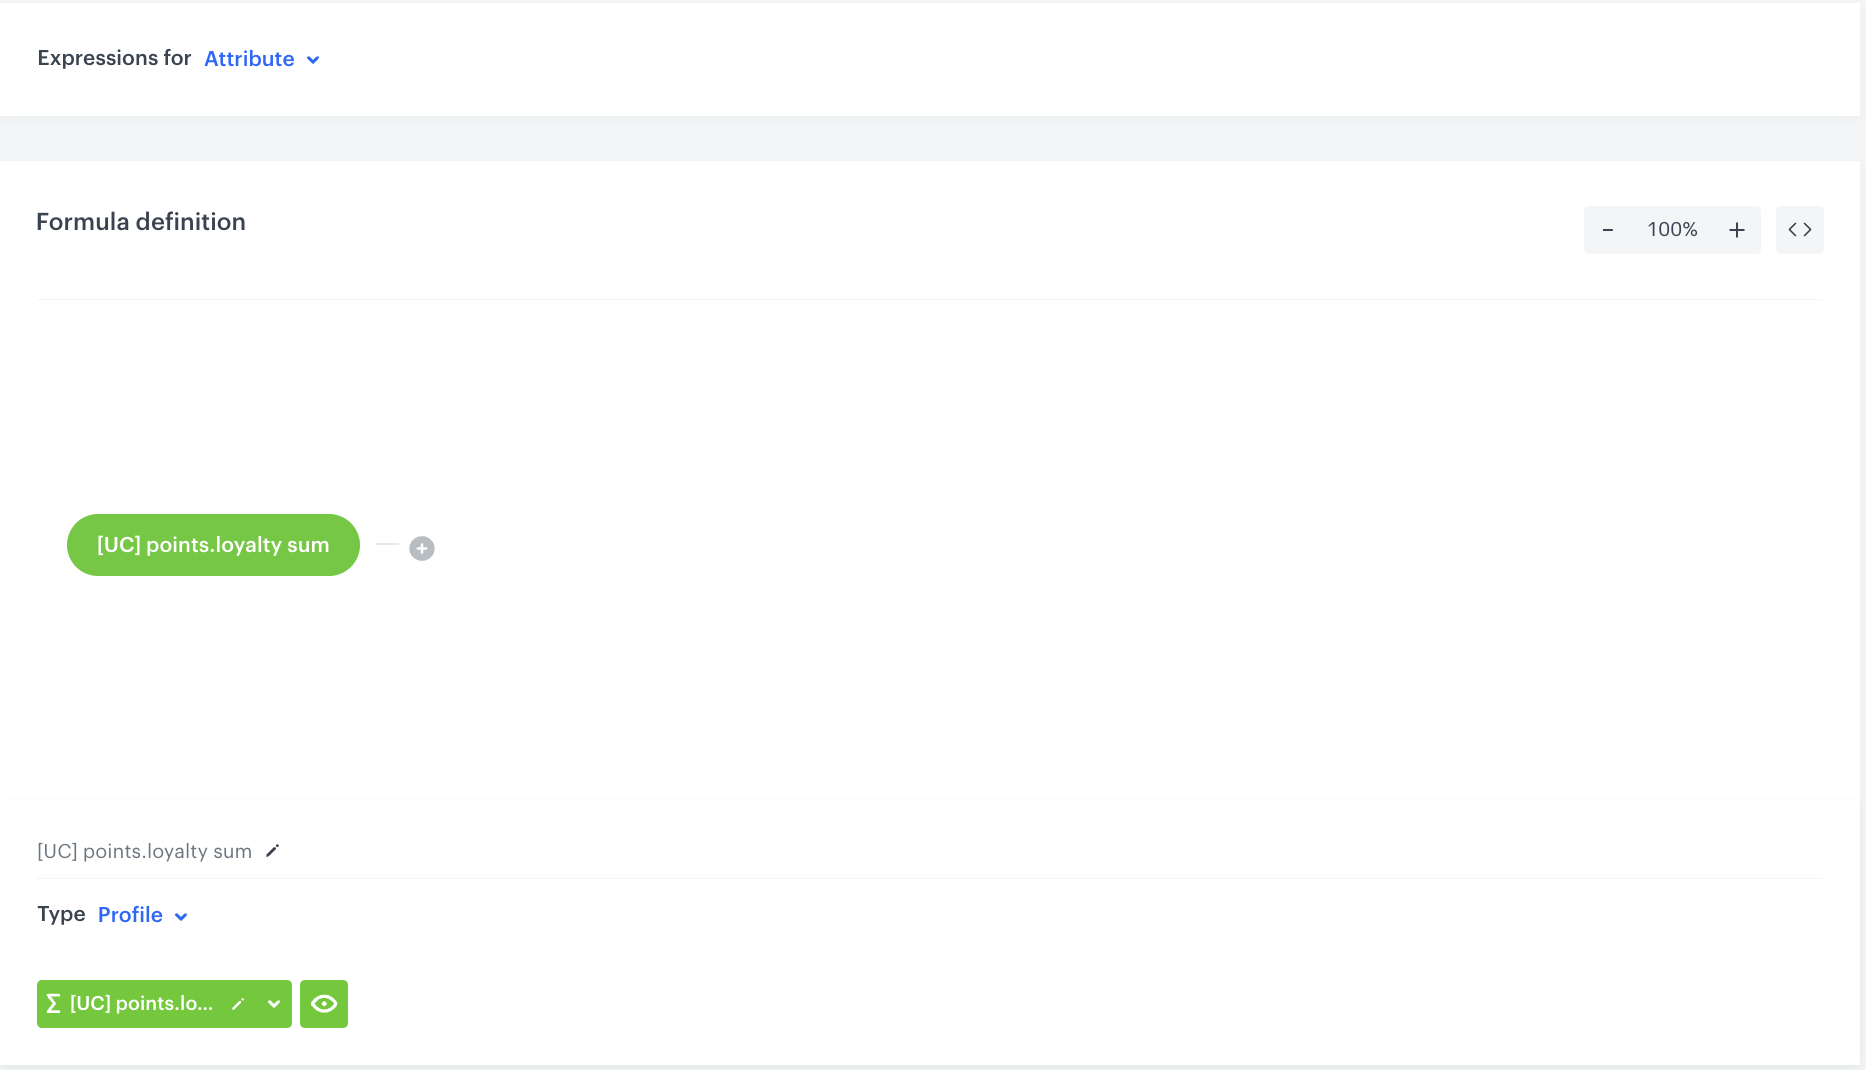
The configuration of the expression
Current status of the membership
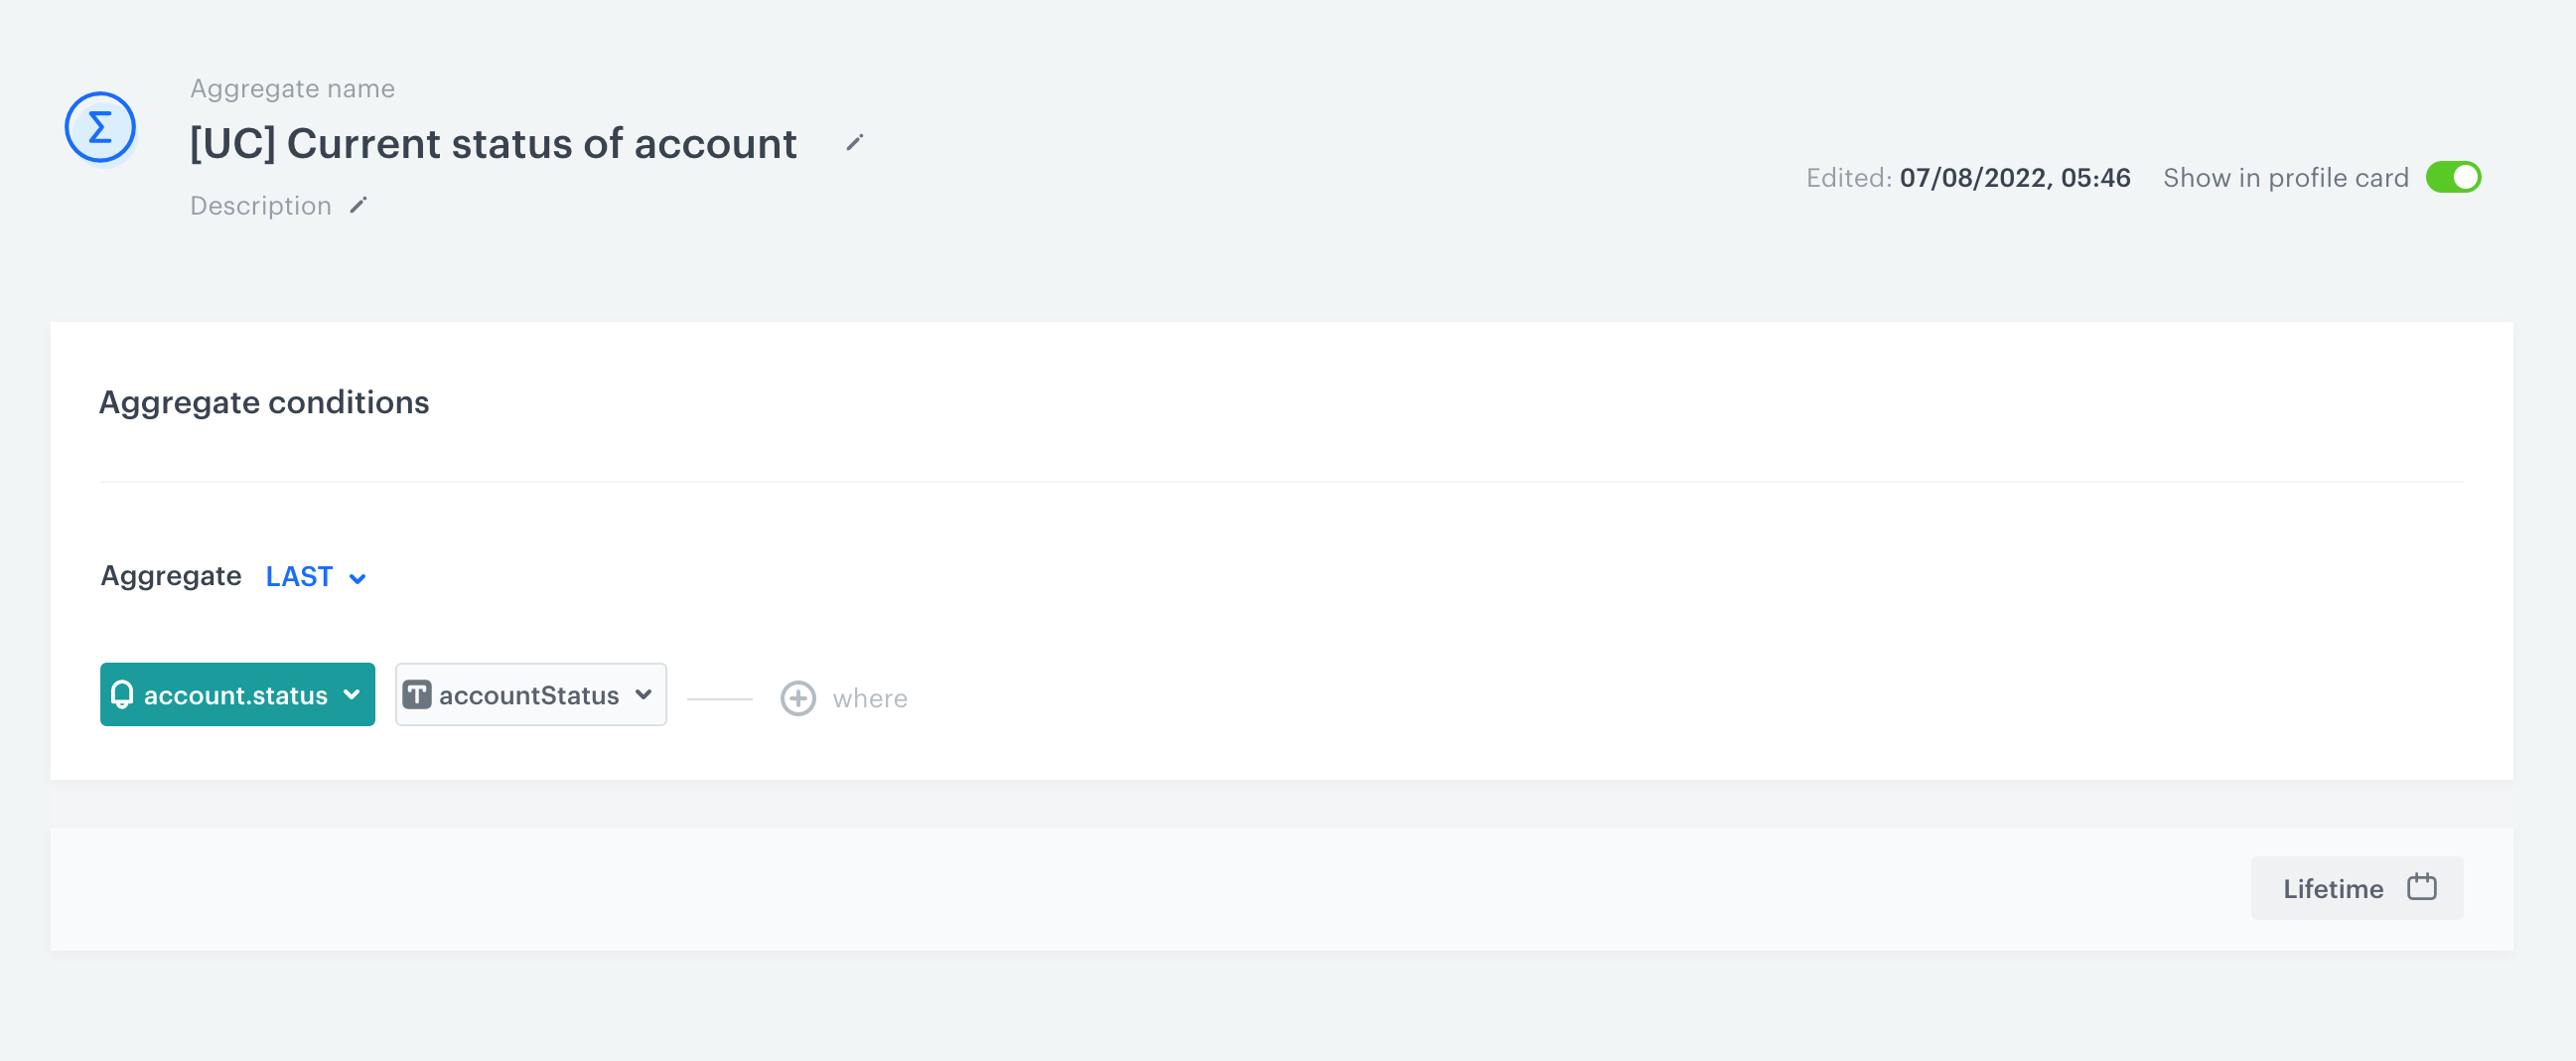
Create an aggregate that analyzes a customer’s current membership status. This aggregate will later be used in in-app messaging to define customers who are active participants in the loyalty program.
- Go to Analytics > Aggregates > New aggregate.
- Enter the name of the aggregate.
- As the type of the aggregate, select Last.
- From the Choose event dropdown list, select the account.status event.
- As the event parameter, choose accountStatus.
- Using the date picker in the lower-right corner, set the time range to Lifetime.
- To save the aggregate, click Save.
Create an in-app message
In this part of the process, configure an in-app campaign that displays the appropriate message to the user on the mobile app.
-
Go to Communication > In-app messages > Create in app.
-
In the Audience section, click Define.
-
In the New Audience section, click Define conditions.
In this step, you define the group of customers who are currently active members of the loyalty program. -
Choose Has property and find the aggregate analyzing the status of the customer’s membership, created earlier in the process.
-
As an operator, choose Equal and add the value
active. -
Click Apply to save the aggregate.

The audience settings -
In the Content section, click Define.
-
Click Create Message and select Code Editor to create the code for your in-app message.
-
Style the message according to your design preferences using HTML, CSS and JS sections. Below you can find sample code that you can use to create an in-app message.
Important: The CSS and JS code snippets shown below can be directly copied into your in-app campaign. In the HTML code snippet, you need to replace the expression ID with the expression you created for your campaign.
    <div class="in-app-wrapper">
        <div class="in-app-wrapper-inner">
            <div class="in-app__upper">
                <div class="in-app-close"></div>
                    <p class="in-app-title"> Hello {% customer firstname %}</p>
                    <p class="in-app__upper--text">Your current loyalty <br> points balance is <br><strong>{% expression %}
                            2d4c0862-31ac-43c7-a991-97a1e5455e8a {% endexpression %} points.</strong></p>
                </div>
                <div class="in-app__lower">
                    <p class="in-app__lower--text changeDate"></p>
                    <p class="in-app__lower--text">Enjoy your shopping!</p>
            </div>
        </div>
</div> .in-app-wrapper * {
font-family: sans-serif;
}
.in-app-wrapper {
text-align: center;
position: relative;
background: #00000045;
box-shadow: 0 30px 80px 0 rgba(35, 41, 54, 0.2);
width: auto;
height: 100vh;
display: flex;
flex-direction: column;
flex-wrap: nowrap;
align-content: center;
justify-content: center;
align-items: center;
}
.in-app-title {
font-size: 20px;
font-weight: normal;
font-stretch: normal;
font-style: normal;
line-height: 1.5;
letter-spacing: -0.67px;
text-align: center;
color: white;
margin: 0;
padding-top: 20px;
}
.in-app-subtitle {
font-size: 16px;
font-weight: normal;
font-stretch: normal;
font-style: normal;
line-height: 1.43;
letter-spacing: -0.47px;
text-align: center;
color: #13171e;
}
.in-app-close {
position: absolute;
z-index: 1;
width: 50px;
height: 50px;
border: 0;
top: 10px;
right: 10px;
cursor: pointer;
background-color: transparent;
}
.in-app-close:after,
.in-app-close:before {
content: '';
position: absolute;
height: 2px;
width: 50%;
top: 50%;
left: 12px;
margin-top: -1px;
background: white;
}
.in-app-close:after {
-webkit-transform: rotate(-45deg);
-moz-transform: rotate(-45deg);
-ms-transform: rotate(-45deg);
-o-transform: rotate(-45deg);
transform: rotate(-45deg);
height: 2px;
margin-top: -2px;
}
.in-app-close:before {
-webkit-transform: rotate(45deg);
-moz-transform: rotate(45deg);
-ms-transform: rotate(45deg);
-o-transform: rotate(45deg);
transform: rotate(45deg);
height: 2px;
margin-top: -2px;
}
.in-app-wrapper-inner {
background: #fff;
border-radius: 6px;
position: relative;
border-radius: 20px;
margin-left: 20px;
margin-right: 20px;
height: 300px;
width: -webkit-fill-available
}
.in-app__upper {
background-color: #0b68ff;
border-radius: 4% 4% 50% 50% / 4% 4% 10% 10%;
height: 170px;
}
.in-app__lower {
height: 200px;
}
.in-app__upper--text {
font-size: 20px;
color: white;
word-spacing: 2px;
}
.in-app__lower--text {
font-size: 17px;
color: black;
word-spacing: 2px;
}(function () {
var closeButton = document.querySelector(".in-app-close");
closeButton.addEventListener("click", function () {
SRInApp.close();
SRInApp.trackCustomEvent(
"inapp.custom",
{
action: "close",
},
"Custom event from In-App message"
);
});
var modalBackground = document.querySelector(".in-app-wrapper");
modalBackground.addEventListener("click", function (event) {
if (event.target.getAttribute("class") == "in-app-wrapper") {
SRInApp.close();
SRInApp.trackCustomEvent(
"inapp.custom",
{
action: "click outside modal",
},
"Custom event from In-App message"
);
}
});
var oneDay = 24 * 60 * 60 * 1000;
var firstDate = new Date();
var endOfYear = new Date(2022, 12, 31);
var diffDays = Math.round(Math.abs((firstDate - endOfYear) / oneDay));
var insertDate = document.querySelector(".changeDate");
if (diffDays > 30) {
insertDate.innerHTML =
"You still have <strong>" +
diffDays +
" days</strong> to <br> use your points before <br> they expire.";
} else {
insertDate.innerHTML =
"You have only <strong>" +
diffDays +
" days</strong> to <br> use your points before <br> they expire!";
}
})();
-
Click Next.
-
Confirm by clicking Apply.
-
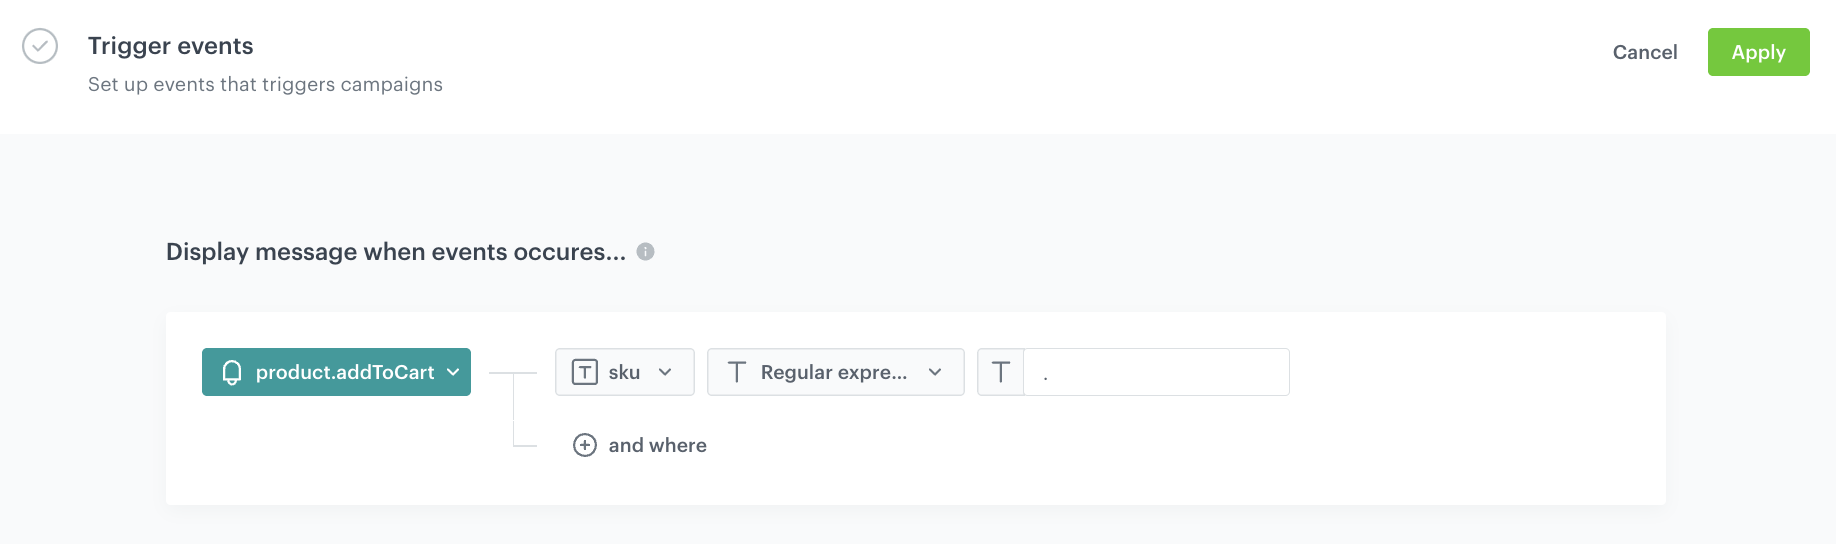
In the Trigger events section, click Define.
-
Select Add event and find the product.addToCart event the mobile application generates.
-
From the Parameter dropdown list select sku.
-
From the Choose operator dropdown list, select Regular expression.
-
As the value, enter
. -
Confirm by clicking Apply.
The audience settings -
In the Schedule section, click Define and set the time when the campaign will be active.
-
In the Display Settings section, click Change.
-
Define the Priority index and enable the Frequency limit toggle to manage the frequency of in-app message display in the application.
In our case, we want to display the massage to the customer a maximum of 1 time in period of 1 day.Note: You can additionaly enable the Capping limit toggle to limit the amount of time the in-app message can be displayed to user in general.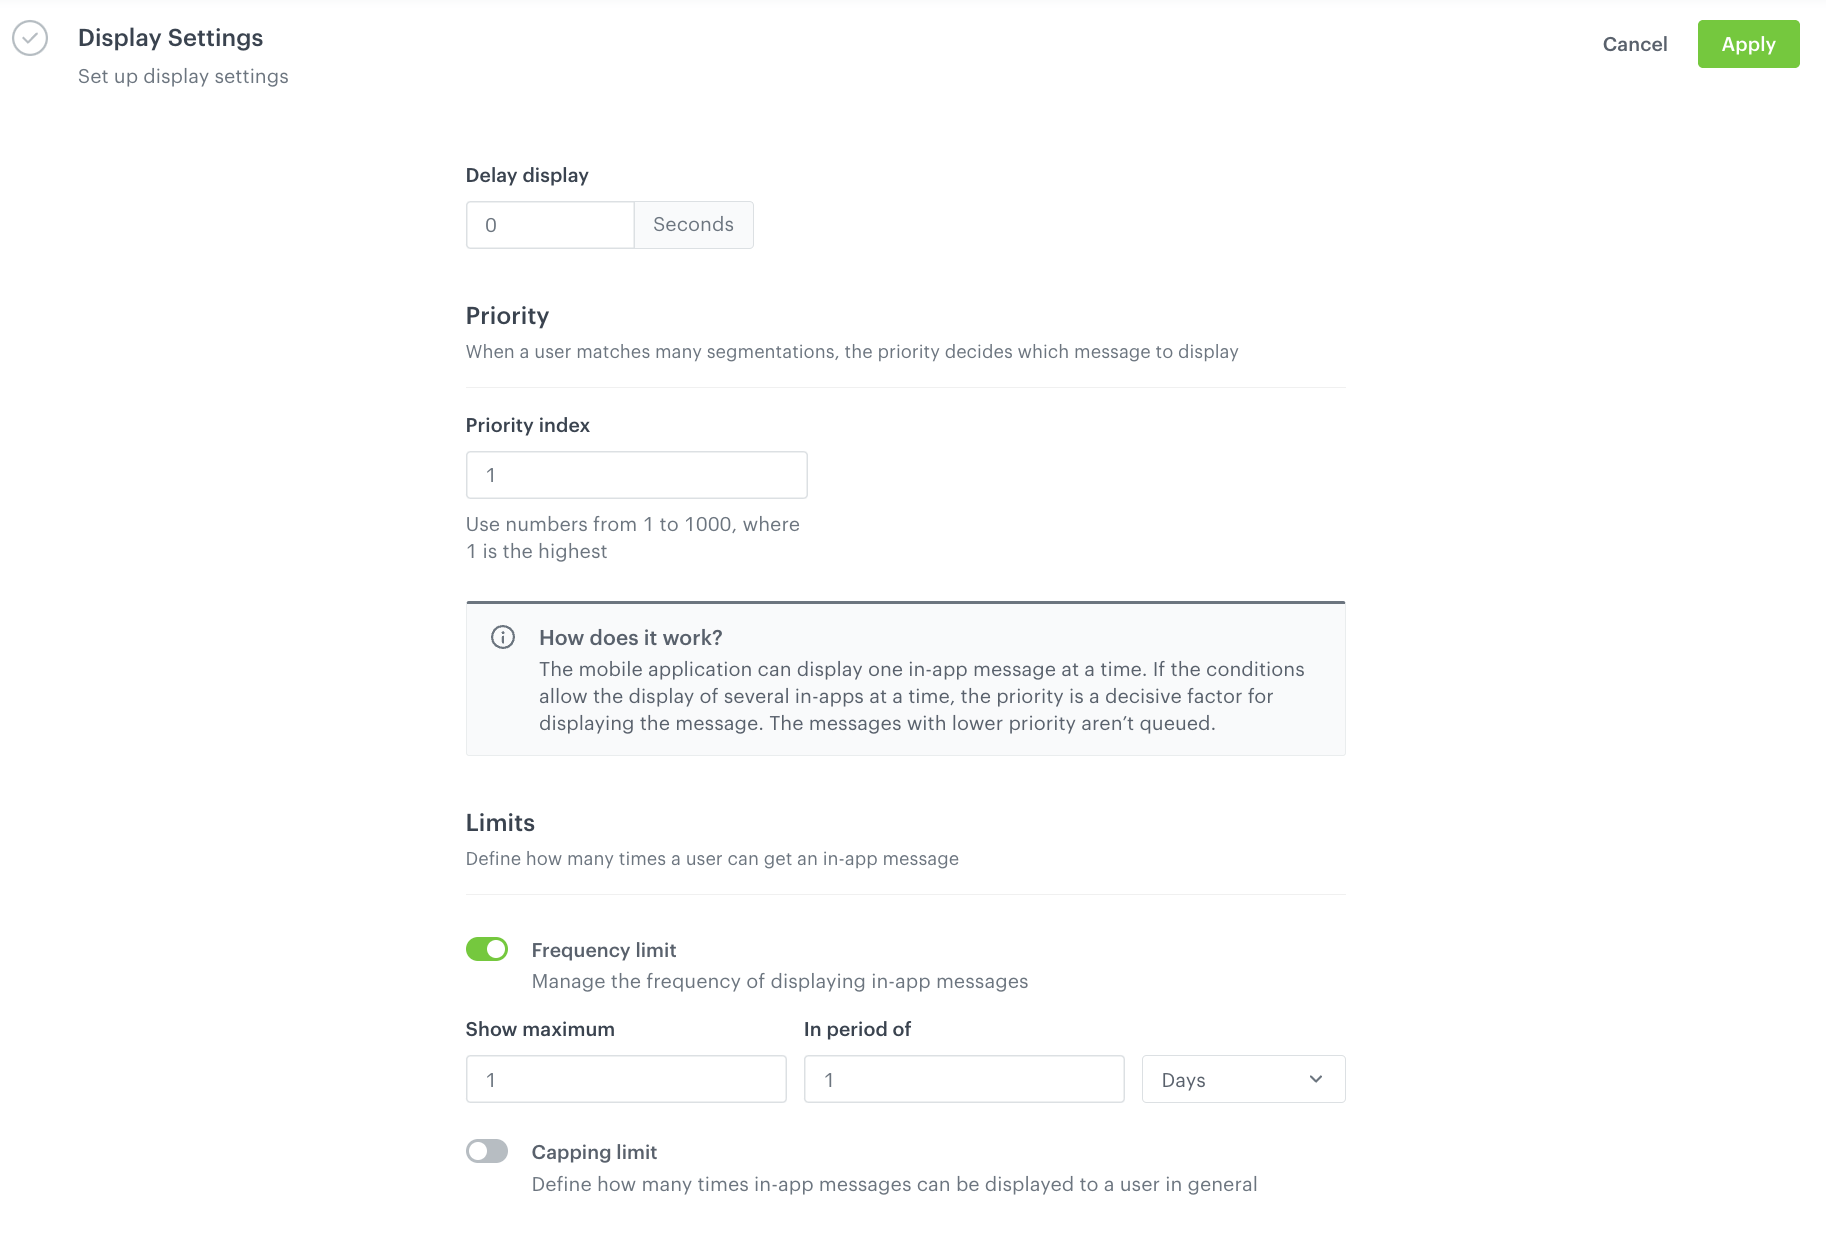
The audience settings -
Confirm by clicking Apply.
-
Optionally, you can define the UTM parameters and Additional parameters for your in-app campaign.
-
Activate the campaign.
Check the use case set up on the Synerise Demo workspace
You can check the configuration of each step directly in the Synerise Demo workspace:
- Aggregate
- Expression with the points balance
- Aggregate with the current status of the membership
- In-app message configuration
If you don’t have access to the Synerise Demo workspace, please leave your contact details in this form, and our representative will contact you shortly.