Send a message encouraging replenishment on WhatsApp
WhatsApp is a trusted platform by millions of users worldwide, making it a valuable channel for customer communication. It’s a channel where you can get closer to your customers by forming personalized communication with them, building a stronger bond with your brand, and increasing loyalty. Thanks to Synerise’s integration with WhatsApp, you have unlimited possibilities to customize your communication with customers. You can take advantage of all the insights you collect in Synerise and use them effectively to deliver the greatest value to your customers.
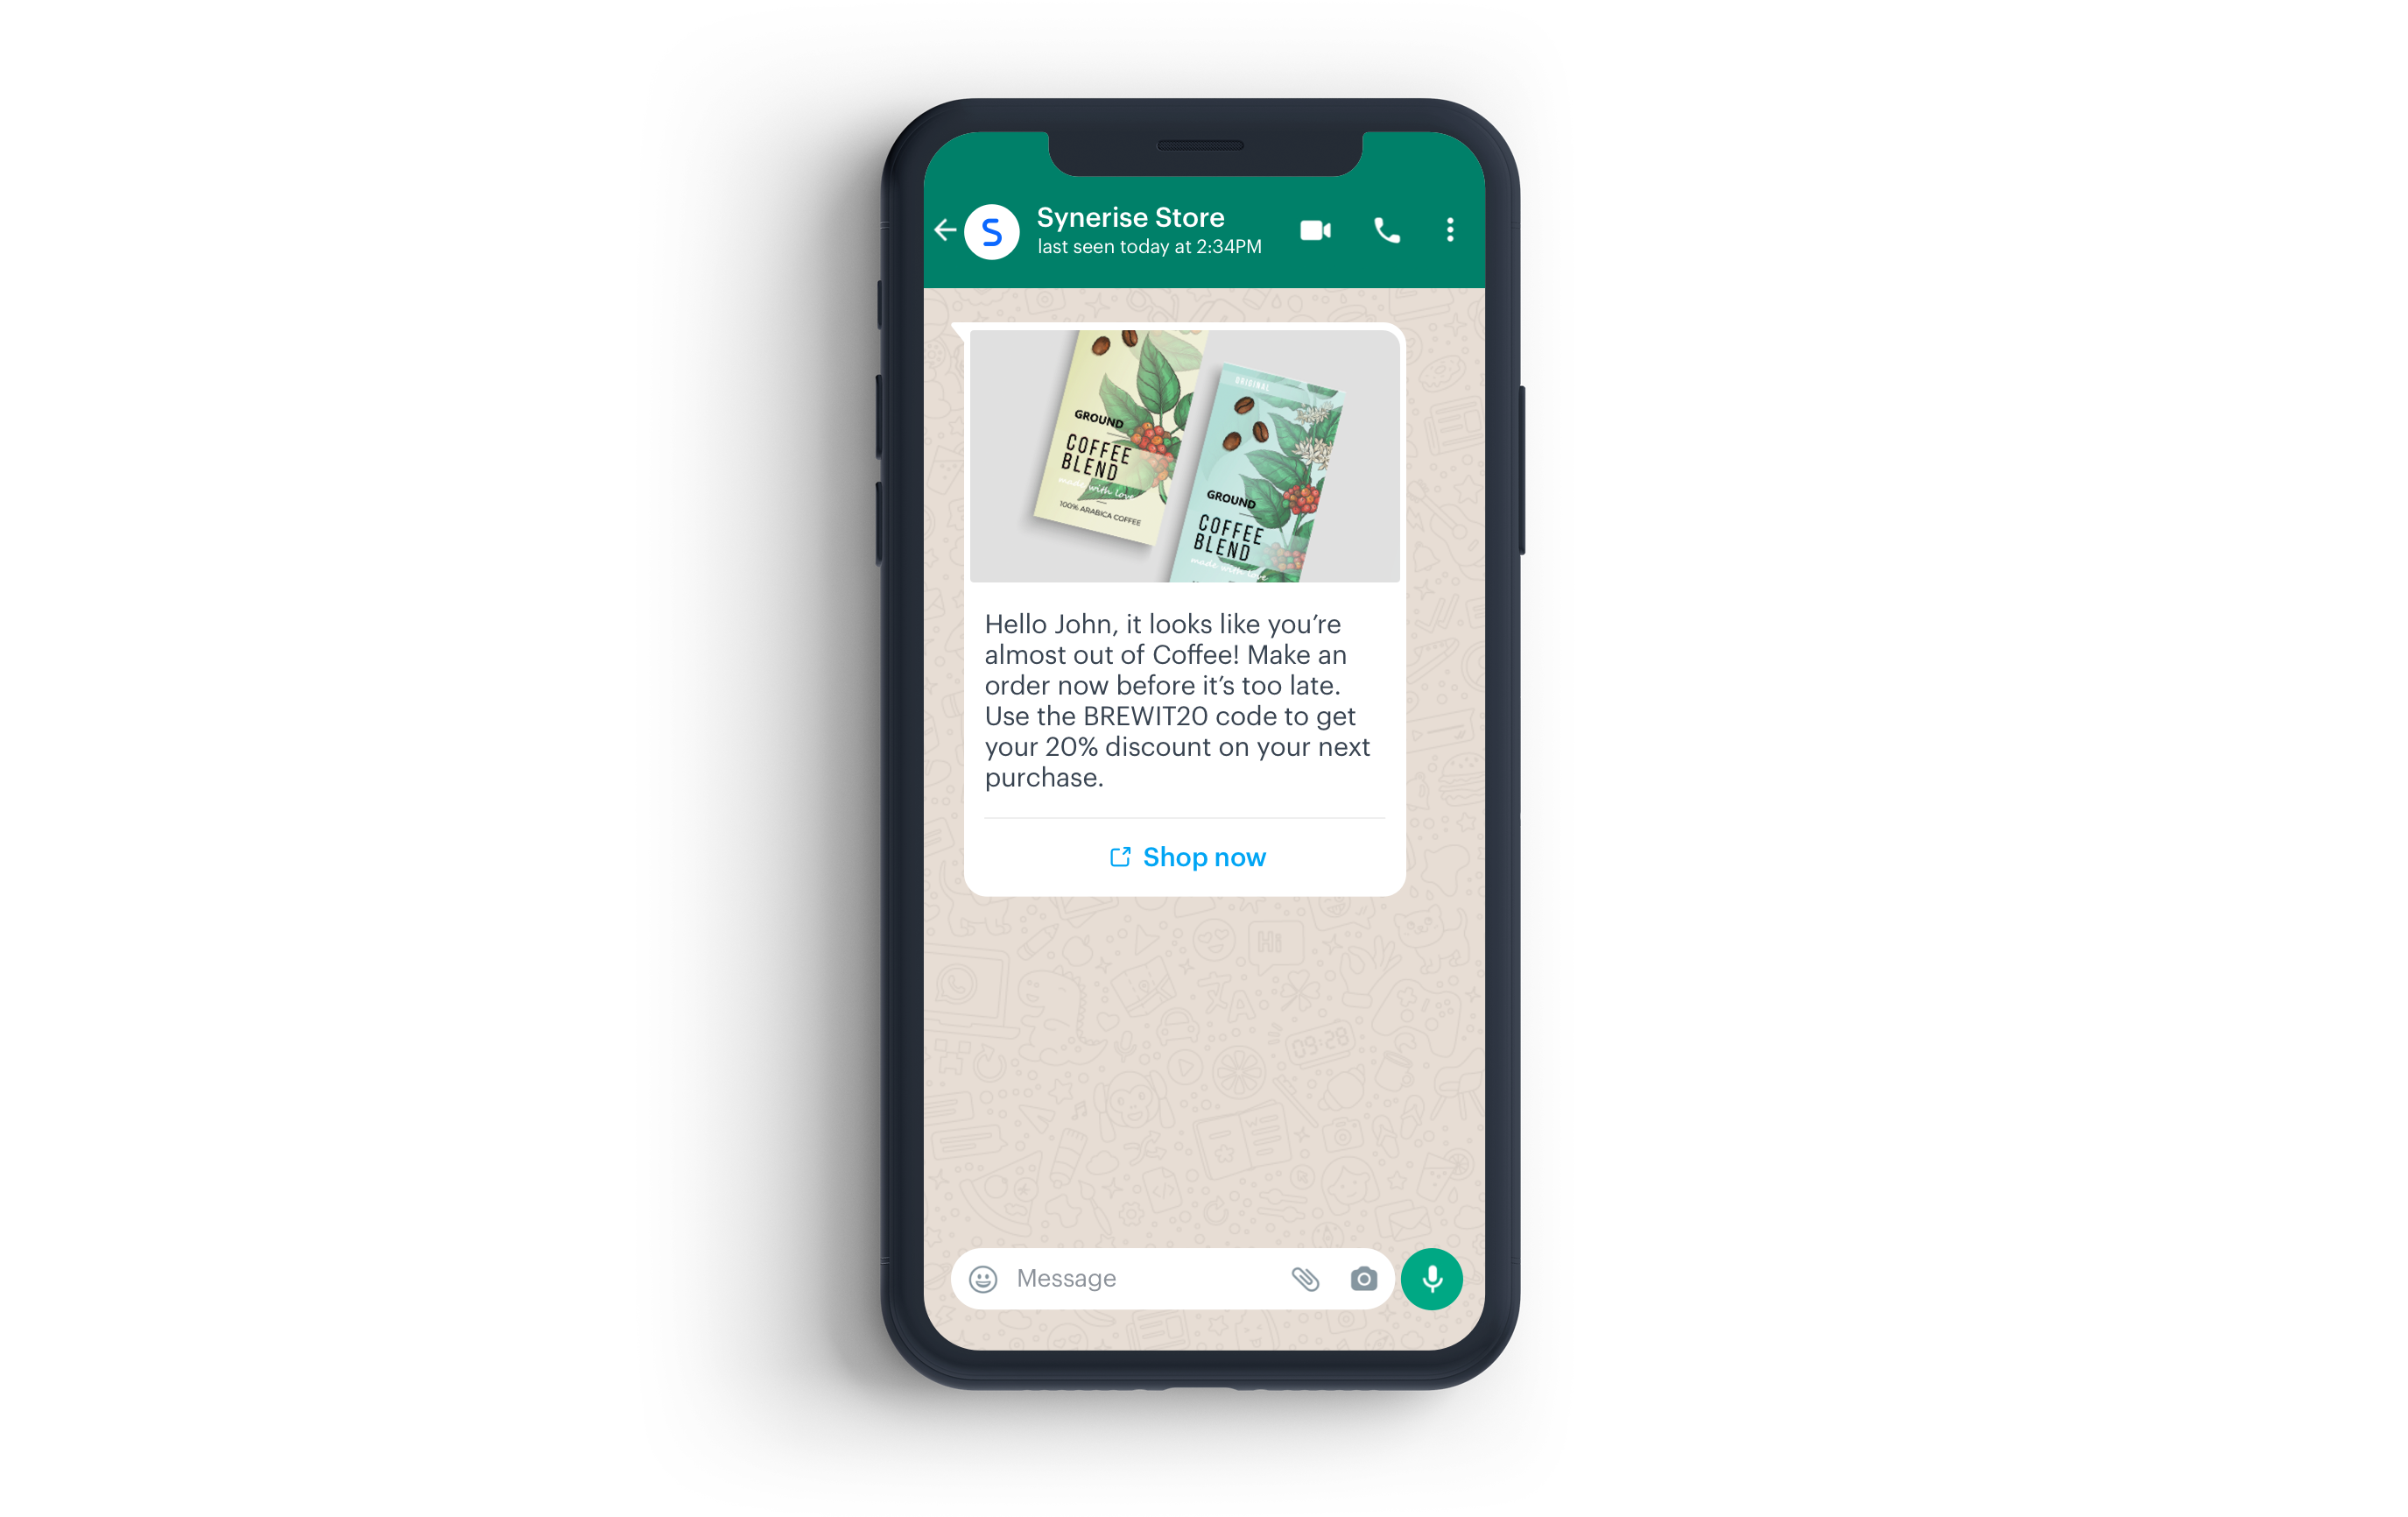
This use case shows a scenario with a replenishment campaign. You will learn how to perform a simple integration with WhatsApp to send a personalized message to customers encouraging them to reorder a product from a specific category, additionally incentivizing the reorder by giving them a discount code for that purchase.
Prerequisites
- Make sure you meet all prerequisites to work with the Send a template message node.
- Implement transaction events either through SDK or API.
- Create item feed
- Create a voucher pool. The ID of this voucher pool will be used as a dynamic value during the message creation process, allowing discount codes to be assigned to each customer participating in this scenario.
Process
- Create an aggregate which returns the SKU of the last purchased product from the specified category.
- Create a message template in the Meta portal
- Create a workflow to send a message to customers on WhatsApp
Create an aggregate
In this part of the process, create an aggregate that returns the SKU of the last purchased product from the Coffee category.
- Go to
 Analytics > Aggregates > New aggregate.
 - Enter the name of the aggregate.
- As the type of the aggregate, select Last.
- From the Choose event dropdown list, select the
product.buyevent. - As the event parameter, select $sku.
- Next to the $sku, click +where.
- From the dropdown list, select $category.
- As the operator, choose Equal.
- In the text field, enter the value of the category you want to use in replenishment campaign - in this use case, it will be
Coffee. - Define the period analyzed in the aggregate.
- Save the aggregate.
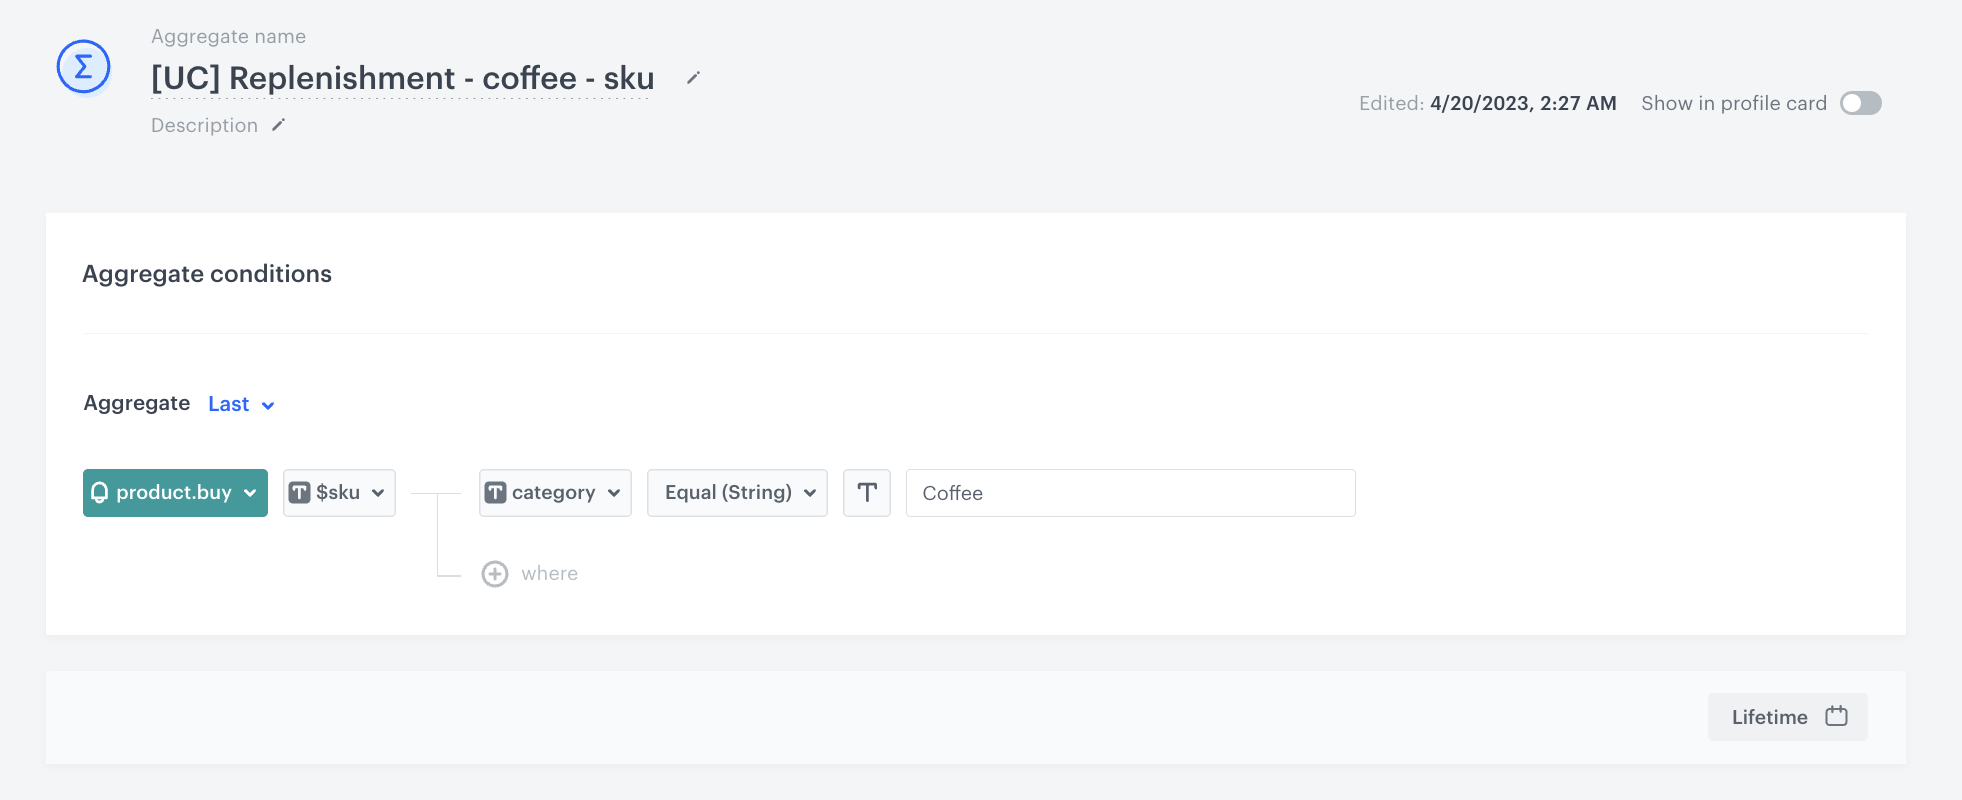
Configuration of the aggregate
Create a message template in the Meta portal
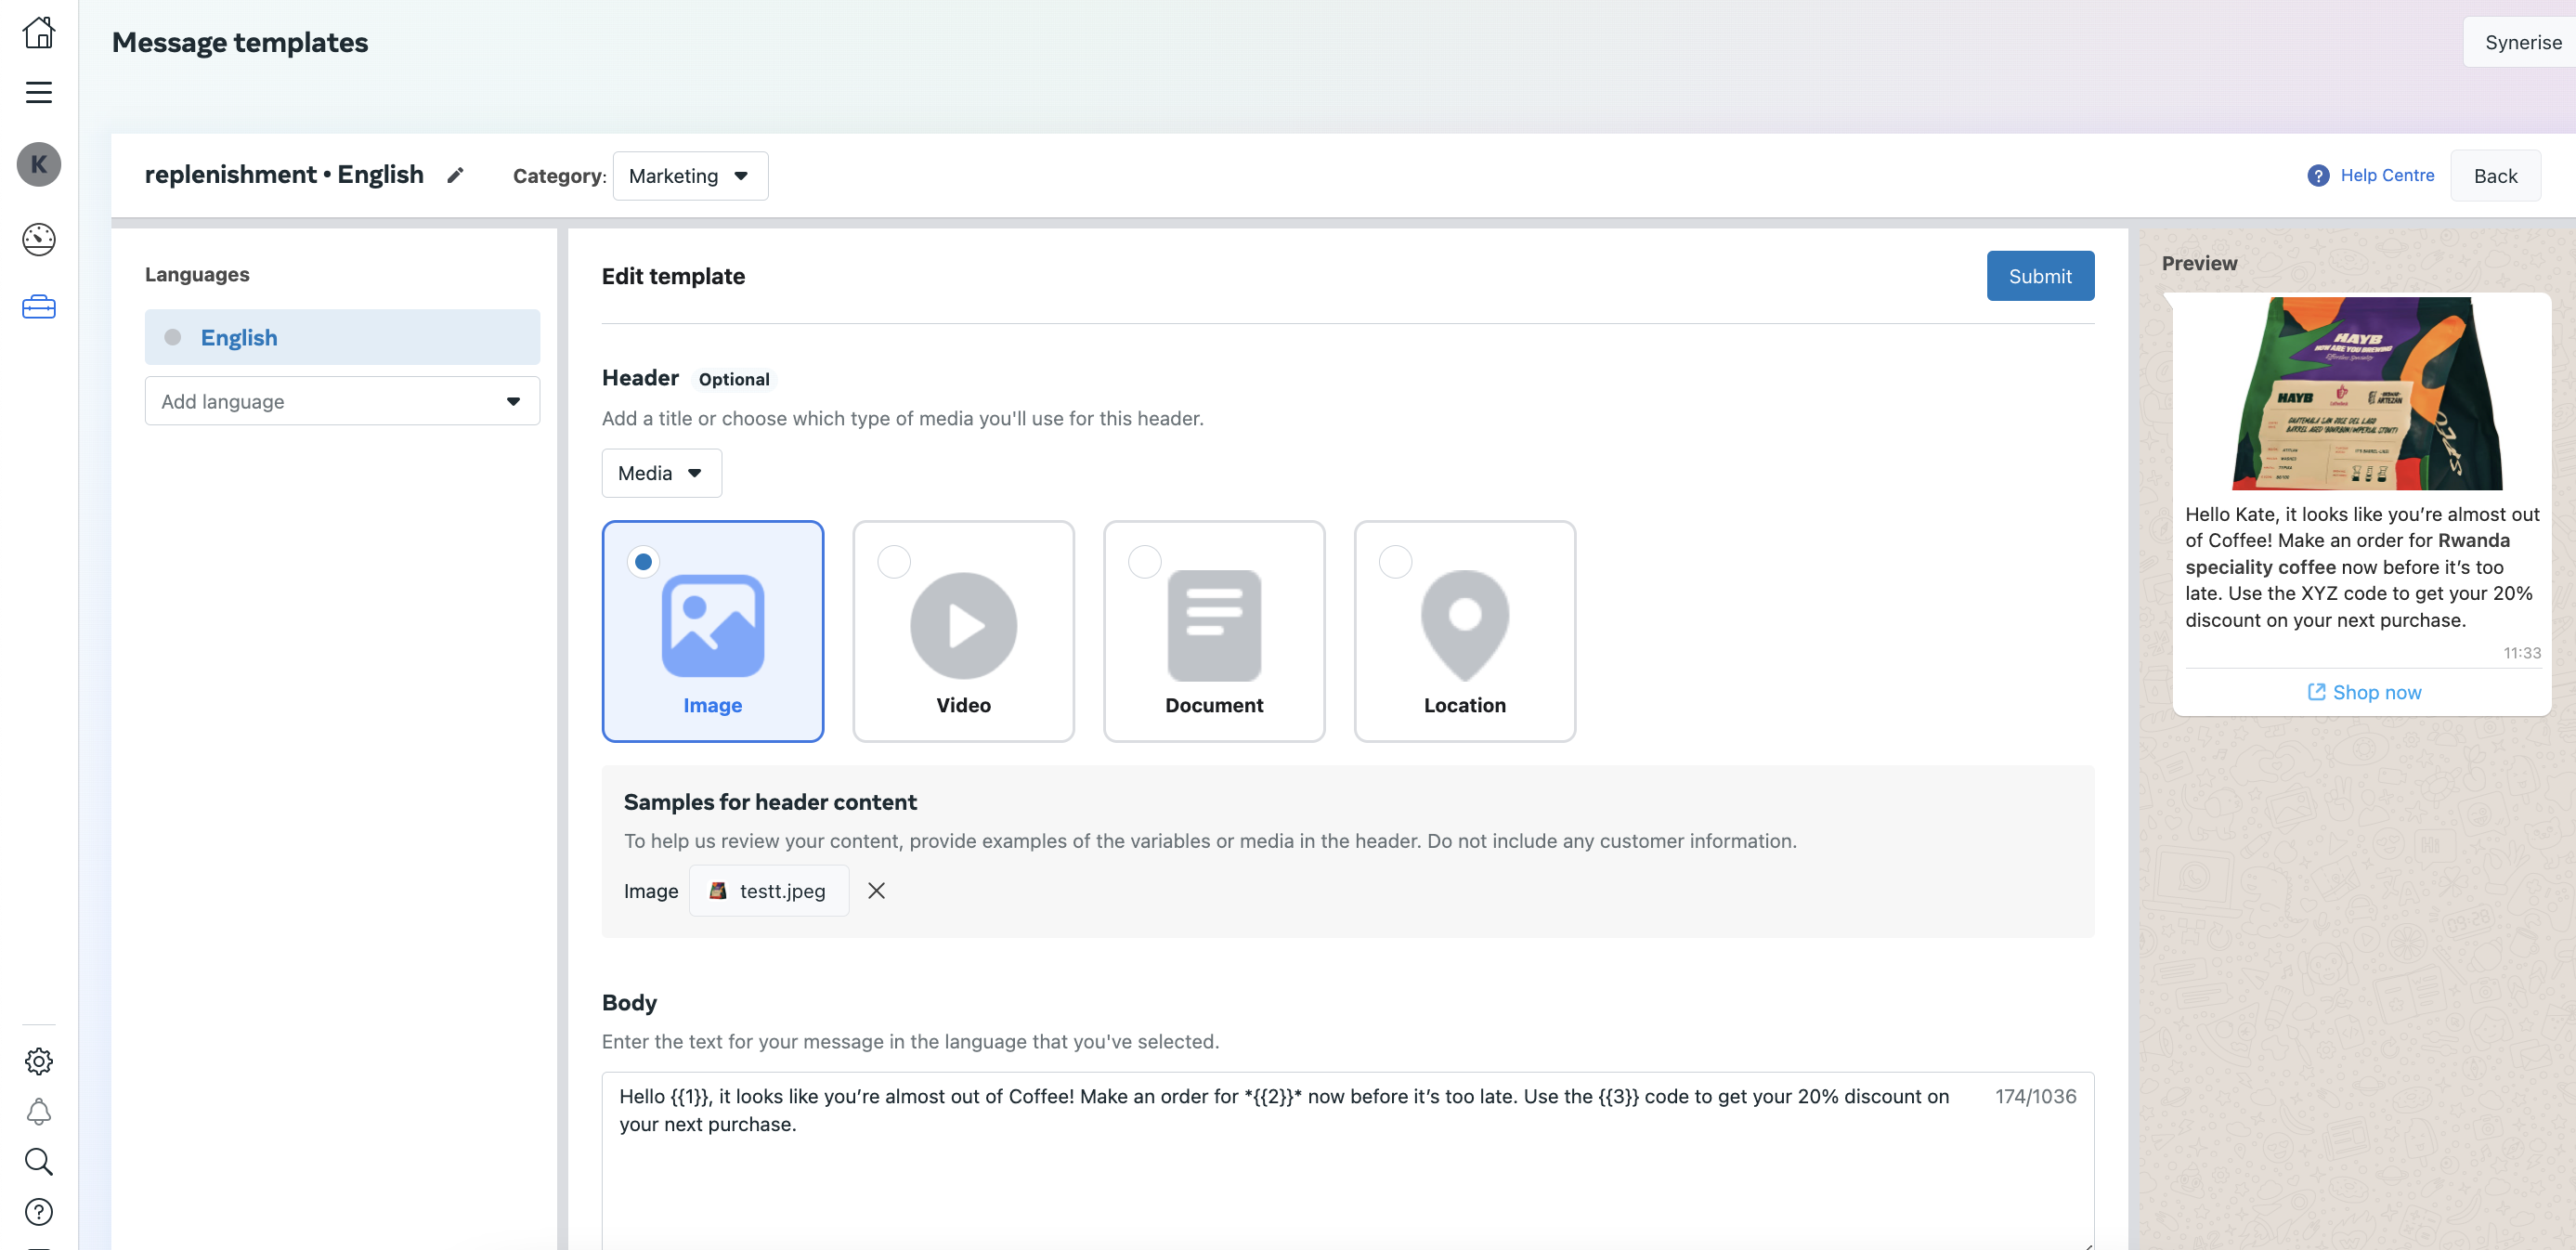
Create a message template in the Meta portal that you will use in the next part of the process. In the body of the message, mark places where the dynamic elements will be added.
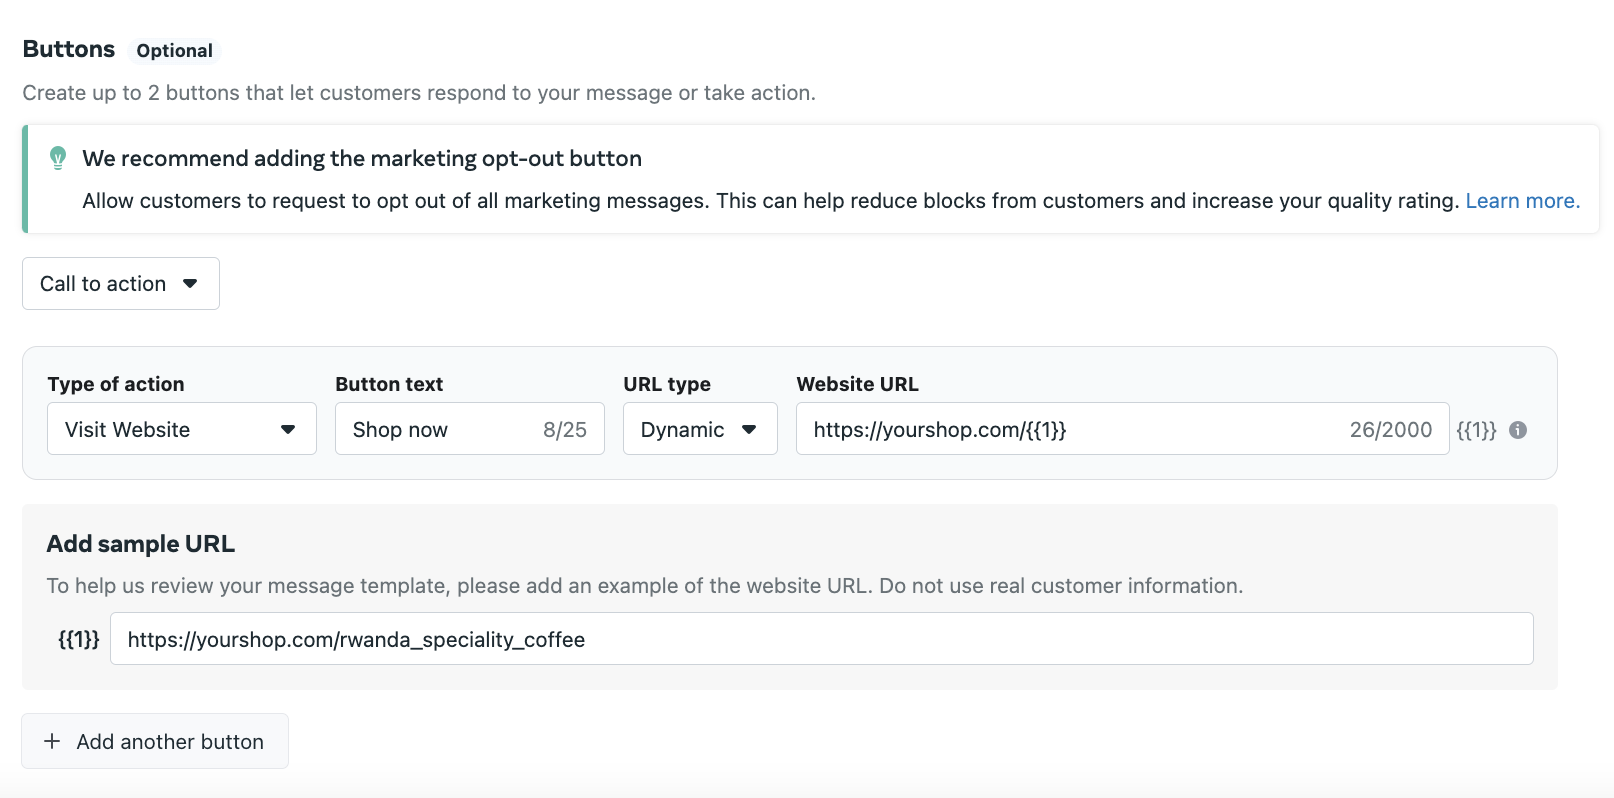
In addition, if you would like to add a CTA at the end of the message, you can add a button and define its copy. The page to which the customer will be redirected after clicking the button can be defined in Synerise.
The example message used in this use case:
Hello {{1}}, it looks like you’re almost out of Coffee! Make an order for {{2}} now before it’s too late. Use the {{3}} code to get your 20% discount on your next purchase.
Where {{1}}, {{2}} and {{3}} are markers that will be replaced with the dynamic values. This step will be done in Synerise.
The screen below shows an example of creating a template message in the Meta portal:
In the following screen, you can see how a button can be defined in the Meta portal:
Create a workflow to send message to customers on WhatsApp
The workflow will be triggered by the product.buy event from the selected product category. The delay is defined up to 30 days. If a customer does not make another purchase from the defined category after that period, we will send a WhatsApp message with the recommended products from the defined category.
- In Synerise, go to
 Automation > Workflows > New workflow.
 - Enter the name of the workflow.
Define the trigger node
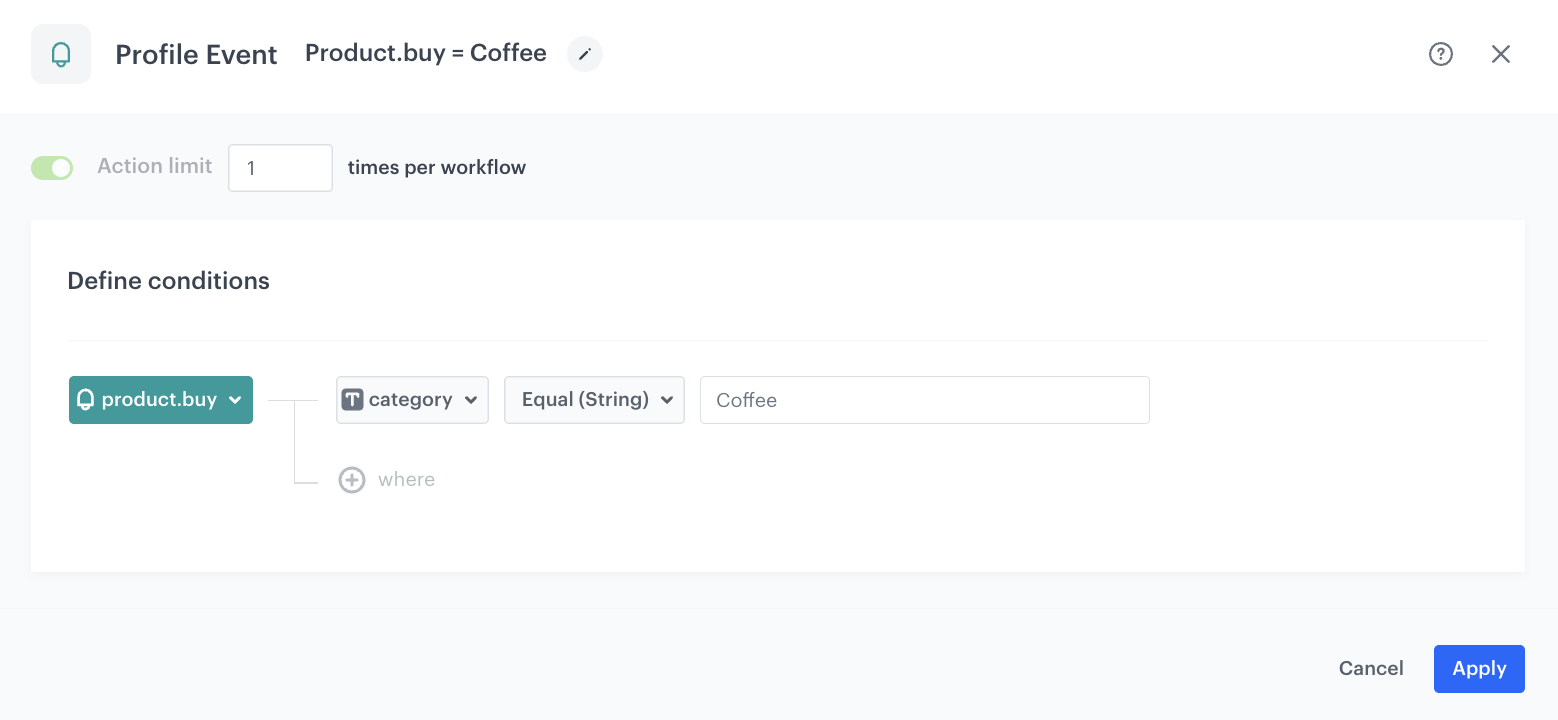
- As the trigger node, add Profile Event. In the configuration of the node, select the event that triggers the workflow. In this use case, it’s a
product.buyevent. - Click + where and choose $category.
- As the logical operator, select Equal.
- In the text field, enter
Coffee. - Confirm by clicking Apply.
Configure the Delay node
- Add the Delay node. In the node settings:
- In the Delay field, type
30. - From the dropdown list, choose Day.
- In the Delay field, type
- Click Apply.
Define the profile filter node
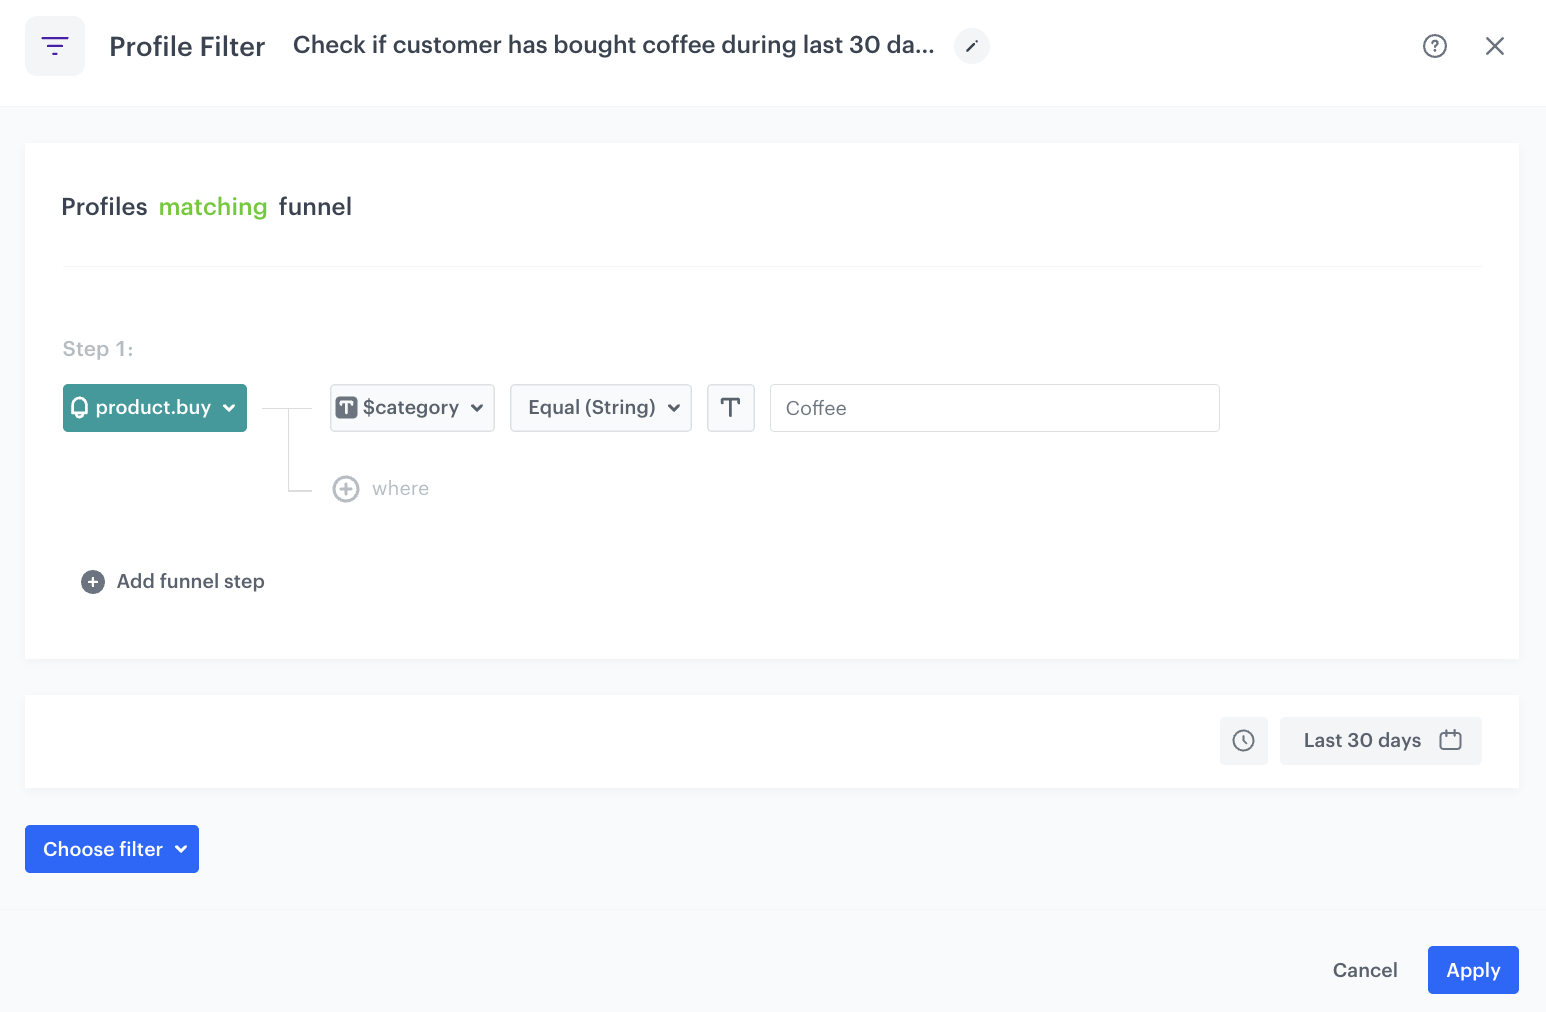
As the next node, choose Profile Filter to check if customers have bought a product from the Coffee category during last 30 days. To do this:
- Choose the
product.buyevent. - As the parameter, choose $category.
- As the logical operator, select Equal.
- In the text field, enter
Coffee. - Set the time range to last 30 days.
- Click Apply.
- To the Matched path, add the End node.
Define the Send a template mesage node
-
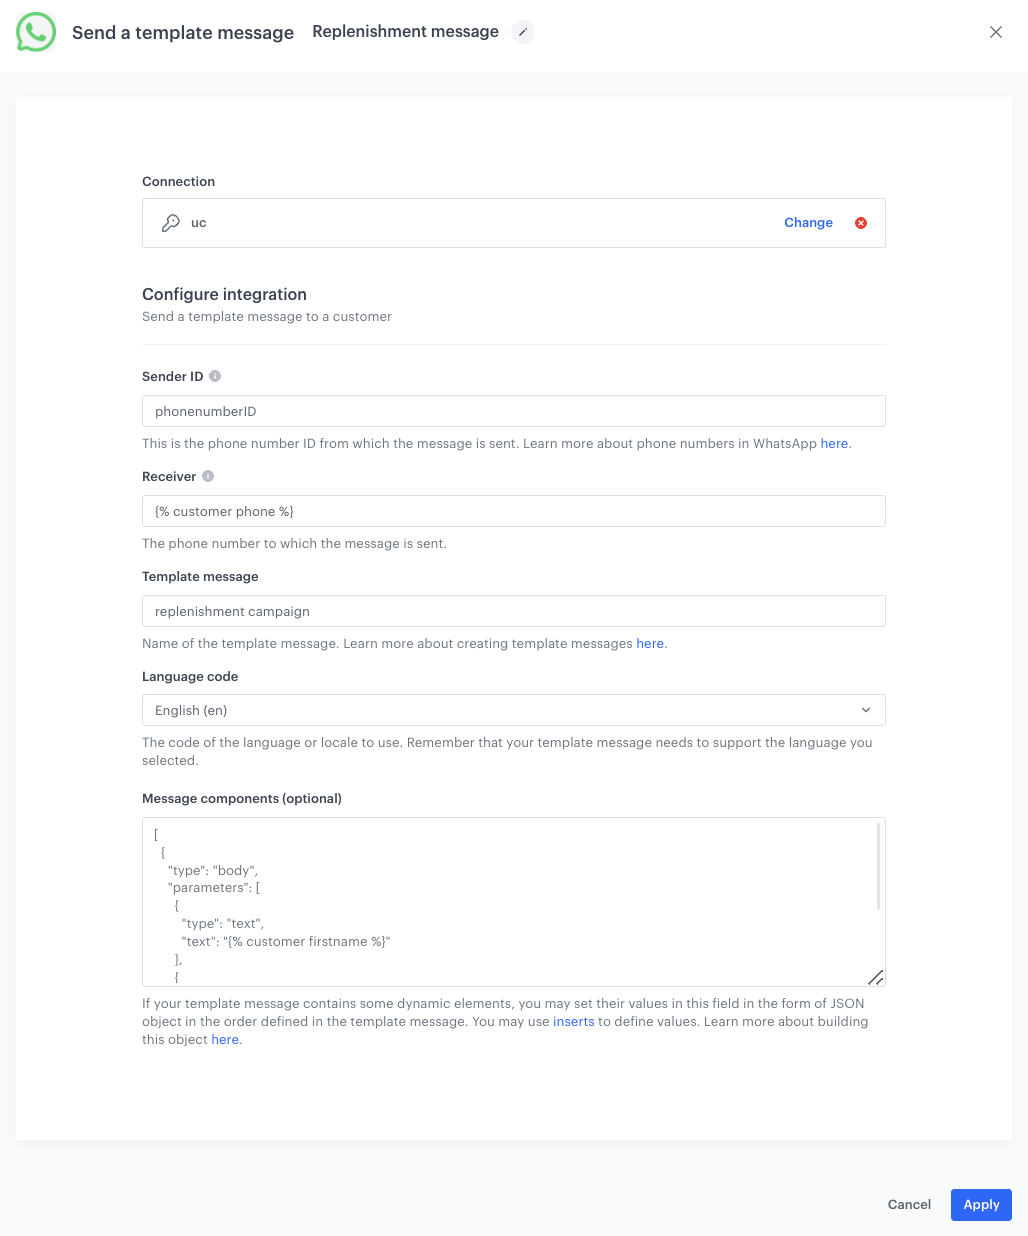
To the Not matched path, add the WhatsApp Send a template message node.
-
Click Select connection.
-
From the dropdown list, select the connection.
- If no connections are available or you want to create a new one, see Create a connection.
- If you selected an existing connection, proceed to defining the integration settings.
-
In the Sender ID field, enter the phone number ID from which the message will be sent.
You can find more information about phone number ID here. -
In the Receiver field, enter the phone number of the customer who will receive this message.
We recommend using the{% customer phone %}insert, which inserts the phone number of an individual customer who goes through this node. -
In the Message template field, enter the name of the message template you created earlier in the Meta portal.
-
From the Language code dropdown list, select the language used in the message.
-
In the Message components field, insert the object that contains the dynamic values in the order defined in the message template.
The example of object used in this use case:Note: The aggregate and voucher pool IDs are used as examples for the purpose of this use case.[ { "type": "body", "parameters": [ { "type": "text", "text": "{% customer firstname %}" }, { "type": "text", "text": "{% aggregate c37acfe7-08a1-345c-a3e7-da795bb6a326 %}{% for item in aggregate_result %}{% catalog.store-1(item).name %}{% endfor %}{% endaggregate %}" }, { "type": "text", "text": "{% voucher %} 8c3c8fd3-e7e9-487d-ba89-0b7824f65f33 {% endvoucher %}" } ] }, { "type": "button", "parameters": [ { "type": "url", "text": "{% aggregate c37acfe7-08a1-345c-a3e7-da795bb6a326 %}{% for item in aggregate_result %}{% catalogvar.store-1(item).url %}{{ catalog_result|replace('https://yourshop.com', '') }}{% endcatalogvar %}{% endfor %}{% endaggregate %}" } ] }, { "type": "header", "parameters": [ { "type": "image", "image": { "link": "{% aggregate c37acfe7-08a1-345c-a3e7-da795bb6a326 %}{% for item in aggregate_result %}{% catalogvar.store-1(item).image %}{{ catalog_result }}{% endcatalogvar %}{% endfor %}{% endaggregate %}" } } ] } ] -
Click Apply.
The following table explains all the inserts used in the body, button and header sections shown above.
| Section | Insert value | Insert explanation |
|---|---|---|
| body | {% customer firstname %} |
The value of this insert is used as the value of {{1}}, so the name of a customer can be displayed in the message. |
| body | {% aggregate c37acfe7-08a1-345c-a3e7-da795bb6a326 %} {% for item in aggregate_result %} {% catalog.store-1(item).name %} {% endfor %} {% endaggregate %} |
The value of this insert is used as the value of {{2}} to return a product that the customer bought the last time and did not purchase again within the estimated time period. |
| body | {% voucher %} 8c3c8fd3-e7e9-487d-ba89-0b7824f65f33 {% endvoucher %} |
The value of this insert is used as the value of {{3}}. In this example, we assign a voucher code from the voucher pool to an individual customer. |
| button | {% aggregate c37acfe7-08a1-345c-a3e7-da795bb6a326 %}{% for item in aggregate_result %}{% catalogvar.store-1(item).url %}{{ catalog_result|replace('https://yourshop.com', '') }}{% endcatalogvar %}{% endfor %}{% endaggregate %} |
The value of this insert is used to return product url. Here we specify the URL omitting the domain, because we define the domain in the Meta platform, as you can see in the screenshot with the button creation. |
| header | {% aggregate c37acfe7-08a1-345c-a3e7-da795bb6a326 %}{% for item in aggregate_result %}{% catalogvar.store-1(item).image %}{{ catalog_result }}{% endcatalogvar %}{% endfor %}{% endaggregate %} |
This value of insert is used to return the url to the product image in header. |
Check the use case set up on the Synerise Demo workspace
You can check the configuration of the aggregate and the workflow directly in our Synerise Demo workspace.
If you don’t have access to the Synerise Demo workspace, please leave your contact details in this form, and our representative will contact you shortly.