


Adding mix of social proof to product pages
In today’s digital landscape, where the abundance of options and information can be overwhelming, purchasing decisions or content choices often rely on trust and social recommendations. Social proof, plays a pivotal role in shaping online user behavior. It revolves around the notion that individuals are more inclined to trust the actions of others than their own instincts, particularly when those actions are visible and relatable.
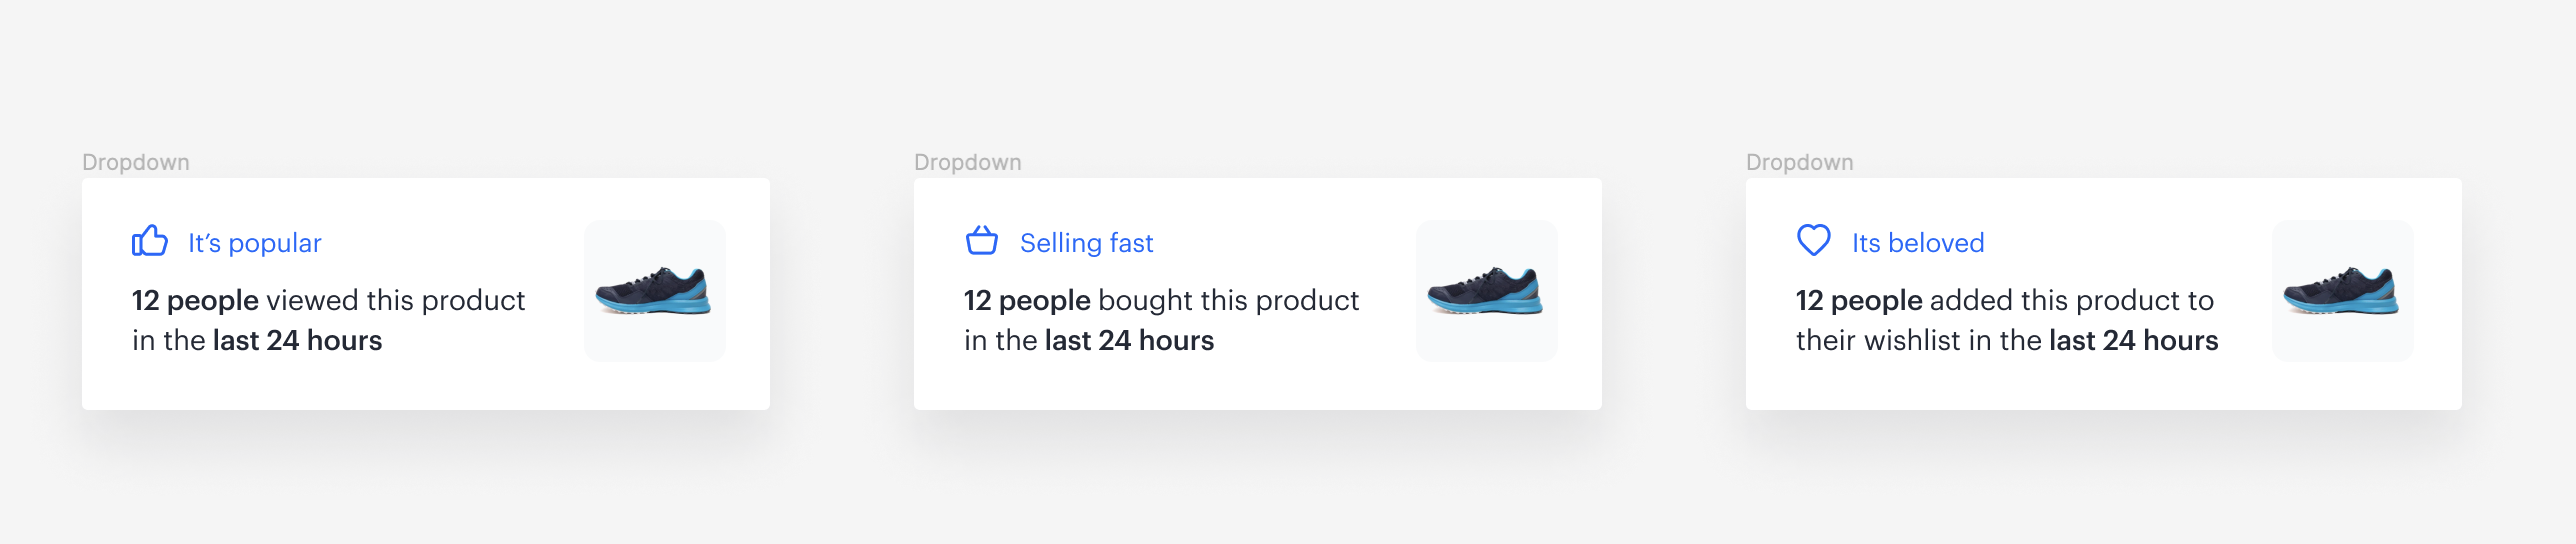
Social proof is a metric with a dynamic key, thanks to which the statistics on a product page will be displayed in real time and they will adjust to the product that is being currently viewed. This use case will focus on how implementing basic social proof mechanisms centered around various recent events can effectively drive user interactions.
We will present you the mechanism of creating basic social proof mix showing three scenarios:
- the number of visitors to the product page during last 24 hours,
- the number of customers who bought the product during last 24 hours,
- the number of customers who added the product to the wishlist during last 24 hours.
You can implement all of them (or chosen one) directly to your website thanks to our ready-to-use template.
Prerequisites
- Implement a tracking code.
- Manage transaction events.
Process
To prepare social proof, you have to create dynamic content with a metric, which will dynamically count particular event occurrence for each product. Perform the steps in the following order:
- Create a metric counting page views.
- Create a metric counting product purchases.
- Create metric counting occurrences of adding the product to the wishlist.
- Prepare a dynamic content.
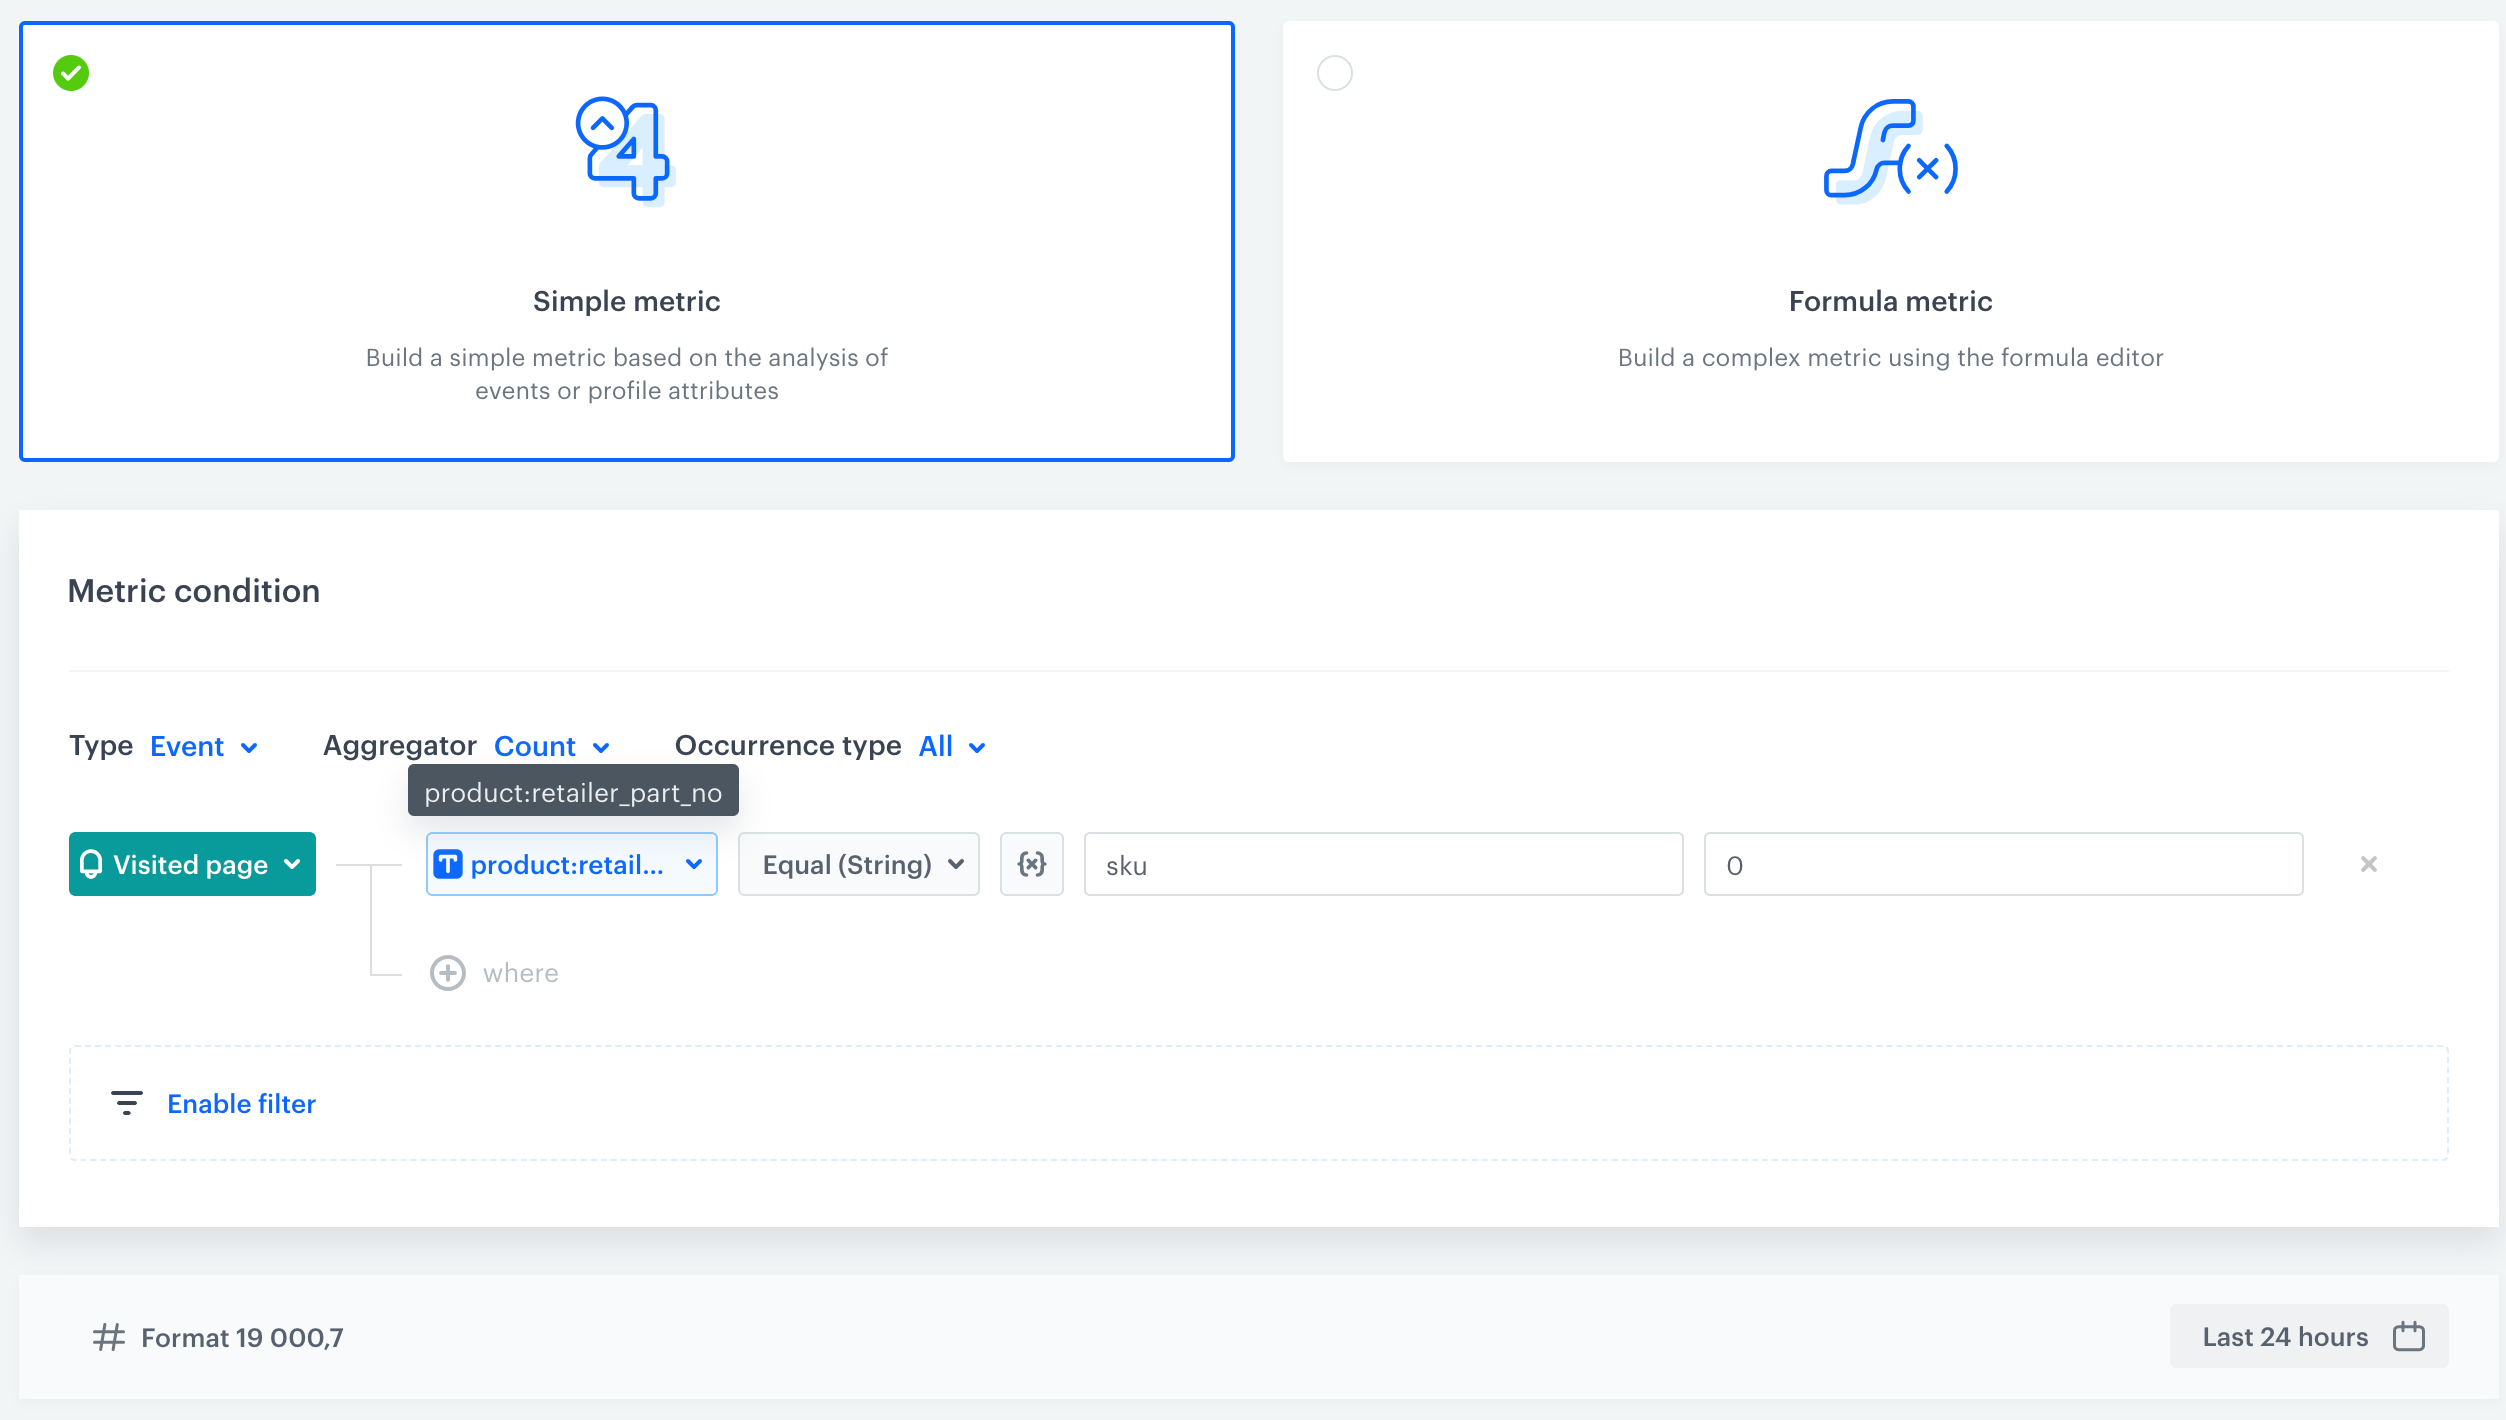
Create metric for page views
If you want to display a message that X customers viewed the product in the last X hours, you have to prepare a metric that counts the occurrences of the page.visit event for a specific product. For that purpose, we will create a dynamic key - sku which will analyze values sent through the retailer_part_no parameter of the page.visit event.
-
Go to Analytics > Metrics > New metric.
-
Leave the Type, Aggregator and Occurrence options at default (Event, Count, and All, respectively).
-
From the Choose event dropdown list, select page.visit.
-
Click the + where and select the product:retailer_part_no parameter or any other which indicates ID of the product.
-
From the Choose operator select Contain.
-
Click the icon next to the logic operator and keep clicking until you get
 .
. -
In the left field, enter
sku. -
In the right field, enter the value of the SKU (0 in our example).
-
Define time from which metric counts the page visit, for example last 24 hours.
Metric for page visit
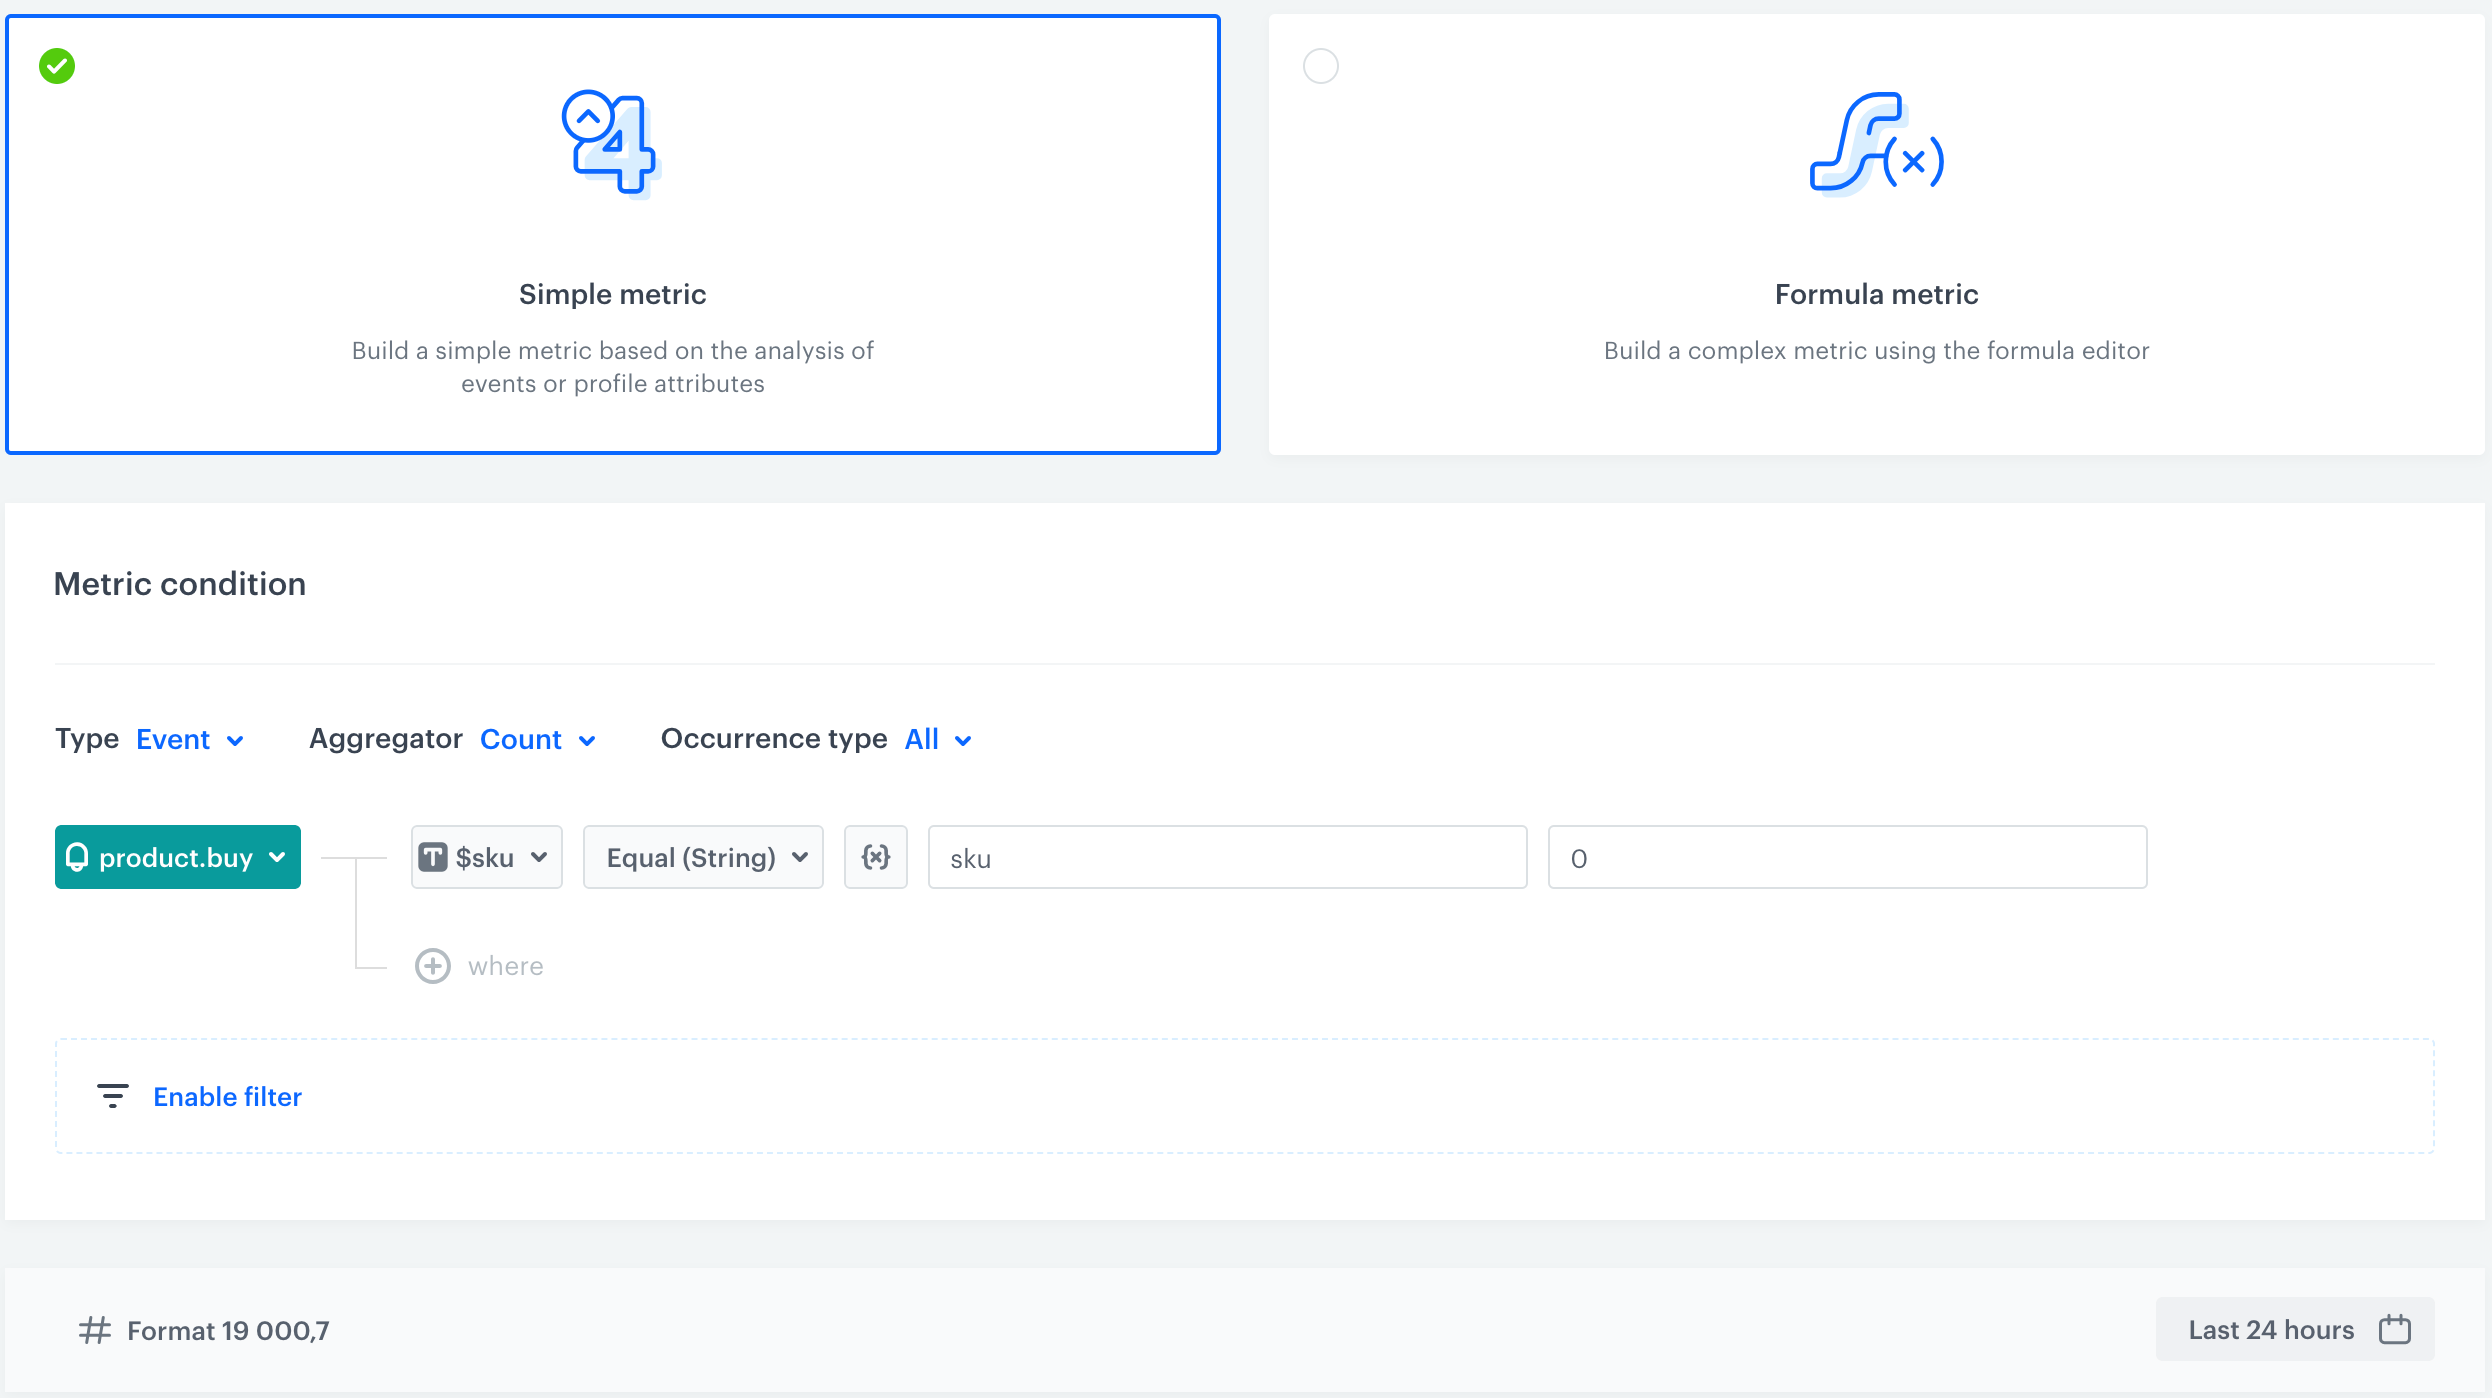
Create metric for products bought
If you want to display a message that X customers bought the product in the last 24 hours, you have to prepare a metric that counts occurrences of the [product.buy event] for a specific product. For that purpose, we will create a dynamic key - sku which will analyze values sent through the $sku parameter of the product.buy event.
-
Go to Analytics > Metrics > New metric.
-
Leave the Type, Aggregator and Occurrence options at default (Event, Count, and All, respectively).
-
From the Choose event dropdown list, select product.buy.
-
Click the + where button and select a parameter that indicates a product ID (in this case, it’s $sku).
-
From the Choose operator, select Contain.
-
Click the icon next to the logic operator and keep clicking until you get
. -
In the left field, enter
sku. -
In the right field, enter the value of the SKU (0 in our example).
-
Define time range for analyzing events (24 hours in our example).
Metric filter
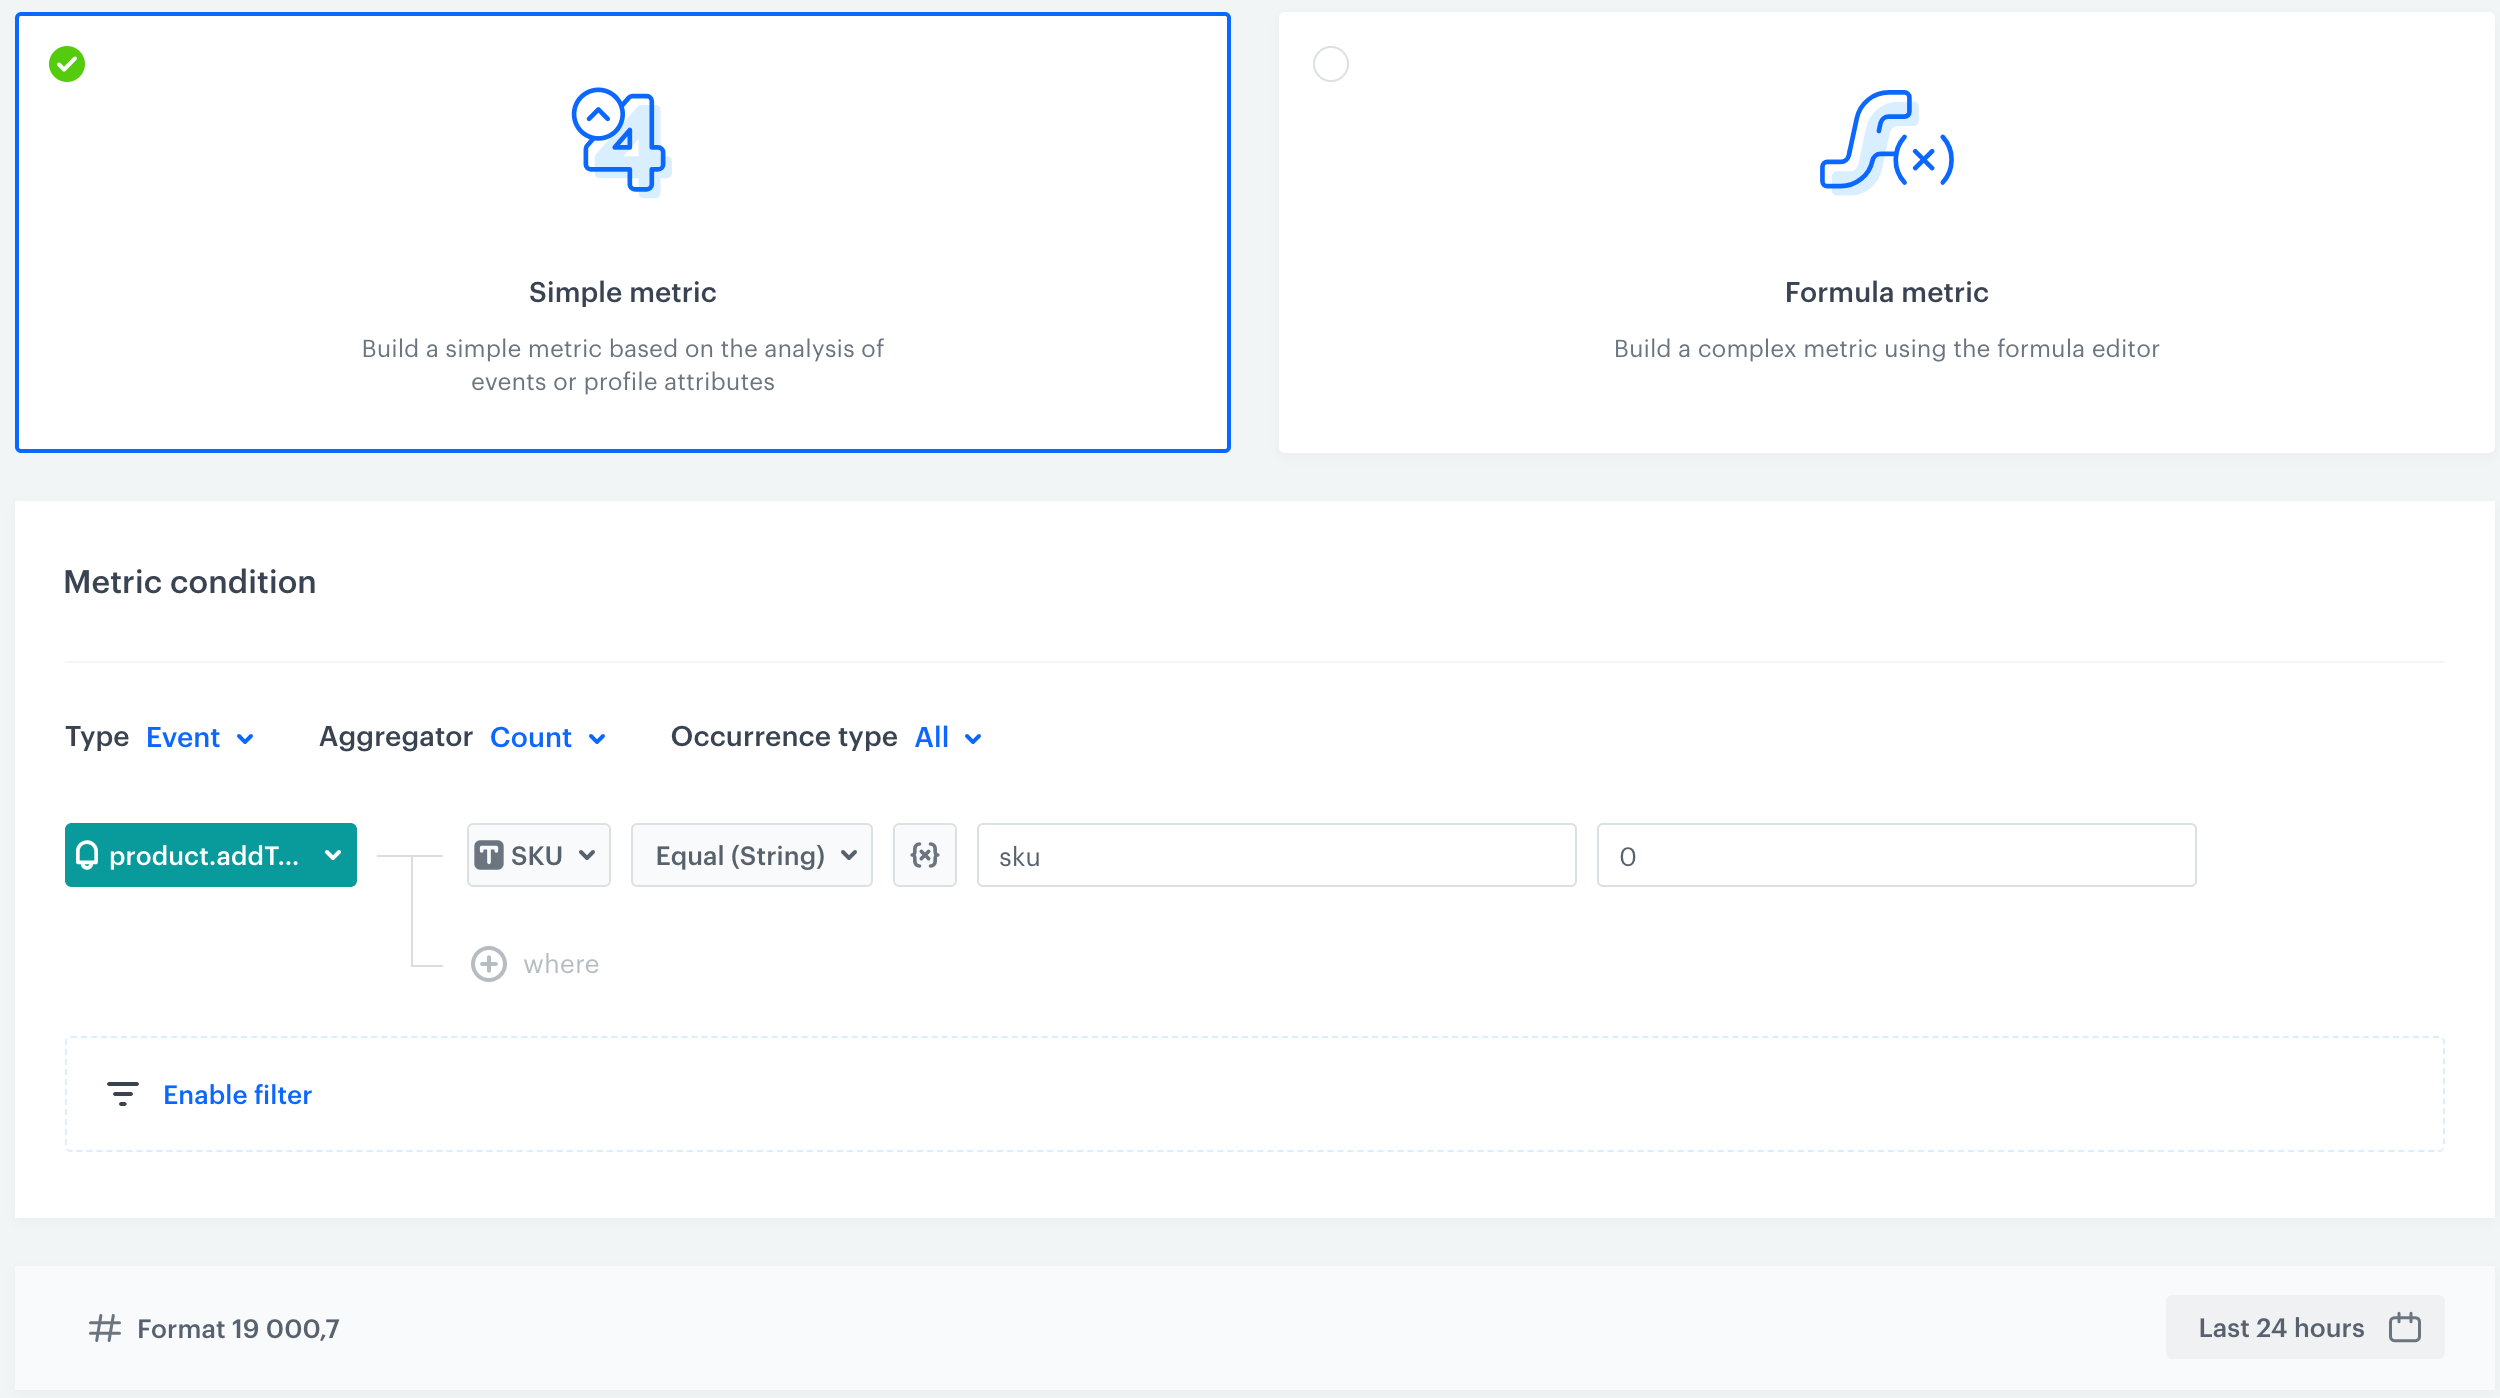
Create metric for adding product to the wishlist
If you want to display a message that X customers added the product to the wishlist in the last X hours, you have to prepare a metric that counts occurrences of the product.addToFavorite event for a specific product. For that purpose, we will create a dynamic key - sku which will analyze values sent through the $sku parameter of the product.addToFavorite event.
-
Go to Analytics > Metrics > New metric.
-
Leave the Type, Aggregator and Occurrence options at default (Event, Count, and All, respectively).
-
From the Choose event dropdown list, select product.addToFavorite.
-
Click the + where button and select a parameter that indicates a product ID (in this case, it’s $sku).
-
From the Choose operator, select Contain.
-
Click the icon next to the logic operator and keep clicking until you get
. -
In the left field, enter
sku. -
In the right field, enter the value of the SKU (0 in our example).
-
Define time range for analyzing events (24 hours in our example)
Metric filter
Prepare a dynamic content
To show a social proof on your website, you need to use a dynamic content. You can use the ready-to-use template displayed as an animated pop-up on the page of every product which is used in this use case. You can customize the design of the template, adjust the time frame (in the settings of a specific metric), rearrange and modify the content according to your business needs. What is more, you can use dynamic content as a carousel which displays those 3 metrics, but you can also include fewer metric variants.
- When a product meets the conditions of at least one metric, a carousel will be displayed (in the static version).
- If a product meets conditions of more than one metric, the carousel will activate and loop to display information from each metric. In this version, up to 3 metrics can be showcased, meaning a maximum of 3 pieces of information will be displayed.
-
Go to Communication > Dynamic content > Create New.
-
Choose the Web layer type of campaign.
-
In the Audience section, select Everyone.
-
In the Content section, select Simple message and by inserting CSS selector define where the social proof will display on your website.
-
In the Content tab, click Create Message and go to Web layer templates folder. Choose Social Proof Mix template.
-
Customize the template layout according to your needs.
In the template configuration, there are three types of variables to edit based on the three metrics created in the previous parts of the process:
- Header and metric content - define the title and main information displayed in the social proof such as time period from which metric shows results. In the metric ID field, add the identifier of the metric (which is available on the list of metrics).
- Styling settings - you can use them to define the design of the social proof such as text color, background, font size, and others.
- Additional carousel settings - these settings let you define carousel speed, switch times, and delay time (given in milliseconds).
-
When your template is ready, save your changes.
-
Schedule when the dynamic content has to be active
-
In the Display settings, define the circumstances the dynamic content will be shown:
- Always on landing, on All pages if in CSS selector is unique selector for a product page.
- Always on landing, on a specific URL which indicates a product page (for example, if a URL contains product), if CSS selector is not unique for a product page. Read more about defining url targeting.
-
Save and activate the campaign.
Check the use case set up on the Synerise Demo workspace
Check all items (metrics and dynamic content) created in this use case in our Synerise Demo workspace:
- Metric that returns the number of visits in last 24 hours,
- Metric that returns the number of times an item was sold in last 24 hours,
- Metric that returns the number of times a product was added to wishlist,
- Dynamic content template.
If you don’t have access to the Synerise Demo workspace, please leave your contact details in this form, and our representative will contact you shortly.