Abandoned cart with a control group and A/B tests
Measuring the effectiveness of campaigns is crucial to evaluate their success and determine if they met their objectives. An important component of this measurement is the use of a control group, which allows for better analysis of campaign activities. By comparing the effects of campaigns targeted at the target group with those aimed at the control group (which doesn’t receive any special campaigns), it becomes easier to assess the campaign’s impact.
A/B testing is a valuable technique that complements the control group approach and helps optimize campaign results. It involves testing different versions of a campaign to determine which one resonates best with the target audience.
This use case presents a detailed scenario of an abandoned shopping cart. The scenario consists of two workflows, each with its own logic explained in the corresponding steps of the process.
Here is a high-level overview of the process:
- The process starts with adding a product to the shopping cart.
- The process includes control and target groups.
- Depending on which group customers are assigned to, they follow different Automation paths.
- Customers in the target group receive email communication about the abandoned shopping cart, while customers in the control group don’t receive any additional communication. Instead, we generate an event for the control group as a simulation for sending an email. This event is later used to analyze the effectiveness of communication targeted at the target audience.
- A/B test are used to find the most effective approach that resonates with customers from the target group.
- To ensure consistent email messaging, each customer is assigned an email_group attribute before receiving the first email. This attribute identifies the type of email the user should receive.
- After sending the respective email or simulating it (for the control group), the automation checks if customers in both groups made a purchase within 25 hours of abandoning their cart.
- If a transaction occurs, an event is generated with the main information about the transaction. Otherwise, a follow-up email is sent to customers.
The detailed logic of each workflow along with the required analytics will be presented in the corresponding process steps.
Prerequisites
- Implement a tracking code into your website.
- Implement the transaction events using SDK or API.
- Implement the
cart.statusevent, which stores the current status of the basket in the form of an event on the customer’s card. This event must to be sent to Synerise after every change in the cart status. - Collect product.addToCart events.
- Create a control group dispatcher.
The dispatcher is essentially a piece of software that intelligently manages content distribution. It uses the DC template, which is like sets of rules, to determine which content to display to different users.
Behind the scenes, this dispatcher employs JavaScript. JavaScript code within the template dynamically updates the webpage based on predefined user allocations. This means that when someone visits the webpage, the dispatcher instantly decides which version of content they should see, whether it’s ‘A’ or ‘B,’ according to the rules set in the DC template.
Moreover, it attaches a special ‘data-test-snrs’ attribute to each user’s experience. This attribute acts as a marker, helping us later identify which version of content each user was exposed to. This kind of tracking is valuable for understanding how different messages perform and for tailoring future interactions based on users’ previous experiences.
- Create email templates that will be use in the abandoned cart communication.
- Create an email account which you will use to send emails.
Process
In this use case, you will go through the following steps:
- Create an aggregate that returns the last total quantity of items the shopping cart for each customer.
- Create the first workflow which outlines the logic of an abandoned cart scenario involving the sending of emails to a target group and a control group.
- Create an aggregate that returns the timestamp of the first message sent from an abandoned cart campaign.
- Create an aggregate that returns the order ID of the first transaction that took place after the first email from abandoned cart campaign was sent.
- Create a second workflow designed to identify transactions within the abandoned cart scenario.
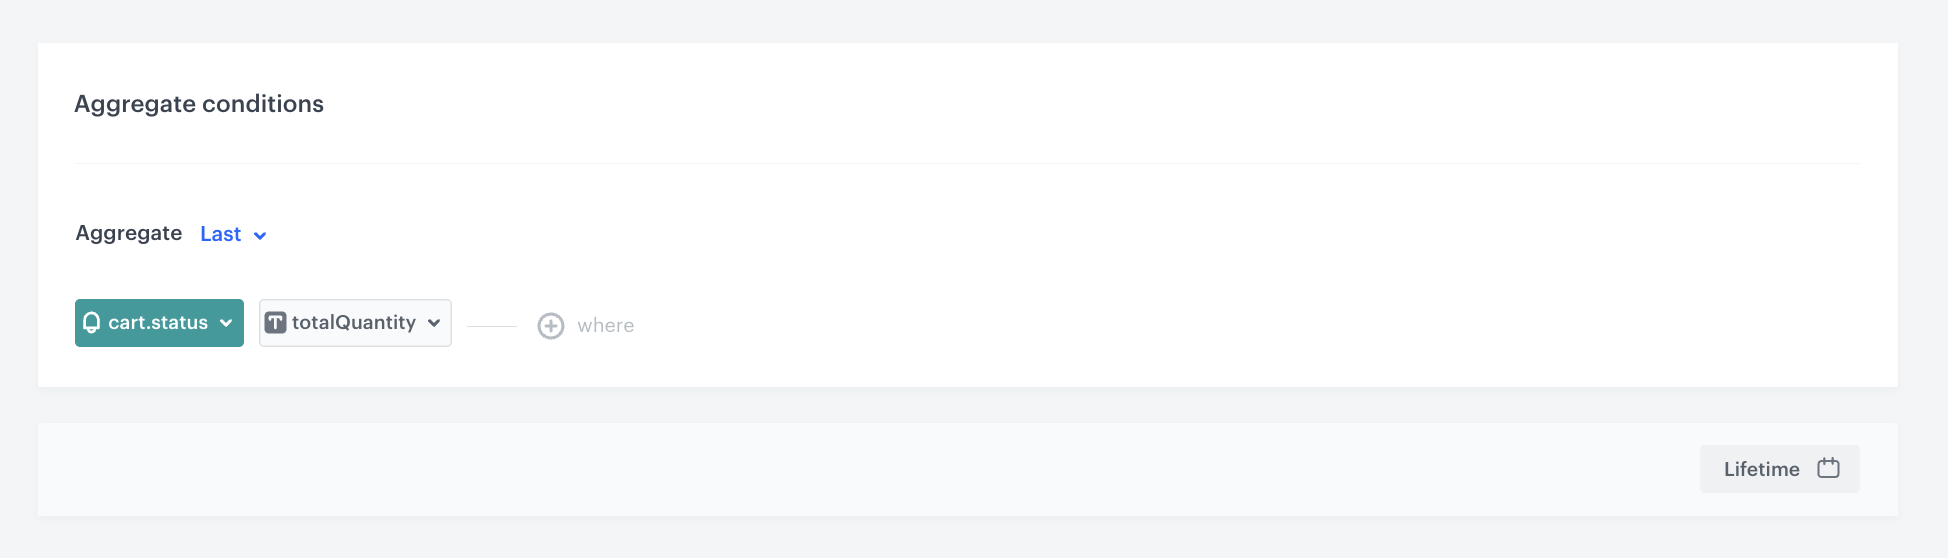
Create an aggregate that returns the number of products in a cart
This aggregate will be used in the first workflow to check if a customer has any products in the shopping cart.
- Go to
 Analytics > Aggregates > New aggregate.
 - Enter the name of the aggregate.
- As the type of the aggregate, select Last.
- From the Choose event dropdown list, select the
cart.statusevent. - As the event parameter, select totalQuantity.
- Set the period from which the aggregate will analyze the results to Lifetime.
- Save the aggregate.
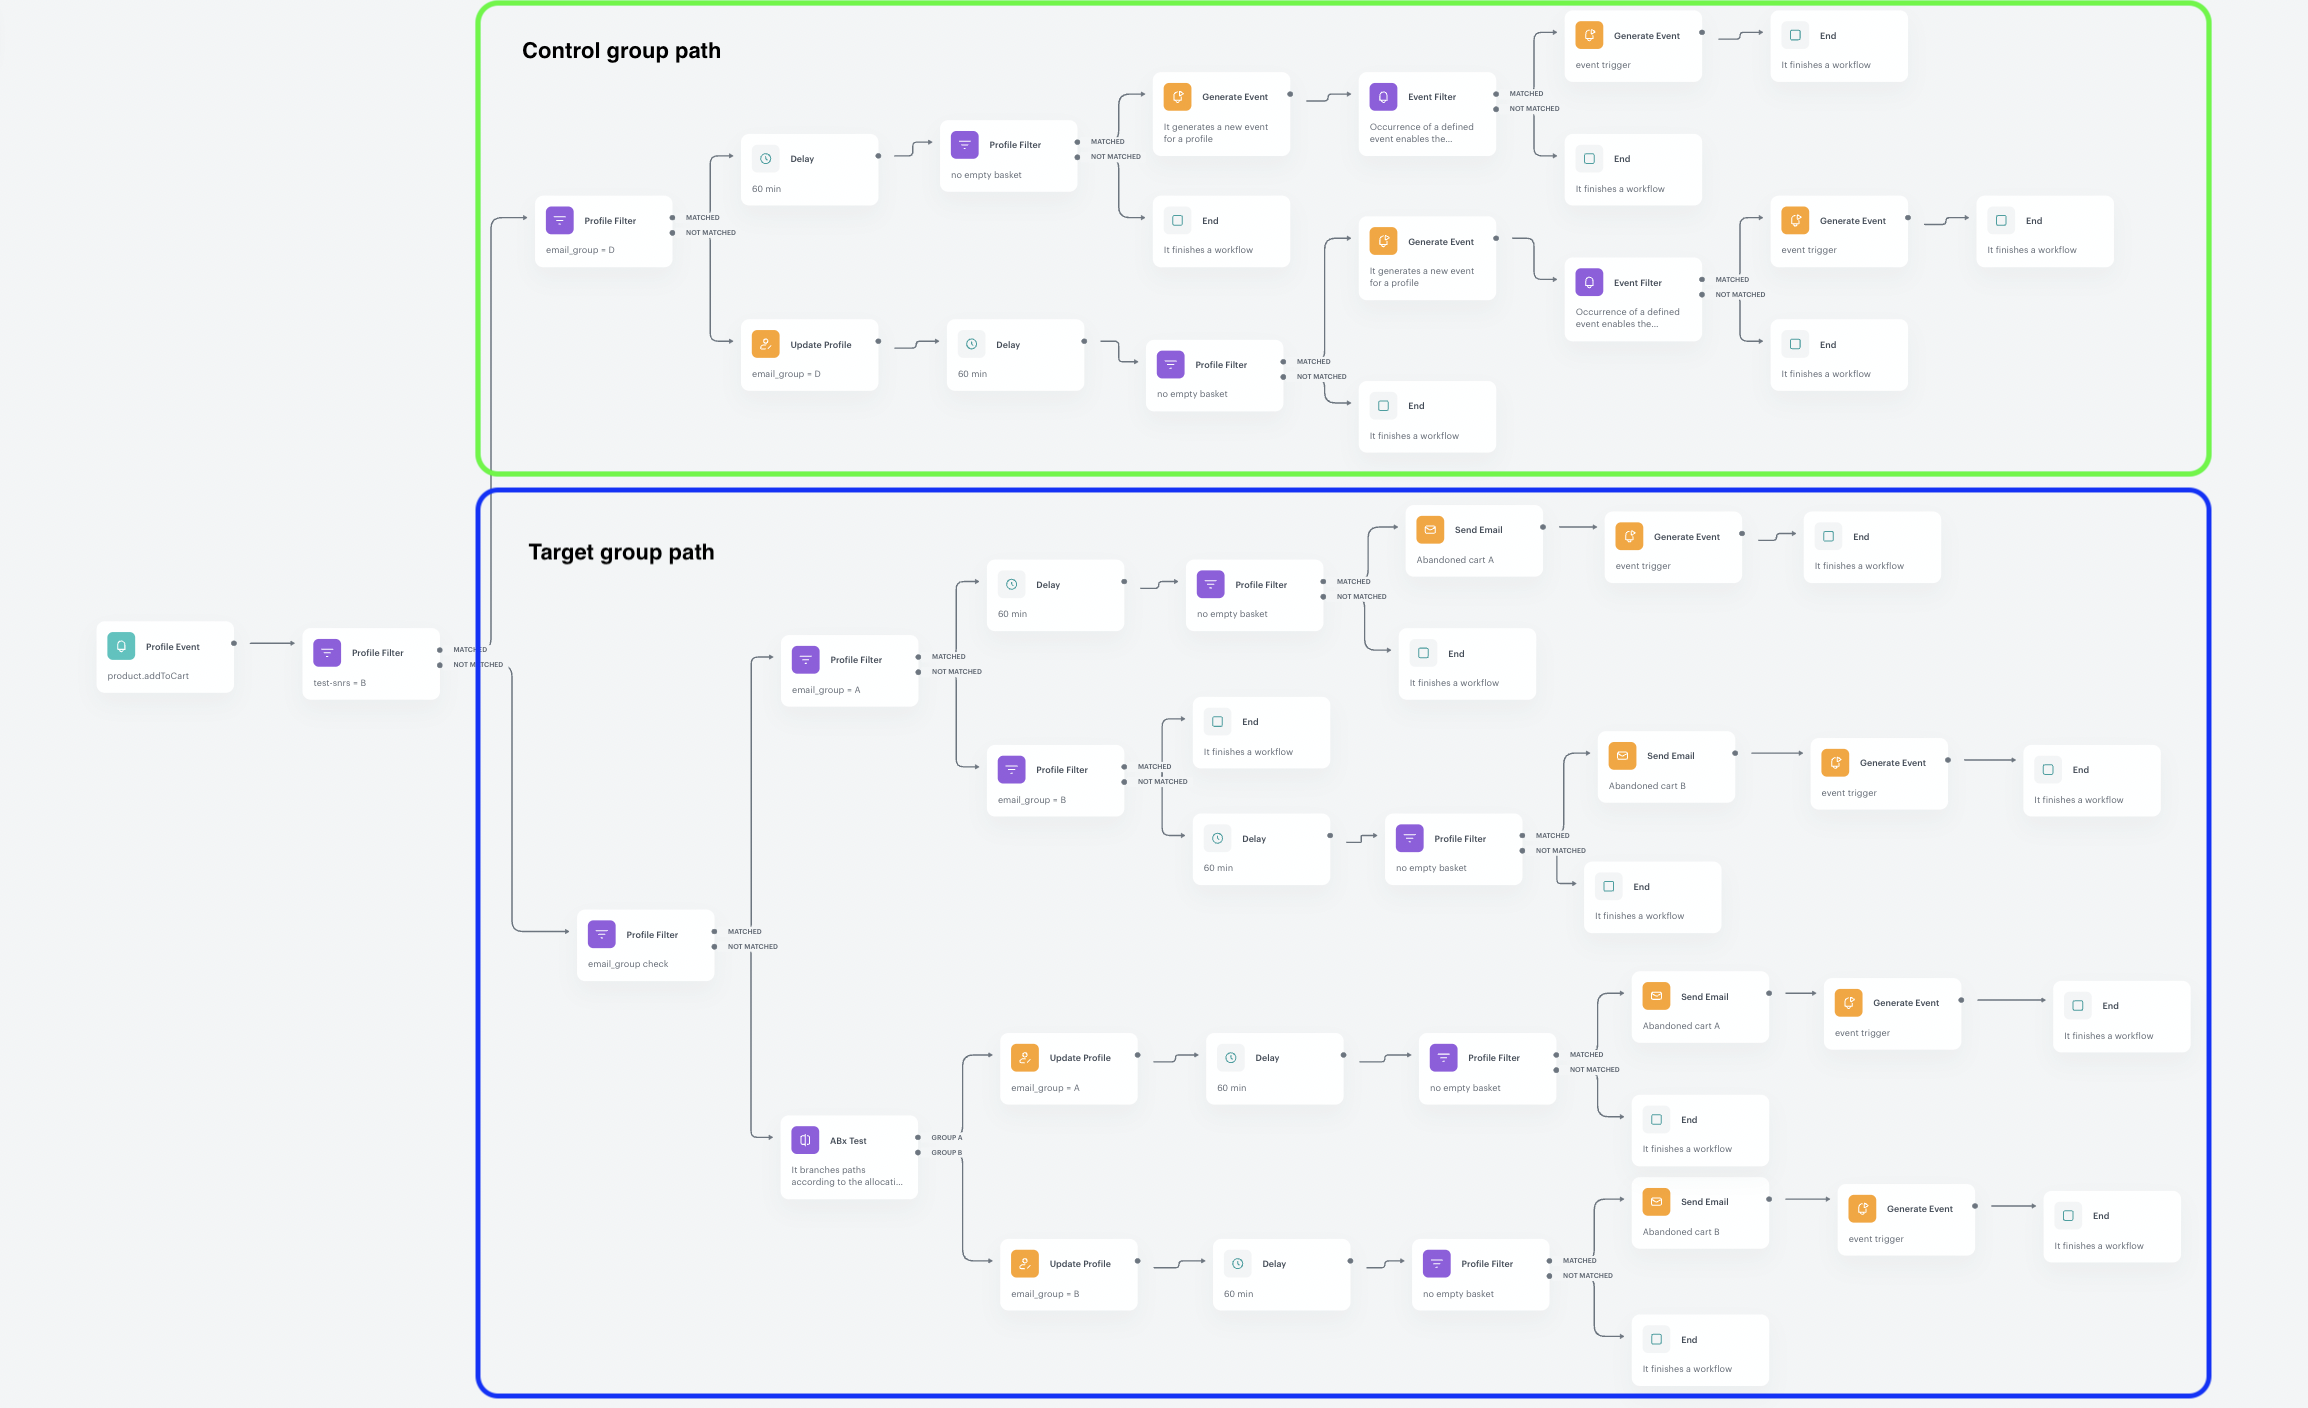
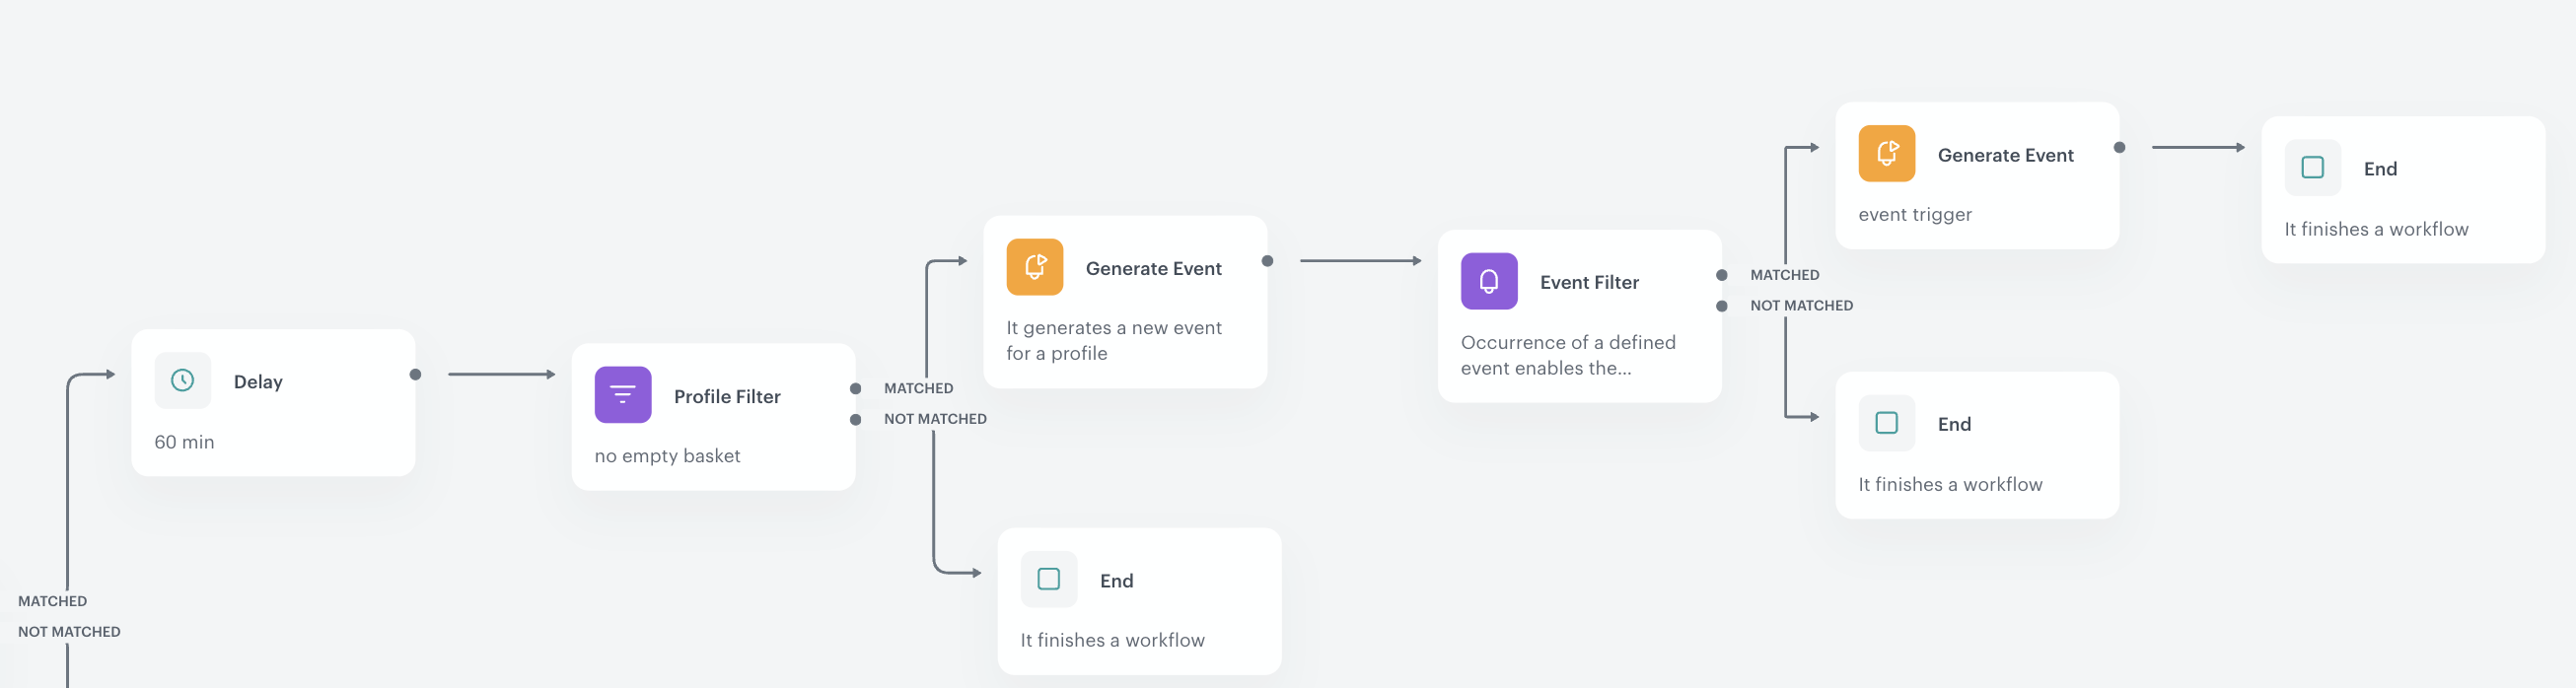
Create the first workflow
This workflow outlines the logic of an abandoned cart scenario involving the sending of emails to a target group and a control group. The paths for both groups are very similar, with the only difference being that in the control group, an email isn’t sent. Instead, sending the email is simulated by generating a special event.
To understand the more detailed logic behind the first workflow, let’s break it down into several parts:
-
Trigger: The workflow is initiated when a customer adds a product to the cart.
-
Path Division: In this step, we divide the path for customers assigned to the target group from those in the control group. We use a filter to determine the group assignment, resulting in two paths: one for the control group and one for the target group. Both paths further divide into two more paths based on whether the customer is entering the workflow for the first time.
-
Target Group Path: This path applies to customers assigned to the target group and is divided into two sub-paths: one for customers entering the workflow for the first time and another for subsequent entries.
- First-time entry: For customers entering the workflow for the first time, an A/B test is conducted to assign them to either group A or group B. At this stage, each customer in the target group receives an email_group attribute to determine the type of emails they will receive.
After assigning the email group, we check for three conditions:
- The customer has products in their basket,
- The customer has not completed a transaction in the past 60 minutes,
- The customer has given consent for email communication.
If all conditions are met, customers will receive an email specific to their email group. If not, the process ends. After sending the email, a campaign.event event is generated, triggering the second workflow.
- Reentry: For customers who reenter the workflow, we first check which email group they were previously assigned to in order to provide them with a consistent email communication targeted to their group. After that, we check the same conditions mentioned in the first-entry path, and if all conditions are met, customers will receive an email with the abandoned cart communication.
- First-time entry: For customers entering the workflow for the first time, an A/B test is conducted to assign them to either group A or group B. At this stage, each customer in the target group receives an email_group attribute to determine the type of emails they will receive.
-
Control Group Path: This path applies to customers assigned to the control group and is divided into two sub-paths: one for customers entering the workflow for the first time and another for subsequent entries.
- First-time entry: Customers entering the workflow for the first time receive the email_group attribute with a value that will identify their assignment to the control group. After assigning the email group, we check for three conditions:
- The customer has products in their basket,
- The customer has not completed a transaction in the past 60 minutes,
- The customer has given consent for email communication.
If all conditions are met, we generate an event for the control group as a simulation for sending an email. If not, the process ends. After generating an event with the email send simulation, we generate a campaign.event event, which will be used as a trigger for the second workflow.
- Reentry: For customers who reenter the workflow, we repeat all the steps described in the first-time entry, excluding the attribute assignment step (considering that customers are already assigned with the attribute when they enter the workflow for the first time).
In further steps, we will describe each part of this process in detail.
Define the workflow trigger
At this stage, you should configure the conditions that trigger the workflow. In our case, the worflow is initiated when a customer adds a product to the cart and we use the product.addToCart event as a trigger.
- As the first node of the workflow, add Profile Event.
- From the Choose event dropdown menu, choose the
product.addToCartevent. - Confirm by clicking Apply.
Create a path division
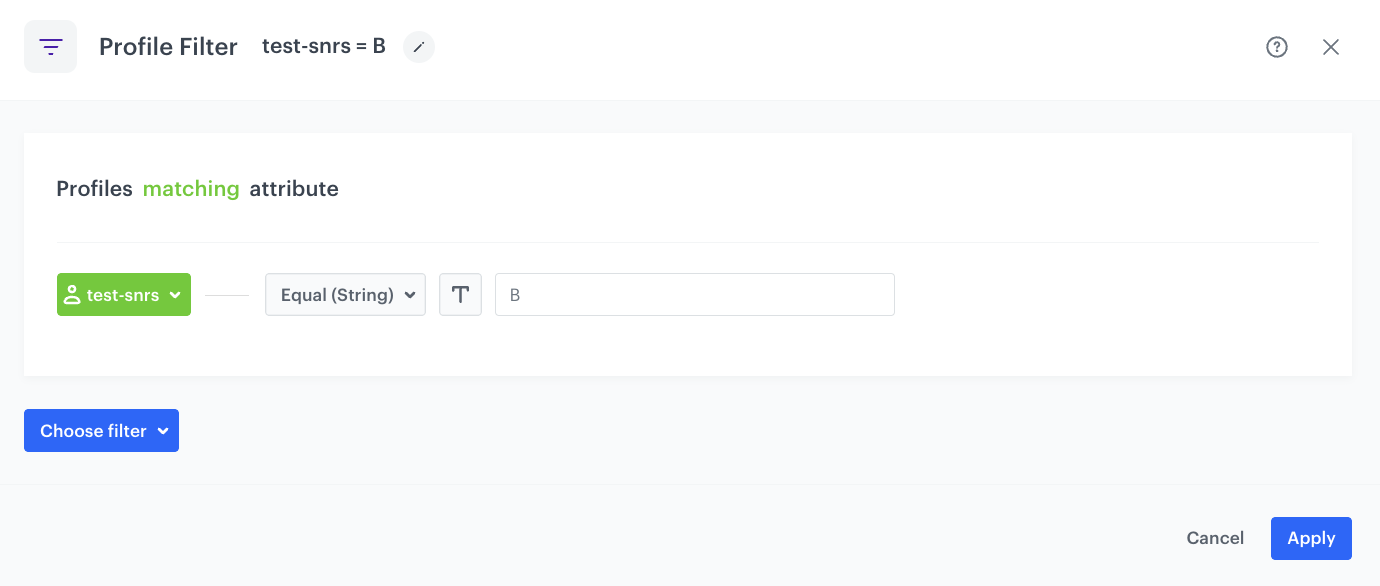
In this part of the process, we will divide the path for customers assigned to the control group from the customers assigned to the target group. To do so, we use the Profile filter node to check whether a customer was assigned to the control group.
After checking the profile filter, the process splits into two paths: for customers who meet the filter condition (are assigned to the control group), and for customers who do not meet these conditions, which means that they are assigned to the target group.
- Add the Profile filter node. In the node settings:
- Click Choose filter and select the test-snrs attribute form the drop-down list.
- From the Choose operator drop-down, choose Equal(String).
- In the text field type
B.
- Click Apply.
The next step will cover the part of the process for the target group.
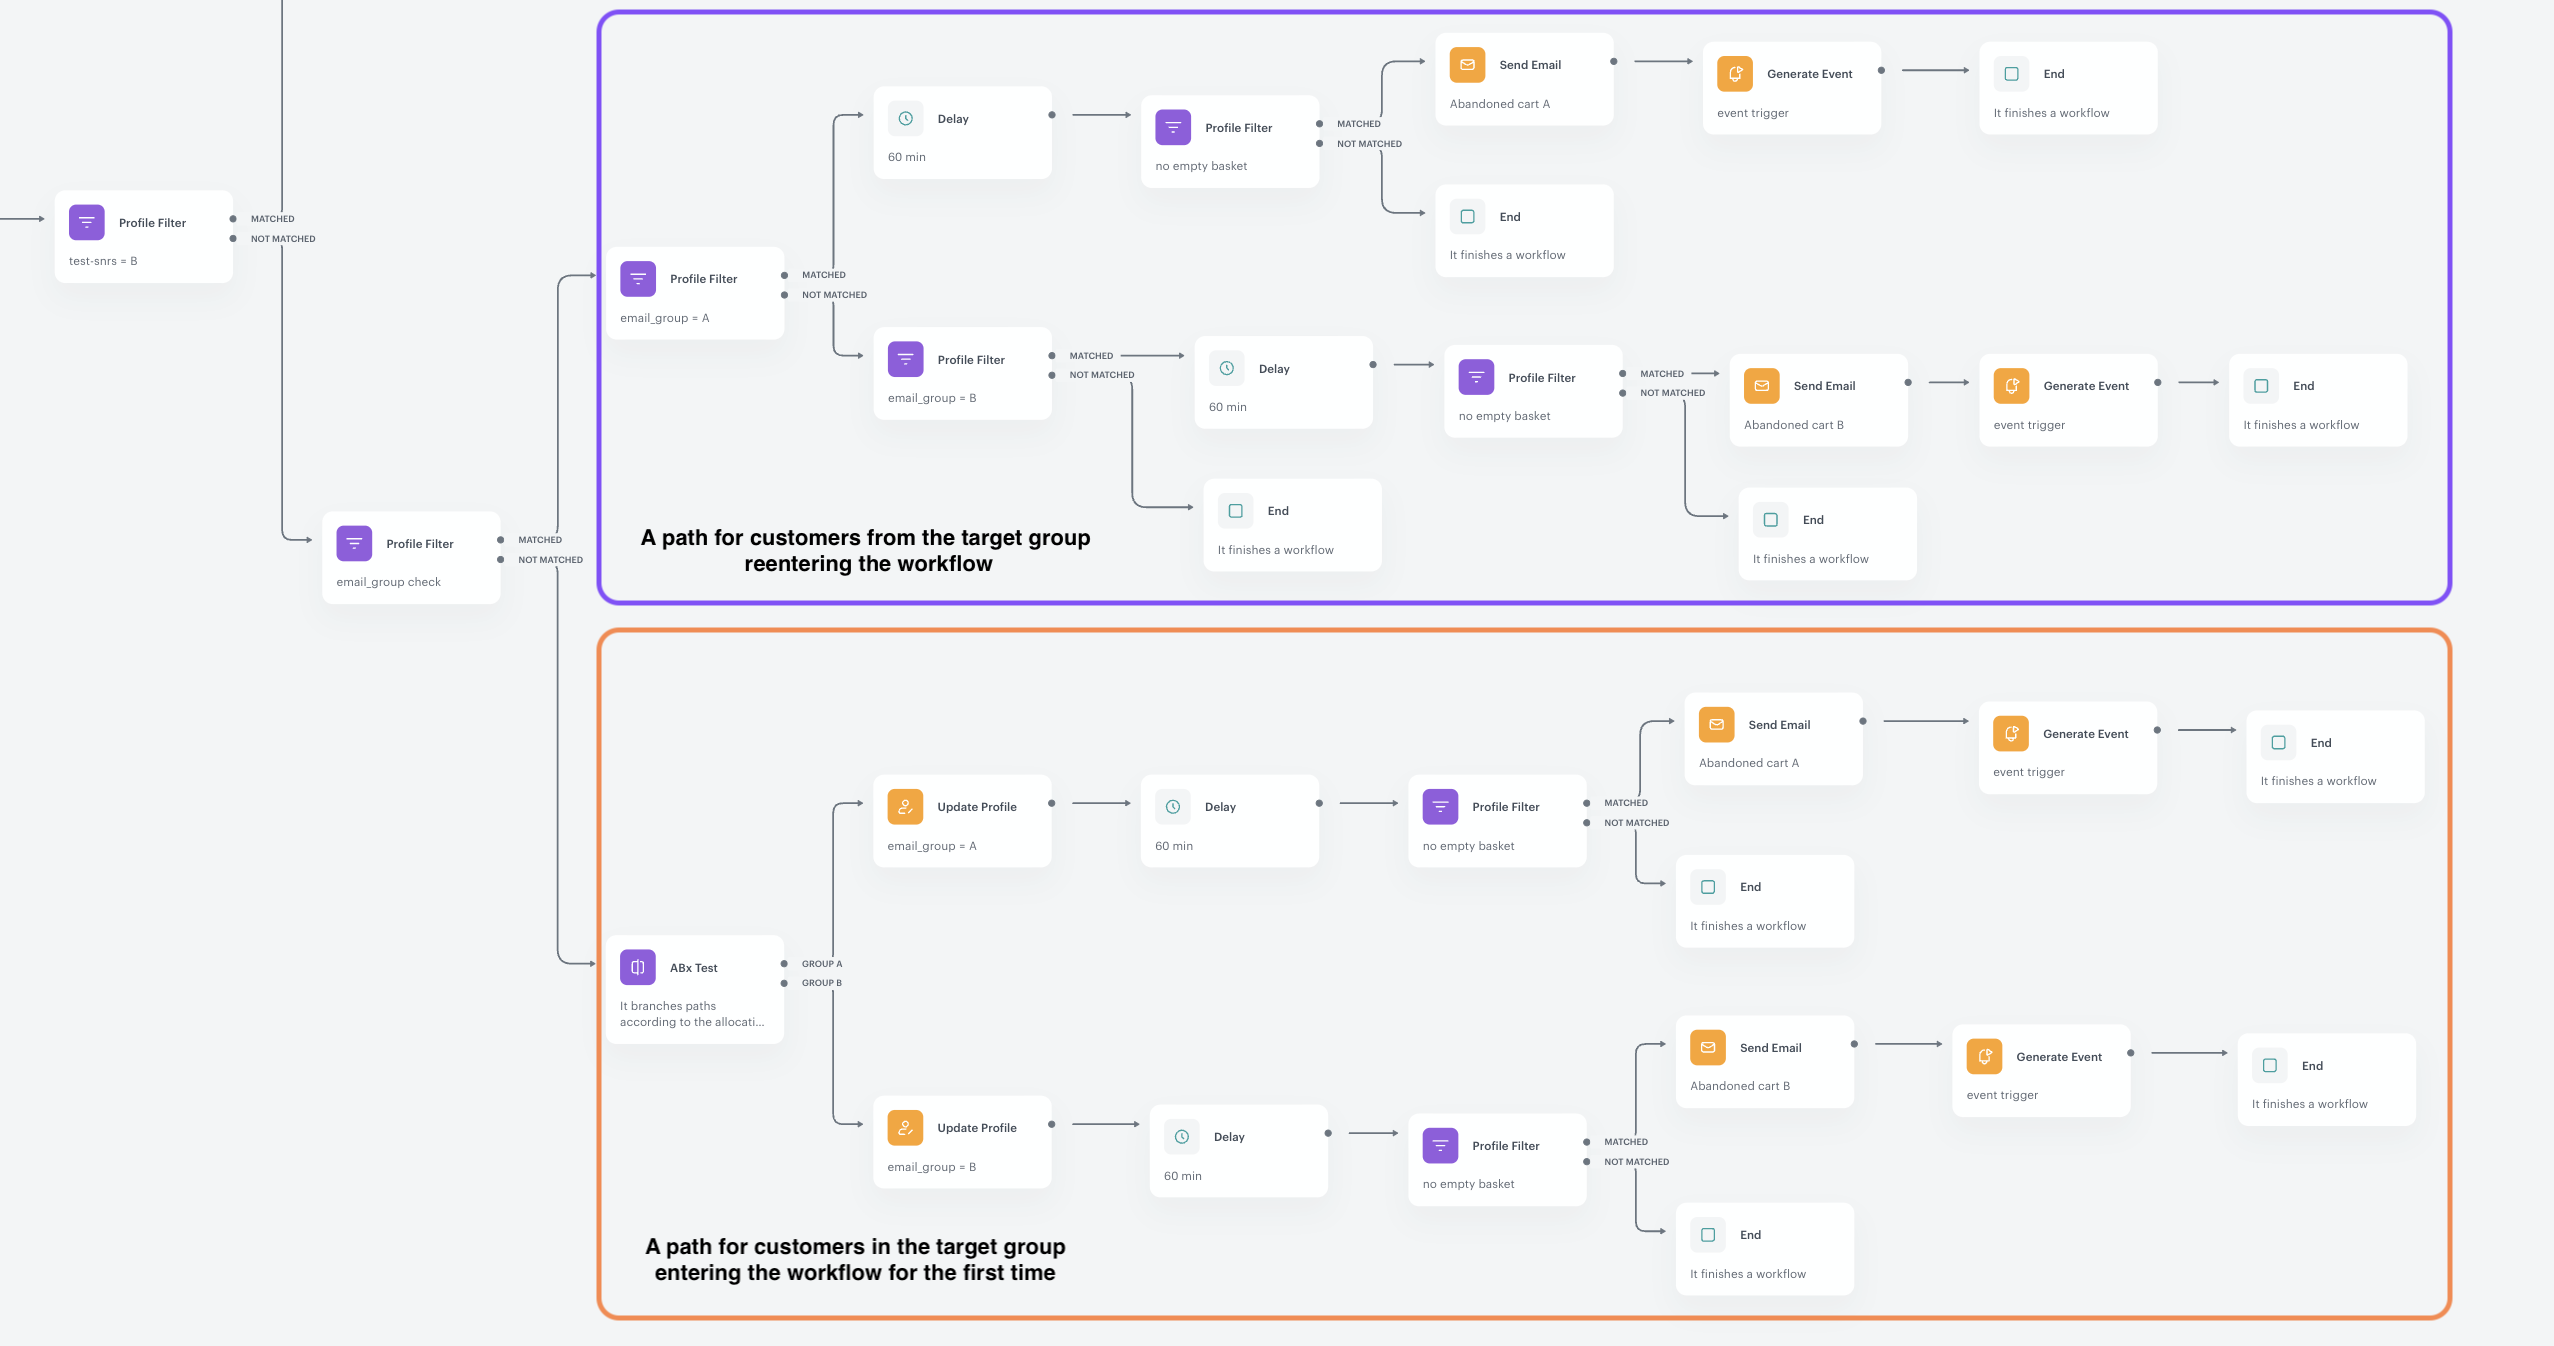
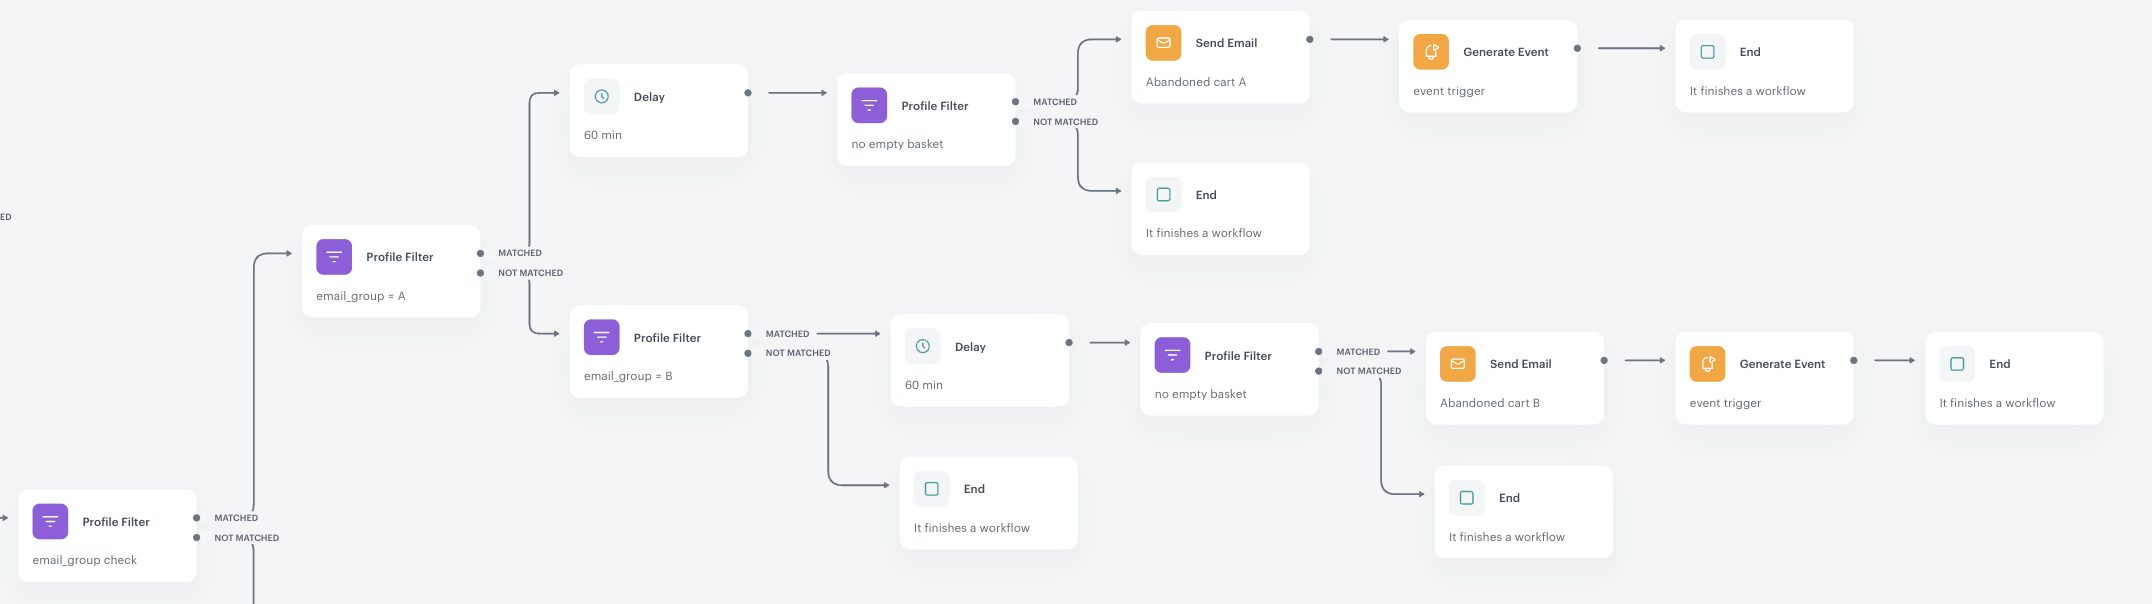
Target group path
This part of the process covers the path of the target group. In the following screenshot, we have highlighted this section. This path is further divided into two sub-paths: one for customers entering the workflow for the first time and another for customers re-entering the workflow.
The division between these sub-paths is checking if customers have been assigned to any email group. Customers entering the workflow for the first time don’t have the email group attribute assigned yet, so they follow the not matched path of the filter (and the assignment of the attribute occurs in their path). Customers re-entering the workflow have already been assigned to an email group, so they follow the matched path of the filter.
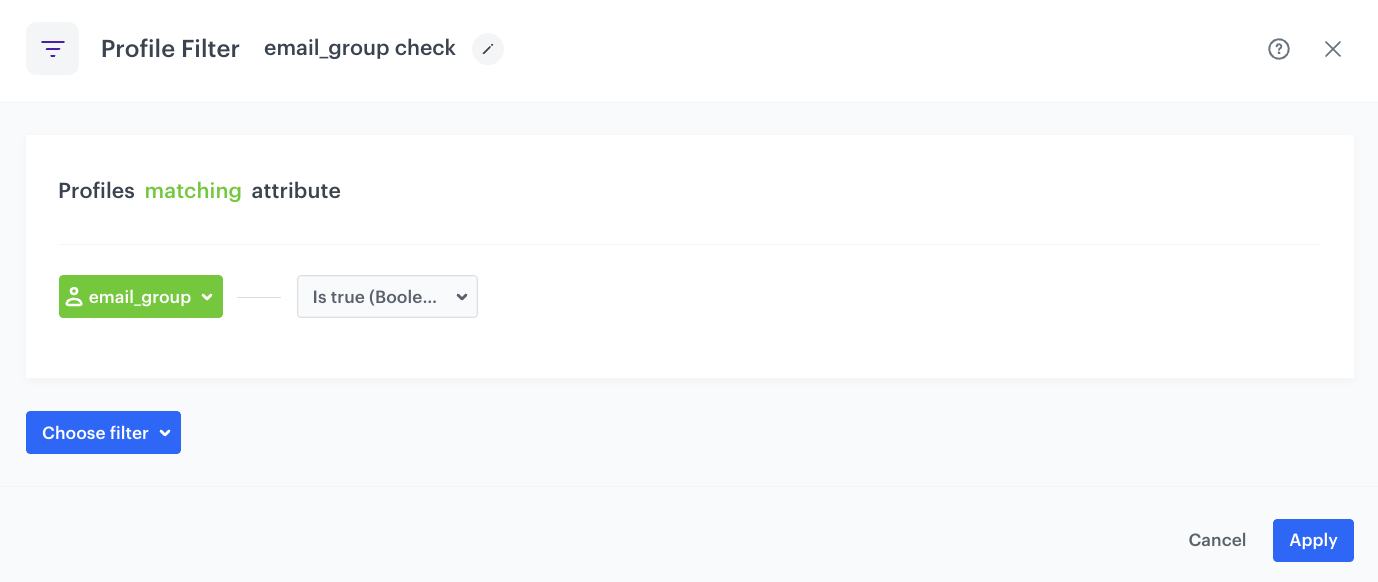
Check if customers are assigned to an email group
This filter is used to check whether the email_group attribute has been assigned to a customer profile.
- Add the Profile filter node to the Not matched path from the profile filter defined in “Define the workflow trigger”. In the node settings:
- Click Choose filter and select the email_group attribute form the drop-down list.
- From the Choose operator drop-down, choose Is true (Boolean).
- Click Apply.
At this point, the path is divided into two sub-paths:
- For customers who are not yet assigned to an email group:
- These are customers who enter the workflow for the first time.
- They will follow the not matched path.
- For customers who are already assigned to an email group:
- These are customers who re-enter the workflow.
- They will follow the matched path.
Customers from the target group who are entering the workflow for the first time
This part of the process covers the path for customers entering the workflow for the first time. It’s shown in the screenshot below.
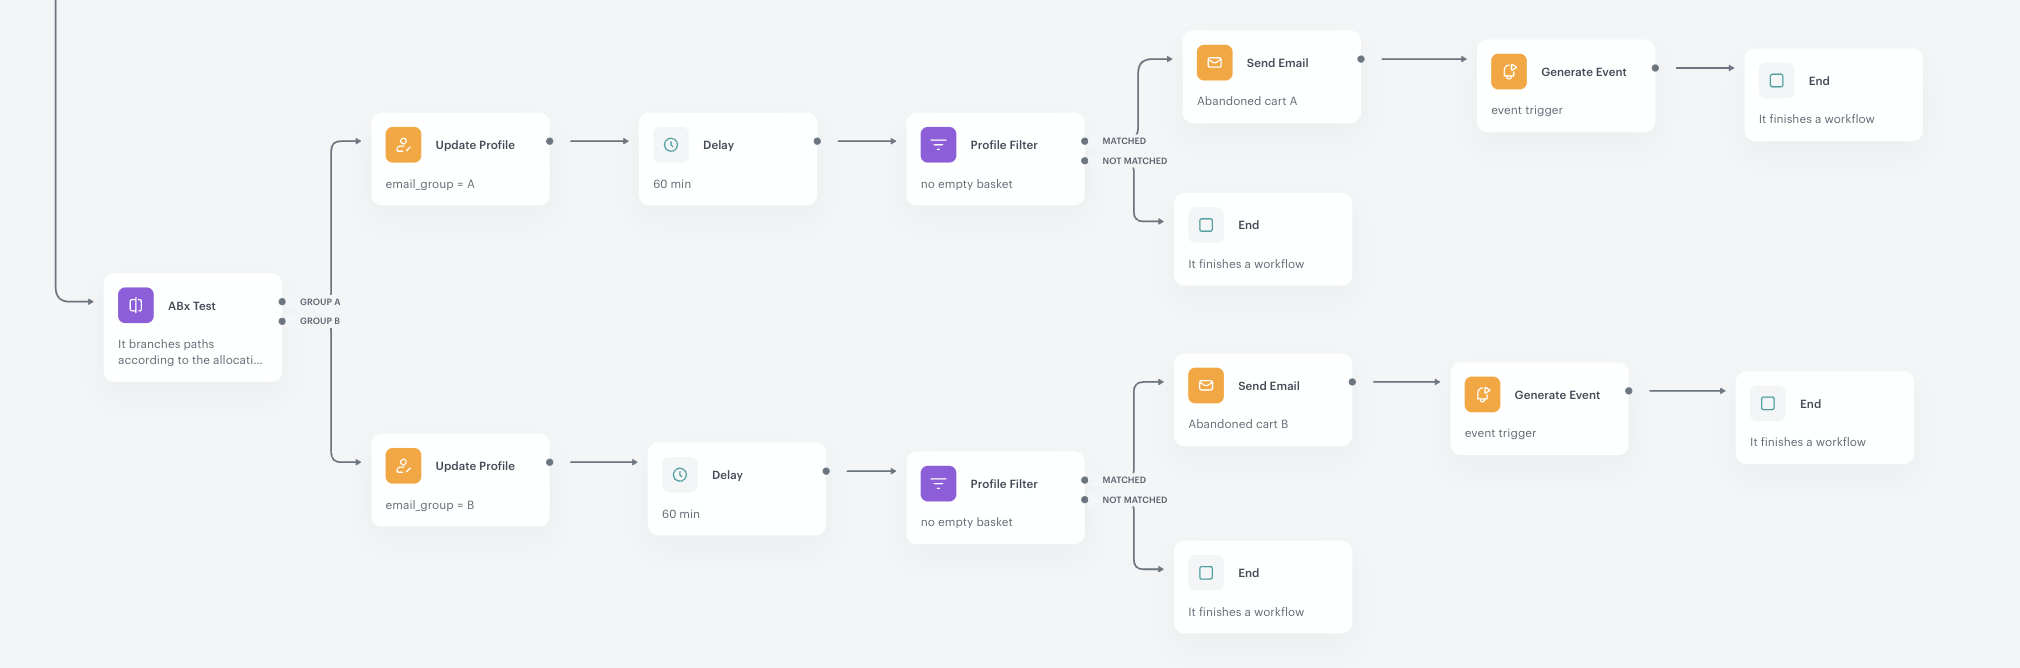
The first step of this path is creating an A/B test to check which type of communication gets better reaction from the customers.
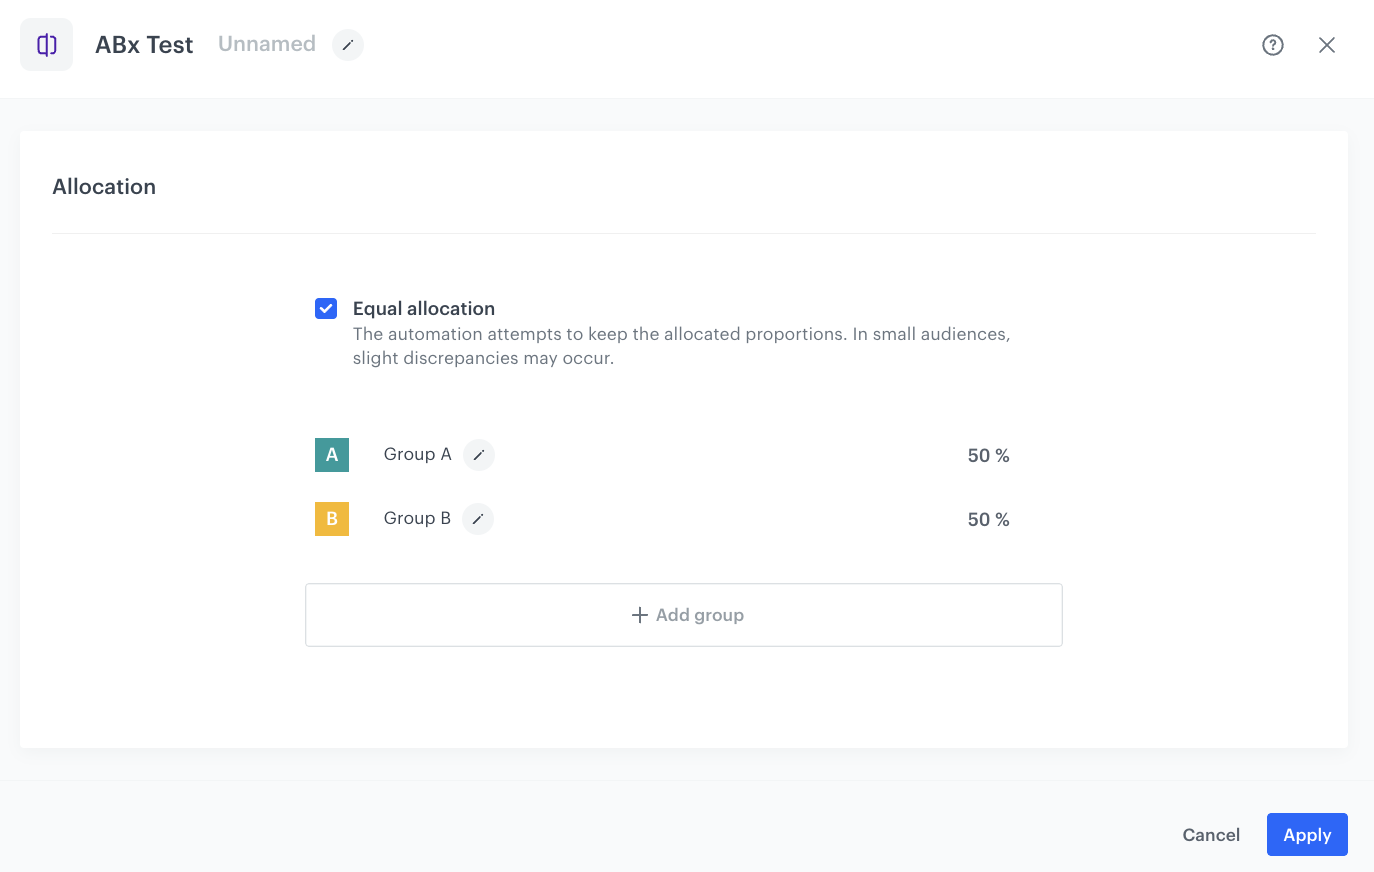
Define the A/B test
In this step, we set up an A/B test for the not matched path from the filter that checked the email group assignment. Customers will be assigned to Group A or Group B.
When configuring the node, keep the allocation equal or change the proportion according to your business needs.
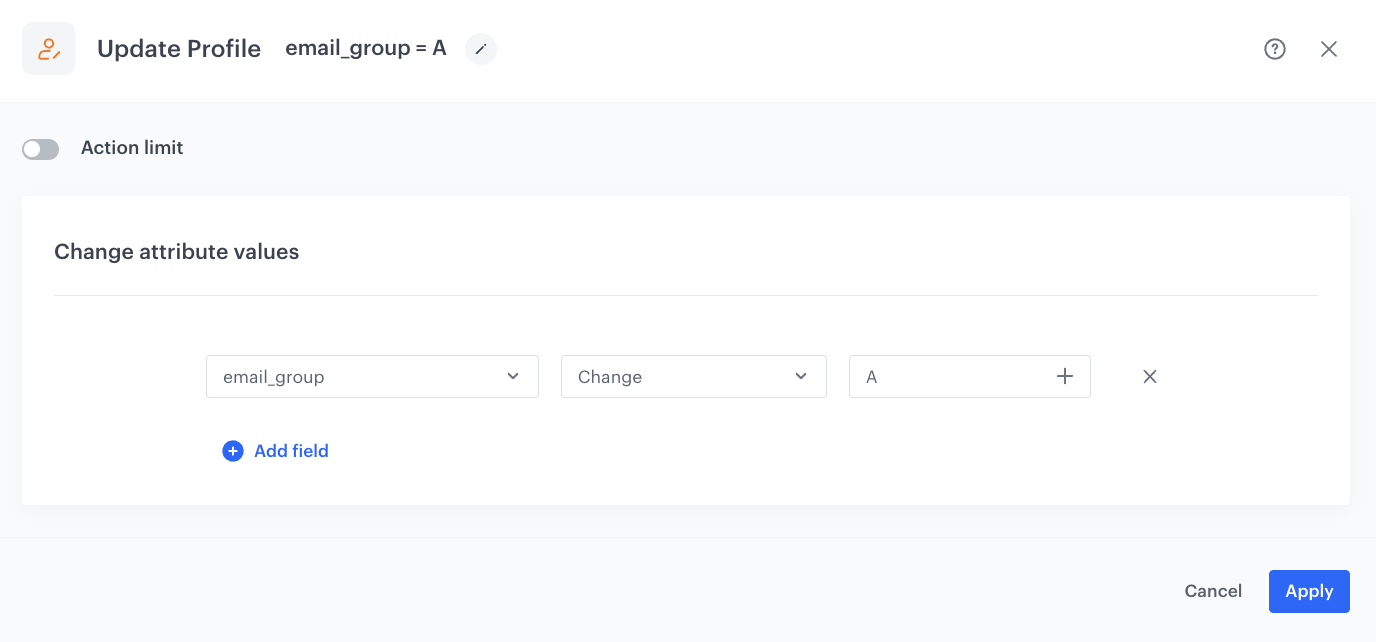
Assign an email_group attribute to customers profiles
Depending on which group a customer is assigned to, we will add an email_group attribute with a value of A or B to their profile.
The ABx Test node is divided into two paths: for Group A and Group B. For customers assigned to Group A, we will add an attribute with the value A, and for customers assigned to Group B, we will add an attribute with the value B.
- For the path for Group A and Group B add the Update Profile node.
- In the Click to select drop-down list, select the email_group attribute. If it doesn’t exist, click Add and create it.
- From the drop-down list on the right, select the Change option.
- As the value:
- In the path for Group A, enter
A - In the path for Group B, enter
B
- In the path for Group A, enter
Define the Delay node for customers from each group
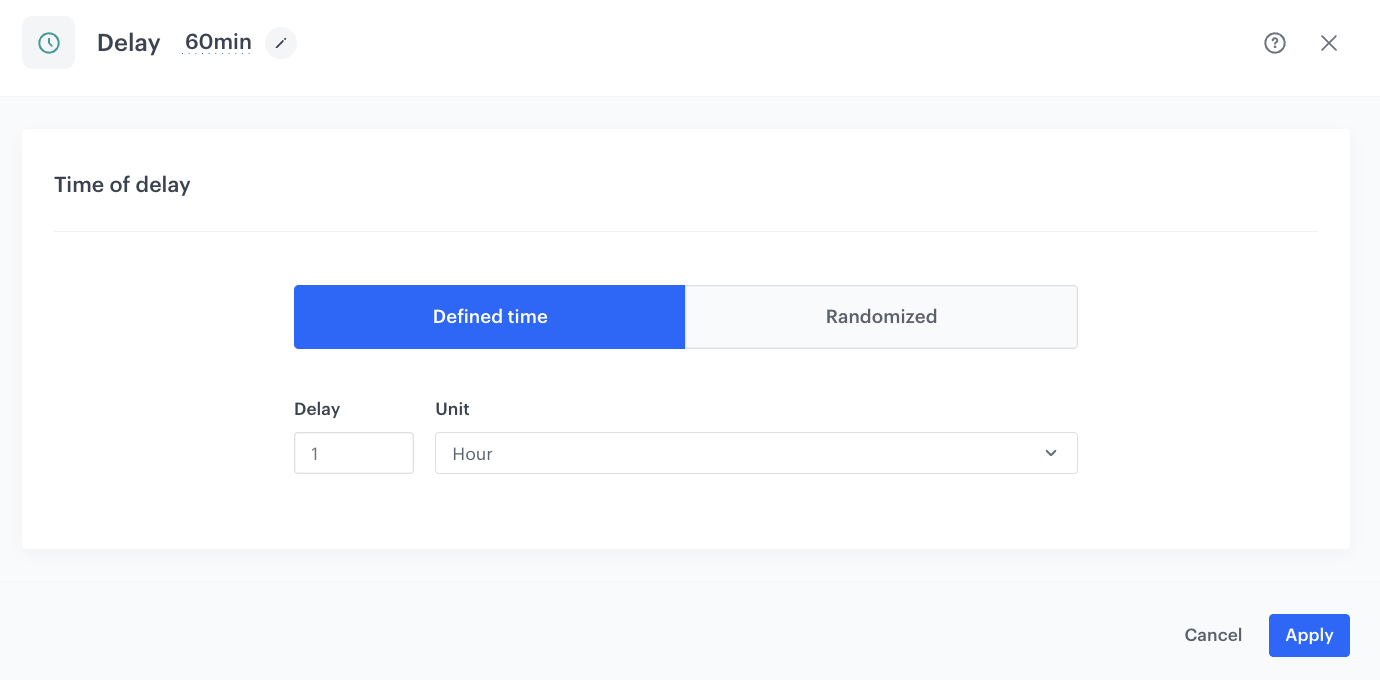
This node creates an hour’s delay before moving to the next condition of the workflow.
- Add the Delay node. In the node settings:
- In the Delay field, type
1. - From the dropdown list, choose Hour.
- In the Delay field, type
- Click Apply.
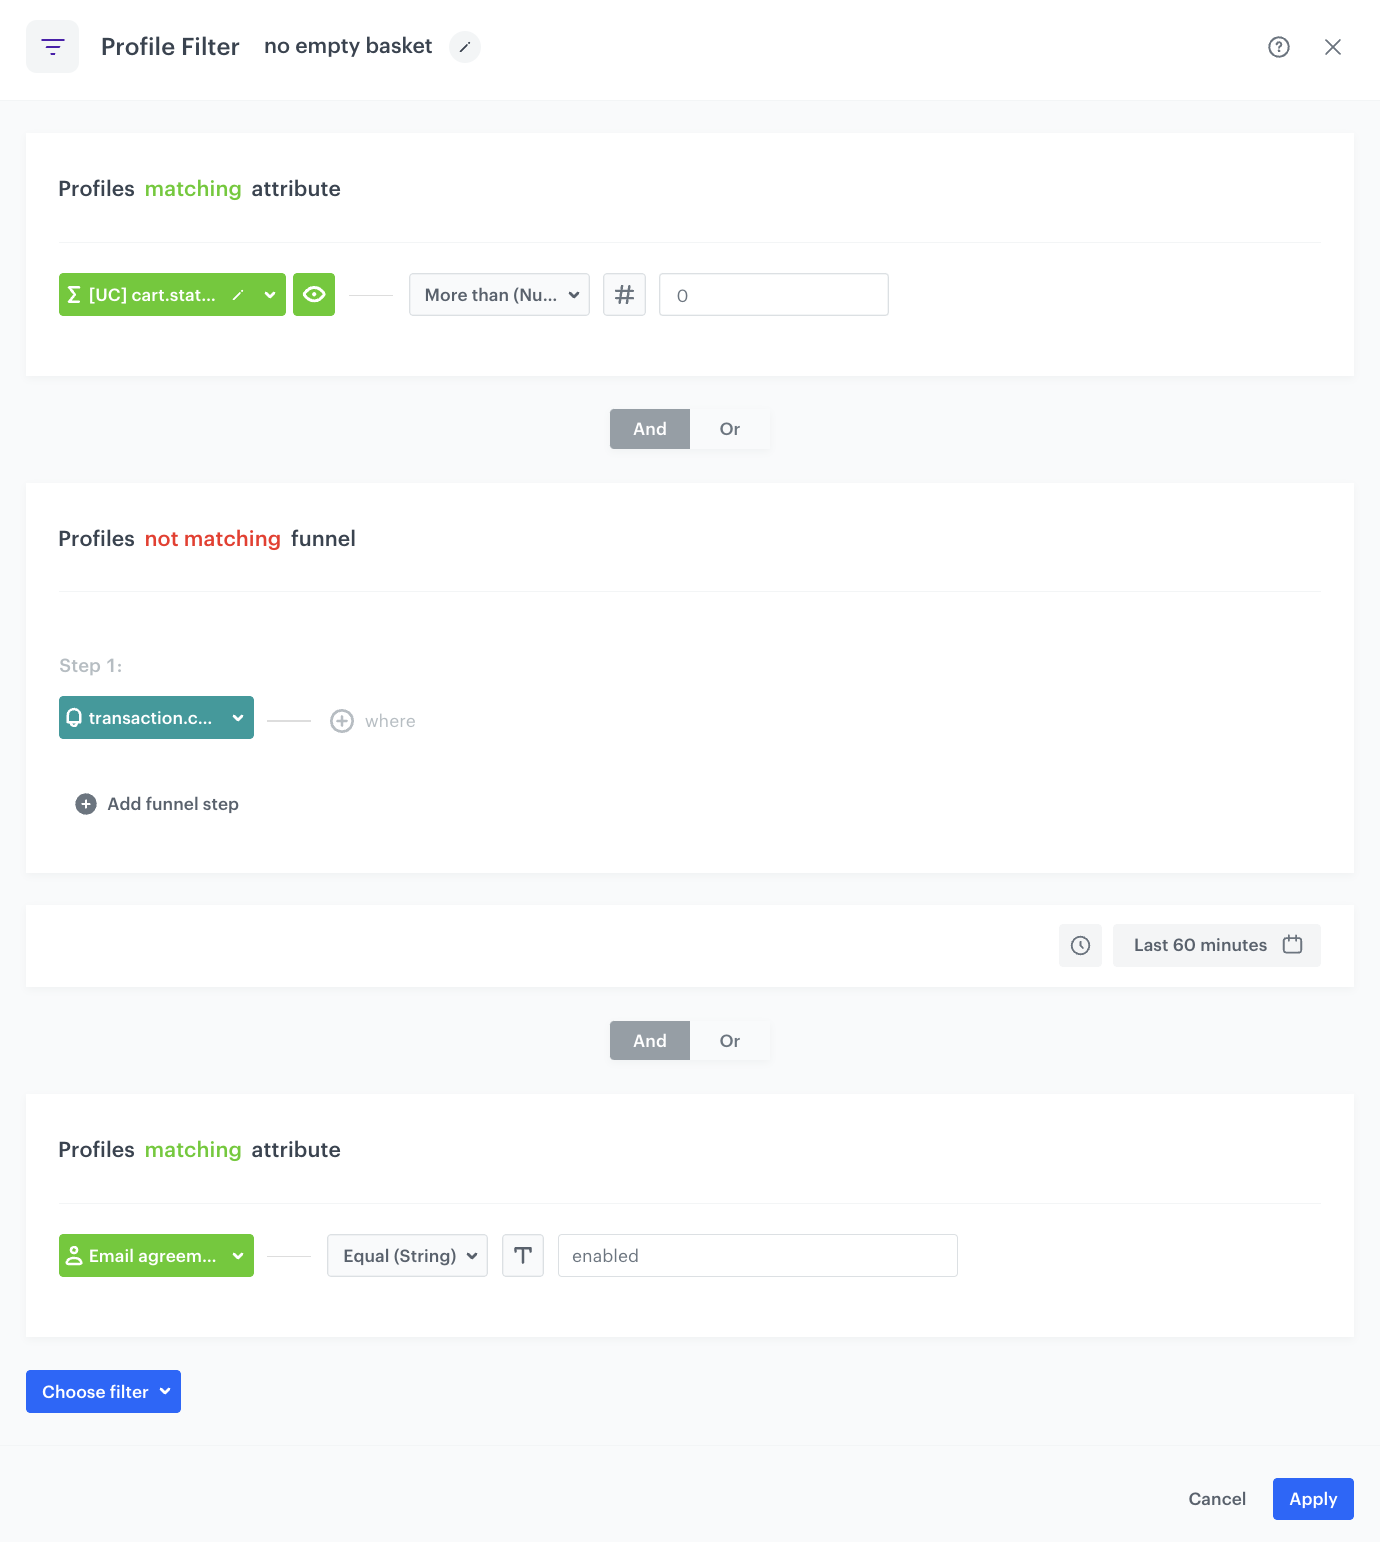
Check if the customer meets all the requirements before sending an email message
Before sending an email message, we will check if the customer meets all requirements:
- The customer has products in the basket,
- The customer has not completed a transaction in the past 60 minutes,
- The customer has given consent for email communication.
- Add the Profile filter node to both Delay nodes. In the node settings:
- Click Choose filter and select the aggregate you created earlier in the process.
- From the Choose operator dropdown, choose More than (Number) and type
0in the empty field. - From the Choose filter dropdown list select transaction.charge event.
- Change the funnel type from profiles matching to profiles not matching.
- To select a specific time range, click the calendar icon. In our case, it will be Last 60 minutes.
- From the Choose filter dropdown list, select the newsletter_agreement attribute.
- From the Choose operator dropdown, choose Equal (String) and type
enabledin the empty field.
- Click Apply.
If a customer does not meet these conditions, the workflow ends for them at this stage. Otherwise, the email message is sent.
Send an email message to a customer
In this step, select email templates (prepared earlier in the prerequisites) that will be sent to customers.
- To the Matched path, add the Send Email node and open its settings.
- In the Sender details section, choose the email account from which the email is sent.
- In the Content section, select the template that you prepared as a part of the prerequisites.
- Optional: In the UTM & URL parameters section, define the UTM parameters added to the links included in the email.
- Optional: In the Additional parameters section, describe campaigns with additional parameters.
- Click Apply.
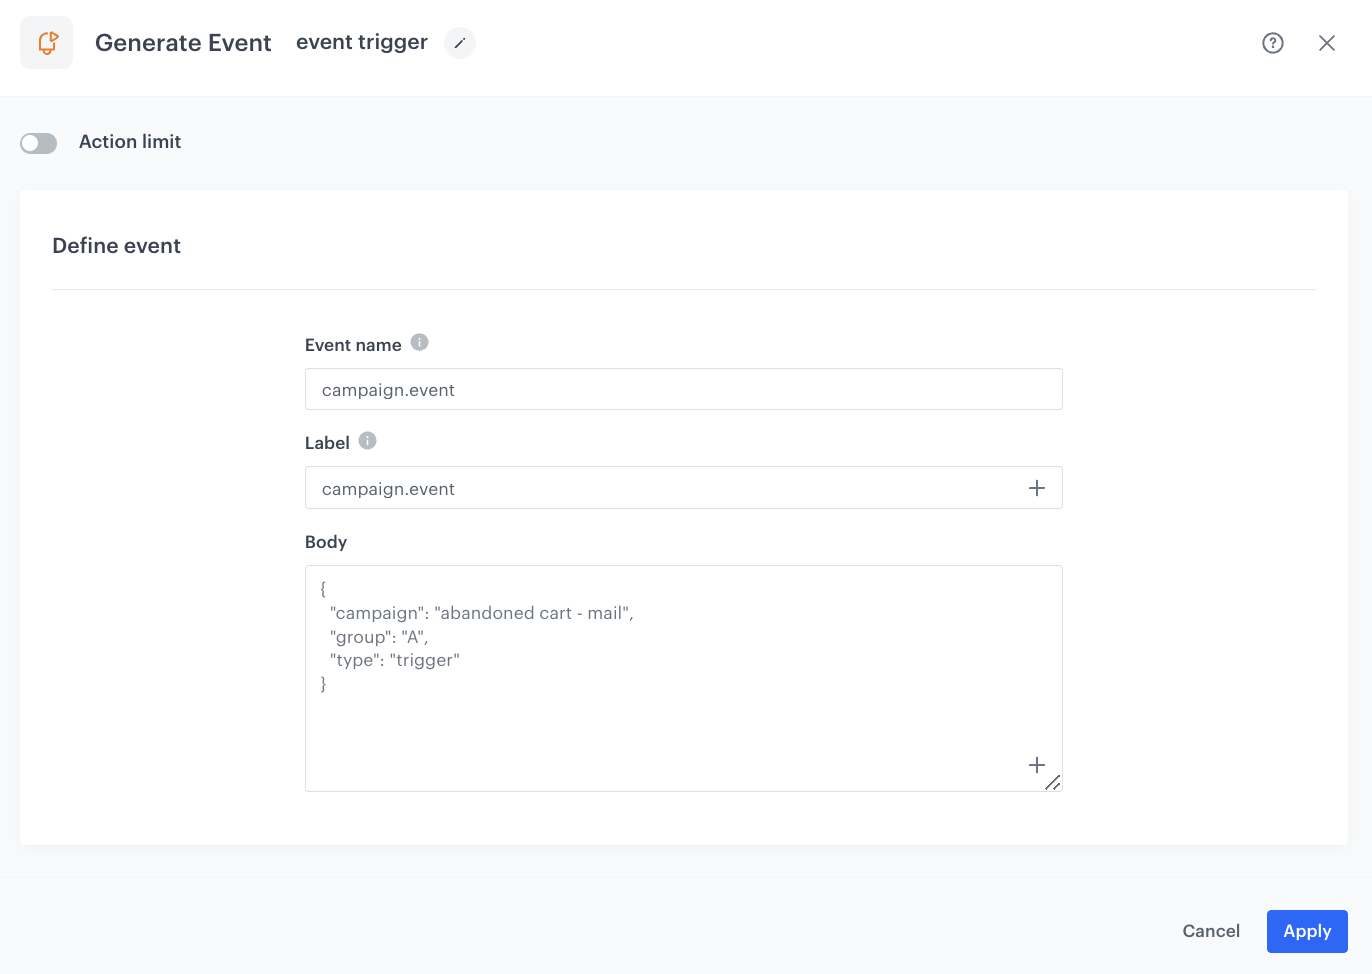
Generate an event that will trigger the second workflow
In this part of the process, we will generate a custom event that will act as a trigger for the second workflow. This event’s action is campaign.event and it includes the following details:
- Campaign name,
- Test group to which the customer was assigned,
- Event type.
- Add the Generate Event node to previous Send Email nodes.
- In the Event name field, enter the name of the event that will be generated on the customer’s profile. In this case, it is
campaign.event. - If your integration requires the Label parameter, enter it.
This is a legacy parameter, it can be entered for backwards compatibility when required. - In the Body section, define the parameters of this event:
- Include a
campaignparameter with the campaign name. - Include a
triggerparameter with the value set totrigger - Include the
groupparameter:- For group A, set it to
A - For group B, set it to
B
- For group A, set it to
- Include a
Example content of Body section for Group A:
{
  "campaign": "abandoned cart - mail",
  "group": "A",
  "type": "trigger"
}
Add the End node to complete the path associated with the A/B test (with the path dedicated to the customers entering the workflow for the first time).
In the next steps, we will address the second part of the path related to the target group - the path intended for customers who have reentered the workflow.
Customers from the target group that reenter the workflow
In this part of the process, we will go through the path designed for customers re-entering the workflow. The described part of the workflow is shown in the screenshot below.
At the start of this path, we check the assigned email group of the customer to determine the type of email to be sent. This ensures that we send an email specifically tailored to the email group the customer was assigned to upon their initial entry into the workflow.
To do this, we will first check if the customer is assigned to the A email group.
Check if the customer is assigned to the A email group
This step checks if the returning customer was assigned to email group A.
- Add the Profile filter node to the Matched path from the filter that checks the customer assignment to any email group. In the node settings:
- Click Choose filter and select the email_group attribute from the dropdown list.
- From the Choose operator drop-down, select Equal (String).
- In the empty field, type
A
- Click Apply.
If the customer has not been assigned to email group A, we then check whether they are assigned to email group B.
Check if the customer is assigned to the B email group
The configuration of this node is the same as described in the previous step, except that this time we are checking the assignment to group B.
- At the not matched path of the node that checks assignment to group A, add a Profile filter node. In the node settings:
- Click Choose filter and select the email_group attribute from the dropdown list.
- From the Choose operator drop-down, choose Equal (String).
- In the empty field, type
B
- Click Apply.
After creating both filters to check the assignment for email group A and B, there are two paths. One is for customers assigned to group A, and the other is for those assigned to group B. The steps following both paths will be the same, with the only difference being the mailing they will receive, as it is specific to their assigned email group. Additionally, the value of the group parameter in the trigger event generated at the end of the workflow will store the group to which the customer is assigned.
For customers who have not been assigned to any group, the workflow ends after the filter checks the profiles for assignment to group B.
Define the Delay node for customers from each group
This node creates an hour’s delay before moving to the next condition of the workflow.
- Add the Delay node to both Profile filter nodes. In the node settings:
- In the Delay field, type
1. - From the dropdown list, choose Hour.
- In the Delay field, type
- Click Apply.
Check if customers meet all the requirements before sending an email message
Before sending the email, we will check if the customer meets all the conditions, which are the same conditions described earlier in the process. To simplify the configuration of the Profile Filters with these conditions, you can duplicate a previously created node and add it to both Delay nodes.
For customers who do not meet the defined conditions, the workflow comes to an end. However, for those who do meet all conditions, the next step in the process is to send them an email.
Send an email message to a customer
In this part of the process, we will send an email to customers in both email groups. You need to create two Send Email nodes and use the dedicated template for each email group that you have already prepared in the prerequisites.
The configuration of these nodes remain the same as described in this part of the process. To simplify the configuration of these nodes, you can duplicate a previously created node and add it to both paths.
Generate an event that will trigger the second workflow
In this part of the process, we will generate a custom event that will act as a trigger for the second workflow. The configuration of this event remain the same as described in this part of the process. To simplify the configuration of these node, you can duplicate a previously created node and add it to both paths.
Add the End node to end the path associated with customers from the target group who reenter the workflow.
That wraps up the workflow section related to customers from the target group. Next, we’ll delve into the second part of the workflow, which focuses on the control group path.
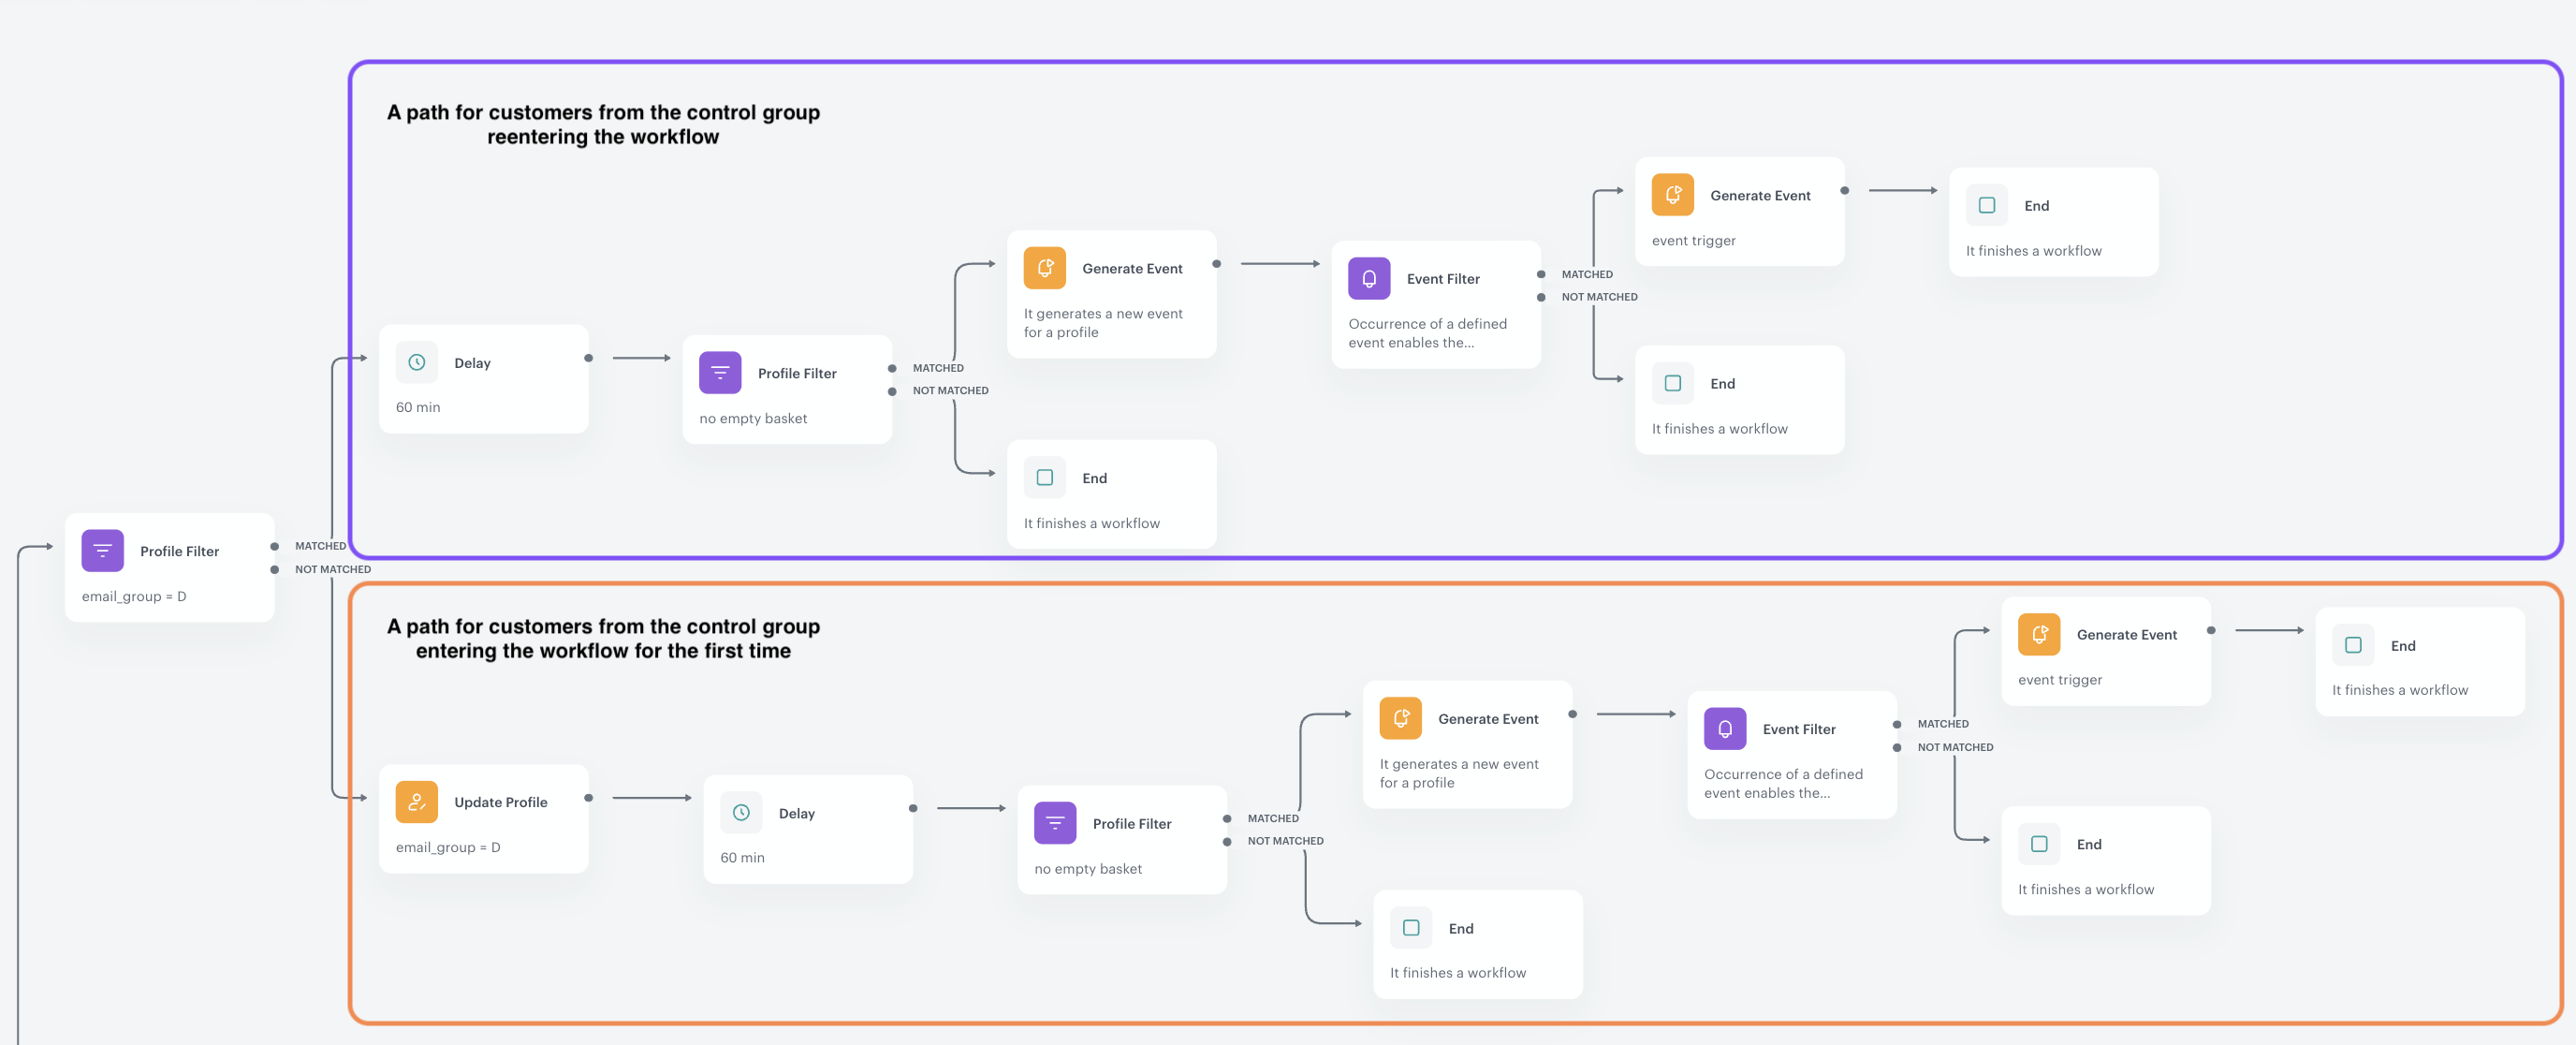
Control group path
In this part of the process, we will focus on the path from the workflow that is dedicated to the control group. In the following screenshot, we have highlighted this section. This path is also further divided into two sub-paths: one for customers entering the workflow for the first time and another for customers reentering the workflow.
The division between these sub-paths is determined by a filter that checks if customers have been assigned the email group D. Customers entering the workflow for the first time do not have the email group attribute assigned yet, so they follow the not matched path of the filter (and the assignment of the attribute occurs in their path). On the other hand, customers reentering the workflow have already been assigned an email group, so they follow the matched path of the filter.
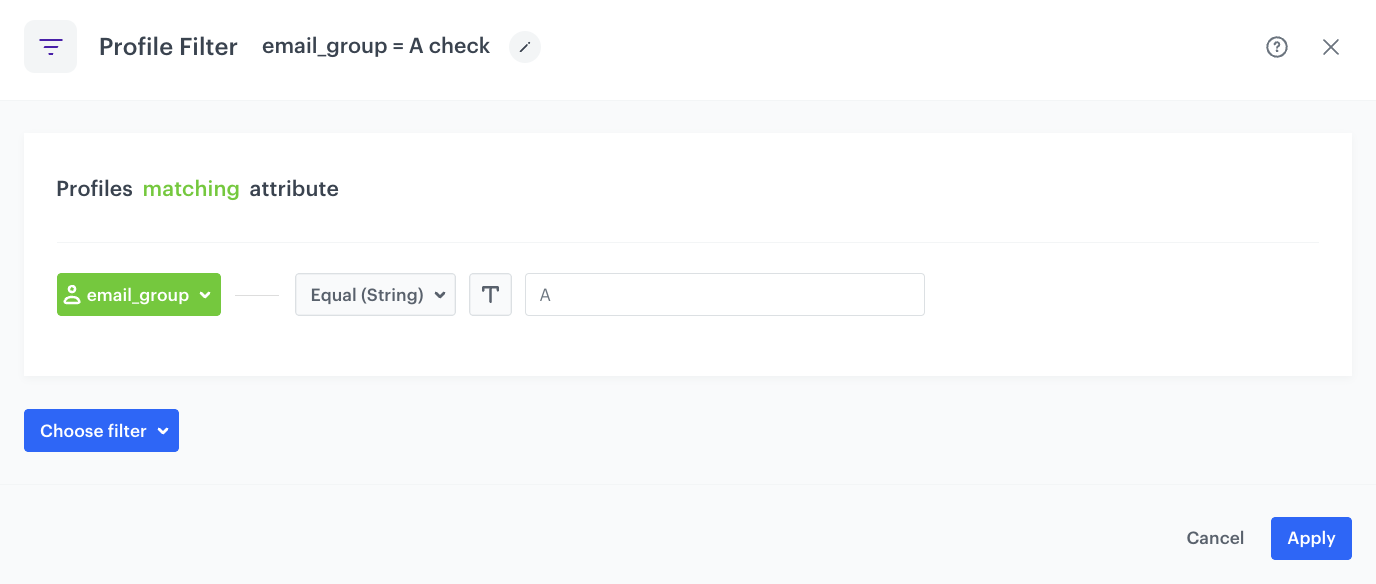
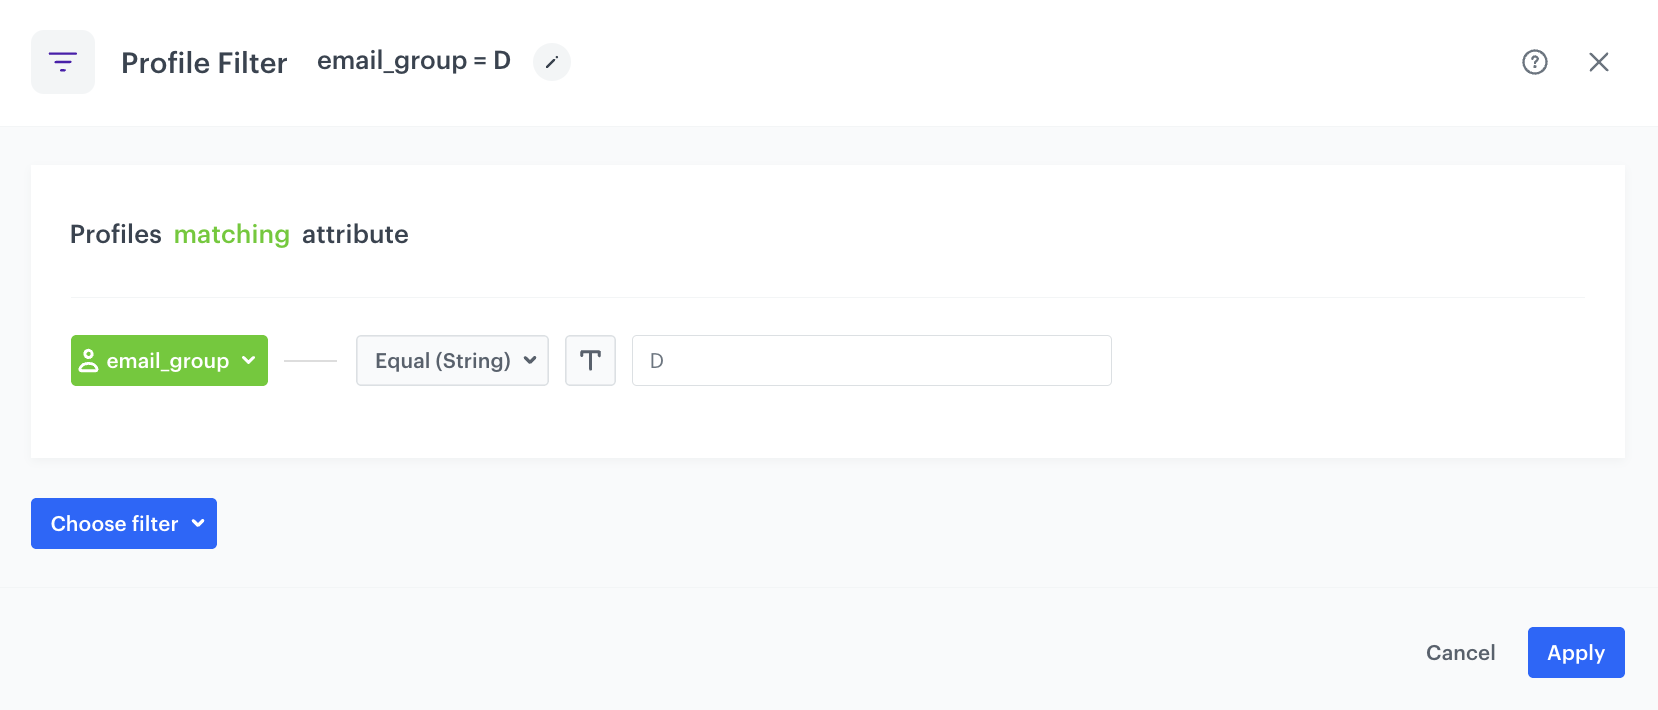
Check if customers are assigned to email group D
This filter checks if the email_group attribute with the value D is assigned to a customer profile.
- Add the Profile filter node to the Matched path from the profile filter defined in this part of the process. In the node settings:
- Click Choose filter and select the email_group attribute form the dropdown list.
- From the Choose operator drop-down, choose Equal (String).
- In the empty field, type
D
- Click Apply.
At this point, the path is divided into two sub-paths:
- For customers who are not yet assigned to the email group D:
- These are customers who enter the workflow for the first time.
- They will be redirected to the not matched path.
- For customers who are already assigned to the email group D:
- These are customers that reenter the workflow.
- They will be redirected to the matched path.
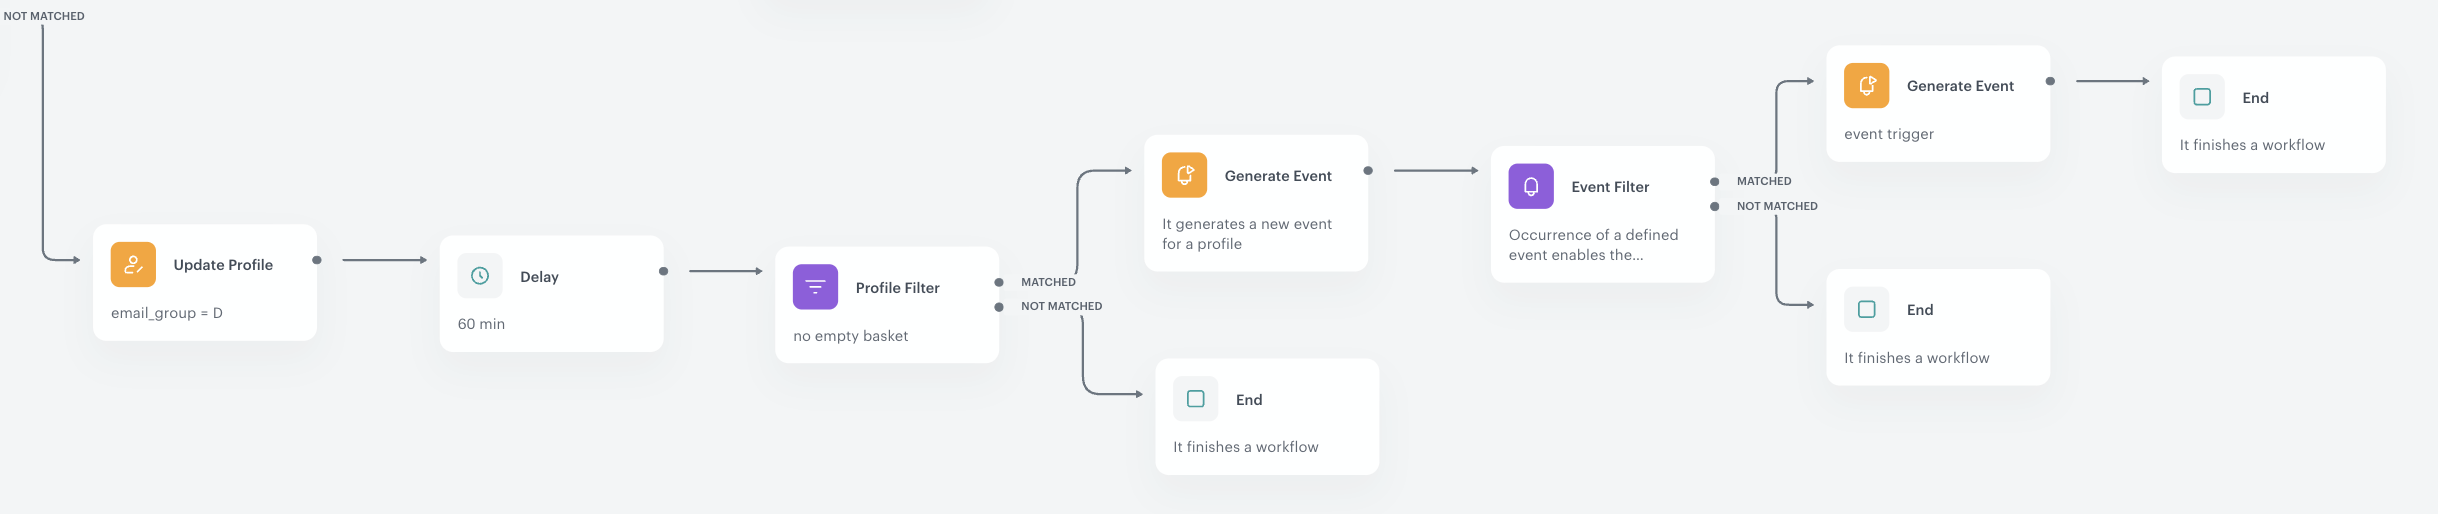
Customers from the control group who are entering the workflow for the first time
In this part of the process, we will go through the path designed for customers entering the workflow for the first time. The described part of the workflow is shown in the screenshot below.
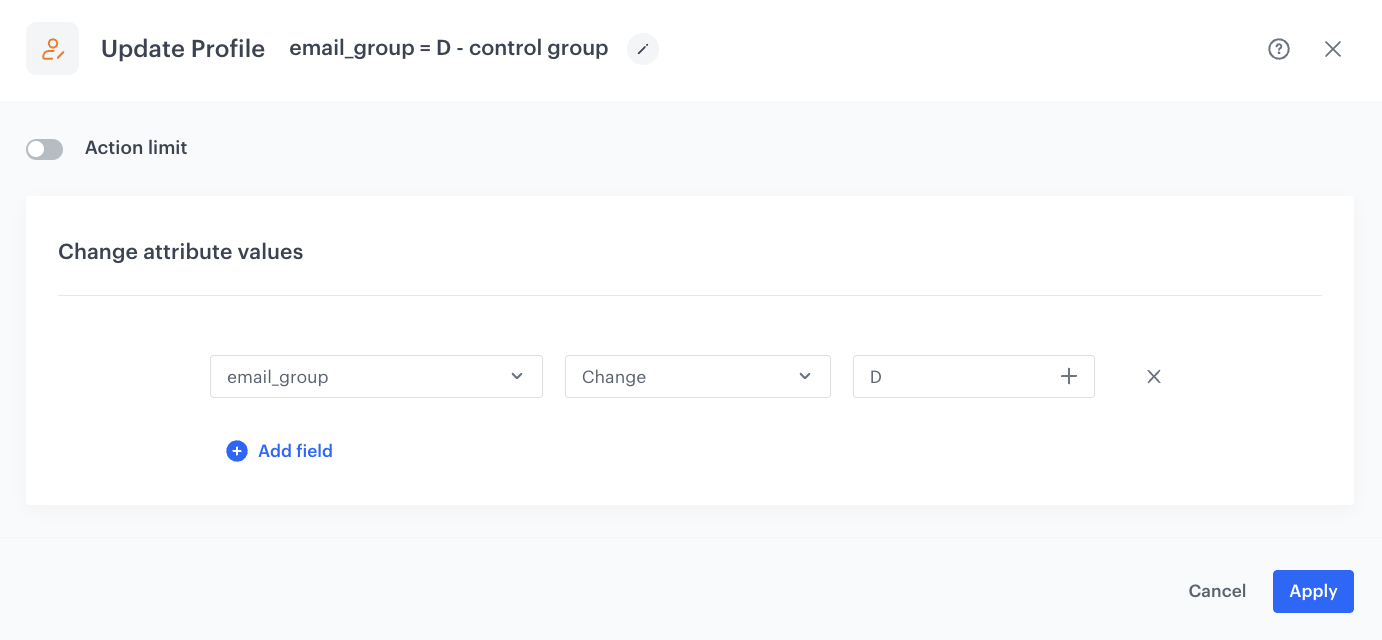
Assign an email_group attribute to customers profiles
In this step we will assign customers from the control group who enter the workflow for the first time to email group D.
- For the Not Matched path for the filter that checks the assignment to email group D, add the Update Profile node.
- In the Click to select dropdown list, add the email_group attribute.
- From the dropdown list on the right, select the Change option.
- In the empty field, type
D
Define the Delay node
This node creates an hour’s delay before moving to the next condition of the workflow.
- Add the Delay node to both Profile filter nodes. In the node settings:
- In the Delay field, type
1. - From the dropdown list, choose Hour.
- In the Delay field, type
- Click Apply.
Check if customers meet all the requirements before sending an email message
Before sending the email, we will check if the customer meets all the conditions, which are the same conditions as described earlier in the process. To simplify the configuration of the Profile Filters with these conditions, you can duplicate a previously created node and add it to both Delay nodes.
For customers who do not meet the conditions, the workflow comes to an end. However, for those who meet all conditions, the next step in the process is to generate an event as a simulation for sending an email.
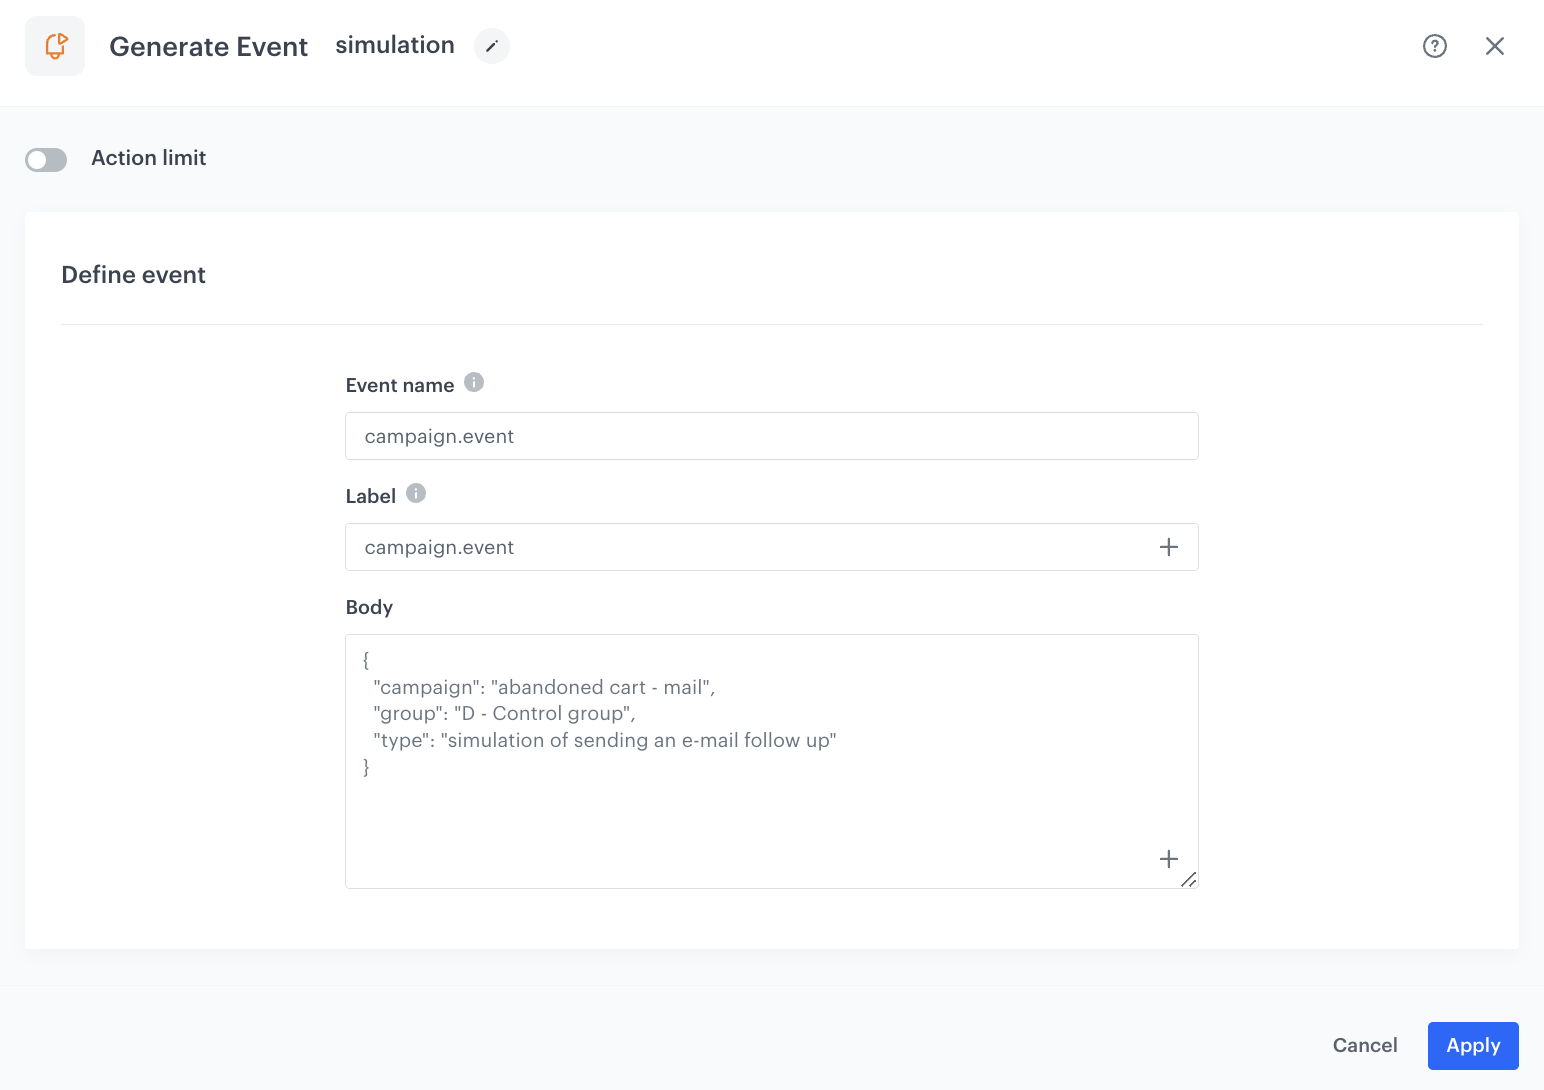
Generate an event to simulate sending an email
In this part of the process, we generate a campaign.event event with parameters that indicate that this is a simulation of an email dispatch. This event is created for the purpose of further analysis of the effectiveness of the overall implemented actions.
-
Add Generate Event to previous Send Email nodes.
-
In the Event name field, enter the name of the event that will be generated on the customer’s profile. In this case, it is
campaign.event. -
If your integration requires the Label parameter, enter it.
This is a legacy parameter, it can be entered for backwards compatibility when required. -
In the Body section, define the parameters of this event, and click Apply.
Example content of Body section for Group D:{ "campaign": "abandoned cart - mail", "group": "D - Control group", "type": "simulation of sending an e-mail" }
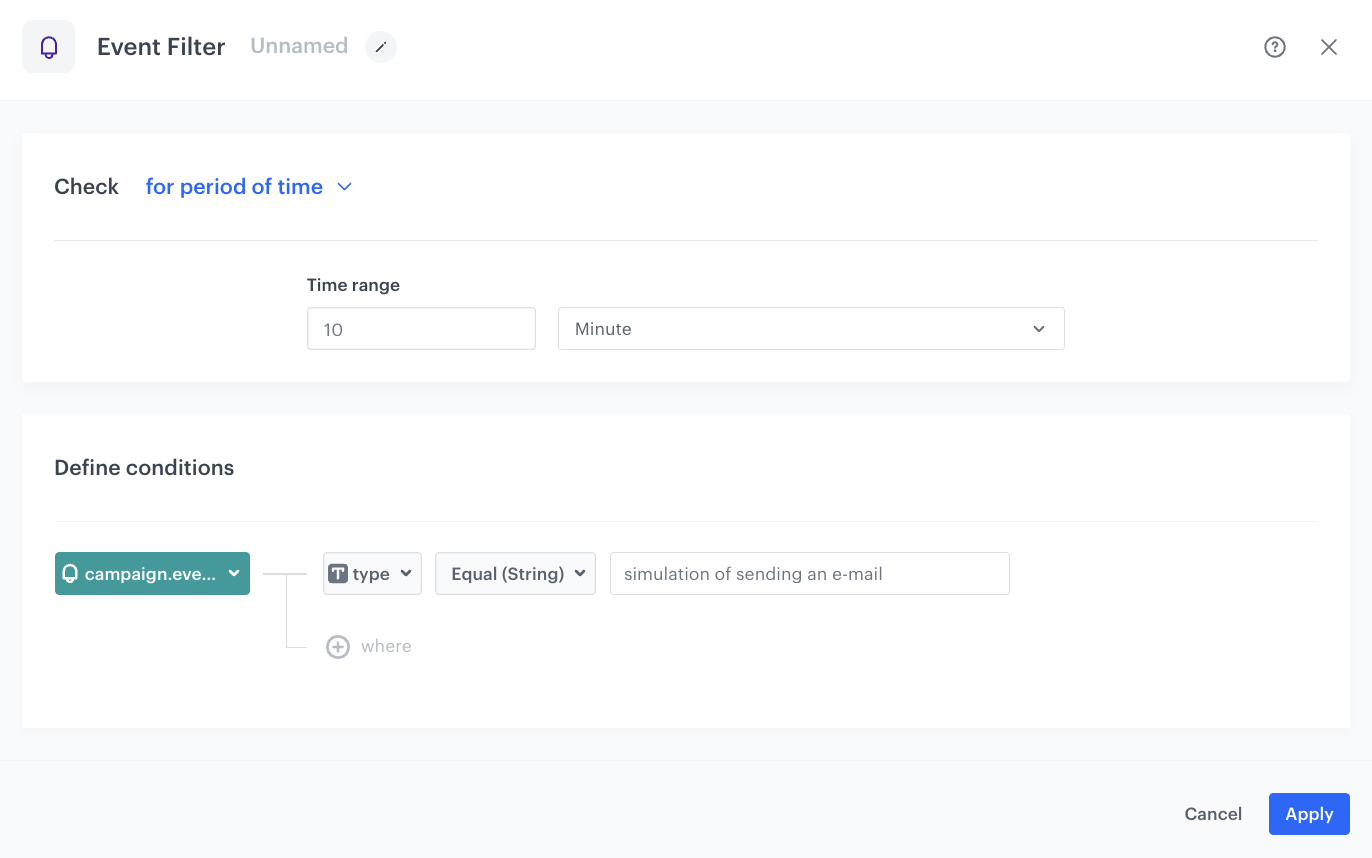
Make sure that the event has been generated
This filter serves as a security measure to ensure that the campaign.event event was generated in the previous step.
- Add the Event filter node. In the configuration of the node:
- Set Check to for period of time.
- Define the time range to 10 minute.
- From the Choose event dropdown list, select the campaign.event event.
- As the event parameter, select type.
- From the Choose operator dropdown list, select Equal (String).
- As the value, enter
simulation of sending an e-mail. The provided value must be the same as the one defined in the event body.
- Confirm by clicking Apply.
Generate an event that will trigger the second workflow
In this part of the process, we will generate the campaign.event event, which will act as a trigger for the second workflow. The structure of the event body is similar to the previously created events for target group customers, with the only difference in the value of the group parameter, which is always specific to the featured group.
- Add the Generate Event node to previous Send Email nodes.
- In the Event name field, enter the name of the event that will be generated on the customer’s profile. In this case, it is
campaign.event. - If your integration requires the Label parameter, enter it.
This is a legacy parameter, it can be entered for backwards compatibility when required. - In the Body section, define the parameters of this event:
- Include a
campaignparameter with the campaign name. - Include a
triggerparameter with the value set totrigger - Include the
groupparameter with the value set toD - Control group
- Include a
Example content of Body section for Group D:
{
  "campaign": "abandoned cart - mail",
  "group": "D - Control group",
  "type": "trigger"
}
Add the End node to complete the path related to the customers from the control group that enter the workflow for the first time.
In the next steps, we will address the second part of the path related to the control group - the path intended for customers who have reentered the workflow.
Customers from the control group who re-enter the workflow
In this part of the process, we will go through the path designed for customers reentering the workflow. The described part of the workflow is shown in the screenshot below.
Customers following this path have already been assigned an email group. Their process begins with a 1 hour delay. After the Delay node, the remaining steps for these customers are identical to those described for customers from the control group who enter the workflow for the first time. Therefore, you need to repeat all those steps in the same order:
- Check if customers meet all the requirements before sending an email message
- Generate an event to simulate sending an email
- Make sure that the event has been generated
- Generate an event that will trigger the second workflow
Once this path is completed, add an End node to conclude the path associated with the customers from the control group that reenter the workflow.
That wraps up the creation of the first workflow.
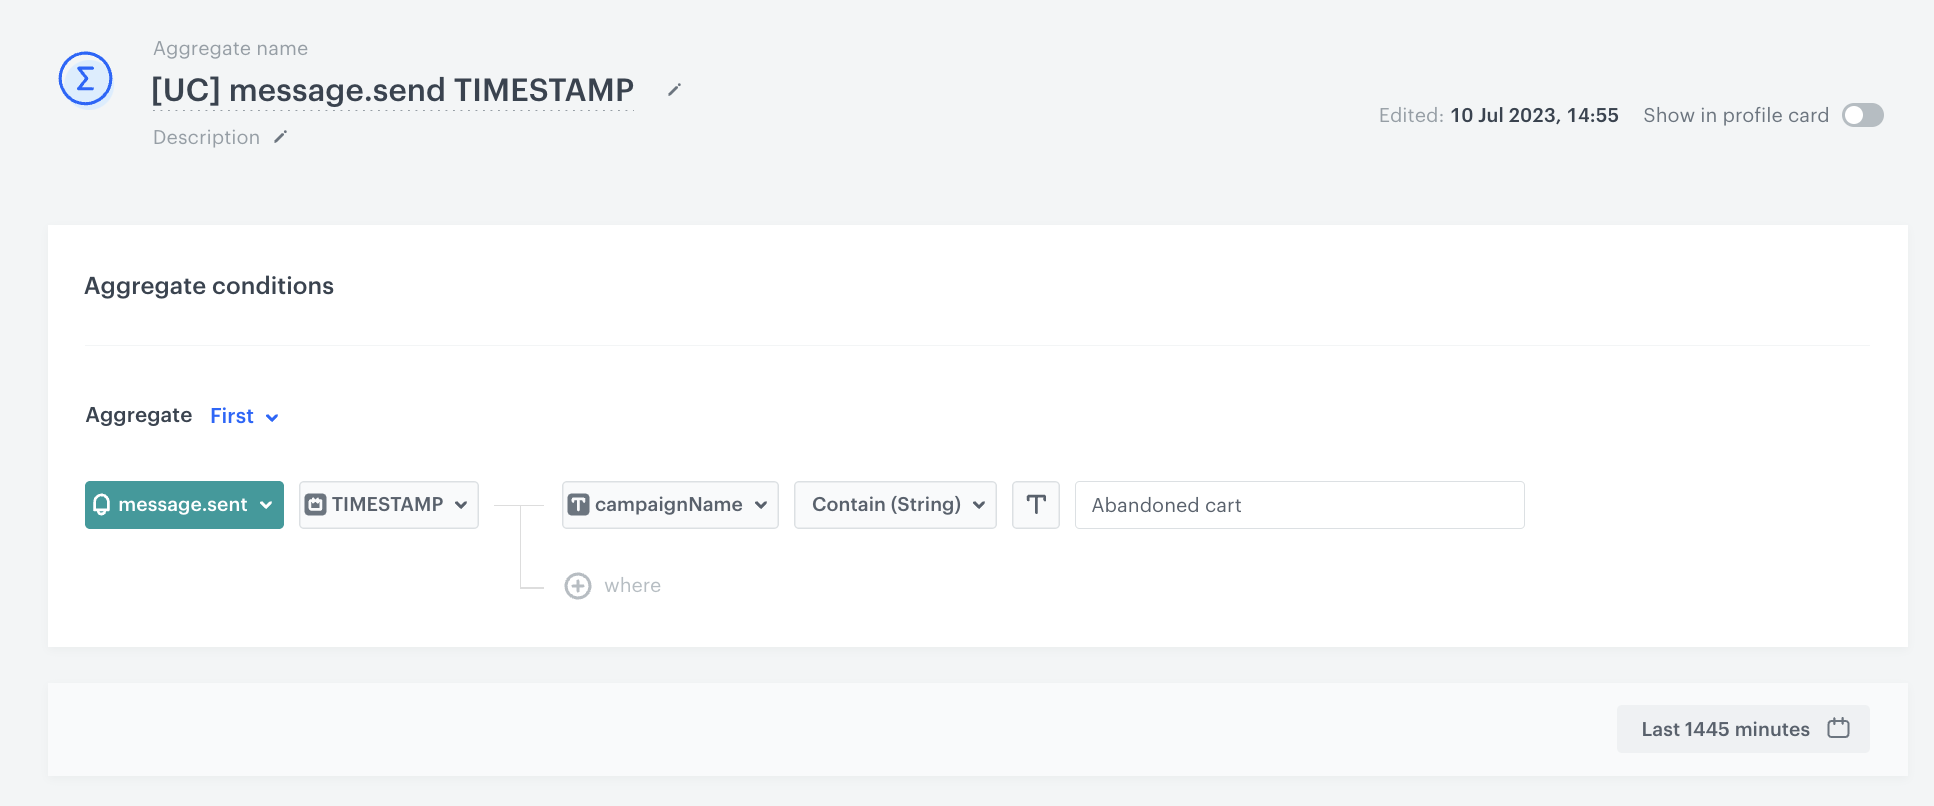
Create an aggregate that returns the timestamp of the first message sent from an abandoned cart campaign
This aggregate returns the timestamp of the first message sent from an abandoned cart campaign described in the first workflow.
- Go to Analytics > Aggregates > New aggregate.
- Enter the name of the aggregate.
- As the type of the aggregate, select First.
- From the Choose event dropdown list, select the
message.sendevent. - As the event parameter, select TIMESTAMP.
- Click the + where button and from the dropdown list, choose campaignName.
- From the Choose operator dropdown, select Contain (String).
- In the text field, type the name of the abandoned cart campaign you used in the first workflow. In our case it’s
Abandoned cart. - Set the period from which the aggregate will analyze the results to Last 1455 minutes (this is 24 hours with a spare of 15 minutes).
- Save the aggregate.
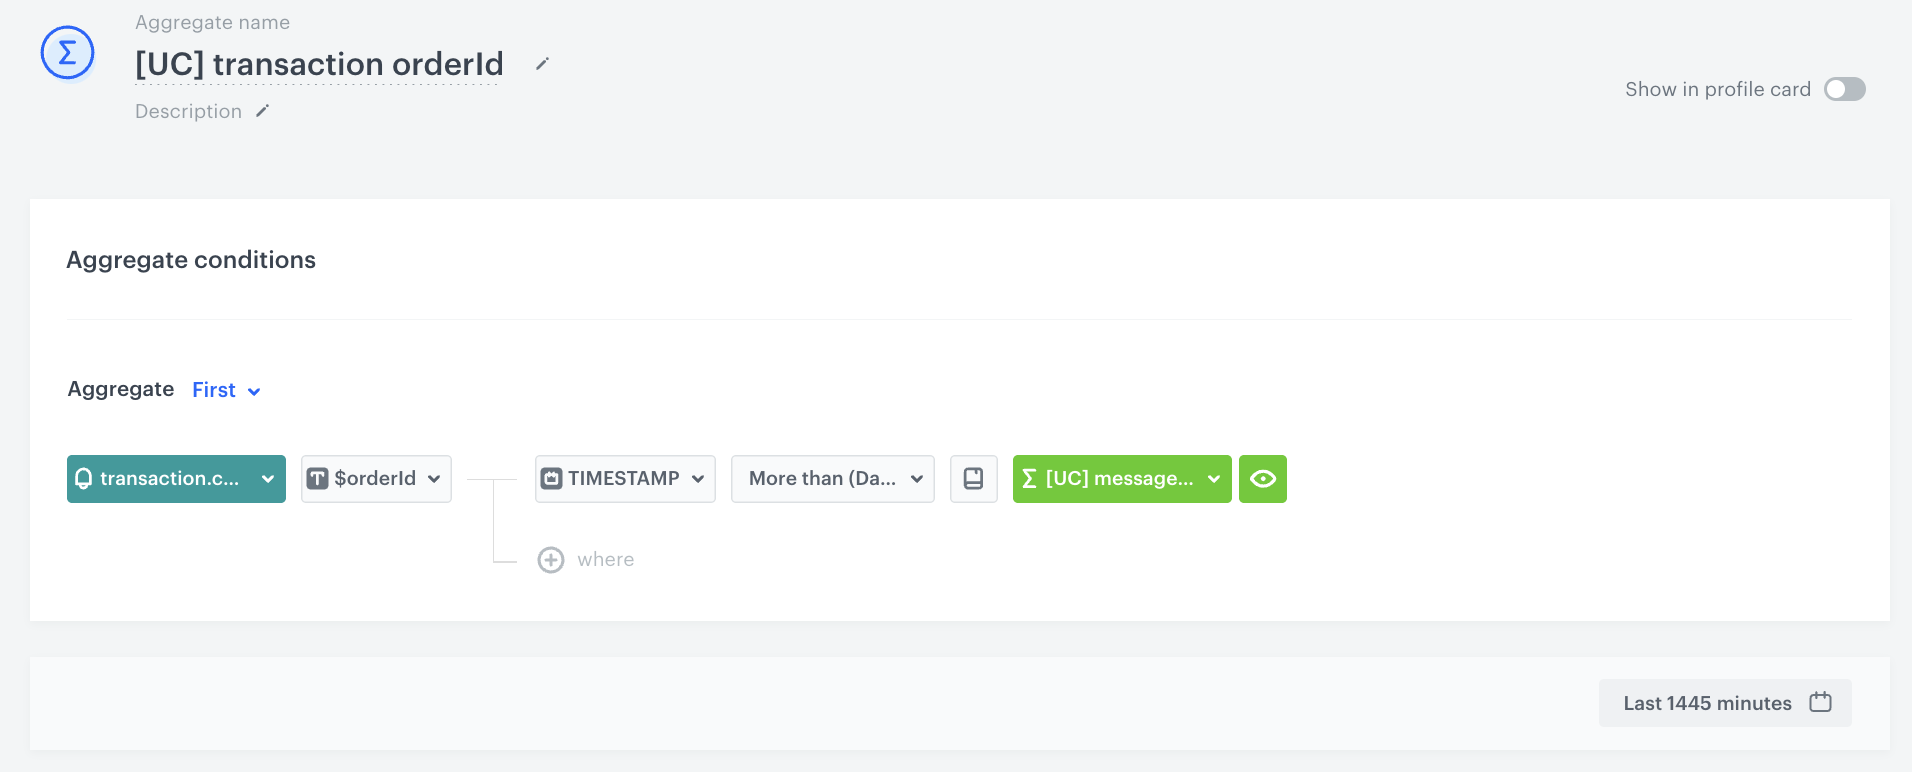
Create an aggregate that returns the order ID of the first transaction that took place after the first email from abandoned cart campaign was sent
The ID of this aggregate will be used as an insert in the event generated in the second workflow.
- Go to Analytics > Aggregates > New aggregate.
- Enter the name of the aggregate.
- As the type of the aggregate, select First.
- From the Choose event dropdown list, select the
transaction.chargeevent. - As the event parameter, select $orderId.
- Click the + where button and from the dropdown list, choose TIMESTAMP.
- From the Choose operator dropdown, select More than (Date).
- Click
 (Choose value icon).
 - From the Choose value dropdown list, select the aggregate you created in the previous step of the process.
- Set the period from which the aggregate will analyze the results to Last 1455 minutes.
- Save the aggregate.
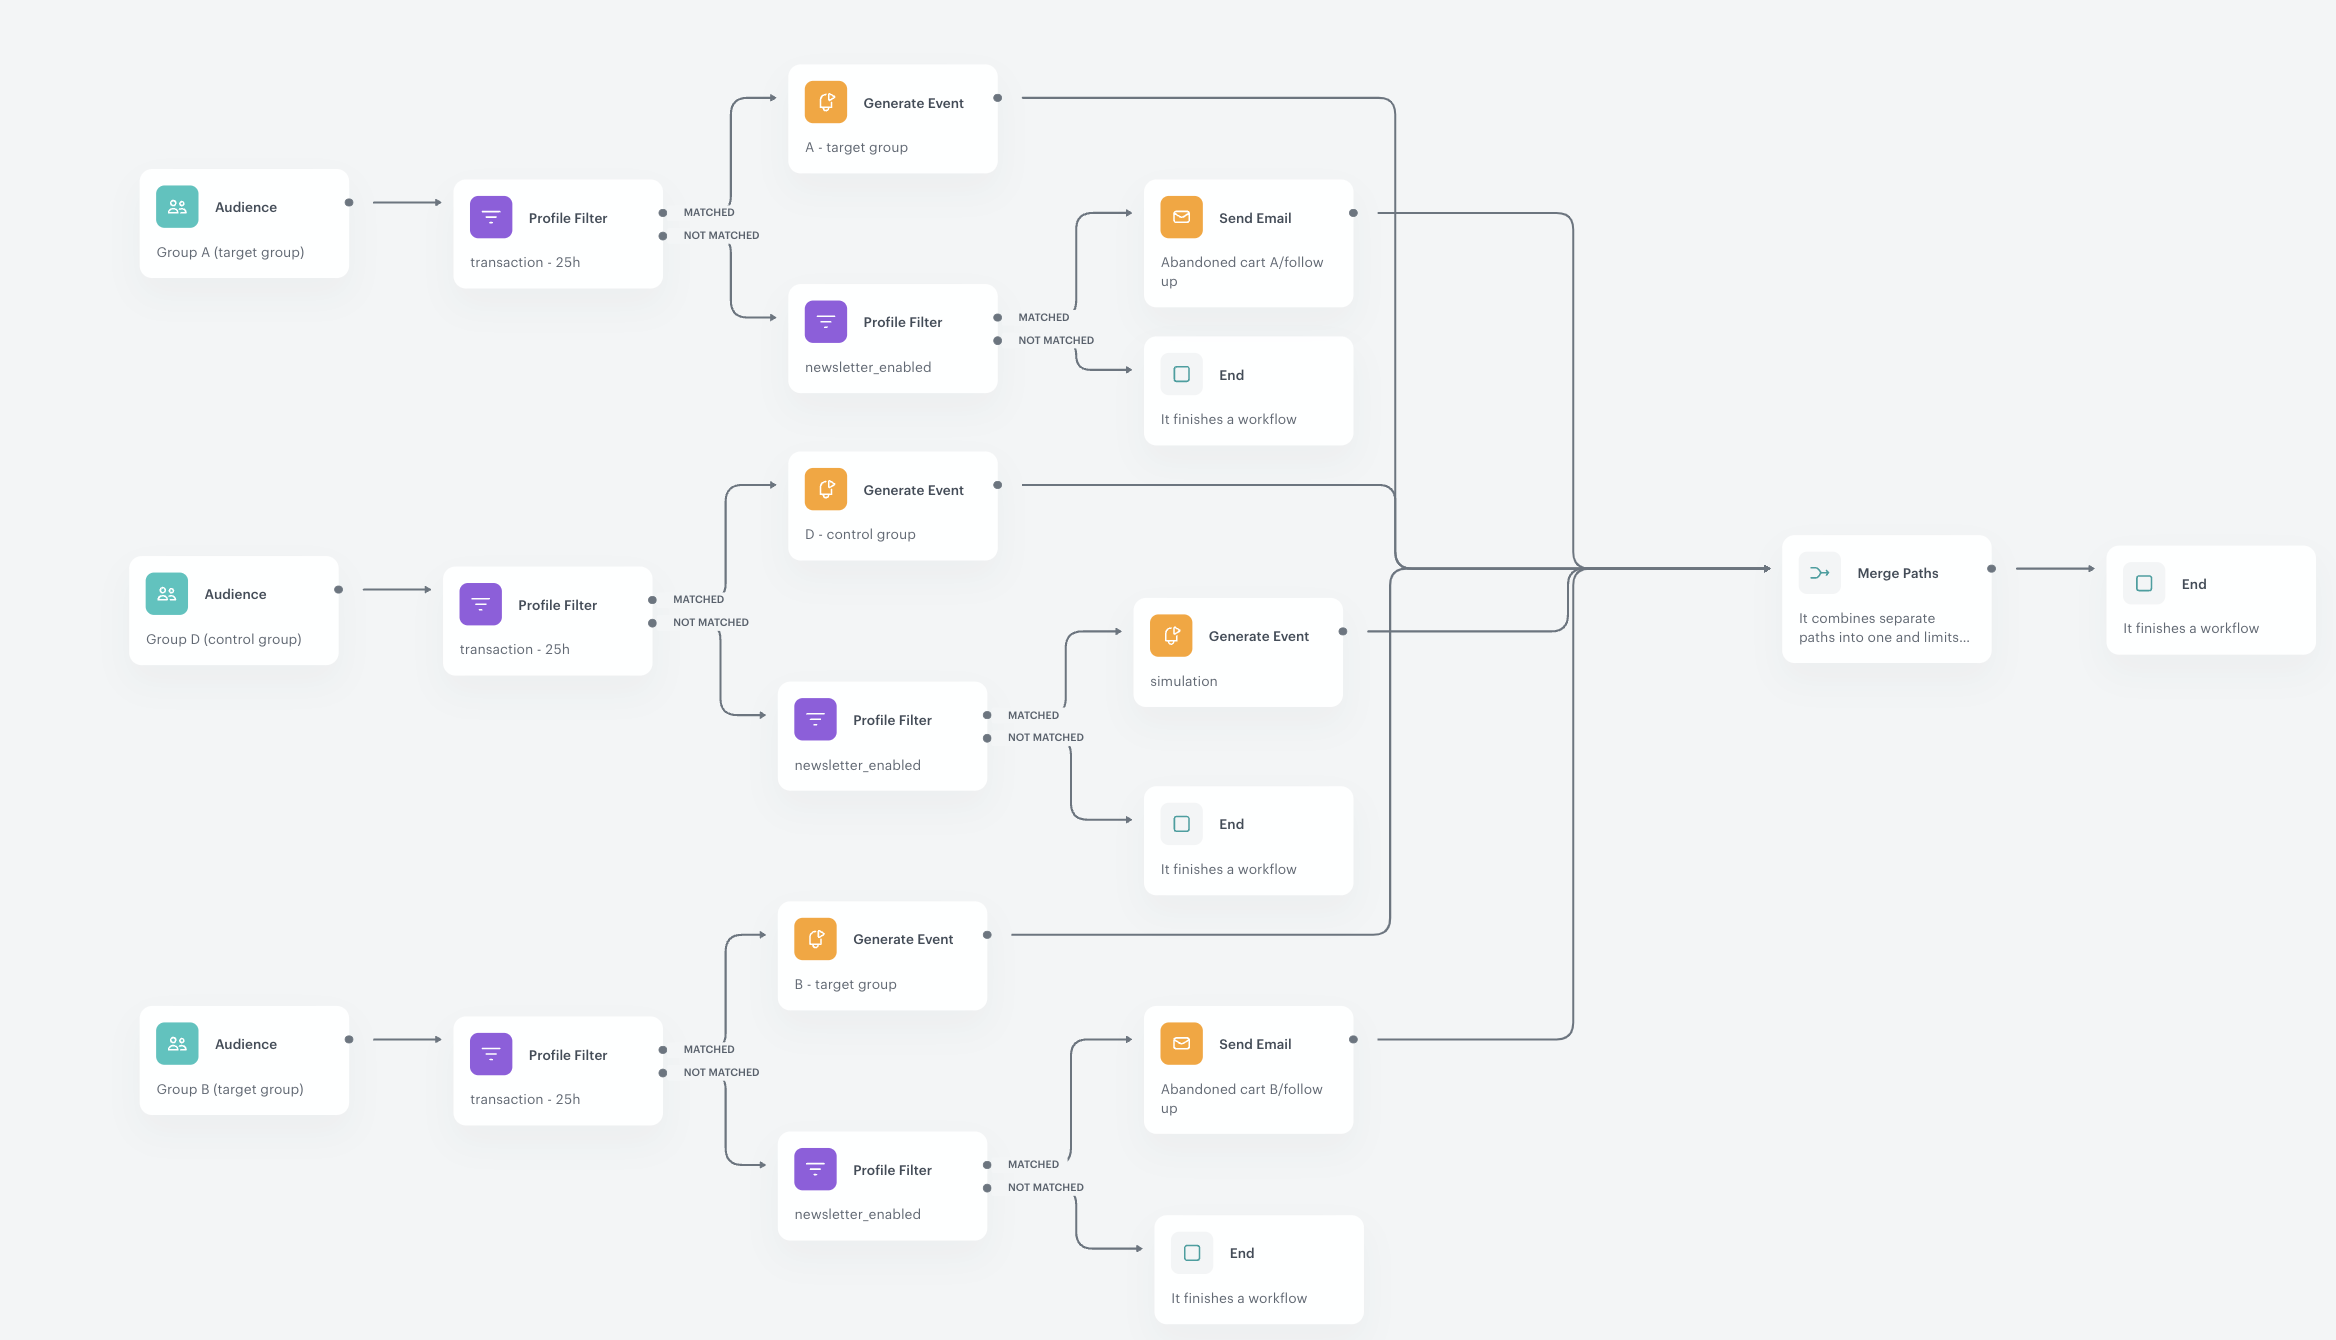
Create the second workflow
The purpose of the second workflow is to identify the transactions that occurred in the abandoned cart scenario. This helps us in future analyses to measure the quantity and value of transactions that occurred after the customer received the abandoned cart message. By doing this, we can assess the effectiveness of the performed actions.
Let’s dive into the detailed logic of the second workflow:
- At the end of each email group’s path (A, B, and D) in the first workflow, we generated a campaign.event event. This event serves as a trigger for the second workflow. Therefore, the second workflow now consists of three triggers, each dedicated to customers from a specific email group. By utilizing the parameters of each event, we create separate audiences for customers belonging to each email group.
- The subsequent steps in the workflow are very similar for all three email groups. We will describe the process simultaneously, highlighting any differences that occur in certain steps.
- After defining the triggers and creating audiences for each email group, we check (using the Profile filter) if a customer has made a transaction within the last 25 hours. At this point, the path for customers from each email group splits into two: those who made a transaction and those who didn’t.
- Customers who made a transaction: For customers who completed a transaction, we generate a campaign.event event. This event has a similar structure to the previously generated events, but has a different
typevalue. It also includes additional information about the order ID from the transaction the customer made during the abandoned cart process. This order ID allows us to identify the value of transactions made during the abandoned cart process, enabling the creation of useful metrics for campaign analysis. - Customers who didn’t make a transaction: For customers in email groups A and B (target groups) who didn’t make a transaction but have consented to email communication, we send a follow-up email. For customers in email group D (control group), we generate a simulated event indicating that an email was sent.
- Finally, we merge all the created paths to conclude the process.
Define the workflow triggers
At this part of the process, configure three triggers of the workflow. Those triggers will be activated each hour for customers from each email group for whom a campaign.event event trigger was generated in the first workflow.
-
Start the workflow with the Audience node.
-
In the configuration of the node, set the Run trigger option to repeatable.
-
Set the interval to 1 hour.
-
Choose the day and time when the process starts.
-
Select the time zone.
-
In Define audience, choose New Audience and click Define conditions.
- As the first condition, from Choose filter dropdown menu, choose the
campaign.eventevent. - From the Choose parameter dropdown list, select type.
- From the Choose operator dropdown list, select Equal (String).
- In the right field, enter the value of the type parameter that was generated in the event. In our case, we type
trigger. - From the Choose parameter dropdown list, select campaign.
- From the Choose operator dropdown list, select Equal (String).
- In the right field, enter the value of the campaign parameter that was generated in the event. In our case, we type
abandoned cart - mail. - From the Choose parameter dropdown list, select group.
- From the Choose operator dropdown list, select Equal (String).
- In the right field, enter the names of the groups for each email group you are creating the trigger for:
- For group A, enter
A - For group B, enter
B - For group D, enter
D - control group
- For group A, enter
- Define the time range from which you want to analyze this event. In our case, it’s Last 60 minutes before 24 hours.
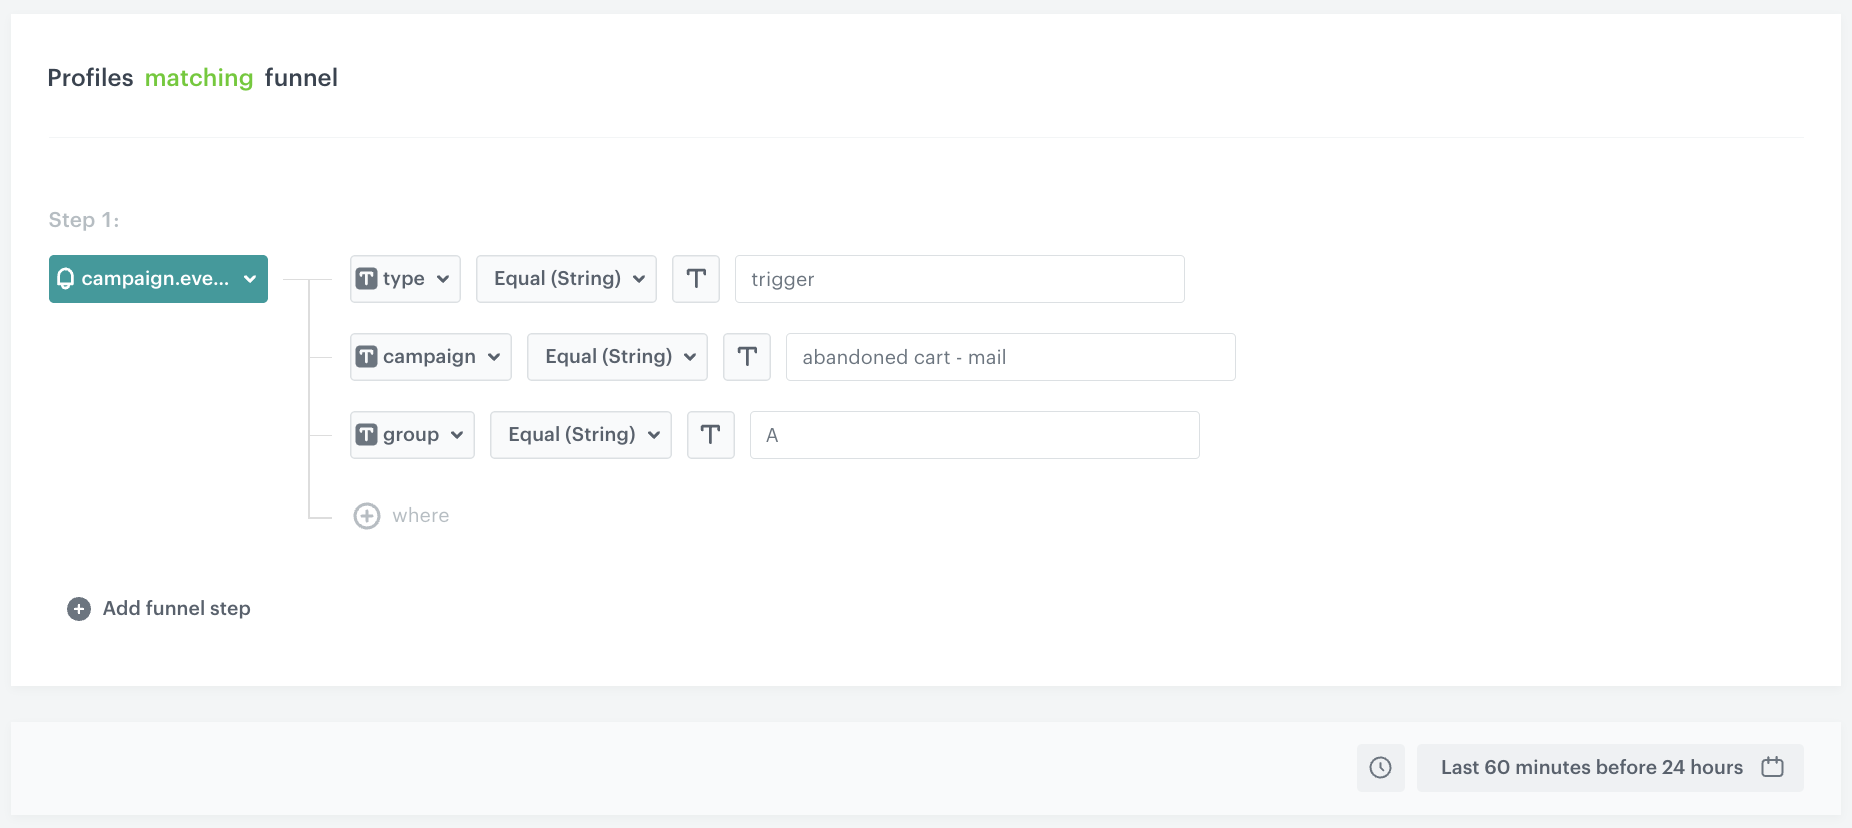
Configuration of the Audience node for group A - As the first condition, from Choose filter dropdown menu, choose the
Check whether customers from each group have made a transaction in the last 25 hours
- Add the Profile filter node to the trigger from each group.
- From the Choose filter dropdown list, select the transaction.charge event.
- Set the period from which you want to analyze this event. In our case, we use Last 1500 minutes.
- Apply all changes.
After this Profile Filter path for customers from each email group splits into two: those who made a transaction and those who didn’t.
Path for customers that made a transaction
When a customer completes a transaction after abandoning their cart, we generate a campaign.event event. This event contains information about the customer’s order ID from the transaction. The order ID helps us identify the value of transactions made during the abandoned cart process, which is important for creating useful metrics for campaign analysis.
The customers from different groups are differentiated by the value of the group parameter in the campaign.event event.
- To the Matched path from the profile filter for all email groups add the Generate event node.
- In the Event name field, enter the name of the event that will be generated in the customer’s profile. In this case, it’s
campaign.event. - If your integration requires the Label parameter, enter it.
This is a legacy parameter, it can be entered for backwards compatibility when required. - In the Body section, define the parameters of this event and click Apply.
orderID section, place an aggregate ID that returns the order ID of the first transaction created earlier in the process. AYou should also change the group value for the corresponding groups.Example content of “Body” section for Group A:
{
  "campaign": "abandoned cart - mail",
  "group": "A",
  "orderID": "{% aggregate 4c1a5eff-edae-33e9-89c2-191bb460ef46 %} {{ aggregate_result[0] }} {% endaggregate %}",
  "type": "revenue prod"
}
- Confirm by clicking Apply.
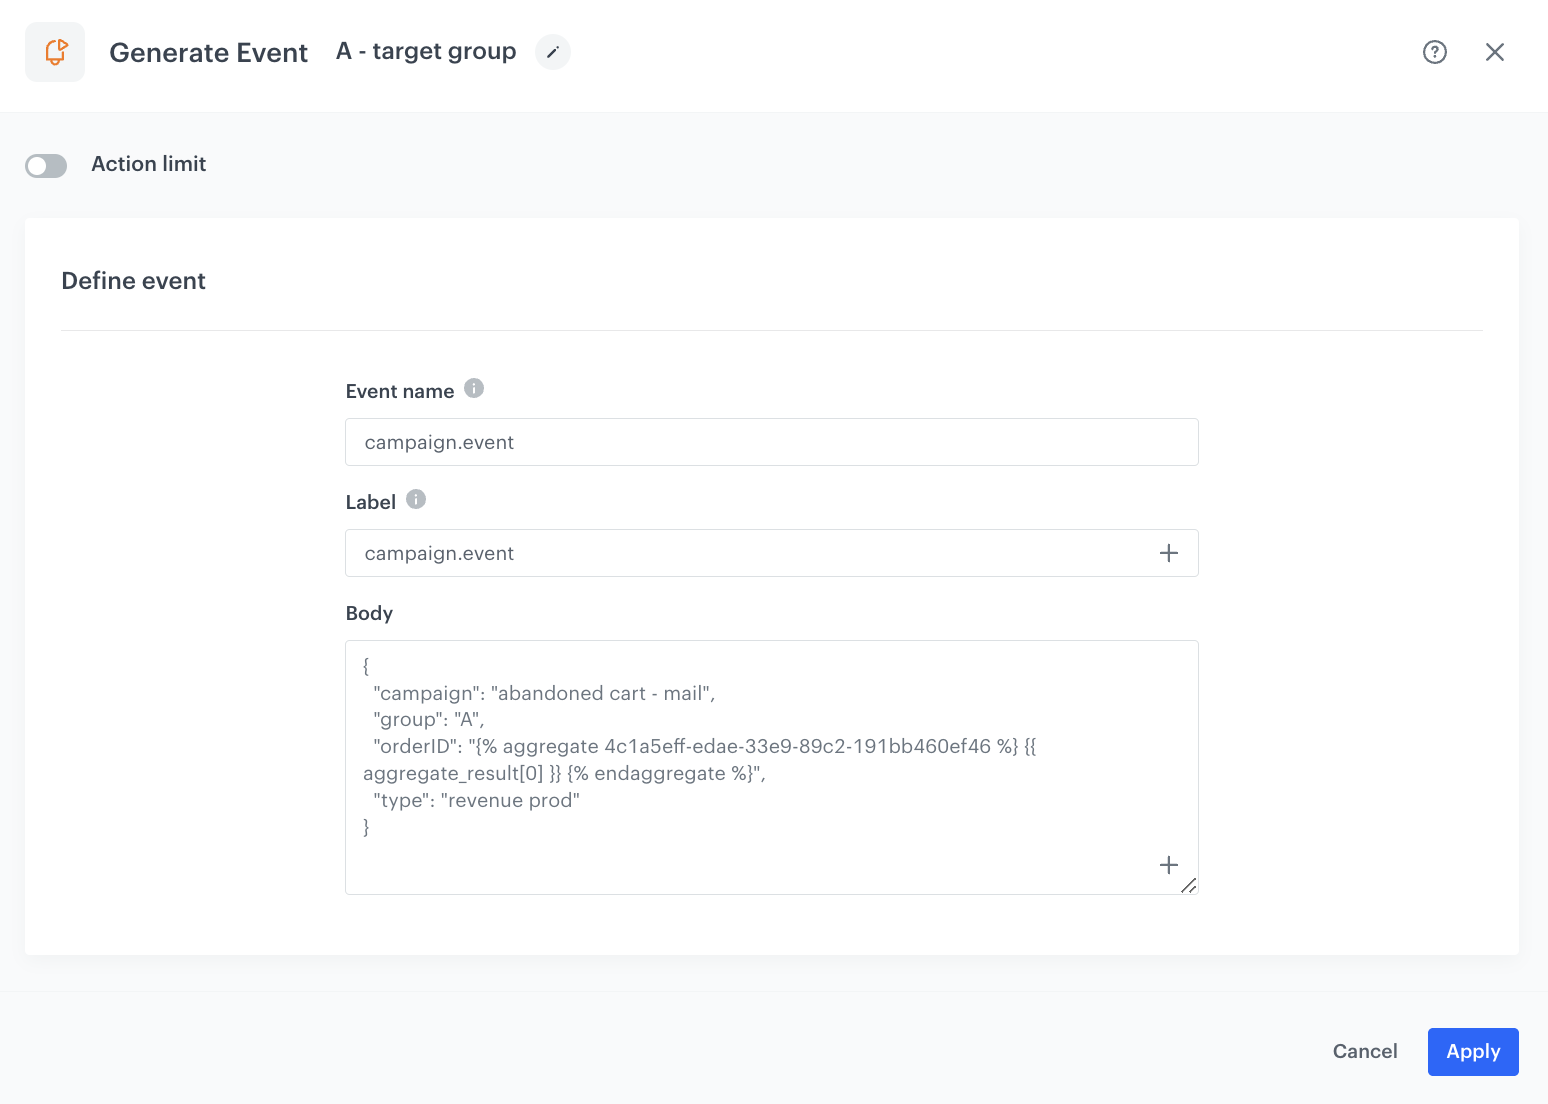
This node will be then connected with the Merge Paths node that combines seperate path into one.
Path for customers who have not completed the transaction
Customers belonging to email groups A and B (target groups) who have not completed a transaction but have given consent for email communication receive a follow-up email. On the other hand, for customers in email group D (control group), we generate a simulated event to indicate that an email was sent.
Check whether customers have given consent for email communication
- To the Not Matched path from the profile filter which checks if the customer made a transaction, for all email groups add the Profile filter node.
- Click Choose filter and select newsletter_agreement attribute form the dropdown list.
- From the Choose operator drop-down, choose Equal(String).
- In the text field, type
enabled.
- Click Apply.
For customers who have not provided consent, the workflow comes to an end. However, for customers from email groups A and B (target group) who meet the conditions of this filter, we proceed to the next step and send them a follow-up email. For customers from email group D (control group), we generate a simulated event to indicate that an email was sent.
Send a follow-up email for customers from email group A and B
- To the Matched path from the profile filter, add the Send Email node and open its settings.
- In the Sender details section, choose the email account from which the email is sent.
- In the Content section, select the template that you prepared as part of the prerequisites.
- Optional: In the UTM & URL parameters section, define the UTM parameters added to the links included in the email.
- Optional: In the Additional parameters section, describe campaigns with additional parameters.
- Click Apply.
This node will be then connected with the Merge Paths node that combines seperate path into one.
Generate an event to simulate sending a follow-up email
-
Add the Generate Event node to the Matched path from the profile filter checking email communication consent.
-
In the Event name field, enter the name of the event that will be generated on the customer’s profile. In this case, it is
campaign.event. -
If your integration requires the Label parameter, enter it.
This is a legacy parameter, it can be entered for backwards compatibility when required. -
In the Body section, define the parameters of this event, and click Apply. Example content of “Body” section for Group D:
{
  "campaign": "abandoned cart - mail",
  "group": "D - Control group",
  "type": "simulation of sending an e-mail follow up"
}
Merge all the final nodes from each email group path into a single path using the Merge Paths node and add an End node to complete the process.
What’s next
Once both workflows are launched, you will obtain valuable information that can be utilized to measure the campaign’s performance. This data can be collected and analyzed through a dashboard, which will present the achieved results in a breakdown for each group (control and target). Through the dashboard, you can assess the overall performance of your campaign, evaluate the results of the AB test conducted for the target group, and determine the number and value of transactions that occurred during the abandoned cart process.
Check the use case set up on the Synerise Demo workspace
You can check the configuration of each step from this use case in our Synerise Demo workspace:
- Aggregate that returns the sku of products in the shopping cart for each customer
- First workflow
- An aggregate that returns the timestamp of the first message sent from an abandoned cart campaign
- An aggregate that returns the order ID of the first transaction that took place after the first email from abandoned cart campaign was sent
- Second workflow