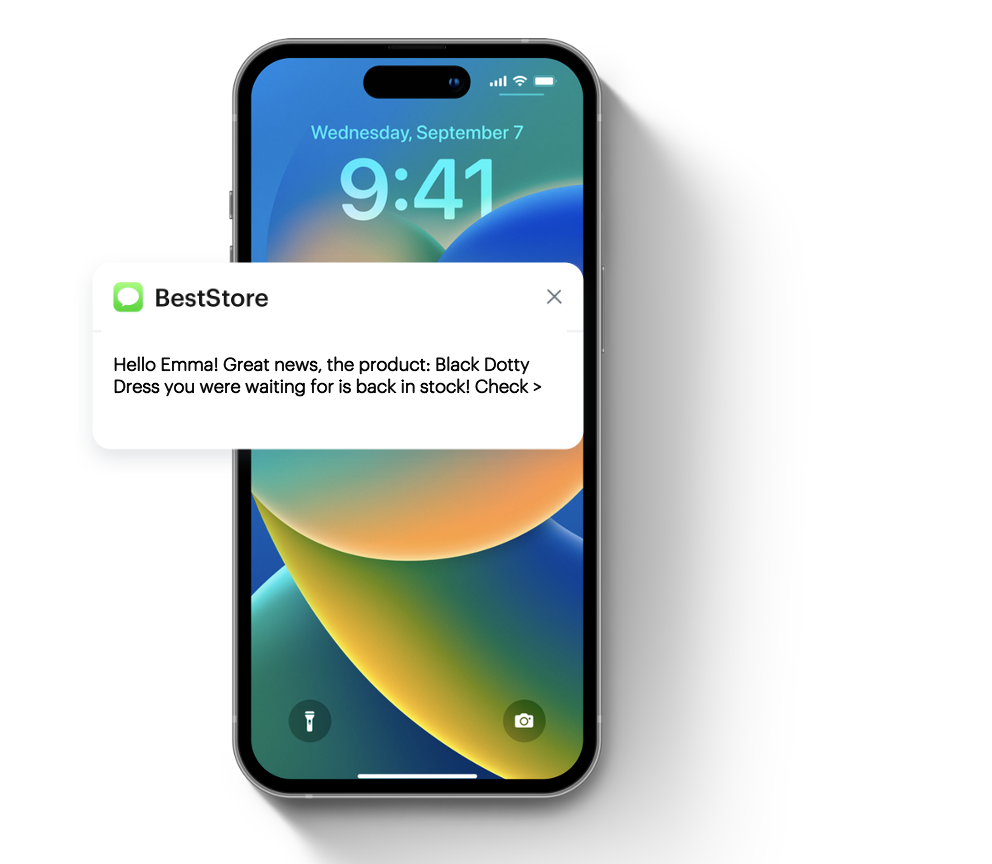
Back in stock push notification campaign
Product unavailability can stem from various factors like sudden trends or seasonal demands, leading to customer frustration when they’re unable to purchase desired items promptly.
Effectively managing these out-of-stock situations is important. Offering customers the option to subscribe to product availability notifications is a proactive strategy. By enabling customers to receive mobile push alerts when items are restocked, you can mitigate revenue loss.
This use case presents a mobile push notification campaign for back-in-stock updates. By sending timely notifications to interested customers, it enhances their shopping experience and fosters brand loyalty. The example involves notifying customers who previously expressed interest in specific products and signed up for notifications when those products are back in stock.
Prerequisites
-
Send an event when a customer signs up for a product availability notification. Such an event must contain the ID of the product that the customer signed up for in order to be notified when the product is back in stock. This event will appear on the profile of the customer who signed up for such notification. You can send this event using the API or JS SDK.
Note:In this use case, we will use the
form.submitevent.You can use the dynamic content to display a sign-up form for product availability notifications on the card of unavailable product and send an event to Synerise when the form is filled out using the JS SDK method.
-
Create item catalog containing information about product availability.
-
Integrate Synerise mobile SDK in your mobile application.
-
Implement mobile pushes in your mobile application: iOS and/or Android.
-
Implement all additional information about the transactions based on the documentation for our transactional API.
Proces
- Create a product.backInStock event
- Create an aggregate that returns products for which the customer has signed up for notifications
- Create an aggregate that returns SKUs of products about which the customer got information that are back in stock
- Create a mobile push template with the back in stock campaign.
- Create a workflow
Create a product.backInStock event
In this part of the process, add the definition of the product.backInStock event, which will later be generated in the workflow that checks whether the product is back in stock. In addition, this event must include the sku parameter, which contains the SKUs of all restocked products the customer signed up for.
- Go to
 Data Management > Events > Add event.
 - In the Name field, enter
product.backInStock.
In the API and SDK, the name parameter is usually calledactionoraction name. - Optionally, define a human-friendly display name that will be shown in the Data Managament and Analytics modules.
- Optionally, in the Description field, enter the description of the event.
- Enable the Make this event available to anonymous profiles without JWT toggle.
- Click Apply.
- In the list of events, find the event you just created.
- On the right side of the screen, click Add property.
- In the Source parameter field, enter
sku. - In the Property name field, enter a human-readable label for display in the Synerise platform.
- Optionally, in the Description field, you can add an explanation about the purpose of this parameter.
- To complete the process, click Save.
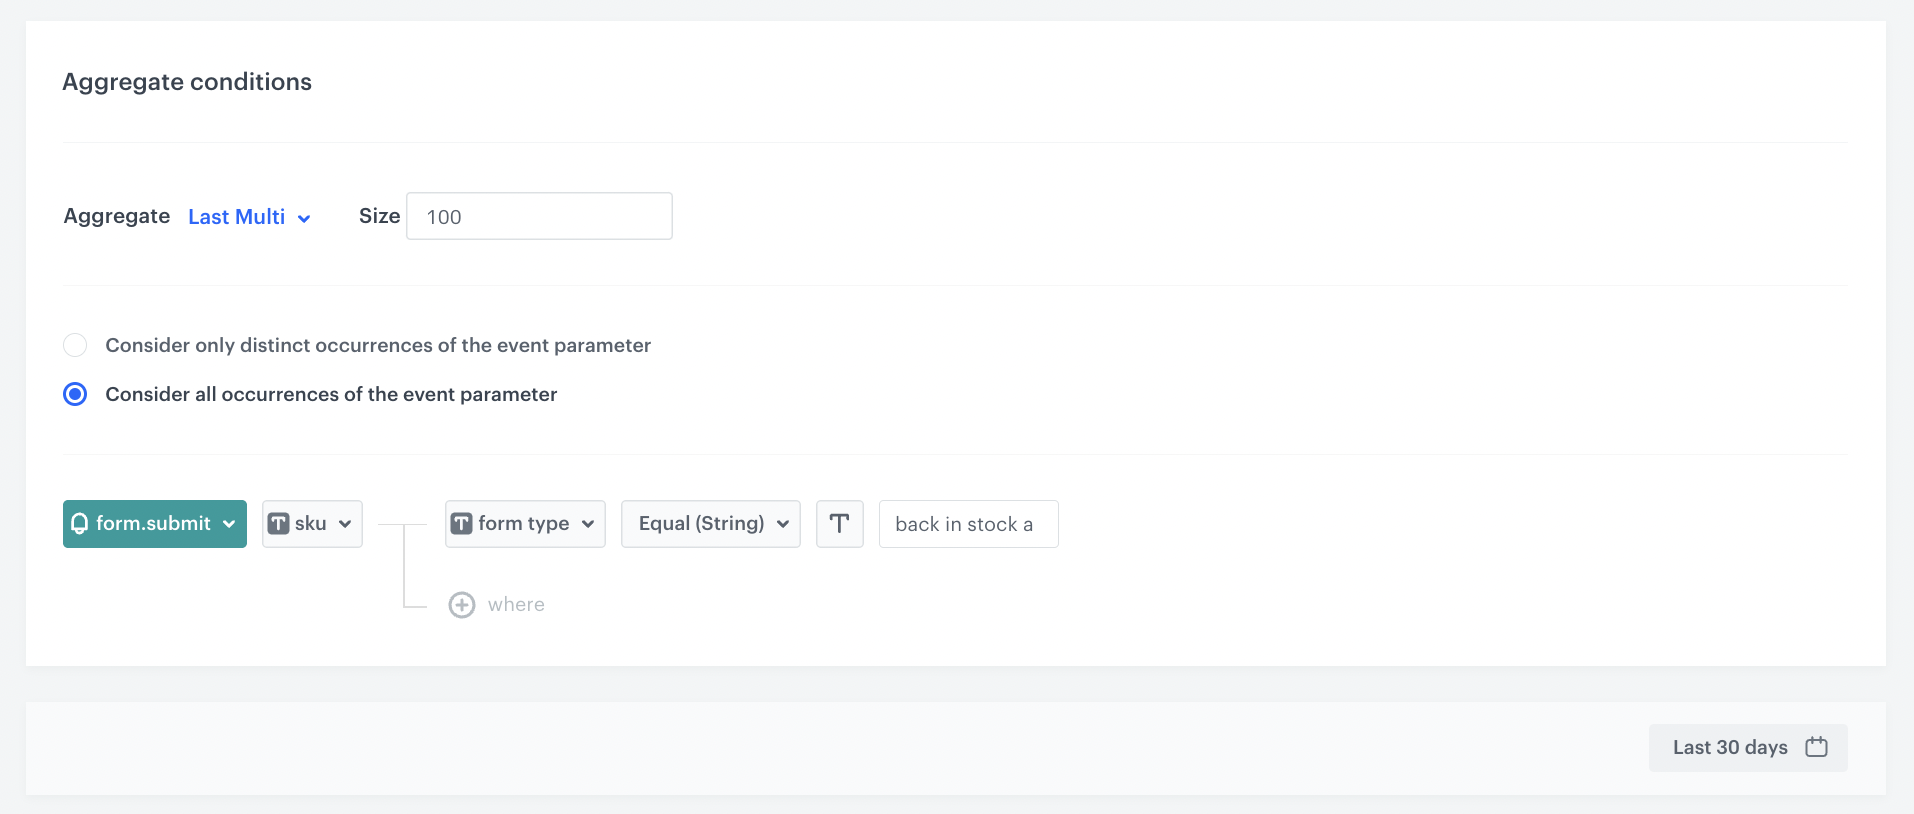
Create an aggregate with products for which the customer has signed up for notifications
The aggregate created will later be used in workflow to check which products have returned to stock.
- Go to
 Analytics > Aggregates > New aggregate.
 - Enter the name of the aggregate.
- As the type of the aggregate, select Last multi and in the Size field, enter
100. - Select the Consider all occurrences of the event parameter radio button. This includes ALL occurrences of the event in the aggregate.
- From the Choose event dropdown list, select the form.submit event.
- As the event parameter, select sku.
- Click + where button.
- From the Choose parameter dropdown list, select the formType parameter.
- From the Choose operator dropdown list, select Equal.
- Enter the name of the form. In our case it’s
back_in_stock_alert. - Set the period from which the aggregate will analyze the results to the last 30 days.
- Save the aggregate.
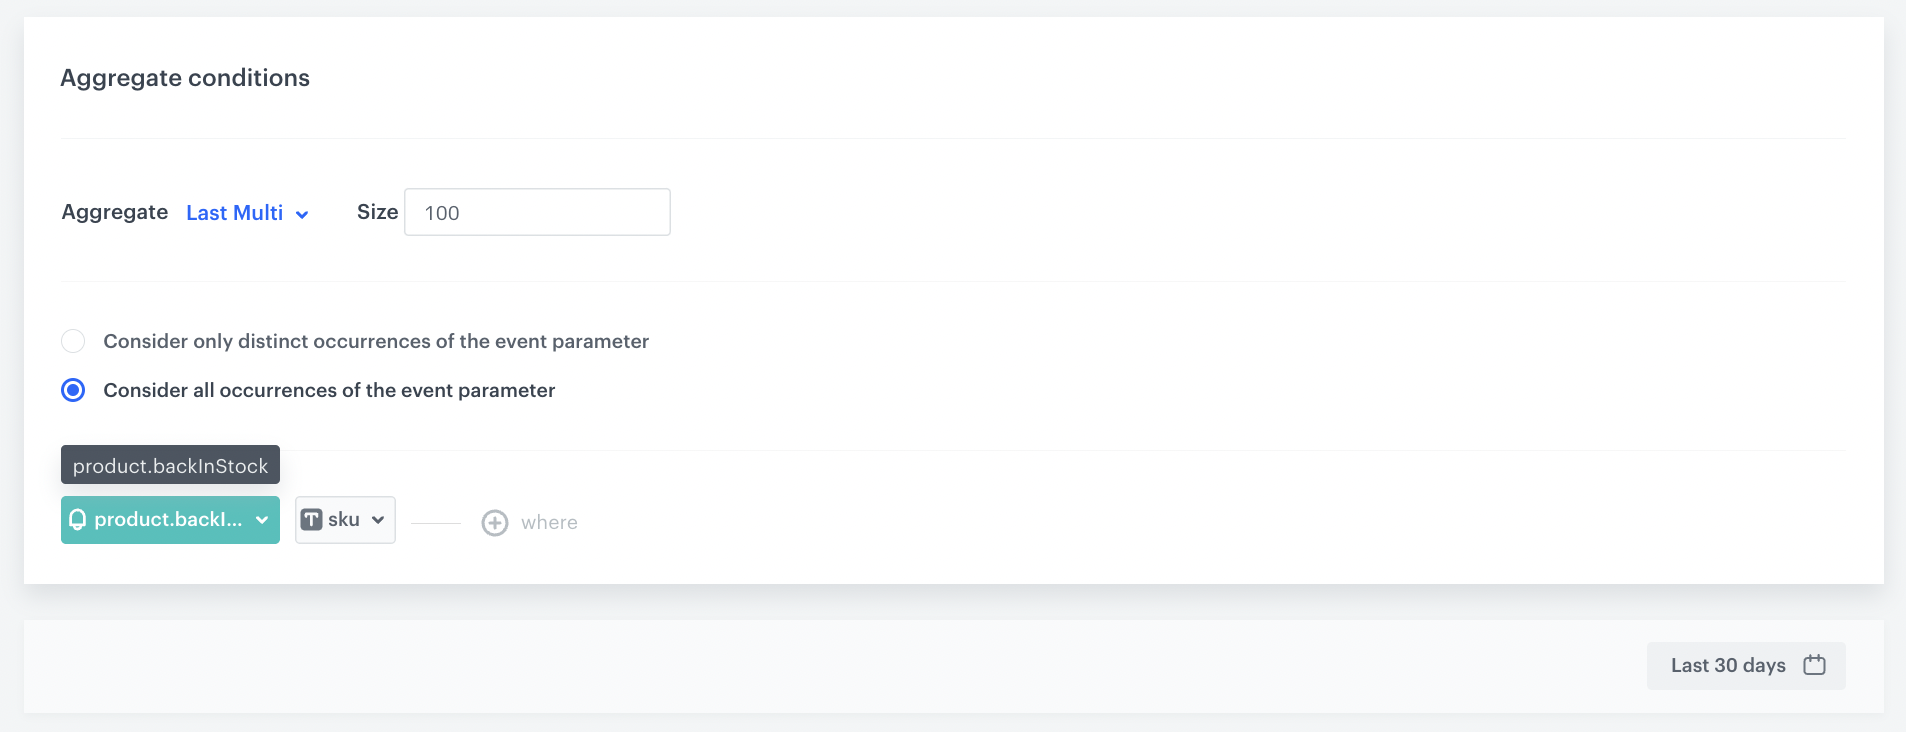
Create an aggregate collecting SKUs of products already received by the customer that are back in stock
This aggregate will be used later in the process to exclude products already sent to customers when sending the next notification.
- Go to Analytics > Aggregates > New aggregate.
- Enter the name of the aggregate.
- As the type of the aggregate, select Last multi and in the Size field, enter
100. - Select the Consider all occurrences of the event parameter option.
- From the Choose event dropdown list, select the product.backInStock event.
- As the event parameter, select sku.
- Set the period from which the aggregate will analyze results to the last 30 days.
- Save the aggregate.
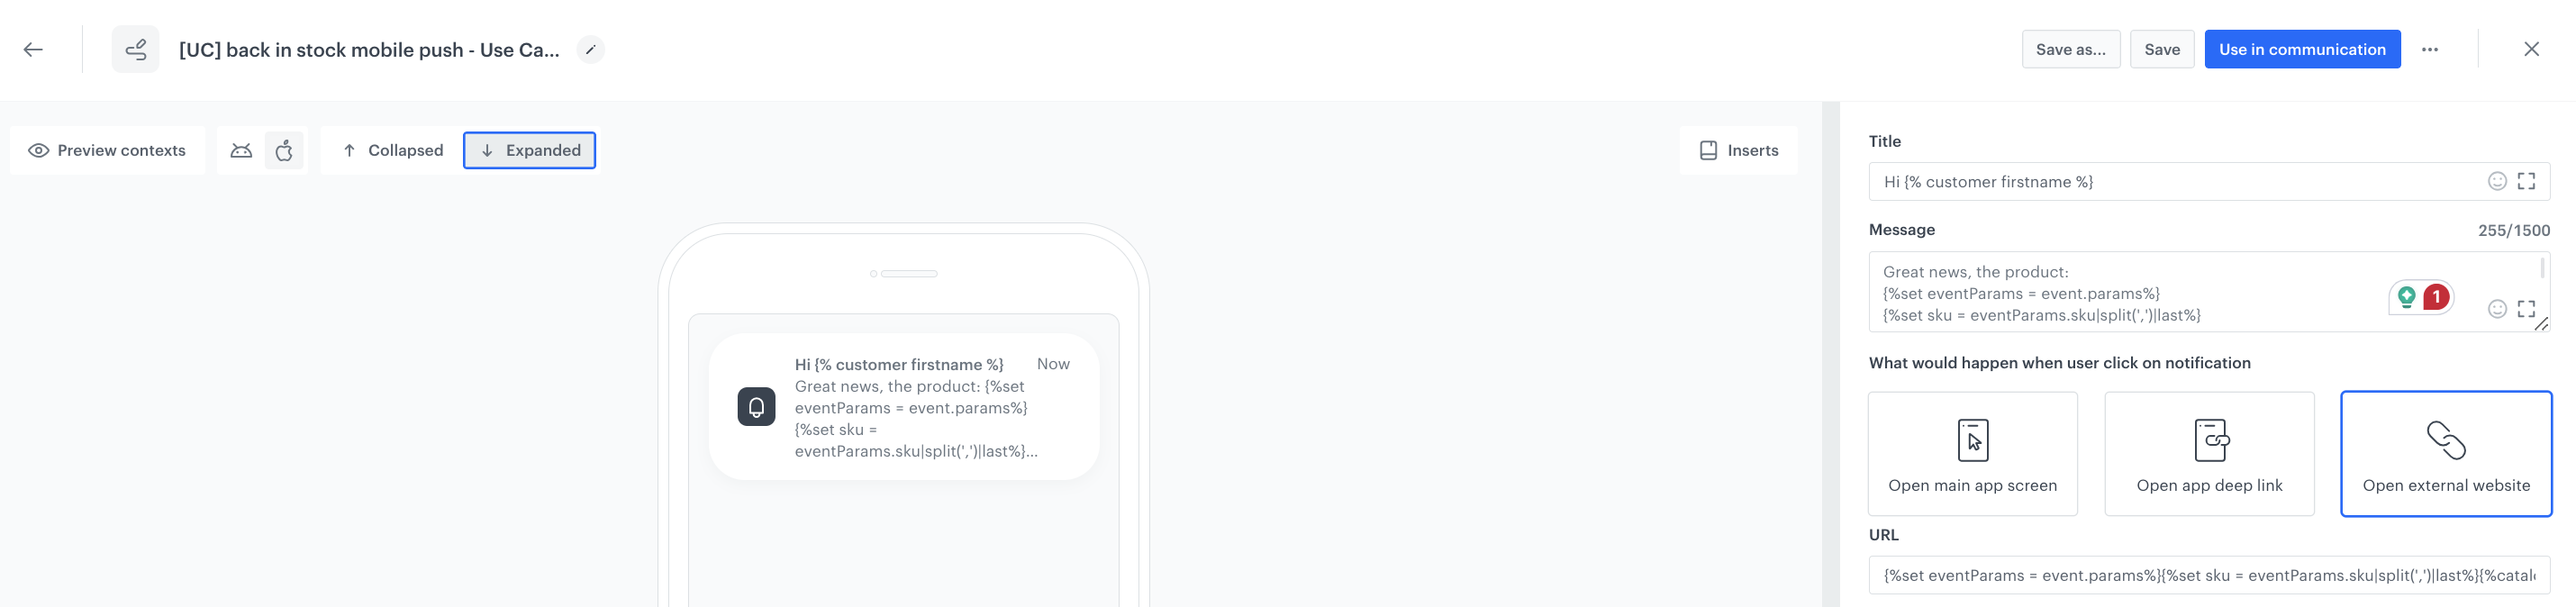
Create a mobile push template
Prepare a mobile push with information about restocking products.
-
Go to Communication > Mobile Push > Templates.
-
You can use the ready-to-use template and edit it in the mobile ush visual builder. Click New Template > Simple Push.
-
Create your mobile push in the visual editor.
-
You can use Jinja to retrieve from the template a list of products that have been restored to the assortment from the Event Filter block, which has not yet been defined because it will be done in subsequent steps. You can learn more how to reuse event parameters here.
The following code is an example of how to do it:
Great news, the product: {%set eventParams = event.params%} {%set sku = eventParams.sku|split(',')|last%} {%catalogitemv2.items-demo(sku)%} {%set itemObject=catalog_result%} {{itemObject.title}} {%endcatalogitemv2%} you were waiting for is back in stock! -
In the URL box, add the following code, which will redirect the customer to the page of the specific product after clicking the notification:
{%set eventParams = event.params%} {%set sku = eventParams.sku|split(',')|last%} {%catalogitemv2.items-demo(sku)%} {%set itemObject=catalog_result%} {{itemObject.link}} {%endcatalogitemv2%} -
Personalize other settings in the templates like style for your business needs.
-
Save the changes.
Create a workflow
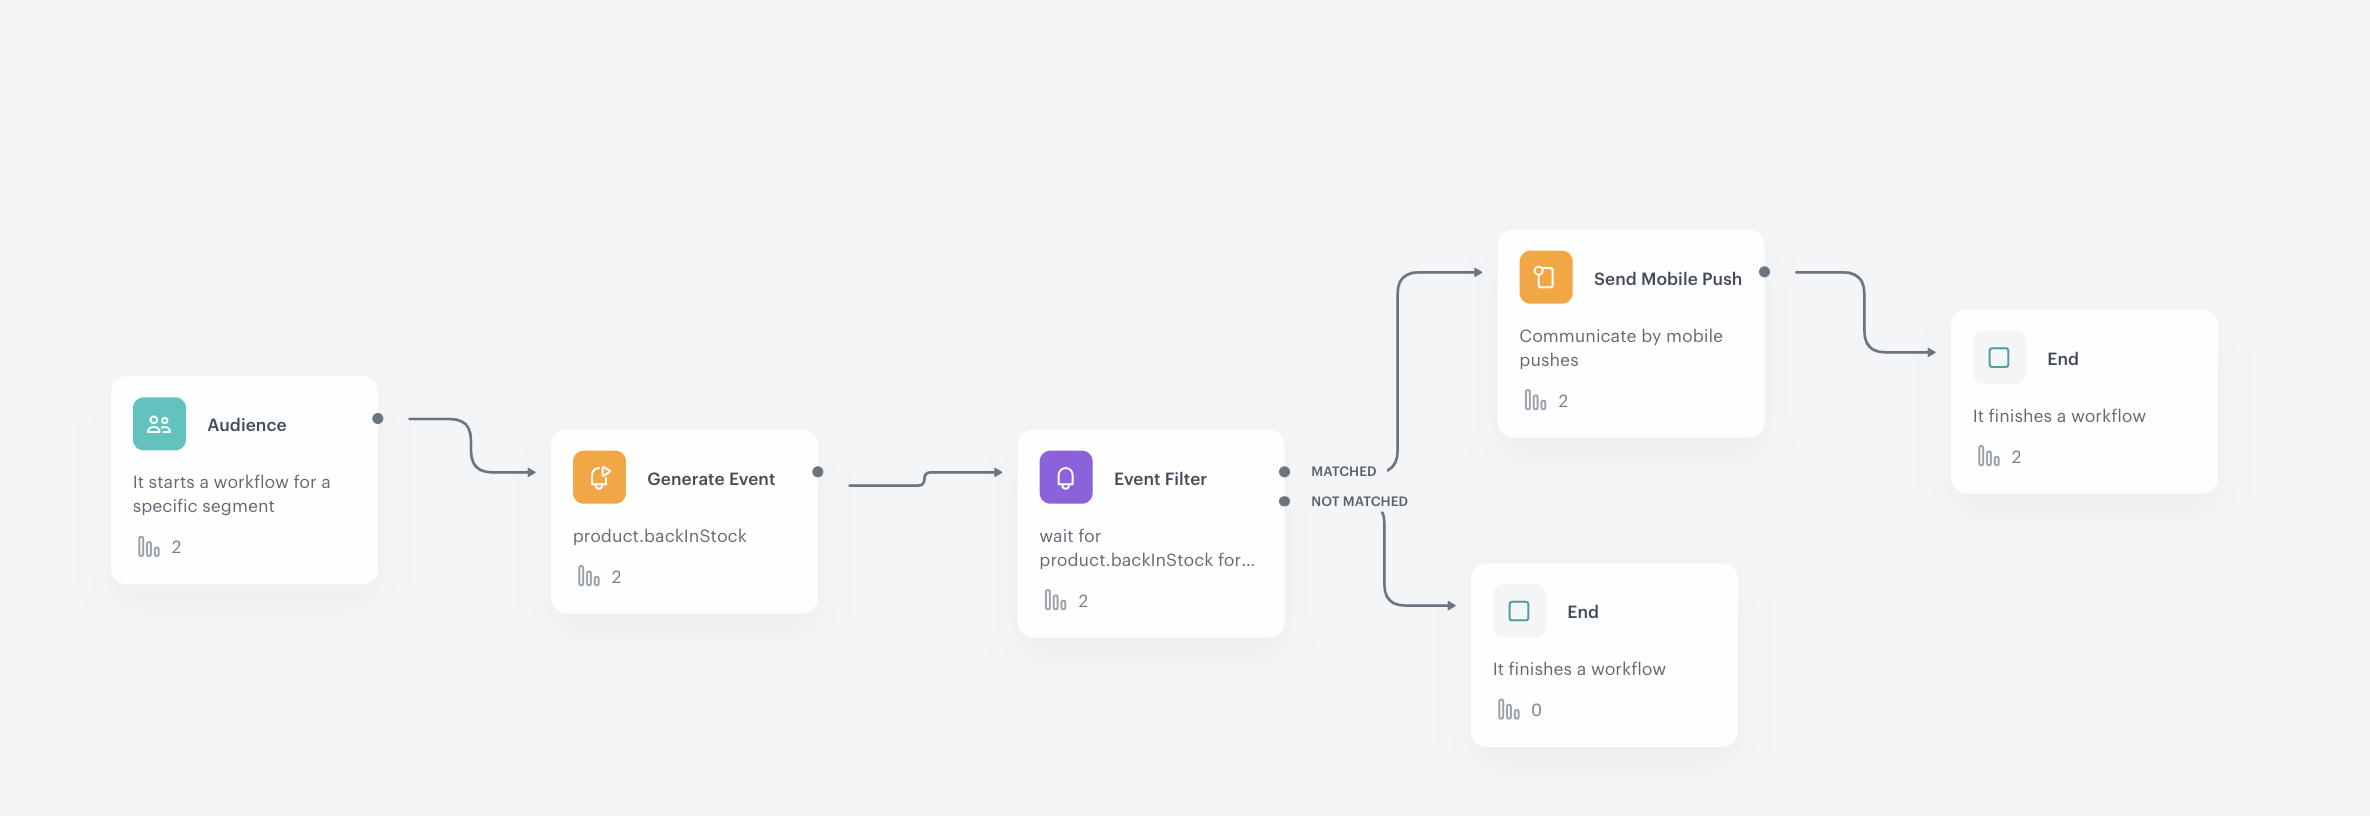
Create a workflow that will check daily whether the products that customers have signed up for notifications have returned to stock. If so, the prepared workflow will send a push notification to the customer with the relevant information.
- Go to Automation > Workflows > New workflow.
- Enter the name of the workflow.
Configure the trigger
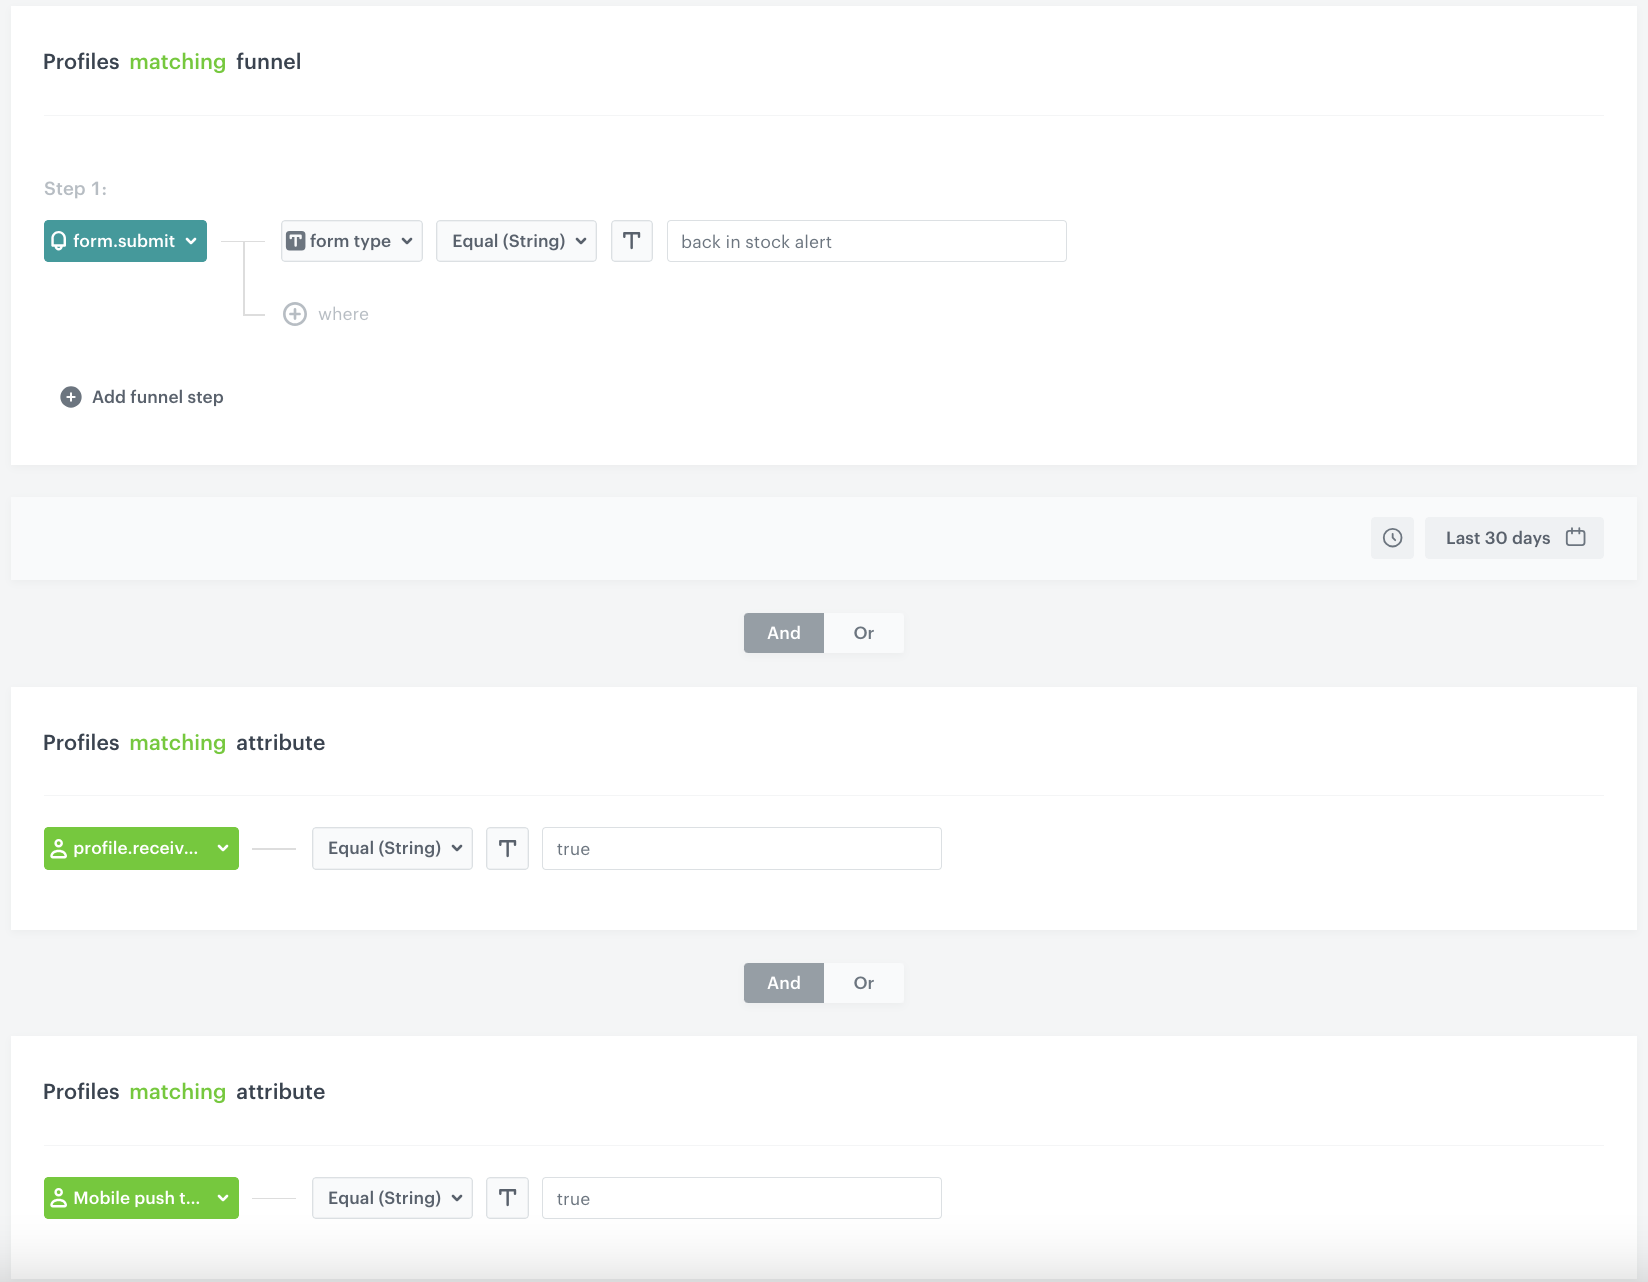
In this part of the process, select the segmentation for which you will run this campaign. In our case, these are those customers who have signed up for product availability notifications in the last 30 days and agreed to receive messages through the mobile application.
- Start the workflow with the Audience node. In the configuration of the node:
- Set the Run trigger option to repeatable.
- Set the interval at which you want to run the workflow.
- Select the time zone.
- Select the New audience tab.
- Click Define conditions.
- From the Choose filter dropdown list, select the form.submit event.
- Click + where button.
- From the Choose parameter dropdown list, select the formType parameter.
- From the Choose operator dropdown list, select Equal.
- Enter the name of the form. In our case it’s
back_in_stock_alert. - Define the time period for the last 30 days.
- From the Choose filter drop-down list, select the
profile.receive_push_messages. This attribute containing the marketing consent status for push notifications. - From the Choose parameter drop-down list, select the Equal operator and specify the condition as true.
- Click Choose filter and from the drop-down list, select the
snrs_has_mobile_push_devices. It includes information on whether the customer has an active FCM token or not. For more information, please visit this material. - From the Choose parameter drop-down list, select the Equal operator and specify the condition as true.
- Confirm by clicking Apply.
Configure the Generate event node
Before sending the push notification to the customer, an event must be generated on the customer’s profile, which will be defined in this step. The event must contain the SKUs of restocked products (these are the products that will be sent to the customer in the notification).
The system will verify the restocking based on the availability parameter in the item catalog which was created as part of the prerequisites.
Additionally, the products for which notifications have already been sent to the customer previously are excluded.
- Add the Generate event node.
In the configuration of the node:
-
Enter the Event name. In our case, we are using
product.backInStockevent.
The Label field exists for backwards compatibility. If your integration does not require this parameter, skip it.Note: Jinjava inserted in Generate event body must have all empty spaces deleted. -
In the Body section, use the following Jinjava and modify it to your needs:
      {
  "sku": "{% set signedProducts=[] %}{% set receivedProducts=[] %}{% set finalSku=[] %}{% aggregate b4173b56-cf83-3ce8-90c8-f35f36a91368 %}{% for sku in aggregate_result|reverse %}{% do signedProducts.append(sku) %}{% endfor %}{% endaggregate %}{% aggregate e55cae5e-2d48-3e29-a2a2-5122913e4e96 %}{% for sku in aggregate_result|reverse %}{% do receivedProducts.append(sku) %}{% endfor %}{% endaggregate %}{% for sku in signedProducts %}{% catalogvar.items-demo(sku).availability %}{% if catalog_result=='in stock' %}{% if sku in receivedProducts|join(',') %}{% else %}{% do finalSku.append(sku) %}{% endif%}{% endif %}{% endcatalogvar %}{% endfor %}{% set counter=0 %}{% for sku in finalSku %}{% set counter=counter + 1 %}{{sku}}{% if counter < finalSku|length%},{% endif %}{%endfor%}"
}
-
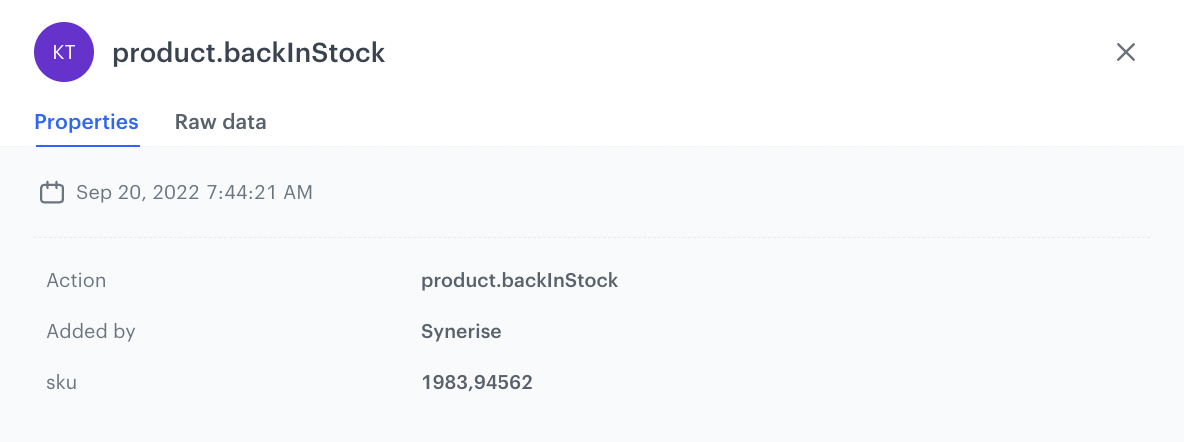
As a result, a product.backInStock event is generated. The sku parameter contains the SKUS of products that are back in stock. The list of the products will be sent in the notification, separated by commas. If the event is empty, it means that none of the products have met the back in stock conditions.
An example of a generated event:
Configure the Event filter node
The workflow waits for the event generation from the previous step and sends the push notification based on it.
- Add the Event filter node. In the configuration of the node:
- Check event for period of time.
- Define the time range to 1 minute.
- From the Choose event dropdown list, select the product.backInStock event.
- As the event parameter, select sku.
- From the Choose operator dropdown list, select Regular expression.
- As the value, enter
.+Note: The.+value means any number of characters. We add this value to exclude from the communication customers for whom an empty SKU parameter was generated in the previous event. It happens when none of the products the customer signed up for were returned to stock. - Confirm by clicking Apply.
- For the not matched path, select the End node.
- For the matched path, select the Send Mobile Push node.
Configure the Send mobile push node
At this stage, a mobile push is sent to customers, which contains the products returned in the event from the previous step.
- In the node configuration, select the template you previously prepared for the back in stock campaign.
- Confirm by clicking Apply.
Add final setting to your workflow
- Add the End node.
- Launch the workflow by clicking Save&Run.
Check the use case set up on the Synerise Demo workspace
You can check the configuration of each step directly in the Synerise Demo workspace:
If you don’t have access to the Synerise Demo workspace, please leave your contact details in this form, and our representative will contact you shortly.