


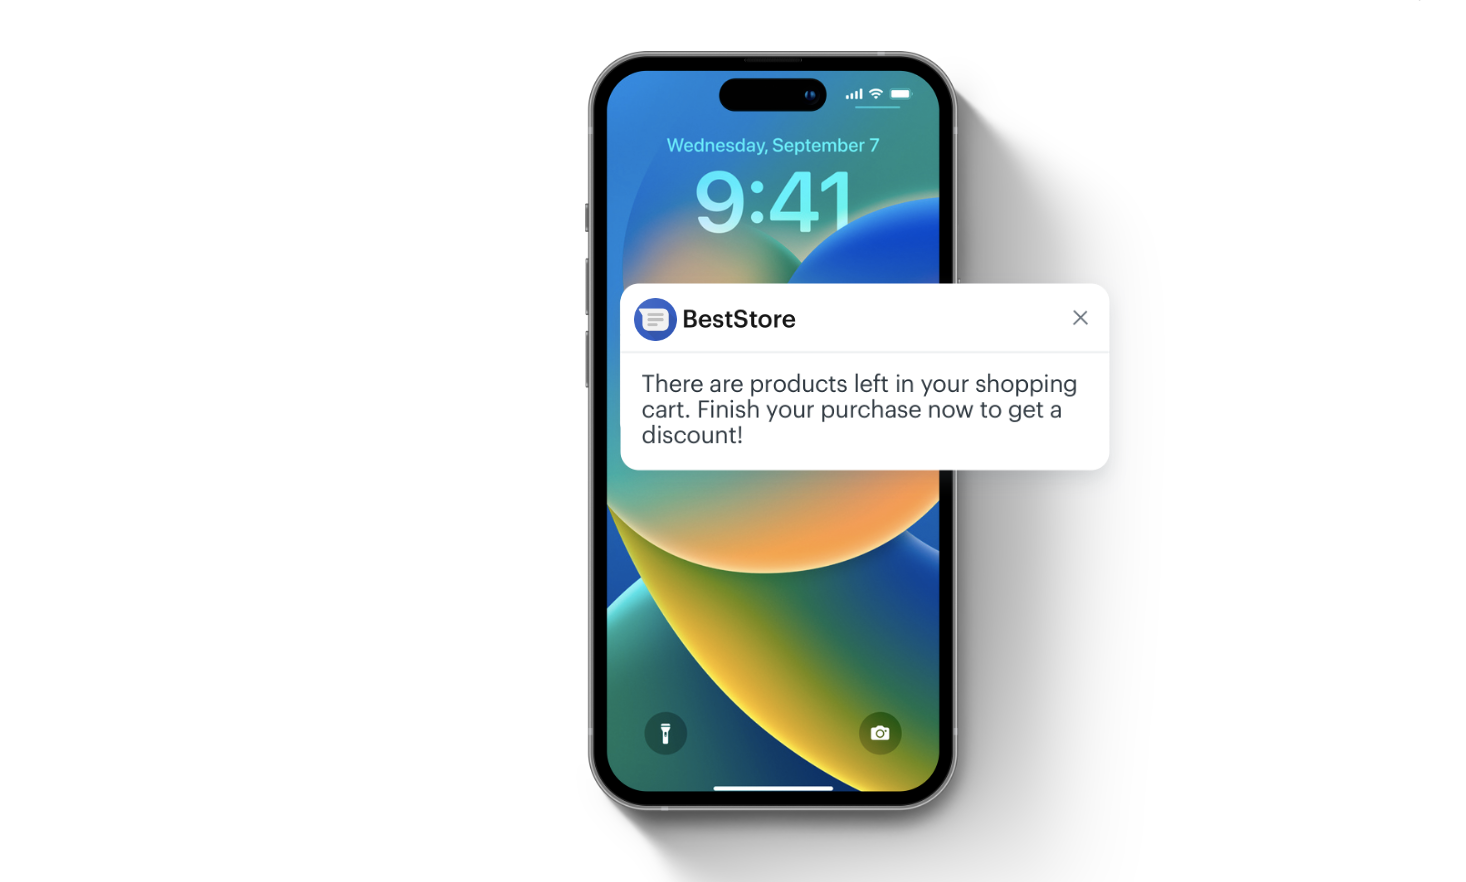
Push notification with price drop alert
Capturing customer attention and encouraging them to complete a purchase has become crucial for business success. Personalized push notifications about price drops are one of the most effective ways to achieve this goal. Price is often the decisive factor influencing customer purchase decisions, especially for those who are more sensitive to pricing. They might delay or even abandon a purchase if the price offer does not meet their expectations. In this context, it is crucial to inform customers about price reductions, especially those who have shown interest in a product by adding it to their favorites or cart without completing the purchase. This can be very useful in boosting sales.
The following use case provides an example of a price drop alert campaign that you can implement in your business. The scenario described involves sending mobile push notifications to customers regarding products whose price has been reduced. These products were previously added to their favorites or cart but were not purchased.
Prerequisites
- Implement a custom event of adding products to favorites. In this use case, this event is named
product.addToFavorites. - Create an item catalog that contains all product information, including current price.
- Create a mobile push template to be used in the price drop campaign.
Process
- Create a product.priceDrop event
- Create an aggregate that returns a list of SKUs of recently purchased products
- Create an aggregate that returns a list of SKUs of items added to favorites by a customer
- Create an aggregate that returns the latest prices of products added to favorites
- Create an aggregate that collects the last sku’s of products received by users with a discounted price
- Create a mobile push template
- Create a workflow
Create a product.priceDrop event
In this part of the process, create the product.priceDrop event, which will later be used in aggregates and a workflow.
- Go to
 Data Management > Events > Add event.
 - Define the name of the event. In our case, it’s
product.priceDrop
In the API and SDK, this parameter is usually called “action” or “action name”. - Optionally, define a human-friendly display name that will be shown in the Data Management and Analytics modules.
- Optionally, describe the event.
- Enable the Make this event available to anonymous profiles without JWT toggle.
- Confirm the settings by clicking Apply.
- In the list of events, find the event you just created.
- On the right side of the screen, click Add property.
- In the Source parameter field, enter the name of the parameter -
sku. - In the Property name field, enter a human-readable label for display in the Synerise platform.
- Optionally, in the Description field, you can add an explanation about the purpose of this parameter.
- To complete the process, click Save.
Create an aggregate that collects sku of recently purchased products
This aggregate will be used in the next part of the process to exclude products that the customer has already bought.
- Go to
 Analytics > Aggregates > New aggregate.
 - Enter the name of the aggregate.
- As the type of the aggregate, select Last multi and in the Size field, enter
100. - Select the Consider only distinct occurrences of the event parameter option.
- From the Choose event dropdown list, select the product.buy event.
- As the event parameter, select sku.
- As the analyzed period, set Last 30 days.
- Save the aggregate.

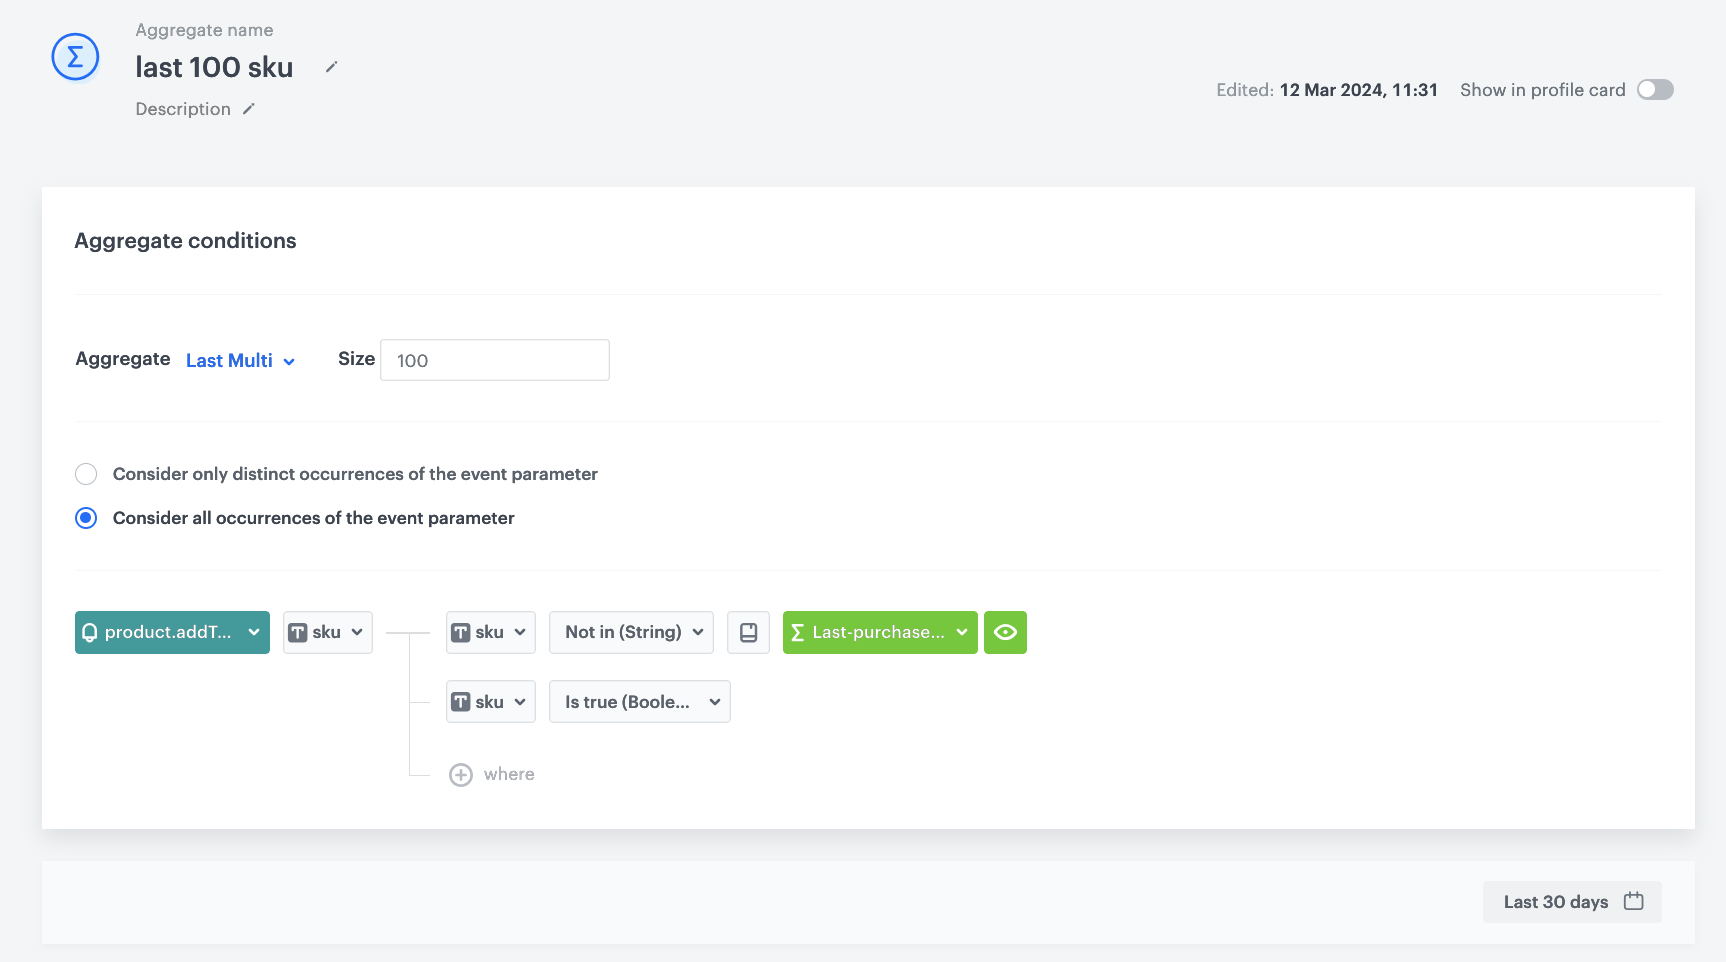
Create an aggregate that returns SKU of discounted products added to favorites
This aggregate will be used in the further part of the process. The result of this aggregate will be filtered to prevent sending notifications about discounts on the same favorite items.
- Go to Analytics > Aggregates > New aggregate.
- Enter the name of the aggregate.
- As the type of the aggregate, select Last multi and in the Size field, enter
100. - Select the Consider all occurrences of the event parameter radio button. This includes ALL occurrences of the event in the aggregate.
- From the Choose event dropdown list, select the product.addToFavorites event.
- As the event parameter, select sku.
- Click + where button.
- From the Choose parameter dropdown list, select the sku parameter.
- From the Choose operator dropdown list, select Not in.
- From the Choose value dropdown list, select the aggregate you created in the previous step.
- Click + where button.
- From the Choose parameter dropdown list, select the sku parameter.
- From the Choose operator dropdown list, select Boolean Is true.
- As the analyzed period, set Last 30 days.
- Save the aggregate.
Create an aggregate that collects the latest prices of products added by users to their favorites
This aggregate will return the prices of products from the previous aggregate.
- Go to Analytics > Aggregates > New aggregate.
- Enter the name of the aggregate.
- As the type of the aggregate, select Last multi and in the Size field, enter
100. - Select the Consider all occurrences of the event parameter radio button. This includes ALL occurrences of the event in the aggregate.
- From the Choose event dropdown list, select the product.addToFavorites event.
- As the event parameter, select price.
- Click + where button.
- From the Choose parameter dropdown list, select the price parameter.
- From the Choose operator dropdown list, select Boolean Is true.
- Click + where button.
- From the Choose parameter dropdown list, select the price parameter.
- From the Choose operator dropdown list, select Not in.
- From the Choose value dropdown list, select the aggregate you created earlier.
- As the analyzed period, set Last 30 days.
- Save the aggregate.

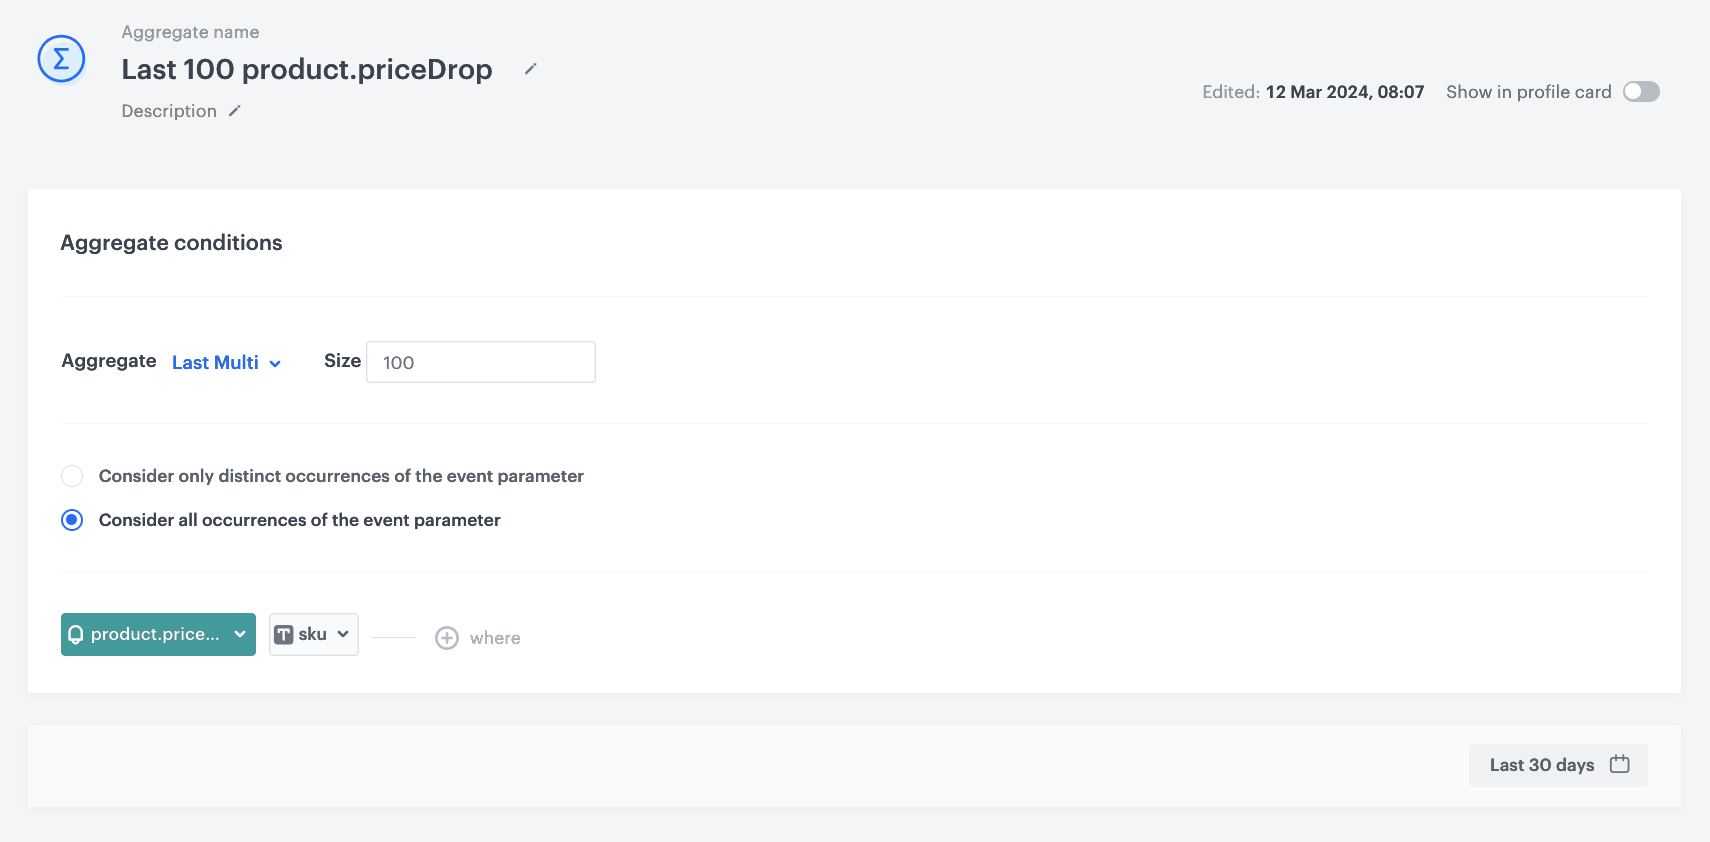
Create an aggregate that collects the last sku’s of products received by users with a discounted price
This aggregate later in the process will be used to exclude discounted products already sent to users when the next message is executed.
- Go to Analytics > Aggregates > New aggregate.
- Enter the name of the aggregate.
- As the type of the aggregate, select Last multi and in the Size field, enter
100. - Check the box - Consider all occurrences of the event parameter.
- From the Choose event dropdown list, select the product.priceDrop event.
- As the event parameter, select sku.
- As the analyzed period, set Last 30 days.
- Save the aggregate.
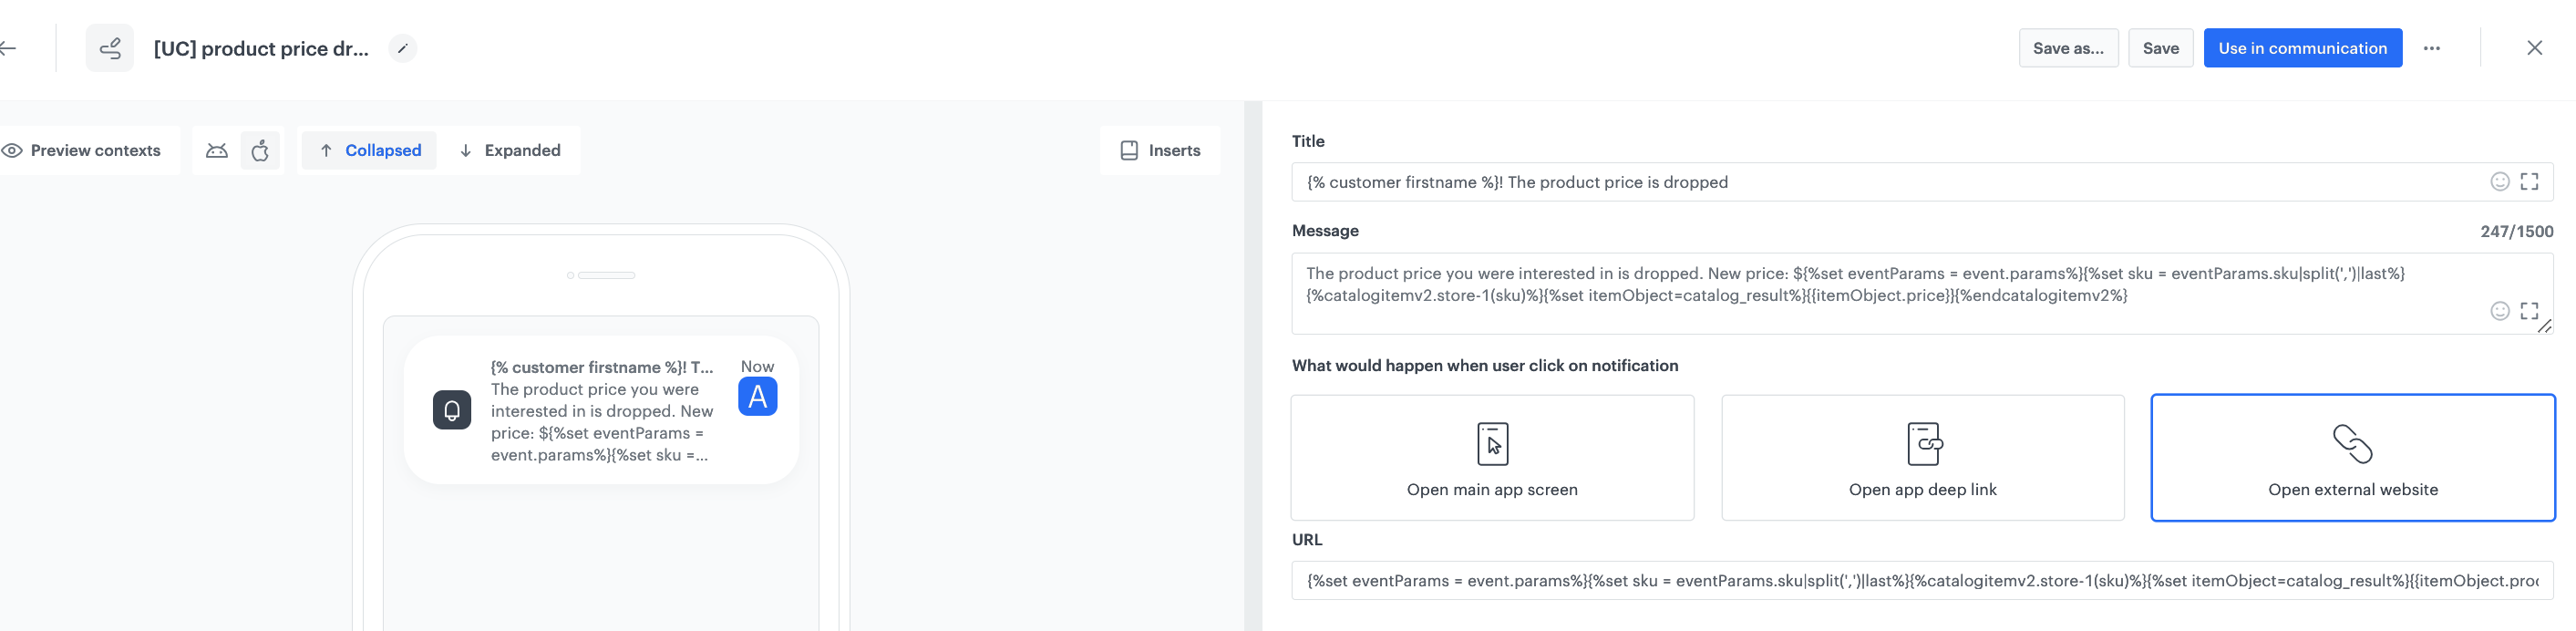
Create a mobile push with template
In this part of the process, create a mobile push template that will be used later in a workflow. It should inform a mobile app user about price drop.
- Go to Communication > Mobile Push > Templates.
- You can use the template from the folder or create your own one using the mobile push code editor. Click New Template > Simple Push.
- Create your mobile push in the code editor.
- You can use Jinja that lets you refer to event context from the Event Filter that will be configured in the next part of the process. This node will be waiting for occurrence of the
product.priceDrop. This event will contain the object with the list of products’ SKU that will be retrieved to the notification template. You can learn more about the logic of inserting dynamic values in such a way in Reusing event context from preceding nodes. The following code is an example of how to do it:The product price you were interested in is dropped. New price: ${%set eventParams = event.params%}{%set sku = eventParams.sku|split(',')|last%}{%catalogitemv2.store-1(sku)%}{%set itemObject=catalog_result%}{{itemObject.price}}{%endcatalogitemv2%} - In the URL box, add the following code, which will redirect the customer to the page of the specific product after clicking the notification:
{%set eventParams = event.params%}{%set sku = eventParams.sku|split(',')|last%}{%catalogitemv2.store-1(sku)%}{%set itemObject=catalog_result%}{{itemObject.productUrl}}{%endcatalogitemv2%} - In an additional settings, in the image URL field enter the code below. It will let you display the image of the discounted product.
{%set eventParams = event.params%}{%set sku = eventParams.sku|split(',')|last%}{%catalogitemv2.store-1(sku)%}{%set itemObject=catalog_result%}{{itemObject.image}}{%endcatalogitemv2%} - Personalize other settings in the template according to your business needs.
- Save the template.
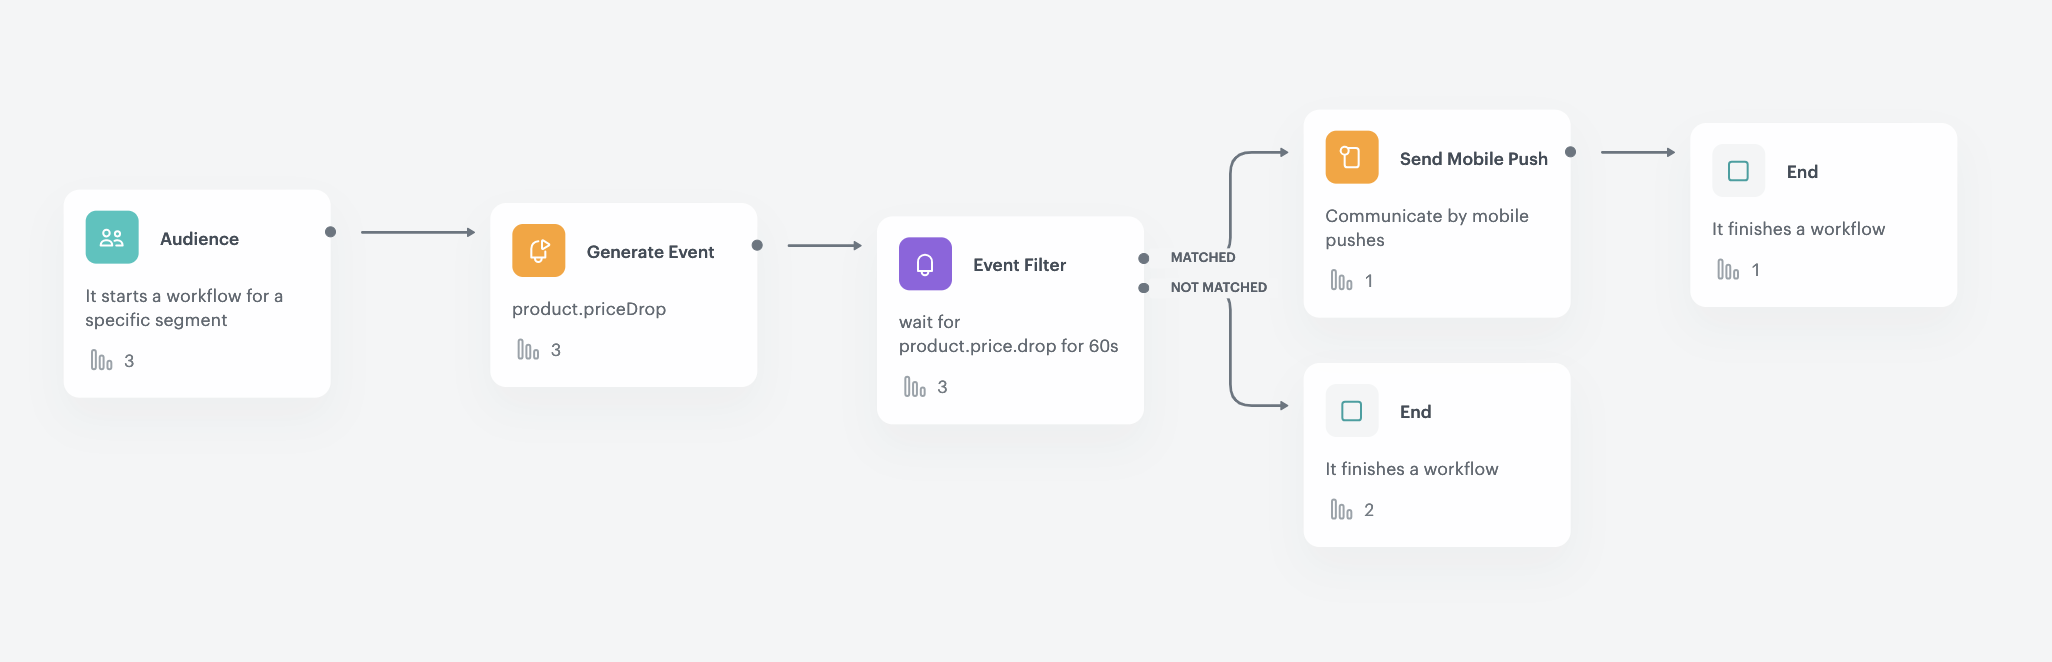
Create a workflow
Create a workflow that will be launched for customers that have all necessary consents to receive mobile push notifications and who added any product to favorites. If there is a price drop of products they added to favorites, they will recevie a push notification about discounts on products they liked.
- Go to Automation > Workflows > New workflow.
- Enter the name of the workflow.
Configure the trigger
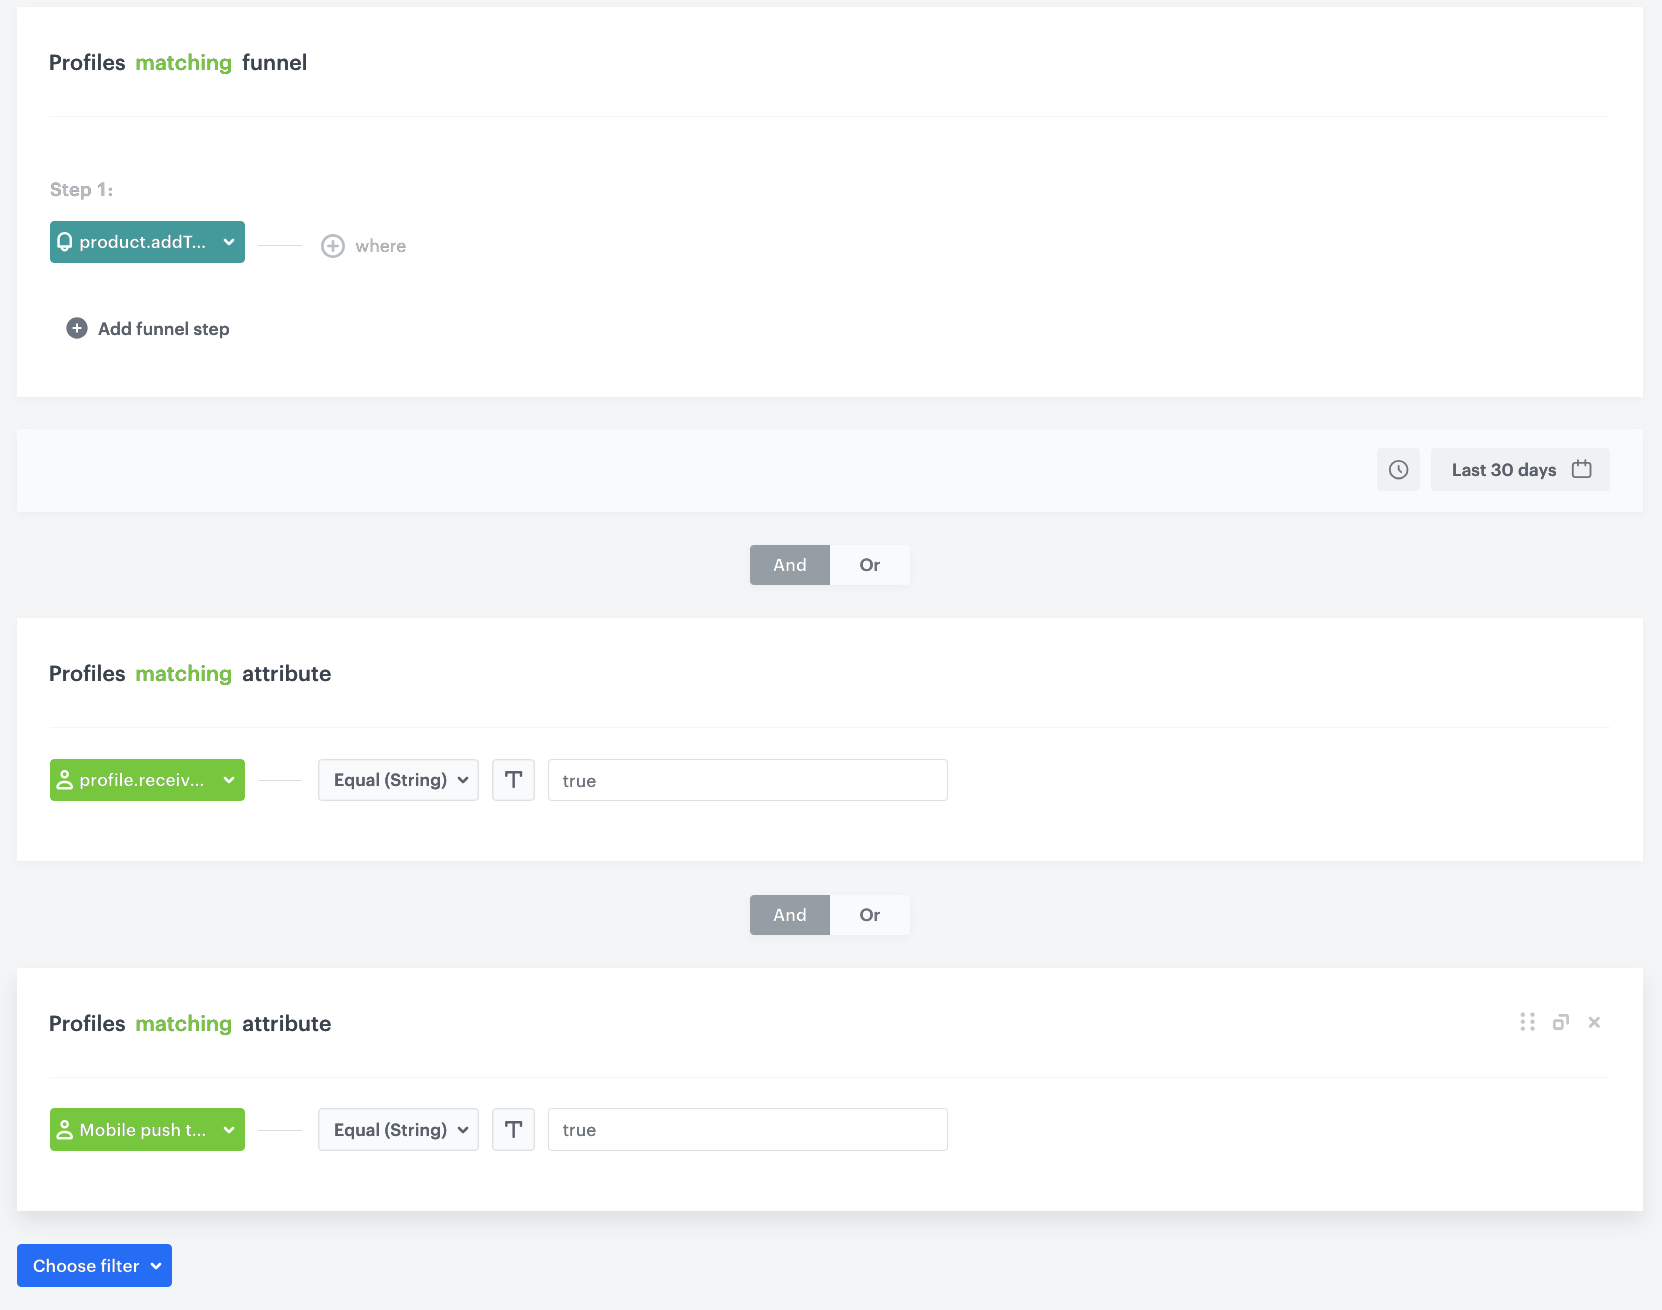
In this part of the process, define the conditions for the audience for whom you will run this campaign. In our case, these are customers who have added products to favorites and who have necessary consents in the mobile push channel.
- As the trigger node, select the Audience node. In the configuration of the node:
- Set the Run trigger option to repeatable.
- Set the interval at which you want to run the automation.
- Select the time zone.
- Select the New audience tab.
- Click Define conditions.
- From the choose filter dropdown list select the product.addToFavorite event.
- Define the time period for the last 30 days.
- From the Choose filter dropdown list, select the
profile.receive_push_messages. This attribute contains the marketing consent status for push notifications. - From the Choose parameter dropdown list, select the Equal operator and specify the condition as true.
- Click Choose filter and from the dropdown list, select the
snrs_has_mobile_push_devices. It includes information on whether the customer has an active FCM token or not. For more information, please visit this Conditions for sending and displaying mobile notifications. - From the Choose parameter dropdown list, select the Equal operator and set the condition to true.
- Confirm by clicking Apply.
Configure the Generate event node
- Add the Generate event node. In this step, check if the product added to favorites by the user has been discounted.
In the configuration of the node:-
Enter the Event name and Label. In our case, we are using
product.addToFavoriteevent.Note: Jinjava inserted in Generate event body must have all empty spaces deleted. -
In the Body section, use the following Jinjava and modify it to your needs:
{
  "sku": "{%set last_sku=[]%}{%set last_price=[]%}{%set last_objects_array=[]%}{%set final_sku=[]%}{%set list=[]%}{%aggregate 9d8f2b6d-c9d8-39f5-90f2-c354fd387c28%}{%-for sku in aggregate_result|reverse-%}{%do last_sku.append(sku)%}{%-endfor-%}{%endaggregate%}{%aggregate 28e5708e-b957-3b7d-ae3c-09eae2a3e29b%}{%-for price in aggregate_result|reverse-%}{%do last_price.append(price)%}{%-endfor-%}{%endaggregate%}{%aggregate 8ba45452-30e2-3107-9548-a2841040a5fe%}{%-for listSku in aggregate_result-%}{%do list.append(listSku)%}{%-endfor-%}{%endaggregate%}{%-for sku in last_sku-%}{%set index=loop.index0%} {%do last_objects_array.append({sku: sku, price: last_price[index], index: index})%}{%-endfor-%}{%set last_objects_array_uniq=last_objects_array|unique(attr='sku')%}{%-for last in last_objects_array_uniq-%}{%set key_name=last.sku%}{%catalogvar.store-1(key_name).price%}{%set catalog_item=catalog_result|float%}{%-if last.price|float > catalog_item|float-%}{%-if last.sku in list|join(',')-%}{%-else-%}{%do final_sku.append(last.sku)%}{%-endif-%}{%-endif-%}{%endcatalogvar%}{%-endfor-%}{%-for sku in final_sku-%}{{sku}}{%-if loop.index != final_sku|length-%},{%-endif-%}{%-endfor-%}{%-if final_sku|length < 1-%}{{kill}}{%-endif-%}"
}
-
If you would like to make a change to the condition that must be met in order for the event to be generated, you can do so in this line:
{% if last.price|float > catalog_item|float %} The result of this node is an event, which contains the sku of the discounted products in the sku attribute, separated by commas. If the event is empty, it means that none of the products met the price drop condition.
An example of a generated event:

Configure the Event filter node
- Add the Event filter node. In the configuration of the node:
- Check event for period of time.
- Define the time range to 1 minute.
- From the Choose event dropdown list, select the product.priceDrop event.
- As the event parameter, select sku.
- From the Choose operator dropdown list, select Regular expression.
- As the value, enter
.+ - Confirm by clicking Apply.
- For the not matched path, select the End node.
- For the matched path, select the Send mobile push node.
Configure the Send mobile push node
At this stage, a mobile push is sent to customers, which contains the products returned in the event from the previous step.
- In the node configuration, select the template type(in our example simple push) and push template from the list.
- Confirm by clicking Apply.
Add final setting to your workflow
- Add the End node.
- Launch the workflow by clicking Save&Run.
Check the use case set up on the Synerise Demo workspace
You can check the configuration of each step directly in the Synerise Demo workspace:
-
Aggregate that collects product sku’s added by the users to their favorites
-
Aggregate that collects the latest prices of products added by users to their favorites
-
Aggregate that counts sku’s of products added to favorites by a user
If you don’t have access to the Synerise Demo workspace, please leave your contact details in this form, and our representative will contact you shortly.