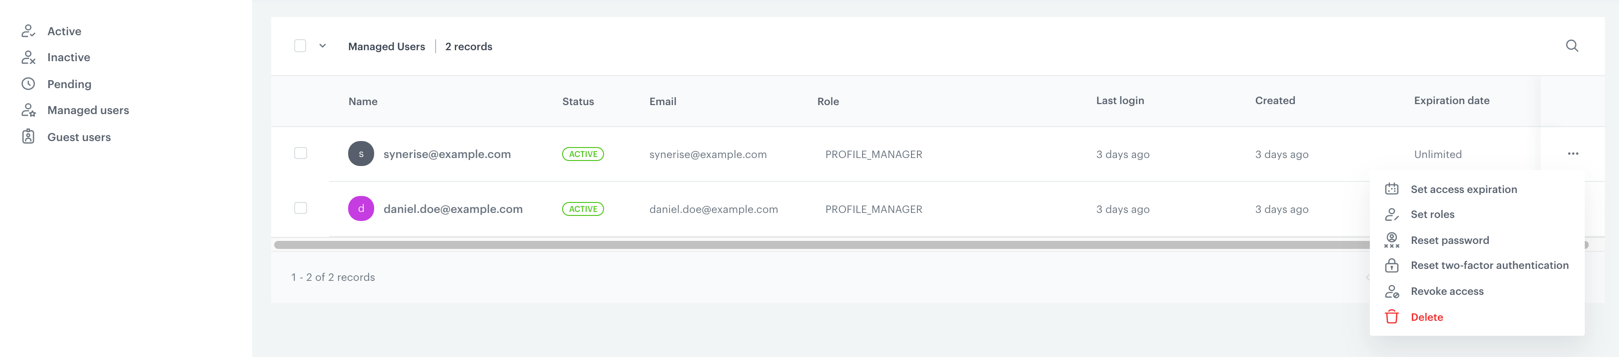
Users
In the Users section in Settings, you can list, invite new users, and manage all the users associated with your company and guest users who have access to your workspace.
This section enables your organisation’s administrators to perform the following actions:
- invite (add) new users,
- set roles (permissions) in the workspace,
- set access expiration,
- reset a password
- reset two factor authentication configuration,
- revoke access to the workspace,
- delete accounts of the managed users,
Managed and guests users
We distinguish two types of users: managed and guests. A guest may be any person that has been invited to your workspace, but you have only a little control over guest accounts (the actions allowed towards the guest users are available in the table below). To gain control over user accounts you must convert them to be manageable, which means you have to prove that you have the power to administer them. In order to do so, you must confirm ownership of the domain after which all added and to-be-added users with accounts under the managed domains will be automatically associated to your workspace.
Such division of user types also brings different options in overall user account management which prevents you from deleting guest accounts, resetting guests two factor authentication (2FA), or resetting guests’ password. You are only entitled to adjust the settings related to users that are connected with your workspace, such as a role level, access expiration and revoking access.
Resetting two factor authentication (2FA) and password won’t work for the accounts from external identity providers like Azure AD, Google, and so on.
The scope of user management covers:
| Define access expiration | Set user roles | Reset password | Reset MFA | Revoke access | Delete account | |
|---|---|---|---|---|---|---|
| Managed users | ||||||
| Guest users |
Inviting users to the workspace
You can invite any person to your workspace by providing user’s e-mail address, assigning a user role, and optionally setting access expiration in case you want to grant timed access that expires by a given date.
- Go to
 Settings > Users.
 - In the right upper corner, click Invite.
Result: A pop-up appears. - In the Email field, enter the email address of a user invited to the workspace.
- From the Roles dropdown list, select a role or roles for the invited user.
- In the Expiration date field, define how long a user has access to your workspace.
- Confirm by clicking Apply.
Result: An invitation is sent to the email address. - The invited user must click the activation link in the email to get access to the workspace.
If you invite people that have email accounts within your managed (verified) domain, they will become automatically managed users.
Setting user roles
You can change the user role for the managed and guest users. This way you can control access to specific modules and permit or restrict performing specific actions. You can either use predefined roles or define your own. More about user roles and user permissions is available here.
- Go to Settings > Users.
- Find a user on the list.
- Click the
 icon.
icon.
Result: A dropdown list shows. - Select the Set user role option. Result: A pop-up appears.
- From the Roles list, select the user roles you want to grant to the selected user.
- Confirm by clicking Apply.
Setting access expiration
In case you need to grant access to your workspace for a specific time only, you can define when the access to your workspace ends for a specific user through access expiration.
- Go to Settings > Users.
- Find a user on the list.
- Click the icon.
Result: A dropdown list shows. - Select the Set acess expiration option.
Result: A pop-up appears. - In the Profile access expiraton field, select the date (day and time) when access to your workspace expires for the selected user.
- Confirm by clicking Apply.
Resetting a password
You can reset a password for a managed user in case there is a necessity to do so.
- Go to Settings > Users.
- Find a managed user on the list.
- Click the icon.
Result: A dropdown list shows. - Select the Reset password option.
Result: A pop-up appears. - Confirm by clicking Reset.
Result: An email is sent to the email address of a user. The email includes a link that redirect a user to a reset password form.
Resetting 2FA
Two factor authentication (2FA) requires a user to log in to the Synerise application with extra credentials. In addition to a login and password, a user enters a security code generated by an authentication app on their device.
This security measure can be enabled for managed and guest users, however, you can force the reset of two factor authetnication only for the managed users.
- Go to Settings > Users.
- Find a managed user on the list.
- Click the icon.
Result: A dropdown list shows. - Select the Reset 2FA option.
Result: A pop-up appears. - Confirm by clicking Reset.
Revoking access
You can revoke access to your workspace to any user any time.
- Go to Settings > Users.
- Find a user on the list.
- Click the icon.
Result: A dropdown list shows. - Select the Revoke access option.
Result: A pop-up appears. - Confirm by clicking Revoke.
Deleting accounts
You can delete permanently an account of the managed user.
- Go to Settings > Users.
- Find a user on the list.
- Click the icon.
Result: A dropdown list shows. - Select the Delete option.
Result: A pop-up appears. - Confirm by clicking Delete.