Integrating VTEX IO with Synerise
You can use the Synerise plugin in your eshop built on VTEX IO ecommerce platform to transmit the data from your website to Synerise, so you can utilize it for analyses and your business campaigns.
This instruction contains steps which require contact with the Synerise Support.
Plugin scope
- Tracking transaction, cart, and customer activity events
- Tracking the checkout page
- Identifying customers after they filled out the form
- Synchronizing data between Synerise and VTEX through webhooks (creating, updating, and removing accounts)
- Implementing a service worker for displaying web push notifications
- Exporting historical data about customers and orders from VTEX to Synerise.
Prerequisites
- You must be granted user permissions to access API key section and add the key in Synerise.
- In VTEX, create an account and a workspace.
- In VTEX, in Catalog > All Products, add the items you want to display in your eshop.
Configuration in Synerise
Create an API key
-
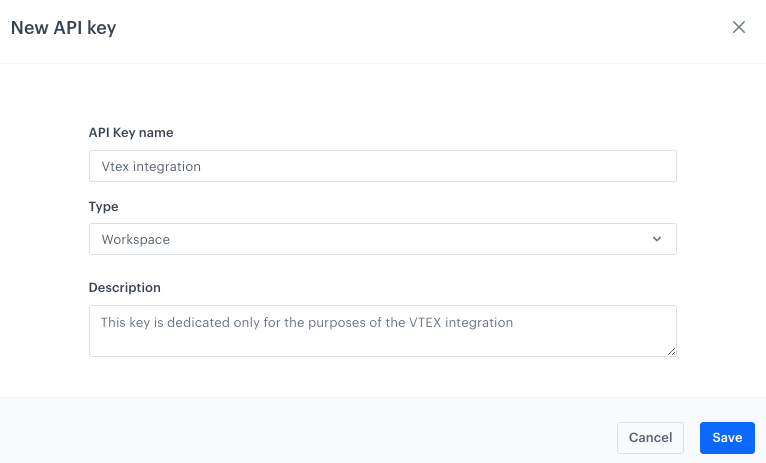
In Synerise, go to Settings > API Keys > Add API key.
-
On the pop-up:
- Enter the name of the API key (it will be visible on the list of API keys).
- Select Workspace.
- Optionally, enter the description of the key (it will be visible on the list of API keys).
Adding a new API key for the Magento integration -
Confirm by clicking Save.
-
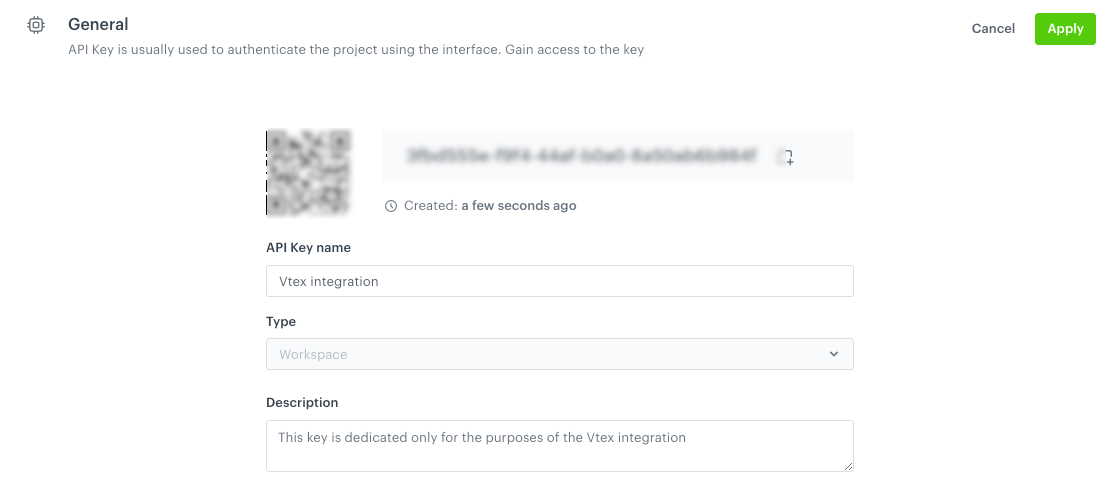
Find the key on the top of API key list and click Permissions.
-
On the pop-up, select the following permissions:
- CATALOG:
- CATALOGS_CATALOG_CREATE
- CATALOGS_CATALOG_READ
- CATALOGS_ITEM_BATCH_CATALOG_CREATE
- CLIENT:
- API_BATCH_CLIENT_CREATE
- API_CLIENT_CREATE
- EVENTS:
- API_ADDED_TO_CART_EVENTS_CREATE
- API_ADDED_TO_FAVORITES_EVENTS_CREATE
- API_CUSTOM_EVENTS_CREATE
- API_LOGGED_IN_EVENTS_CREATE
- API_LOGGED_OUT_EVENTS_CREATE
- API_REGISTERED_EVENTS_CREATE
- API_REMOVED_FROM_CART_EVENTS_CREATE
- TRACKER
- TRACKER_CREATE
- TRANSACTION
- API_BATCH_TRANSACTION_CREATE
- API_TRANSACTION_CREATE
- VTEX
- IMPORT_FEEDER_INTEGRATION_VTEX_CREATE
- IMPORT_FEEDER_INTEGRATION_VTEX_READ
- IMPORT_FEEDER_SYNCHRONIZATIONS_VTEX_READ
- IMPORT_FEEDER_SYNCHRONIZATION_VTEX_CREATE
- IMPORT_FEEDER_SYNCHRONIZATION_VTEX_DELETE
- CATALOG:
-
Confirm by clicking Apply settings.
-
On the list of API keys, double-click the key you created.
-
On the General section, click Show.
-
Copy the API key and paste to the notepad.
Details of the API key
Add the tracking code
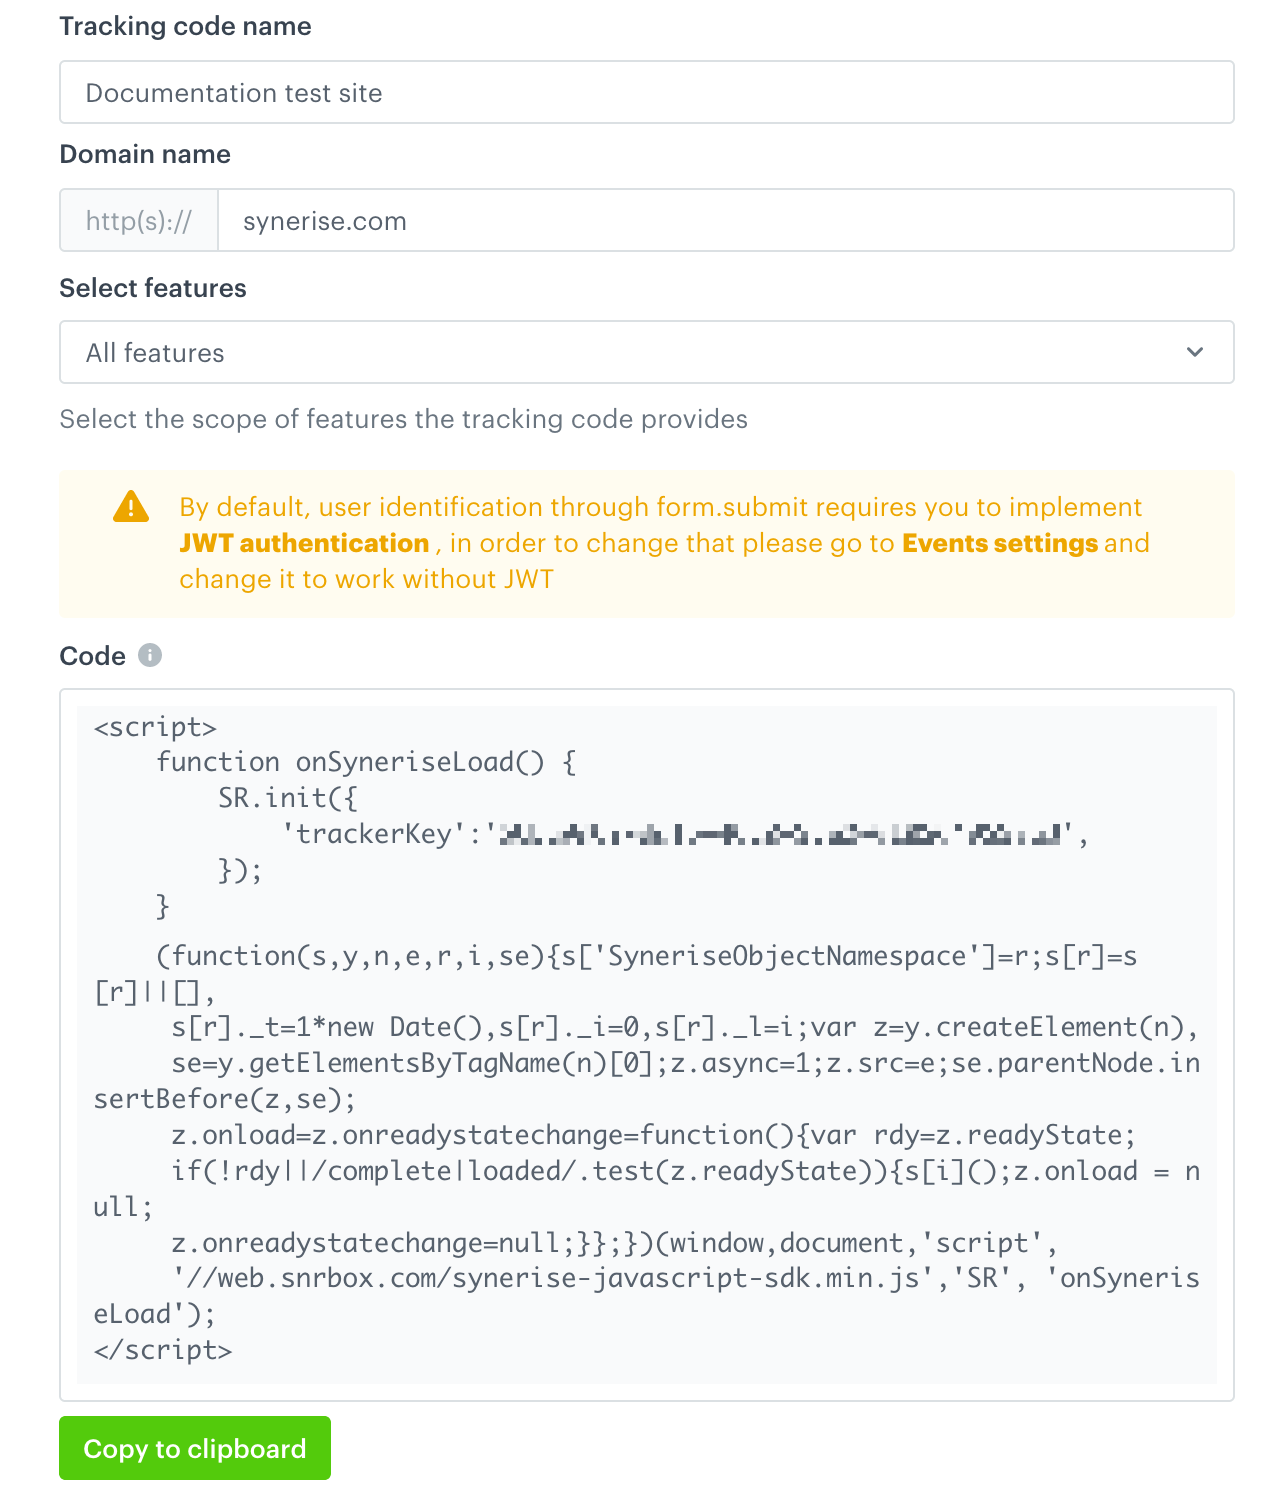
- In Synerise, go to Settings > Tracking codes and add a tracking code.
Full instruction on adding tracking codes is available here.
Note: You can select any feature configuration for the tracking code.
- Copy the tracking code and save it in the notepad.
A blank tracking code form
Enable updating profile information with specific events
To prevent duplicating customers’ accounts when they become identified, make it possible for specific events to update profile information without JWT authorization.
- Go to Data Management > Events.
- Select the JS SDK event settings tab.
- In the Events without JWT allowed for updating profiles’ information section, click Define.
- From the Select events dropdown list, select form.submit
- Confirm by clicking Add.
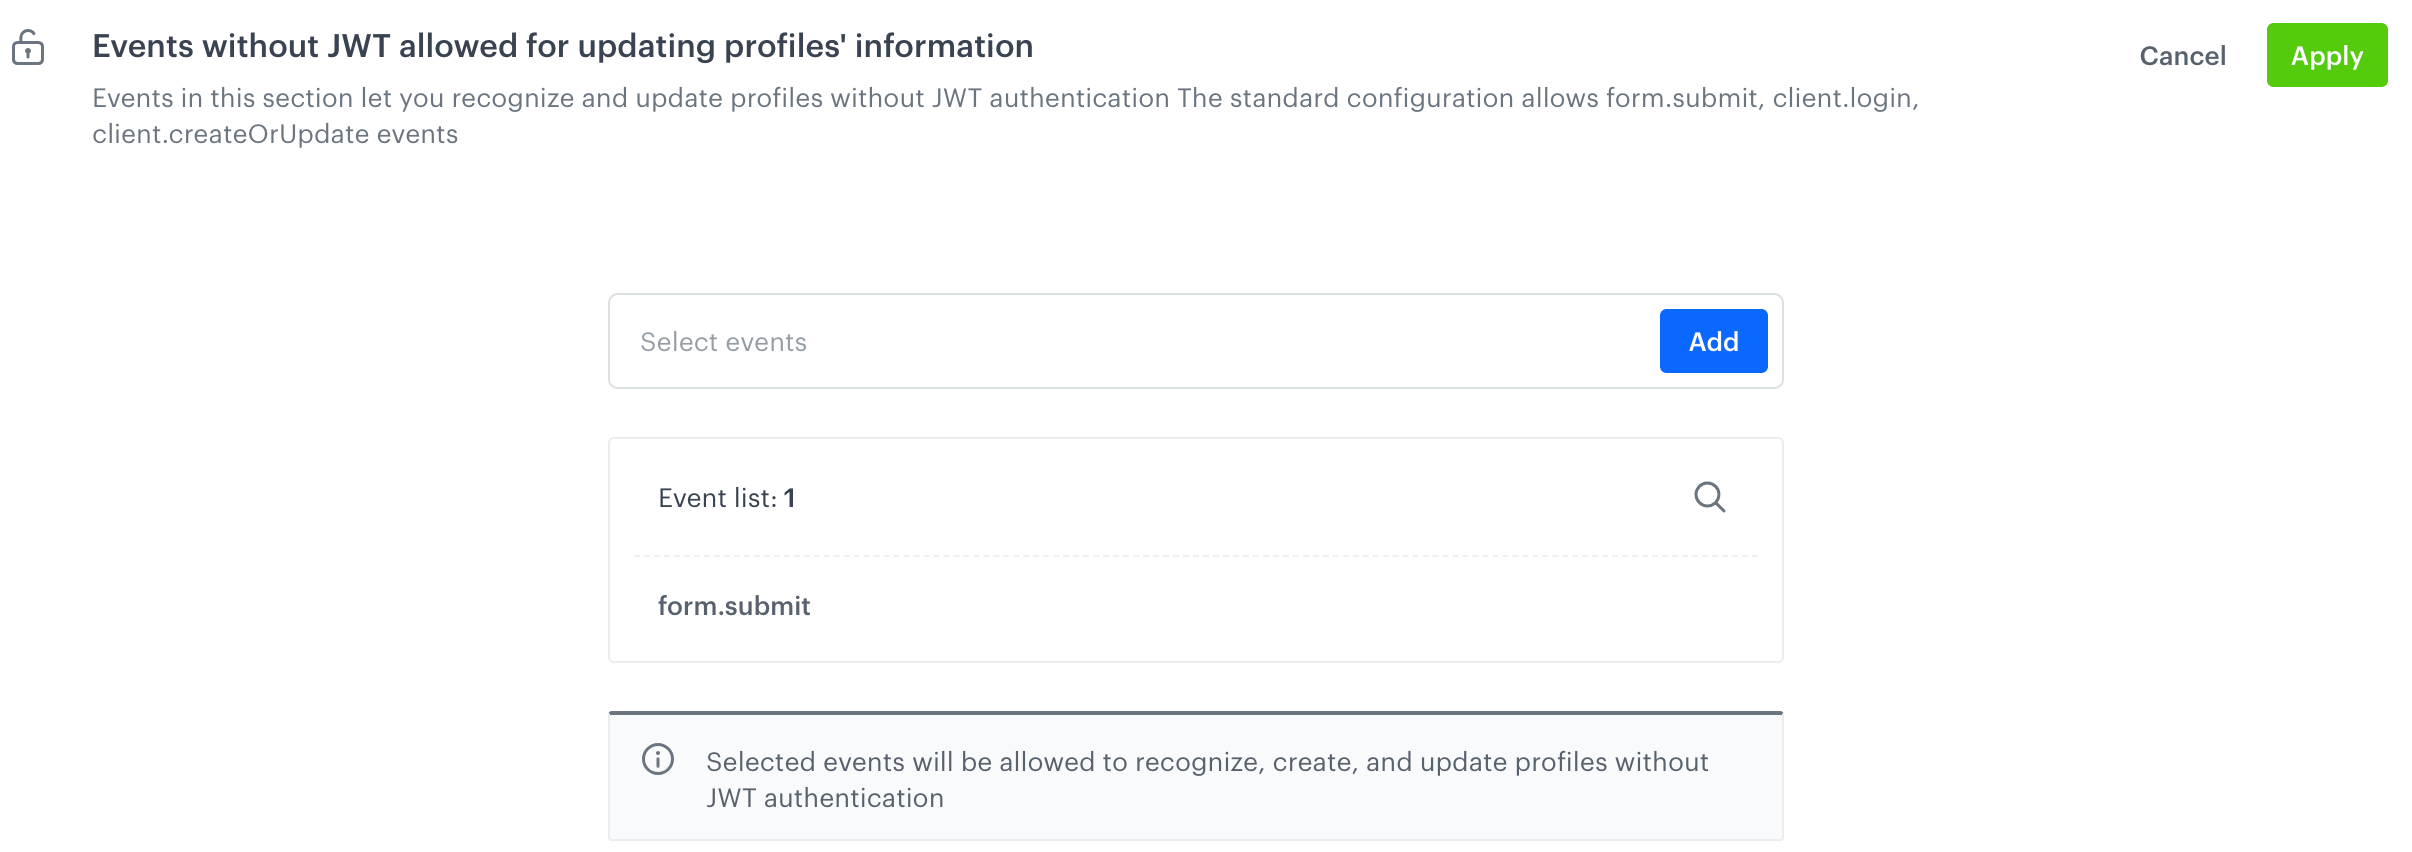
Configuration of the section - Confirm the settings by clicking Apply.
Prepare tracking events on the checkout page
In this part of the process, you will use a ready-to-use dynamic content template available in the Synerise platform. This template includes JavaScript that’s inserted into the checkout page to identify customers when they fill out a form and to track events on the checkout page. By default, the dynamic content from this template doesn’t include any elements visible on the site.
- Go to Communication > Dynamic Content > Create new.
- Enter the name of the dynamic content.
- As the dynamic content type, select Insert object.
- In the Audience section, select the Everyone tab.
- In the Content section, click Simple message.
- In CSS Selector:
- Select After.
- In the text field, enter
.snrs-modal-wrapper
This sets the dynamic content to be injected after one of the elements created when Synerise JS SDK is initialized. If you need to, you can set a different selector.
- Click Create message.
- Select Script templates.
- From the Script templates library, select VTEX - tracking events on checkout page.
The template is ready to be used, it contains all necessary scripts that track events and identify customers when they fill out the form. - If needed, you can make changes to the templates.
Note: You can learn more how to edit a template in a dynamic content template builder here. - In the upper right corner, click Next.
- Confirm the settings in the Content section by clicking Apply.
- In the Schedule section, select Display immediately and click Apply. If needed, you can declare the date when the dynamic content will start and end being active
- In the Display settings section:
- Open Advanced options.
- In Page targeting, click Others.
- In Display on pages, click Add rule.
- Select Page with URL and enter the URL of your checkout page.
- Optionally, in the UTM & URL parameters section, define these parameters.
- In the upper right corner, click Activate.
Configure web push notifications
If you want to enable web push notifications:
- Configure web push notifications. In the Path to the service worker field, enter
/synerise/snr-sw.js - Configure two-step agreement form.
Configuration in VTEX
Install the Synerise plugin
There are two ways of installing the Synerise plugin.
Coming soon
- Download VTEX console.
- In the console, log on to your VTEX workspace.
- Install the Synerise application with the following command:
vtex install synerisepartnerar.synerise-integration
Connecting the item feed with Synerise
In this part of the integration, you will enable sending items from your VTEX item feed to an item feed catalog in Synerise.
This part includes the following sub-procedures:
- In your VTEX workspace, go to Stores > (Synerise) Feed.
- Add item data and configure additional settings.
- Add the feed in Synerise.
Item data
The center of the view shows fields that are sent to Synerise and saved in the Synerise catalog that is your item feed.
By default, all the required parameter mappings are already added.
For each mapping:
- Field name is the name under which the value will be saved in Synerise.
- Field value is the value. You can use inserts to pull data from the VTEX database (see examples in fields added by default).
The field names and values that you send to Synerise must meet the requirements of the Google Merchant XML feed.
- In all fields that indicate prices, add the currency.
By default, those fields are
g:priceandg:sale_price
Example:
Adding the currency to a field - In the link field, add your store’s hostname to the link.
Example:
Adding the store's hostname to a field - If you want to add a new field:
- At the bottom of the screen, click Add field.
- Enter the field name.
- Enter the field value.
To add an insert that retrieves data from the VTEX database, click the plus icon and select an insert. The inserts are loaded with the feed configuration page, so if you added a field to the VTEX database in another window, you need to refresh the feed configuration to see it.
- If you want to remove a field, click the red button to the right of the field.
- If you want to replace a value or its fragment:
- Next to the field you want to modify, click Conversions.
- Click Add conversion.
- In Current value, enter the string to replace.
This field is case-sensitive. - In New value, enter the string that will replace the previous string.
Example:
By default, VTEX provides links to scaled-down images. You can modify the image address in g:image_link with this conversion:
Modifying a field value when exporting feed to Synerise
- In the upper-right corner of the page, click Save settings.
- If you want to preview the feed after saving the settings, but before it’s exported to Synerise, go to
https://yourshopsubdomain.myvtex.com/_v/synerise/feed-preview?start=0&end=10
where:yourshopsubdomainis your store’s subdomain.start(optional parameter) is the ID of the first item to show.end(optional parameter) is the ID of the last item to show.
By default, the preview shows the first 10 items.
- If you want to view the last feed that was generated for export to Synerise, in the upper-right corner, click Open.
At the bottom of the file that opens, you can find the number of items and generation time (UTC).
Additional feed settings
Additional settings on the right side:
- In The frequency of generating the feed, enter a cron expression for how often you want to regenerate the feed for export.
Important:
- The interval between updates must be at least 30 minutes.
- The expression is interpreted starting with full hours, regardless of when you save the settings. For example, if you set the interval to 60 minutes and save the settings at 12:25, the nearest update will be at 13:00, then 14:00, and so on.
- Copies older than 7 days are deleted from VTEX database.
- If you want to only include available products in the feed, switch the Only available products toggle on.
- Only for multistore integrations: In Sales channel, select the store from which you want to send the feed.
- In Number of products processed at once, set the number of records sent in one batch of the export.
If your feed has many parameters, a large batch of data may cause problems with transfer between Synerise and VTEX. We recommend setting the batch size to 1000 or less. - In the upper-right corner of the page, click Save settings.
Adding the feed to Synerise
In Synerise, create a link to the item feed which will be pulled from VTEX.
- In Synerise, go to Settings > AI Engine Configuration > Add feed.
- On the pop-up, select Google Merchant.
- In the Feed link field, enter
https://yourshopsubdomain.myvtex.com/_v/synerise/feed, whereyourshopsubdomainis the subdomain of your store. - Fill out the rest of the form:
- Enter the name of the feed.
- As the file type, select XML.
- Define the frequency of pulling feed updates to Synerise. This should be the same frequency as the interval you set in the cron expression in VTEX.
- In Authentication type, select None.
- Confirm the settings by clicking Apply.
Result: The item feed generated by VTEX starts being pulled into Synerise. You can use data from the feed, for example in search and recommendation.
Enable Synerise Web SDK on the store’s site
In this part of the process, enable tracking the customer activity and using other Web SDK features in your store (excluding the checkout page) by adding a tracking code.
- In your VTEX workspace, go to Stores > (Synerise) Settings.
- In the Tracker code tab, enter the tracking code you added in this part of the process. This field allows customized version of the tracking code as well.
- After the line with
trackerKey, add the following:customPageVisit: true,and'dynamicContent': {'virtualPage': true}.
Result:function onSyneriseLoad() { SR.init({ 'trackerKey':'YOUR_TRACKER_KEY', 'customPageVisit': !0, 'dynamicContent': { 'virtualPage': true } }); } (function(s,y,n,e,r,i,se){s['SyneriseObjectNamespace']=r;s[r]=s[r]||[], s[r]._t=1*new Date(),s[r]._i=0,s[r]._l=i;var z=y.createElement(n), se=y.getElementsByTagName(n)[0];z.async=1;z.src=e;se.parentNode.insertBefore(z,se); z.onload=z.onreadystatechange=function(){var rdy=z.readyState; if(!rdy||/complete|loaded/.test(z.readyState)){s[i]();z.onload = null; z.onreadystatechange=null;}};})(window,document,'script', '//web.snrbox.com/synerise-javascript-sdk.min.js','SR', 'onSyneriseLoad'); - In the upper right corner, click Save settings.
Enable Synerise Web SDK on the checkout page
The checkout page in VTEX requires a custom script to enable Synerise tracker and SDK.
- In your VTEX workspace, click the gear icon in the lower left corner and go to Checkout.
- Next to the name of the store that you are configuring, click the gear icon.
- On the page that opens, go to the Code tab.
- From the Files list, open checkout6-custom.js
- In the file, add the tracking code you added in this part of the process.
WARNING: Don’t add thecustomPageVisitanddynamicContentparameters in this tracking code!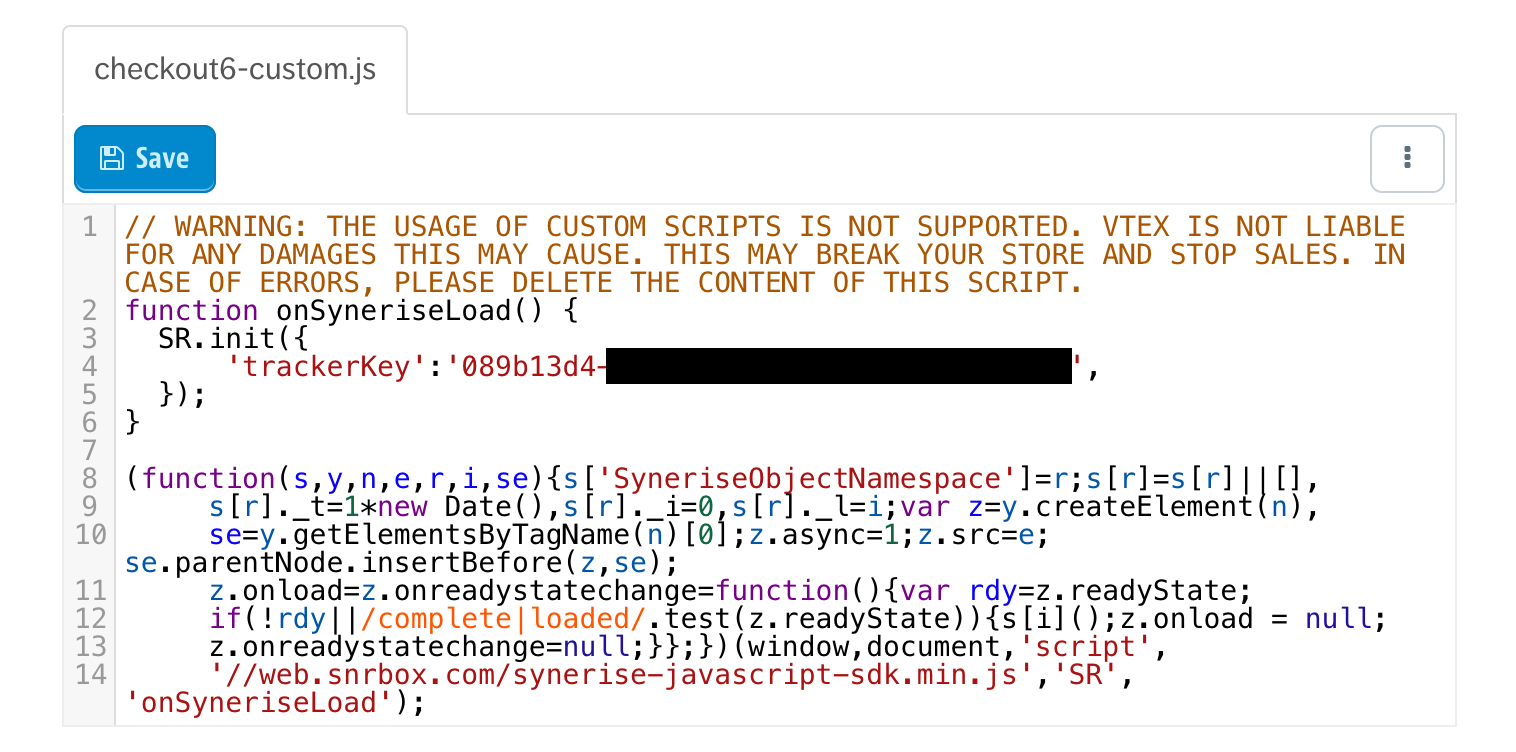
Tracking code added to the checkout page scripts - Click Save.
Result: Synerise SDK is added to the checkout page and the dynamic content used to track events on the checkout page becomes enabled.
Enable data exchange between Synerise and VTEX
In this part of the process, enable data exchange between Synerise and VTEX.
- In your VTEX workspace, go to Stores > (Synerise) Settings.
- In the Api tab, enter the Synerise API key which you created in the previous part of the process.
- In the Host field, enter the API host URL. Depending on the cloud where your Synerise workspace is hosted, use:
- for Microsoft Azure:
https://api.synerise.com - for Google Cloud Platform:
https://api.geb.synerise.comTip:If you don’t know where your workspace is hosted, you can check by looking at the link you’re using to access the Synerise platform.
- If it’s
https://app.synerise.com/login, the workspace is hosted on Microsoft Azure - If it’s
https://app.geb.synerise.com/login, the workspace is hosted on Google Cloud Platform
- If it’s
- for Microsoft Azure:
- In the upper right corner, click Save settings.
Enable event tracking
In this part of the process, enable tracking of the backend events related to customers and products.
-
In your VTEX workspace, go to Stores > (Synerise) Settings.
-
In the Events tab, enable the Sending events to Synerise toggle.
-
You can add the following events to the list:
Event name in VTEX Description Event name in Synerise Customer login This event is generated when a customer logs in to their account on your website. client.login Customer logout This event is generated when a customer logs out from their account on your website. client.logout Add to cart This event is generated when a customer adds an item to the cart. product.addToCart Remove from cart This event is generated when a customer removes an item from the cart. product.removeFromCart Cart status This event is generated when the customer changes the contents of the cart. cart.status Order updated This event is generated when a customer changes the order. transaction.charge and product.buy Newsletter subscription This event is generated when a customer enables the email marketing agreement. marketingAgreement.turnOn Important: The events connected with creating, registering, and updating customers will be configured in this part of the process. -
Complete by clicking Save settings.
Implement a service worker
In this part of the process, you will implement a service worker into your eshop which will let you display web push notifications.
- In your VTEX workspace, go to Stores > (Synerise) Settings.
- On the Service worker tab, enter the contents of the
snr-sw.jsfile you downloaded while configuring web push notifications in Synerise. - Confirm the settings by clicking Save settings.
Enable sending customer data
In this part of the process, you will:
- Configure the attributes to send (or leave them at default).
- Enable sending data to Synerise when a customer account is:
This process involves creating webhooks.
Attributes sent to Synerise
The following table lists the customer data that is sent to Synerise.
The same data is sent when synchronizing historical data.
If the phone number or email are incorrect, the profile is not created or updated at all. If multiple profiles are created/updated as part synchronizing historical data, only the profiles with errors are skipped.
The phone number must match the following regular expression:
(^\+[0-9 \-()/]{6,19}$)|(^[0-9 \-()/]{6,20}$)
The email must match the following regular expression:
^(([^<>()\[\]\\.,;:\s@"]+(\.[^<>()\[\]\\.,;:\s@"]+)*)|(".+"))@((\[[0-9]{1,3}\.[0-9]{1,3}\.[0-9]{1,3}\.[0-9]{1,3}])|(([a-zA-Z\-0-9]+\.)+[a-zA-Z]{2,}))$
| Property in VTEX | Property in Synerise |
|---|---|
email |
email |
firstName |
firstName |
lastName |
lastName |
userId |
customId |
1. businessPhone2. phone3. homePhone |
phone1 |
isNewsletterOptIn |
agreements.email |
birthDate |
birthDate |
gender |
sex |
profilePicture |
avatarUrl |
country |
countryCode |
state |
province |
city |
city |
postalCode |
zipCode |
street + number + complement |
address |
| other attributes | Additional attributes that you add. See “Sending custom attributes” |
1The numbers are checked in the listed order. The first non-empty one is saved in Synerise.
Sending custom attributes
If you want to send additional customer attributes:
- In your VTEX workspace, go to Stores > (Synerise) Settings.
- Open the Data tab.
- In the Customer attributes selector, from the dropdown, select the additional attributes that you want to send to Synerise.
- Click Save settings.
Customer created an account
- In the VTEX workspace, go to Store Settings > Master Data.
- Select the method of authentication.
- After you have been authenticated, select the Trigger tab.
- From the Action dropdown list, select Send an HTTP request.
- In the Name field, enter a meaningful name of the trigger (for example, “Create customer”).
- From the Data Entity dropdown list, select Customer.
- Set the Status option to Enabled.
- In the Rules tab, from the Trigger rule dropdown list, select A record is created.
- In the Schedule tab, select Run ASAP.
- In the If Positive tab:
- In the URL field, type the endpoint:
https://yourshopsubdomain.myvtex.com/_v/private/synerise/triggers/customer
Replaceyourshopsubdomainwith your shop’s subdomain. - As the method, select POST.
- In the headers, add
x-synerise-api-keywith your API key as the value. - In the request body, enter the following code:
where
{ "id":"{!id}" }{!id}will automatically be replaced with the ID of the record.
- In the URL field, type the endpoint:
- Click Save.
Customer updated the account
- In the VTEX workspace, go to Store Settings > Master Data.
- Select the method of authentication.
- After you have been authenticated, select the Trigger tab.
- From the Action dropdown list, select Send an HTTP request.
- In the Name field, enter a meaningful name of the trigger (for example, “Update customer”).
- From the Data Entity dropdown list, select Customer.
- Set the Status option to Enabled.
- In the Rules tab, from the Trigger rule dropdown list, select A record is changed.
- In the Schedule tab, select Run ASAP.
- In the If Positive tab:
- In the URL field, type the endpoint:
https://yourshopsubdomain.myvtex.com/_v/private/synerise/triggers/customer
Replaceyourshopsubdomainwith your shop’s subdomain. - As the method, select PATCH.
- In the headers, enter the
x-synerise-api-keyparameters and as a value your API key. - In the request body, enter the following code:
where
{ "id":"{!id}" }{!id}will automatically be replaced with the ID of the record.
- In the URL field, type the endpoint:
- Click Save.
Customer account has been deleted
- In the VTEX workspace, go to Store Settings > Master Data.
- Select the method of authentication.
- After you have been authenticated, select the Trigger tab.
- From the Action dropdown list, select Send an HTTP request.
- In the Name field, enter a meaningful name of the trigger (for example, “Delete customer”).
- From the Data Entity dropdown list, select Customer.
- Set the Status option to Enabled.
- In the Rules tab, from the Trigger rule dropdown list, select A record is deleted.
- In the Schedule tab, select Run ASAP.
- In the If Positive tab:
- In the URL field, type the endpoint:
https://yourshopsubdomain.myvtex.com/_v/private/synerise/triggers/customer
Replaceyourshopsubdomainwith your shop’s subdomain. - As the method, select DELETE.
- In the headers, enter the
x-synerise-api-keyparameters and as a value your API key. - In the request body, enter the following code:
where
{ "email":"{!email}", "userId": "{!userId}" }{!email}and{!userId}will automatically be replaced with the email of the customer and the ID of a customer respectively. In Synerise,userIdis the equivalent ofcustomId.
- In the URL field, type the endpoint:
- Click Save.
Historical data from VTEX
If you want to export historical information about orders and customers from VTEX to Synerise, you can use the Synchronization feature. It lets Synerise access the VTEX database and fetch data about customers and transactions.
Some customer attributes are sent by default. You can add custom attributes. For details, see “Attributes sent to Synerise”.
If the phone number or email are incorrect, the profile is not created or updated at all. If multiple profiles are created/updated as part synchronizing historical data, only the profiles with errors are skipped.
The phone number must match the following regular expression:
(^\+[0-9 \-()/]{6,19}$)|(^[0-9 \-()/]{6,20}$)
The email must match the following regular expression:
^(([^<>()\[\]\\.,;:\s@"]+(\.[^<>()\[\]\\.,;:\s@"]+)*)|(".+"))@((\[[0-9]{1,3}\.[0-9]{1,3}\.[0-9]{1,3}\.[0-9]{1,3}])|(([a-zA-Z\-0-9]+\.)+[a-zA-Z]{2,}))$
After exporting data to Synerise, you can use to train AI models, build analytics, create communication campaigns, and more.
Synchronization is a one-time transfer, usually used for historical data. Continuous connection (event tracking, transaction tracking, customer data updates) for exchanging new data is achieved by completing the integration as described in “Configuration in Synerise” and “Configuration in VTEX”.
Each exported transaction is saved in Synerise as a transaction.charge event and a number of related product.buy events. Exported customers are saved as profiles. If a transaction or profile already exists in Synerise and the synchronization contains new data, the transaction or profile is updated.
- In your VTEX workspace, create a user role with a set of permissions required for historical imports:
- Go to Account settings > User roles > New role
- Select the following permissions for Product:
- OMS
- Notify payment
- Notify invoice
- View order
- Notify refund
- Order feed subscription
- View store sales stats
- Feed v3 and Hook Admin
- Feed v3 and Hook view only
- Subscription view only
- Subscription metrics and reports
- List Orders
- Dynamic Storage
- Full access to all documents
- Insert or update document (not remove)
- List data entity
- Create data entity
- Remove data entity
- View data entity details
- CMS
- CMS GraphQL API
- Pricing
- Read prices
- Read trade policy configurations
- Search
- General Settings
- OMS
- In your VTEX workspace, go to Stores > (Synerise) Synchronization.
- If this is the first time that you’re accessing this feature, you are asked to allow Synerise access to VTEX API. To do so:
- In a new browser tab, open your VTEX admin panel.
- Generate an internal application key and token as described in VTEX documentation.
Important: When you generate the token, copy it immediately. It won’t be accessible later.
- Return to the tab where you need to enter the app key and token in the Synerise plugin.
- Paste the key and token into the corresponding fields.
- Click Authorize.
- Click Create New.
- In the pop-up that opens:
- Select the date range for the export.
- Select one of the export types:
- ORDERS exports data about transactions and creates/updates
transaction.chargeandproduct.buyevents. - CUSTOMERS exports data about customers and creates/updates profiles.
- ORDERS exports data about transactions and creates/updates
- Click OK.
Result: The transfer starts. You can check its progress in the Status column on the list of synchronizations.