Integrating Magento with Synerise
This document provides integration instructions for the v2.x and higher plugin versions, which support both single-store and multi-store implementations.
The Synerise users can integrate their websites built on the Magento platform. The scope of integration involves the transmission of the following data from Magento to Synerise:
- information about the customers (their activity, identification of a customer throughout the whole journey),
- information about the transactions,
- information about the items
Prerequisites
- You must be granted user permissions to access API key section and add the key in Synerise.
- You must have access to admin panel in the Magento platform.
Configuration in Synerise
Log in to your workspace in Synerise and perform the steps described below:
Create an API key
-
In Synerise, go to Settings > API Keys > Add API key.
-
On the pop-up:
- Enter the name of the API key (it will be visible on the list of API keys).
- Select Workspace.
- Optionally, enter the description of the key (it will be visible on the list of API keys).
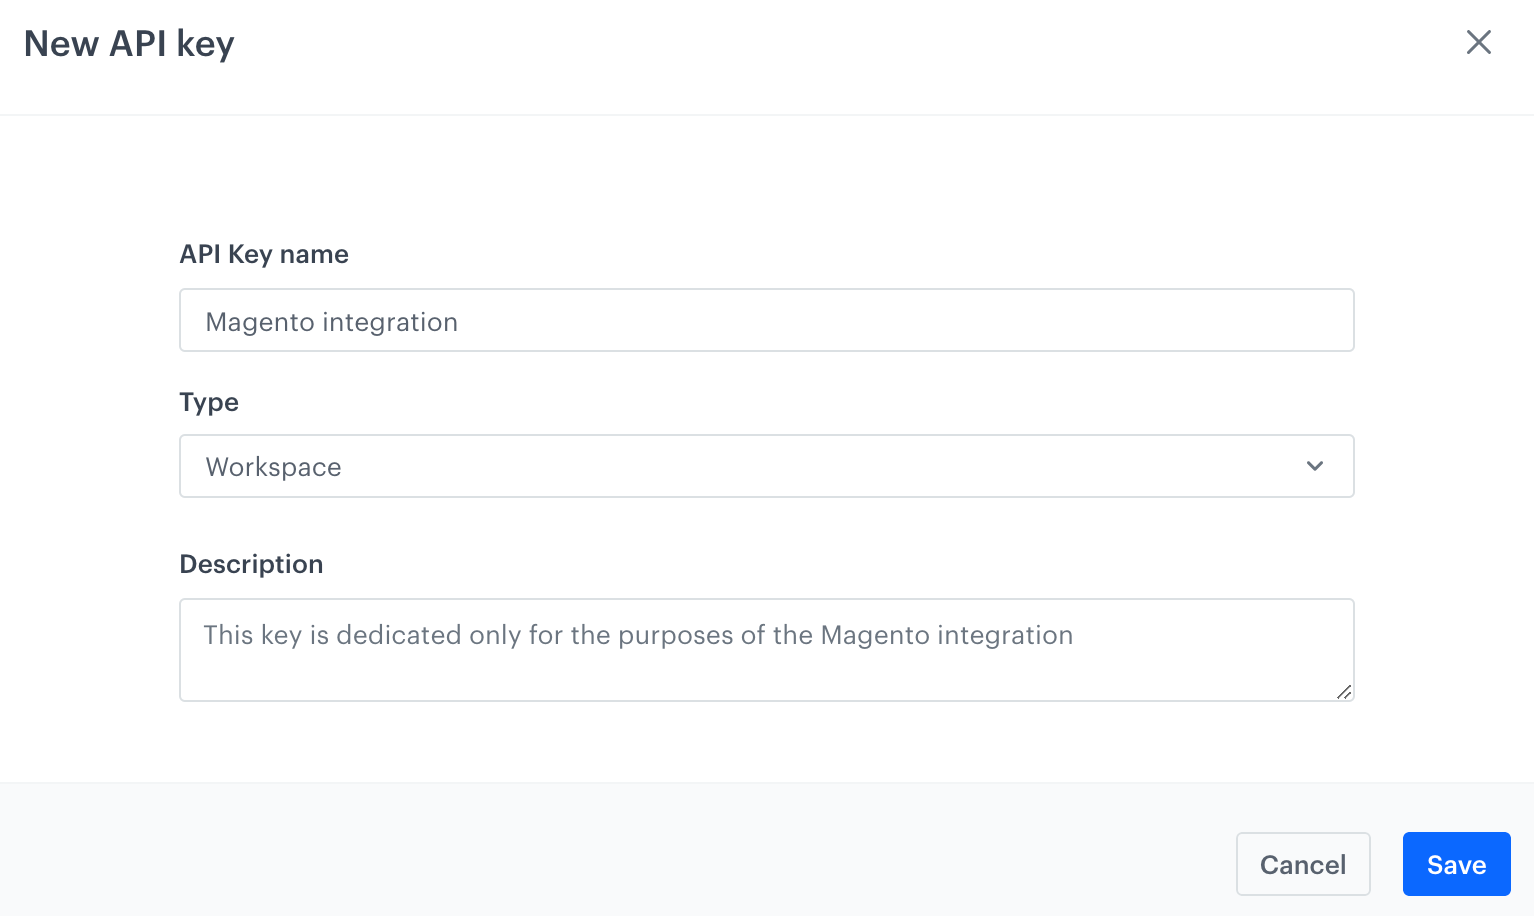
Adding a new API key for the Magento integration -
Confirm by clicking Save.
-
Find the key on the top of API key list and click Permissions.
-
On the pop-up, select the following permissions:
- CATALOG:
- CATALOGS_CATALOG_CREATE
- CATALOGS_CATALOG_READ
- CATALOGS_ITEM_BATCH_CATALOG_CREATE
- CLIENT:
- API_BATCH_CLIENT_CREATE
- API_CLIENT_CREATE
- EVENTS:
- API_ADDED_TO_CART_EVENTS_CREATE
- API_ADDED_TO_FAVORITES_EVENTS_CREATE
- API_CUSTOM_EVENTS_CREATE
- API_LOGGED_IN_EVENTS_CREATE
- API_LOGGED_OUT_EVENTS_CREATE
- API_REGISTERED_EVENTS_CREATE
- API_REMOVED_FROM_CART_EVENTS_CREATE
- TRACKER
- TRACKER_CREATE
- TRANSACTION
- API_BATCH_TRANSACTION_CREATE
- API_TRANSACTION_CREATE
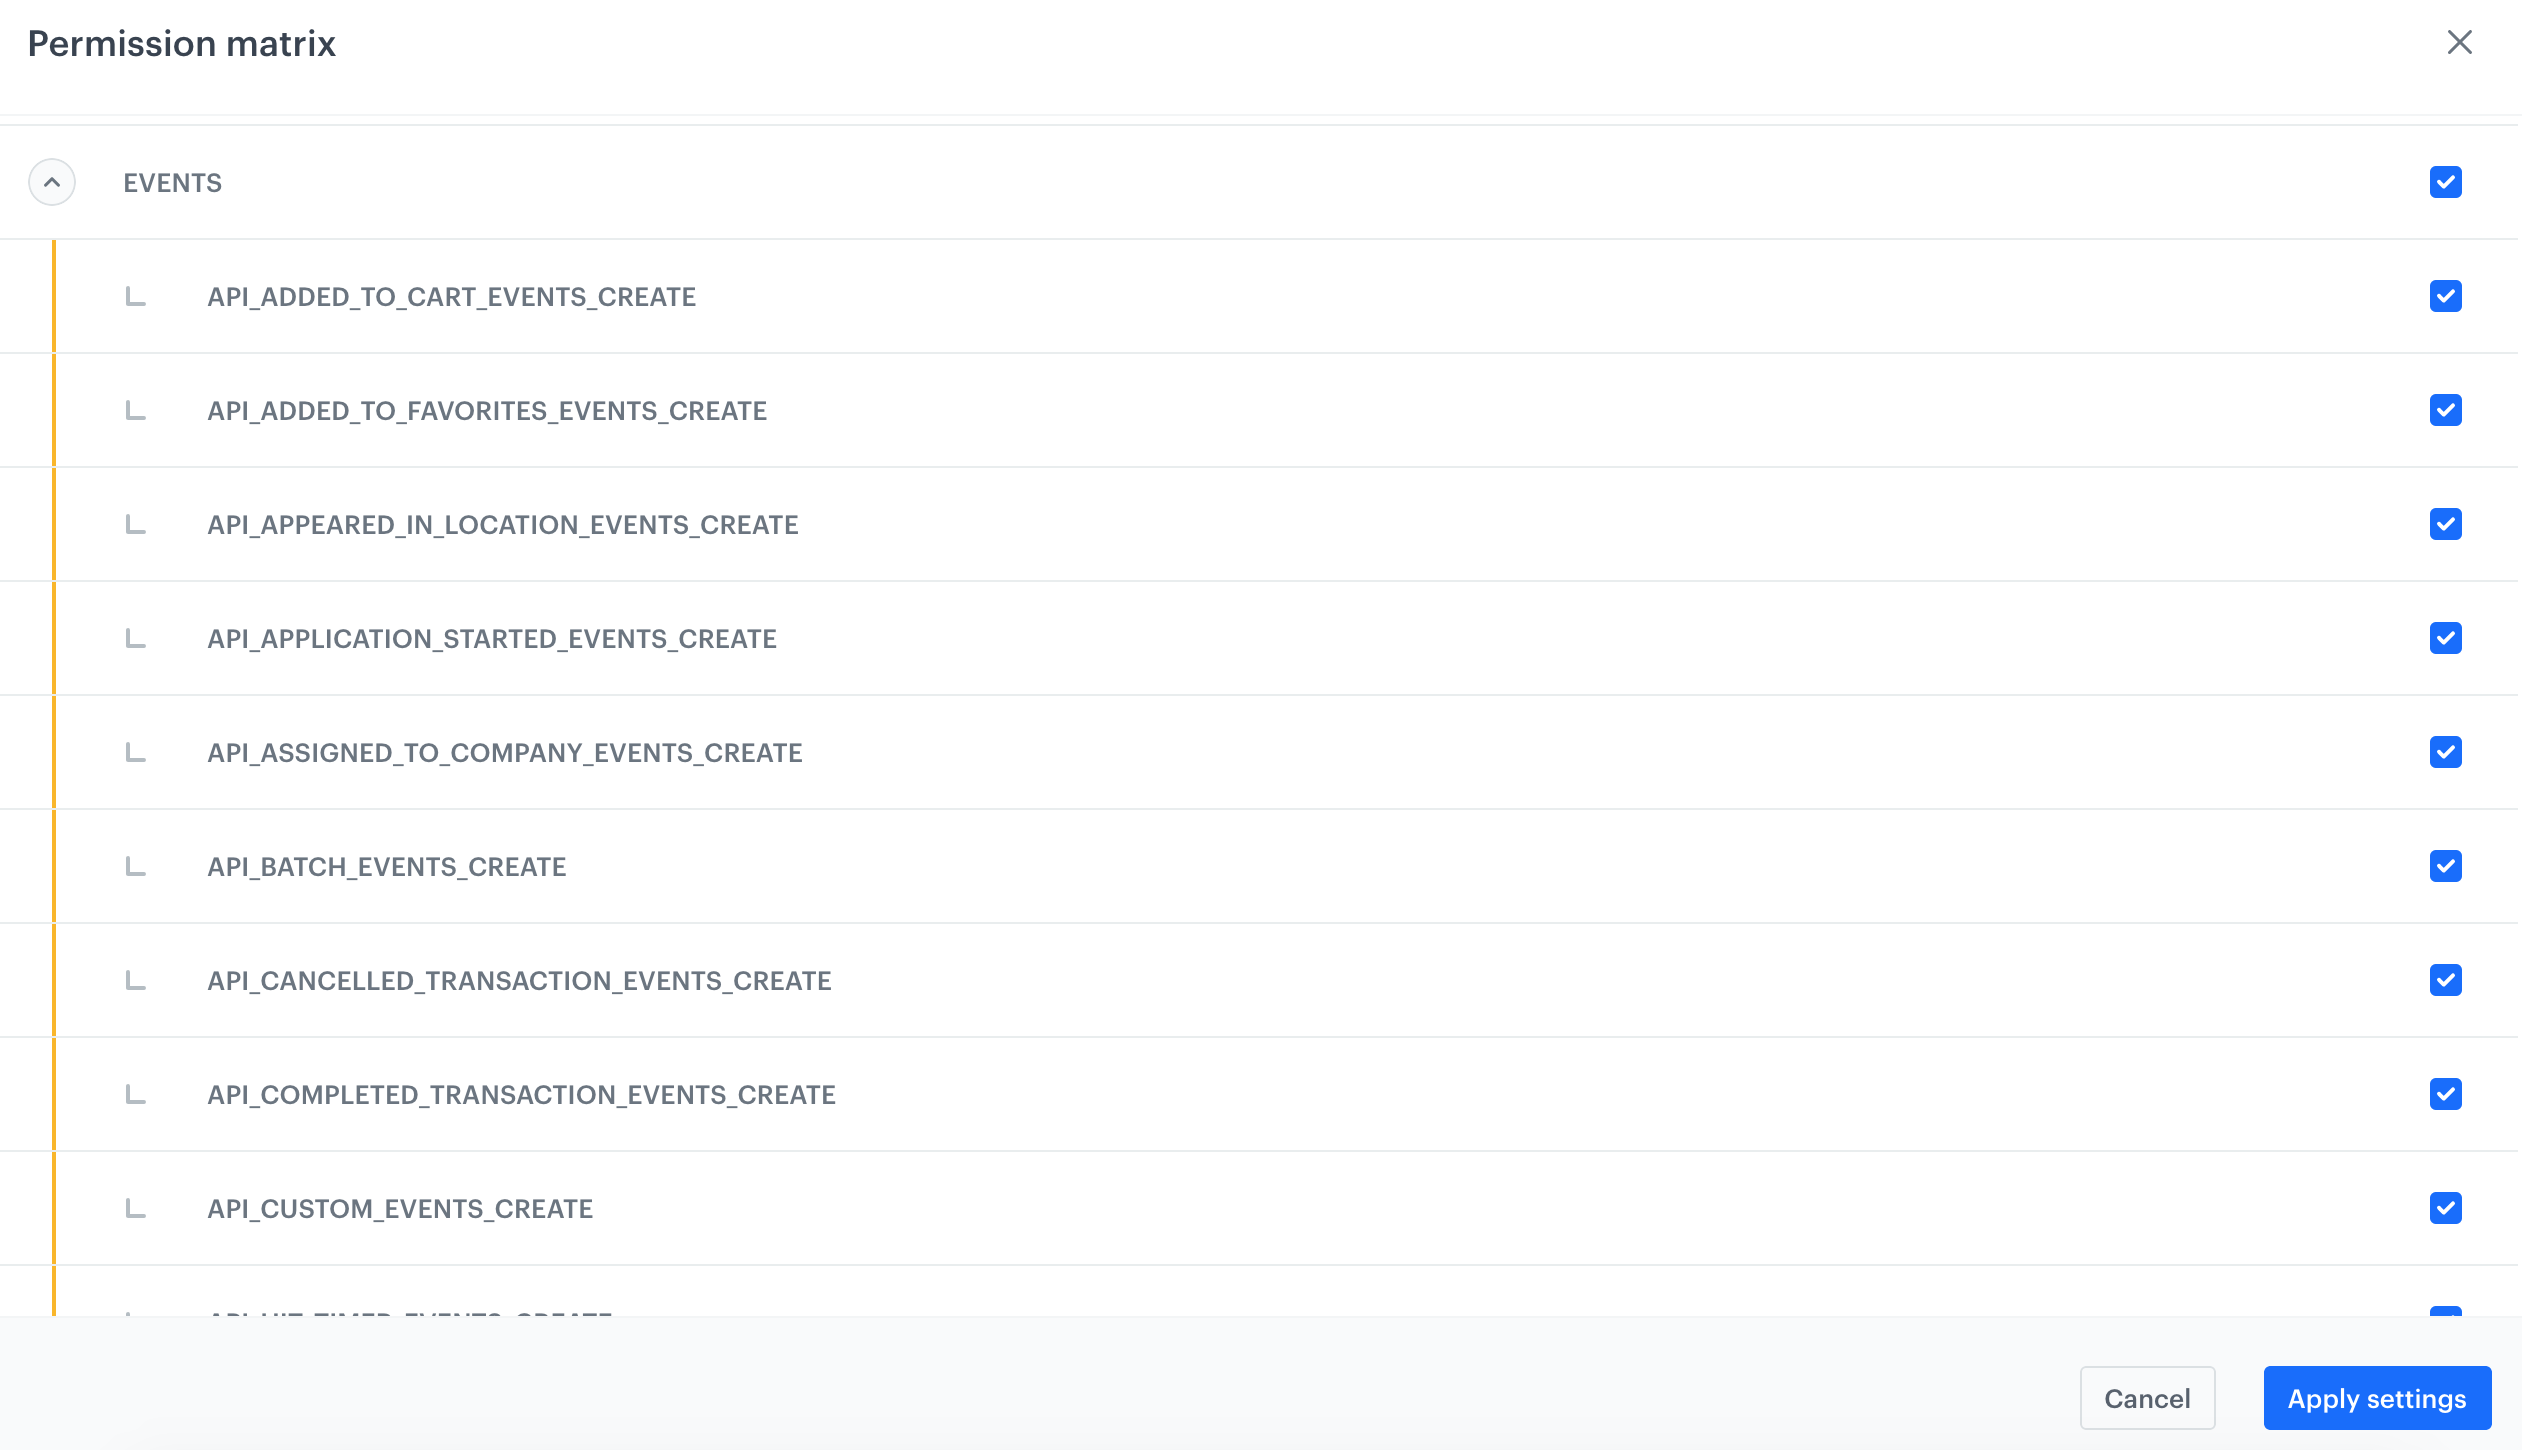
Permissions for the API key required by the Magento integration - CATALOG:
-
Confirm by clicking Apply settings.
-
On the General section, click Show.
-
Copy the API key and paste to the notepad.
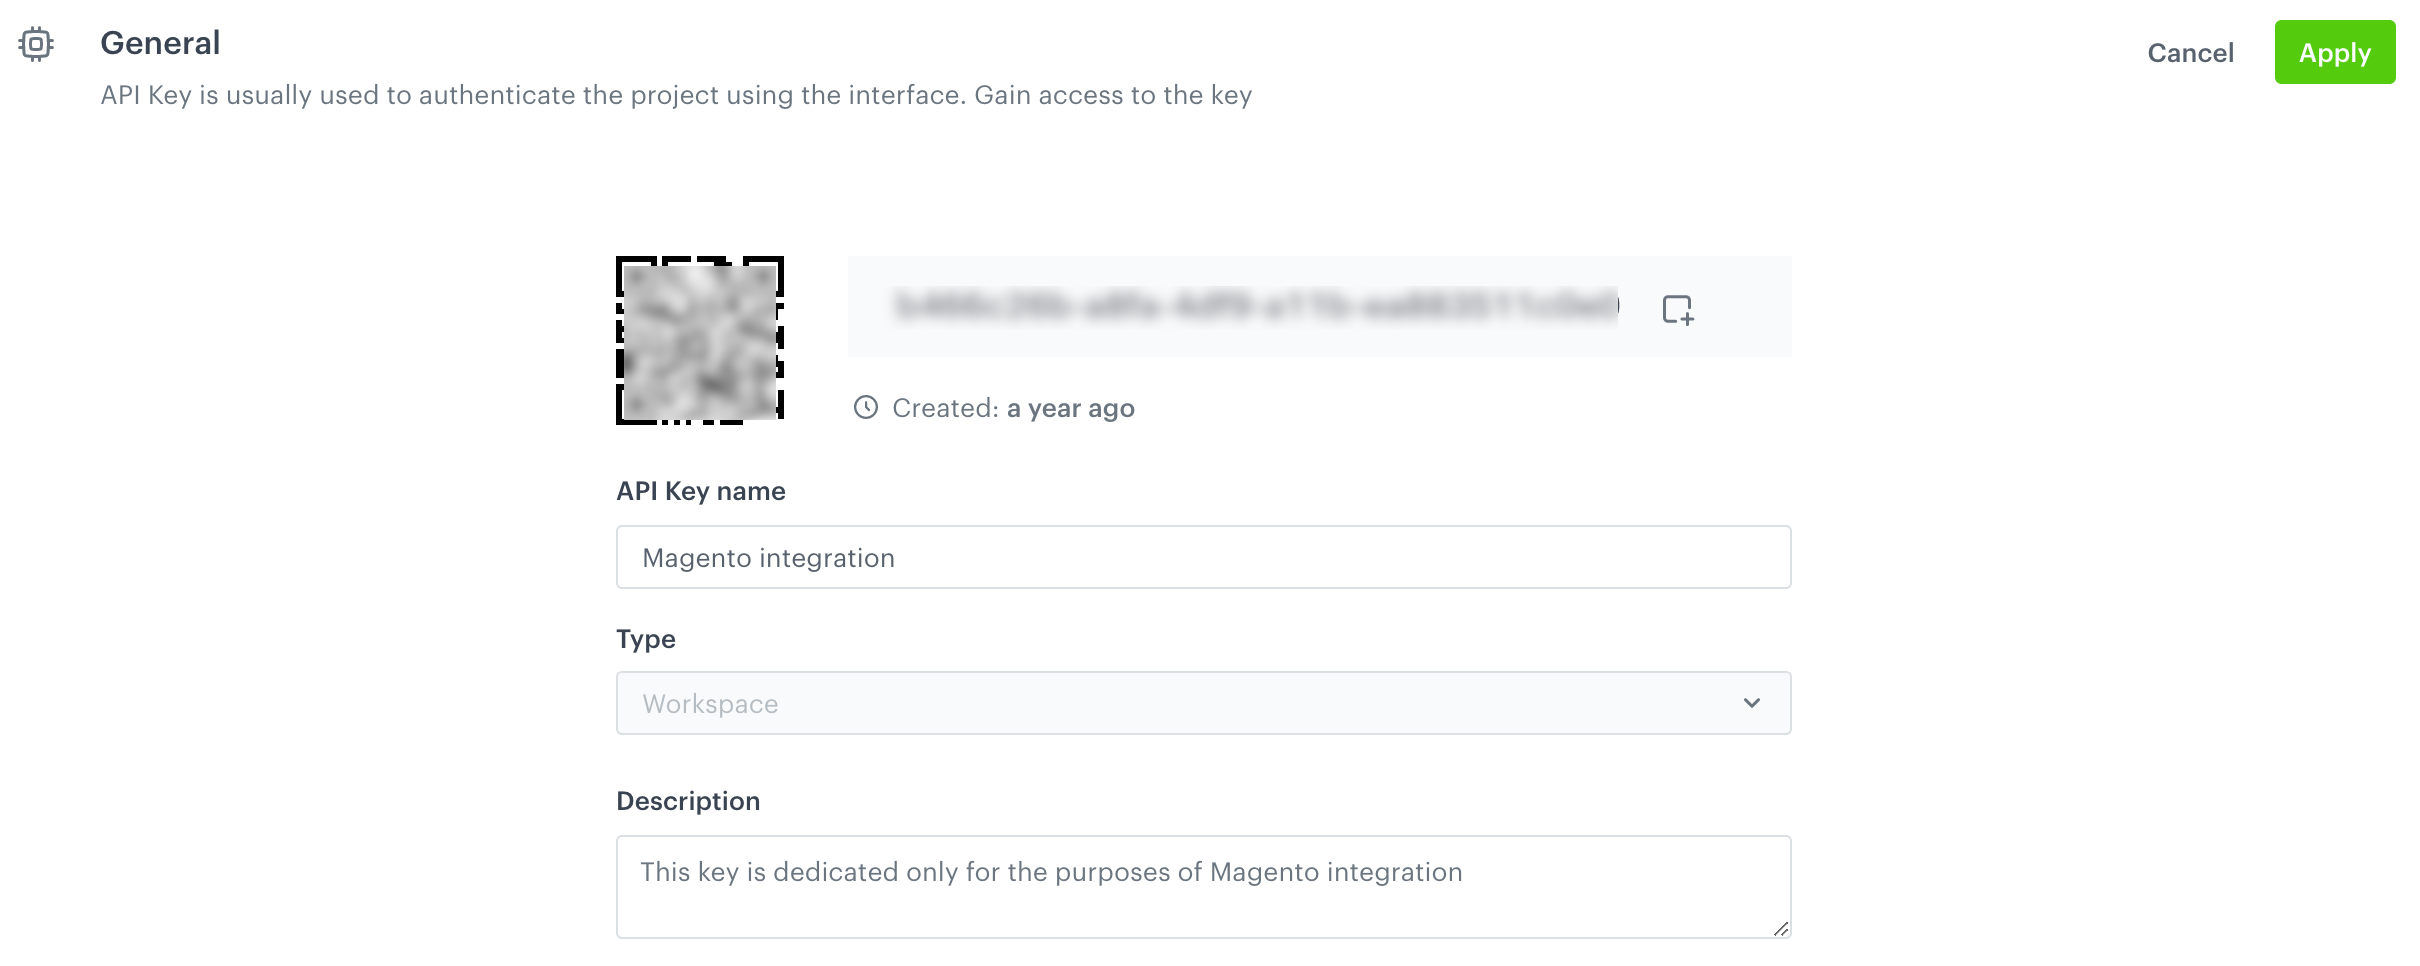
Details of the API key
Enable basic access authentication (optional)
By default, the authorization process involves obtaining a token with a limited lifespan. To acquire this token, you must send a request. Alternatively, basic authorization requires only the usage of a GUID and API key, eliminating the need for additional requests or timeouts. However, this approach may increase vulnerability.
The full instruction is available in “Basic access authentication”
Configuration in the Magento panel
Log in to your administration panel in Magento and perform the steps described below:
Download the Synerise plugin
To download the Synerise plugin in Magento, click here.
Add a workspace
In this part of the process, you need to add a Synerise workspace to your Magento administration panel by using the API key of a workspace. This will allow you to exchange the data between Synerise and Magento.
-
In your Magento administration panel, go to Marketing > Synerise > Workspaces.
-
Click Add workspace.
-
From the Environment dropdown list, select the option according to your Synerise deployment variant.
-
In the Api Key field, enter the API key you created in the previous steps.
-
If you want to use basic access authentication:
- Set the Enable option to Yes.
- In the GUID field, enter the GUID you obtained while performing the “Basic access authentication” procedure.
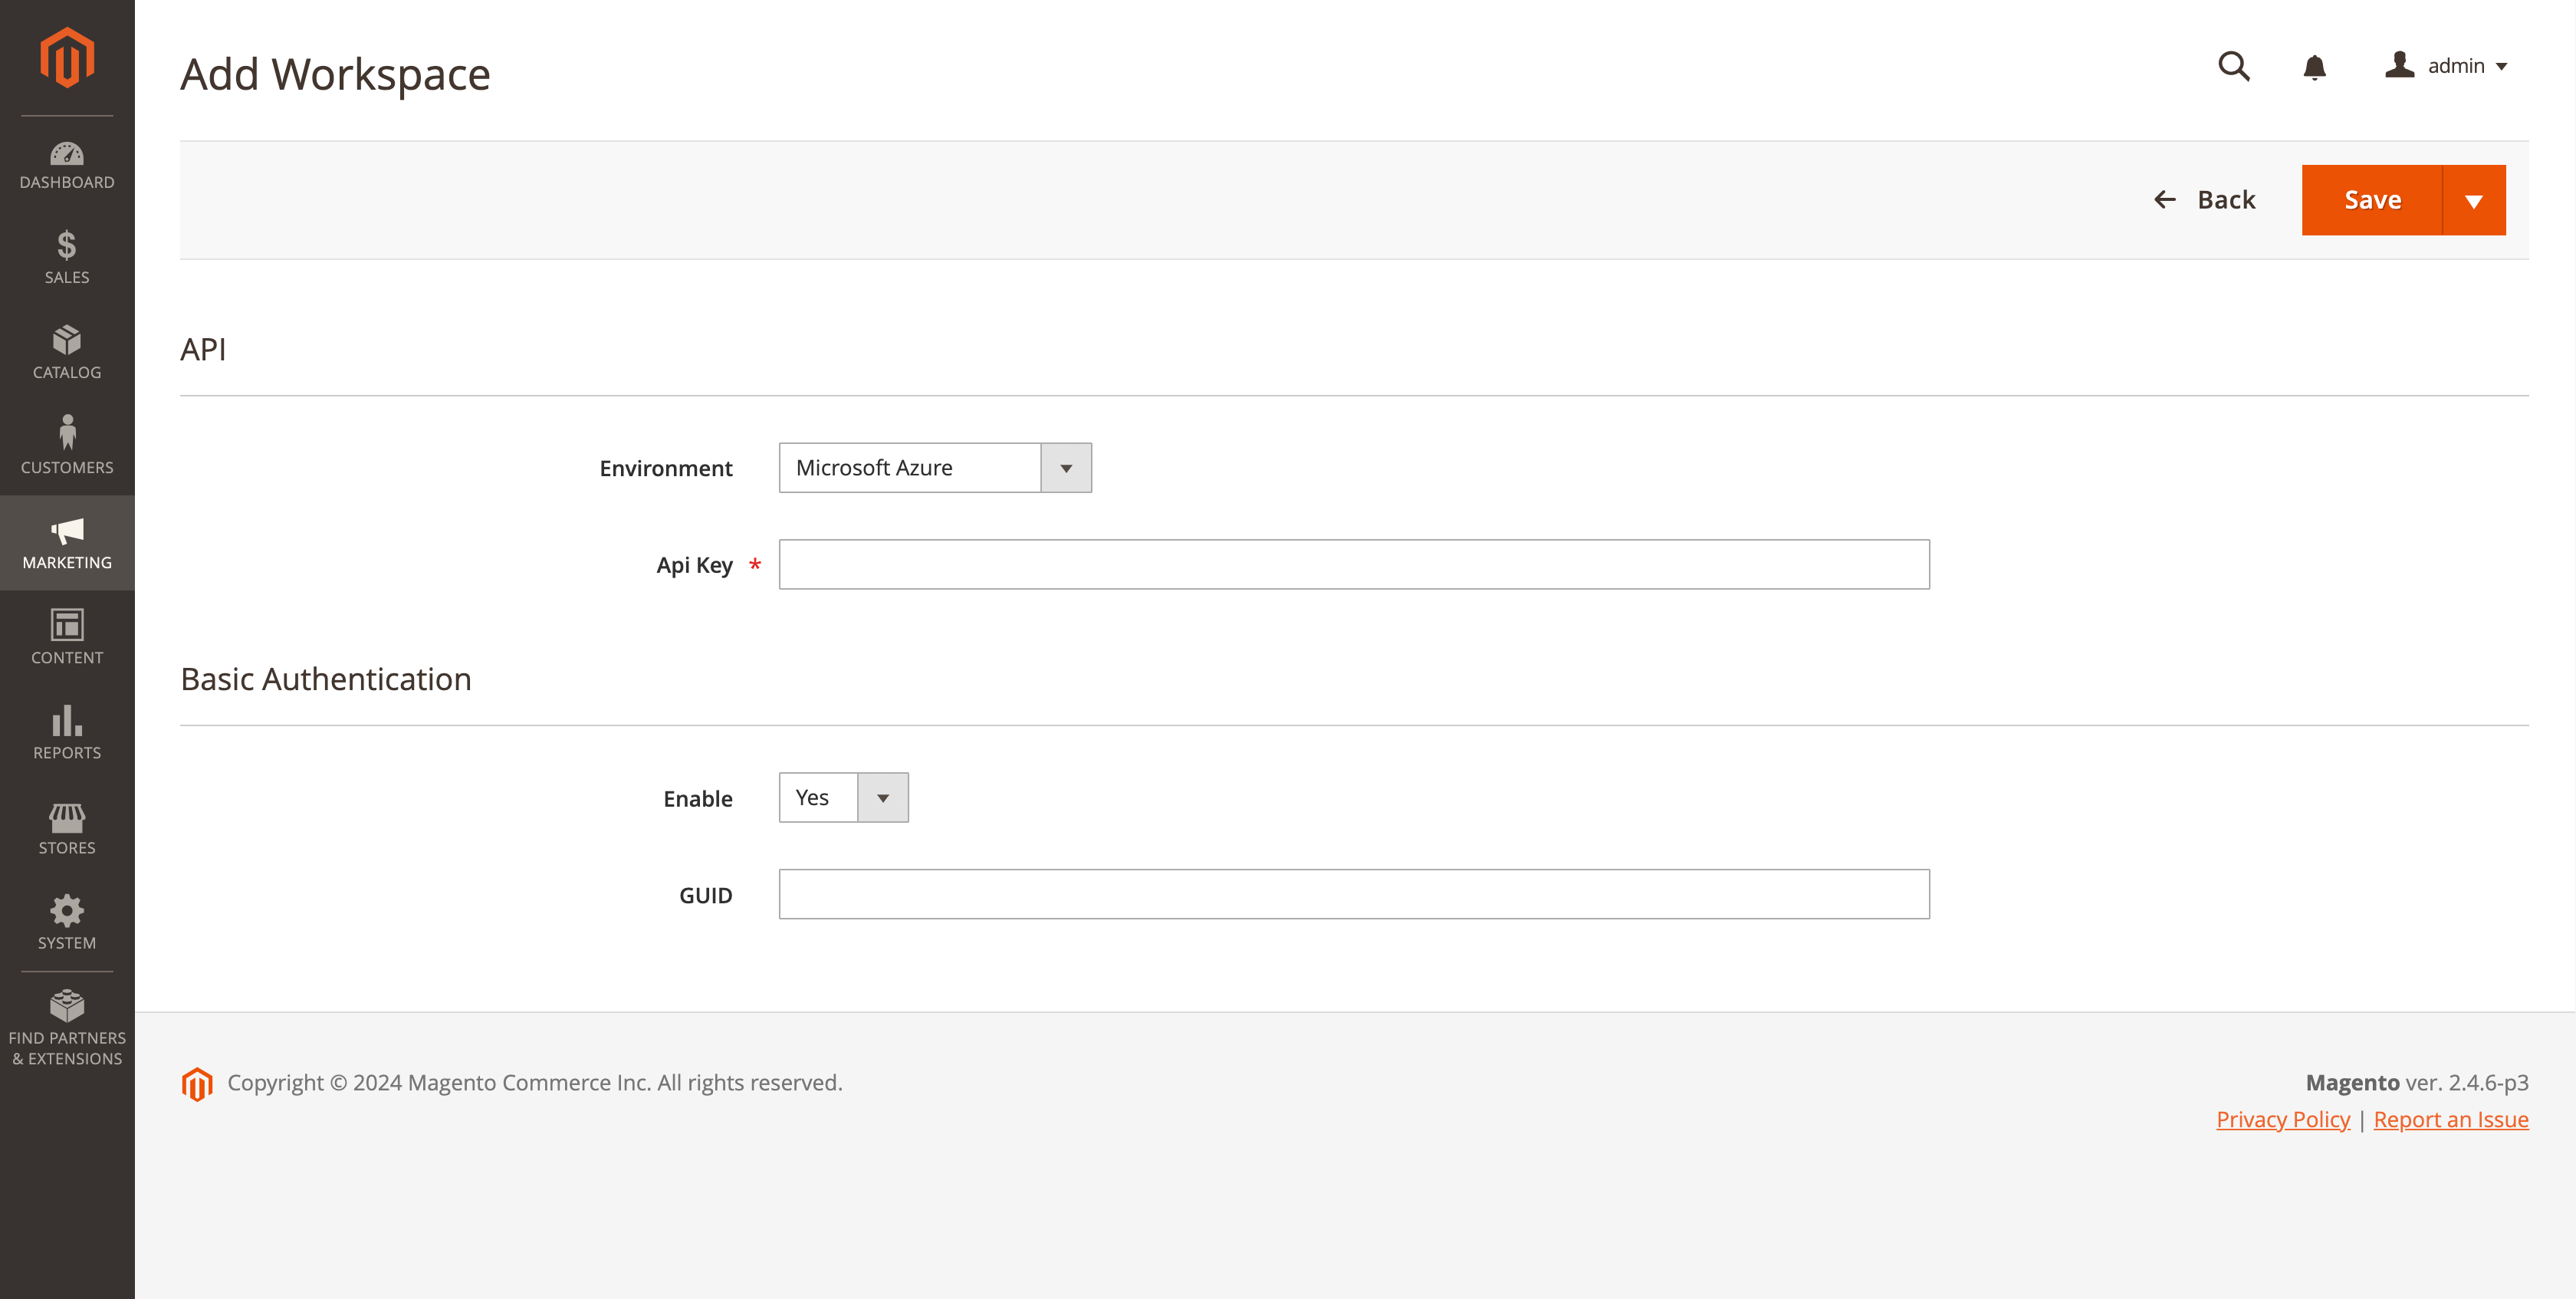
Adding a workspace -
To add more workspaces, repeat actions from step 2 onwards.
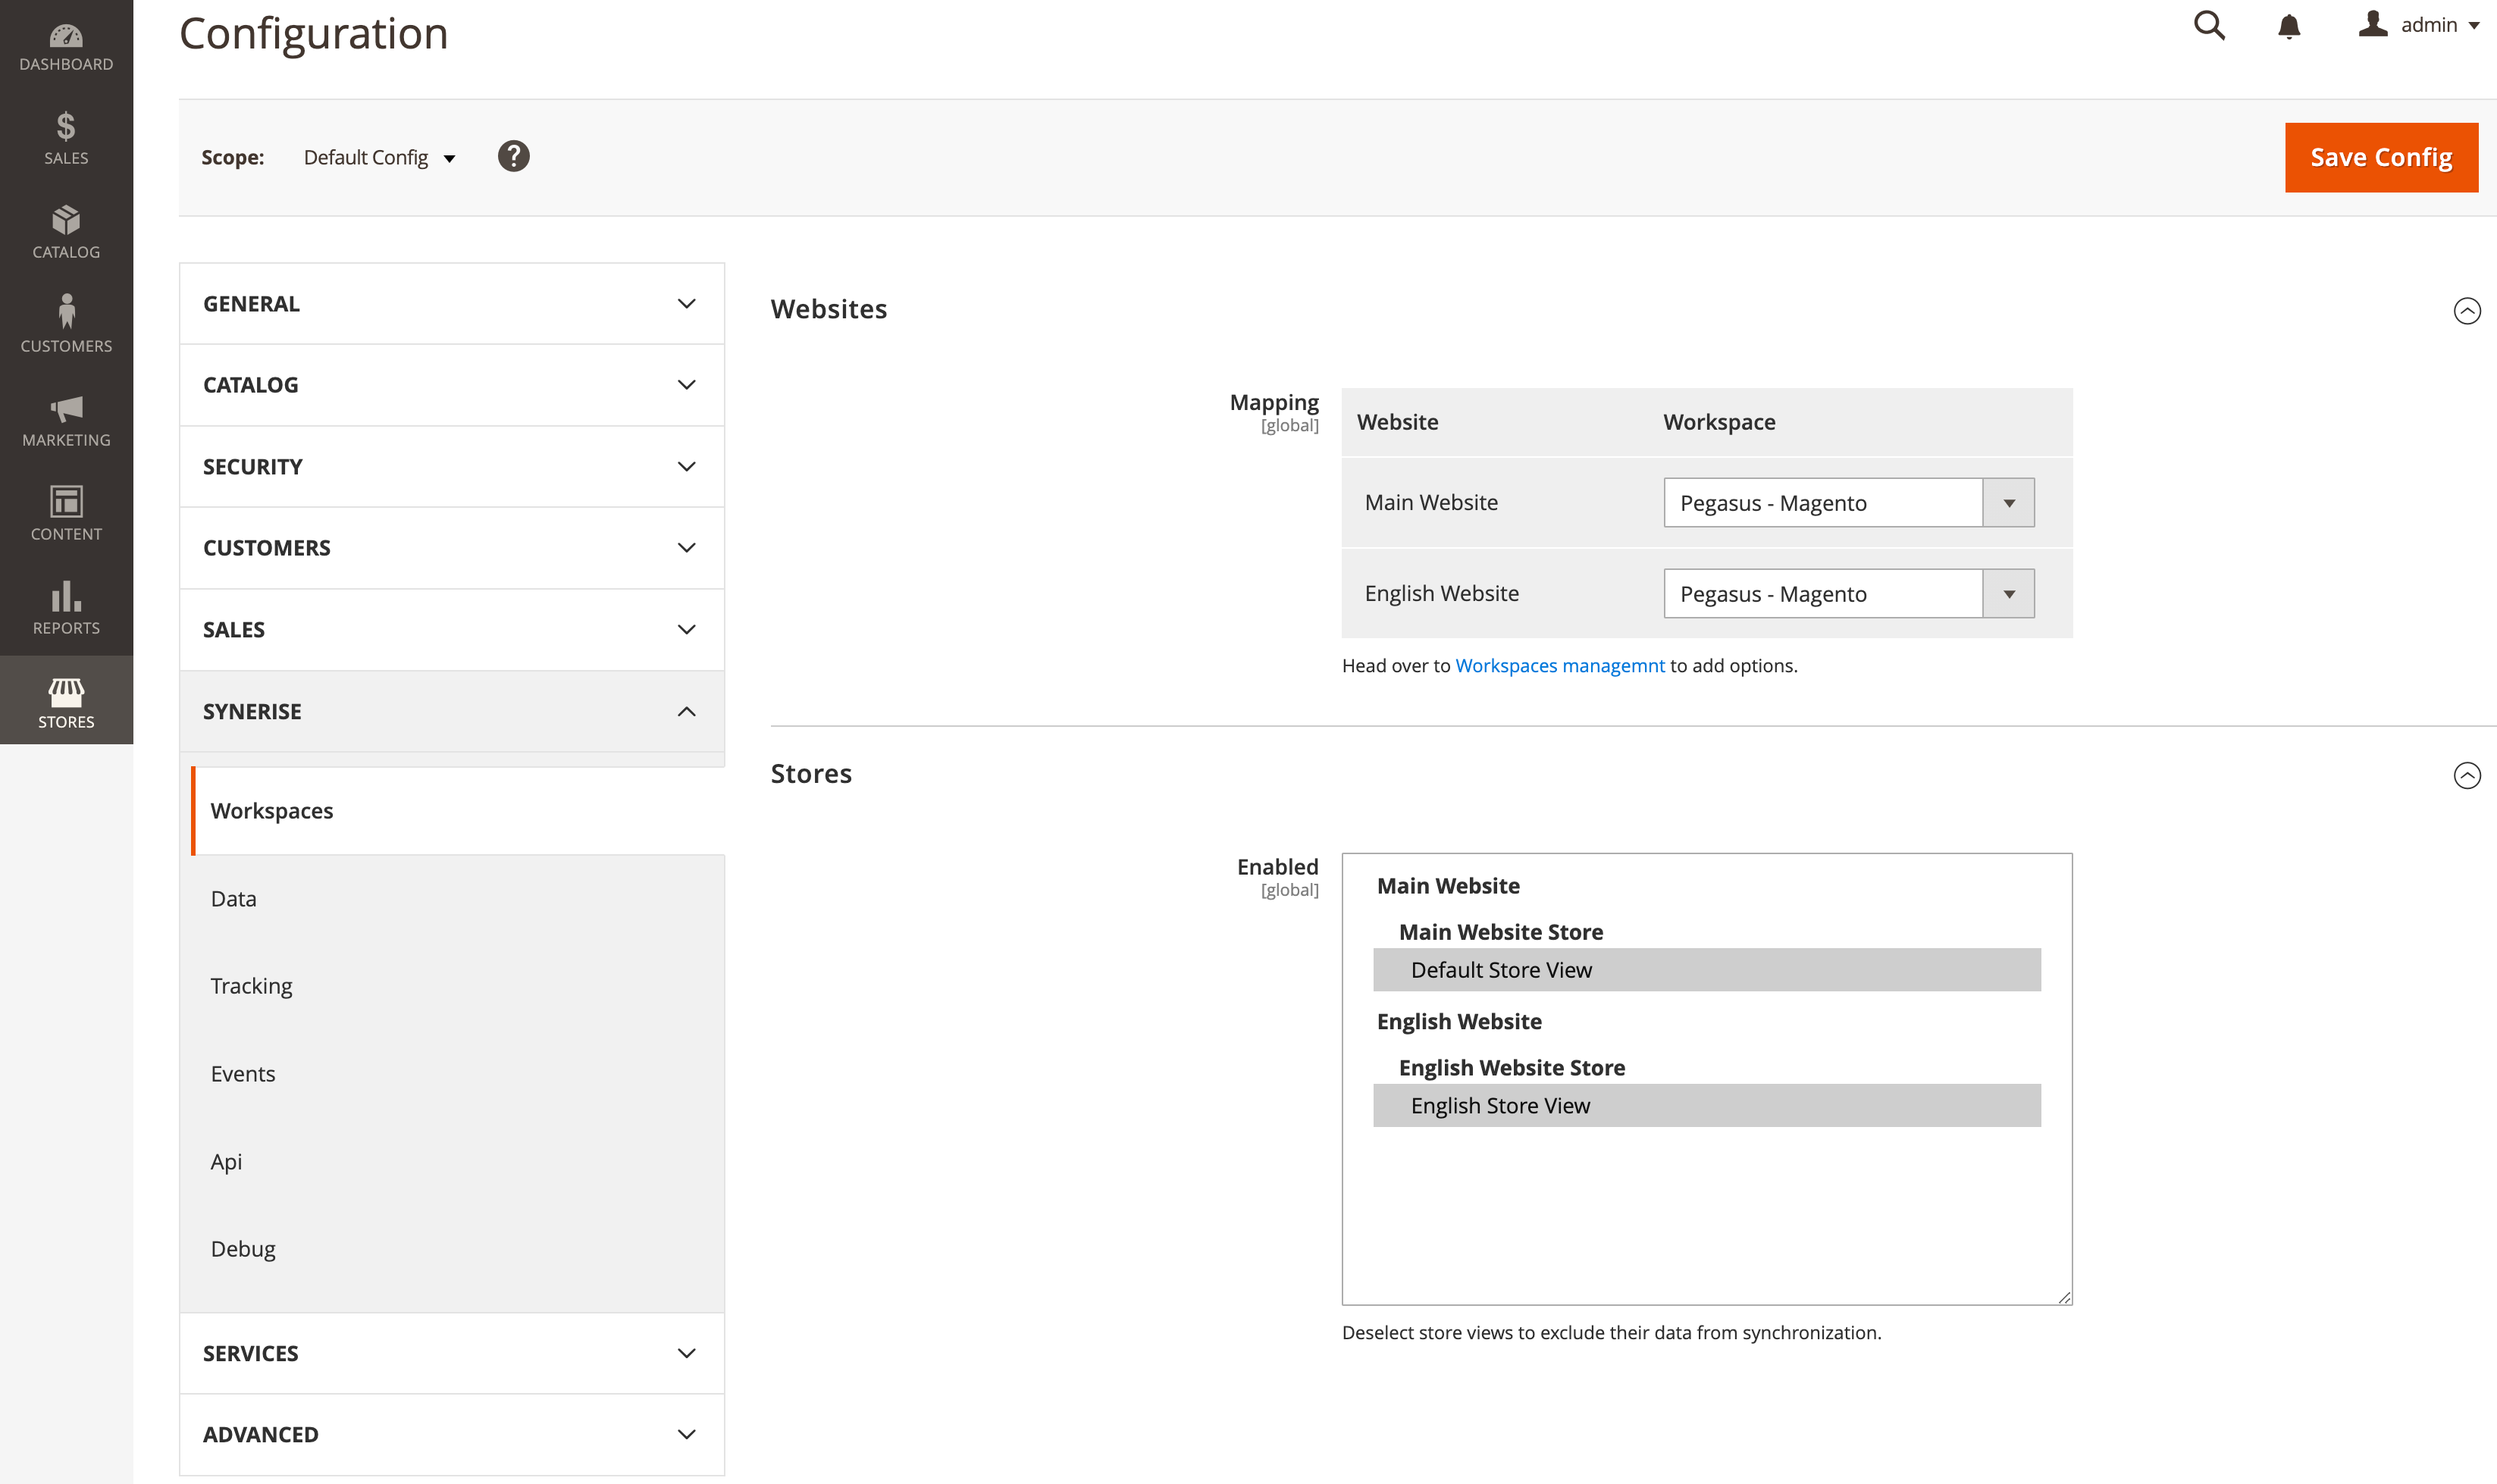
Assign workspace to your website
In this part of the process, assign the workspace you added to the Magento administration panel to the website you manage in Magento. This way, you can exchange data between Synerise and a website in Magento.
- Go to Stores > Configuration > Synerise.
- In the Website section, assign a workspace to your website by selecting a workspace from the dropdown list.
- If you have more websites, you can assign more workspaces to them.
- In the Stores section, you can select stores for event tracking and data synchronization with Synerise.
Enable page tracking
In this part of the process, you can enable tracking the customer activity in your store by a tracking code which is added automatically as you assign workspaces to the websites. You can also set advanced options related to page tracking in this section as well.
- On the left panel, select the Tracking section.
- Set the Enabled option to Yes.
- Recommended: Set the Open Graph option to Yes.
Result: Magento sends the following OG tags to Synerise:
-product:retailer_part_nowhich is the SKU of the item,
-product:original_price:amountwhich is the original price (before discounts, if any)
-product:price:amountwhich is the current price of the item
WARNING: When Open Graph is switched off, theproduct:retailer_part_no parameterparameter is not added to the page.visit events. This means the event doesn’t include an identifier of the viewed event, preventing the generation of Synerise recommendations based on the Similar model, if you use any. Cart and transaction events remain unaffected. - In case you need to customize the tracking code, in the Custom script subsection, set the Enabled option to Yes. And then, make changes to the code.
- If multiple subdomains share a single workspace, in the Cookie domain field enter the domain of the common cookies.
- If you need a custom implementation of the
page.visitevent, in the Custom Page Visit field select Yes. And then make changes to the code. - If you use the tracking code for single page applications, change the Virtual Page option to Yes.
Enable event tracking and queuing events
In this part of the process, enable tracking of the backend events related to customers and products. Also, you can enable queuing events instead of sending them in real time. By default, events are sent in real time.
-
In the left panel, select Events section
-
Select the scope of tracked events.
- Set the Enabled option to Yes.
- Select the events (
command + clickorctrl + click) that will be tracked by Synerise and available in the customers’ profiles. You can choose from the following events:
Important: We recommend selecting all the events.Click here to expand the list and description of eventsEvent Description Action name in Synerise Customer login This event is generated when a customer logs in to
their account on your website.client.login Customer logout This event is generated when a customer logs out from
their account on your website.client.logout Customer updated This event is generated when a customer makes changes to their account (for example, updates information about birthday, location, and so on). client.updateData Customer registration This event is generated when a customer creates an account on your website. client.register Customer added product to cart This event is generated when a customer adds an item
to the cart.product.addToCart Customer removed product from cart This event is generated when a customer removes
an item from the cart.product.removeFromCart Cart updated This event is generated when a set of items in the cart changes - a customer deleted or added items. cart.status Cart quantities updated This event is generated when the customer changes the amount of a particular item already present in the cart. cart.status Order updated This event is generated when a customer changes the order. transaction.charge Product updated This event is generated when a product has been edited - then the product is added to queue to be synchronized. n/a Product deleted This event is generated when the product is removed from Magento. The product stays in the Synerise catalog and the deleted=1parameter is added.n/a Product import This event is generated when a product has been edited through the import of data. n/a Product “is salable” value changed This event is generated when the value of the is_salableparameter changes (this parameter defines whether a product can be sold) - then the product is added to queue to be synchronized.n/a Product stock status changed This event is generated when the stock status of the product changes (stock status and is_salableparameter are not equivalent) - then the product is added to queue to be synchronized.n/a Subscription updated This event is generated when a customer changes their marketing agreements. marketingAgreement.turnOn / marketingAgreement.turnOff / newsletter.unsubscribe To synchronize additional data apart from those which are sent to Synerise through customer actions, go to the “Enable data synchronization” section.
-
If you want to add the parameters from the _snrs_param cookie to the cart and transaction events, set the Include Tracking Params option to Yes.
Queuing events
Queuing events is based on the Message Queues implementation. When this option is enabled, the events are queued up and then sent through a consumer process. When this option is disabled, the events are sent in real time.
-
In the Message Queues section, set the Enabled option to Yes.
-
In the Events to send by queue, select the scope of events sent this way. The unselected events will be sent in real time.
-
In the upper right corner, click Save Config.
Important: If you define new store views in Magento, execute thebin/magento setup:upgradecommand.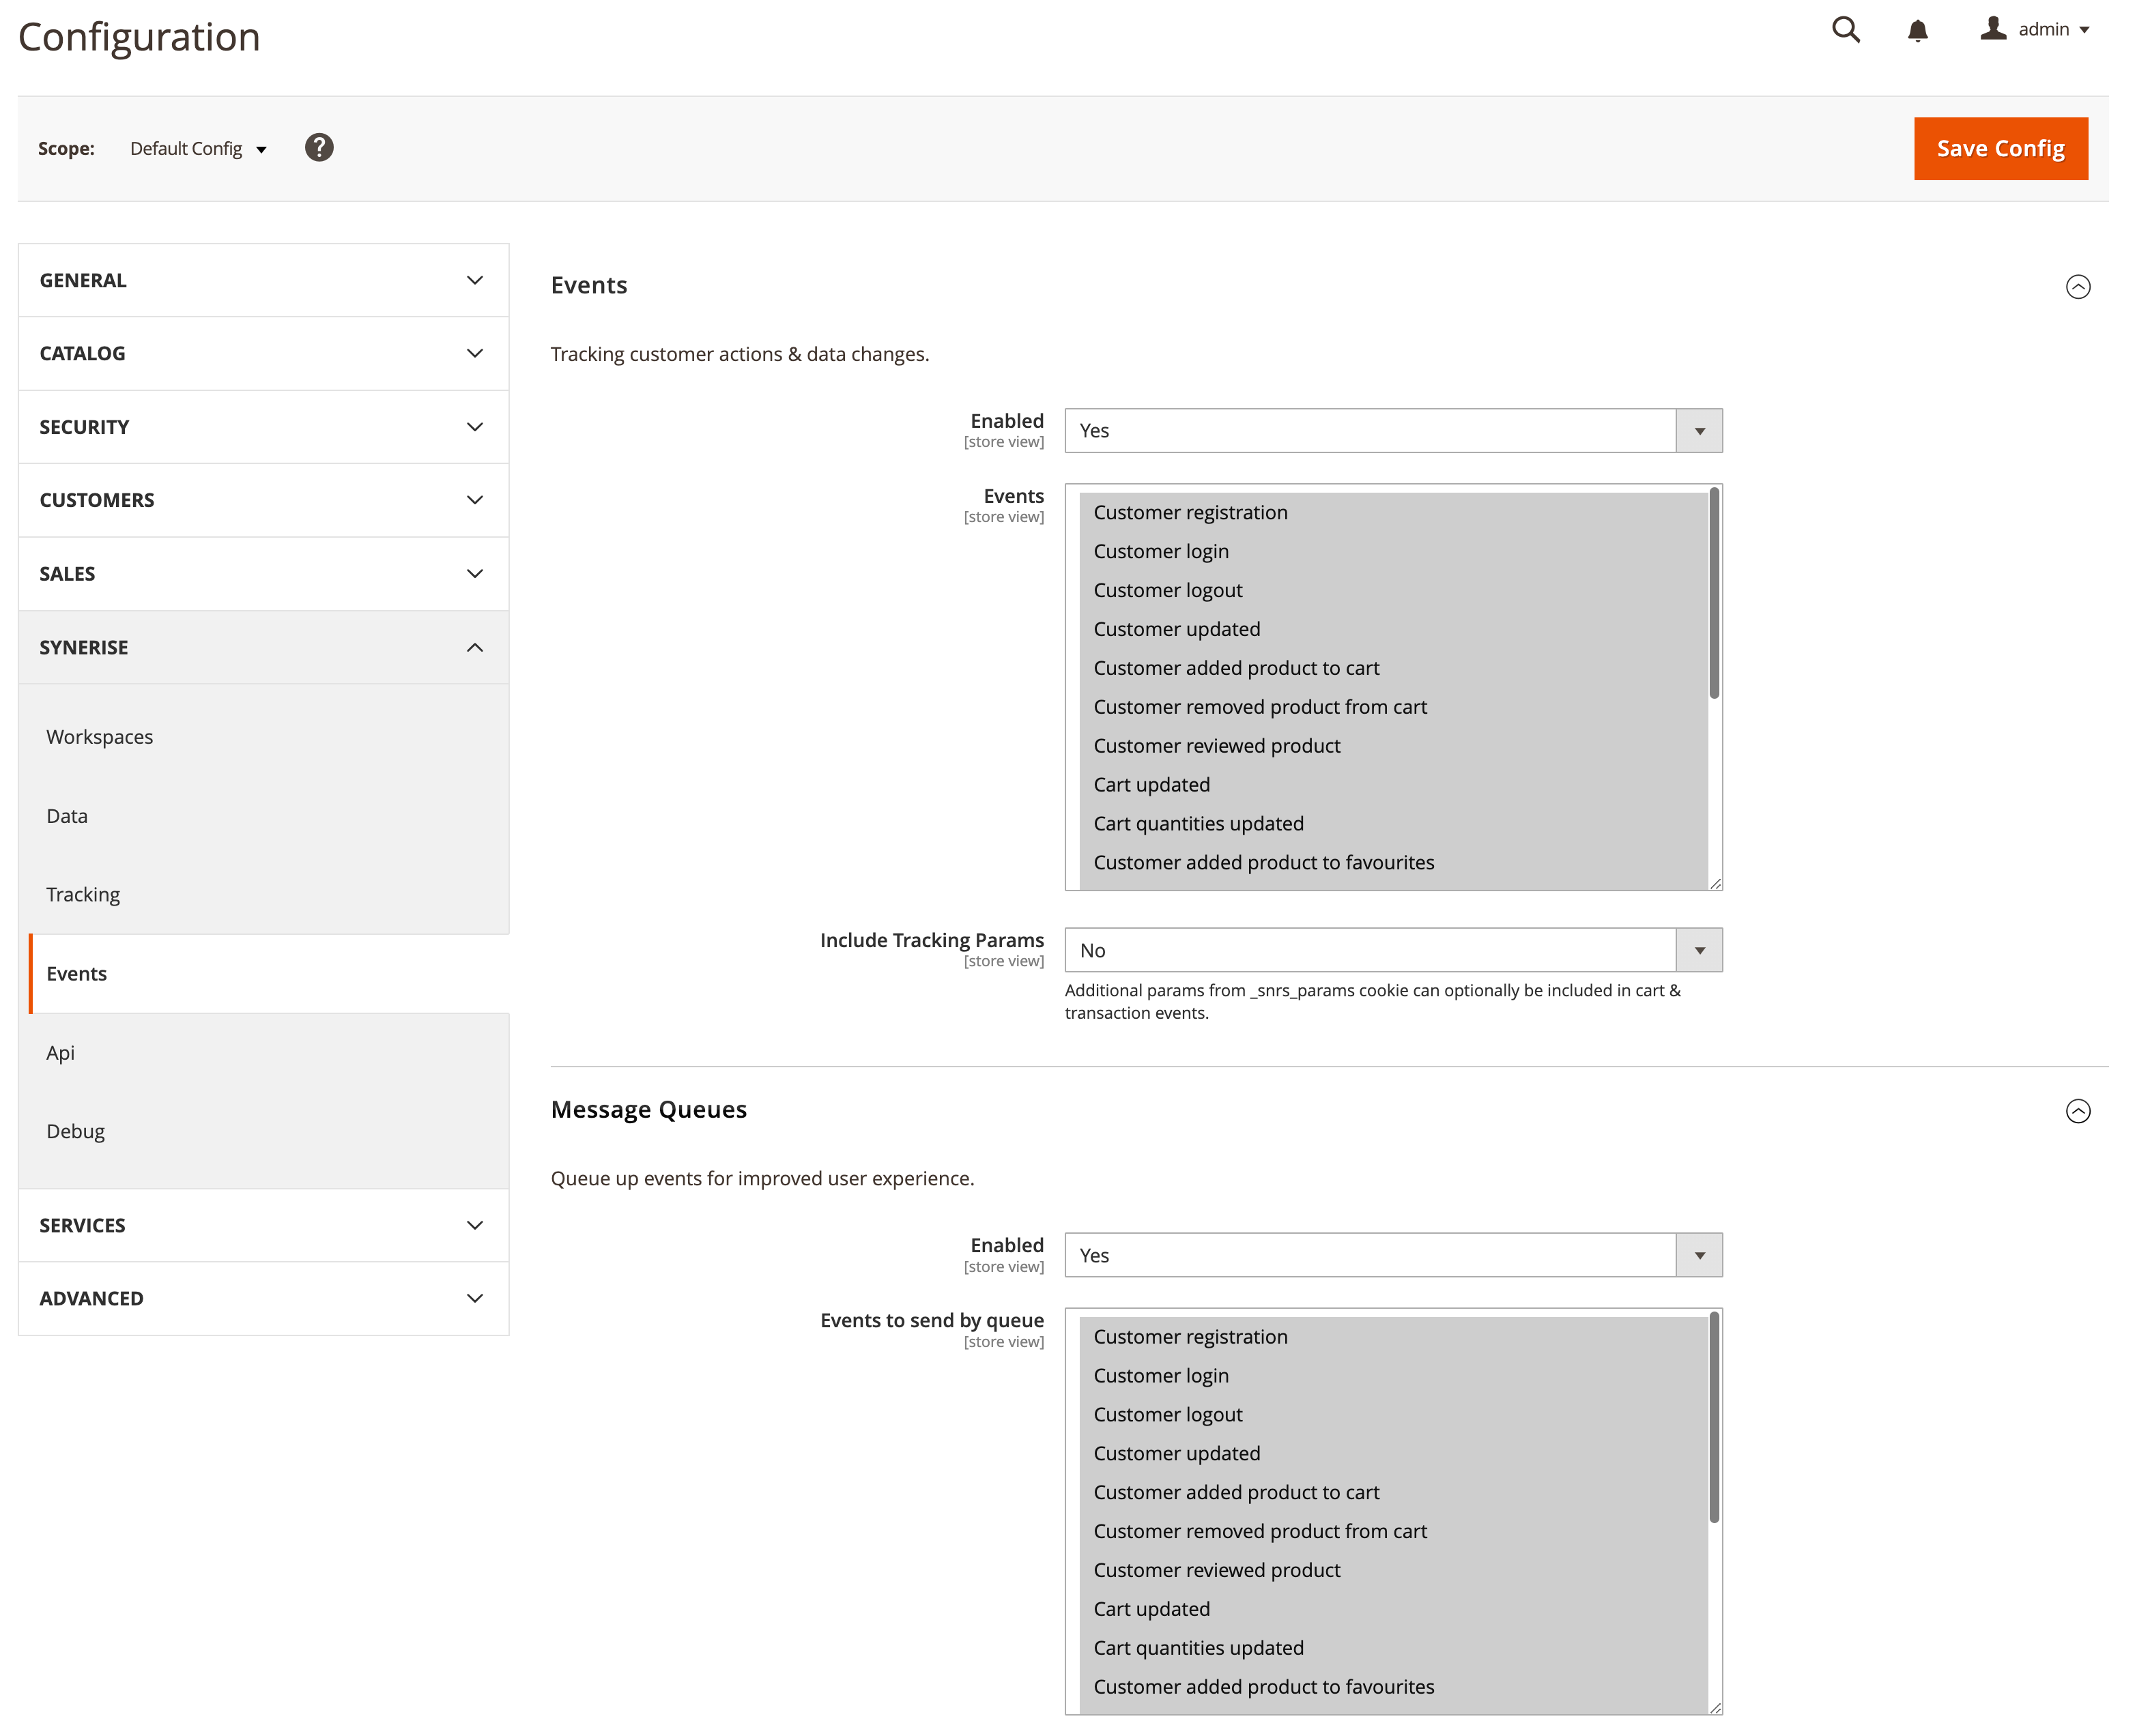
The Events section
Enable data synchronization
Follow the instructions in the Scheduling synchronization of data between Magento and Synerise article.
Define request settings
In this part of the process, you can define the timeout period for the live and scheduled requests.
A timeout defines the time to wait for a response. If the waiting time exceeds the value specified in the configuration, the request will be canceled. In the case of live requests, data may not be sent, hence using event queuing is recommended.
- Go to Stores > Configuration > Synerise > API.
- To define the timeout period for live requests, in the Live requests section, in the Timeout field, enter the value.
- To define the timeout period for scheduled requests, in the Scheduled requests section, in the Timeout field, enter the value.
- In the upper right corner, click Save Config.
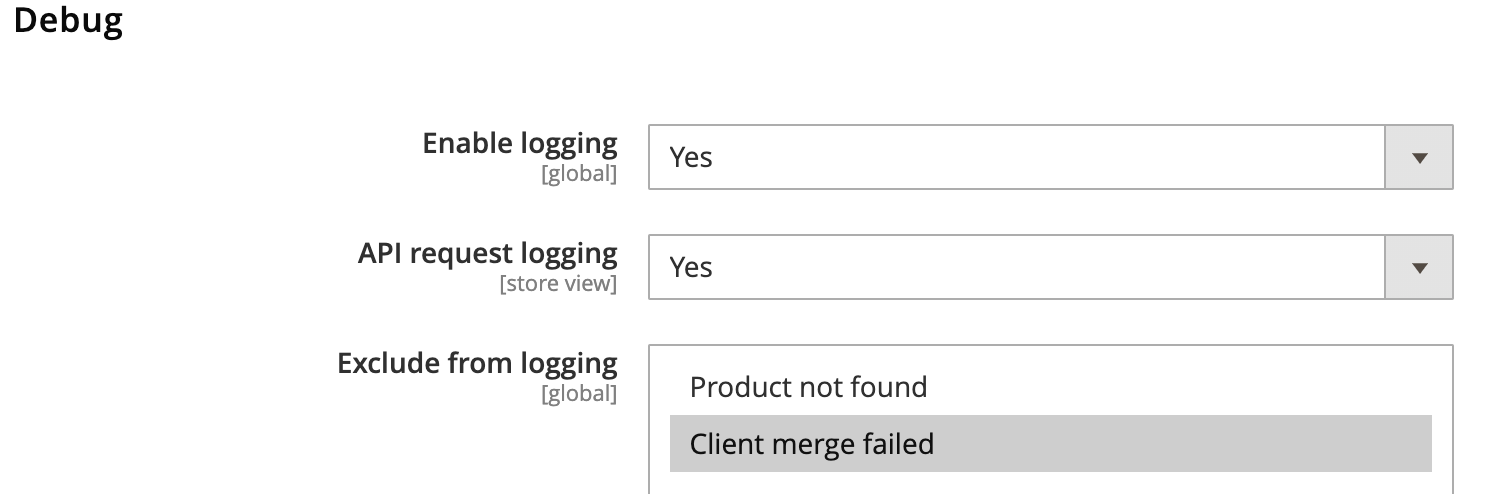
Enable request logging
You can enable logging all activities in the Synerise module in Magento and easily access the log files in Magento. Each occurrence that needs to be logged, such as an error, triggers the generation of a corresponding log file.
In this part of the process, you can:
- enable logs of all activities in the Synerise module, which you can later download
- enable saving full API request and response from Synerise API
- exclude data from logs
-
In the Debug section, set the Enable logging option to Yes.
-
Go to Content > Logs.
-
On the list of files, find the one you want to download.
-
In the Action column, click Download The files contain data such as error descriptions, warnings, and so on.
The Synerise log section in the Magento panel -
To enable saving full API requests and responses from Synerise API, in the Debug section, set the API request logging option to Yes.
This option can be enabled only when the enable logging option is active. In such case, the requests and responses will be included in the log files. -
To eliminate unnecessary data from logs, you can add these data to or delete the data in the Debug section on the Exclude from logging list. Any data included in this list will not appear in the logs.